
The Landing Zone add-on lets you build landing pages in a visual editor inside the J2Commerce administrator. You assemble a page from premade sections such as a hero, buy box, product grid, FAQ and video, or from your own columns of products, articles and text, and show the page through a menu item.
Use it for pages such as a product launch. Prices, stock and Add to Cart on the page always come live from J2Commerce.
Requirements
- Joomla 6.0 or later
- PHP 8.3 or later
- J2Commerce 6.3.5 or later
Installation
The Landing Zone app is a separate add-on available from the J2Commerce Extensions Store. It is not included with the core J2Commerce 6 component.
Purchase and Download
- Go to the J2Commerce Extensions Store and open Apps.
- Open Landing Zone, click Add to Cart, then complete checkout.
- Open My Downloads from your profile menu and download the latest
app_landingzone.zip.
Install the App
- In the Joomla administrator, go to System -> Install -> Extensions.
- Upload
app_landingzone.zip, or use the Install from URL option.
Enable the App
- Go to J2Commerce -> Apps.
- Find Landing Zone and click its status icon so it turns into a green checkmark.
Open the app's name in the list to change its options. The Landing Zones button on that screen takes you to your landing pages.
Creating a Landing Page
Go to J2Commerce -> Apps and open Landing Zone. The list shows your pages with their menu items, language, access, modified date and ID. Use the search box and the status filter to find a page.
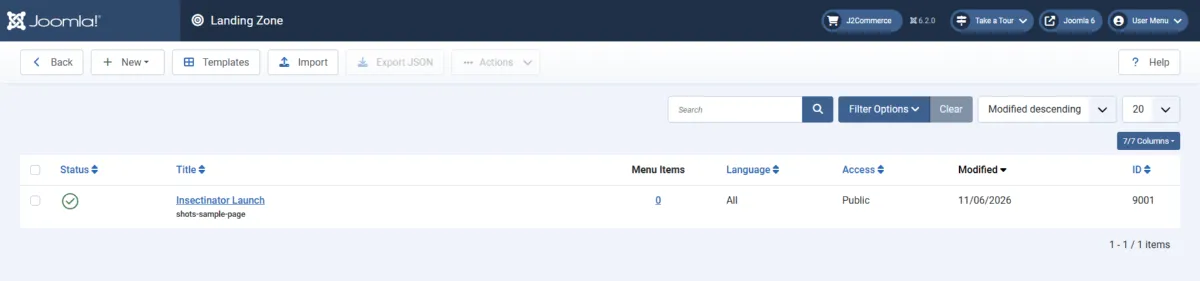
- Click New.
- Choose Blank Page for an empty page, or From Saved Template to start from a template.
- In the dialog for a template, pick one of the Saved Page Templates or a Shipped Templates entry (Insectinator Launch ships with the add-on). You can type a name for the new page, then click Create Page.
The editor opens on the new page. The Change Status menu in the list publishes, unpublishes, duplicates, checks in or deletes the pages you tick. A page that was edited after it was published shows Changed Since Publish.
The Editor
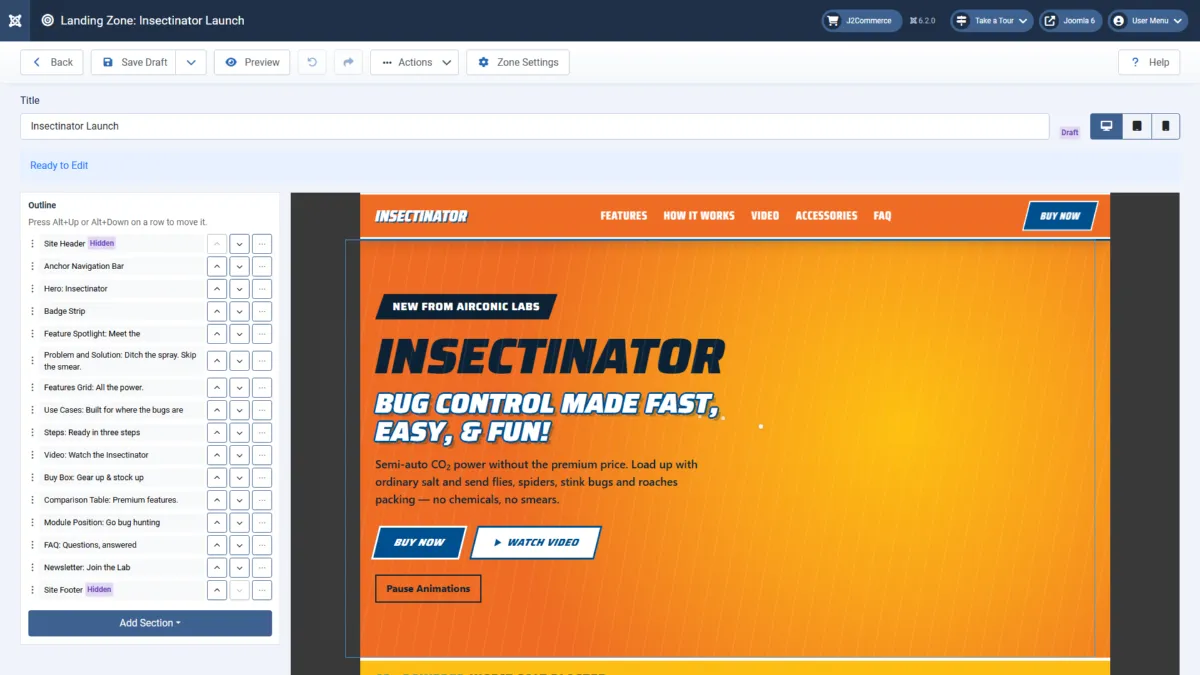
The editor has an outline of your sections on the left and the page canvas on the right. Type the page name in the Title field above them. A badge shows whether the page is a draft, and Unsaved Changes appears when something has not been saved yet.
Adding Sections
- Click Add Section under the outline.
- Choose Block Layout to start from a premade block, or Custom Layout to build your own columns.
- For a block layout, search the list or filter it by category, then click Add next to the section you want. A page holds up to 25 sections.
Drag a row in the outline to reorder it, or focus a row and press Alt+Up Arrow or Alt+Down Arrow. Each section can also be duplicated, hidden or removed.
Editing a Section
Click a text, image or block on the canvas to edit it in a dialog, then click Apply. Select a section in the outline to open all of its settings in the Settings pane. Use Back to return to the section list.
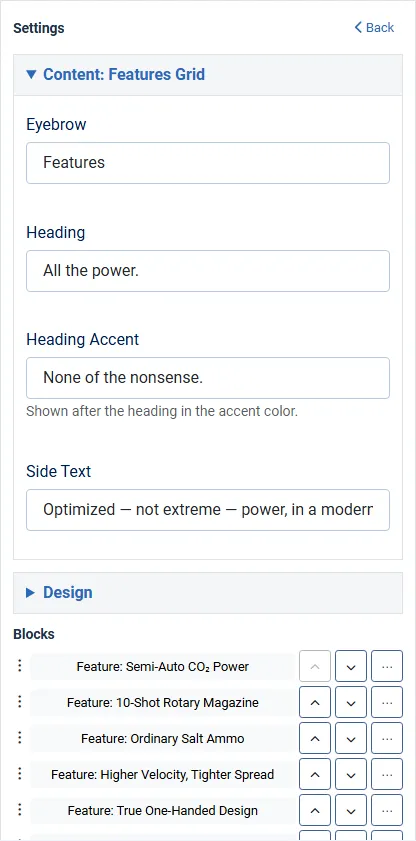
Settings are grouped under collapsible headings: Content, Design, Visibility and Advanced. The Visibility and Anchor group has these settings for every section.
| Setting | What It Does | Default | Options |
|---|---|---|---|
| Anchor | A name that links on the page can jump to. Lowercase letters, numbers and hyphens, starting with a letter. It must be unique on the page. | Empty | Any valid name |
| Hide This Section | Keeps the section in the editor but leaves it off the page. | No | Yes, No |
| Hide On | Hides the section on the chosen screen sizes. | None ticked | Extra Small, Small, Medium, Large, Extra Large |
Images carry an Alt Text field and a Decorative Image option. Links can point to a section anchor, a menu item, a product, an article, a category, a contact or a web address.
The Toolbar
| Button | What It Does | Default | Options |
|---|---|---|---|
| Save Draft | Saves your work. Its menu also has Save and Close, Publish and Save as Template. | Not applicable | Not applicable |
| Preview | Opens the saved draft in a new tab. | Not applicable | Not applicable |
| Undo Last Change and Redo Last Change | Step back and forward through your edits. | Not applicable | Not applicable |
| Actions | Opens Revisions, Insert Saved Section, Export JSON and Design Elements, followed by the keyboard shortcut functions. | Not applicable | Not applicable |
| Zone Settings | Opens the page-level settings. See Zone Settings. | Not applicable | Not applicable |
| Back | Returns to the list. If you have unsaved changes, you can save and leave, leave without saving or keep editing. | Not applicable | Not applicable |
Use the three device buttons above the canvas to preview the page at Desktop, Tablet and Mobile widths.

Keyboard Shortcuts
| Keys | Action | Where |
|---|---|---|
Ctrl+S | Save the draft | Anywhere in the editor |
Ctrl+Z | Undo the last change | Outside text fields |
Ctrl+Shift+Z or Ctrl+Y | Redo the last undone change | Outside text fields |
Alt+Up Arrow or Alt+Down Arrow | Move the focused section or block | Outline and block lists |
F6 or Shift+F6 | Go to the next or previous pane | Anywhere in the editor |
Escape | Close a dialog or menu | Dialogs and menus |
Enter or Space | Activate the focused control | Buttons and rows |
Sections
The add-on ships 21 sections, grouped by category in the Add Section dialog. Most sections are made of blocks, such as a feature card, a question or a product card, that you add inside the section with Add Block.
| Section | What It Does | Category | Notes |
|---|---|---|---|
| Hero | Opening banner with an eyebrow, a heading or image wordmark, tagline, lead text, product image and buttons. | Hero | A button can append the live price of a product to its label. |
| Anchor Navigation Bar | Navigation bar with section links, brand text and a button. | Header | Can stick to the top while scrolling. |
| Site Header | Logo, menu and social links. | Header | Can be sticky. |
| Buy Box | Product cards with a badge, description, what's in the box, quantity and Add to Cart, plus an optional bundle banner. | Commerce | Title, price, SKU, stock and Add to Cart come live from J2Commerce. A disabled product hides its card. |
| Product Grid | A grid of J2Commerce product cards in two, three or four columns. | Commerce | Choose Chosen Products or an Article Category ID, up to 24 products. |
| Badge Strip | A highlight strip with a title and feature chips. | Content | |
| Feature Spotlight | A center image with callouts, in two or three columns. | Content | |
| Problem and Solution | Old way and new way pairs with an image. | Content | |
| Features Grid | Feature cards with icons. | Content | |
| Use Cases | Use case cards with a collage of images. | Content | |
| Steps | Numbered steps with detail steps. | Content | |
| Comparison Table | A table of columns and rows. | Content | Needs a caption to publish. |
| FAQ | Questions and answers. | Content | |
| Module Position | Shows every module in a position, or one module by ID, with an optional card frame. | Content | Use it to place a newsletter, search or other site module on the page. |
| Rich Text | A heading with formatted text from the editor. | Content | Headings must not skip a level. |
| Image and Text | An image beside text. | Content | |
| Call to Action Banner | A banner with a message and buttons. | Content | |
| Spacer | Empty space between sections. | Content | |
| Video | A YouTube or Vimeo video, or an MP4 or WebM file under the images folder. | Media | Needs a video title. Nothing is requested from the video site until the visitor presses Play. A captions file or a captions confirmation is required to publish. |
| Newsletter | A band that shows the sign-up form of a published site module, chosen by Module ID. | Forms | |
| Site Footer | Link columns and contact details (title, address, phone and email). | Footer |
Custom Layout
The Custom Layout section builds a row of one to four columns. You fill each column with elements.
| Setting | What It Does | Default | Options |
|---|---|---|---|
| Columns | Number of columns. | Two | One, Two, Three, Four |
| Column Widths | How the width is shared between two columns. Shown when Columns is Two. | Equal | Equal, Wide Left (2/3 and 1/3), Wide Right (1/3 and 2/3), Narrow Left (1/4 and 3/4), Narrow Right (3/4 and 1/4) |
| Space Between Columns | The gap between columns. | Medium | None, Small, Medium, Large |
| Width | Whether the row stays inside the page width or spans the screen. | Page Width | Page Width, Full Width |
| Vertical Alignment | How the columns line up. | Top | Top, Center, Bottom |
| Stack Columns Below | The screen width under which the columns sit one above the other. | Tablet (768 px) | Tablet (768 px), Desktop (992 px) |
| Section Background | Background color of the section. | White | A color from the page palette |
| Column Background, Padding and Text Alignment | Set separately for each column. | None, None, Start | Padding: None, Small, Medium, Large. Alignment: Start, Center, End |
Each element has a Column number from 1 to 4. A number past the last column puts the element in the last column.
Specific Elements
These elements show exactly what you choose.
- Text: formatted text.
- Image: an image with an optional link.
- Button: button text, link and a Primary or Secondary style.
- Product: one product. Title, image, price, stock and Add to Cart come live from J2Commerce, and a disabled product is left out. Show Stock Status adds the stock line.
- Article: one article, with Show Image and Show Intro Text.
- Contact: one contact.
Dynamic Lists
These elements build a list that changes as your catalog or articles change.
- Products (Dynamic): Newest Products, Most Viewed Products, Featured Products, Products on Sale or Products in a Category.
- Articles (Dynamic): Newest Articles, Most Viewed Articles, Featured Articles or Articles in a Category.
Both have How Many and Items per Row (One, Two or Three). With a category source, only items directly in that category are listed. Subcategories are not included.
Design Elements
In the editor, open Actions -> Design Elements to set the colors, fonts, shape and spacing of the page. Changes apply to the whole page.
| Panel | What It Does | Default | Options |
|---|---|---|---|
| Colors | Edit the page colors. Start From applies a palette to the 16 base colors. You can add your own colors, rename them and delete them, up to 32 in all. | Not applicable | Palettes: Insectinator, Slate and Amber, Forest and Gold, Plum and Peach, Graphite and Orange, Teal and Coral, or a palette from one of your templates |
| Fonts | Choose a Display Font, Label Font and Body Font. | Not applicable | Plugin Fonts, your own and Google fonts, and Extra Fonts |
| Shape, Spacing and Motion | Corner Radius, Container Width (px), Section Spacing (px) and Motion. | Corner Radius 0 (Square) | Numeric values |
| Token Sets | Save the current values as a named set. Apply a set to the page or delete it. | None | Any saved set |
| Contrast Check (WCAG 2.2 AA) | Lists each text and background pair with its contrast ratio and a Pass or Fail result. | Not applicable | Not applicable |
Tip
If your site template caps corner radius at 0.25 rem, keep Corner Radius at 0 or 0.25 rem.
Fonts
Go to J2Commerce -> Apps, open Landing Zone and click the Fonts tab. A font appears in the Design Elements lists and loads only on a page that uses it.
| Setting | What It Does | Default | Options |
|---|---|---|---|
| Web Font Uploads | The Allow Web Fonts in Media Manager button adds woff2, woff, ttf and otf to the file types Media Manager accepts. Only a Super User can use it. | Not allowed until you click | Not applicable |
| Custom Fonts | Fonts you host yourself. Add one row for each file, one per weight and style. | Empty | Font Family Name (letters, numbers, spaces and hyphens, up to 40 characters), Weight (100 to 900), Style (Normal, Italic), Font File |
| Google Fonts | Families to load from Google Fonts, one per line, for example Roboto or Roboto:400,700 to choose weights. | Empty | Letters, numbers, spaces and hyphens |
| Fonts Your Template Already Loads | Font families to offer in Design Elements besides the plugin fonts, one per line. Your template or a site stylesheet must load the font itself. | Empty | Letters, numbers, spaces and hyphens |
Self-Hosted Fonts
- Click Allow Web Fonts in Media Manager, as a Super User, if the field says Media Manager does not accept web font files yet.
- In Content -> Media, upload your font files to the
files/landingzone-fontsfolder. File names use letters, numbers, hyphens and underscores, with one extension. - Add a row to Custom Fonts for each file, then pick the file in Font File.
Warning
When a page uses a Google font, each visitor's browser contacts Google (fonts.googleapis.com and fonts.gstatic.com), which shares the visitor's IP address with Google. Self-hosted fonts avoid this.
Zone Settings
Click Zone Settings in the editor toolbar to open the page settings. Click Save Draft in the panel to keep your changes. Publish the page to update the live page.
| Setting | What It Does | Default | Options |
|---|---|---|---|
| Show Header & Footer | Shows the site template's header, menus and footer. Choose No to show only this page. | Yes | Yes, No |
| Process Content Plugins | Runs content plugins on rich text, so shortcodes such as {loadposition} work on the live page. | Yes | Yes, No |
Saving and Publishing
Drafts and Autosave
Every edit goes to a draft. Visitors see a change only after you publish.
The editor saves the draft by itself after the last change (see Plugin Options) and shows Draft saved with the time. Press Ctrl+S or click Save Draft to save at once.
Revisions
Open Actions -> Revisions to see earlier versions with their date, user, type and label. The types are Publish, Manual, Autosave, Restore and Import.
Restore copies a revision into the draft. The published page does not change until you publish.
Editing Locks and Conflicts
While you edit a page, it is checked out to you. Another user who opens it sees who has it checked out, and the page opens read-only. A user with the right permission can check it in from the list.
If someone else saved the page after you opened it, a dialog explains that your changes were not saved. Choose Load Latest (Undo brings your changes back), Save as Copy or Keep Editing.
Publishing
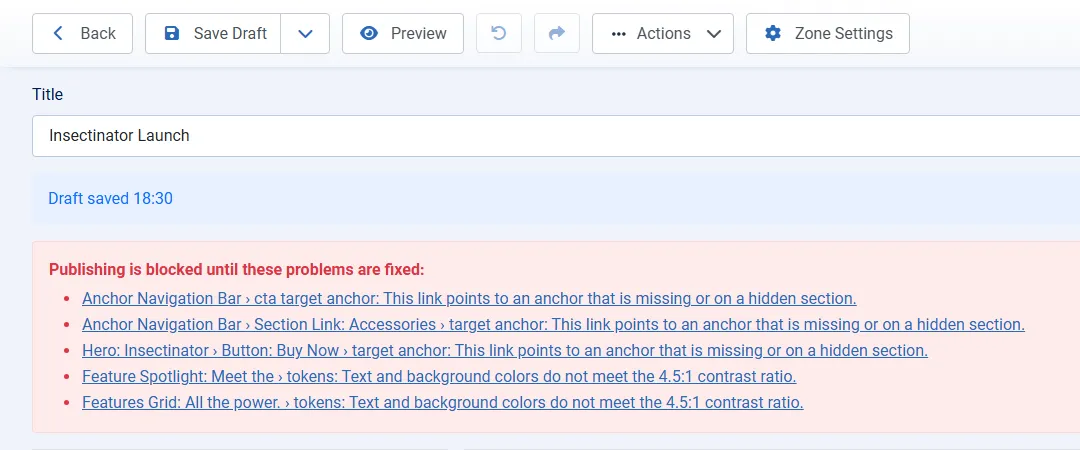
Click the arrow next to Save Draft and choose Publish. Publishing also switches the page on. Publishing is blocked until these problems are fixed:
- A value that is invalid, or a product, module, menu item or other item that no longer exists or is unpublished.
- No main heading. Add a hero heading.
- A heading in rich text that skips a level.
- Text and background colors that fall below the 4.5:1 contrast ratio.
- An image with no alt text that is not marked Decorative Image.
- A button with no text label.
- Two sections with the same anchor, a reserved anchor, or a link to an anchor that is missing or on a hidden section.
- A video with no title, or with neither a captions file nor the captions confirmation.
- A comparison table with no caption.
A link text such as Click Here or Read More does not block publishing. The editor lists it in a note after publishing.
Showing a Page on Your Site
- Go to Menus and open the menu you want, then click New.
- Click Select next to Menu Item Type and choose Landing Zone under J2Commerce.
- Choose the page in Layout. The field is required.
- Give the menu item a title, then click Save & Close.
The page list shows how many menu items use each page in the Menu Items column.
Templates, Export and Import
Templates
Choose Save as Template from the Save Draft menu, name the template, and choose The Whole Page or The Selected Section. Page templates appear under New -> From Saved Template. To add a saved section to a page, choose Actions -> Insert Saved Section.
Click Templates in the list toolbar to see your saved templates by scope (Page or Section). You can rename or delete a template there.
Export and Import
- To export, tick one page in the list and click Export JSON. In the editor, use Actions -> Export JSON. Unsaved changes are not in the export, so save the draft first.
- To import, click Import in the list toolbar. Choose a JSON file or paste the JSON, optionally name the page, then click Check Import. The limit is 512 KB.
- Read the result. Products are matched by SKU, and a product that has no matching SKU is matched by ID only. Items that cannot be found are listed under Not Found.
- Click Import, or Remove Unresolved Items and Import to drop the items that were not found. The editor opens on the new page.
Plugin Options
Go to J2Commerce -> Apps and click Landing Zone. The Fonts tab is described above.
| Setting | What It Does | Default | Options |
|---|---|---|---|
| Default Subtemplate | Markup family for pages that do not choose their own. Leave empty to follow the store setting. | Empty | The subtemplates installed on your site |
| Autosave Interval (Seconds) | How long after the last change the editor saves the draft. | 30 | 15 to 300 |
| Revisions Kept | Number of revisions stored for each page. | 30 | 5 to 100 |
| Cache Static Sections | Caches the markup of sections that show no live commerce data. Sections with prices, stock or dynamic lists always stay live. | Yes | Yes, No |
| Default Token Set | The Design Elements token set every landing page starts from. Values a page sets itself override the set. | None | Any saved token set |
Troubleshooting
The Page Will Not Publish
The editor lists each problem with a Go to Field link. Fix every item listed under Publishing is blocked until these problems are fixed, then publish again.
The Page Opens Read-Only
Another user has it checked out, or you lack permission to edit it. Ask that user to close the editor, or check the page in from the list.
A Font Does Not Appear
Check that the font file is in the files/landingzone-fonts folder and that its row in Custom Fonts names the file. A Google font needs its name on its own line in Google Fonts.
The Menu Item Type Is Missing
The list shows a warning when the Landing Zone menu item type is missing from the component. Reinstall the add-on to restore it.
Uninstalling
Go to System -> Manage -> Extensions, find Landing Zone and click Uninstall.
Warning
Uninstalling removes the add-on's database tables, so your landing pages, revisions and saved templates are deleted. Export the pages you want to keep first.