Clover POS Integration
The Clover POS Integration app links your Clover point-of-sale system to your J2Commerce online store. Clover is the source of truth: products, categories, and prices are pulled from Clover into J2Commerce automatically. When a customer buys something online, the plugin decrements stock in Clover in real time. Cancellations and refunds restock Clover inventory automatically.
Requirements
- PHP 8.3.0 or later (with the
sodiumextension enabled) - Joomla 6.x
- J2Commerce 6.x
- An active Clover merchant account
- A Clover Developer Dashboard app with REST API permissions
Before You Connect: Create a Clover Developer App
The plugin connects to Clover through OAuth 2.0, so you need a Clover Developer App configured with the correct permissions and redirect URI. Complete this one-time setup in the Clover Developer Dashboard before touching the plugin settings.
Step 1: Create a Clover developer account
You need a separate developer account — your merchant account login cannot be used here.
- Sandbox (testing): Sign up at sandbox.dev.clover.com. Use an email address not already associated with any Clover account.
- Production: Log in at www.clover.com/developers.
Clover will reject signup with "User already exists" if the email is linked to any other Clover account — merchant, developer, or employee. Use a fresh email address for your developer account.
Step 2: Create a new app
- Log in to your developer dashboard.
- Click Create App (or open an existing app if you already have one).
- Give the app a name — for example, "My Store — J2Commerce Sync".
- Choose the appropriate region (North America, Europe, or LATAM) that matches where your merchant account is hosted.
Step 3: Configure app settings and permissions
Once the app is created, open its settings. You need to configure two areas.
Required REST Permissions
Under Requested Permissions, enable at minimum:
| Permission | Why it is needed |
|---|---|
| Inventory Read | Pull products, categories, and SKUs from Clover |
| Inventory Write | Decrement and restock inventory after sales |
| Orders Read | Read orders (required if Sync Sale to Clover POS is enabled) |
| Orders Write | Push web orders into Clover POS |
If you add permissions after the initial OAuth connection, you must click Disconnect in J2Commerce and reconnect via OAuth so the new token includes the updated scopes. A 401 error on sync operations almost always means a missing permission.
REST Clients and Site URL
Before the OAuth redirect will work, you must register a Web REST client:
- In the Clover Developer Dashboard, find the REST Clients section for your app.
- Add a new Web REST client.
- In the Site URL field, enter your Joomla site's base URL (for example,
https://www.yourstore.com).
Without this step, Clover returns a 404 when it tries to redirect back to your store after authorization.
Step 4: Copy your App ID and App Secret
From your app's dashboard:
- App ID — sometimes labeled Client ID. This is the public identifier for your app.
- App Secret — sometimes labeled Client Secret. Keep this private; it never leaves your server.
You will paste both values into the plugin settings in the next section.
Purchase and Download
Step 1: Go to our J2Commerce website -> Apps
Step 2: Locate the Clover POS Integration App -> click View Details -> Add to cart -> Checkout.
Step 3: Go to your My Downloads under your profile button at the top right corner and search for the app. Click Available Versions -> View Files -> Download
Install the App
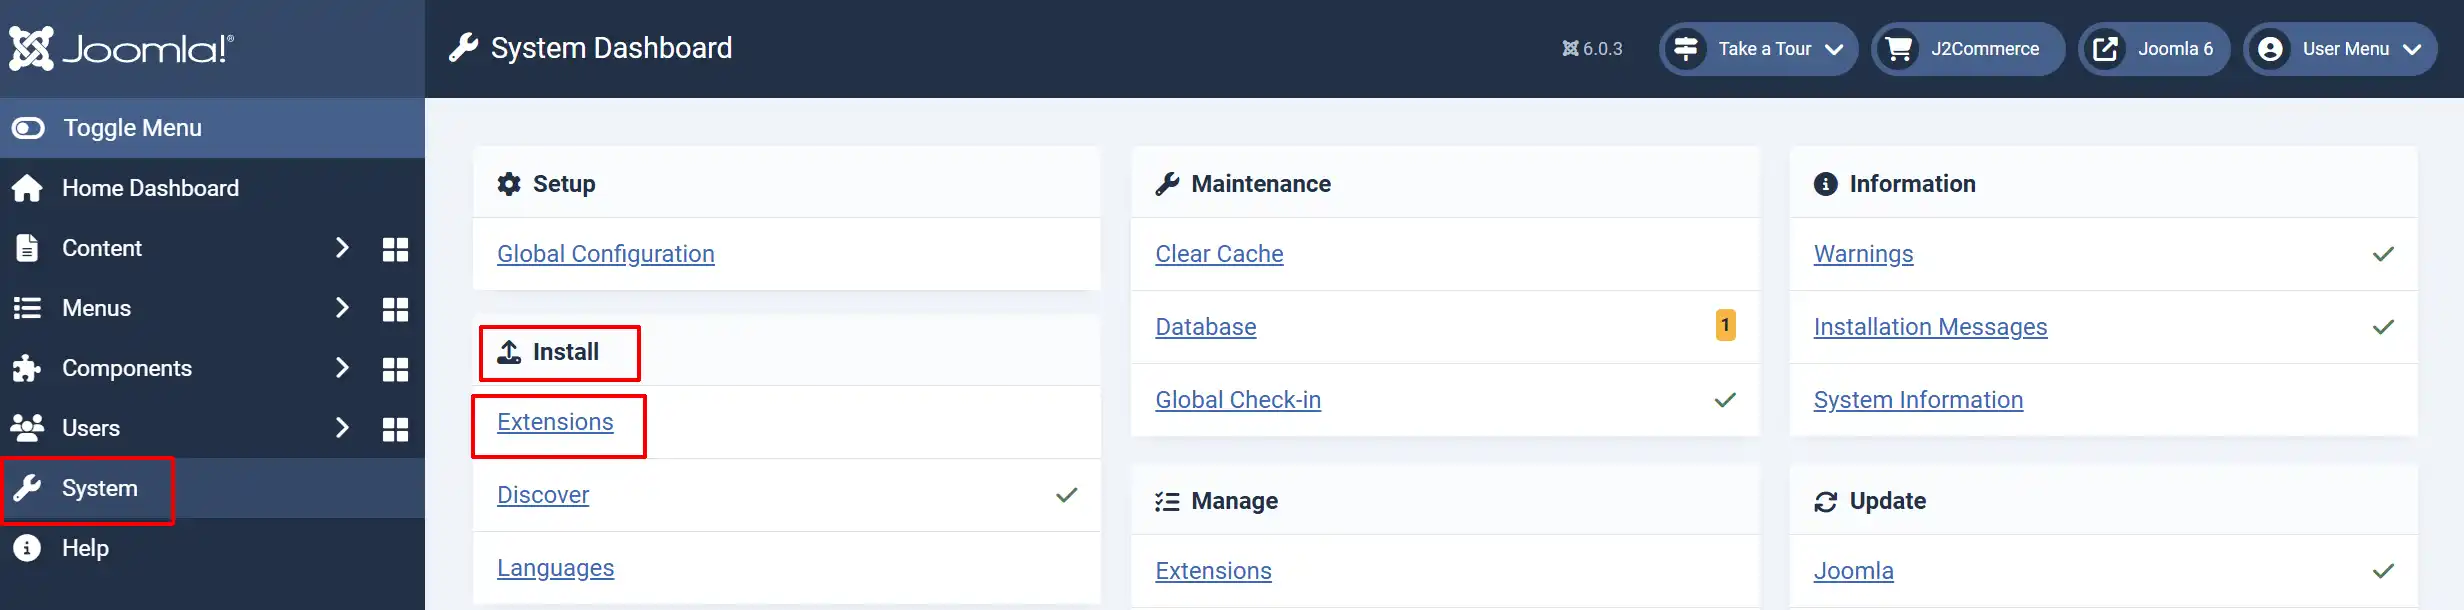
Go to System -> Install -> Extensions
Upload the app_cloverpos.zip file or use the Install from URL option.
Enable the App
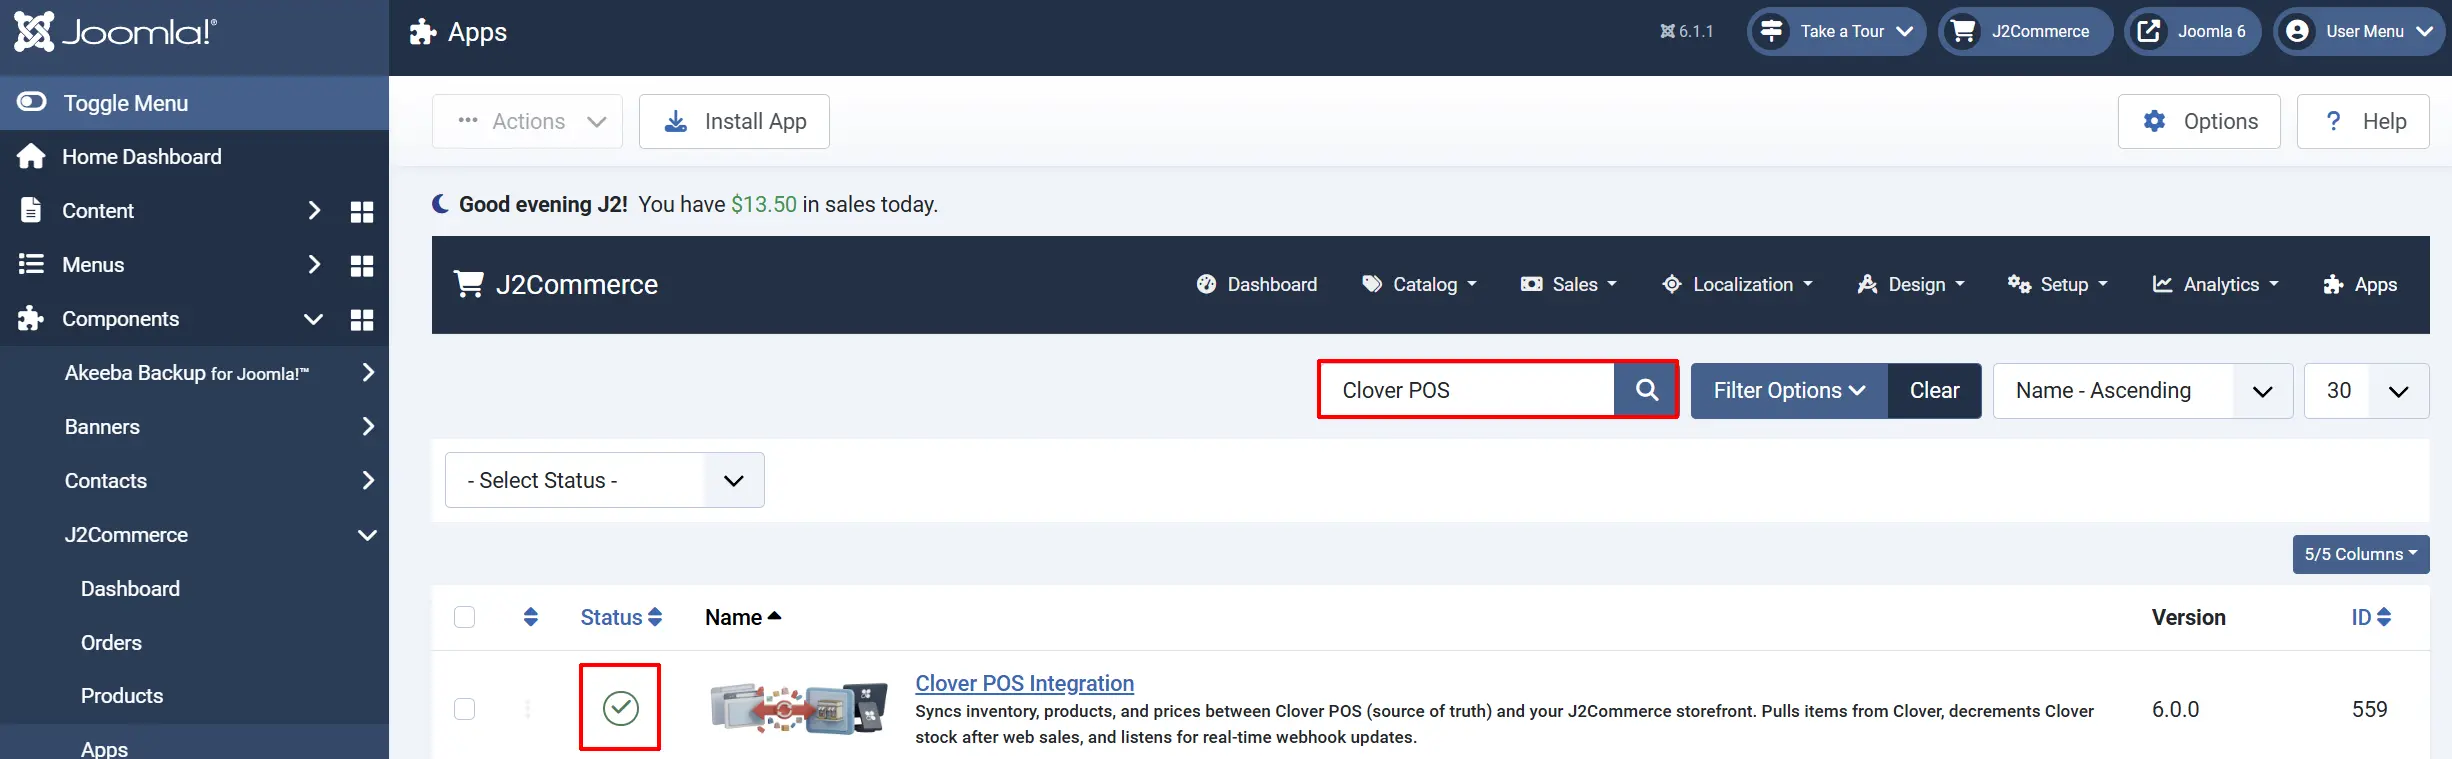
Once you have installed the App, you will need to enable it. There are two ways you can access the App.
Option A: Go to the J2Commerce icon at the top right corner -> Apps
Option B: Go to Components on the left sidebar -> J2Commerce -> Apps

To help you narrow down the list, you can do a search for the Clover POS Integration app, click the X, and it will turn into a green checkmark. It is now enabled and ready for setup.
Configure the App
Click the Clover POS Integration title in the Apps list to open the plugin settings. The settings are organized into four tabs.
Click the Toggle Inline Help button in the toolbar to reveal a description below each field as you configure it.

Connection Tab
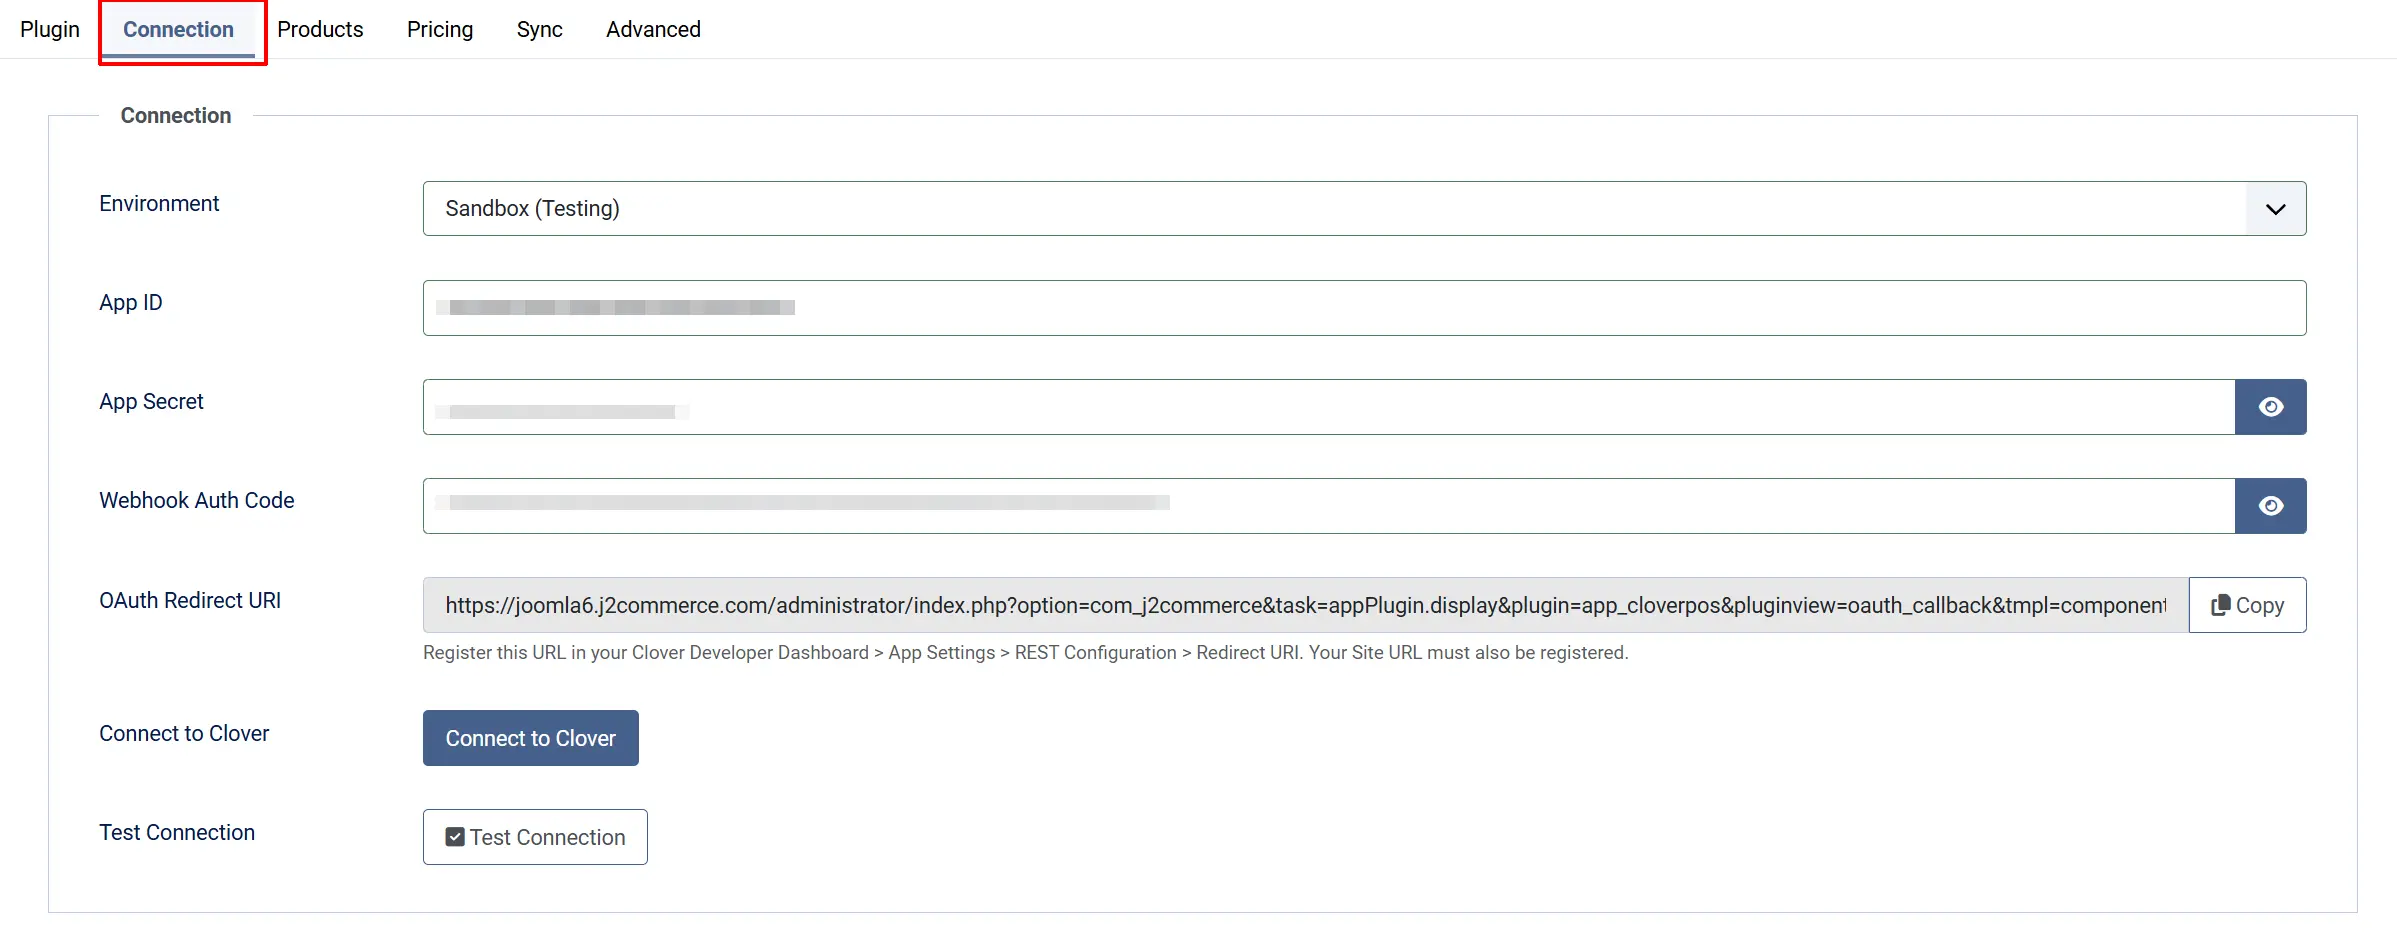
Environment: Choose Sandbox for testing or a regional production environment (North America, Europe, Latin America) that matches your Clover merchant account
App ID: The App ID (Client ID) from your Clover Developer Dashboard
App Secret: The App Secret (Client Secret) from your Clover Developer Dashboard
Auth Code: Leave blank. This field is only used if you need to manually supply a one-time authorization code outside the normal OAuth flow
OAuth Redirect URI: Read-only. Copy this URL and paste it into your Clover Developer Dashboard under REST Configuration
Connect to Clover: Launches the OAuth authorization popup once App ID and App Secret are saved
Test Connection: Verifies the stored token by calling the Clover API and displaying your merchant name
- Step-by-step: Register the Redirect URI in Clover
The OAuth Redirect URI field shows the exact URL that Clover must send the merchant back to after they approve the connection. You must register this URL in Clover before clicking Connect.
- Go to J2Commerce -> Apps -> Clover POS Integration -> Settings.
- In the Connection tab, find the OAuth Redirect URI field. Click Copy to copy the URL to your clipboard.
- In your Clover Developer Dashboard, open your app and go to App Settings -> REST Configuration.
- Paste the copied URL into the Redirect URI field.
- Save the app settings in Clover.
The redirect URI looks like:
https://www.yourstore.com/administrator/index.php?option=com_j2commerce&task=appPlugin.display&plugin=app_cloverpos&pluginview=oauth_callback&tmpl=component
The OAuth callback is deliberately routed through the Joomla administrator application, not the public site. This is required because the Joomla administrator and site front-end maintain separate sessions (shared_session = false). If the callback went through the site, the security state token written during the initiation step would not be found, and the connection would fail with a state mismatch error.
- Step-by-step: Complete the OAuth Connection
- Enter your App ID and App Secret and click Save in the toolbar.
- Confirm the OAuth Redirect URI is registered in Clover (see above).
- Click the Connect to Clover button. A centered popup window opens and redirects to Clover's authorization screen.
- Log in to Clover and approve the connection for your merchant account. The popup closes automatically on success.
- The Connection Status card on the dashboard shows Connected with your Merchant ID.
- Click Test Connection to confirm the API responds correctly.
Products Tab
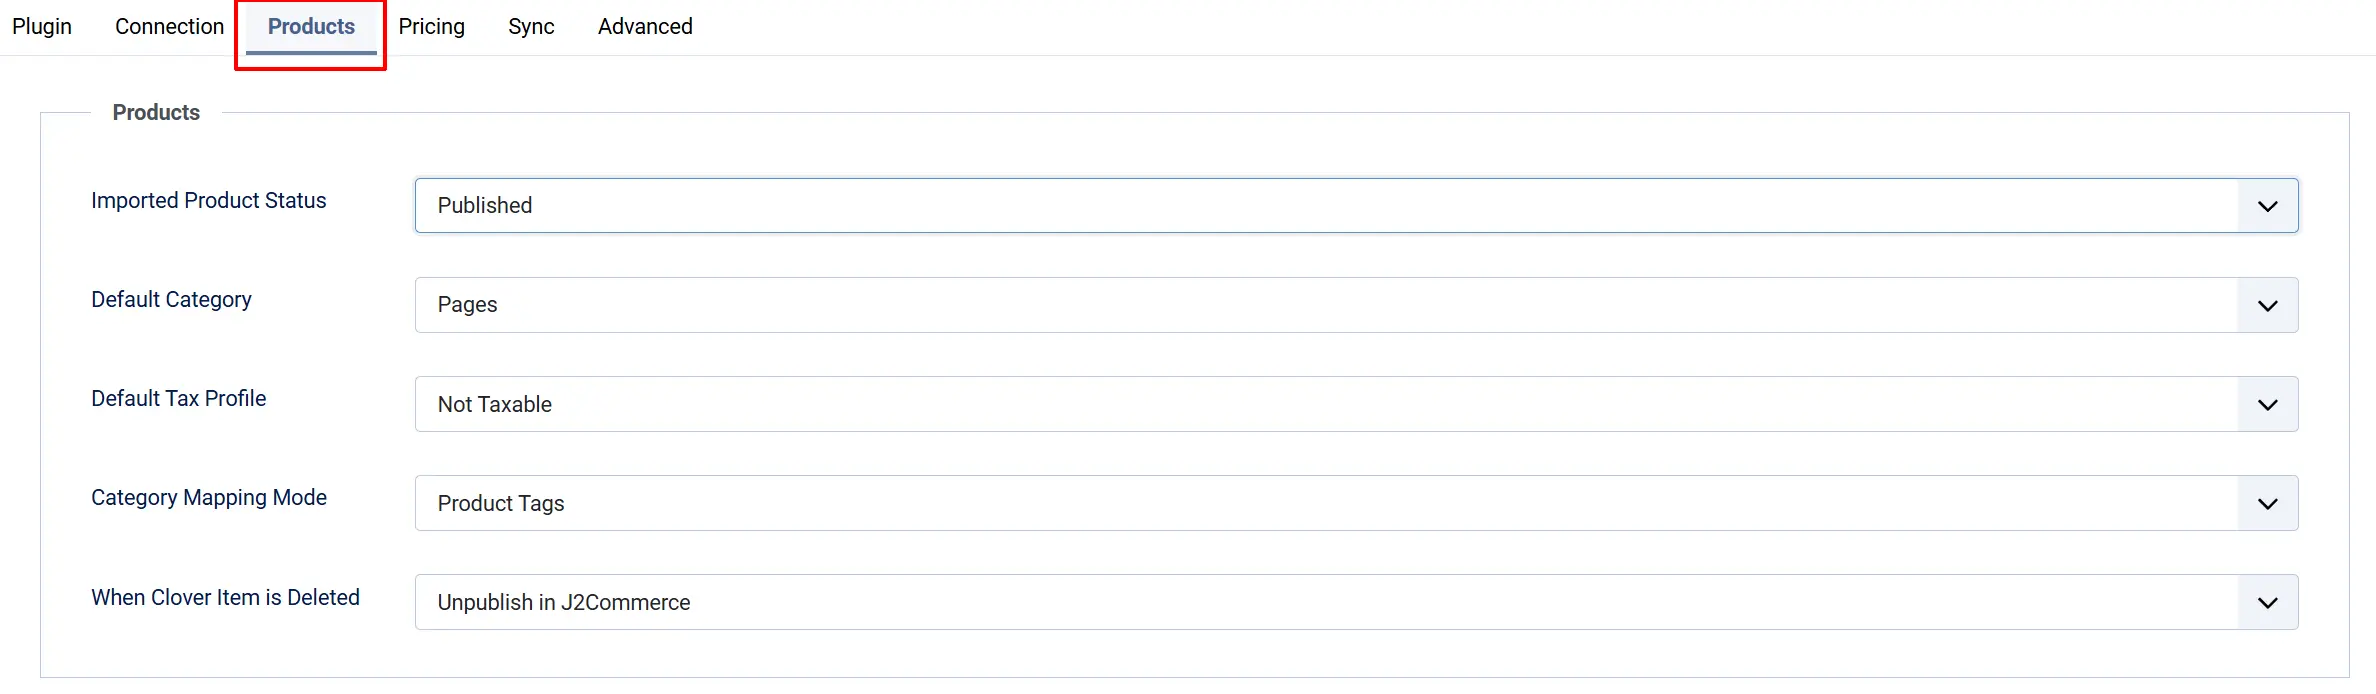
Import Status: Whether newly imported Clover products are created as Published or Unpublished in J2Commerce
Default Category: The Joomla content category assigned to imported products that have no Clover category mapping
Default Tax Profile: The J2Commerce tax profile applied to newly imported products. Leave blank to import without tax
Category Mapping Mode: How Clover categories are matched to J2Commerce categories. Tag maps by Clover item group name; Category maps by the Clover category name directly
Delete Action: What happens to a J2Commerce product when the matching Clover item is deleted: Unpublish (safe default), Trash, or Ignore
Pricing Tab

Pricing Mode: Direct uses the Clover price as-is. Markup adds a fixed amount or percentage to the Clover price before importing
Markup Type: Shown only when Pricing Mode is set to Markup. Choose Percentage or Fixed amount
Markup Value: The markup amount (percentage points or currency units) to add on top of the Clover price
Sync Tab
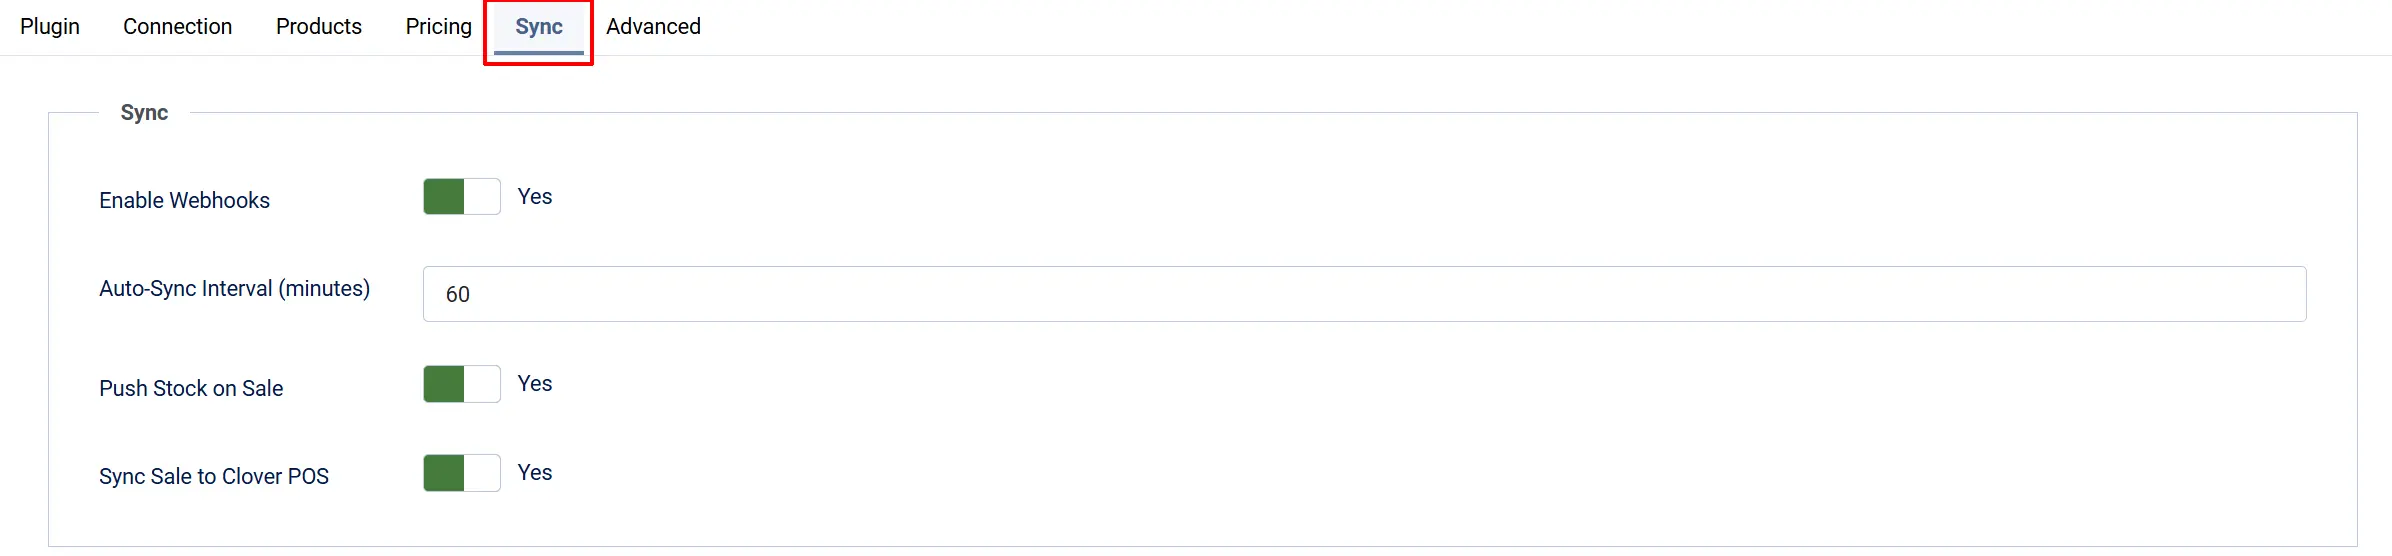
Enable Webhooks: When enabled, Clover sends real-time notifications to your store whenever inventory or products change in Clover
Sync Interval: How often (in minutes) the scheduled cron task checks Clover for changes. Minimum is 5 minutes
Push Stock on Sale: When a web order is paid, decrement the matching Clover inventory count. Also restocks Clover when an order is cancelled or refunded
Sync Sale to Clover POS: When a web order is paid, push it to Clover POS as an order containing the line items, with customer details in the order note. Requires the Orders Read/Write permission in your Clover app
Sync Sale to Clover POS requires the Orders Read/Write permission in your Clover Developer Dashboard app. If syncing returns an HTTP 401 error, enable that permission and reconnect via OAuth.
Advanced Tab

Log Retention (days): Sync log entries older than this many days are automatically deleted by the cron task
Debug Mode: When enabled, detailed diagnostic messages are written to the J2Commerce log file. Disable in production
Testing in Sandbox Mode
Before going live, it is strongly recommended to test the full integration end-to-end against Clover's sandbox environment. Sandbox mode uses completely separate hosts, test merchant accounts, and fake inventory — nothing is billed and no real data is touched.
Sandbox environment overview
Developer dashboard: https://sandbox.dev.clover.com
OAuth authorization host: https://sandbox.dev.clover.com
API host: https://apisandbox.dev.clover.com
Plugin Environment setting: Sandbox
Step-by-step: Complete a sandbox test
1. Create a sandbox developer account.
Sign up at sandbox.dev.clover.com using an email address not already associated with any Clover account.
2. Create a sandbox app.
In the sandbox developer dashboard, create a new app. Note the App ID and App Secret.
3. Create a sandbox test merchant.
In the sandbox developer portal, you can create a virtual test merchant account. This gives you a sandbox Merchant ID and a test inventory you can populate with items.
4. Add test inventory.
Log in to your sandbox merchant dashboard, go to Inventory, and add a few items with names, prices, and stock quantities. These are the products that will be pulled into J2Commerce during the test sync.
5. Configure the plugin for sandbox.
In J2Commerce, open the Clover POS Integration settings:
- Set Environment to Sandbox.
- Enter the sandbox App ID and App Secret.
- Click Save.
6. Register the redirect URI in your sandbox app.
Copy the OAuth Redirect URI from the plugin settings and paste it into the sandbox app's REST Configuration in the Clover sandbox developer dashboard (same steps as production — see above).
7. Connect via OAuth.
Click Connect to Clover. The popup redirects to sandbox.dev.clover.com, not the live Clover site. Approve the connection for your sandbox test merchant. After the popup closes, the Connection Status card shows Connected with the sandbox Merchant ID.
8. Run a test sync.
Click Sync Now in the toolbar. The dashboard shows how many products were imported. Go to J2Commerce -> Catalog -> Products to confirm the test items appeared.
9. Test a purchase.
Place a test order on your store for a product that was imported from the sandbox. After the order is paid, check the Sync Log to confirm the inventory decrement was pushed to Clover, and check your sandbox merchant's inventory to verify the stock count changed.
10. Switch to production when ready.
When everything behaves as expected, go back to the plugin settings, change Environment to the correct production region (North America, Europe, or Latin America), enter your production App ID and App Secret, save, and complete the OAuth flow again with your live merchant account.
A sandbox connection and a production connection are completely separate. Switching the environment setting does not carry over the OAuth token. You must reconnect via OAuth after changing the environment.
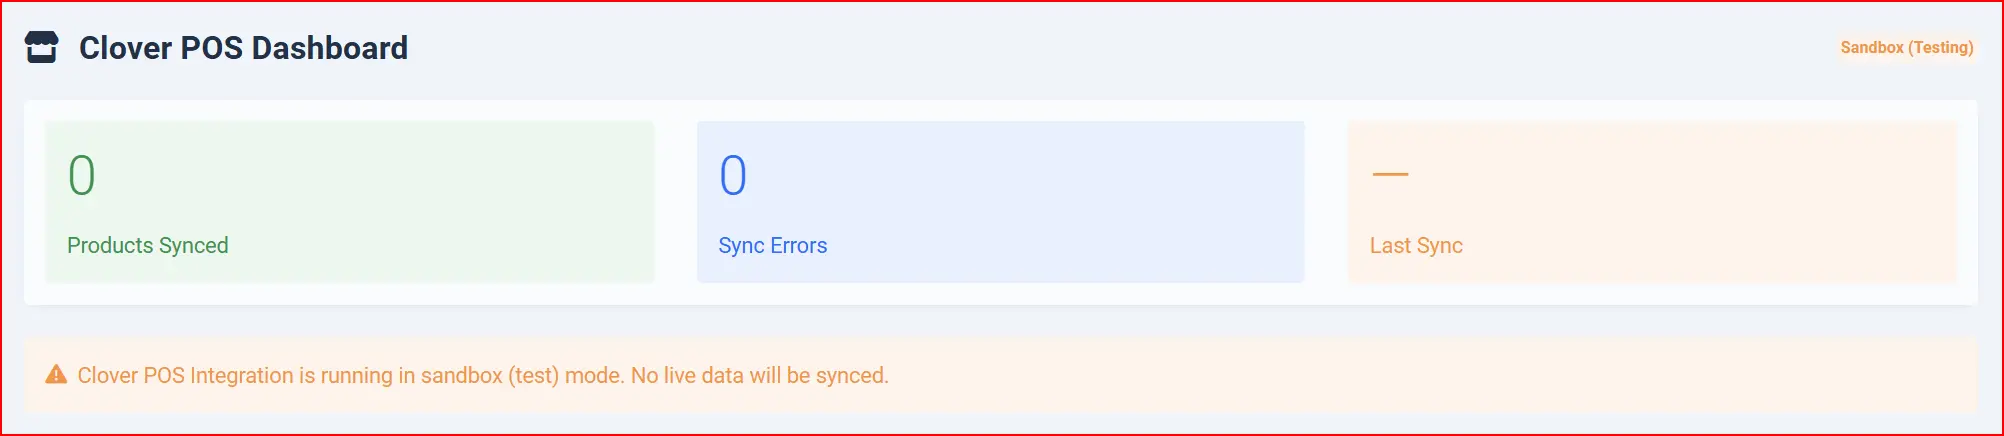
Identifying sandbox mode on the dashboard
The Clover Dashboard shows a yellow Sandbox badge next to the title and displays a persistent alert:
"Clover POS Integration is running in sandbox (test) mode. No live data will be synced."
This alert disappears as soon as the environment is changed to a production region.
Clover Dashboard
After saving your settings, go to J2Commerce -> Apps -> Clover POS Integration (click the title). The Clover Dashboard is your central control panel.

Stats Row
Three summary cards are displayed at the top of the dashboard:
- Products Synced — the number of products successfully linked to a Clover item.
- Sync Errors — the count of items with a sync error status (shown in red when greater than zero).
- Last Sync — the timestamp of the most recent successful sync operation.
Connection Status Card
Shows whether the plugin is connected to your Clover merchant account. When connected, the card displays the Merchant ID. When disconnected, it shows instructions to complete the OAuth flow.
Toolbar Actions
The toolbar at the top of the Clover Dashboard provides these actions:
Sync Now: Immediately pulls categories and all products from Clover and updates J2Commerce
Test Connection: Sends a test call to the Clover API and displays your merchant name on success
Disconnect: Removes the stored OAuth token. Products already synced are not deleted, but automatic syncing stops
Sync Log: Opens the full sync log list view
Settings: Opens the plugin settings form
Set Up Webhooks
Webhooks allow Clover to push inventory and product changes to your store instantly, without waiting for the next scheduled sync. They require a one-time verification step where Clover confirms that your server is reachable before it starts sending event notifications.
What to expect during verification
When you enter the webhook URL in Clover and click Verify, Clover sends a POST request to your store that contains a one-time verificationCode field. Your store receives this POST, stores the code, and returns it immediately. The plugin's Webhook Verification card on the dashboard auto-polls every 7 seconds and displays the code as soon as it arrives. You then copy the code and paste it back into Clover to complete the verification handshake.
You do not need an external tunnel or ngrok — the dashboard does the polling for you.
Prerequisites
- Your Joomla site must be accessible from the public internet. Webhooks cannot reach a local development server.
- Enable Webhooks must be set to Yes in the Sync tab of the plugin settings.
Step-by-step: Verify the webhook
-
Go to J2Commerce -> Apps -> Clover POS Integration (the dashboard).
-
Locate the Webhook Verification card.
-
Copy the Webhook URL shown in the card. The URL has this form:
https://www.yourstore.com/index.php?option=com_ajax&plugin=app_cloverpos&group=j2commerce&task=webhook&format=raw -
Log in to your Clover Developer Dashboard and open your app.
-
Find the Webhooks section (under App Settings).
-
Add the webhook URL and click Verify in Clover.
-
Clover sends a verification POST to your store. The Verification code from Clover field on the J2Commerce dashboard updates automatically within a few seconds. If it has not appeared, click Check now to poll immediately.
-
Copy the code from the J2Commerce dashboard.
-
Paste the code back into the Clover Developer Dashboard where it prompts for the verification code, and confirm.
The webhook is now verified. Clover sends real-time event notifications to your store for inventory changes, item updates, and stock movements.
The Verification code from Clover field on the dashboard auto-polls every 7 seconds. You do not need to refresh the page. Click Check now at any time for an immediate check.
How webhooks work after verification
Once verified, Clover sends a signed POST to your webhook URL whenever a relevant event occurs (item created, updated, deleted, or stock changed). Your store responds with HTTP 200 immediately and enqueues a background job. The background job then fetches the full updated object from Clover's API and applies the change to J2Commerce. This two-step approach keeps the webhook endpoint fast and ensures no data is lost.
Incoming webhook events appear in the Sync Log with action webhook.
Setting the webhook auth code
After verification, Clover includes an X-Clover-Auth header on all subsequent event POSTs. The plugin validates this header against the Auth Code value in the Connection tab of the plugin settings. To set it:
- Go to Settings -> Connection tab.
- In Clover Developer Dashboard, copy the static auth secret shown for your webhook endpoint.
- Paste it into the Auth Code field in J2Commerce.
- Click Save.
If Auth Code is not configured, the plugin accepts the verification handshake (which Clover sends without an auth header) but rejects all subsequent event payloads with a 403 error.

Run Your First Sync
Once connected, run a manual sync to import your Clover catalog into J2Commerce:
- Go to J2Commerce -> Apps -> Clover POS Integration (the dashboard).
- Click Sync Now in the toolbar.
- The dashboard displays a result message showing how many products were imported, updated, and failed.
- Go to J2Commerce -> Catalog -> Products to review the imported products.
New products are imported with the Import Status you configured (Unpublished by default). Review them and publish the ones you want visible in your store.
Sync Log
The Sync Log records every sync operation — imports, updates, inventory adjustments, webhook events, and errors. Use it to diagnose problems or confirm that syncs are completing successfully.
- From the Clover Dashboard, click Sync Log in the toolbar.
- Use the Status filter to show only errors, successes, or skipped entries.
- Use the search box to find entries by message text, entity type, or action.
- Click column headers to sort by date, status, action, or entity type.
Log entries older than the configured Log Retention days are automatically removed by the scheduled cron task.
Products in J2Commerce
Each product imported from Clover shows a sync status badge on its edit screen:
- Synced (green) — the product is linked and up to date with Clover.
- Pending (yellow) — a sync is queued but not yet completed.
- Error (red) — the last sync for this product failed.
- Deleted (grey) — the Clover item was removed; the product remains in J2Commerce per your Delete Action setting.
The badge also shows the Clover Item ID and the timestamp of the last successful sync.
How Automatic Sync Works
The plugin keeps your store in sync through three mechanisms:
- Webhooks — Clover sends a notification when inventory or a product changes. Your store processes the webhook immediately (requires webhook setup above).
- Scheduled cron — The J2Commerce cron task runs a full catalog sync at the interval you configured (default: every 60 minutes).
- Order events — When a web order is paid, inventory decrements are pushed to Clover. When an order is cancelled or refunded, inventory is restocked.
Cron Task Setup
The Clover POS Integration includes a dedicated Joomla Scheduled Task plugin called J2Commerce - Clover Sync (plg_task_cloversync). This plugin registers two task types that appear in System -> Scheduled Tasks. You must install the cloversync task plugin and create one or both tasks to enable automatic background syncing.
Install the cloversync task plugin
The cloversync task plugin is included in the same app_cloverpos.zip package. It installs automatically alongside the main app plugin. To confirm it is enabled:
- Go to System -> Manage -> Extensions.
- Search for Clover Sync.
- Confirm it shows as Enabled. If not, click the toggle to enable it.
Create the scheduled tasks
Go to System -> Scheduled Tasks -> New to add a task. Two task types are available.
Task type: Clover: Full Catalog Sync
Task type name: Clover: Full Catalog Sync
This task pulls every catalog item from Clover — categories, products, variants, SKUs, prices, and inventory counts — and applies the changes to J2Commerce. It reconciles anything that may have been missed by webhooks.
Task Title: Clover — Full Catalog Sync
Frequency: Every 60 minutes (or longer if your catalog is large)
Priority: Normal
To create this task:
- Go to System -> Scheduled Tasks -> New.
- From the task type list, select Clover: Full Catalog Sync.
- Set the title and execution interval.
- Click Save.
This task has no additional configuration fields beyond the standard scheduler options. All sync behavior is controlled by the Clover POS Integration app settings.
Task type: Clover: Refresh Access Token
Task type name: Clover: Refresh Access Token
Clover OAuth access tokens expire after 30 minutes. This lightweight task proactively refreshes the token before it expires so the connection never goes stale between syncs.
Task Title: Clover — Refresh Access Token
Frequency: Every 15–25 minutes
Priority: High
To create this task:
- Go to System -> Scheduled Tasks -> New.
- From the task type list, select Clover: Refresh Access Token.
- Set the title and execution interval (every 15 to 25 minutes is ideal).
- Click Save.
This task only does work when a connection exists and the stored access token is near expiry. If the plugin is not connected, the task completes immediately with no action.
Ensure the Joomla task runner is active
Scheduled Tasks require the Joomla task runner to execute. Confirm the J2Commerce Task system plugin is enabled:
- Go to System -> Manage -> Plugins.
- Search for J2Commerce Task and confirm it is enabled.
Then set up a server-level cron job to call the Joomla CLI at regular intervals:
php /path/to/joomla/cli/joomla.php scheduler:run --all
A server cron frequency of every 5 minutes is recommended so the token refresh and catalog sync tasks fire close to their configured intervals.
If your hosting does not allow server-side cron jobs, use Joomla's built-in Lazy Cron option in the Scheduled Tasks settings. Lazy Cron triggers tasks on page requests, which is less precise but requires no server access.
How the two tasks relate
The Refresh Access Token task keeps the OAuth connection alive. The Full Catalog Sync task uses that connection to pull fresh data from Clover. Running Refresh Token on a shorter interval than Full Catalog Sync ensures the connection is always valid when the sync task fires.
For a typical store, a good configuration is:
- Refresh Access Token — every 20 minutes
- Full Catalog Sync — every 60 minutes
- Server cron — every 5 minutes
Troubleshooting
Connection Status Shows "Not Connected" After OAuth
Cause: The redirect URI registered in Clover does not match the one the plugin uses, the App ID or App Secret is incorrect, or a required REST client (Web) has not been added.
Solution:
- Go to J2Commerce -> Apps -> Clover POS Integration -> Settings.
- Copy the exact URL from the OAuth Redirect URI field.
- Paste it into your Clover Developer Dashboard under App Settings -> REST Configuration -> Redirect URI (must be an exact match, including
https://). - Confirm a Web REST client exists under REST Clients and that the Site URL is set to your store's base URL.
- Verify the App ID and App Secret are correct.
- Click Save and then Connect to Clover again.
OAuth State Mismatch Error
Cause: The OAuth initiation step writes a security state value to the Joomla administrator session. If the callback is received on the site front-end instead of the administrator, the state is not found and the connection is rejected.
Solution:
The OAuth Redirect URI shown in the plugin settings already points to the administrator path. Confirm you have copied the full URL exactly (it contains administrator/ in the path) into Clover's REST Configuration.
Sync Now Returns Zero Products
Cause: The Clover merchant account has no items, or the app lacks inventory permissions.
Solution:
- Log in to Clover and confirm your inventory items exist and are active.
- In your Clover Developer Dashboard, confirm Inventory Read is listed under Requested Permissions.
- If you recently added the permission, click Disconnect on the Clover Dashboard and reconnect via OAuth to get a new token with the updated permissions.
Stock Is Not Decrementing in Clover After a Sale
Cause: Push Stock on Sale is disabled, or the Clover app lacks Inventory Write permission.
Solution:
- Go to Settings and confirm Push Stock on Sale is set to Yes.
- In your Clover Developer Dashboard, confirm Inventory Write is enabled.
- Reconnect via OAuth if you changed permissions.
- Check the Sync Log for error entries with the action
inventory_decrement.
Webhook Verification Code Never Appears
Cause: Your server is not reachable from the public internet, or the webhook URL was entered incorrectly in Clover.
Solution:
- Confirm your Joomla site is accessible from the internet (webhooks cannot reach a local development server).
- Copy the Webhook URL from the Webhook Verification card again and re-enter it in the Clover Developer Dashboard.
- Click Verify in Clover, then click Check now on the Clover Dashboard.
- If the code still does not appear, check your server error log and the J2Commerce debug log (enable Debug Mode in the plugin settings temporarily).
Sync Sale to Clover Returns HTTP 401
Cause: The Orders Read/Write permission is not enabled for your Clover app.
Solution:
- Open your app in the Clover Developer Dashboard.
- Under Requested Permissions, add Orders Read and Orders Write.
- Click Disconnect on the Clover Dashboard and reconnect via OAuth.
Token Expiry Warning on Dashboard
Cause: The Clover access token expires after 30 minutes. This warning appears when the token is close to expiry and the automatic refresh has not yet run.
Solution:
The plugin refreshes the token automatically when it detects expiry is near. To prevent this warning from appearing regularly, create the Clover: Refresh Access Token scheduled task and set it to run every 15–25 minutes (see Cron Task Setup above).
Products Import as Unpublished
Cause: This is the default behavior — it is intentional so you can review imported products before they appear in your store.
Solution:
- Go to J2Commerce -> Catalog -> Products.
- Review the imported products and publish the ones you want visible.
- If you prefer products to import as published automatically, change Import Status to Published in the plugin settings.