Omnisend Integration
The Omnisend Integration app connects your J2Commerce store to Omnisend so your email and SMS automations always have the right purchase data behind them. When a shopper adds a product to the cart, starts checkout, or completes an order, J2Commerce sends those events to Omnisend in real time. A checkout consent checkbox lets customers opt in to your marketing list at the moment they buy. A product catalog sync keeps Omnisend's Product Picker and product-abandonment flows up to date automatically.
Requirements
- PHP 8.3.0 or later
- Joomla 6.x
- J2Commerce 6.x
- An active Omnisend account
Find Your Omnisend API Key
Before configuring the app, you need an API key from Omnisend. J2Commerce uses this single key for all server-side communication with Omnisend.
- Log in to your Omnisend account.
- Click your store name in the top navigation, then go to Store Settings -> API Keys.
- Click Create API Key, give it a name (for example, "J2Commerce"), and click Create.
- Copy the API key that appears. You will not be able to see the full key again after closing this screen.
Copy the key to a safe place before leaving the Omnisend screen. The key is shown only once at creation time.
Purchase and Download
The Omnisend Integration is a separate add-on available from the J2Commerce Extensions Store. It is not included with the core J2Commerce 6 component.
Step 1: Go to www.j2commerce.com -> Apps.
Step 2: Locate the Omnisend Integration app, click View Details, then Add to Cart -> Checkout.
Step 3: After purchase, go to My Downloads under your profile menu and find the app. Click Available Versions -> View Files -> Download Now.
Install the App
- In the Joomla admin, go to System -> Install -> Extensions.
- Upload the
app_omnisend.zippackage file.

Enable the App
Once installed, confirm the app is enabled. There are two ways to reach it.
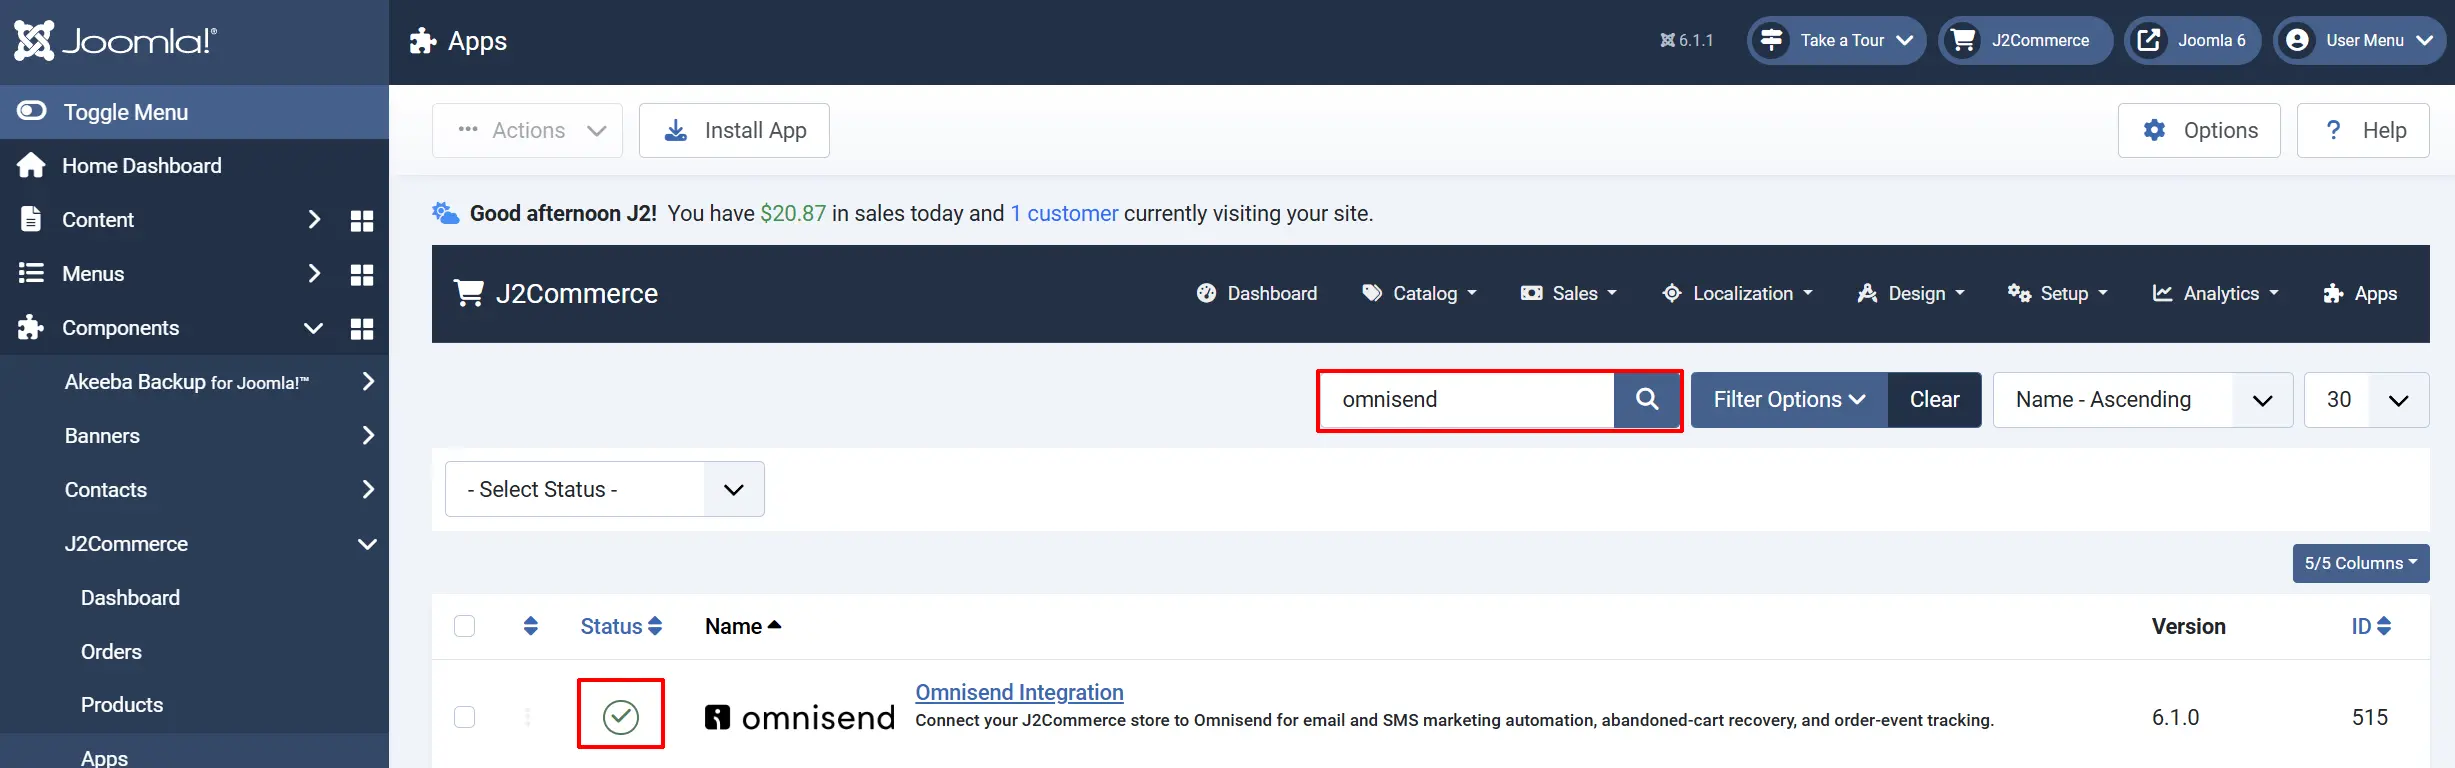
Option A: Click the J2Commerce icon in the top-right corner -> Apps.
Option B: Go to Components in the left sidebar -> J2Commerce -> Apps.

Look for Omnisend Integration in the list. If the toggle shows a red X, click it to turn it into a green checkmark. The app is now active.
Configure the App
Open the app settings by going to J2Commerce -> Apps, then clicking the Omnisend Integration name.
Click the Toggle Inline Help button in the toolbar and the app will show a description below each field as you configure it.

API Connection

This is the only required setting. Nothing else works without it.
API Key: Your Omnisend API key
Paste the key from Omnisend Store Settings -> API Keys. Use the plain API key — do not prefix it with "Bearer".
After saving the API key, click Omnisend Dashboard in the toolbar and then click Test Connection to confirm J2Commerce can reach your Omnisend account. A success message shows your brand name and store currency.
Order Events
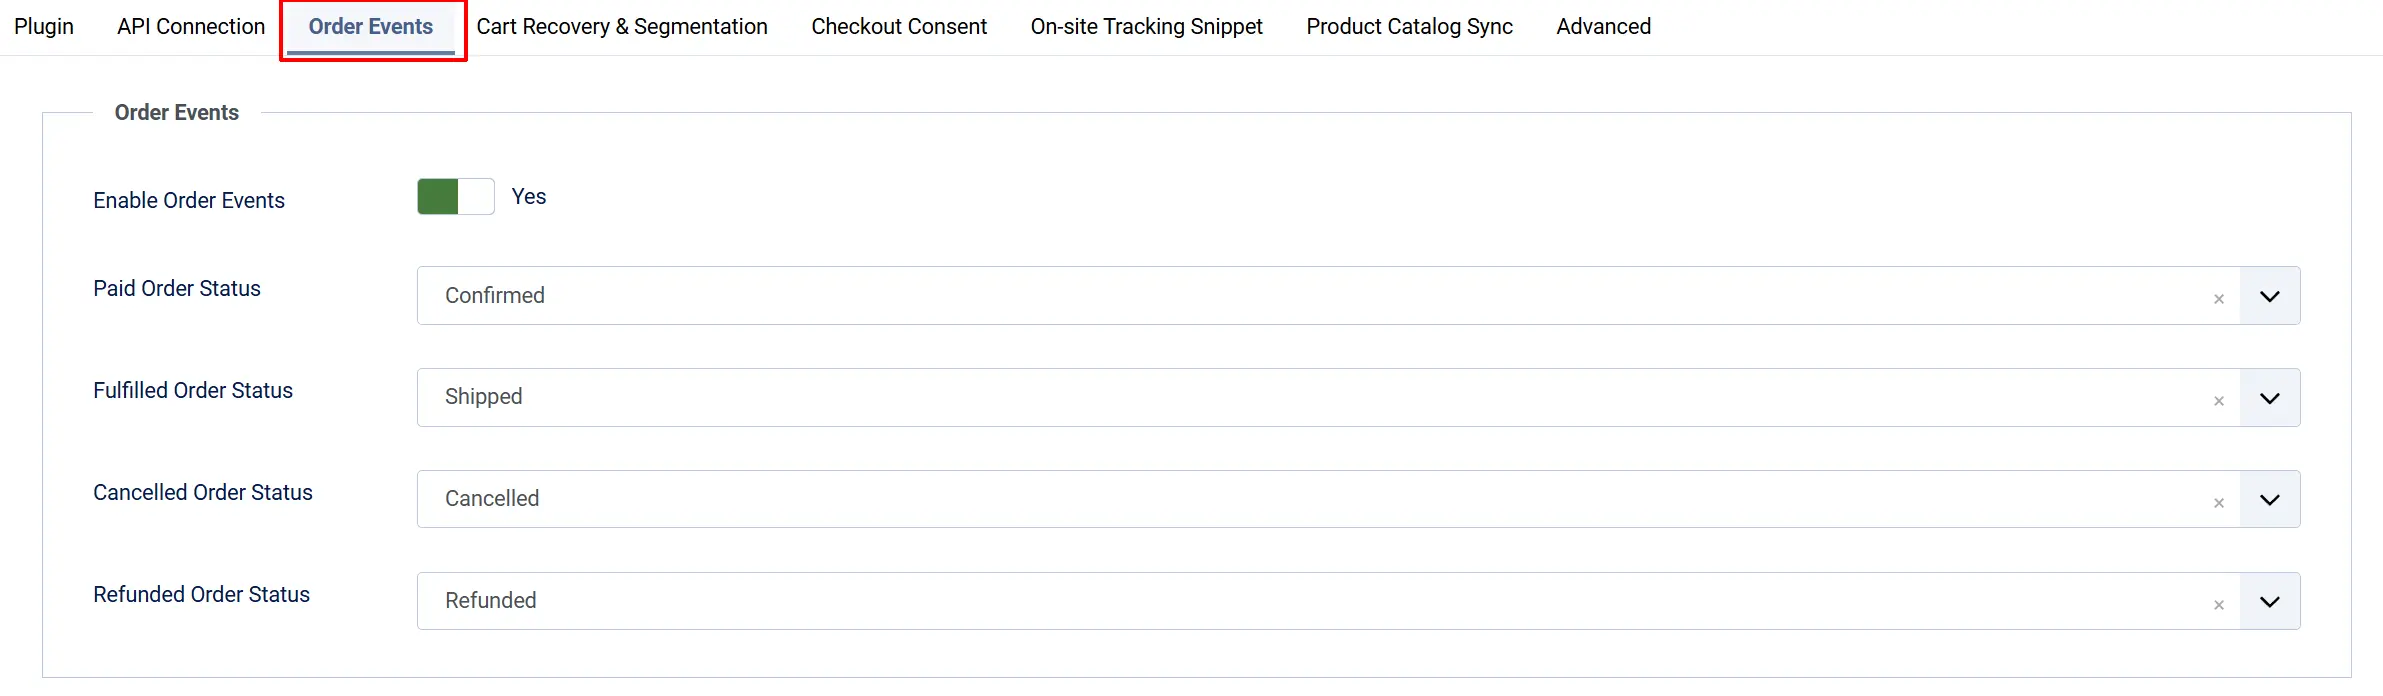
Controls which order lifecycle events are sent to Omnisend. Each event can trigger automations in Omnisend's Flow Builder.
Enable Order Events: Master switch for all order lifecycle events. Turn this off to stop all order event syncing.
Paid Order Status: The J2Commerce order status that fires the "paid for order" event in Omnisend. Typically the Confirmed or Paid status.
Fulfilled Order Status: The order status that fires the "order fulfilled" event. Typically the Shipped status.
Cancelled Order Status: The order status that fires the "order canceled" event. Typically the Cancelled status.
Refunded Order Status: The order status that fires the "order refunded" event. Leave empty to disable refund event tracking.
When a new order is placed, J2Commerce automatically sends a "placed order" event regardless of the starting status.
To find your order status IDs, go to J2Commerce -> Setup -> Order Statuses and check the ID column.
Cart Recovery and Segmentation

Controls cart and checkout abandonment tracking, plus per-product purchase events.
Enable Cart and Checkout Abandonment: Sends an "added product to cart" event when a shopper adds a product, and a "started checkout" event when the checkout page loads. Powers cart-abandonment and checkout-abandonment automations in Omnisend. Requires Enable Site-wide Snippet to be on.
Enable Ordered-Product Events: Sends one "ordered product" event per line item on every completed order. Enables "bought product X" segments and cross-sell or replenishment flows.
On-site Tracking Snippet
![]()
Controls the Omnisend JavaScript snippet that loads on your store's frontend pages.
Enable Site-wide Snippet: Injects the Omnisend JavaScript on every frontend page. Required for browse abandonment, Omnisend's on-site forms, Live View, and the "viewed product" event. Only your public brand ID is included in the page — your API key is never sent to the browser.
Tracking Snippet (paste from Omnisend): Optional. Paste the JavaScript from Omnisend's Connect-store flow here. Do not include the surrounding <script> tags — paste the JavaScript content only. When filled in, this takes precedence over the auto-built snippet. Leave empty to let J2Commerce build the snippet from your API key.
Enable "Viewed Product" Event: Pushes a "viewed product" event to Omnisend when a shopper opens a product page. Enables product-abandonment automations and contact segmentation by browsed products. Requires Enable Site-wide Snippet to be on.
If you paste a custom tracking snippet, the "viewed product" event is still appended automatically. You do not need to include it in the pasted snippet.
Checkout Consent

Adds a marketing-consent checkbox to the checkout payment step so customers can opt in to your Omnisend email list when they buy.
Show Consent Checkbox: Displays a checkbox on the checkout payment step. When the customer ticks it and completes the order, they are added to Omnisend as an email subscriber.
Checkbox Label: The text shown next to the consent checkbox. Leave blank to use the built-in default: "Email me news and exclusive offers". Plain text only — HTML is not allowed.
Sync Phone Number (SMS): Sends the customer's billing phone number to Omnisend alongside their email. The number is stored in Omnisend but is not marked as SMS-subscribed — SMS marketing requires its own separate consent.
The consent checkbox is always unchecked by default. This is intentional for GDPR compliance — customers must actively tick it to subscribe.
Product Catalog Sync

Controls automatic syncing of your product catalog to Omnisend.
Enable Product Catalog Sync: When on, every time you save or delete a product in J2Commerce, it is automatically synced to Omnisend's product catalog. Enables the Omnisend Product Picker in email campaigns and product-abandonment automations.
Advanced

Debug Logging: Writes verbose log entries to logs/plg_j2commerce_app_omnisend.php. Turn this off in production. Use it only when diagnosing a problem.
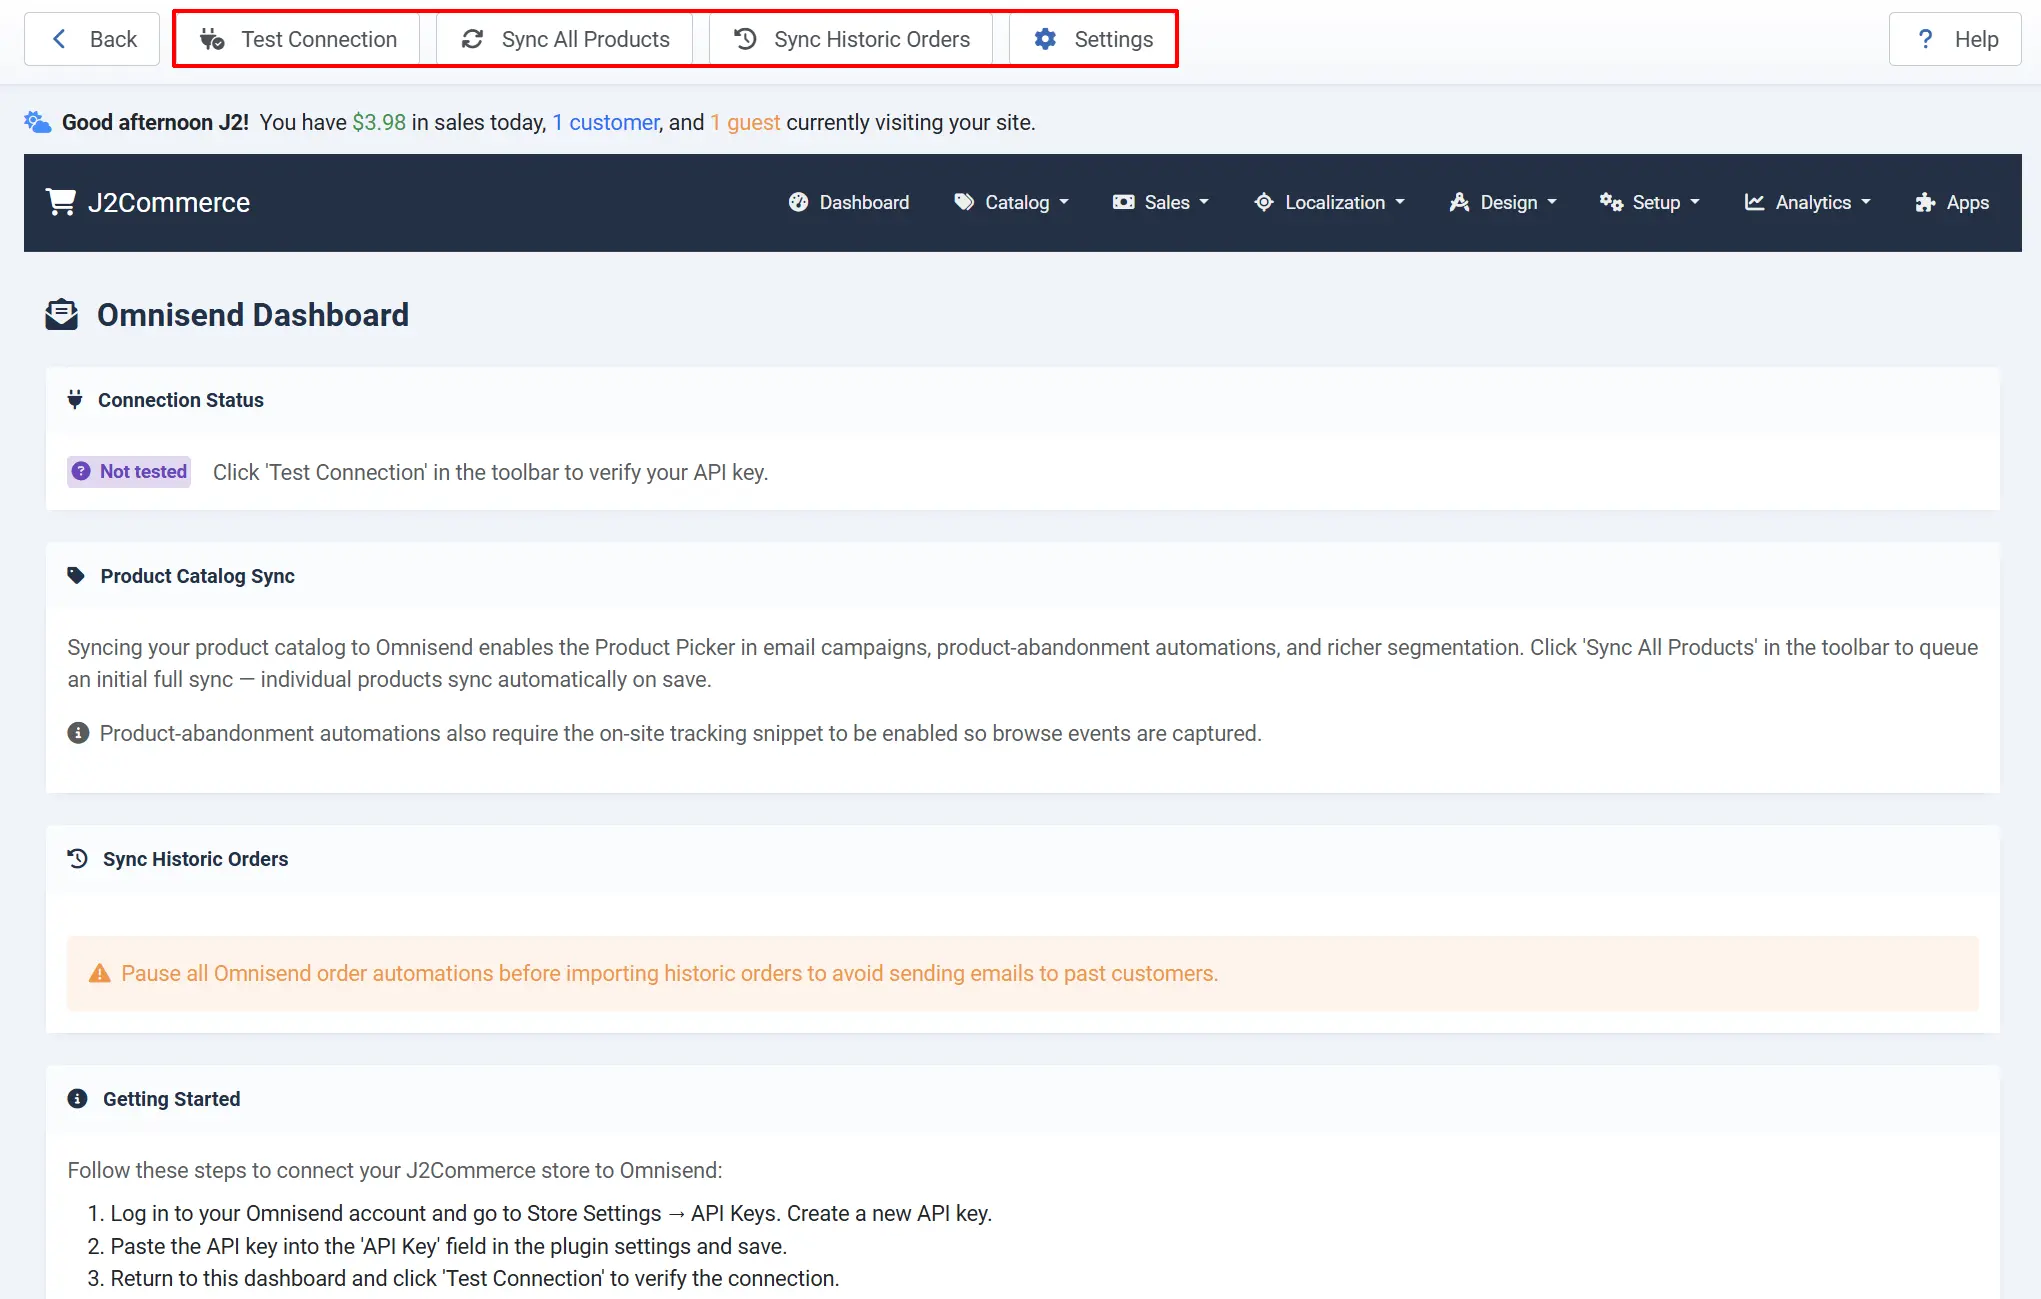
The Omnisend Dashboard
After saving your API key, click Omnisend Dashboard in the toolbar from the plugin settings page to open the integration's admin view.

From the dashboard you can:
- Test Connection — Verifies your API key and shows your Omnisend brand name and currency.
- Sync All Products — Queues all enabled products and their categories for a full catalog sync to Omnisend. Use this once when you first connect, or after enabling catalog sync on an existing store.
- Sync Historic Orders — Queues all past orders for Omnisend. Use this once when you first connect so Omnisend has purchase history for segmentation and flows.
- Settings — Opens the plugin configuration form directly.
The sync buttons add items to J2Commerce's background queue. Delivery to Omnisend happens the next time the J2Commerce Scheduled Tasks run. Make sure you have a cron job set up for Joomla's task scheduler at System -> Scheduled Tasks.
How It Works
Here is a plain-English summary of what happens behind the scenes when the integration is active.
A customer registers or places an order. J2Commerce queues a contact record for Omnisend with the customer's email, first name, and last name. If the customer ticked the consent checkbox at checkout, Omnisend marks them as an email subscriber. If Sync Phone Number (SMS) is on, the billing phone is included as well.
An order is placed. J2Commerce sends a "placed order" event with the full order details: items, quantities, prices, shipping, discounts, and currency. If Enable Ordered-Product Events is on, one additional "ordered product" event fires per line item.
An order status changes. When an order moves to a status you mapped in the Order Events settings, J2Commerce queues the matching event — "paid for order", "order fulfilled", "order canceled", or "order refunded".
A shopper visits a product page. If Enable "Viewed Product" Event is on, a "viewed product" event is pushed to Omnisend so product-abandonment flows can trigger.
A shopper adds a product to the cart. If Enable Cart and Checkout Abandonment is on, an "added product to cart" event fires with cart contents, prices, and a checkout URL that Omnisend can embed in abandonment emails.
A shopper reaches the checkout page. A "started checkout" event is pushed, powering checkout-abandonment flows.
A product is saved or deleted. If Enable Product Catalog Sync is on, the product is automatically synced to — or removed from — Omnisend's product catalog without any manual action.
Events Sent to Omnisend
| Event Name | When It Fires | What Enables It |
|---|---|---|
| placed order | After a new order is saved | Automatic when order events are on |
| paid for order | When order status matches Paid Order Status | Configurable status mapping |
| order fulfilled | When order status matches Fulfilled Order Status | Configurable status mapping |
| order canceled | When order status matches Cancelled Order Status | Configurable status mapping |
| order refunded | When order status matches Refunded Order Status | Configurable status mapping (disabled by default) |
| ordered product | One per line item on each new order | Enable Ordered-Product Events |
| added product to cart | When a shopper adds a product to the cart | Enable Cart and Checkout Abandonment + snippet on |
| started checkout | When the checkout page loads | Enable Cart and Checkout Abandonment + snippet on |
| viewed product | When a shopper opens a product page | Enable "Viewed Product" Event + snippet on |
Tips
- Set up cron first. The integration uses J2Commerce's background queue. If Joomla's task scheduler is not running via cron, events queue up but never reach Omnisend. Confirm your cron job is active before testing.
- Pause automations before a historic sync. When you click Sync Historic Orders, pause any Omnisend flows triggered by "placed order" events first. Otherwise Omnisend may send confirmation-style emails to past customers.
- Use Test Connection before going live. Click Test Connection from the Omnisend Dashboard after saving your API key. It confirms your brand name and currency are correct.
- The API key is not your Omnisend password. The key is found under Omnisend Store Settings -> API Keys, not in your account login area.
- Leave Tracking Snippet empty unless Omnisend gave you one. Most stores can let J2Commerce auto-build the snippet. Only paste a custom snippet if Omnisend gave you one during their Connect-store wizard and you want the exact launcher they issued.
Troubleshooting
Contacts are not appearing in Omnisend
Check that the API key is saved. Go to J2Commerce -> Apps -> Omnisend Integration -> Settings and confirm the API Key field is filled in. Open the dashboard and click Test Connection. If it returns an error, the key is wrong or has been revoked.
Check the background queue. Contacts and events go through J2Commerce's background queue. If Joomla's task scheduler is not running via cron, nothing is delivered. Go to System -> Scheduled Tasks and confirm the last run time is recent.
Check the Joomla log. Turn on Debug Logging in the Advanced settings, reproduce the issue, then check administrator/logs/plg_j2commerce_app_omnisend.php for error messages.
Events are not firing (cart, checkout, or viewed-product events)
These events require the on-site JavaScript snippet to be running. Check:
- Enable Site-wide Snippet is set to Yes in the On-site Tracking Snippet settings.
- Your API key is saved and Test Connection succeeds.
- Open your storefront in a browser, view the page source, and search for
omnisend. The snippet should appear just before</body>.
If you are using a caching extension or a CDN with HTML caching, the snippet injection may be cached away. Flush all caches and reload.
The consent checkbox is not appearing at checkout
- Confirm Show Consent Checkbox is set to Yes in the Checkout Consent settings.
- Confirm the app is enabled — the toggle in J2Commerce -> Apps should be a green checkmark.
- Confirm your API key is saved. The plugin skips all frontend output when no key is configured.
Cart or checkout abandonment events are not working
- Confirm Enable Cart and Checkout Abandonment is set to Yes.
- Confirm Enable Site-wide Snippet is also set to Yes — cart events require the snippet to be loaded.
- Open Omnisend's Live View and add a product to the cart in a fresh browser window. The event should appear in Live View within a few seconds.
Sync All Products shows 0 products queued
The product sync only covers products backed by Joomla articles (the standard J2Commerce product type). Confirm your products are published. Also check that Enable Product Catalog Sync is set to Yes before clicking Sync All Products.
Test Connection returns an error about an invalid API key
The API key in Omnisend is a plain string — do not prepend "Bearer" or any other prefix. Copy the key exactly as shown in Omnisend under Store Settings -> API Keys. If the key was rotated or deleted in Omnisend, create a new one and update the plugin settings.