Partial Payments
The Partial Payments app lets you collect a deposit when a customer places an order and then receive the remaining balance on a schedule you control. Customers pay a percentage or fixed-amount deposit at checkout and return to their account to pay each installment when it comes due. Automated emails handle the reminders so you do not need to chase customers manually.
This app is ideal for stores selling high-ticket items, custom-made goods, services booked in advance, training courses, or any product where spreading the cost makes the purchase more accessible.
Requirements
- PHP 8.3.0 +
- Joomla! 6.x
- J2Commerce 6.x
- Joomla email (SMTP or PHP mail) configured so reminder emails can send
Purchase and Download
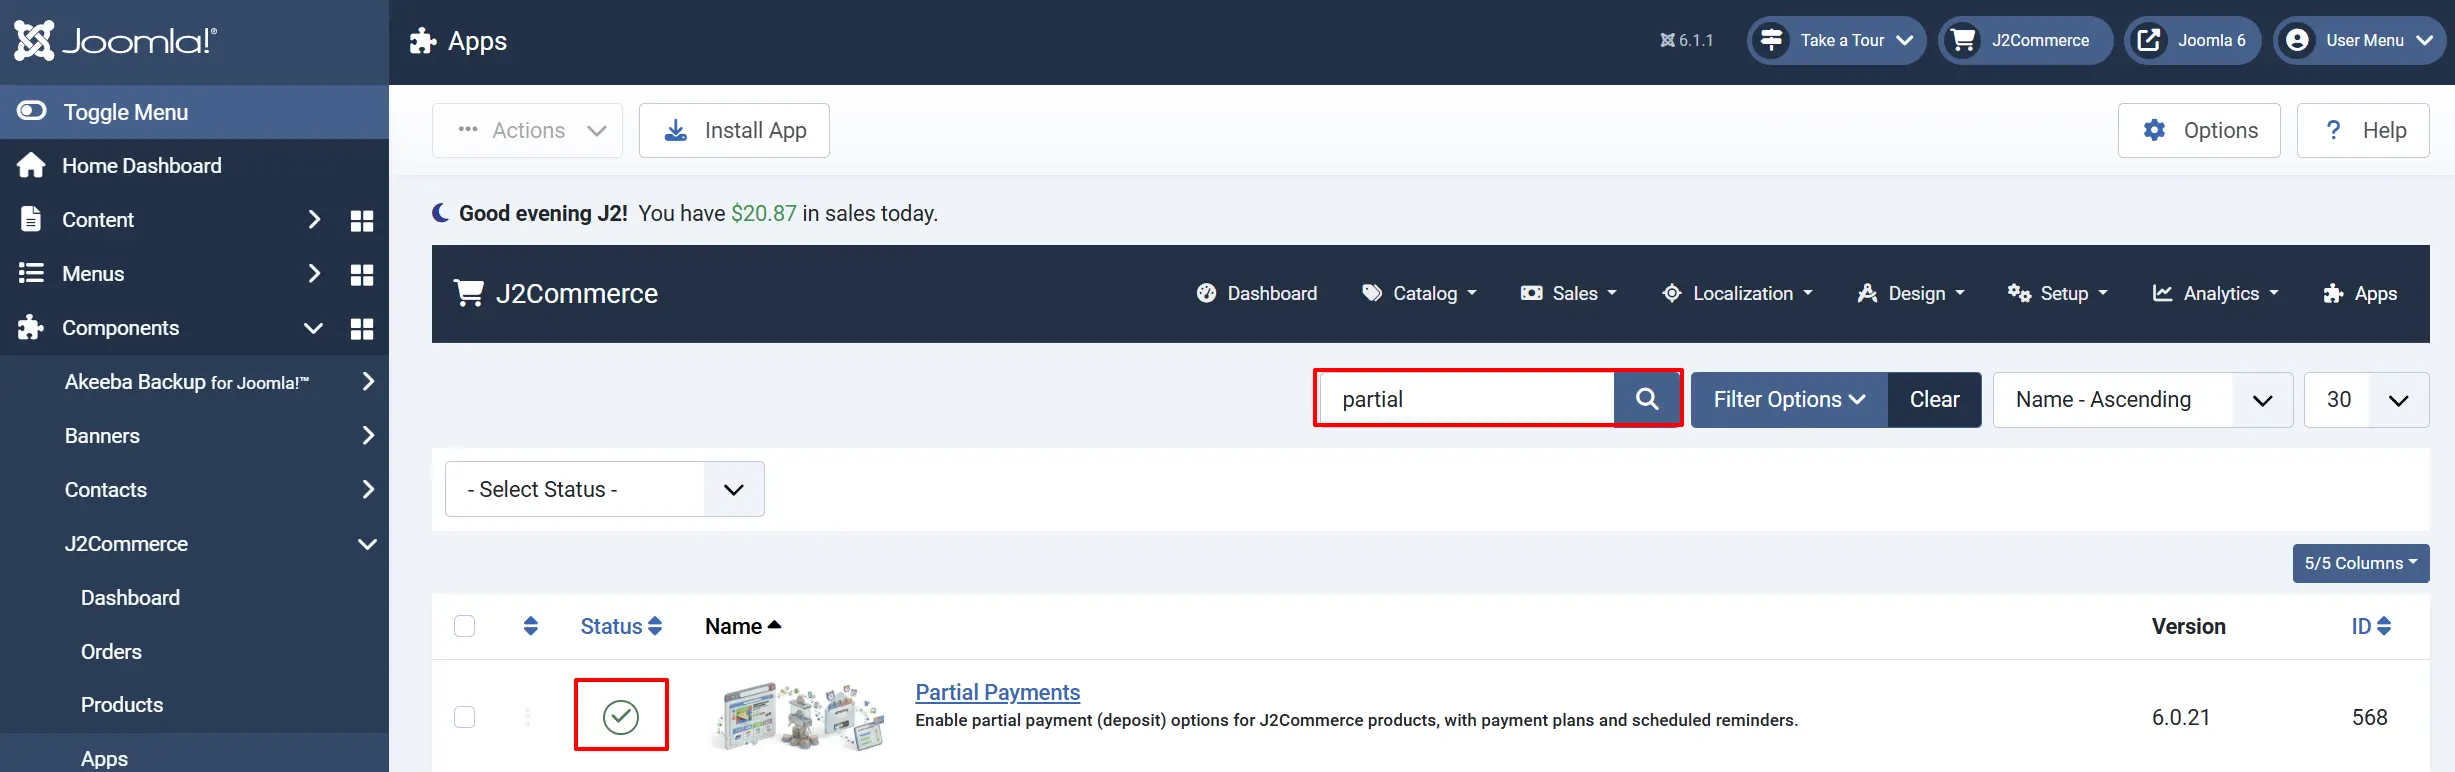
Step 1: Go to the J2Commerce website -> Apps
Step 2: Locate Partial Payments -> click View Details -> Add to Cart -> Checkout
Step 3: Go to your My Downloads section under your profile button at the top right corner and search for the app. Click Available Versions -> View Files -> Download Now to save the ZIP file to your computer.
Install the App
In the Joomla Administrator, go to System -> Install -> Extensions.
Upload the plugin app_partialpayment.zip file or use the Install from URL option.

Enable the App
The plugin installs and enables itself automatically. No separate enable step is needed. However, it's important to know where to go to enable or disable it in the future .
There are two ways to reach the Apps list.
Option A: Go to the J2Commerce icon at the top right corner -> Apps
Option B: Go to Components on the left sidebar -> J2Commerce -> Apps

To help you narrow down the list, you can do a search for Partial Payments, click the X, and it will turn into a green checkmark. It is now enabled and ready for setup.
Configure the App
Click the Partial Payments title (next to the green checkmark) to open the settings screen.
Click the Toggle Inline Help button on any app you install to see a description below each field directly in the admin panel.
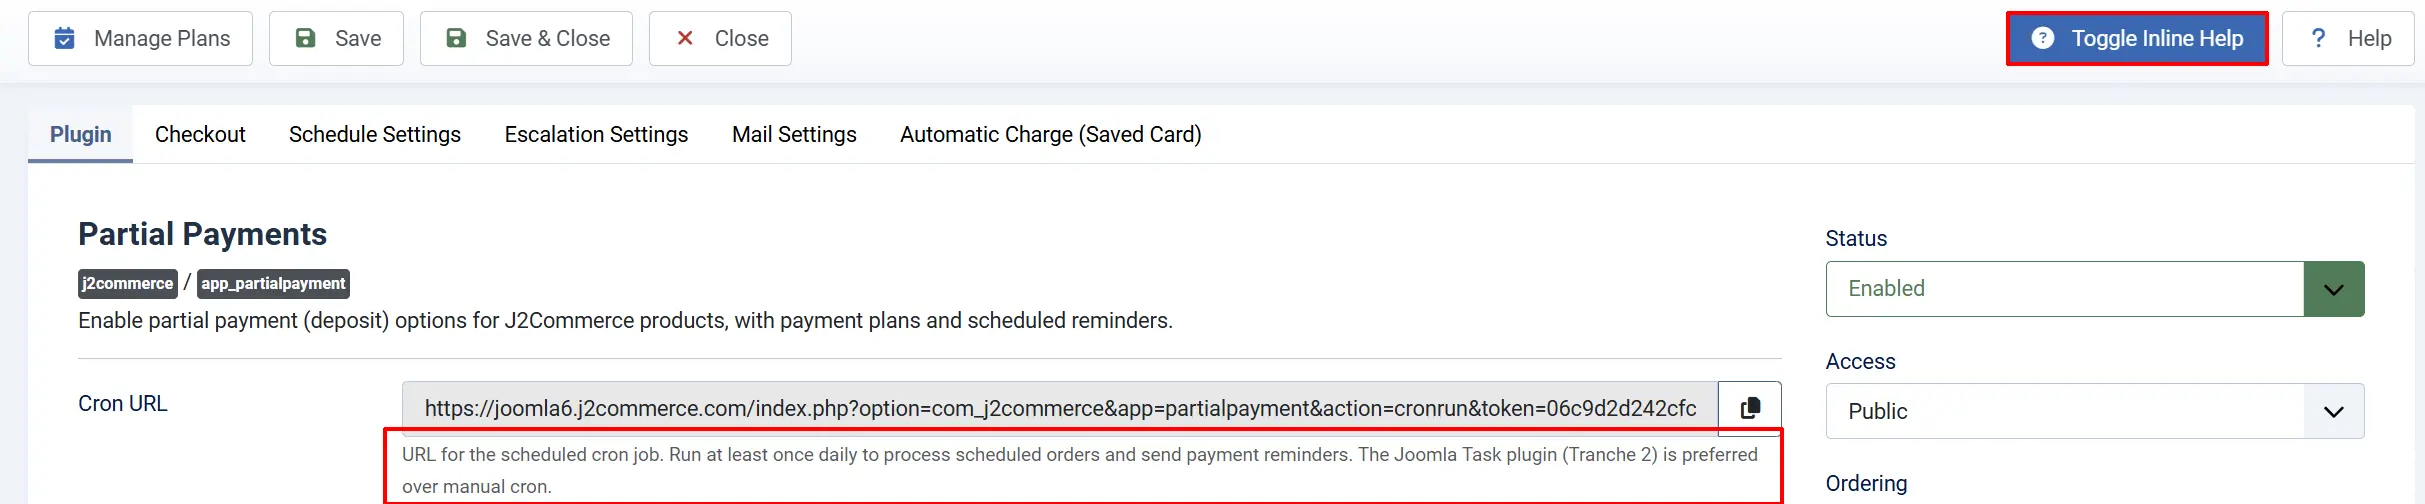
The settings are split across six tabs: General Settings, Checkout, Schedule Settings, Escalation Settings, Mail Settings, and Automatic Charge (Saved Card).
General Settings tab
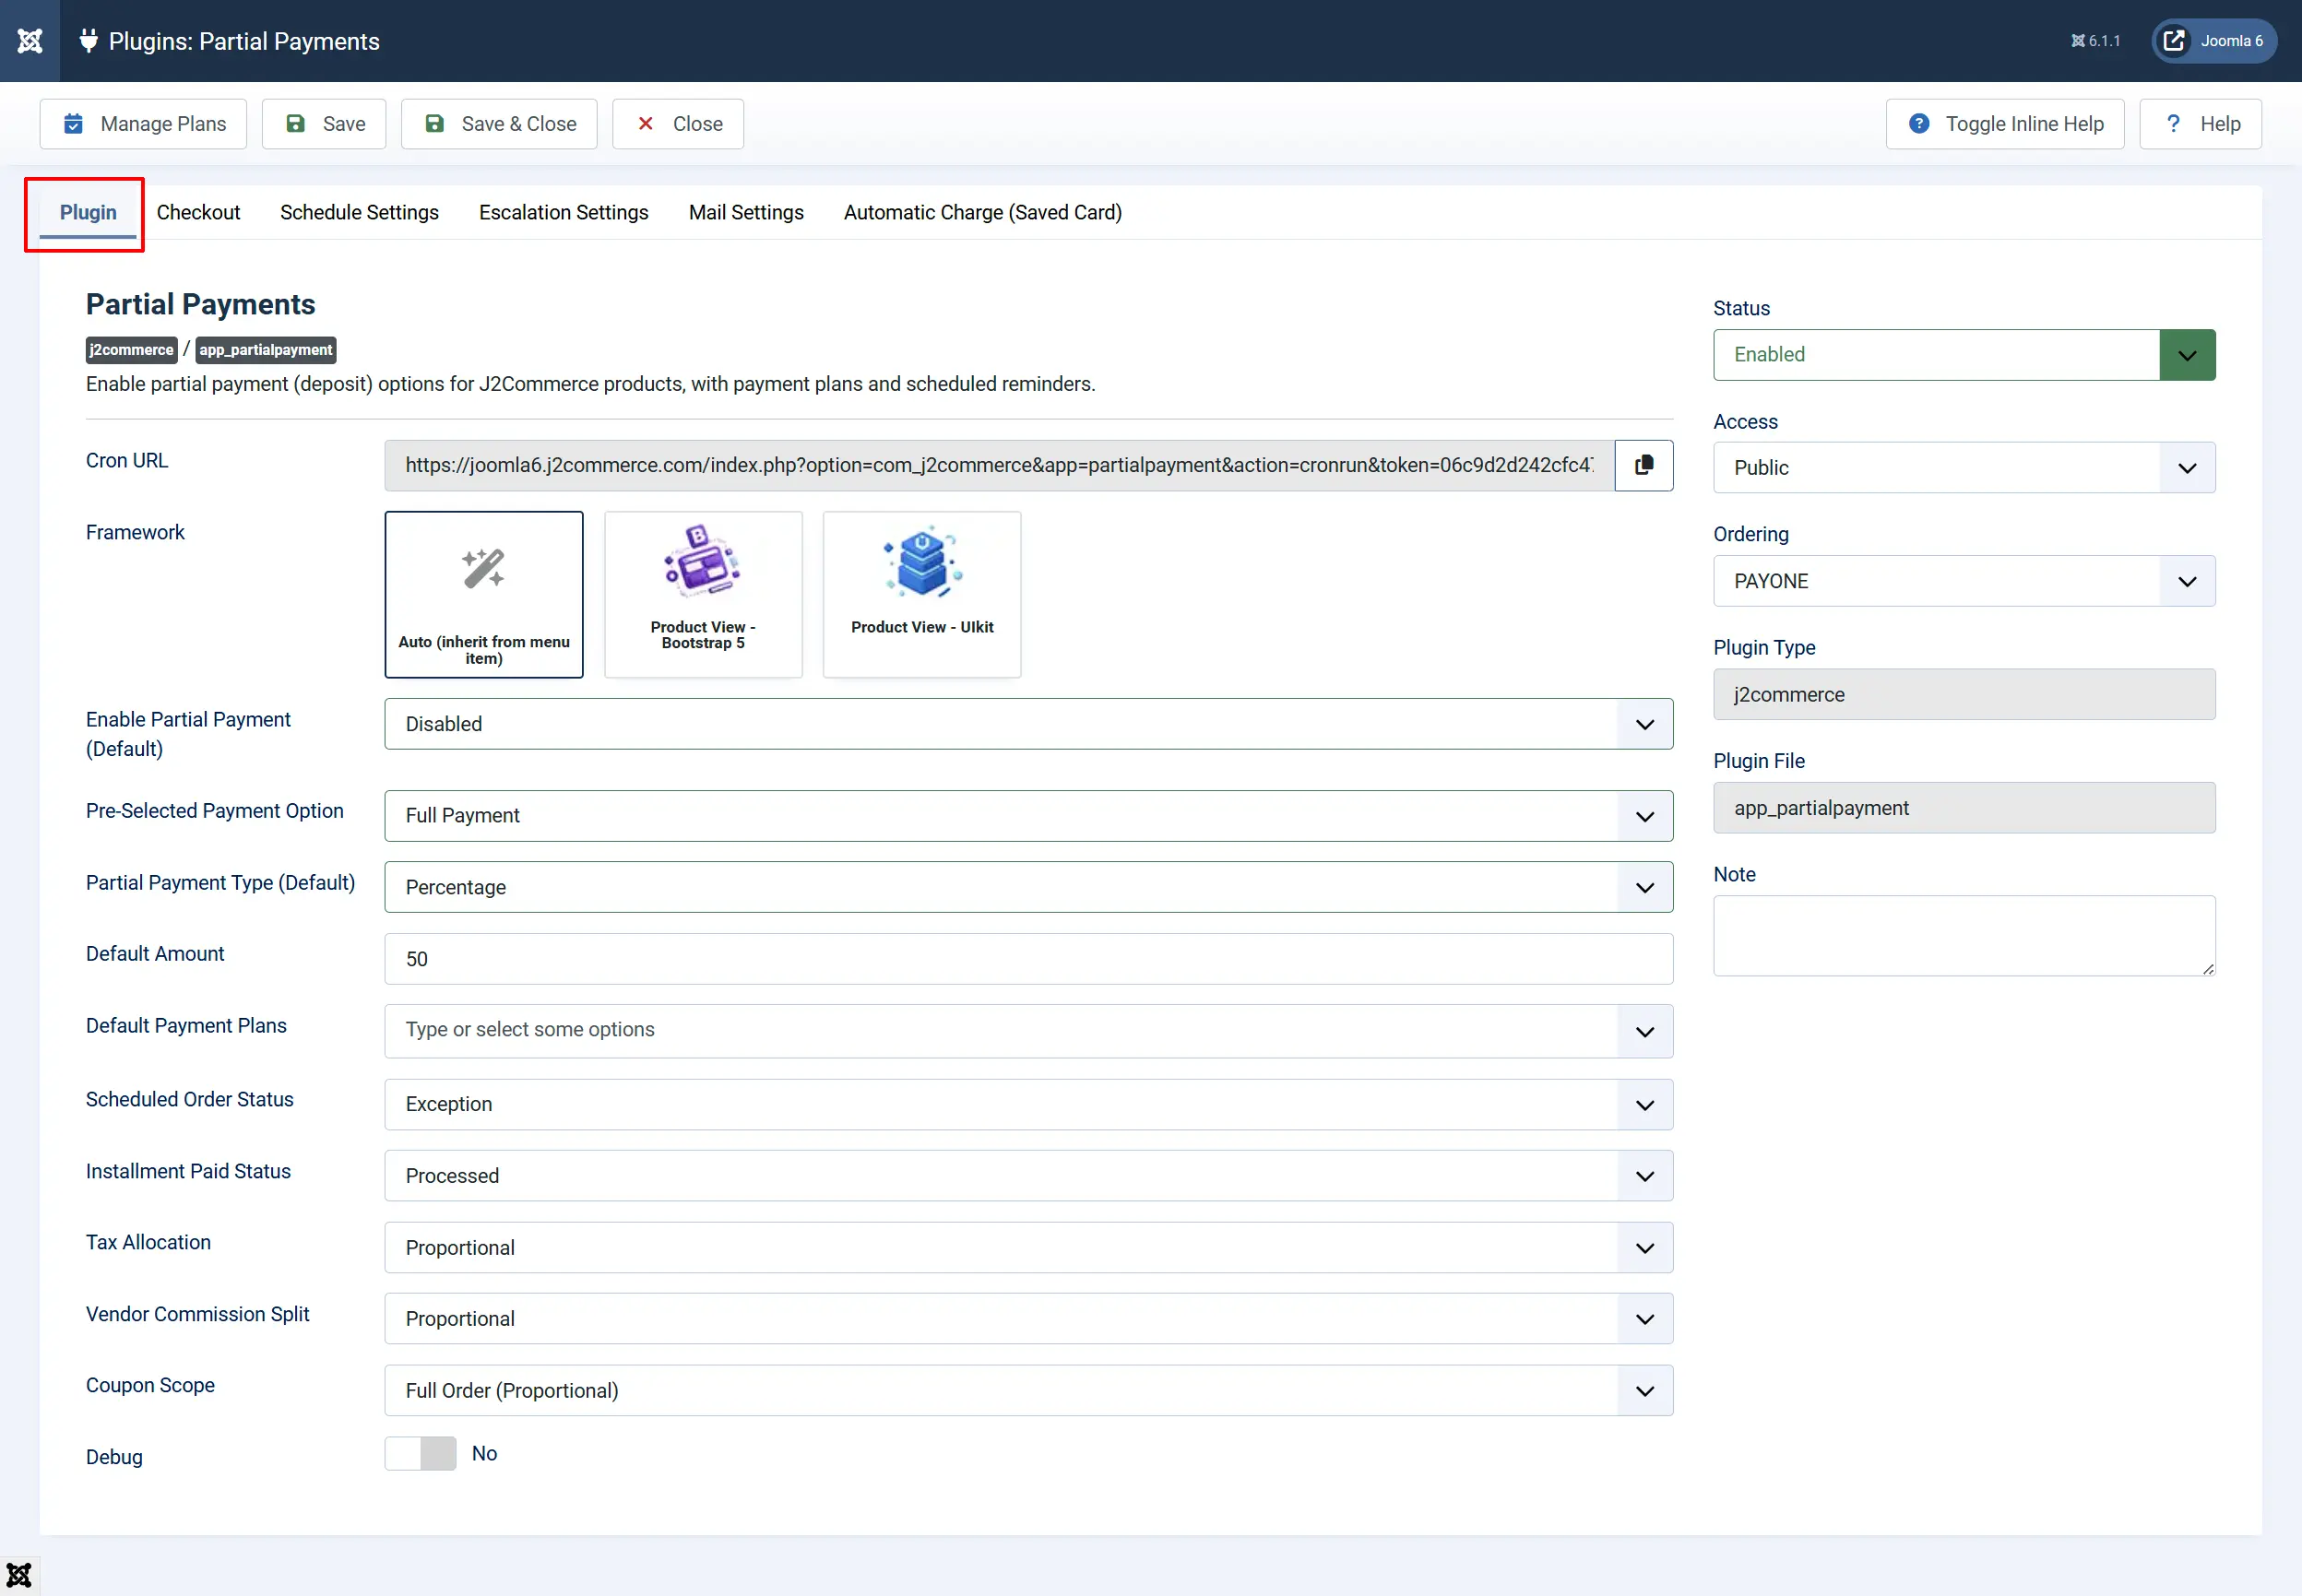
Cron URL: A read-only URL you copy into your server cron or the Joomla Scheduler. Run it at least once a day so scheduled installments activate on time and reminder emails go out. See Cron Setup below.
Framework: Choose Bootstrap 5 for standard Joomla templates or UIkit for UIkit 3-based templates. This controls how the front-end payment selector and cart display look.
Enable Partial Payment (Default): The storewide default. You can override it on each product.
- Disabled — partial payment is off unless a product overrides this to turn it on
- Enabled (Required) — every buyer must pay a deposit; full payment is not offered
- Enabled (Optional) — the customer chooses between paying in full or paying a deposit
Pre-Selected Payment Option: When partial payment is optional, this is the choice pre-selected on the product page. The customer can still switch before adding to cart.
- Full Payment — full payment is ticked first
- Partial Payment — the deposit option is ticked first
Partial Payment Type (Default): How the deposit amount is calculated.
- Percentage — a percentage of the product price (e.g. 30 means 30%)
- Fixed Amount — a fixed amount in your store currency
Default Amount: The deposit value when using the storewide default. Enter 30 for 30% when the type is Percentage, or 50 for a $50 fixed deposit.
Default Payment Plans: One or more saved payment plans offered across all products that use the storewide defaults. Create plans first in Creating Payment Plans.
Scheduled Order Status: The order status assigned to future installments after the deposit is paid. Defaults to Scheduled, which is created for you at install.
Installment Paid Status: The order status that marks an installment as paid. Defaults to Processed.
Tax Allocation: How order tax is split between the deposit and the installment payments.
- Proportional — each payment carries its proportional share of the total tax (default)
- Upfront (With Deposit) — the full tax is collected with the deposit; installments are tax-free
Vendor Commission Split: For marketplace setups, how vendor commissions are distributed across payments.
- Proportional — each installment carries its share of the commission (recommended)
- Upfront (First Installment) — the entire commission is deducted from the deposit only
Coupon Scope: How a coupon discount is applied when partial payment is active.
- Full Order (Proportional) — the discount is spread across all payments proportionally (default)
- Deposit Only — the entire discount reduces the deposit; installments stay at full price
- Each Installment — the discount is re-applied independently to every installment
Debug: Logs partial payment events to the J2Commerce log for troubleshooting. Leave No on a live store.
Recommended starting point: Leave Enable Partial Payment (Default) on Disabled and turn the feature on per product until you are comfortable with how it behaves.
Checkout tab
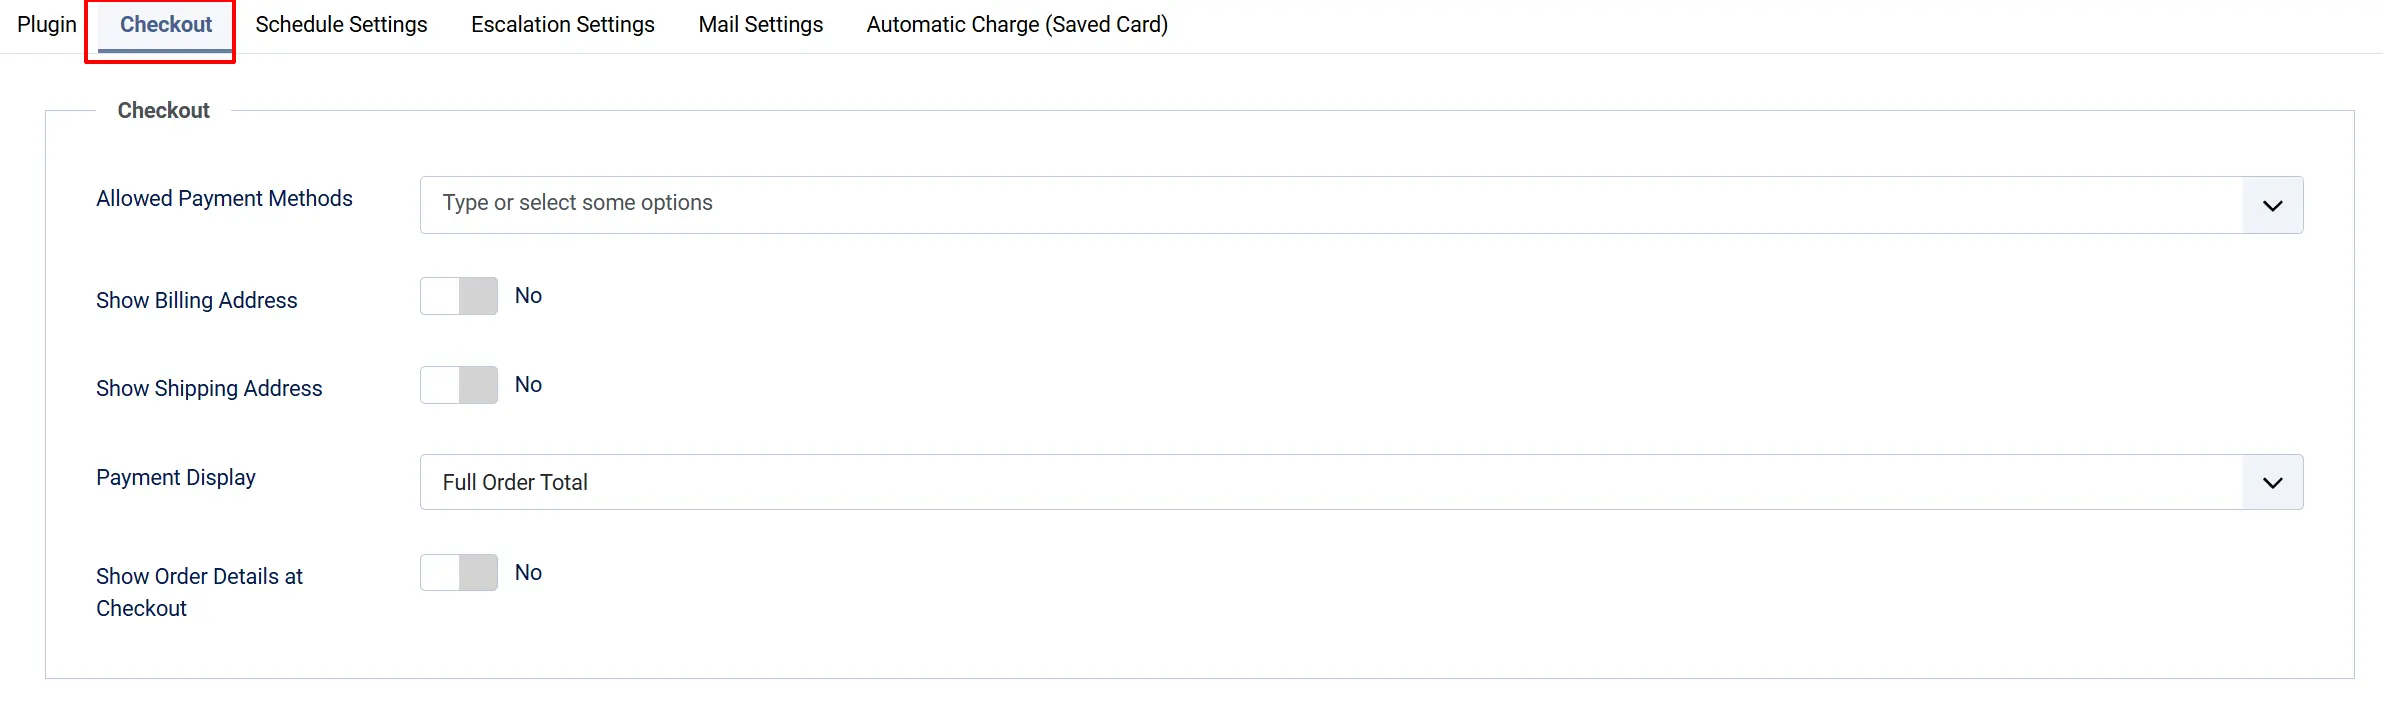
Allowed Payment Methods: Restrict deposit payments to specific gateways. Leave empty to allow all active payment methods. Only gateways selected here appear for partial payment orders at checkout.
Show Billing Address: Show the billing address step when a customer pays an installment (the Pay Now flow). Disable this if billing was already collected with the original deposit order and does not need re-entry.
Show Shipping Address: Show the shipping address step when a customer pays an installment. Disable if shipping details were already captured with the original order.
Payment Display: What total the customer sees in the checkout sidecart.
- Full Order Total — the complete order price is shown even though only the deposit is charged today (default)
- Partial Amount Only — only the deposit amount due today is shown
Show Coupon & Voucher Fields at Checkout: When enabled, coupon and voucher entry fields are shown in the sidecart during installment checkout. Disable to hide them when the customer is paying a later installment.
Show Order Details at Checkout: When enabled, a summary of the original order items appears below the totals in the sidecart during installment checkout.
Schedule Settings tab

Maximum Installment Horizon (Days): The longest a payment plan may run, measured in days from the deposit date. Set 0 to remove the limit. The default is 365. This prevents a plan from scheduling a payment far into the future accidentally.
Escalation Settings tab
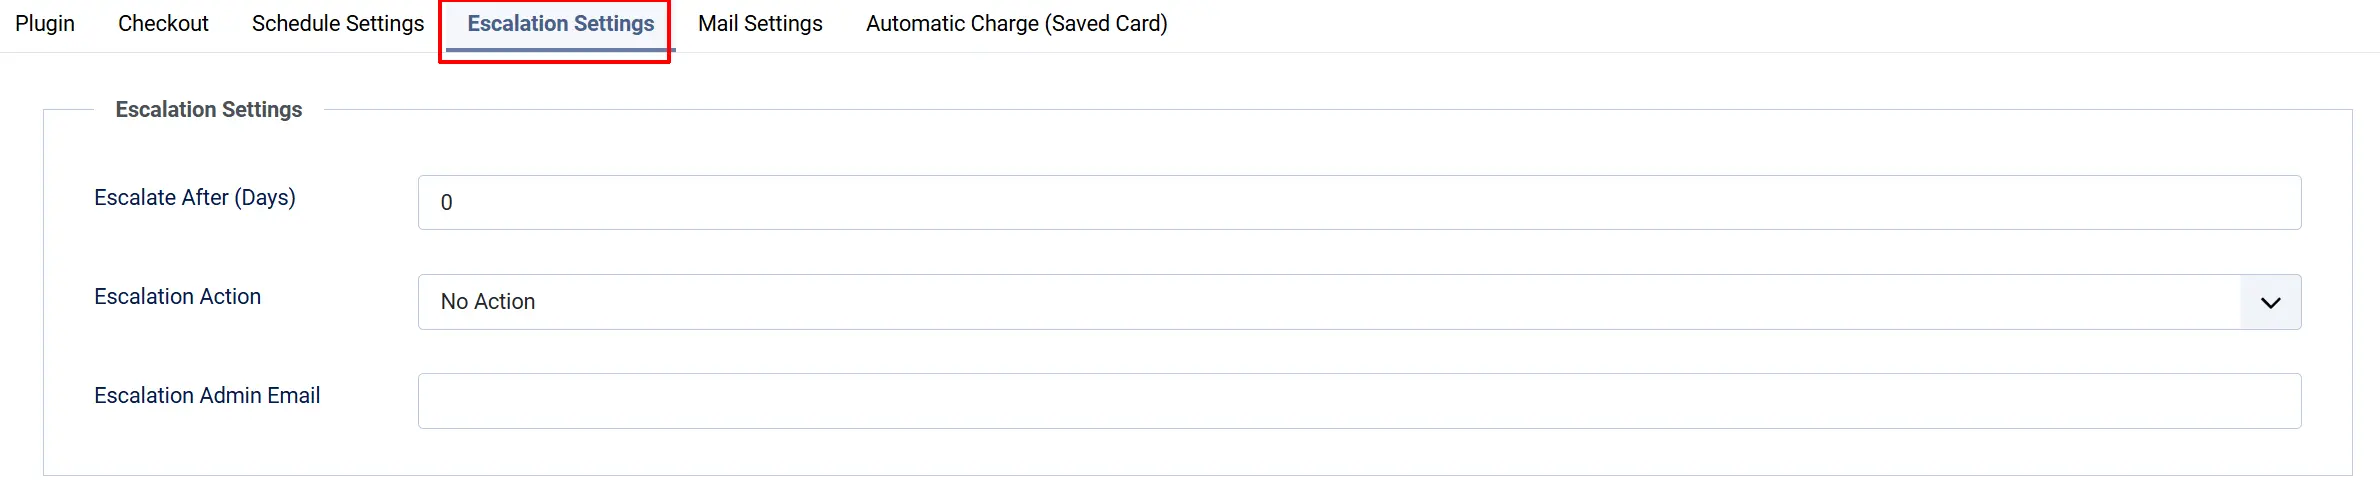
These settings control what happens when a customer misses an installment due date.
Escalate After (Days): How many days past the due date before escalation triggers. Set 0 to turn escalation off entirely.
Escalation Action: What happens when an installment escalates.
- No Action — record the event but take no automated step
- Notify Admin by Email — send an alert to the escalation email address
- Cancel This Installment — void the overdue installment only
- Cancel All Remaining Installments — void all outstanding installments for the order
Escalation Admin Email: The address that receives the notification when the action is Notify Admin by Email. Leave empty to use the site's global administrator email.
Mail Settings tab
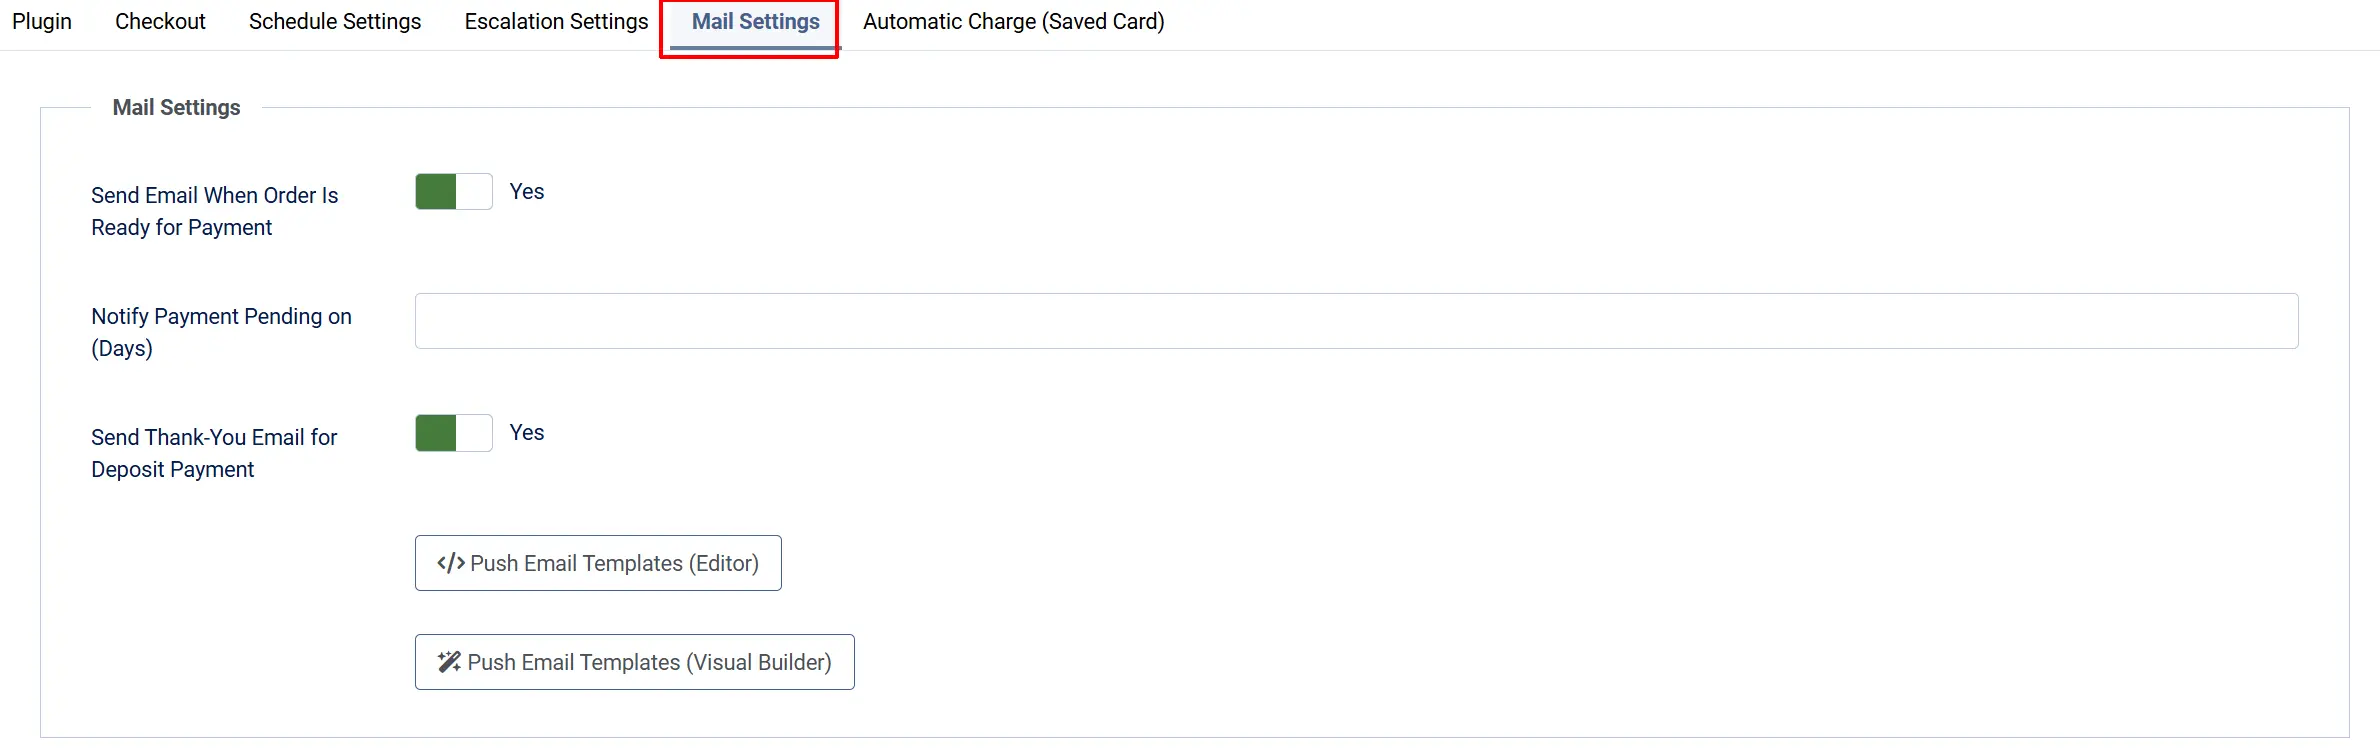
Send Email When Order Is Ready for Payment: Emails the customer when a scheduled installment becomes due. Default Yes.
Notify Payment Pending on (Days): Comma-separated day counts after the due date on which to send overdue reminders. For example, entering 2,5 sends one reminder 2 days after the due date and another at 5 days. Leave empty to disable overdue reminders.
Send Thank-You Email for Deposit Payment: Emails a confirmation the moment the deposit is received. Default Yes.
Push Email Templates (Editor): Seeds the built-in HTML email bodies into the J2Commerce Email Templates manager in standard editor format. Run this once after installation or after resetting defaults. Existing rows are updated, not duplicated.
Push Email Templates (Visual Builder): Seeds the same email bodies using the GrapesJS visual builder format. Use this when you want to customise templates with the drag-and-drop visual editor.
Automatic Charge (Saved Card) tab
Enable Automatic Charge: When enabled, the daily cron attempts to charge each installment automatically on its due date using a saved payment method from the customer's account, instead of emailing them to pay manually.
Automatic charging requires a compatible payment gateway that supports saved cards — for example the Stripe plugin with vault support enabled. Without a compatible gateway, leave this No and customers pay each installment from the Pay Now link in their account.
Creating Payment Plans
A payment plan defines how the balance is collected after the deposit — for example "deposit today, then three equal monthly payments." You can assign plans storewide in General Settings or per product.
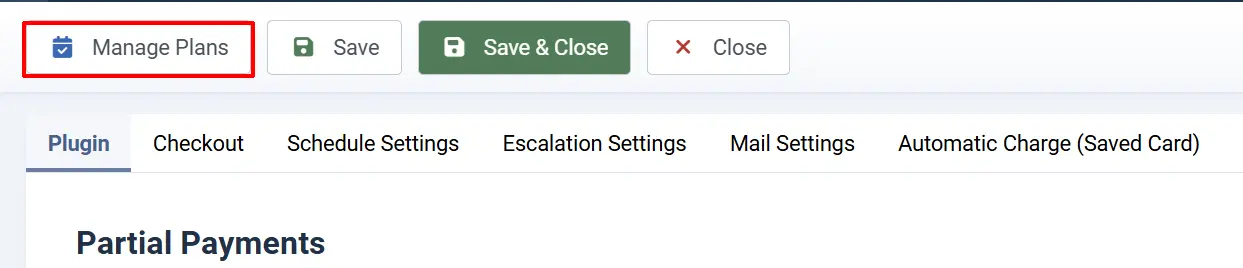
To manage plans, open the Partial Payments settings in J2Commerce -> Apps, then click the Manage Plans button in the toolbar -> New.
Plan Details tab
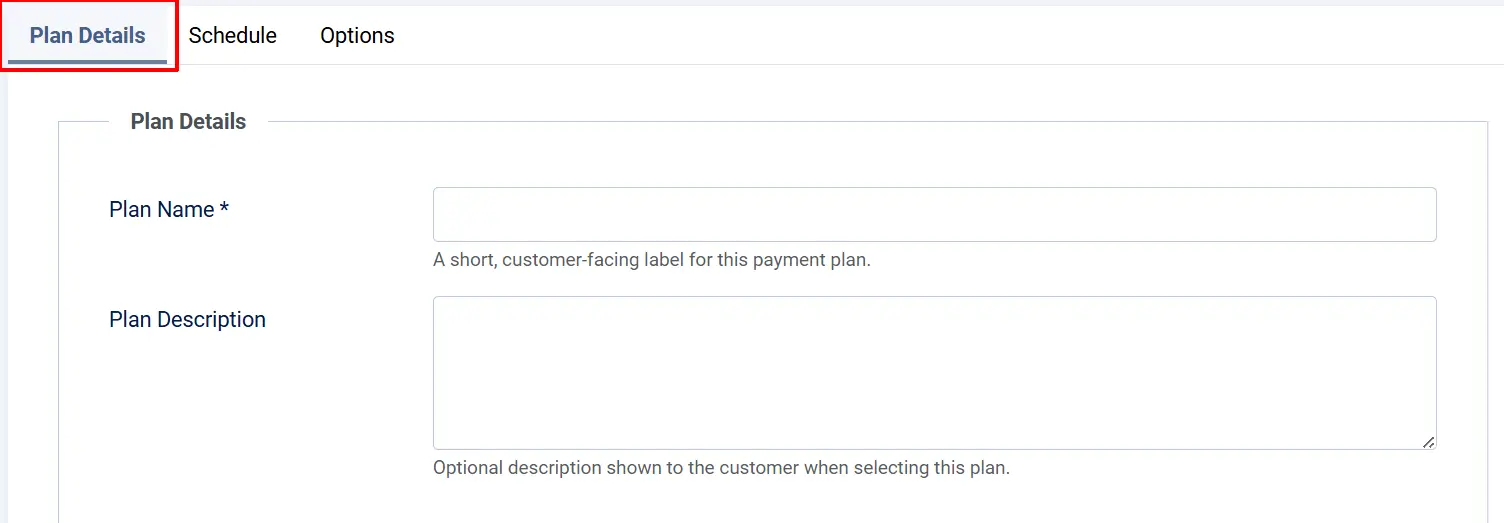
Plan Name: A short, customer-facing label (e.g., "3 Monthly Payments"). This appears on the product page and cart.
Plan Description: Optional text shown to the customer when they select the plan.
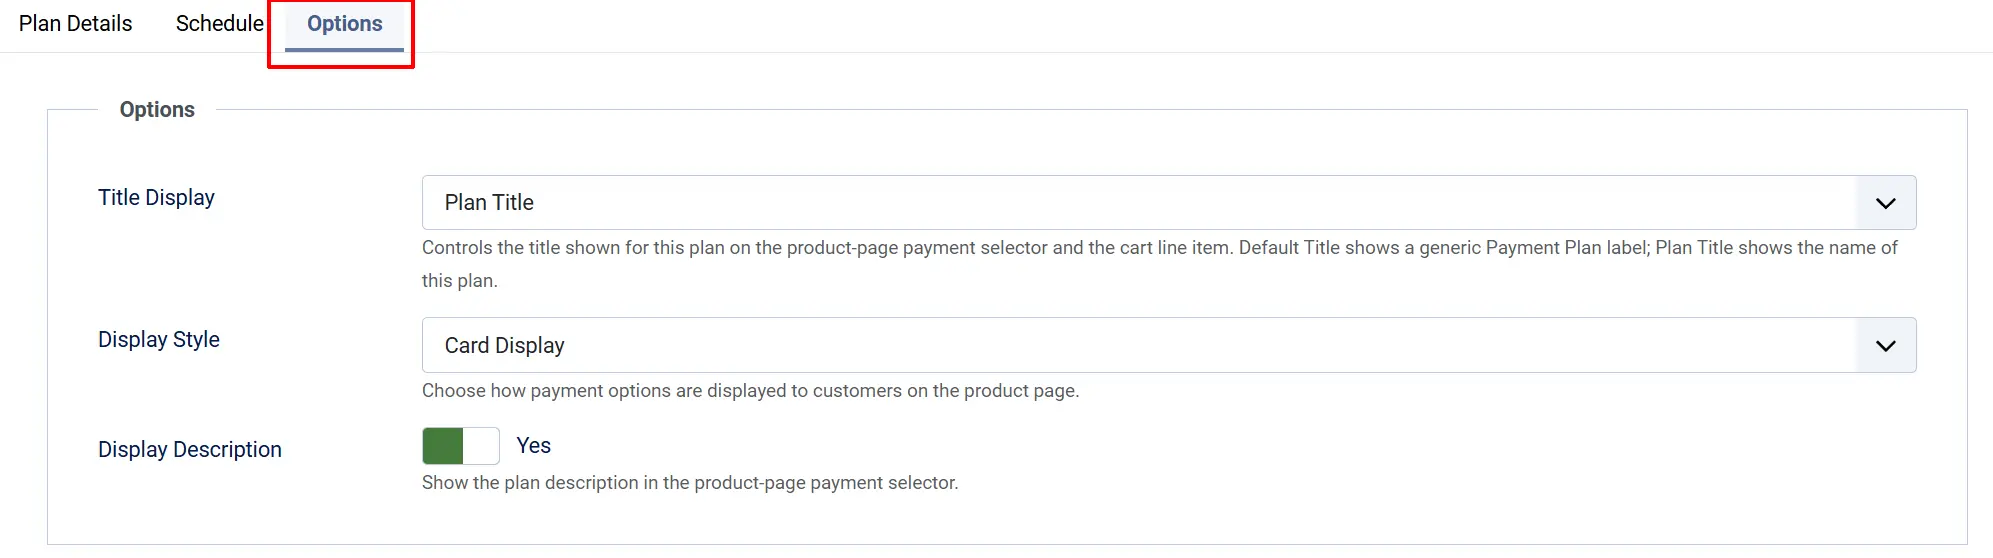
Then open the Options tab to set display preferences:
Display Style: How the payment option cards appear on the product page.
- Card Display — each option shows as a visual card (default)
- Radio Display — a compact radio-button list
Display Description: Show or hide the plan description text in the product-page payment selector.
Visible at Checkout: When off, this plan is not offered to customers at checkout but remains available for admin assignment. Useful for plans in draft or plans used only on specific products.
Title Display: Controls the label shown in the cart line item.
- Default Title — shows a generic "Payment Plan" label
- Plan Title — shows the actual plan name
Schedule tab
Then open the Schedule tab to build the installment timeline.
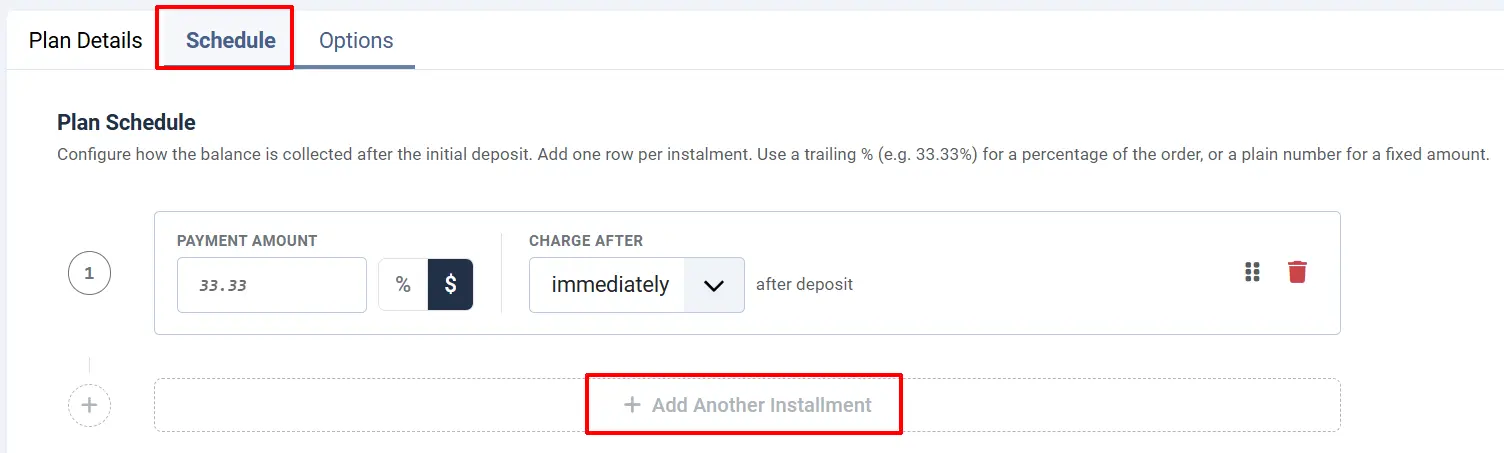
- Click Add Installment to add a row.
- Enter the Payment amount for that installment. Use a trailing
%(e.g.33.33%) for a percentage of the order total, or a plain number for a fixed amount in your store currency. - Set When the payment is charged using an interval after the deposit: Days, Weeks, Months, or Years.
- Drag rows to reorder them.
The Schedule preview updates as you type and shows whether the total across all rows adds up to 100% (or the full order amount for fixed plans). Click Save when the preview shows the full amount is allocated.
Use the Duplicate and Reset Schedule to Defaults toolbar buttons when building multiple similar plans to save time.
Options tab
Title Display: Controls the title shown for this plan on the product-page payment selector and the cart line item. Default Title shows a generic Payment Plan label; Plan Title shows the name of this plan.
Display Style: Choose how payment options are displayed to customers on the product page.
Display Description: Show the plan description in the product-page payment selector.
Enabling Partial Payment on a Product
Each product can use the storewide defaults or set its own deposit terms. There are three ways to reach a product.
Option A: Go to the J2Commerce icon at the top right corner -> Catalog -> Products
Option B: Go to Components on the left sidebar -> J2Commerce -> Products
Option C: Go to Content -> Categories -> find the category, then open the product
Open the product, click the J2Commerce tab, then the Apps tab, and find the Partial Payment section.
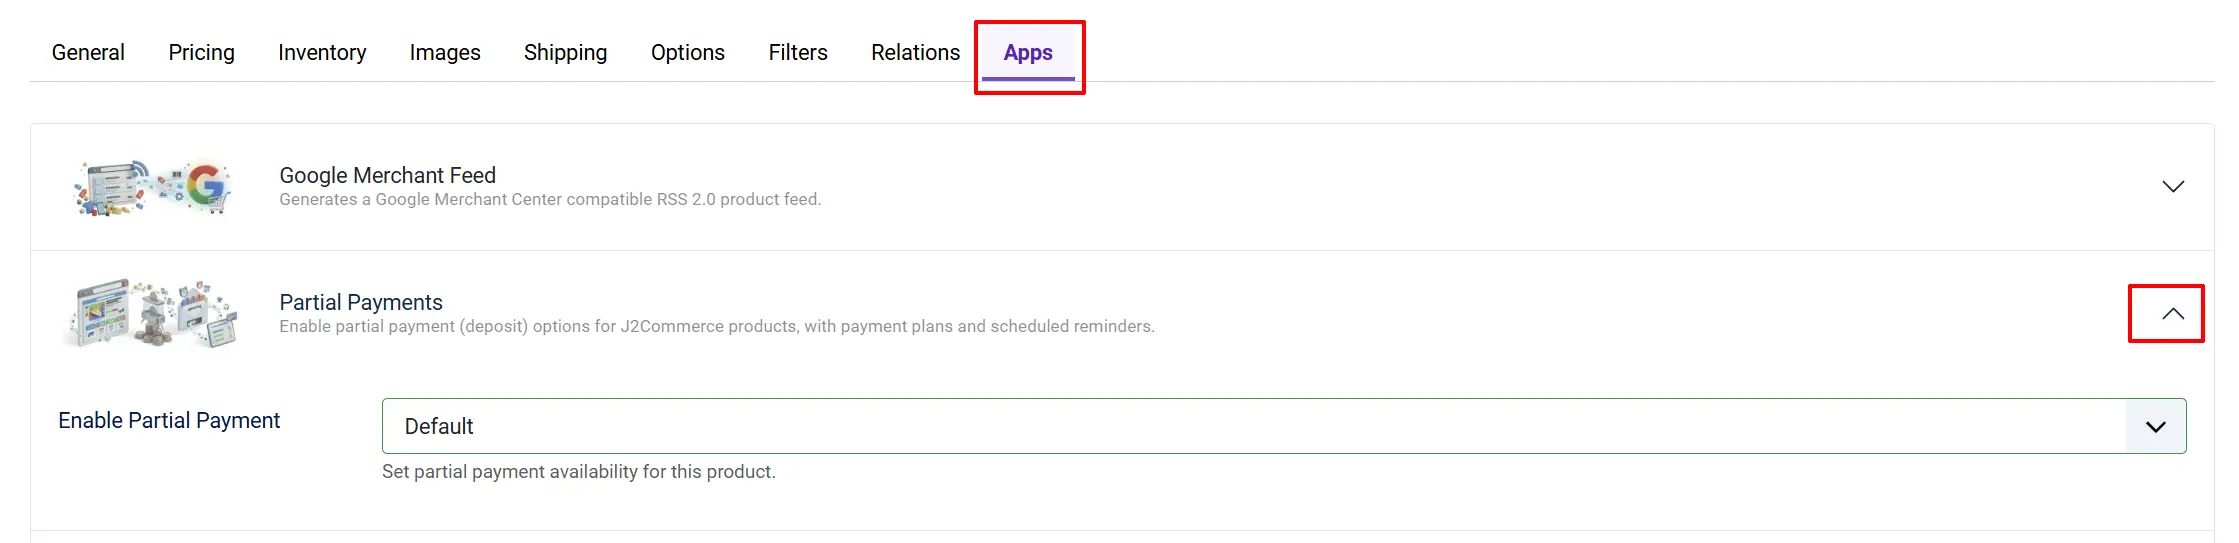
Enable Partial Payment: Set this product's availability.
- Disabled — partial payment is off for this product, even if the storewide default is on
- Enabled (Required) — every buyer must pay a deposit for this product
- Enabled (Optional) — the customer chooses full payment or a deposit
Pre-Selected Payment Option: (appears only when set to Enabled (Optional)) Which option is pre-ticked on the product page — Full Payment or Partial Payment.
Partial Payment Type: (appears when not Disabled) Whether the deposit is a Percentage of the price or a Fixed Amount.
Deposit Amount: (appears when not Disabled) The deposit for this specific product. Overrides the storewide default amount.
Payment Plans: (appears when not Disabled) The plans offered for this product. Overrides the storewide plan list.
Example: An $800 photography course where you want a $200 deposit — set Partial Payment Type to Fixed Amount, Deposit Amount to 200, and Enable Partial Payment to Enabled (Required). Every buyer pays $200 at checkout; the remaining $600 is collected later according to the plan schedule.
How It Works
When a customer reaches a product page or checkout:
- J2Commerce checks whether Partial Payment is enabled for that product (or uses the storewide setting).
- If it is optional, the customer sees a Pay in Full / Pay Deposit choice. If it is required, the deposit is applied automatically.
- At checkout the customer pays only the deposit amount through their chosen payment method. The order total on the order record reflects the full purchase price, while the gateway charges only the deposit due today.
- The remaining balance is saved as one or more scheduled child orders using your Scheduled Order Status.
- When an installment's due date arrives, the cron activates it and either emails the customer a Pay Now link or auto-charges a saved card, depending on your settings.
- The customer pays from the Pay Now link, and a confirmation email is sent for each completed installment.
Customer Experience
Product Detail Page
When partial payment is optional, a toggle appears near the add-to-cart button:
- Pay in Full — proceeds normally at the full price
- Pay Deposit — shows the deposit label, e.g. "Pay a 30% deposit" or "Pay a deposit of $150"
When a payment plan is offered, a plan selector also appears so the customer can choose their preferred installment schedule.
When partial payment is required, the deposit label shows without a toggle and the customer proceeds directly with the deposit.
Cart
Line items using partial payment show a Deposit badge next to the product name. The order totals area adds two extra rows:
- Full Subtotal — the complete price before the deposit arrangement
- Future Payments — the balance still owed after today's deposit
Checkout
If you have set Allowed Payment Methods in the Checkout tab, only those gateways appear. The total shown in the sidecart follows your Payment Display setting — either the full order total or only the deposit due today.

Customer Profile — Pay Now and Schedule
After the deposit order is placed, the customer can view the remaining payment schedule in their account under My Profile -> Orders. When an installment becomes due, a Pay Now alert appears on the order with a direct link to complete the payment. A Payment Schedule view lists all installments, their amounts, and their due dates.

Cron Setup
The cron does two things: it activates scheduled installments when their due date arrives, and it sends payment-due and overdue reminder emails. Run it at least once a day. Running it more often (every few hours) means customers are notified sooner after a due date passes.
Option A — Joomla Scheduler
If a companion Joomla Task plugin is available for Partial Payments, you can wire the cron into the native System -> Scheduled Tasks area and no server-level cron is needed.
Option B — Server Cron
Copy the Cron URL from the General Settings tab and add it to your server's cron table.
cPanel example:
- Log in to cPanel and open Cron Jobs.
- Set the schedule to once daily (for example
0 6 * * *for 6:00 AM daily). - In the command field use:
curl -s "PASTE_YOUR_CRON_URL_HERE" > /dev/null 2>&1
Email Templates and Merge Tags
The app sends several types of email. Each has a built-in default body, and you can override the subject and body using the Email Templates manager (use the Push Email Templates buttons in the Mail Settings tab to seed the defaults).
| Email type | When it sends |
|---|---|
| Installment Due | When a scheduled installment becomes ready for payment |
| Overdue Reminder | On each day listed in Notify Payment Pending on (Days) after the due date |
| Deposit Received | Immediately after a deposit payment is confirmed |
| Admin Overdue Alert | When an overdue installment escalates with action Notify Admin |
| Installment Confirmed | After a later installment payment is received |
| Plan Complete | When the final installment is paid and the plan is finished |
| Payment Failed | When an automatic charge attempt fails |
| Schedule Created | When the deposit is placed and the installment schedule is set up |
Merge Tags
Use these tags in any custom email subject or body. They are replaced with real values when the email sends. Always include the square brackets exactly as shown.
| Merge tag | What it inserts |
|---|---|
[CUSTOMER_NAME] | The customer's name or email address |
[PARTIAL_PAYMENT_ORDER_ITEM_NAME] | The product name from the order |
[INVOICE_URL] | A link to the customer's order invoice |
[PAY_NOW_URL] | A direct link the customer uses to pay an outstanding installment |
[PARTIAL_PAYMENT_DATE] | The scheduled payment due date |
[PARTIAL_PAYMENT_DAYS_PASSED] | Days elapsed since the due date (for overdue reminders) |
[PAID_PARTIAL_AMOUNT] | The deposit already paid |
[PARTIAL_PAYMENT_FULL_AMOUNT] | The full order total |
[BALANCE_PARTIAL_AMOUNT] | The outstanding balance still owed |
[INSTALLMENT_INDEX] | This installment's number in the sequence |
[INSTALLMENT_TOTAL] | The total number of installments in the plan |
Coupon Restrictions
You can control how individual coupons interact with partial payment orders. When editing a coupon in J2Commerce -> Sales -> Coupons, look for the Partial Payment tab.
Coupon Restriction:
- No restriction — the coupon is accepted for any order (default)
- Deposit orders only — the coupon requires at least one partial payment product in the cart; it is rejected for full-payment-only carts
- Full payment orders only — the coupon is rejected when any partial payment product is in the cart
Tips
- Start small — test with one product set to Enabled (Optional) before turning partial payment on storewide.
- Run the cron daily — scheduled installments will not activate and reminders will not send without it.
- Keep plan names short — they appear on the product page and in the cart where space is limited.
- Use Upfront tax if your accounting requires the full tax amount collected at order time rather than spread across installments.
- Match the Framework setting to your active template (Bootstrap 5 or UIkit) so the payment selector looks right on the product page and cart.
- Note on subscription products: Partial Payments is not available for subscription products. If a cart contains a subscription, the partial payment option is automatically hidden.
Troubleshooting
The "Scheduled" order status is missing
Cause: The status was deleted after installation.
Solution: Go to J2Commerce -> Setup -> Order Statuses and add a status named Scheduled (a yellow or warning colour is a good visual choice). Then open the Partial Payments settings and select it in Scheduled Order Status.
Reminder emails are not sending
Cause: The cron is not running, Joomla email is not configured, or the email setting is off.
Solution:
- Open the Cron URL in a browser and look for a success message to confirm it runs.
- Check Joomla email at System -> Global Configuration -> Server and send a test email.
- In the Mail Settings tab, confirm Send Email When Order Is Ready for Payment is Yes.
- Enable Debug in General Settings, run the cron again, then check the J2Commerce log for error messages.
The balance shows in the wrong currency
Cause: The store currency or exchange rate changed after the original deposit order was placed. Existing installment orders keep the currency from the original order.
Solution: For new orders, make sure the currency switcher is set correctly before the customer adds to the cart. Verify the J2Commerce currency plugin is enabled and exchange rates are current.
Customers can still select a restricted payment method
Cause: The gateway restriction is not saved, or the field is empty (which allows all methods).
Solution: Open J2Commerce -> Apps -> Partial Payments -> Checkout tab and confirm only the intended gateways are listed in Allowed Payment Methods (an empty field means all gateways are allowed). Save, then clear the Joomla cache at System -> Clear Cache.
The Pay Now button does not appear
Cause: The installment has not yet been activated by the cron, or the customer is viewing the parent deposit order instead of a child installment order.
Solution:
- Confirm the installment order's status matches your Scheduled Order Status.
- Confirm the cron has run at least once since the installment due date passed.
- Ask the customer to view the individual installment order in their account, not the original parent order.
The partial payment option does not appear on a product
Cause: The product or storewide setting has partial payment set to Disabled, or the app itself is not enabled.
Solution:
- Go to J2Commerce -> Apps and confirm Partial Payments has a green checkmark.
- Open the product, go to the J2Commerce tab, then Apps, and check the Enable Partial Payment setting.
- If the product setting is Disabled, change it to Enabled (Required) or Enabled (Optional) and save.
Automatic charge fails silently
Cause: The payment gateway does not support the auto-charge event, or the customer has no saved card on file.
Solution: Confirm your payment gateway plugin supports saved-card vaulting and the onJ2CommercePartialPaymentChargeInstallment event. If not, set Enable Automatic Charge to No and rely on the Pay Now email flow instead.
Related Topics
- Payment Methods — configure the gateways available at checkout
- Store Setup — manage order statuses and global configuration
- Apps and Extensions — browse all J2Commerce add-ons