BaseLinker Integration
The BaseLinker Integration app connects your J2Commerce store to BaseLinker — a multi-channel e-commerce management platform that centralises orders, inventory, and shipments from marketplaces like Amazon, eBay, and Allegro. Once connected, J2Commerce automatically pushes new orders and product stock to BaseLinker and pulls shipping tracking numbers and order status changes back into your store.
Requirements
- PHP 8.3.0+
- Joomla! 6.x
- J2Commerce 6.x
- An active BaseLinker account with API access
Purchase and Download
The BaseLinker Integration app is a separate add-on available from the J2Commerce Extensions Store. It is not included with the core J2Commerce 6 component.
Step 1: Go to the J2Commerce website -> Apps.
Step 2: Locate the J2Commerce - BaseLinker Integration app -> click View Details -> Add to cart -> Checkout.
Step 3: Go to My Downloads under your profile menu at the top right corner and search for the app. Click Available Versions -> View Files -> Download.
Install the App
You can install this BaseLinker Integration App using the Joomla installer. The following steps help you with a successful installation.
In the Joomla admin, go to System -> Install -> Extensions
Upload the BaseLinker Integration zip file or use the Install from URL option.
 (1)-a6689f12b23b8e992f5c2a169737672f.webp)
Enable the App
Once you have installed the App, you will need to enable it. There are two ways you can access the extension.
Option A: Go to the J2Commerce icon at the top right corner -> Apps
Option B: Go to Components on the left sidebar -> J2Commerce -> Apps
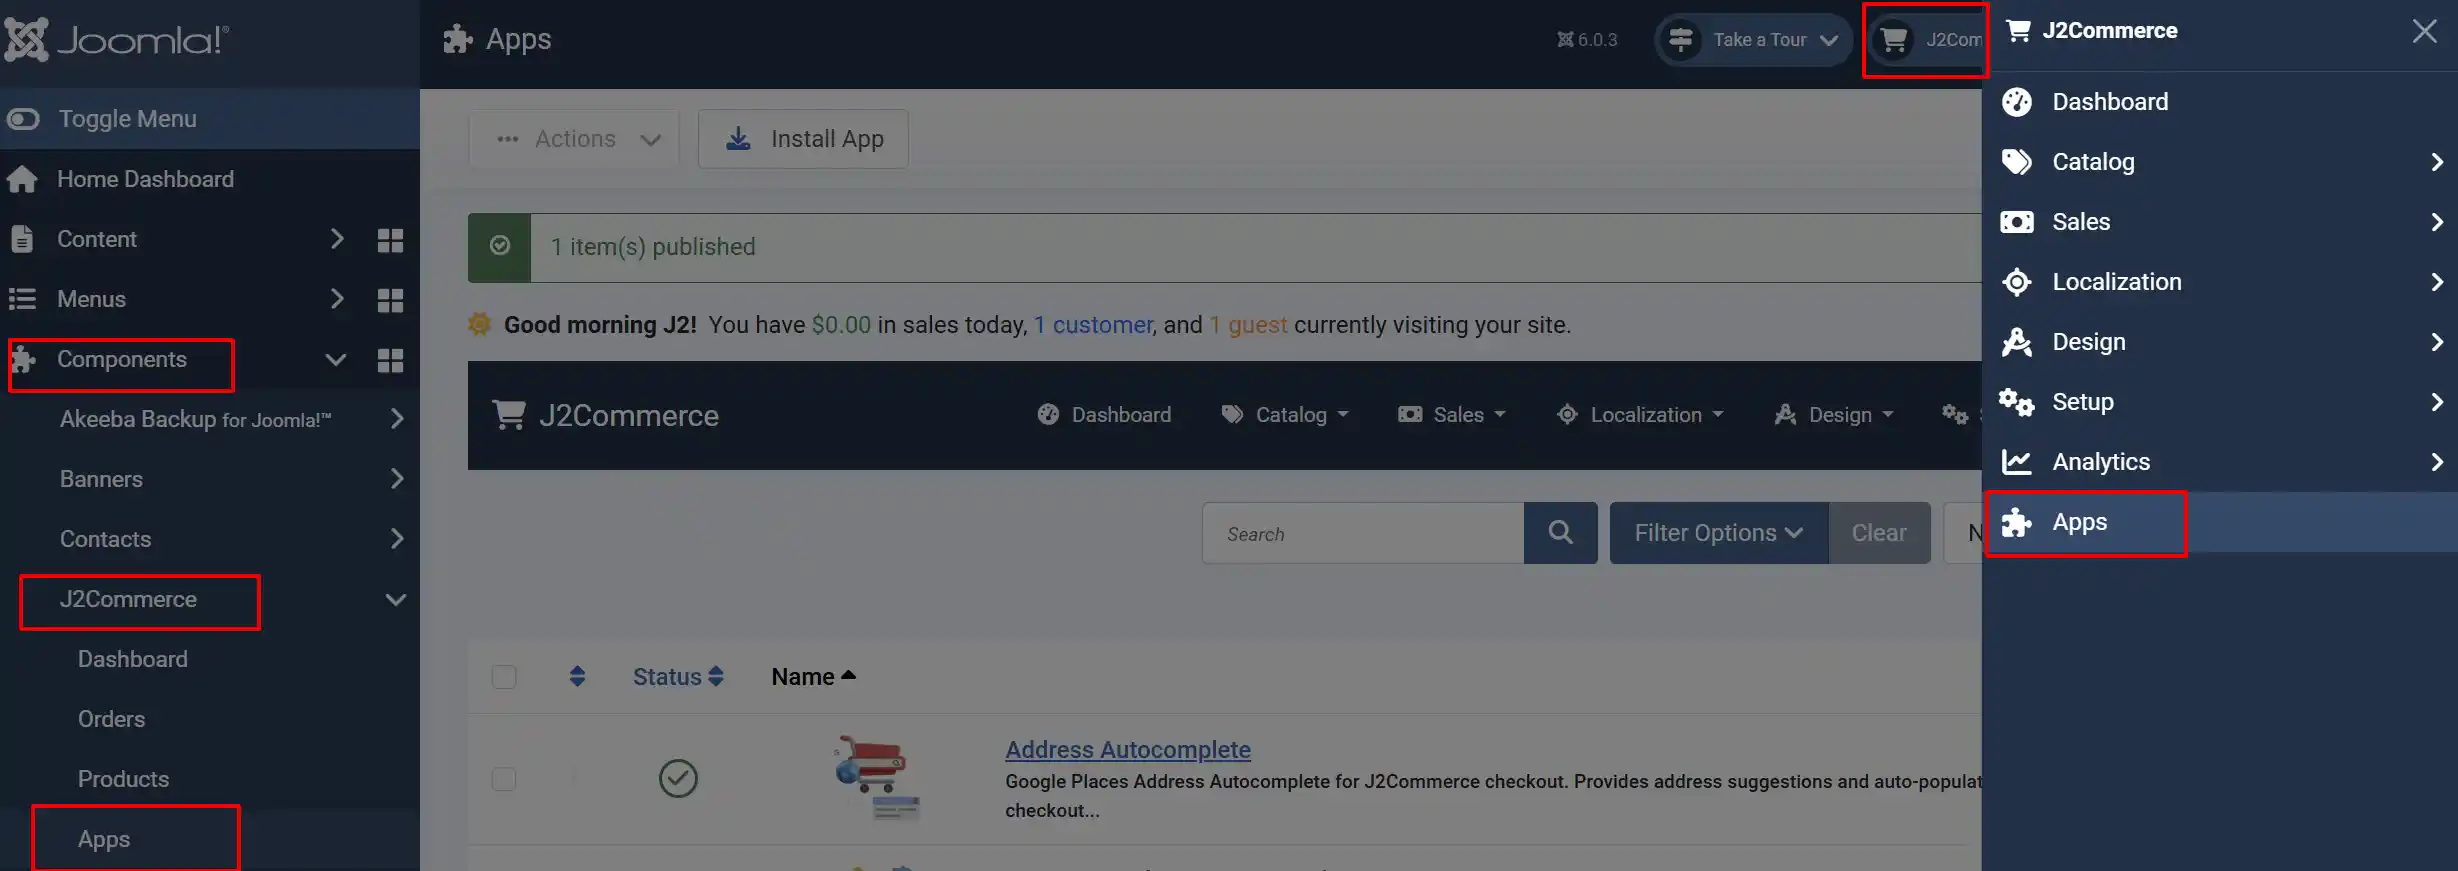
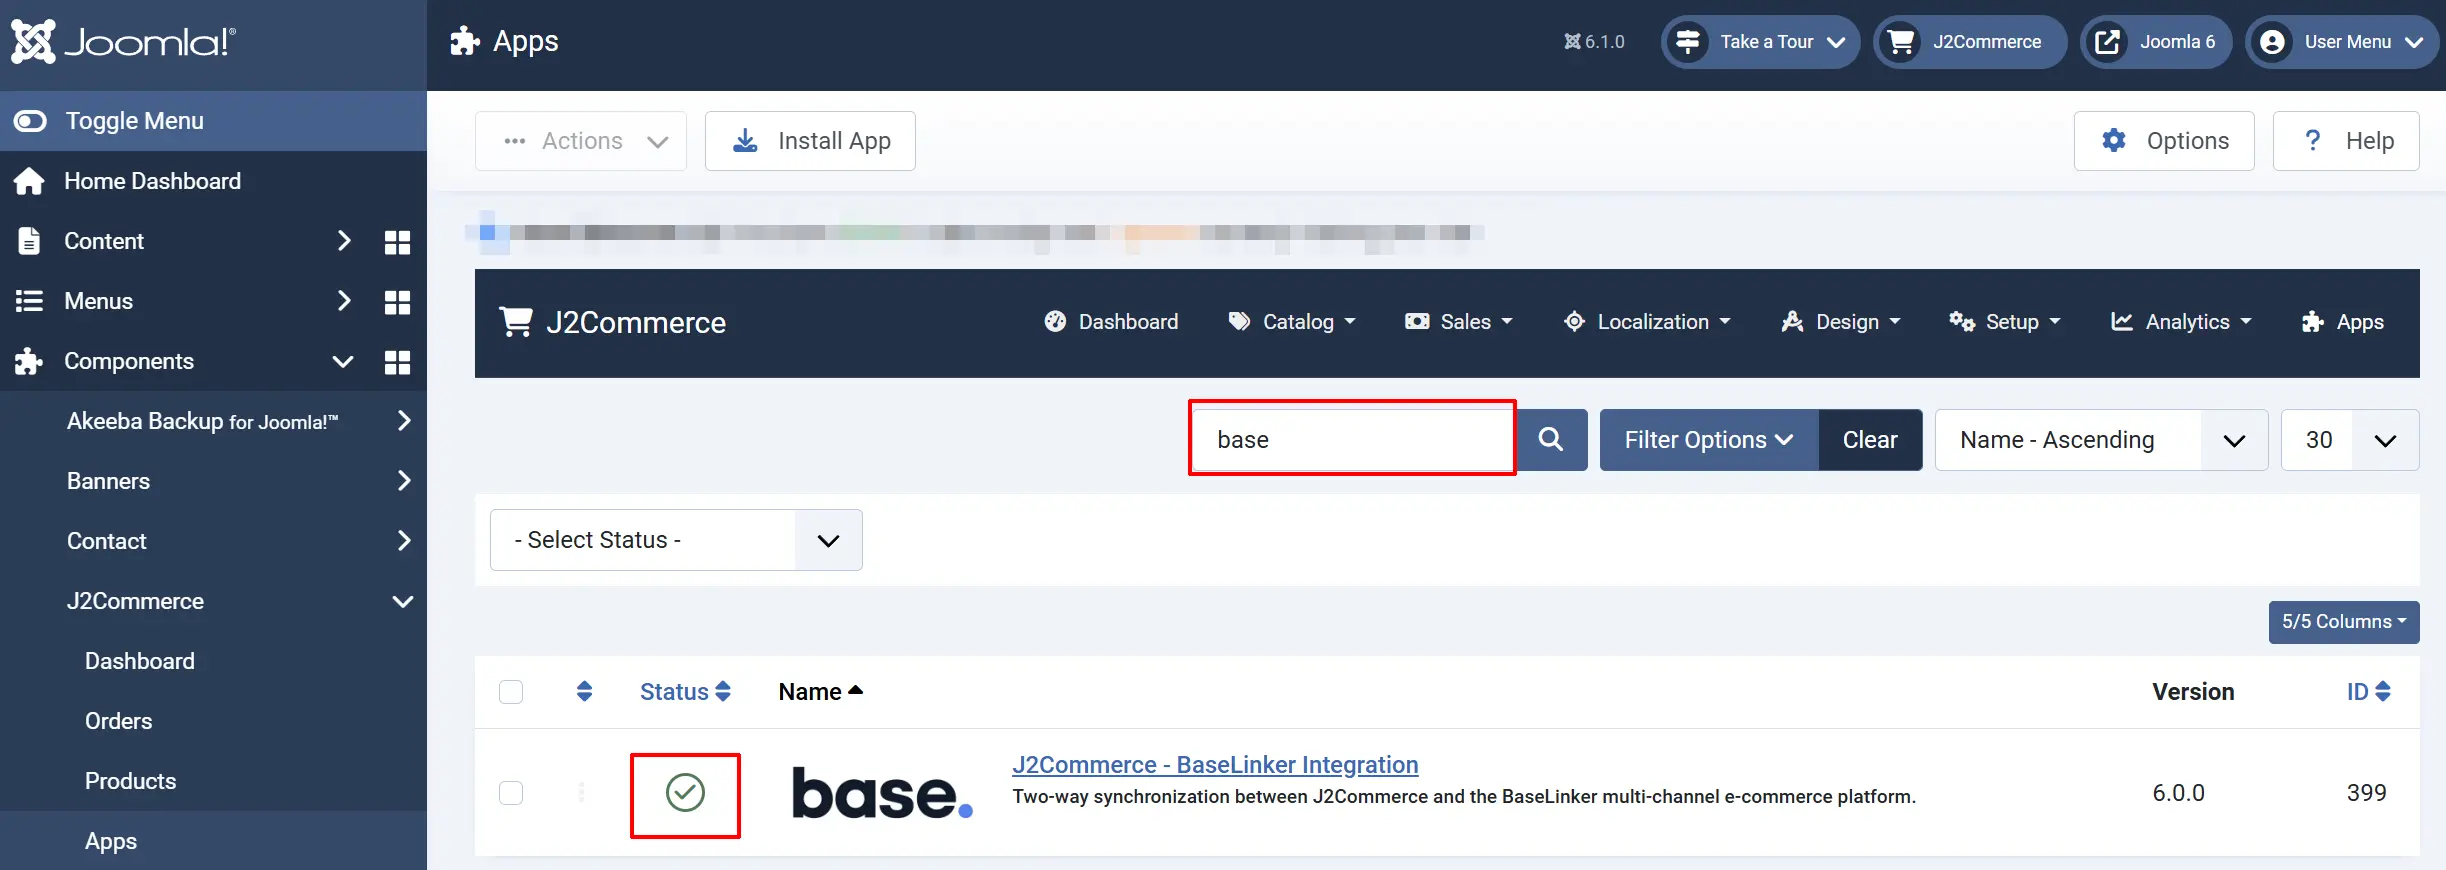
Search for J2Commerce - BaseLinker Integration, click the X, and it will turn into a green checkmark. It is now enabled and ready for setup.
Configure the App
Click the BaseLinker Integration title next to the green checkmark to open its settings. The configuration is split into four tabs.
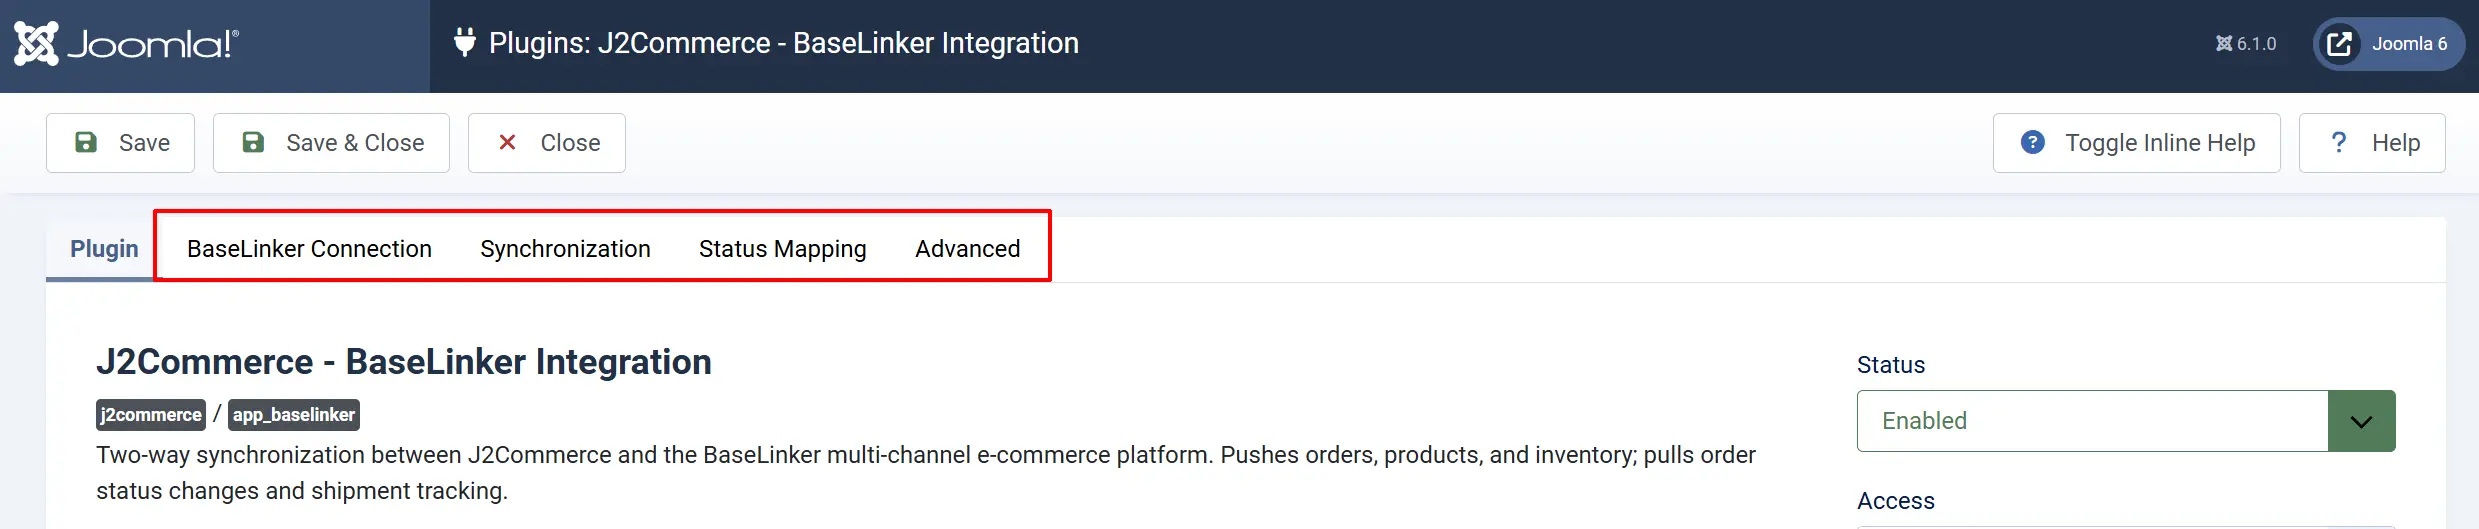
Click the Toggle Inline Help button at the top of any app to show a description below each field.
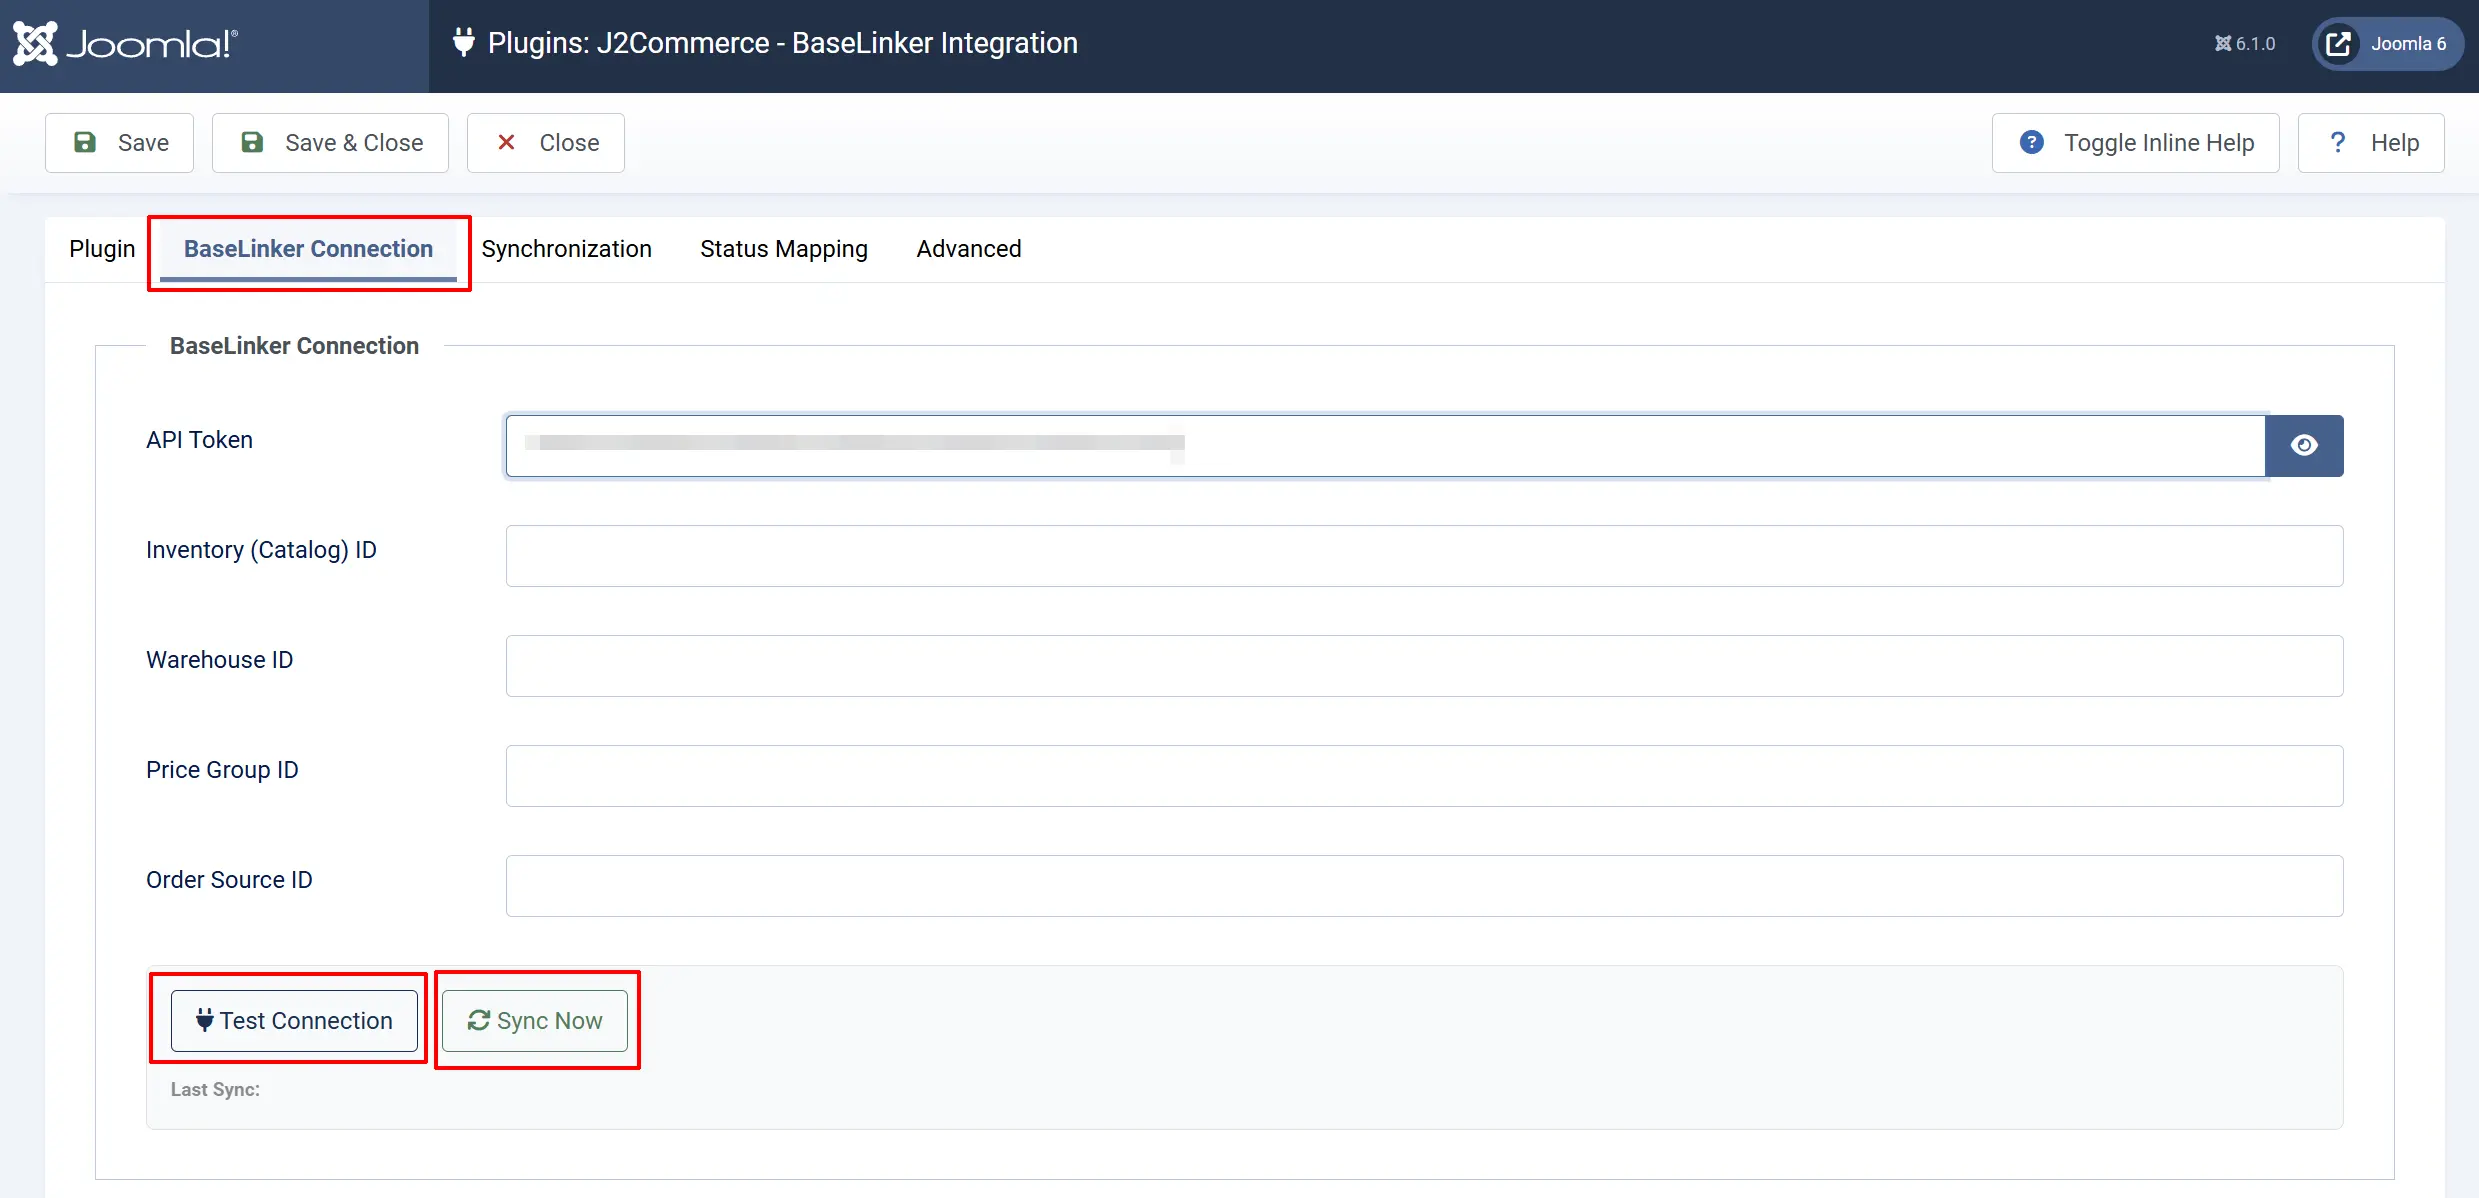
Connection Tab

This tab connects J2Commerce to your BaseLinker account.
Login / Create your BaseLinker Account. https://login.baselinker.com/
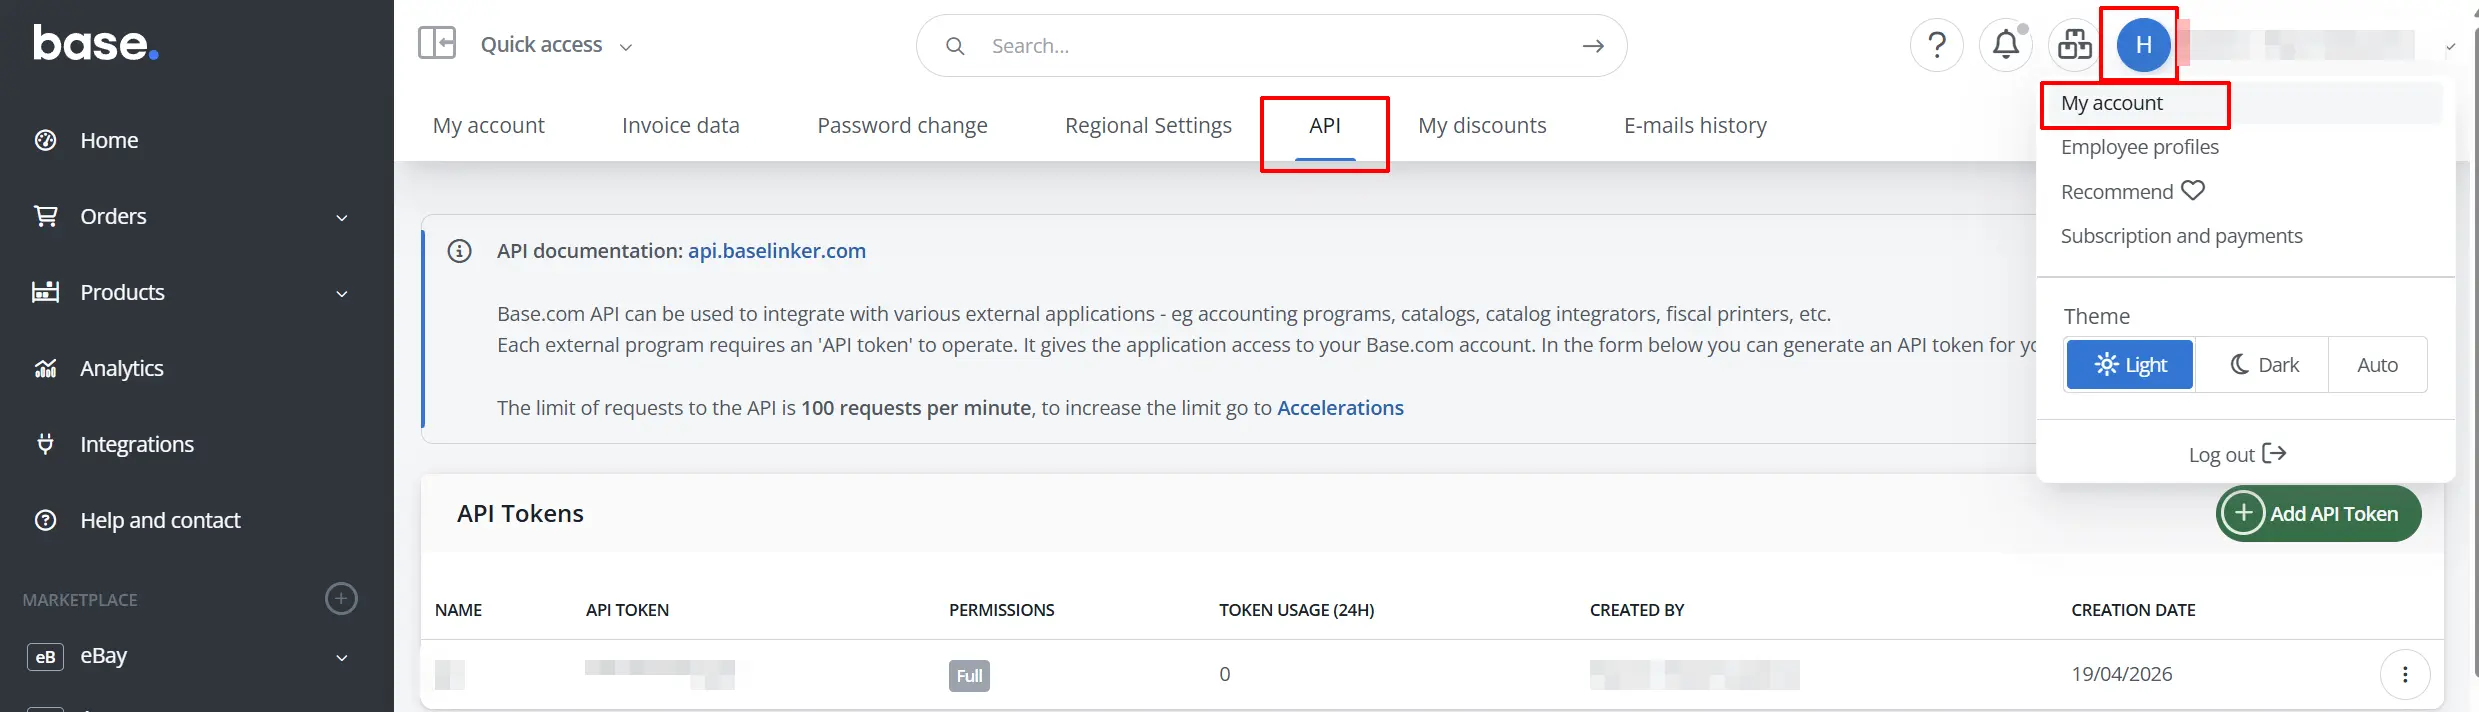
API Token: Your BaseLinker API token. Obtain it from your BaseLinker account under My Account -> API.
After entering the API Token in the App, click Save, before entering anything else or selecting the Test Connection button. If you don't save it, then you may receive an invalid Token error message when selecting the Test Connection or Sync buttons
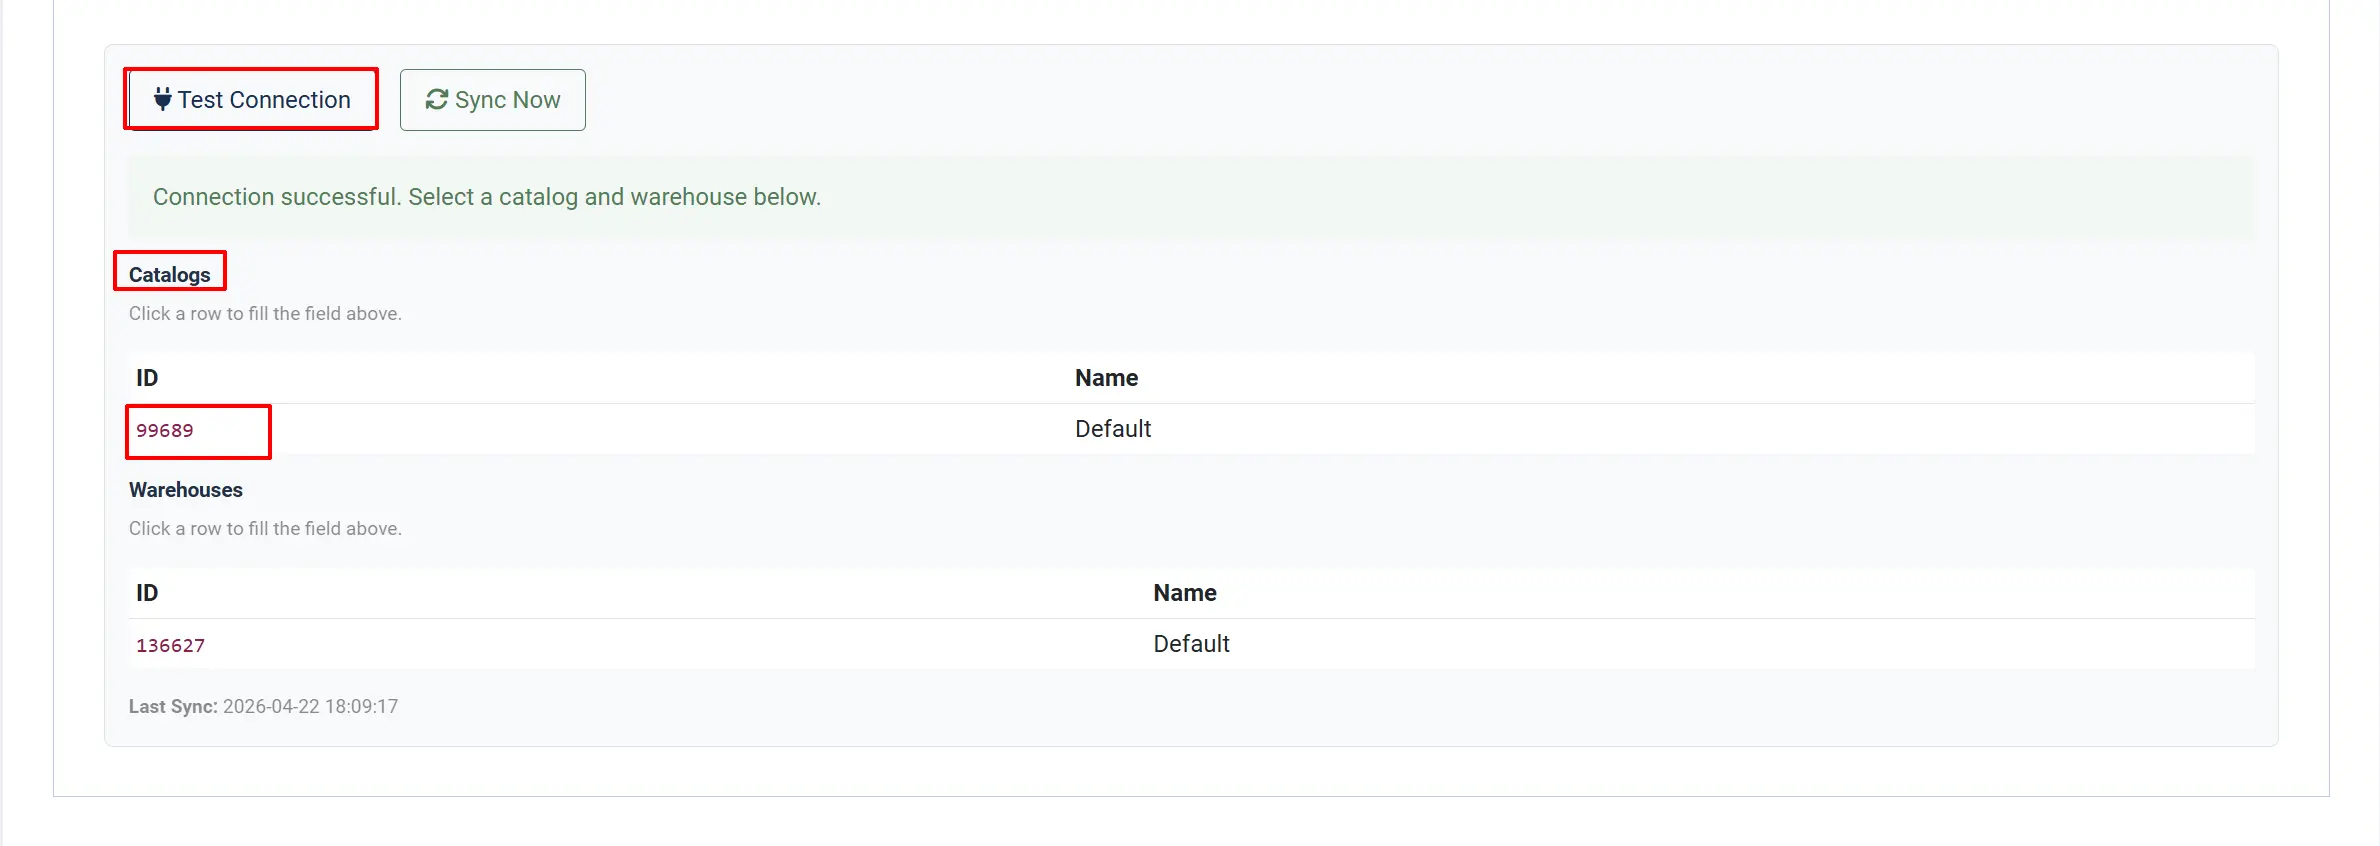
Inventory (Catalog) ID: The target catalog ID in BaseLinker where products will be pushed. Target catalog ID in BaseLinker. Use the Test Connection button to list available catalogs.
-
Click the Test Connection button to list your available catalogs.
-
Click on the Red ID number and it will automatically place it in the Catalog ID section
Warehouse ID: The warehouse in BaseLinker that receives stock level updates. Order Source ID: The source ID BaseLinker assigns to orders imported from J2Commerce. Find this in BaseLinker under your store source settings.
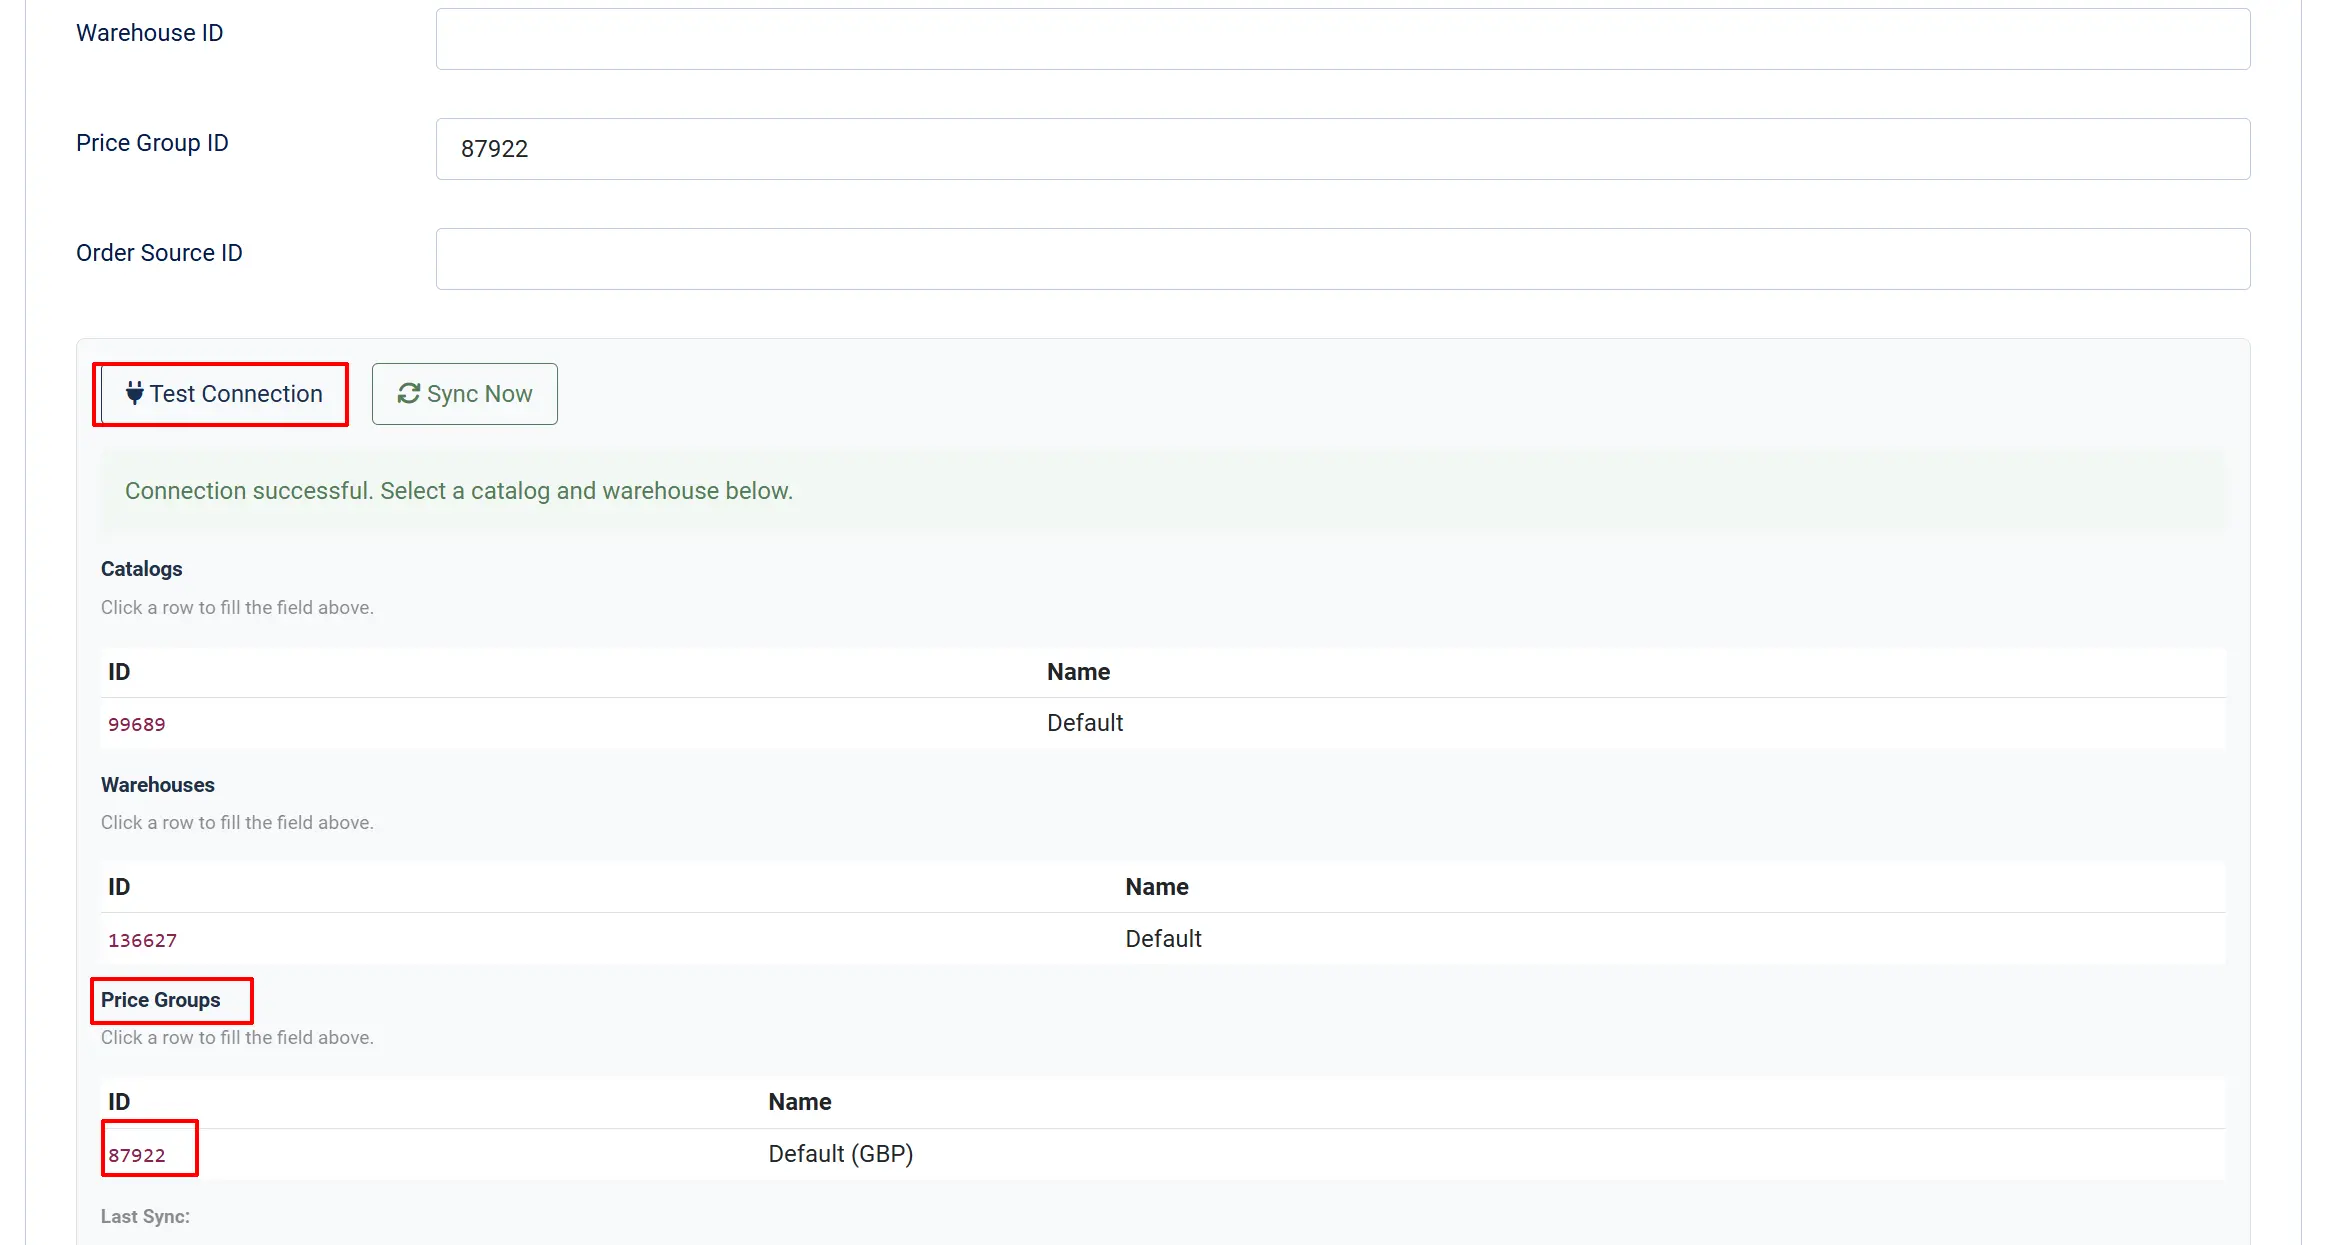
Price Group ID: Price group for product prices. Use Test Connection to list available price groups for the selected inventory.
-
Click the Test Connection button to list your available Price Group.
-
Click on the Red ID number and it will automatically place it in the Price Group section
Actions panel:
- Test Connection — Verifies your API token and lists your BaseLinker warehouses. Run this after entering your token to confirm the connection before saving.
- Sync Now — Triggers a full manual synchronisation immediately: pushes eligible orders and products, then pulls status changes and tracking info.
Synchronization Tab
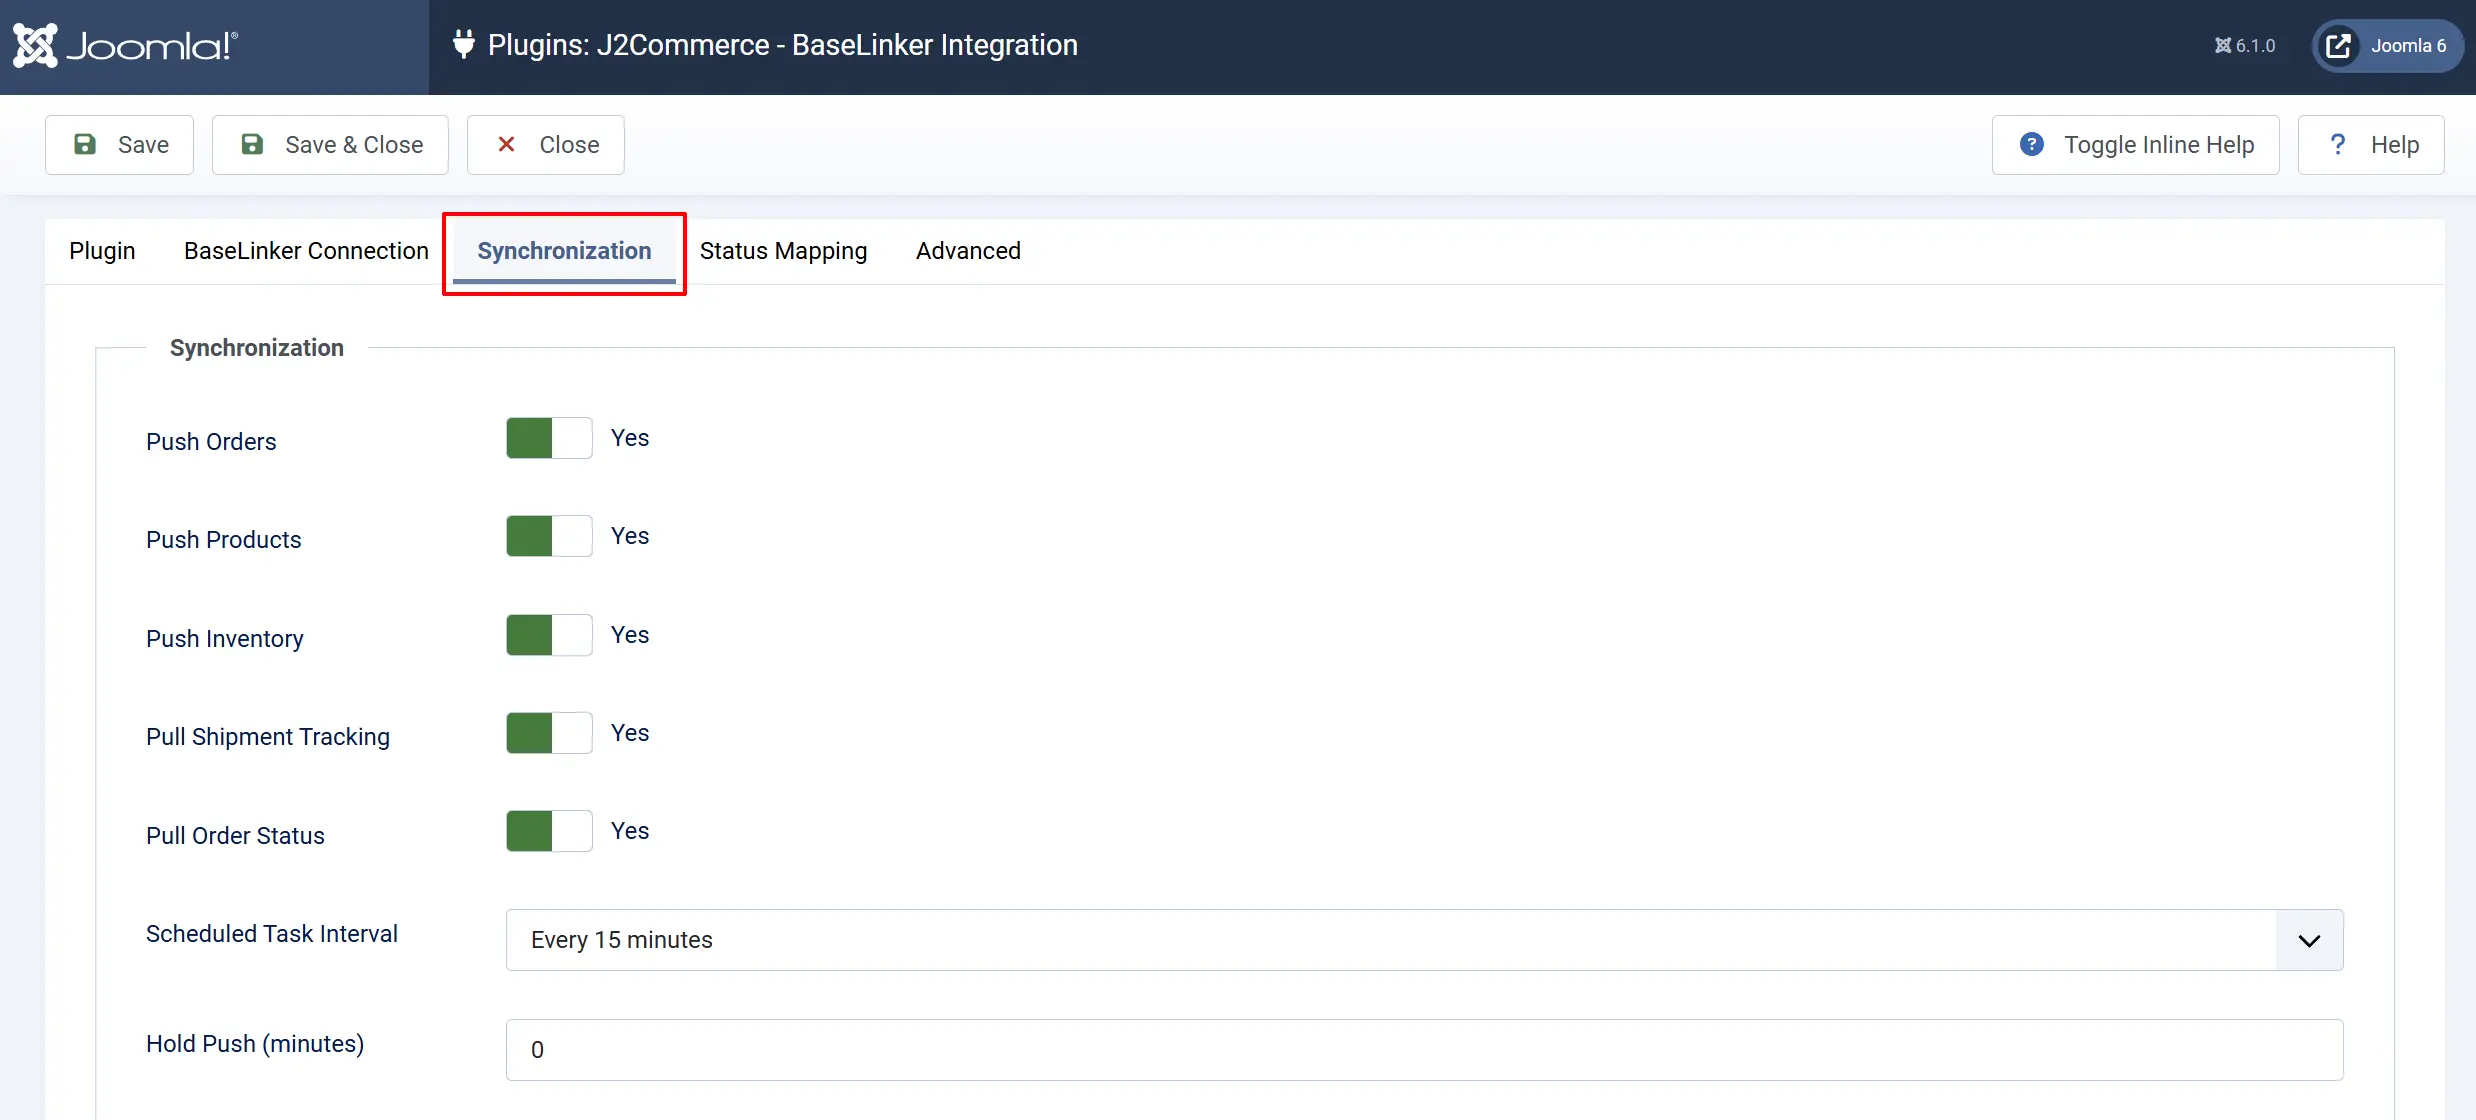
Control which data types sync and how often background syncs run.
Push Orders: Send new J2Commerce orders to BaseLinker after payment.
Push Products: Push product details to the BaseLinker catalog when a product is saved.
Push Inventory: Push current stock levels to BaseLinker during scheduled syncs.
Pull Shipment Tracking: Pull courier codes and tracking numbers from BaseLinker back into J2Commerce orders.
Pull Order Status: Update J2Commerce order statuses when BaseLinker reports a status change.
Scheduled Task Interval: How often background syncs run automatically (Every 15 minutes / 30 minutes / 1 hour / 6 hours).
Hold Push (minutes): Delay in minutes before a newly paid order is eligible to push to BaseLinker. Useful for correcting order errors before they reach BaseLinker (0–1440).
Status Mapping Tab
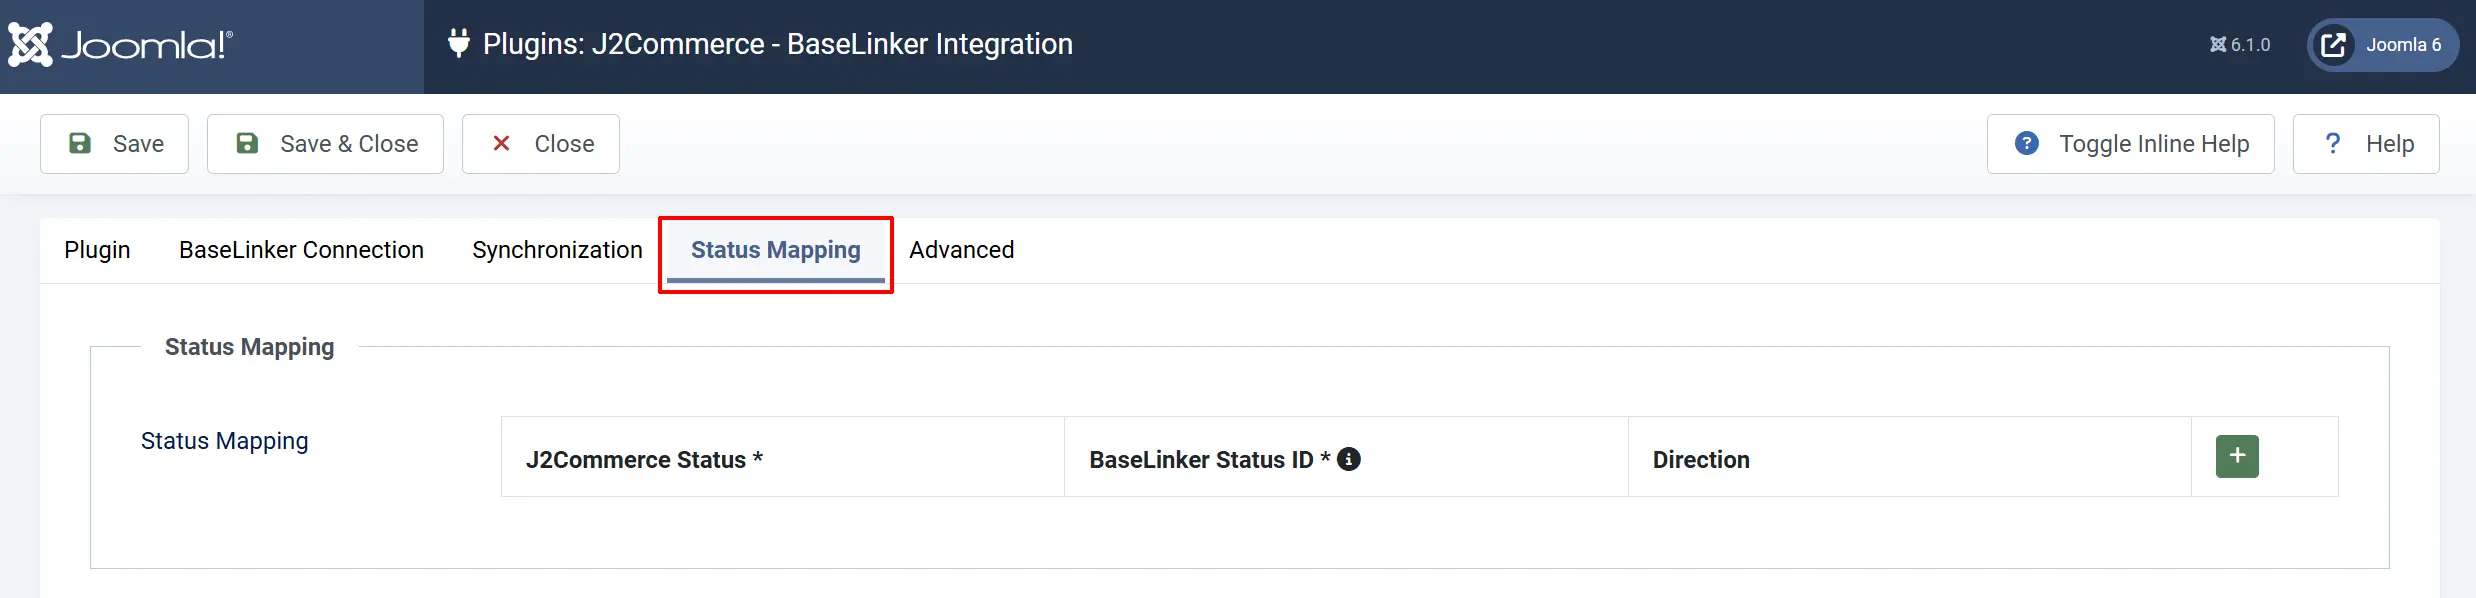
Map J2Commerce order statuses to BaseLinker status IDs so the two systems stay in sync.
Each row in the mapping table has three fields:
J2Commerce Status: The J2Commerce order status (Confirmed, Processing, Shipped, etc.).
BaseLinker Status ID: The numeric status ID from BaseLinker. Find your status IDs via the BaseLinker admin panel under Order Statuses.
Direction: Push only — update BaseLinker when J2Commerce changes. Pull only — update J2Commerce when BaseLinker changes. Both — sync in both directions.
Click Add Item to add a new mapping row. You can create as many rows as needed to cover every status you want to keep in sync.
A status with no mapping row is not synchronised in that direction. If you only want to push "Shipped" to BaseLinker but not pull it back, set Direction to Push only.
Advanced Tab
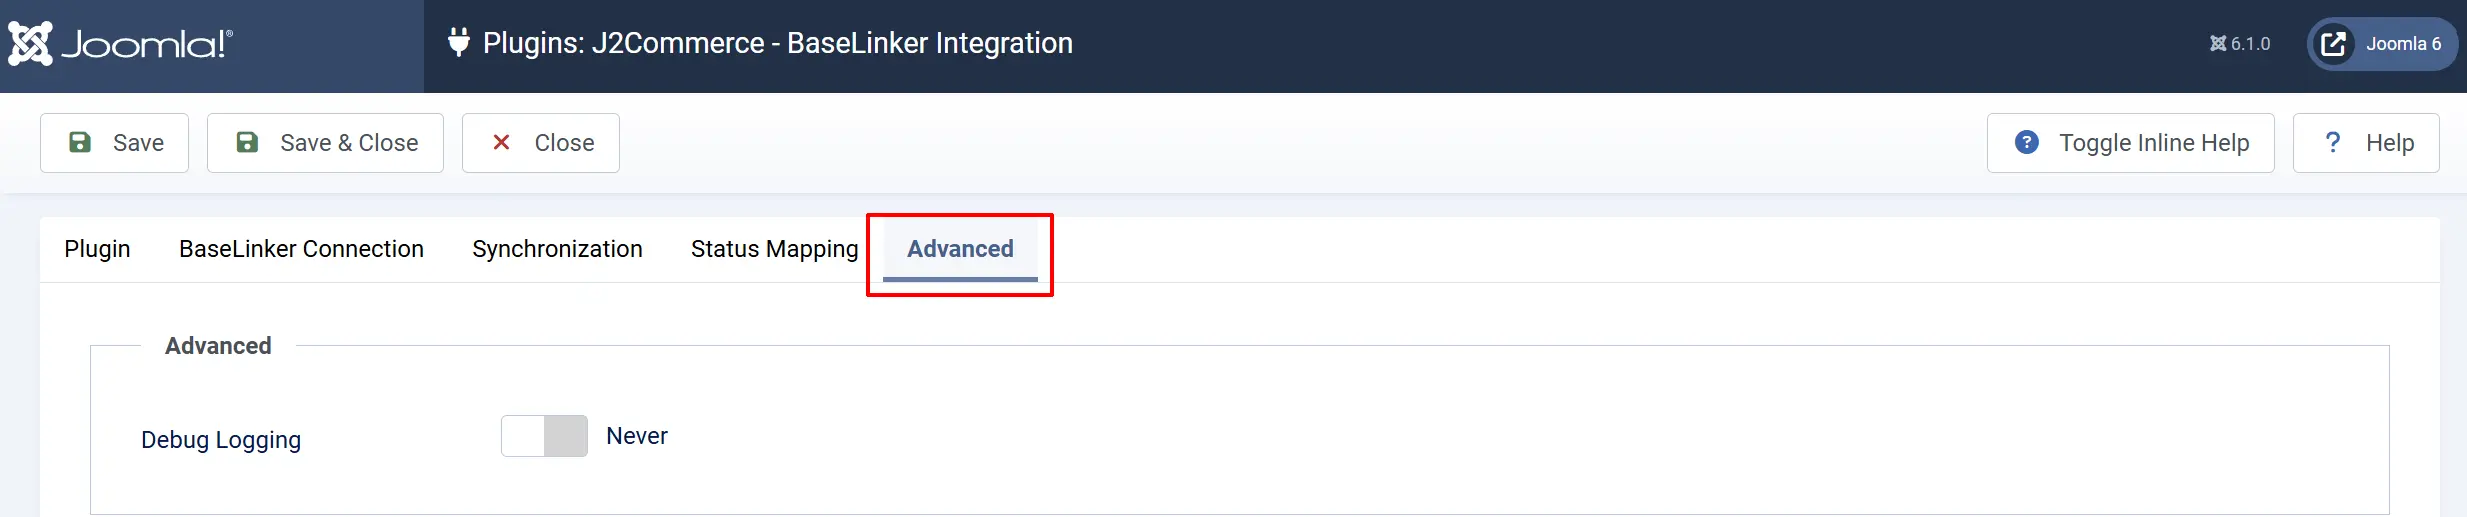
Debug Logging: Log every API call to administrator/logs/plg_j2commerce_app_baselinker.log.php. Useful for diagnosing sync problems. Disable in production.
Once you have completed the app configuration, open any product you have created and click Save and Close. By doing this, it activates all of the products
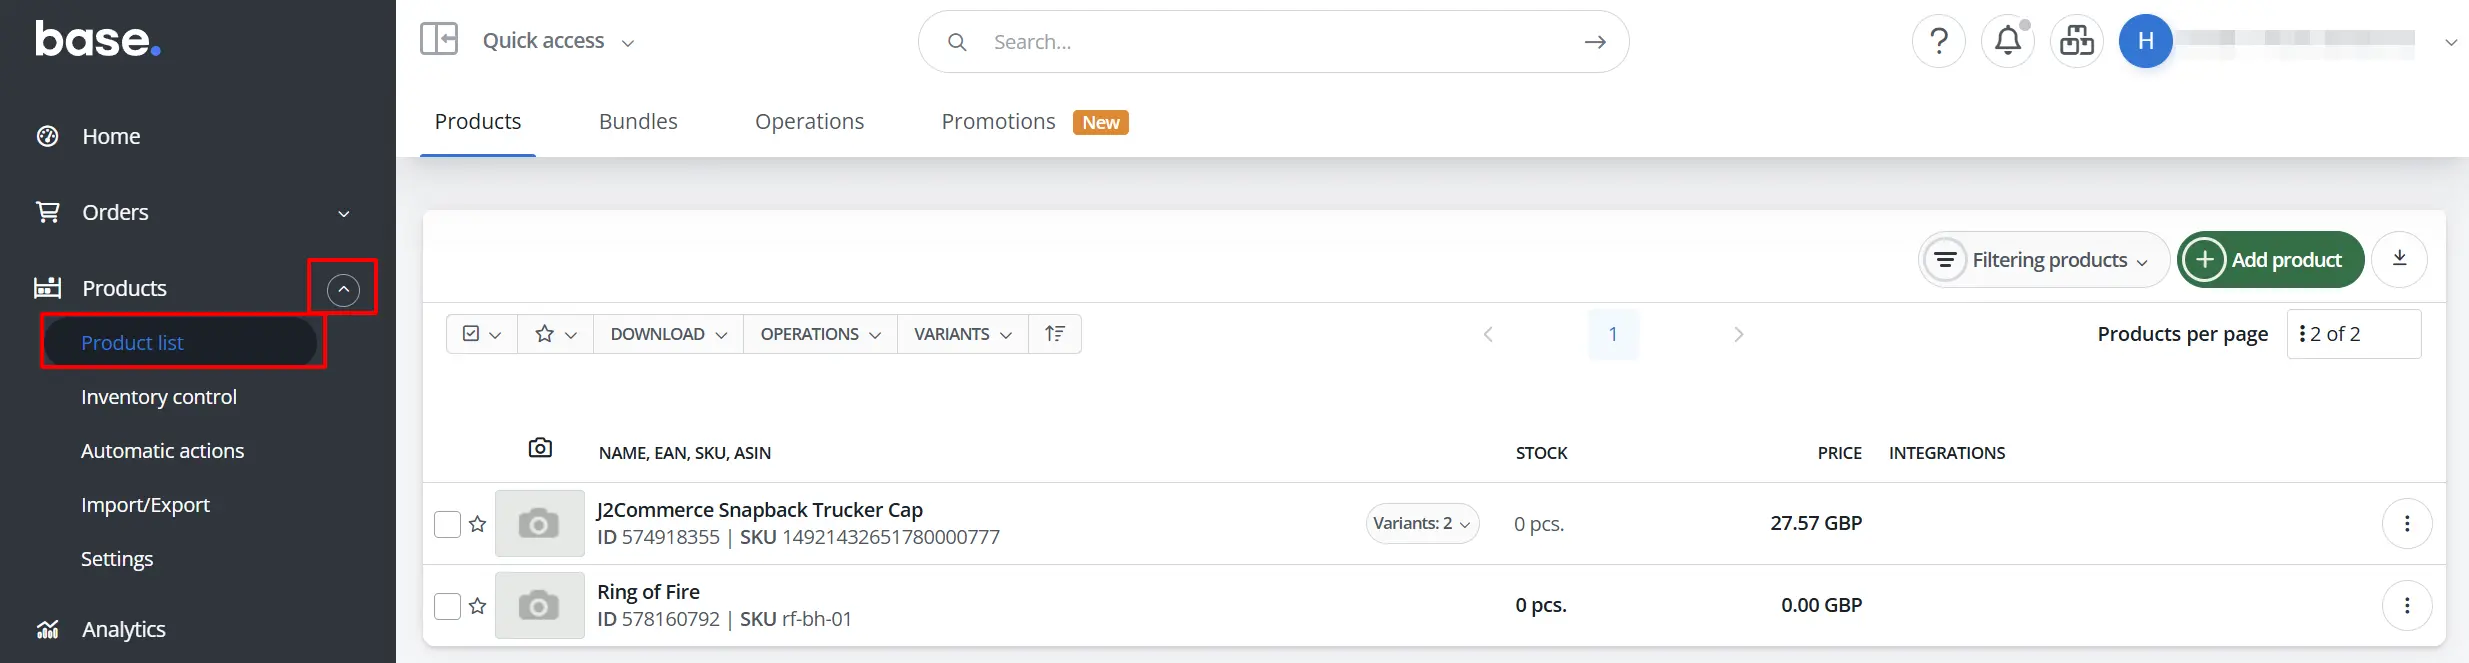
Linking Products to your Base account
Step 1: After configuring the app, open any product and then click Save and Close. By doing that, it activates the app and pushes the products through to Base.com.
Step 2: Open your Base account. Click on Products (on the left panel) -> Product List to verify your products have been linked to your Base Account.
How It Works
Pushing Orders to BaseLinker
When a customer completes payment, J2Commerce automatically pushes the order to BaseLinker. The order includes the customer's billing and shipping address, all order lines, and payment details. Each order is only ever pushed once — if a sync error occurs and you click Sync Now, J2Commerce skips orders that were already sent successfully.
If you set a Hold Push delay, the order waits that many minutes before becoming eligible to push. This gives you time to review or correct the order in J2Commerce first.
Pushing Products and Stock
When you save a product in J2Commerce, the product's details (SKU, price, weight) are pushed to your BaseLinker catalog. Stock levels are updated during each scheduled sync. If a product's details have not changed since the last push, it is skipped to avoid unnecessary API calls.
Pulling Order Status Changes
BaseLinker tracks status changes as an activity journal. During each scheduled sync, J2Commerce reads that journal and updates matching orders using the Status Mapping rules you configured. Only statuses with a Pull only or Both direction mapping are applied.
Pulling Shipment Tracking
For orders with a Shipped or Delivered status, J2Commerce queries BaseLinker for associated shipment packages and saves the courier code and tracking number to the order. A note is also added to the order history so you can see when tracking was retrieved.
Scheduled Syncs
Background syncs run automatically based on your Scheduled Task Interval setting. They require the Joomla Scheduled Tasks plugin (plg_task_j2commerce) to be enabled. You can verify it is active by going to System -> Manage -> Extensions and searching for Task - J2Commerce.
Tips
- Run Test Connection first — Before saving any other settings, enter your API token and click Test Connection. The result shows your available warehouses and catalogs, which you need to fill in the Inventory ID and Warehouse ID fields.
- Start with Push Orders only — Enable just Push Orders during initial setup, verify orders appear in BaseLinker, then enable the remaining sync types one at a time.
- Use Hold Push for high-volume stores — A 5–10 minute hold gives your team time to catch and fix errors before orders reach BaseLinker.
- Keep Debug Logging off in production — The log file grows quickly under normal order volume. Turn it on only when diagnosing a specific problem, then turn it off again.
- Check BaseLinker Status IDs carefully — BaseLinker status IDs are numeric and specific to your account. Log into BaseLinker and go to Order Statuses to find the correct ID for each status before filling in the mapping table.
Troubleshooting
Orders Are Not Appearing in BaseLinker
Cause: Push Orders is disabled, or the order has not yet passed the Hold Push delay.
Solution:
- Go to J2Commerce -> Apps -> J2Commerce - BaseLinker Integration.
- Confirm Push Orders is set to Yes.
- Check the Hold Push (minutes) value. If it is greater than 0, the order will not push until that time has elapsed after payment.
- Click Sync Now to force an immediate sync.
- If orders still do not appear, enable Debug Logging, place a test order, then check
administrator/logs/plg_j2commerce_app_baselinker.log.phpfor error messages.
Test Connection Fails
Cause: The API token is incorrect or has been revoked.
Solution:
- Log into your BaseLinker account.
- Go to My Account -> API.
- Copy the token exactly — it is case-sensitive.
- Paste it into the API Token field in J2Commerce and click Test Connection again.
Order Status Is Not Updating in J2Commerce
Cause: No Status Mapping row exists for that BaseLinker status, or the Direction is set to Push only.
Solution:
- Go to J2Commerce -> Apps -> J2Commerce - BaseLinker Integration -> Status Mapping tab.
- Find the row for the relevant J2Commerce status.
- Confirm the Direction is set to Pull only or Both.
- Confirm the BaseLinker Status ID matches the status ID in your BaseLinker account.
- Save the settings and click Sync Now.
Tracking Numbers Are Not Appearing on Orders
Cause: Pull Shipment Tracking is disabled, or the order does not yet have a Shipped or Delivered status in J2Commerce.
Solution:
- Go to J2Commerce -> Apps -> J2Commerce - BaseLinker Integration -> Synchronization tab.
- Confirm Pull Shipment Tracking is set to Yes.
- Check that the order's status in J2Commerce is Shipped or Delivered.
- Click Sync Now to pull tracking immediately.
Scheduled Syncs Are Not Running
Cause: The Joomla Scheduled Tasks plugin is not enabled.
Solution:
- Go to J2Commerce -> Apps -> J2Commerce - BaseLinker Integration.
- Search for Task - J2Commerce.
- If it shows as disabled, click the checkbox and click Enable.
- Confirm your server's cron job is configured to run the Joomla Task Scheduler. See the Joomla Scheduled Tasks documentation for setup instructions.