Subscription Extra Fields
The Subscription Extra Fields add-on extends the Subscription Products plugin by letting you attach custom data fields to subscription records. Once installed, administrators can view and edit those field values directly on each subscription's detail page in the J2Commerce back end.
A common use case is capturing information that varies per subscriber — for example, a membership tier code, a preferred contact method, or a promotional source. The field values are stored alongside the subscription and remain available whenever the subscription record is viewed.
What's New in J2Commerce
Subscribers migrating from J2Store will notice that this plugin no longer uses a custom app configuration view. Configuration is now handled entirely through the standard Joomla Plugin Manager, which means you can manage this plugin the same way as any other Joomla plugin. No separate apps screen is needed.
Prerequisites
- J2Commerce 6 installed and activated
- The Subscription Products add-on installed and enabled (this plugin extends the subscriptions table created by that add-on)
- At least one non-core custom field created in J2Commerce (see Step 3: Set up custom fields below)
Purchase and Download
This plugin is a separate add-on available from the J2Commerce Extensions Store. It is not included with the core J2Commerce 6 component.
Step 1: Go to our J2Commerce website -> Apps
Step 2: Locate the Subscription Extra Fields package -> click View Details -> Add to cart -> Checkout.
Step 3: Go to your My Downloads under your profile button at the top right corner and search for the app. Click Available Versions -> View Files -> Download Now
Install the Plugin
Go to System > Install -> Extensions
Install the app_subscriptionextrafields.zip package file or use the Install from URL option.
-e0515ef561b368cb4d5a053cacb4c525.webp)
If the Subscription Products plugin is not already installed, the installer will display a warning and stop. Install the Subscription Products add-on first, then retry.
Enable the App
Once you have installed the app, you will need to enable it. There are two ways you can access the app.
Option A: Go to the J2Commerce icon at the top right corner -> Apps
Option B: Go to Components on the left sidebar -> J2Commerce -> Apps
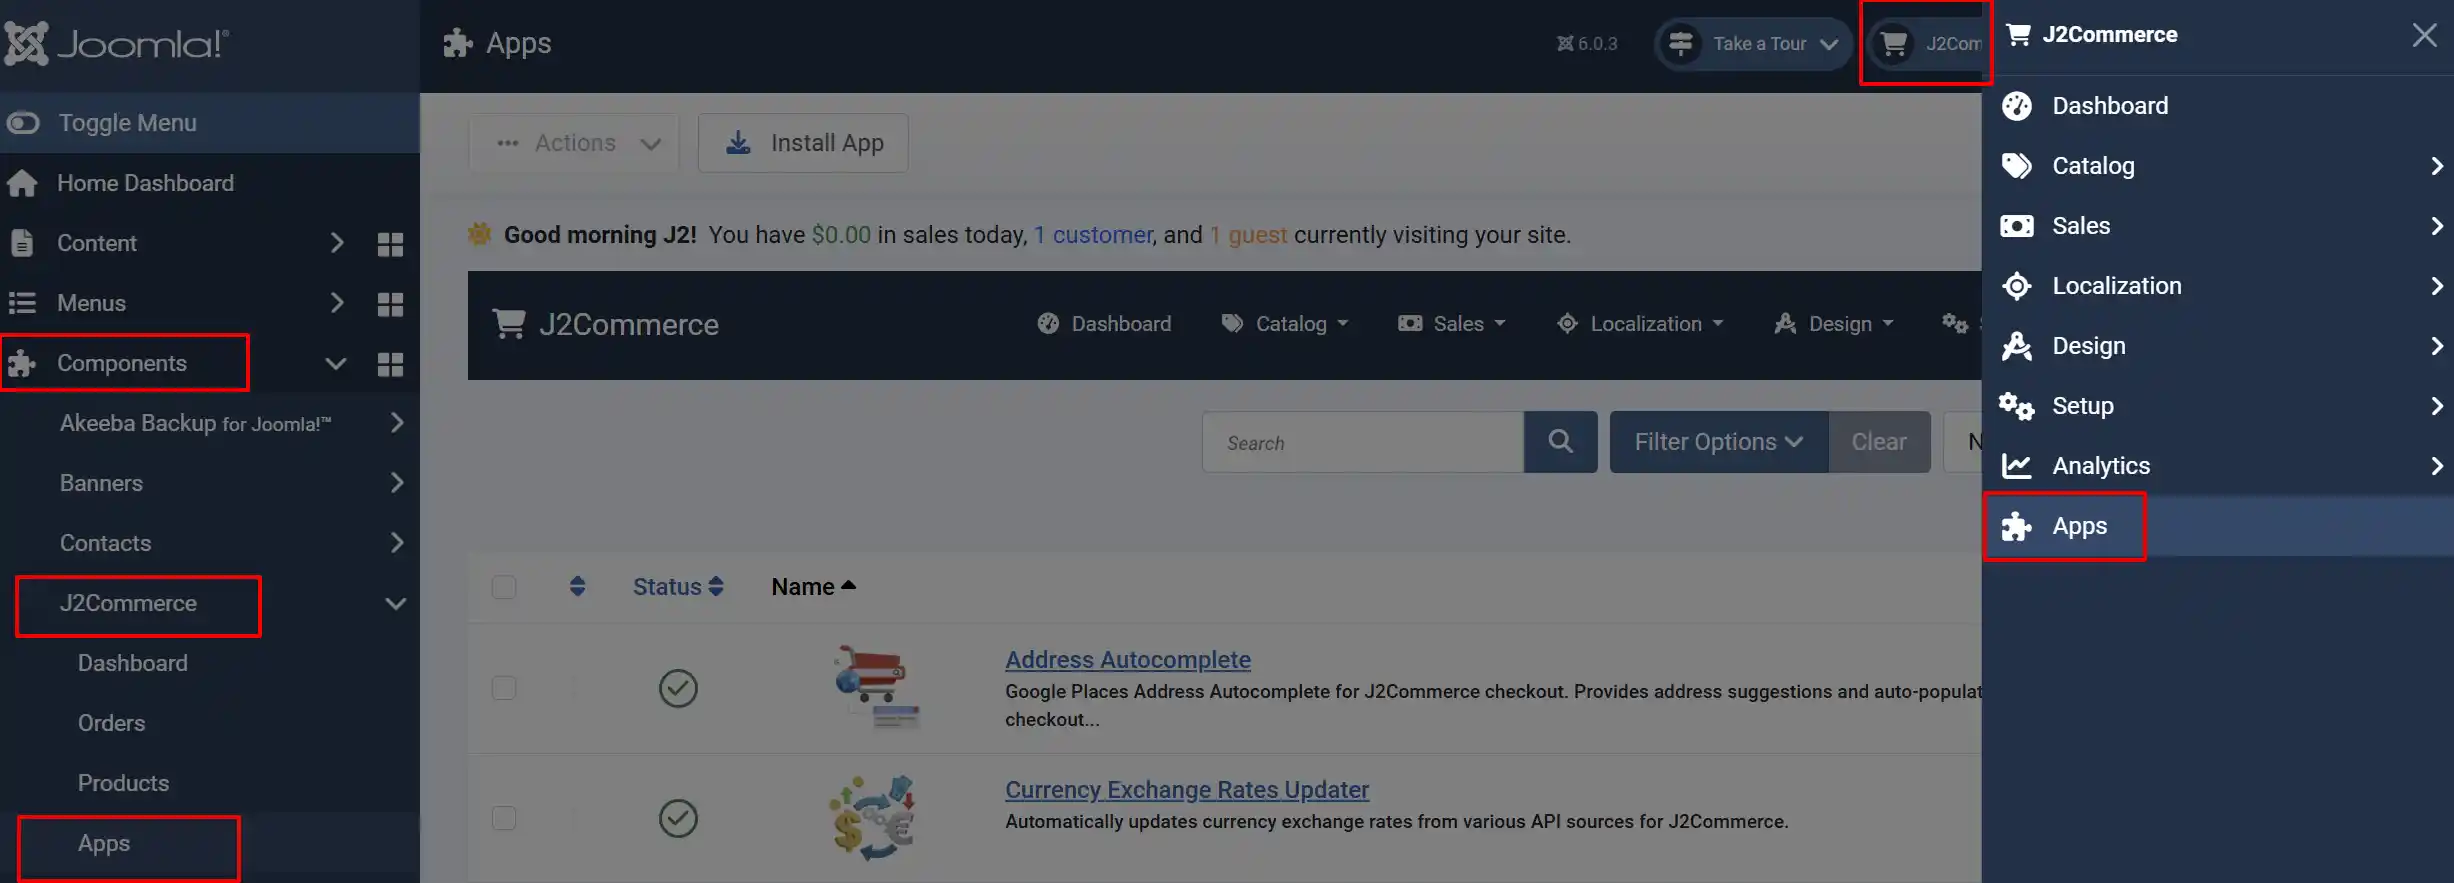
Search for Subscription Extra Fields, click the X, and it will turn into a green checkmark. It is now enabled and ready for setup.
Configure the Plugin
Click the Toggle Inline Help button in the toolbar and the app will show a description below each field as you configure it.
When you open the pligin and you will see two settings.
The plugin has two settings.
Subscription Extra Fields: Select which J2Commerce Checkout Fields to attach to subscriptions. Choose All to include every enabled non-core Checkout Fields, or pick individual fields from the list.
Debug Mode: Write detailed log entries to the Joomla log directory. Useful for troubleshooting. Disable this in production.
Choosing which fields to include
The Subscription Extra Fields dropdown lists every enabled non-core checkout fields from your J2Commerce Checkout Fields system. You can:
- Select All to automatically include every enabled non-core field. New fields you add later are picked up without reconfiguring this plugin.
- Select specific field names to include only those fields on subscription records. This is useful when you have many checkout fields but only a subset are relevant to subscriptions.
After making your selection, click Save & Close.
Set Up Checkout Fields in J2Commerce
The plugin pulls its field list from the J2Commerce Checkout Fields system. If you have not created any Checkout Fields yet, or need to add new ones, do that first.
Go to J2Commerce -> Setup -> Checkout Fields.
Click New to create a field.

Basic Details tab:

Field Name: The label displayed to administrators on the subscription record.
Field Name Key: A unique identifier used internally (no spaces; use underscores).
Field Type: The input type. See the supported types below.
-
The following field types are fully supported on subscription records:
-
Text: A single-line text input.
-
textarea: A multi-line text area for longer content.
-
select (or singledropdown): A dropdown with predefined options.
-
radio: A set of radio buttons, one selectable at a time.
-
checkbox: A single checkbox returning a yes/no value.
-
-
Any other field type falls back to a standard text input on the subscription detail screen.
Make sure the Enabled toggle is set to Yes on each custom field you want to use. Disabled fields are filtered out by the plugin and do not appear in the configuration dropdown or on subscription records.
Default Value: For select, radio, or checkbox fields: enter the options, one per line. Each option uses the format value::Label.
Status: Must be set to Published for the field to appear in the Subscription Extra Fields plugin.
Click Save & Close when done.
How Extra Fields Appear on Subscriptions
Once the plugin is configured, the extra fields appear on the subscription detail page in the J2Commerce back end.
- Go to J2Commerce -> Sales -> Orders (or navigate to a subscription through the Subscription Products view).
- Open a subscription record.
- Find the Additional Fields card on the subscription detail page.
Each selected field is displayed in its native input format — text boxes, dropdowns, radio buttons, or checkboxes — alongside the field label defined in J2Commerce custom fields.
Editing and saving field values
Administrators can update field values directly from the subscription detail page without leaving the screen.
- Change the value of any field in the Additional Fields card.
- Click Apply to save the changes.
- A confirmation message appears briefly when the save completes successfully.
The values are stored as JSON in the extra_fields column of the subscriptions database table and are tied to that specific subscription record.
Configuration Reference
| Setting | Options | Default | Notes |
|---|---|---|---|
| Subscription Extra Fields | Any combination of enabled non-core custom fields, or All | All | Selecting All is dynamic — new fields are included automatically |
| Debug Mode | Yes / No | No | Logs are written to [joomla_logs]/app_subscriptionextrafields.php |
Troubleshooting
The Additional Fields card does not appear on the subscription detail page
Cause: Either the plugin is not enabled, no fields are configured, or the Subscription Products plugin has not been set up correctly.
Solution:
- Go to J2Commerce -> Apps and confirm Subscription Extra Fields is enabled.
- Open the plugin and verify at least one field (or All) is selected under Subscription Extra Fields.
- Confirm that the selected fields are enabled in J2Commerce -> Setup -> Checkout Fields (the Status column must show Published).
- Open a subscription record and check whether the Additional Fields card is present. The card only renders when at least one field has a definition available.
The plugin dropdown shows no fields to select
Cause: There are no enabled non-core checkout fields in J2Commerce.
Solution: Create at least one checkout field at J2Commerce -> Setup -> Checkout Fields and make sure its Status setting is Published. After saving the field, return to the plugin configuration — the new field will appear in the dropdown.
The installer shows a warning about the subscriptions table
Cause: The Subscription Products plugin has not been installed yet, so the j2commerce_appsubscriptionproduct_subscriptions database table does not exist.
Solution: Install and enable the Subscription Products add-on first, then reinstall the Subscription Extra Fields plugin. The installer checks for this table during the preflight step and will not proceed if it is missing.
Field values are not saving (Apply button shows an error)
Cause: A session or permission issue, or the plugin configuration was changed after data was originally saved.
Solution:
- Enable Debug Mode in the plugin settings, then retry saving. Check the log file at your Joomla logs directory for the filename
app_subscriptionextrafields.php. - Confirm that the subscription ID shown in the URL matches a valid subscription record.
- If the error persists, disable and re-enable the plugin, then try again.
- Disable Debug Mode once the issue is resolved.