After-Sale Special
The After-Sale Special app lets you show customers a one-click upsell offer immediately after they pay — before they ever reach the order confirmation page. You decide who qualifies using targeting rules (cart contents, order total, customer group, first order, location, language, or payment type), and which discounted products to offer them. If the shopper accepts, the item is added to the order they just placed and their saved card is charged automatically — no re-entering payment details required.
Requirements
- with PHP 8.3.0 +
- Joomla! 6.x
- J2Commerce 6.x
Purchase and Download
Step 1: Go to our J2Commerce website -> Apps
Step 2: Locate the After-Sale Special App -> click View Details -> Add to cart -> Checkout.
Step 3: Go to your My Downloads under your profile button at the top right corner and search for the app. Click Available Versions -> View Files -> Download Now
Install the App
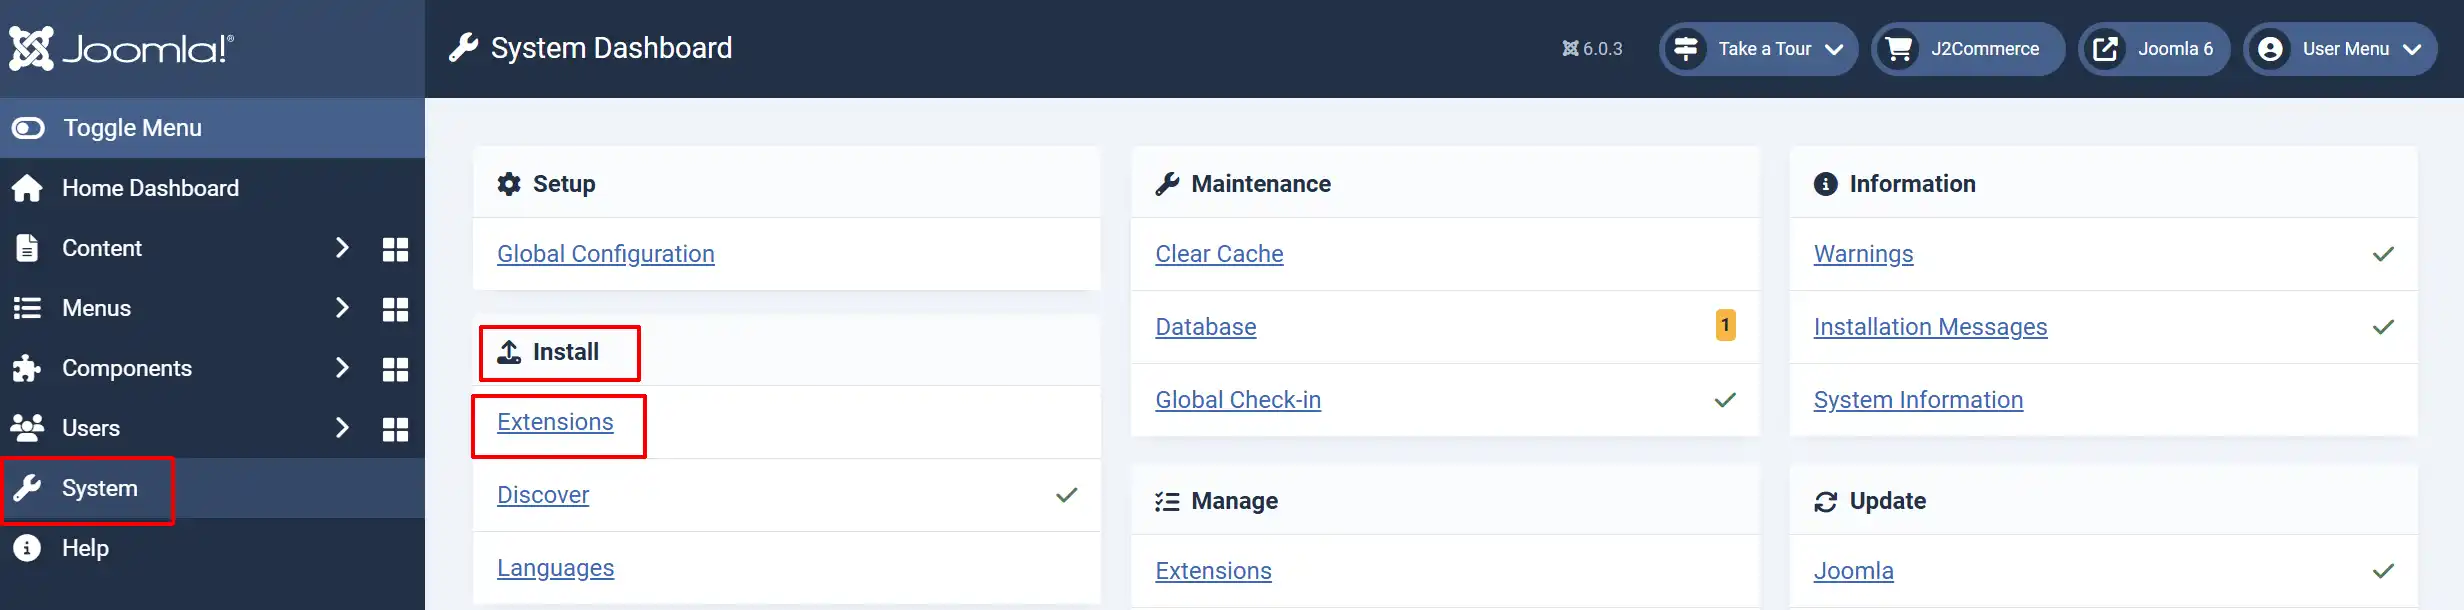
In the Joomla Administrator, go to System -> Install -> Extensions.
Upload the plugin ZIP file or use the Install from URL option.
Enable the App
The plugin installs and enables itself automatically. No separate enable step is needed. However, it's important to know where to go to enable or disable it in the future .
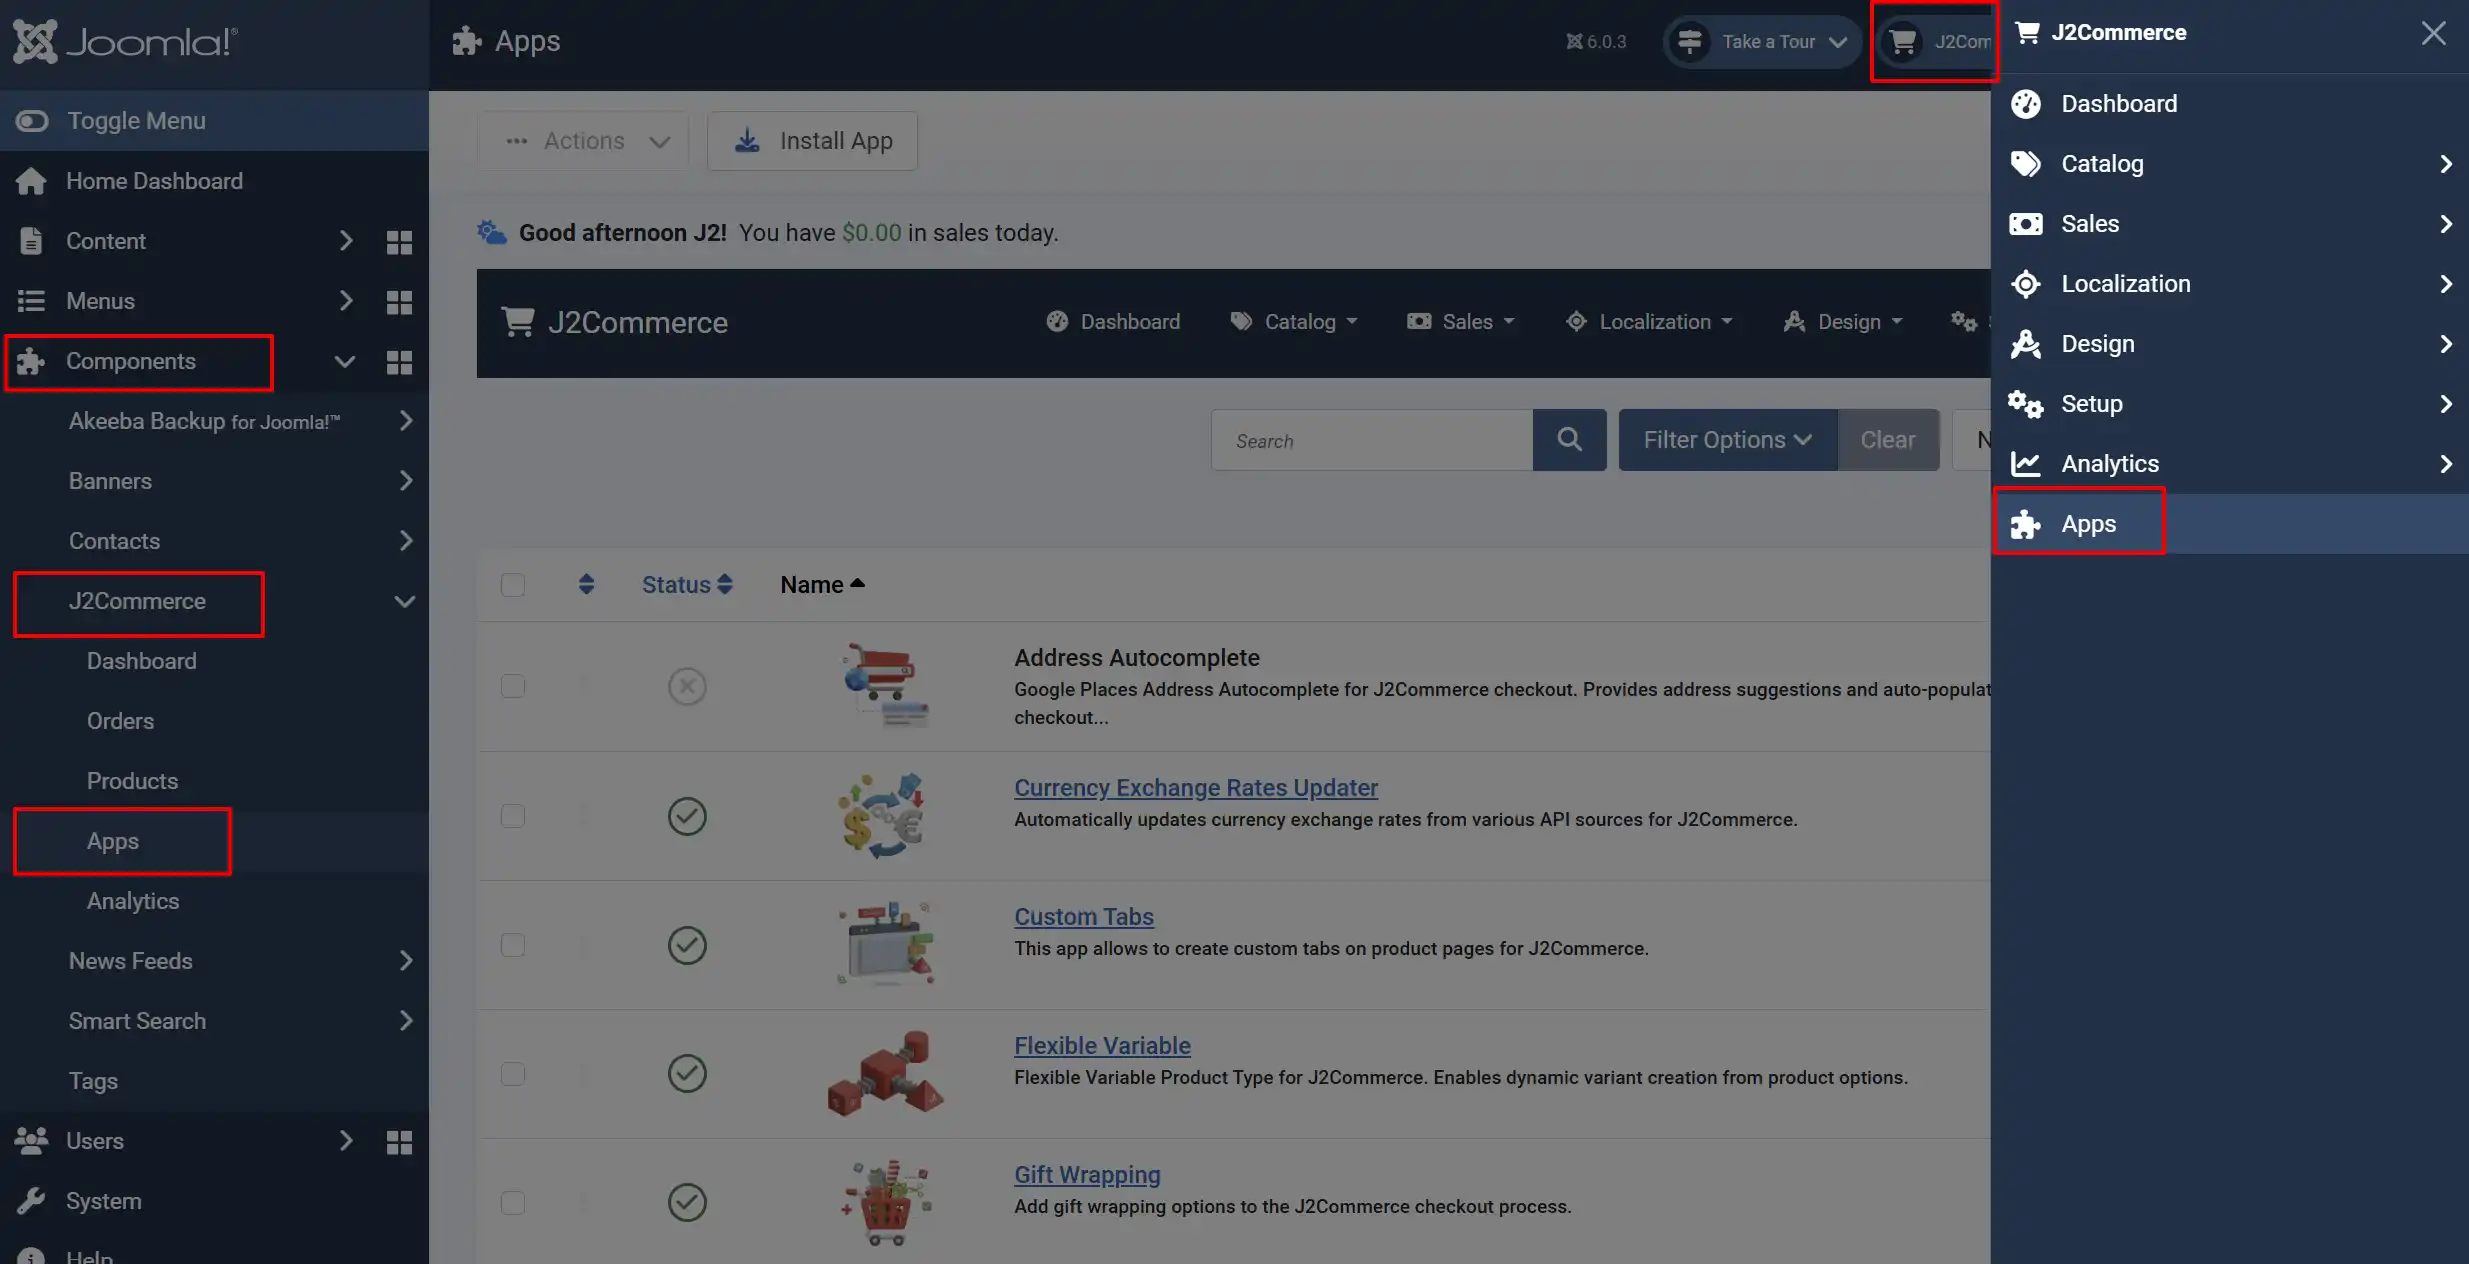
There are two ways to reach the Apps list.
Option A: Go to the J2Commerce icon at the top right corner -> Apps
Option B: Go to Components on the left sidebar -> J2Commerce -> Apps
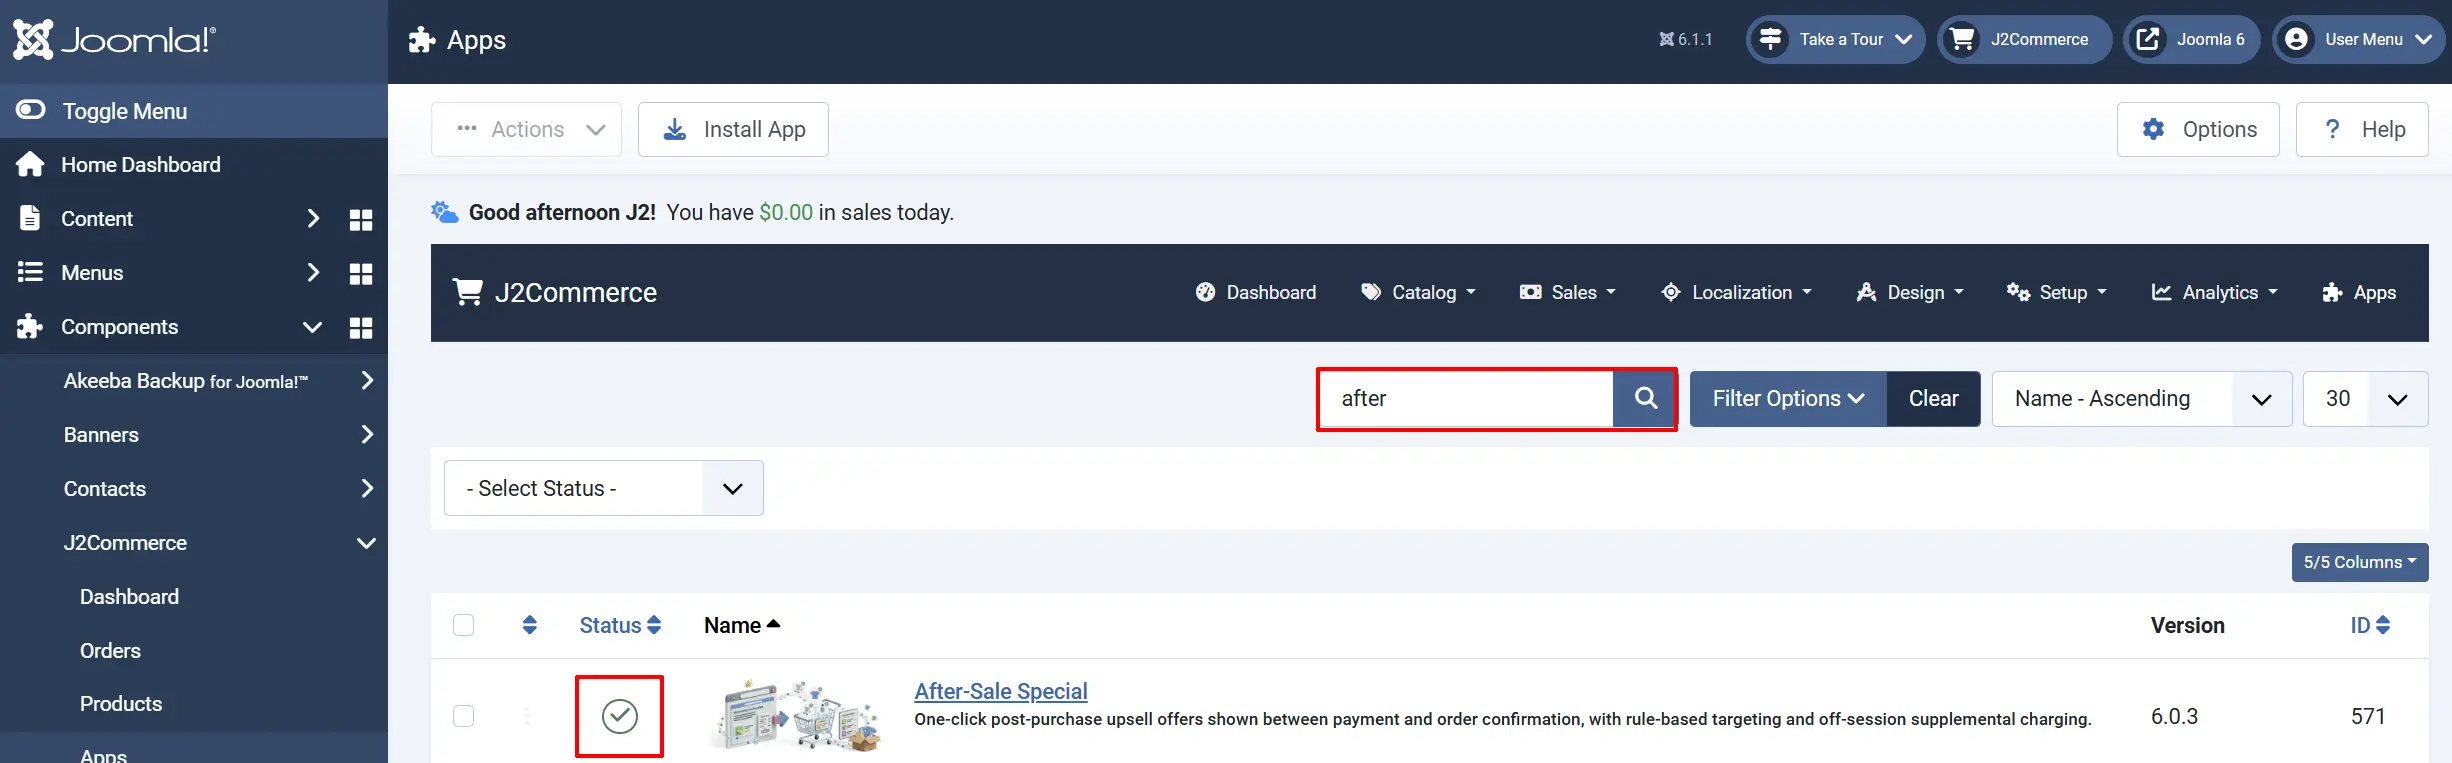
To help you narrow down the list, you can do a search for After-Sale Special, click the X, and it will turn into a green checkmark. It is now enabled and ready for setup.
Configure the App
Click the After-Sale Special title (next to the green checkmark) to open the settings screen.
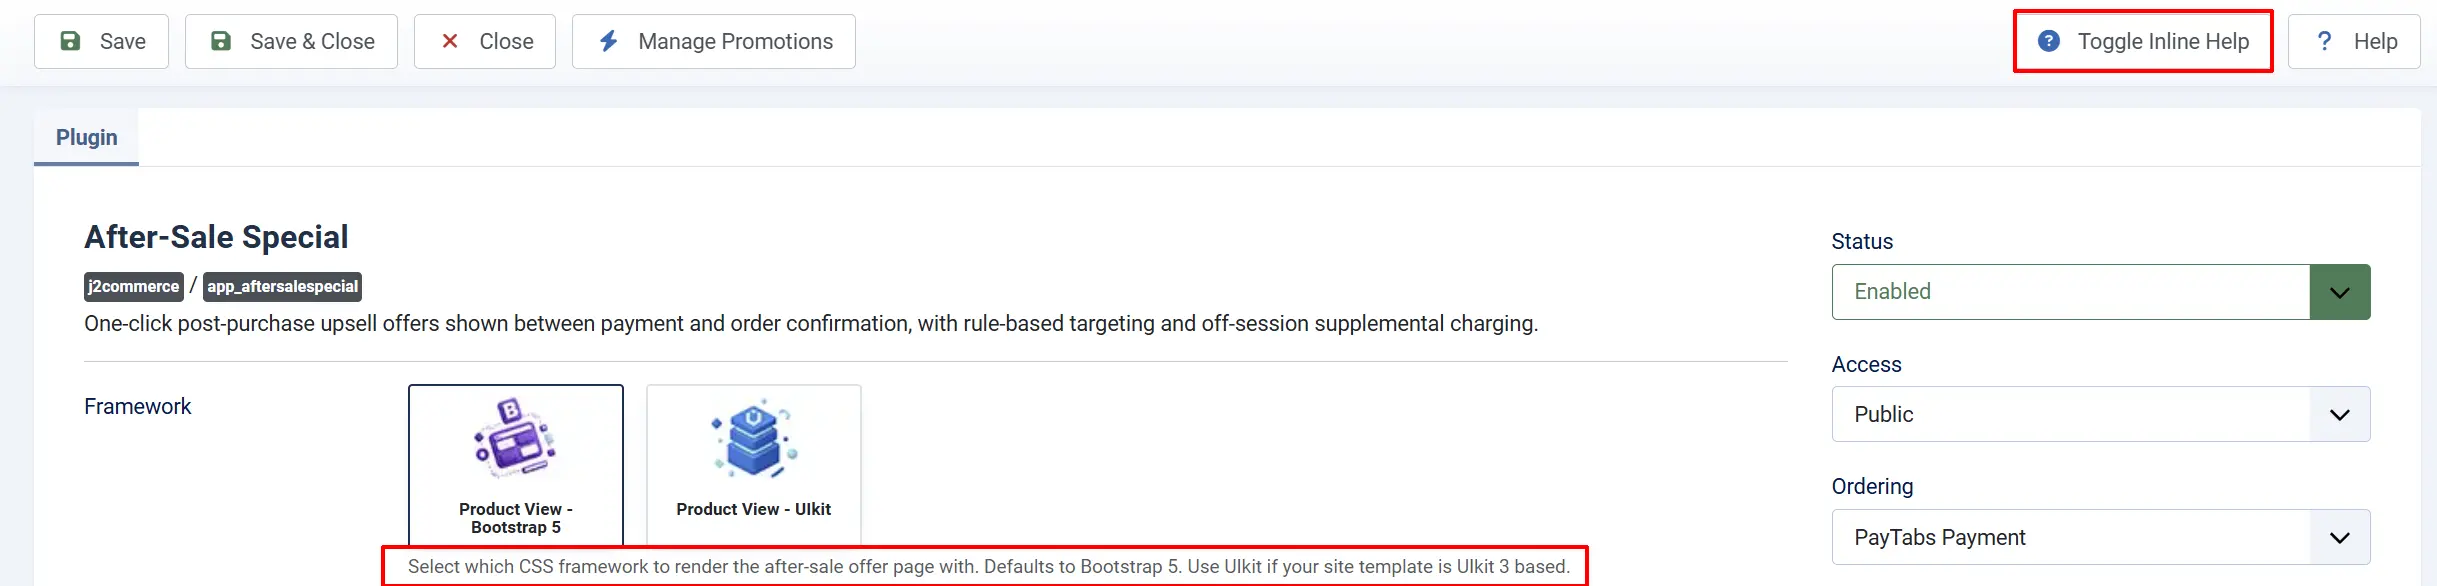
Click the Toggle Inline Help button on any app you install to see a description below each field directly in the admin panel.
Basic Settings tab
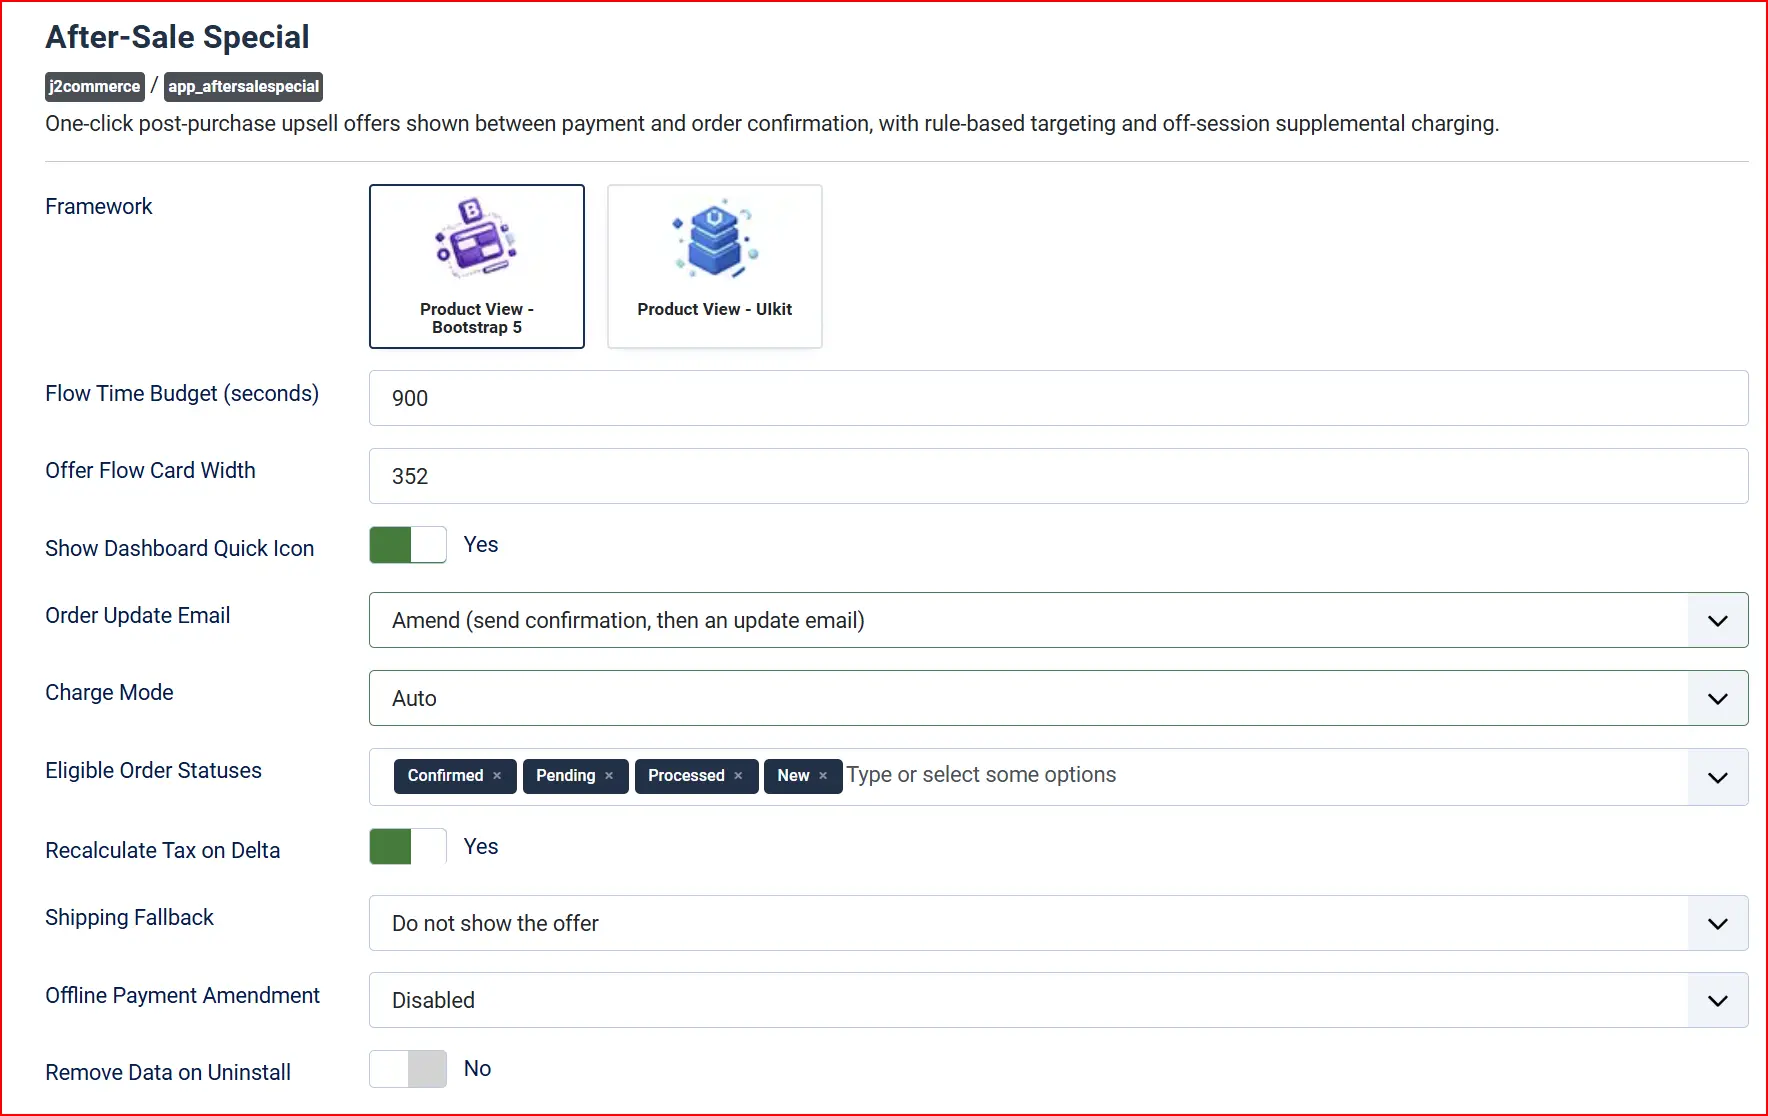
Framework: Select which CSS framework renders the after-sale offer page shown to the customer. Defaults to Bootstrap 5. Choose UIkit instead if your site template is built on UIkit 3.
Flow Time Budget (seconds): Controls how long the shopper has to finish the offer flow before it expires. Once the time budget passes, any remaining offers are skipped and the customer is sent to the order confirmation page.
Offer Flow Card Width: Sets the width, in pixels, of each step card in the Offer Flow visual builder canvas (used only in the admin — it has no effect on the storefront). Accepts a value between 240 and 720; the default is 352.
Show Dashboard Quick Icon: Adds an After-Sale Specials quick icon to the J2Commerce dashboard, badged with the number of currently active promotions.
Leave this On if you want a fast at-a-glance reminder of how many promotions are live.
Order Update Email: Controls how the order confirmation email interacts with the offer flow.
- Amend — the normal confirmation email sends right away, then a separate update email goes out if the customer accepts an offer.
- Defer — the confirmation email is held until the offer flow finishes (accepted, declined, or expired), so the customer gets one email that already reflects any accepted upsell.
NOTE: In Defer mode, if the customer abandons the offer page without deciding, the confirmation email is automatically released once the Flow Time Budget expires — it is never lost.
Charge Mode: Decides what happens when a customer accepts an offer.
- Auto — charges the customer's saved payment method automatically when one exists. For orders paid with an offline method, it falls back to the Offline Payment Amendment setting below.
- Token Only — only shows offers when a chargeable saved payment method is available on the order. If there is nothing to charge, the offer is suppressed rather than shown.
Eligible Order Statuses: Only orders that land in one of the selected statuses right after payment are considered for an after-sale offer. By default this is Confirmed and Processed.
Recalculate Tax on Delta: When enabled, tax is computed on the accepted offer's amount using the order's stored shipping address and the upsold product's tax profile, so the extra charge is taxed correctly for that customer's location.
Shipping Fallback: Controls what happens for an offer that would normally add shipping (i.e., Waive Shipping on Upsell Items is off for that offer) when a live shipping rate cannot be re-quoted after checkout.
- Use a flat amount — adds a fixed shipping charge you set below.
- Waive shipping — the item ships free even though the offer wasn't configured to waive shipping.
- Do not show the offer — the offer is hidden from that customer rather than risk an inaccurate shipping charge. This is the default.
Flat Shipping Amount: Only appears when Shipping Fallback is set to Use a flat amount. Enter the shipping charge, in your store's base currency, to add to an accepted offer when a live rate can't be re-quoted.
Offline Payment Amendment: For orders placed with an offline payment method (bank transfer, money order, cash), this decides whether the customer can still accept an after-sale offer.
- Disabled — offers requiring a charge are not shown to customers who paid offline.
- Amend and Invoice — the offer is added to the order and the extra balance is recorded for you to collect manually; nothing is auto-charged since there is no card on file.
Remove Data on Uninstall: When enabled, uninstalling this app also permanently deletes its promotions, offers, and conversion history tables. Leave this Off if you might reinstall the app later and want to keep your promotion data.
Creating a Promotion
Go to the J2Commerce icon at the top right corner -> Apps -> After-Sale Special, click Manage Promotions in the toolbar -> New
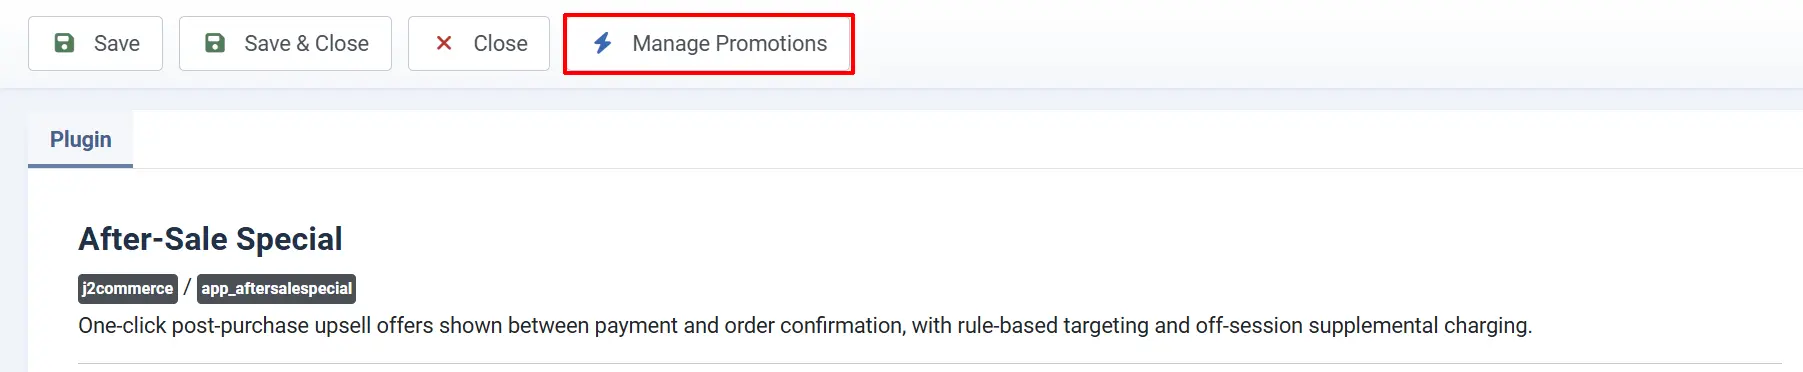
A Promotion defines who qualifies for an upsell and how many offers they can be shown. Each promotion can hold one or more Offers — the actual discounted products shown to the shopper.
Promotion Details tab
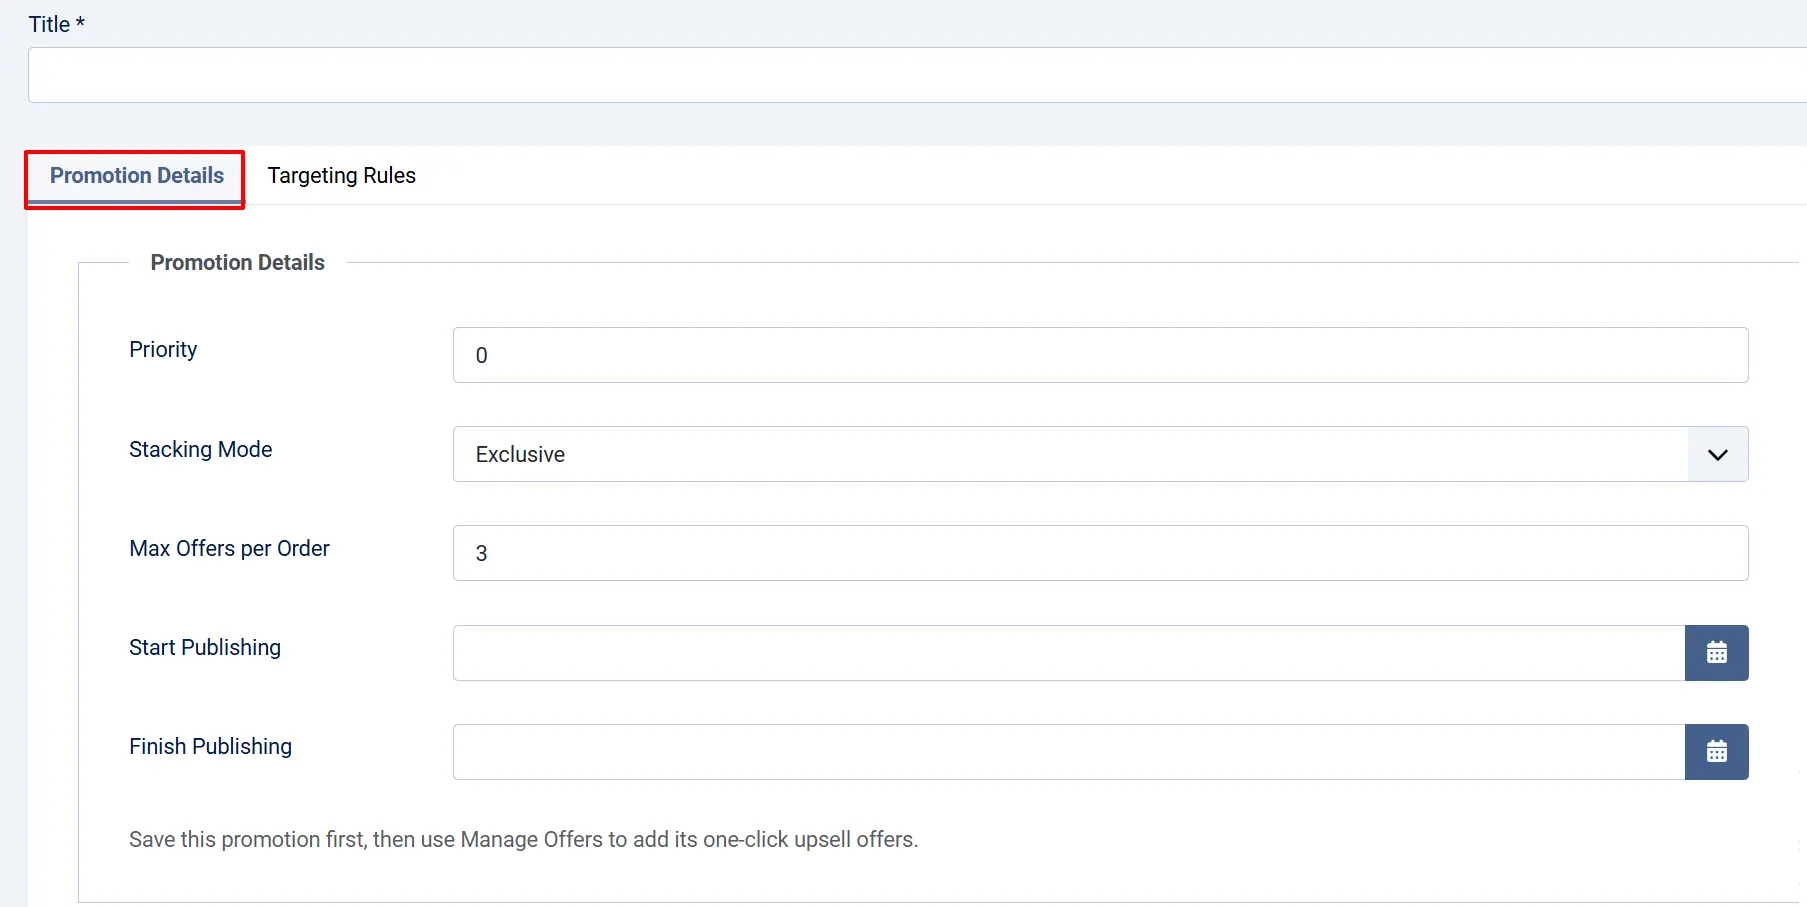
Title: The name shown for this promotion in the promotions list and admin toolbars.
Priority: Higher priority promotions are evaluated first.
Stacking Mode: Exclusive stops evaluating further promotions after the first one matches. Stack keeps queuing offers from every matching promotion.
Max Offers per Order: Caps the number of offer pages shown for one order.
Start Publishing / Finish Publishing: Leave empty to evaluate the promotion immediately with no end date, or set dates to control when it becomes (and stops being) active.
NOTE: A new promotion has no offers yet. Save it first — the Manage Offers and View Flow buttons only appear once the promotion has been saved.
Targeting Rules tab
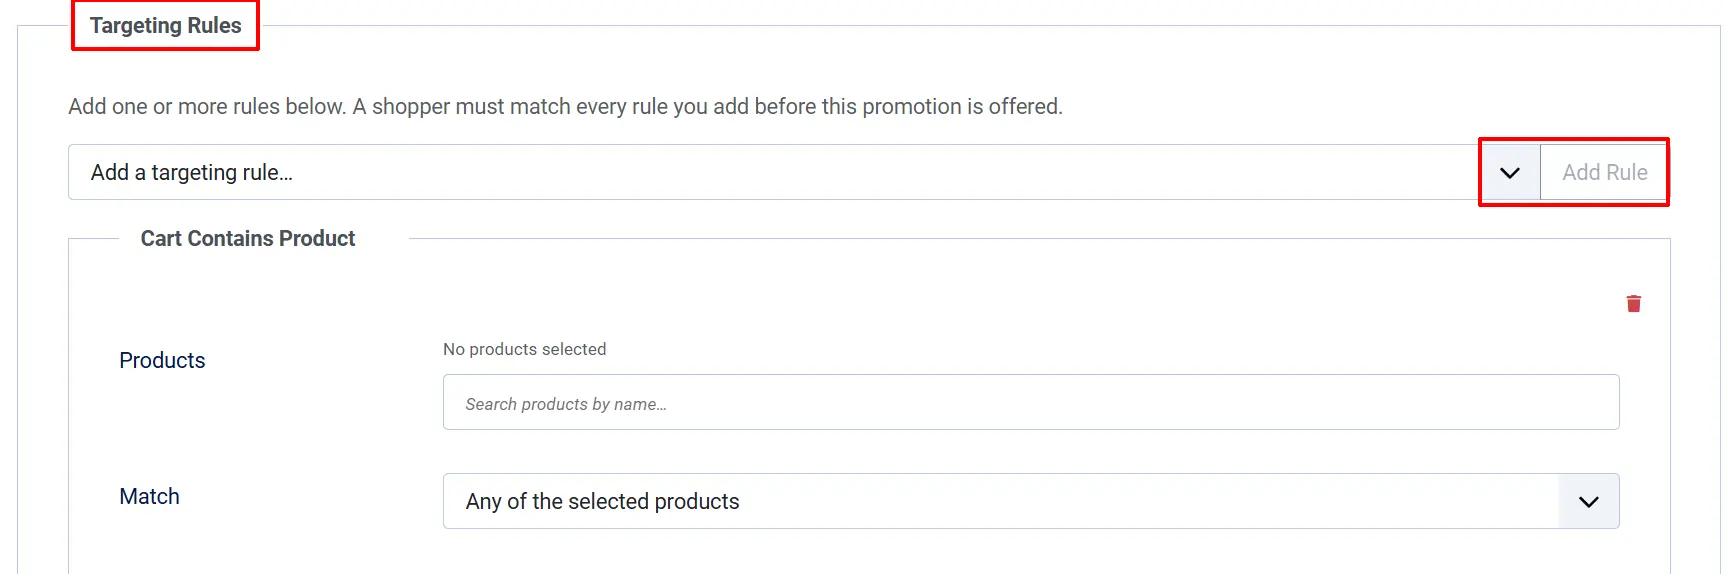
Click Add Rule to add one or more targeting conditions. A shopper's order must match every rule you add before the promotion is offered to them. Leave this empty to match every order.
-
Cart Contains Product: The order includes any (or all) of the specific products you select.
-
Cart Contains Category: The order includes a product from one of the categories you select.
-
Order Total: The order subtotal falls within a minimum and/or maximum amount you set.
-
Customer Group: The customer belongs to one of the user groups you select.
-
First Order Only: This is the customer's very first order in your store.
-
Geo Zone: The customer's shipping or billing address (your choice) falls within one of the geo zones you select.
-
Language: The customer is browsing in one of the site languages you select.
-
Payment Type: The order has a stored payment credential available (needed for offers you want to charge automatically).
Once you have added rules, save the promotion. The Manage Offers and View Flow buttons appear in the toolbar so you can start adding offers.
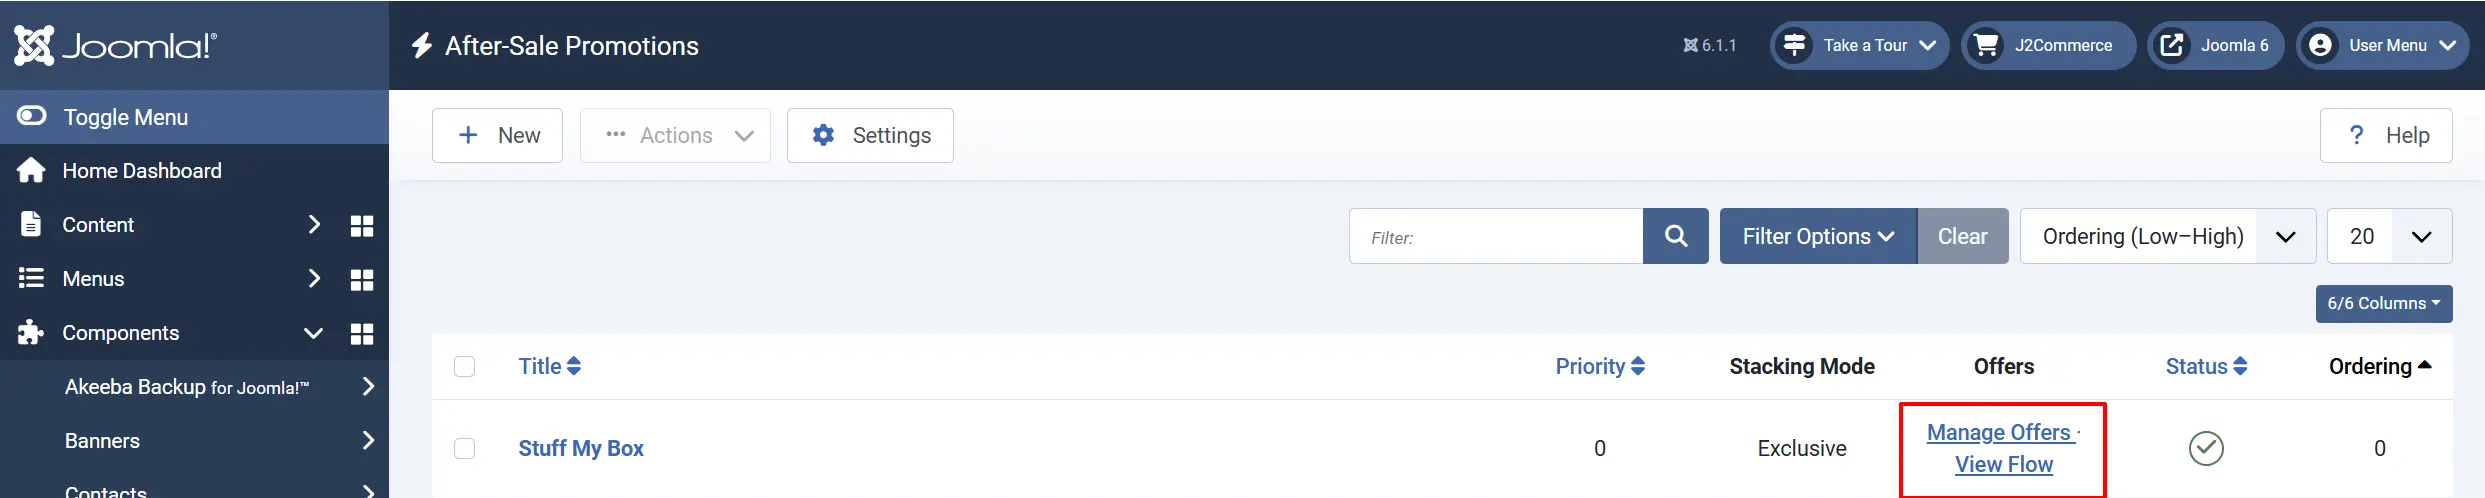
Adding Offers to a Promotion
Step 1: From an already-saved promotion, click Manage Offers in the toolbar, or from the promotions list open the promotion and click Manage Offers.
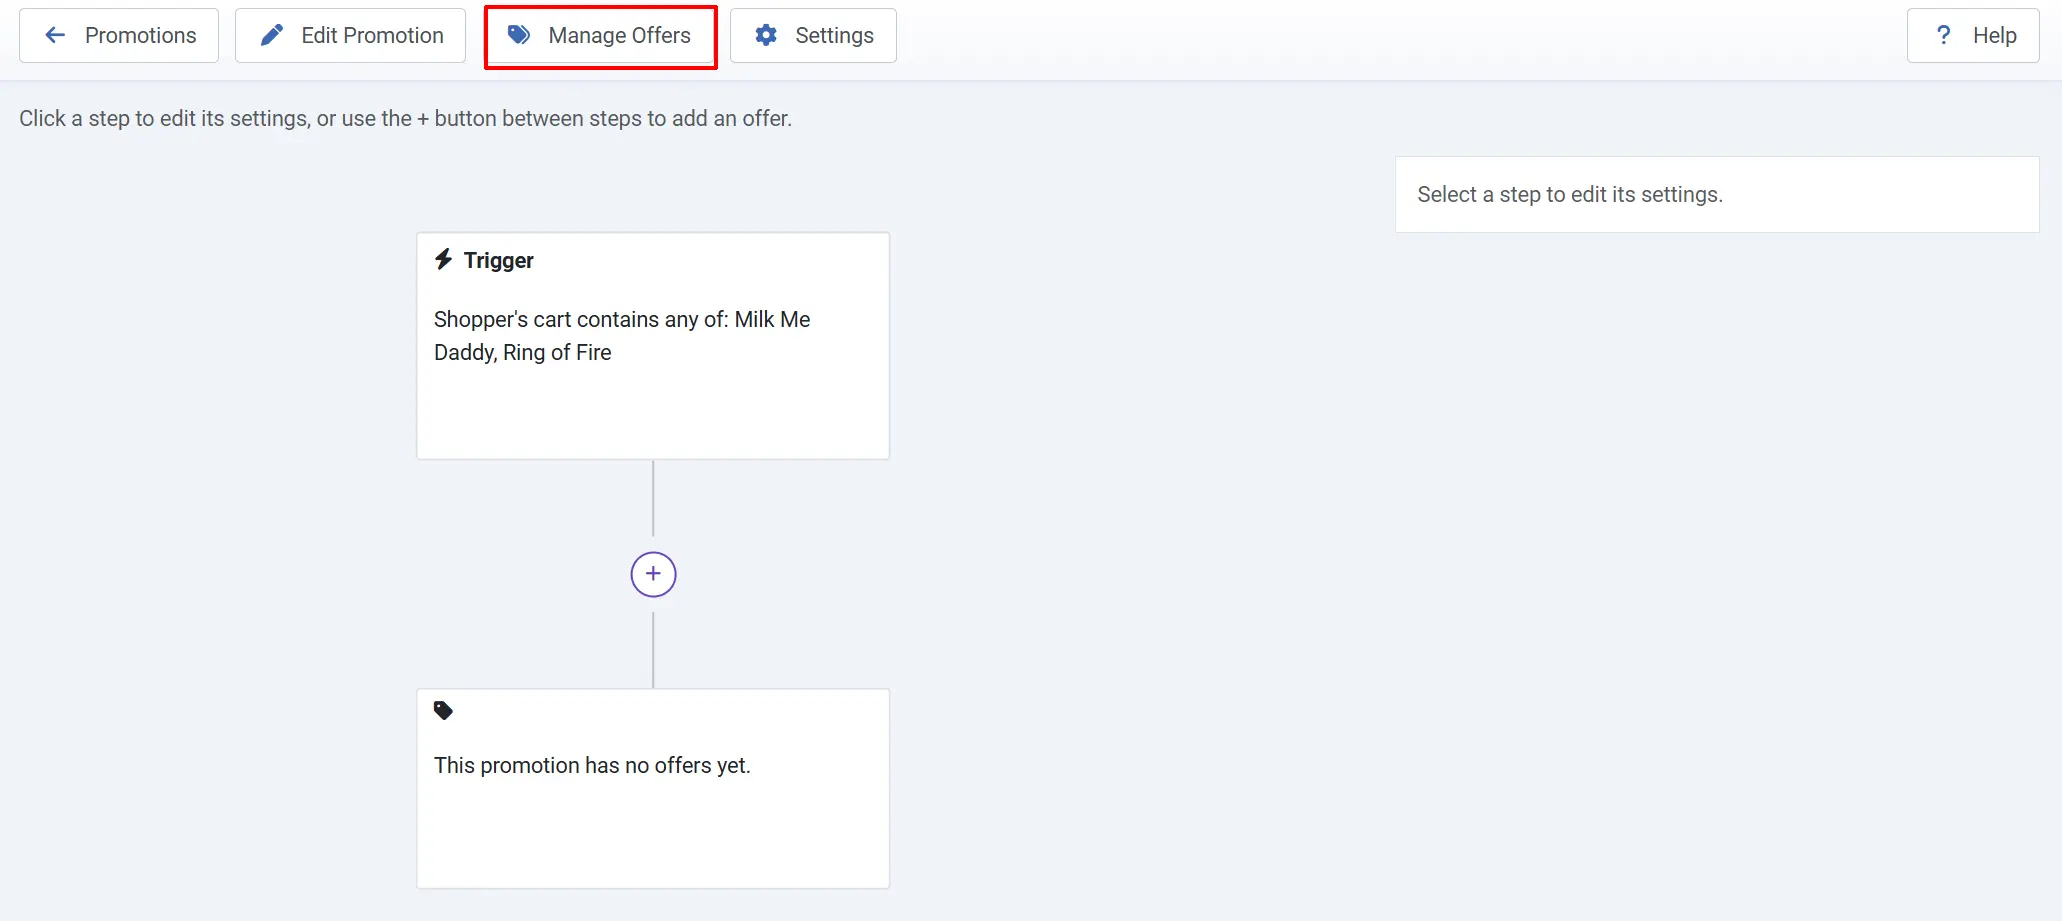
Step 2: Click New to add an offer.
Offer Details tab
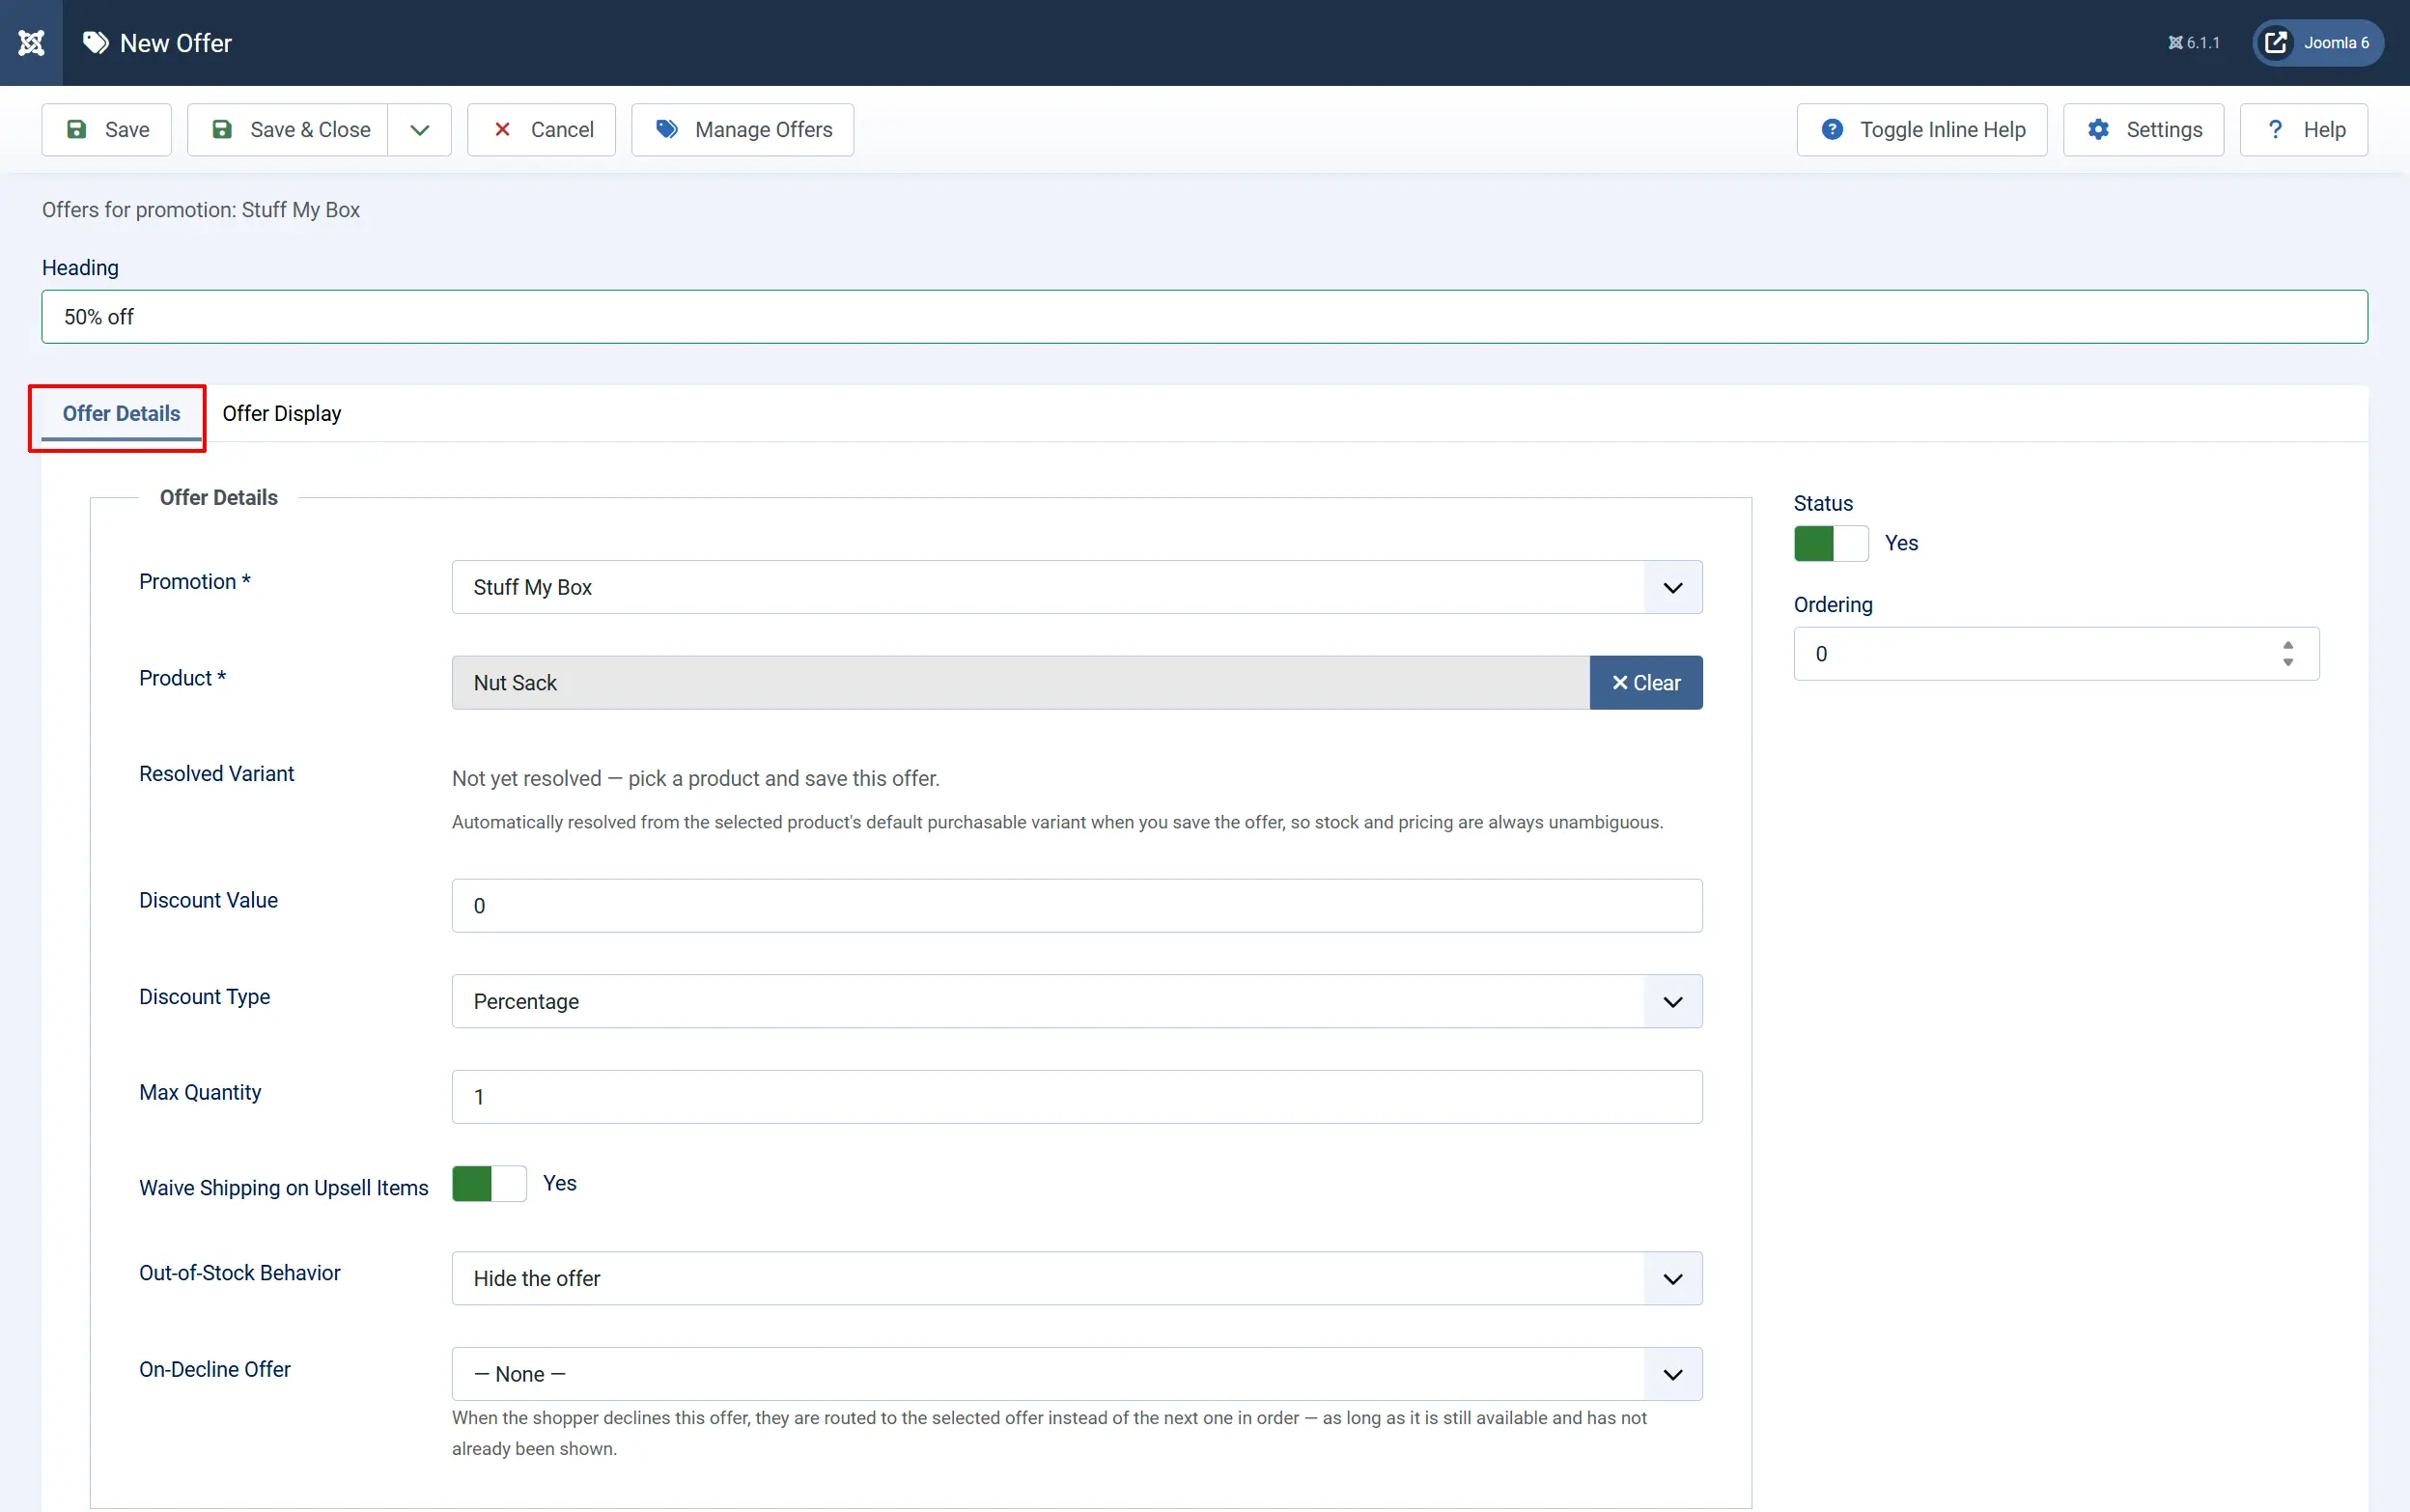
Promotion: The promotion this offer belongs to.
Product: The product upsold on the after-sale offer page. Selected using the standard product picker.
Resolved Variant: Read-only. Automatically resolved from the selected product's default purchasable variant when you save the offer, so stock and pricing are always unambiguous.
Discount Value: The amount taken off the item, interpreted according to Discount Type.
Discount Type: Percentage discounts a percent of the item price. Flat Amount subtracts a fixed amount per unit.
Max Quantity: The highest quantity of this upsell a shopper may add from the offer page.
Waive Shipping on Upsell Items: When enabled, the item is added with no shipping charge — the simplest and most reliable option for a frictionless upsell.
Out-of-Stock Behavior: Hide the offer removes it from the queue entirely when the variant has no stock. Show, disabled still shows the offer but the shopper cannot add it.
On-Decline Offer: When the shopper declines this offer, route them to this offer instead of the next one in order (as long as it's still available and hasn't already been shown). Leave as — None — for the normal queue order.
NOTE: If the selected product has more than one purchasable variant, After-Sale Special uses the one marked as default. Manage variants from the product editor if you need a different one resolved.
Offer Display tab
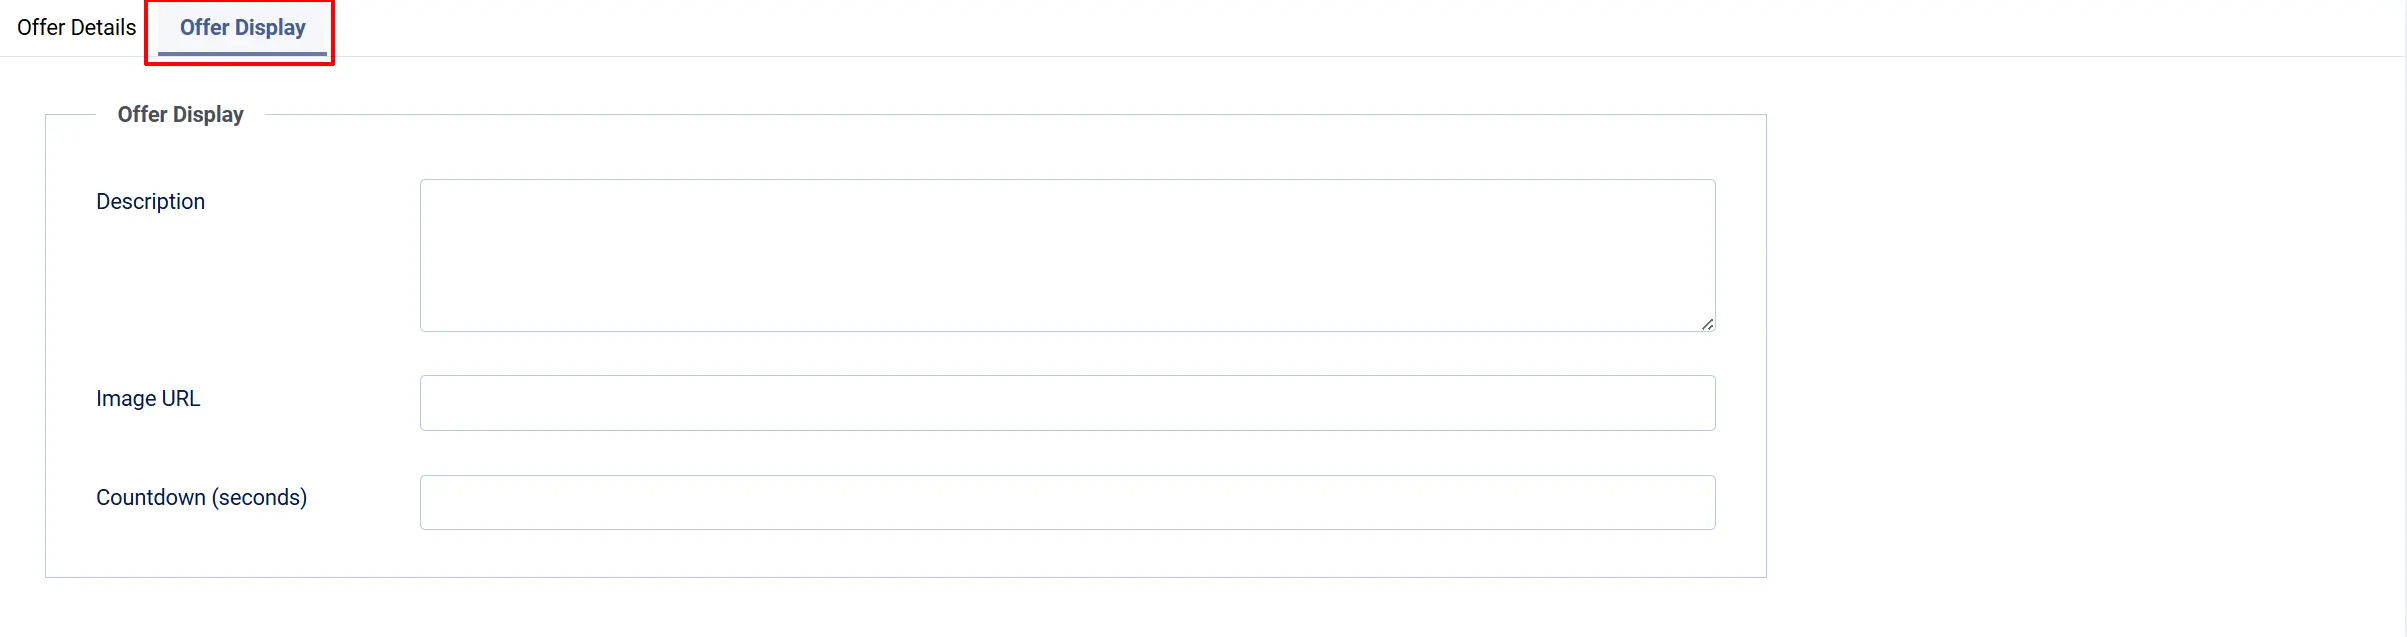
Description: Optional supporting copy shown below the heading on the offer page.
Image URL: Optional override for the product image shown on the offer page.
Countdown (seconds): Optional display-only urgency timer on the offer page. Leave empty to disable.
The offer Heading field (at the top of the form) supports the {price} and {discount} tokens — use them to automatically drop the discounted price or discount amount into your heading text.
Using the Offer Flow Builder
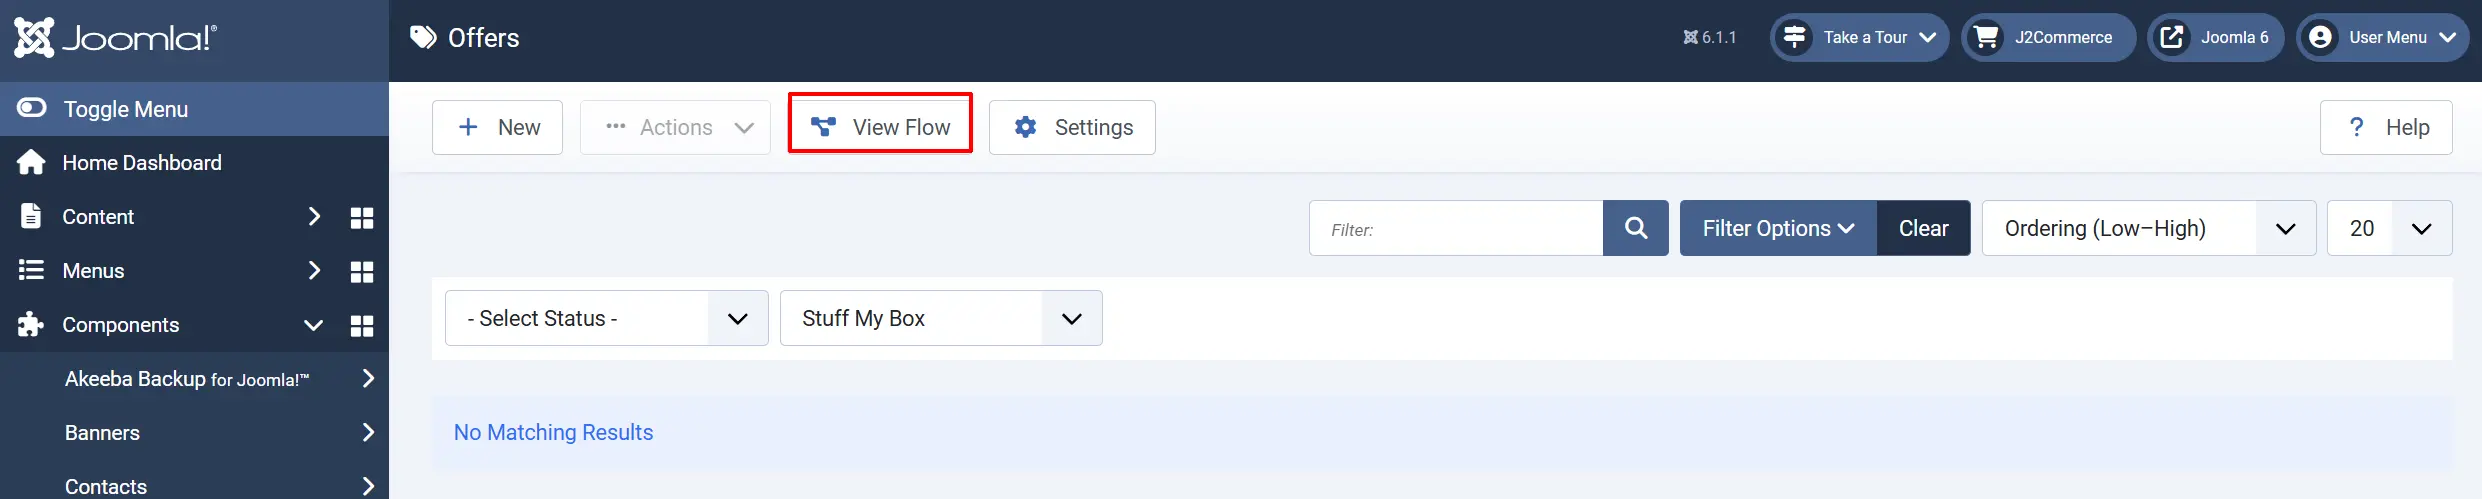
Once a promotion has offers, click View Flow in the promotion edit toolbar to see and rearrange the whole customer journey visually.
The canvas shows a Trigger card summarizing your targeting rules, followed by a card for each offer in order, ending in an Order Complete card.
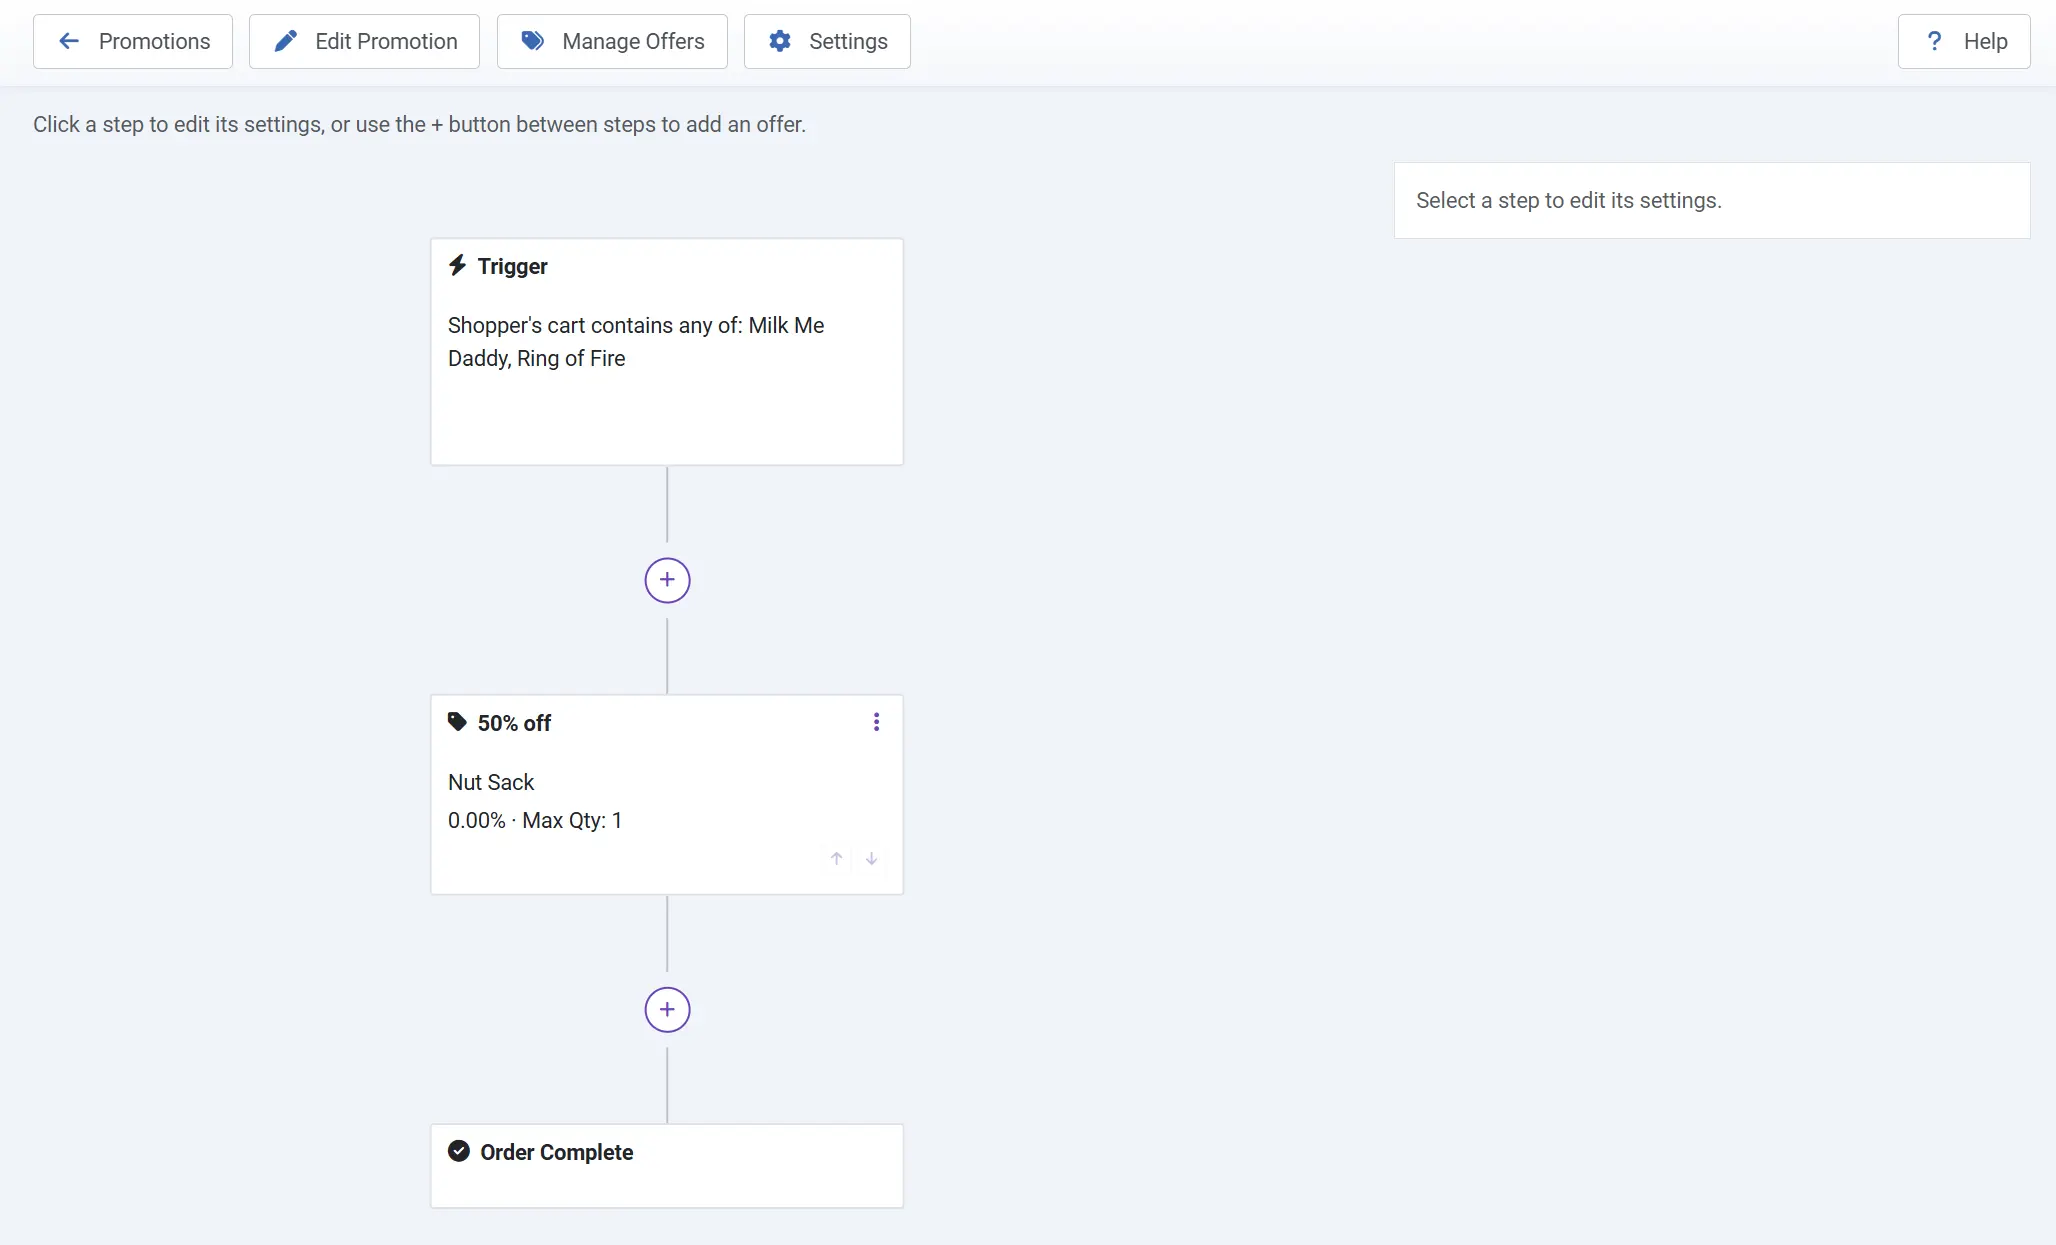
From here you can:
- Click any step to open its settings in the side panel and save changes without leaving the canvas.
- Use the + button between steps to add a new offer at that point in the sequence.
- Use the kebab menu on an offer card for Edit, Copy, Enable/Disable, or Delete.
- Use the up/down arrows to reorder offers.
- See at a glance which offer an "On-Decline Offer" jump routes to, and whether an offer is disabled or beyond the promotion's Max Offers per Order cap.
NOTE: The Offer Flow canvas requires the J2Commerce Flow Builder Library (lib_j2commerceflow) to be installed. If it isn't, the canvas shows a message instead of loading — see Troubleshooting below.
How It Works
When a customer completes payment on an eligible order:
- After-Sale Special checks whether the order's new status is one of the Eligible Order Statuses.
- It evaluates your promotions in priority order and builds a personalized queue of offers for that specific order, based on each promotion's targeting rules and each offer's own conditions (stock, shipping, not already purchased in this order).
- Instead of landing directly on the order confirmation page, the customer is shown the first offer in the queue.
- The customer can Add to Order, decline with No Thanks, Next (or No Thanks, Continue on the last offer), or Skip all offers.
- Accepting an offer adds the item to the same order the customer just placed, recalculates the order total (and tax, if Recalculate Tax on Delta is enabled), and automatically charges the difference to their saved payment method — or records it as a balance due for offline payment methods when Offline Payment Amendment allows it.
- After the last offer is decided (or the shopper chooses Skip all offers), the customer continues on to the normal order confirmation page.
Display Conditions
An offer is shown when:
- The order's status after payment is one of the Eligible Order Statuses.
- Its owning promotion is enabled, within its publish window, and its targeting rules match the order.
- The offer itself is enabled.
- The customer hasn't already purchased that exact product in this order.
- The offer's stock behavior allows it (in stock, or Show, disabled for out-of-stock items).
- If the offer isn't set to waive shipping, the Shipping Fallback setting doesn't block it.
- The promotion's Max Offers per Order cap (and Stacking Mode) hasn't already been reached.
Tips
- Waive shipping whenever practical — it's the simplest way to guarantee an offer is always shown and priced correctly, since no live shipping re-quote is available after checkout.
- Use Exclusive stacking to keep the offer flow short and focused on your highest-priority promotion; use Stack only when you deliberately want to combine offers from multiple promotions.
- Set an On-Decline Offer to build a simple downsell path — for example, route a decline on a premium bundle to a cheaper single-item offer.
- Use countdowns sparingly — reserve them for genuinely time-sensitive upsells so they keep their urgency.
- Choose Token Only charge mode if you never want to invoice offline customers for an accepted offer — it simply won't show them one.
Troubleshooting
Offers Never Appear After Checkout
Cause: The app is disabled, the promotion has no matching offers, or the order's status isn't in the eligible list.
Solution:
- Go to J2Commerce -> Apps -> After-Sale Special and confirm it shows a green checkmark (enabled).
- Open the promotion and check the Targeting Rules tab — an order must match every rule listed.
- Confirm the promotion is enabled and within its Start Publishing/Finish Publishing window.
- Check Manage Offers and confirm at least one offer is enabled and has a resolved variant.
- Check the Eligible Order Statuses setting matches the status the order actually reaches after payment.
"Add to Order" Fails or Shows a Charge Error
Cause: The customer has no chargeable saved payment method, or the charge attempt itself failed at the gateway.
Solution:
- Check the Charge Mode setting — Token Only intentionally hides offers with nothing to charge.
- For offline payment methods (cash, bank transfer, money order), confirm Offline Payment Amendment is set to Amend and Invoice if you want those customers to still be able to accept offers.
- Review the order's history in J2Commerce -> Orders — a failed charge is logged there and the offer amendment is automatically reverted, so the order total is left unchanged.
Product Has No Resolved Variant
Cause: The product selected for an offer has no purchasable variant.
Solution:
- Open the product in J2Commerce -> Catalog -> Products and add at least one purchasable variant.
- Return to the offer and re-save it so the variant resolves.
Confirmation Email Looks Out of Sync
Cause: Order Update Email is set to Defer, and the offer flow hasn't finished yet.
Solution:
- This is expected in Defer mode — the confirmation email is intentionally held until the customer finishes the offer flow (or the Flow Time Budget runs out), so it reflects any accepted upsell.
- If you'd rather have the confirmation email send immediately every time, switch Order Update Email to Amend in the app's settings.
Offer Flow Canvas Won't Load
Cause: The J2Commerce Flow Builder Library (lib_j2commerceflow) is not installed.
Solution:
- Install
lib_j2commerceflowfrom the J2Commerce Extensions Store. - Reload the View Flow screen for the promotion.