ActiveCampaign Integration
The ActiveCampaign Integration app connects your J2Commerce store to ActiveCampaign so your email and SMS automations always have real purchase data behind them. Every time a customer places an order, their status changes, or a cart sits abandoned, J2Commerce pushes that activity to ActiveCampaign in real time. A checkout consent checkbox lets shoppers opt in to your marketing list the moment they buy, and a product catalog sync keeps ActiveCampaign's Product Picker and segmentation tools up to date automatically.
Requirements
- PHP 8.3.0 or later
- Joomla 6.x
- J2Commerce 6.x
- An active ActiveCampaign account
Find Your ActiveCampaign API URL and Key
Before configuring the app, you need two values from your ActiveCampaign account: the API URL and the API Key. J2Commerce uses these together for every server-side call to ActiveCampaign.
- Log in to your ActiveCampaign account.
- Go to Settings -> Developer (or Store Settings -> API in some account types).
- Copy the API URL — it looks like
https://youraccount.api-us1.com. - Copy the API Key shown on the same screen.
Copy both values to a safe place before leaving the ActiveCampaign screen. Never paste a "Bearer" token into the API Key field — J2Commerce expects the plain API key.
Purchase and Download
The ActiveCampaign Integration is a separate add-on available from the J2Commerce Extensions Store. It is not included with the core J2Commerce 6 component.
Step 1: Go to www.j2commerce.com -> Apps.
Step 2: Locate the ActiveCampaign Integration app, click View Details, then Add to Cart -> Checkout.
Step 3: After purchase, go to My Downloads under your profile menu and find the app. Click Available Versions -> View Files -> Download Now.
Install the App
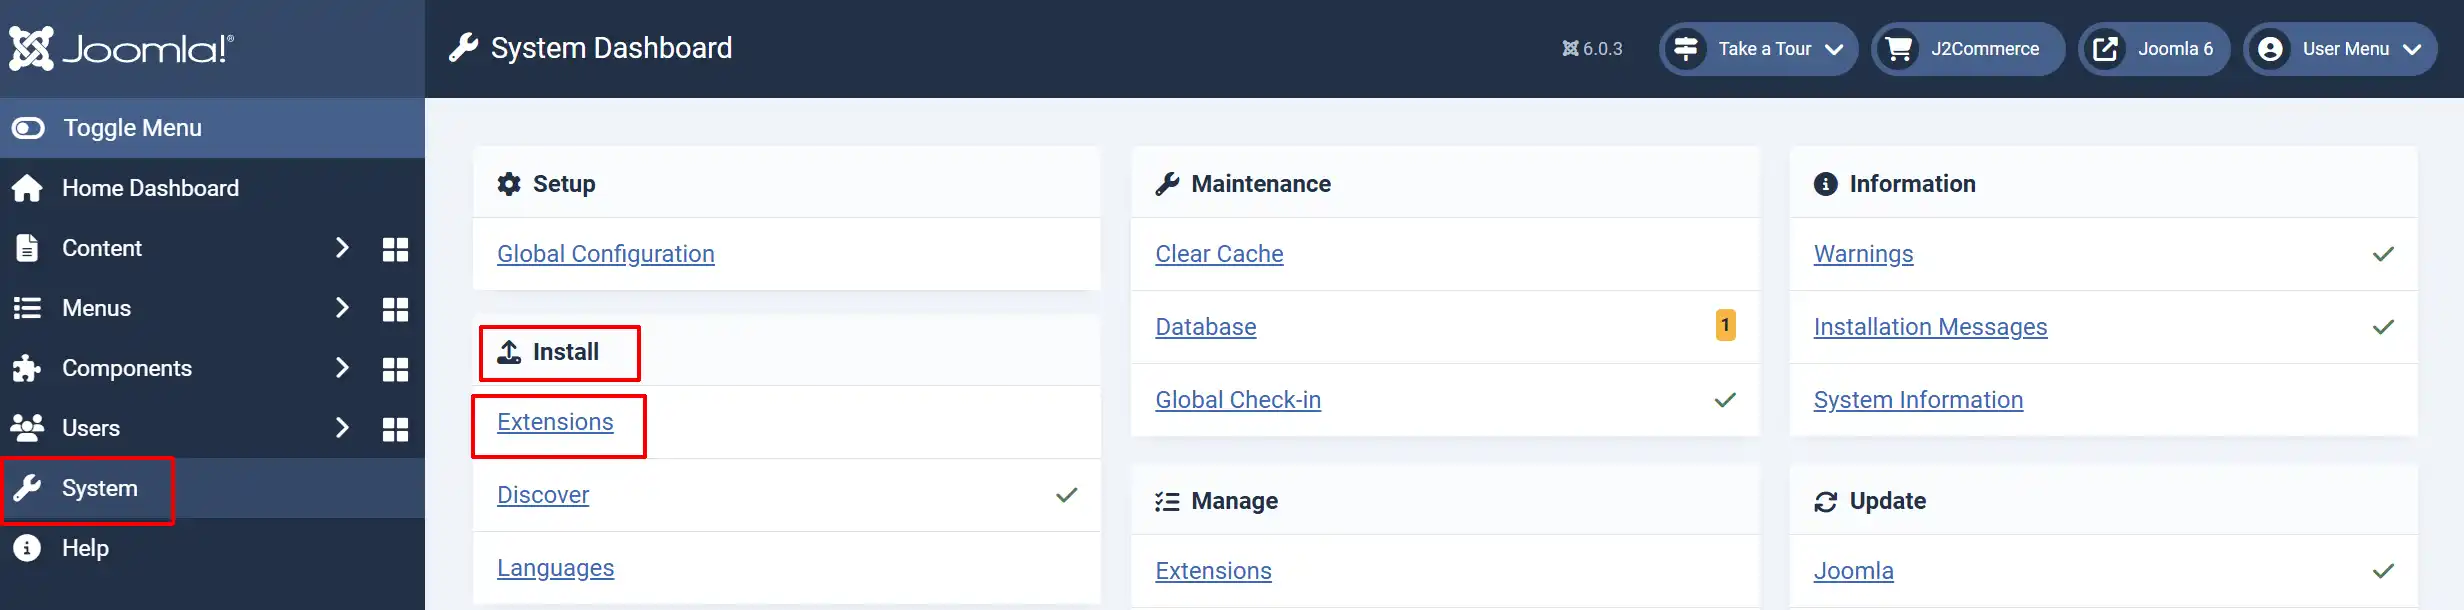
In the Joomla Administrator, go to System -> Install -> Extensions.
Upload the plugin ZIP file or use the Install from URL option.
Enable the App
The plugin installs and enables itself automatically. No separate enable step is needed. However, it's important to know where to go to enable or disable it in the future .
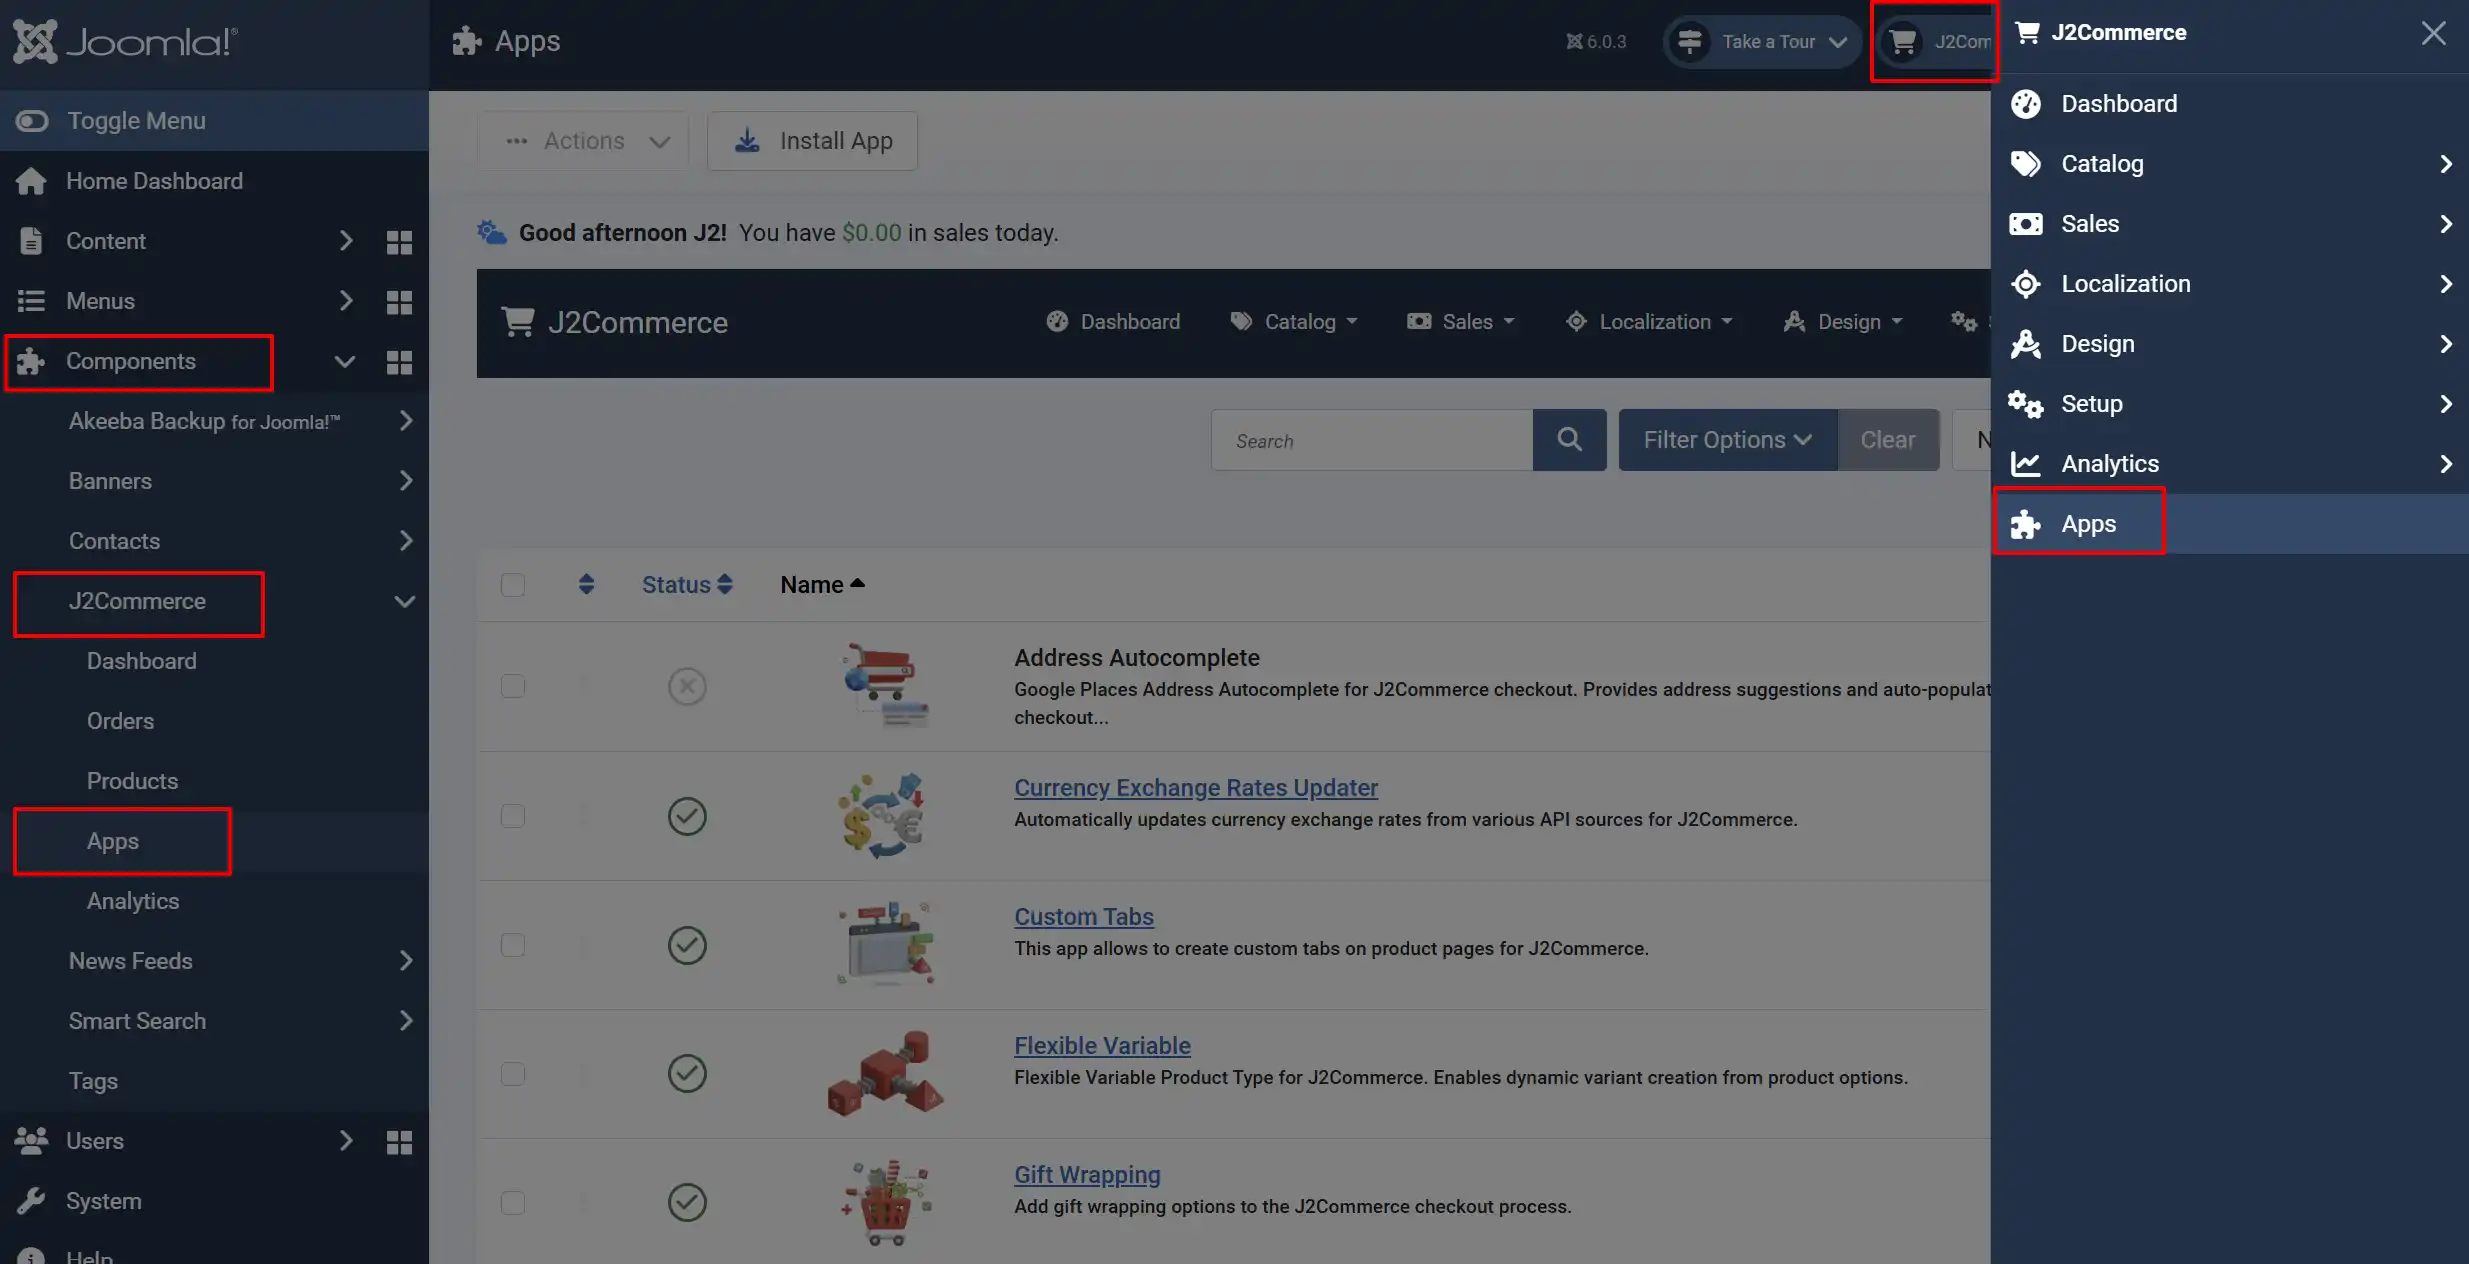
There are two ways to reach the Apps list.
Option A: Go to the J2Commerce icon at the top right corner -> Apps
Option B: Go to Components on the left sidebar -> J2Commerce -> Apps
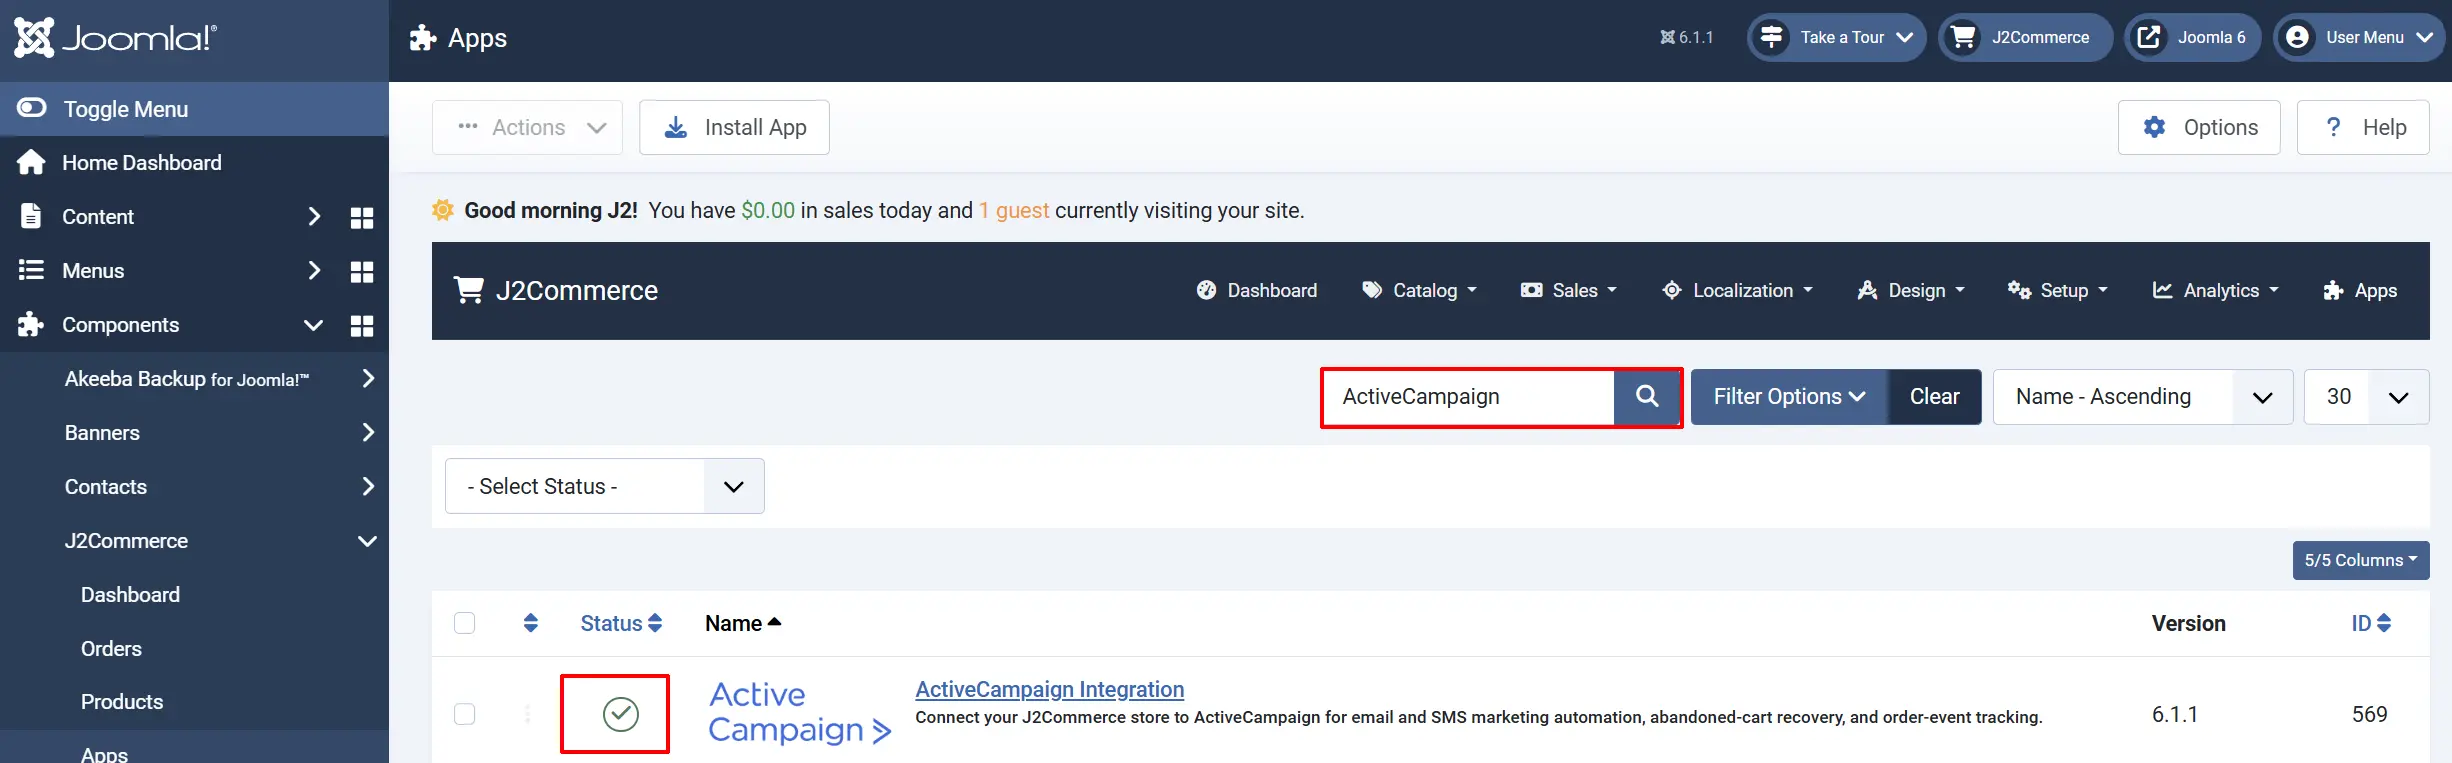
To help you narrow down the list, you can do a search for ActiveCampaign Integration, click the X, and it will turn into a green checkmark. It is now enabled and ready for setup.
Configure the App
Click the ActiveCampaign Integration title (next to the green checkmark) to open the settings screen.
Click the Toggle Inline Help button on any app you install to see a description below each field directly in the admin panel.

API Connection
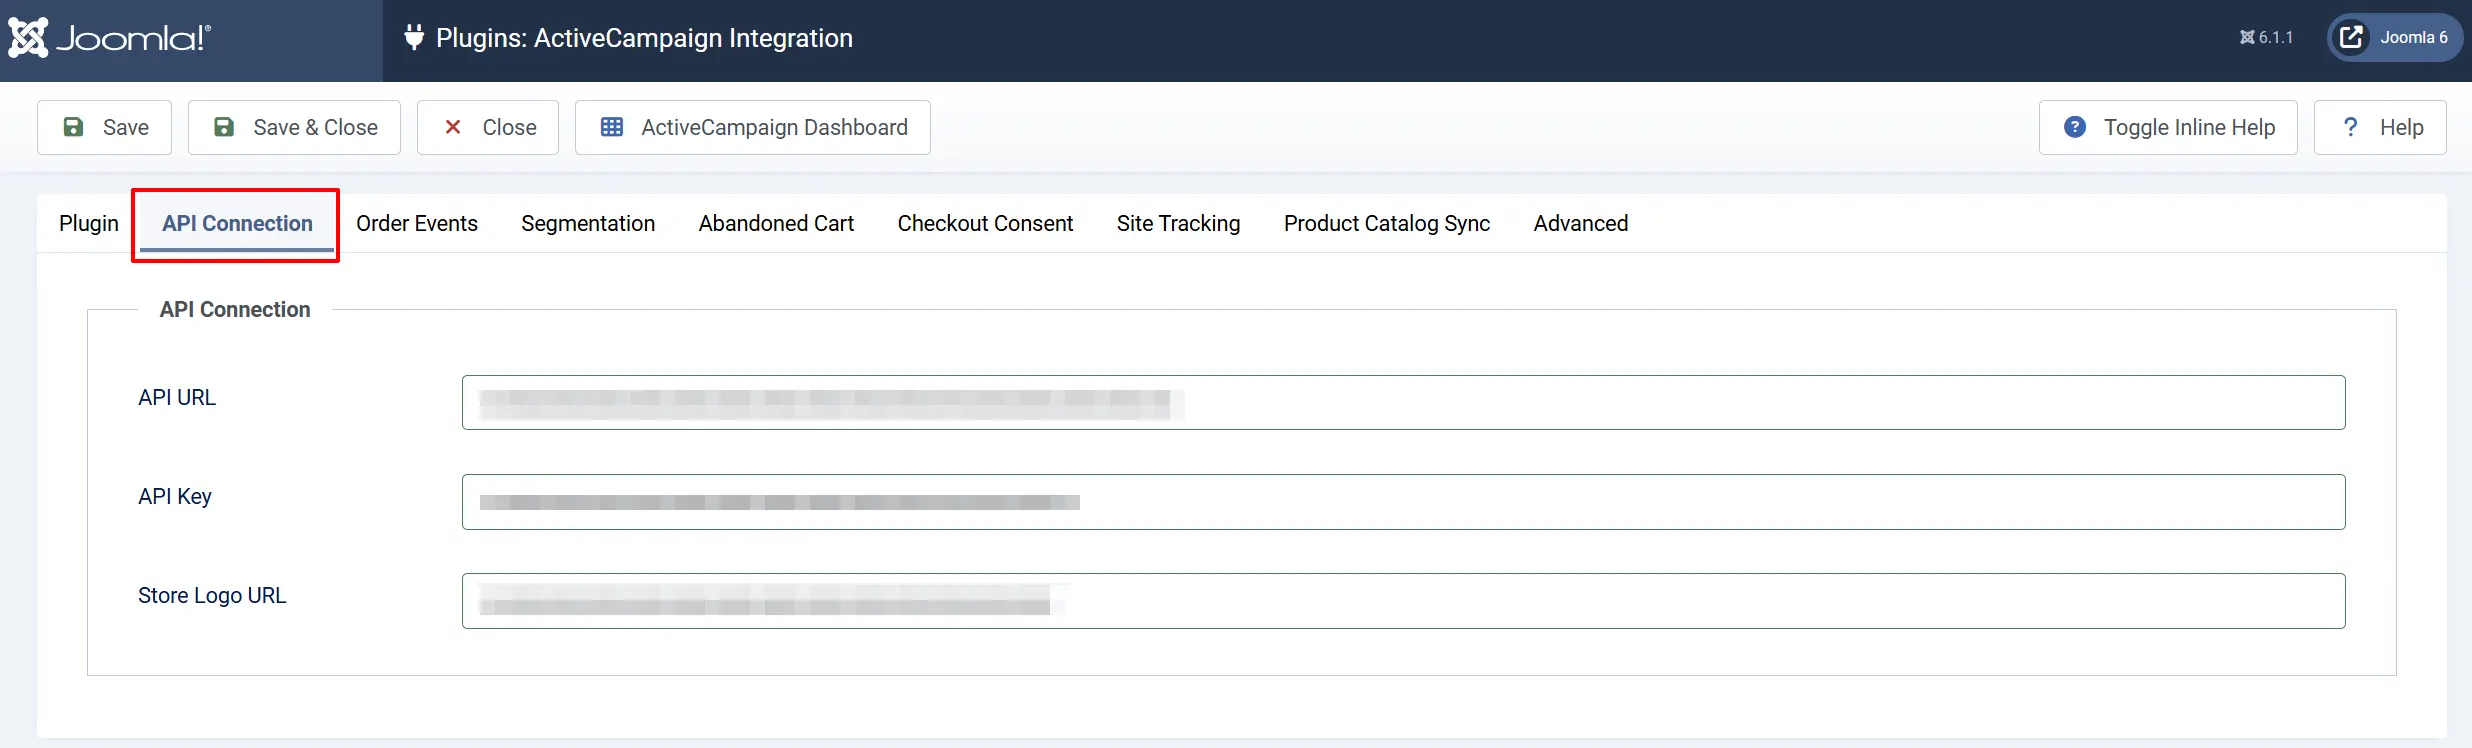
This is the only required section. Nothing else works without it.
API URL: Your ActiveCampaign account API URL, for example https://youraccount.api-us1.com. Found under Store Settings -> API alongside the API key.
API Key: Your ActiveCampaign API key. Use the plain key only — never a Bearer token.
Store Logo URL: Optional. A URL to your store logo, shown on the ActiveCampaign store connection and in ecommerce emails. Defaults to your site favicon. Only applies when the connection is first created.
After saving the API URL and Key, click ActiveCampaign Dashboard in the toolbar and then click Test Connection to confirm J2Commerce can reach your ActiveCampaign account. A success message shows how many contacts already exist in your account.
Order Events
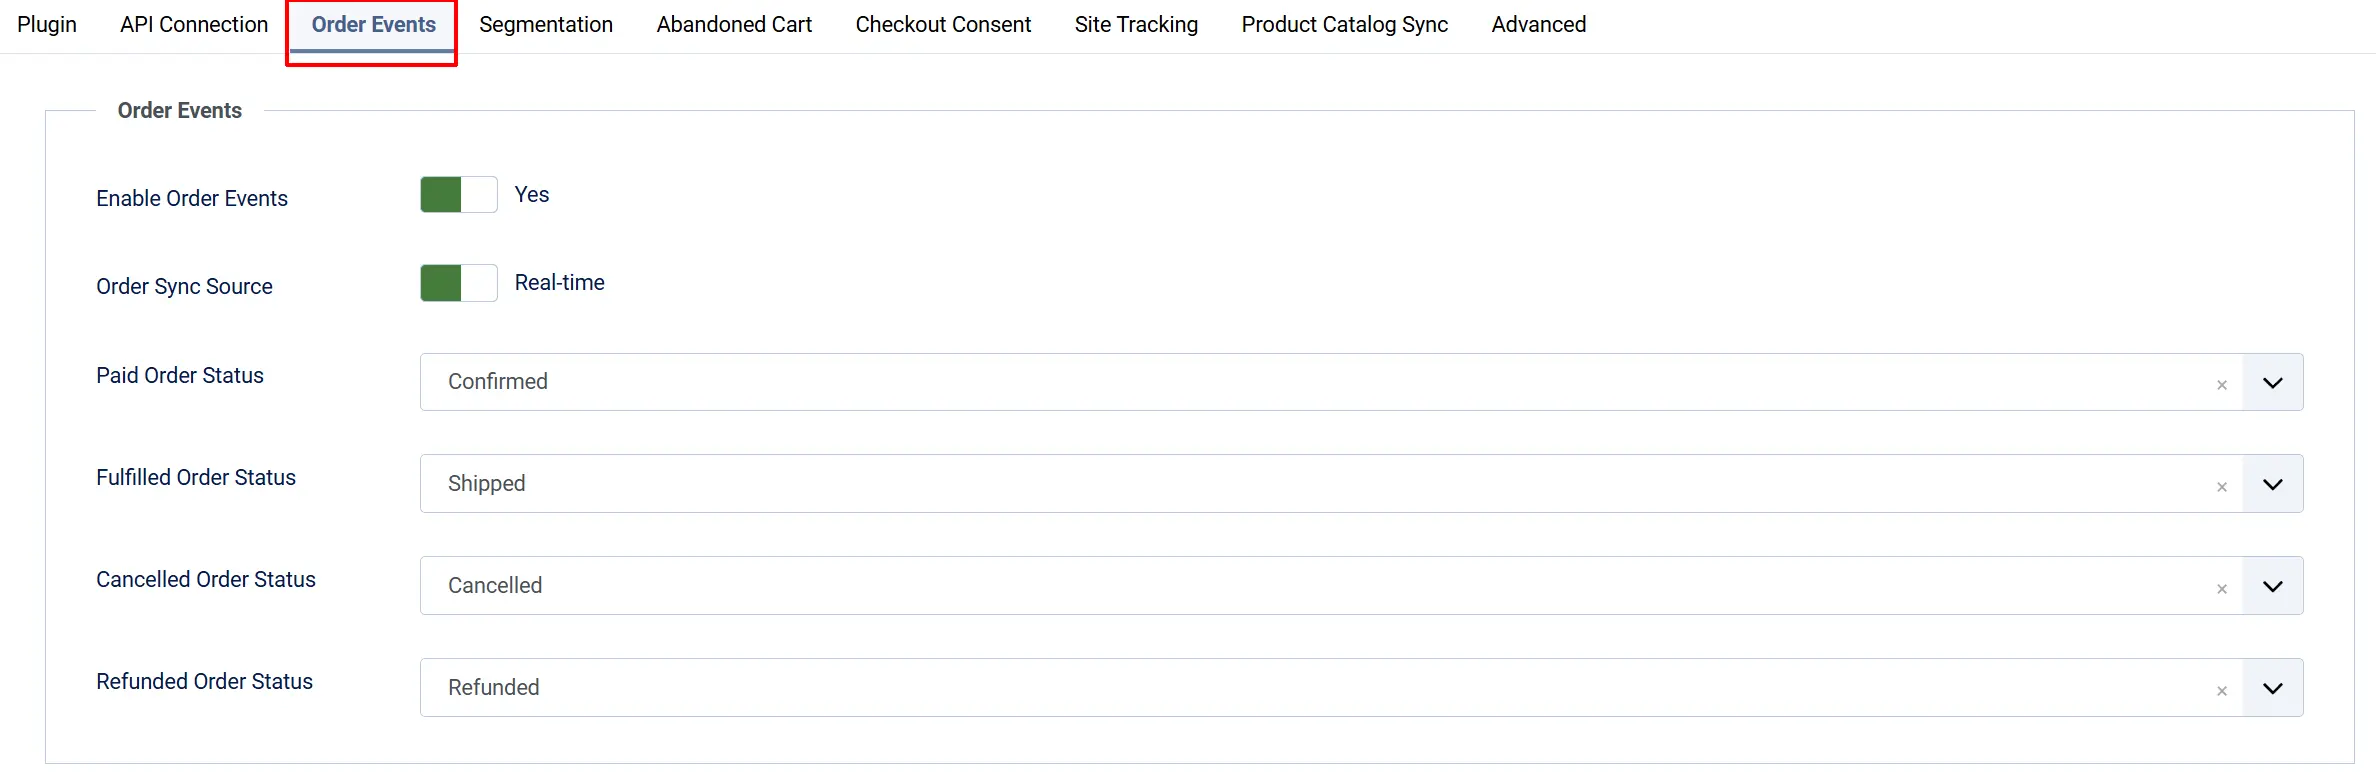
Controls which order lifecycle events are sent to ActiveCampaign as Deep Data orders, and which J2Commerce order status triggers each one.
Enable Order Events: Master switch for all order lifecycle events. Turn this off to stop all order event syncing.
Order Sync Source: Tells ActiveCampaign whether orders are being pushed live (Real-time) or backfilled (Historical). The Sync Historic Orders dashboard action always sends Historical regardless of this setting.
Paid Order Status: The order status that triggers the "paid for order" event. Typically your Confirmed / Paid status.
Fulfilled Order Status: The order status that triggers the "order fulfilled" event. Typically your Shipped status.
Cancelled Order Status: The order status that triggers the "order cancelled" event.
Refunded Order Status: The order status that triggers the "order refunded" event. Leave empty to disable refund event tracking.
A "placed order" Deep Data sync happens automatically for every new order, regardless of these status mappings.
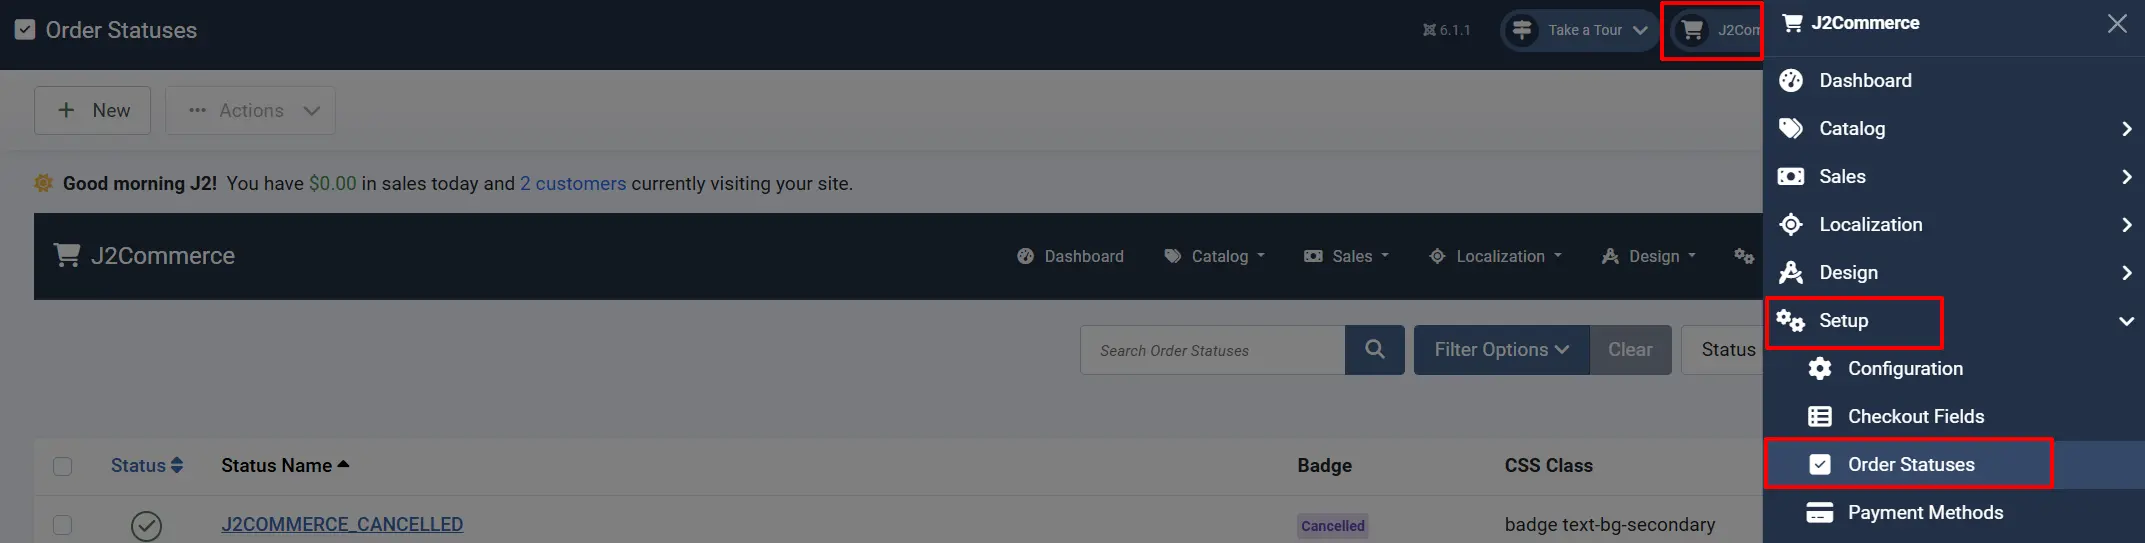
NOTE: If the status you want isn't listed in the dropdown menu, you can create a new one by going to J2Commerce -> Setup -> Order Statuses
Segmentation
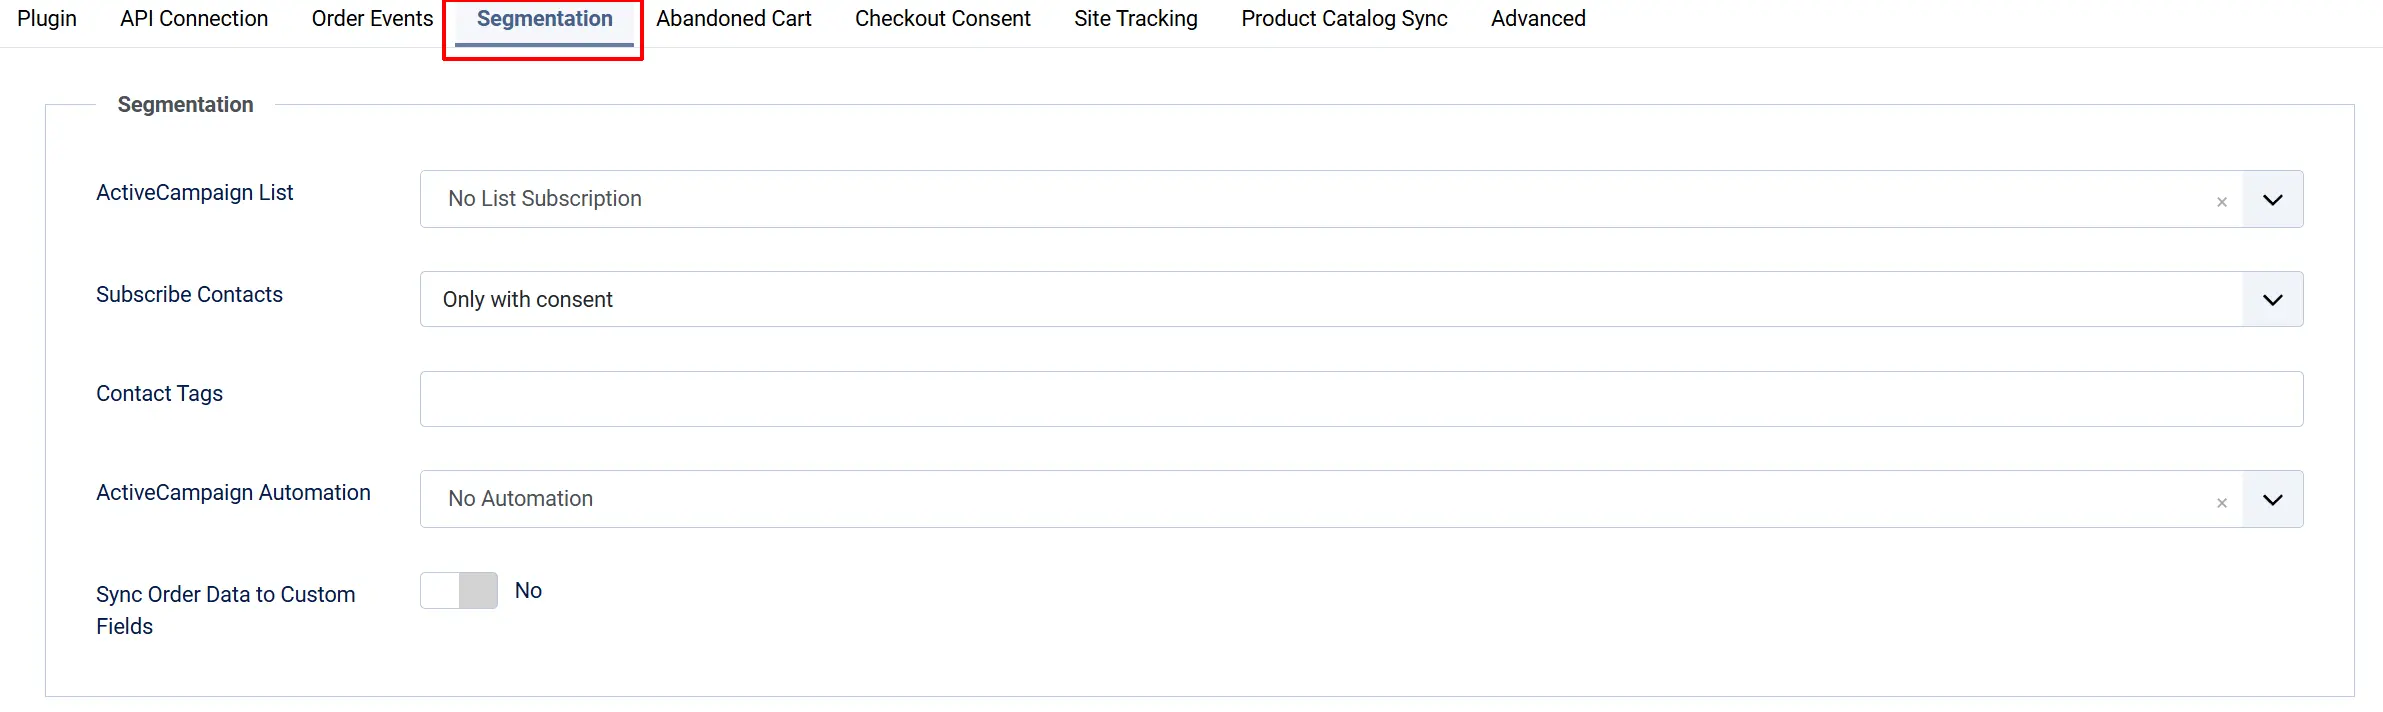
Controls which ActiveCampaign list, tags, and automation your synced contacts receive.
ActiveCampaign List: The list to subscribe synced contacts to. This dropdown loads live from your account once the API URL and Key are saved. Choose No List Subscription to skip list subscription entirely.
Subscribe Contacts: When a contact is subscribed to the list above: Only with consent, Always, or Never (the contact is still synced, just not added to the list).
Contact Tags: Comma-separated tag names applied to every synced contact, for example j2commerce-customer, vip. Tags are created automatically in ActiveCampaign if they don't already exist.
ActiveCampaign Automation: The automation to enroll synced contacts into. Loads live once your credentials are saved. Choose No Automation to skip enrollment.
Sync Order Data to Custom Fields: When enabled, the customer's last order total and last order date are written to ActiveCampaign contact custom fields (created automatically if missing), enabling richer segmentation.
Abandoned Cart

Enable Abandoned Cart Recovery: When enabled, carts left inactive past the timeout below are synced to ActiveCampaign as abandoned Deep Data orders, powering cart-abandonment automations. Currently supports logged-in shoppers only — guest carts are not yet synced.
Abandonment Timeout: How long a cart must sit inactive before it's considered abandoned: 1 hour, 6 hours, 10 hours, or 24 hours. Only shown when Abandoned Cart Recovery is enabled.
Checkout Consent
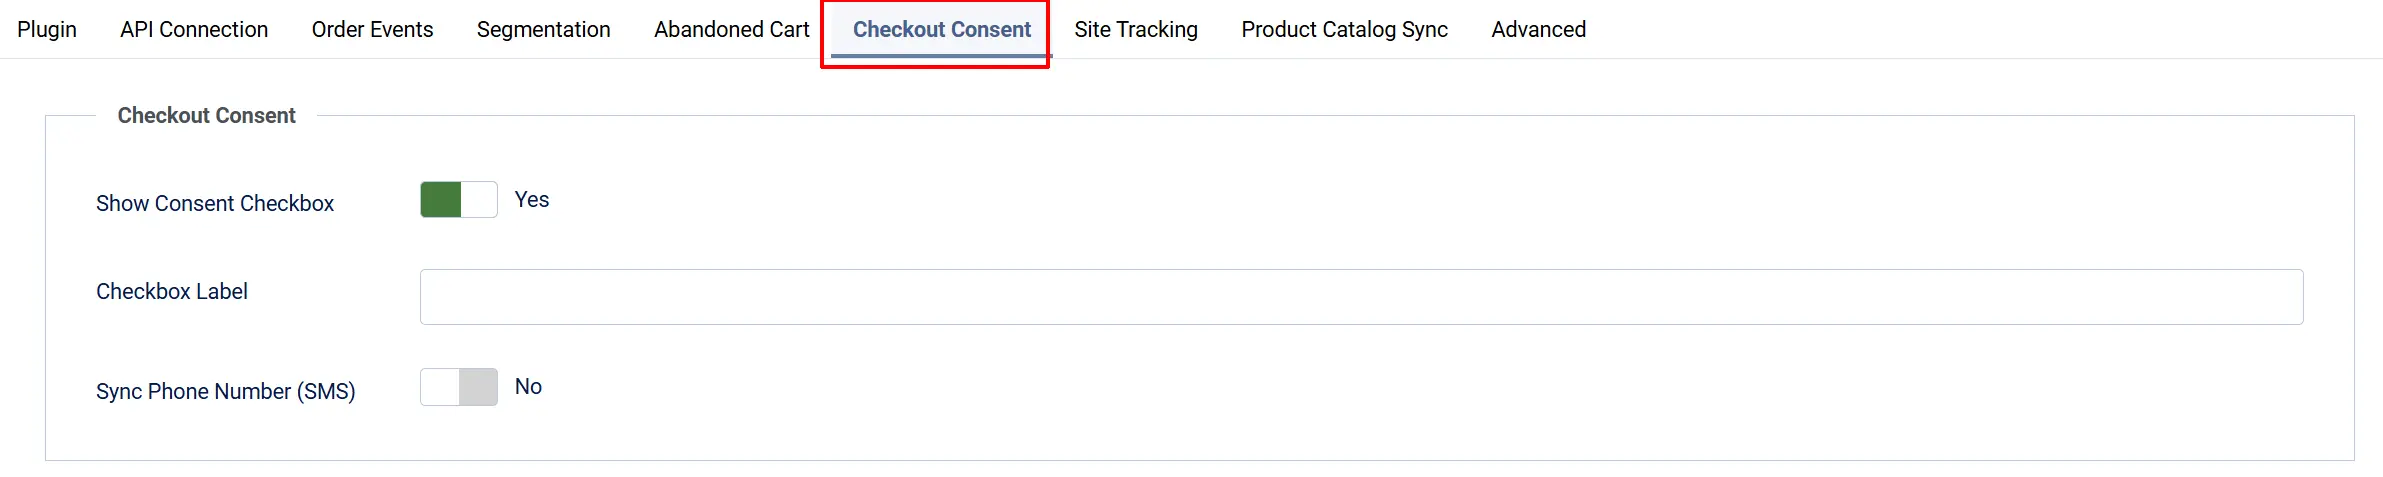
Show Consent Checkbox: Displays a checkbox on the checkout shipping/payment step. Checking it subscribes the customer to your ActiveCampaign list.
Checkbox Label: The text shown next to the checkbox. Leave blank to use the built-in default: "Email me news and exclusive offers." Plain text only — HTML is not allowed.
Sync Phone Number (SMS): Sends the customer's billing phone number to ActiveCampaign as an SMS contact identifier. The number is not marked as SMS-subscribed — SMS marketing still requires its own separate consent. This simply lets ActiveCampaign hold the number for transactional or separately-consented messages.
Adds a marketing-consent checkbox to the checkout shipping/payment step so customers can opt in to your ActiveCampaign email list when they buy.
The consent checkbox is always unchecked by default. This is intentional for GDPR compliance — customers must actively tick it to subscribe.
Site Tracking
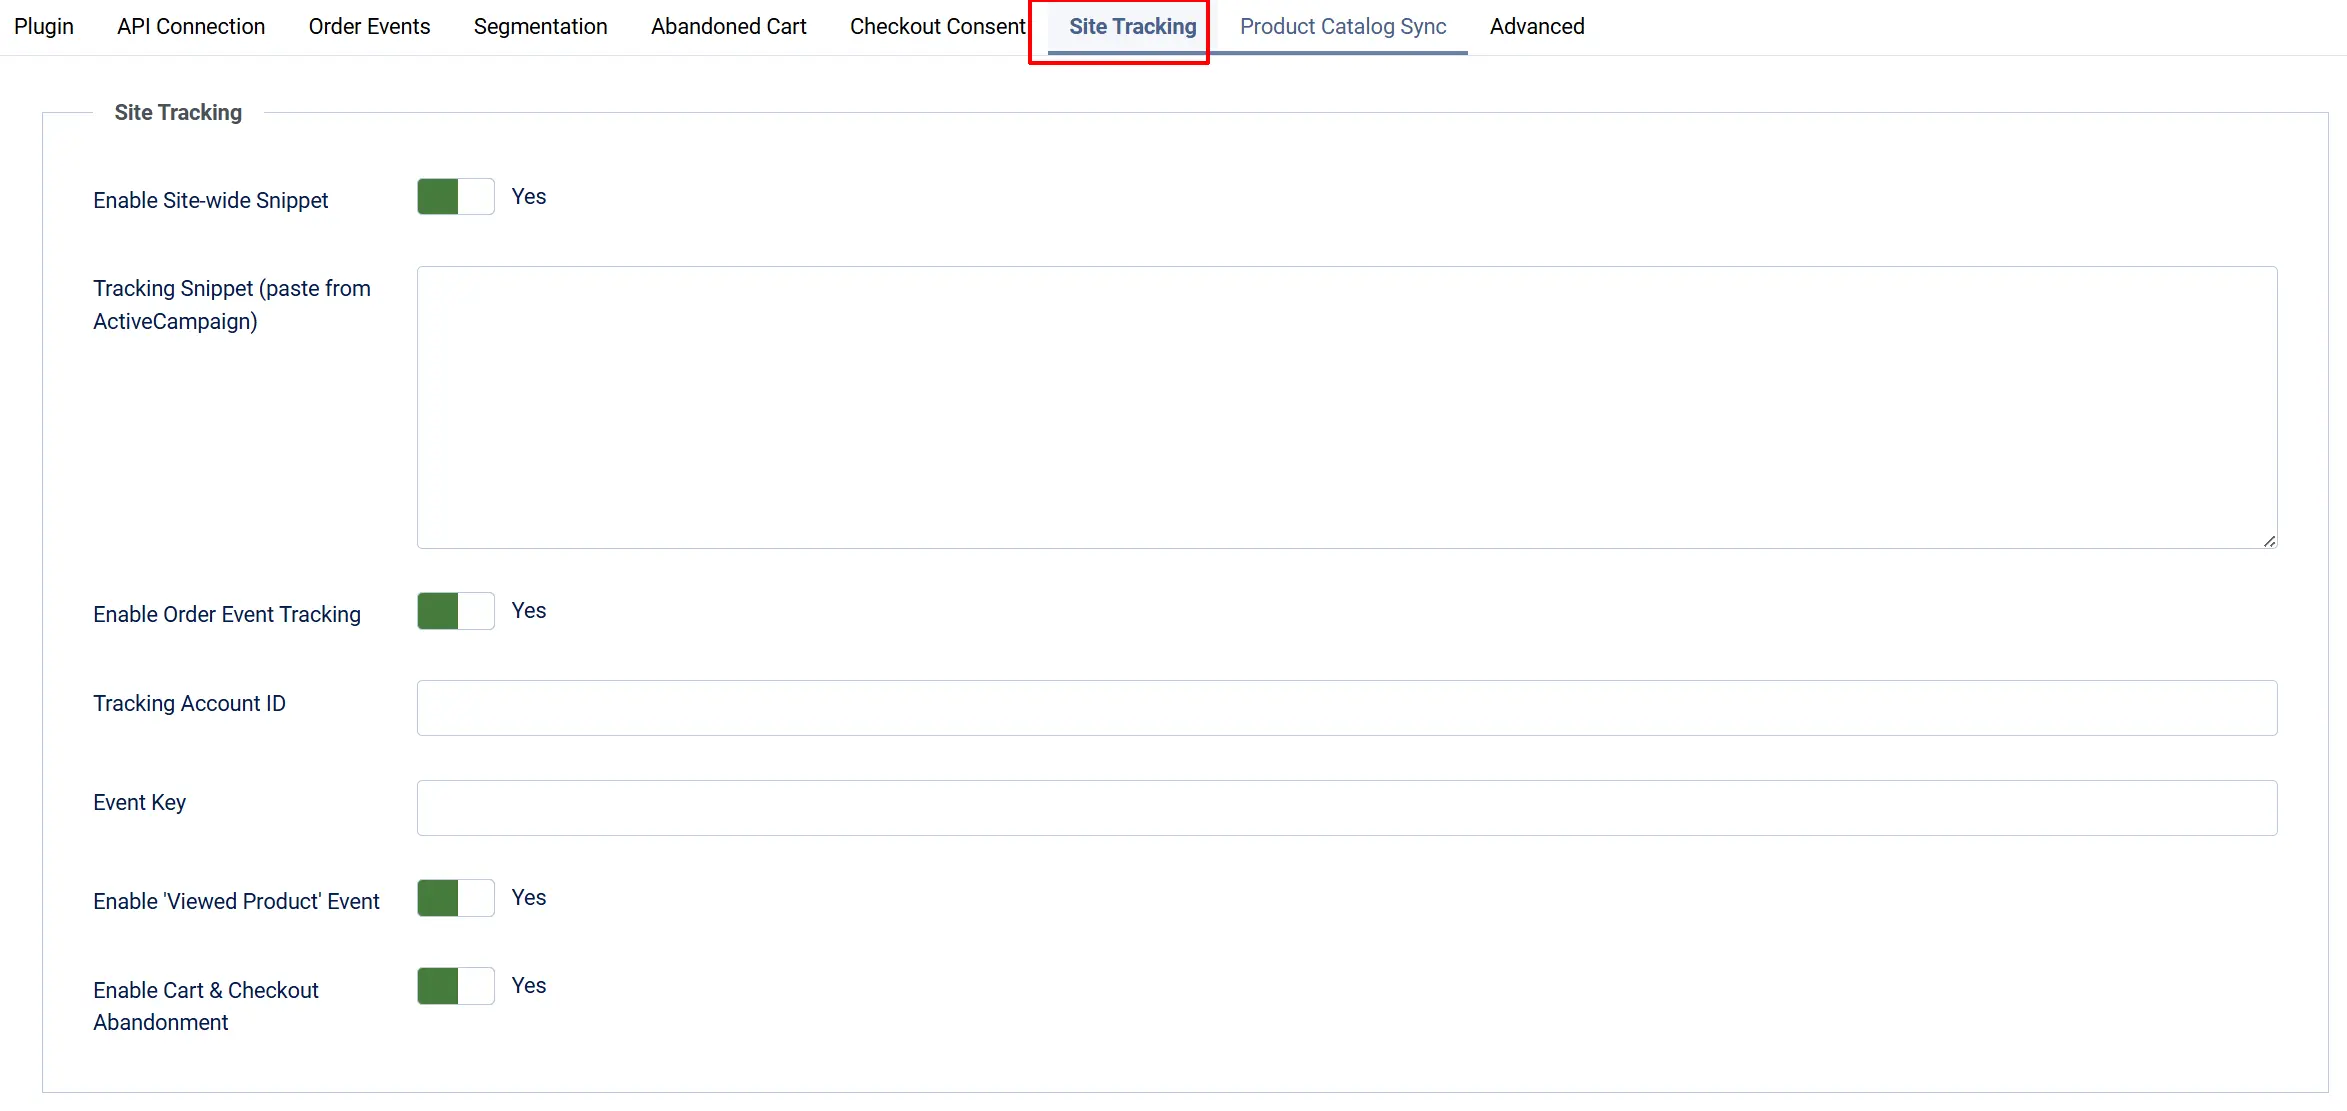
Controls the ActiveCampaign JavaScript that runs on your storefront, plus the separate trackcmp.net event-tracking integration.
Enable Site-wide Snippet: Injects the ActiveCampaign site-tracking snippet (pasted below) on every page of your site. Logged-in shoppers are automatically identified to ActiveCampaign by email once the snippet is present.
Tracking Snippet (paste from ActiveCampaign): Paste only the JavaScript from the site-tracking snippet ActiveCampaign gives you under Settings -> Tracking. Do not include the surrounding <script> tags — the plugin adds those for you. It is injected just before the closing </body> tag. There is no auto-built fallback, so this field is required for site tracking to work.
Enable Order Event Tracking: When enabled, order lifecycle events (placed, paid, fulfilled, cancelled, refunded) are also sent as ActiveCampaign site-tracking events via trackcmp.net, in addition to the Deep Data order sync in Order Events above. Requires the two fields below.
Tracking Account ID: The actid value from your ActiveCampaign site-tracking snippet.
Event Key: The Event Tracking key from ActiveCampaign Settings -> Tracking -> Event Tracking. This is separate from your API key and is never logged.
Enable "Viewed Product" Event: Reserved for a future release. Requires Enable Site-wide Snippet to be on.
Enable Cart & Checkout Abandonment: Reserved for a future release. Currently, use Enable Abandoned Cart Recovery above for cart-abandonment sync.
The Enable "Viewed Product" Event and Enable Cart & Checkout Abandonment fields are placeholders for an upcoming release and do not send data yet. Use Enable Abandoned Cart Recovery (in the Abandoned Cart section) for cart-abandonment automations today.
Product Catalog Sync

Enable Product Catalog Sync: When on, every product save or delete is automatically synced to ActiveCampaign's product catalog. Enables the ActiveCampaign Product Picker in campaigns and product-abandonment automations. Requires the on-site snippet for browse-abandonment flows.
Advanced

Debug Logging: Writes verbose log entries to the Joomla log file. Turn this off in production — use it only when diagnosing a problem.
The ActiveCampaign Dashboard
After saving your API URL and Key, click ActiveCampaign Dashboard in the toolbar from the plugin settings page to open the integration's admin view.
From the dashboard you can:
- Test Connection — Verifies your API URL and Key and shows how many contacts already exist in your ActiveCampaign account.
- Sync All Products — Queues every enabled product for a full catalog sync to ActiveCampaign. Use this once when you first connect, or after enabling catalog sync on an existing store.
- Sync Historic Orders — Queues all past orders for ActiveCampaign. Use this once when you first connect so ActiveCampaign has purchase history for segmentation.
- Settings — Opens the plugin configuration form directly.
The sync buttons add items to J2Commerce's background queue. Delivery to ActiveCampaign happens the next time the J2Commerce Scheduled Tasks run. Make sure you have a cron job set up for Joomla's task scheduler at System -> Scheduled Tasks.
Before clicking Sync Historic Orders, pause any ActiveCampaign automations triggered by order events. Otherwise ActiveCampaign may send confirmation-style emails to past customers.
How It Works
Here is a plain-English summary of what happens behind the scenes when the integration is active.
A customer registers or places an order. J2Commerce queues a contact record for ActiveCampaign with the customer's email, first name, and last name. If the customer ticked the consent checkbox at checkout, they're subscribed to your list according to the Subscribe Contacts setting. If Sync Phone Number (SMS) is on, the billing phone is included as an SMS identifier.
An order is placed. J2Commerce sends a Deep Data "placed order" record with the full order details: items, quantities, prices, shipping, discounts, and currency. If Sync Order Data to Custom Fields is on, the customer's last order total and date are also written to their ActiveCampaign contact record.
An order status changes. When an order moves to a status you mapped in Order Events, J2Commerce re-syncs the order and, if Enable Order Event Tracking is on, fires the matching trackcmp.net event — "paid for order," "order fulfilled," "order cancelled," or "order refunded."
A cart sits inactive. If Enable Abandoned Cart Recovery is on, once a logged-in shopper's cart has been inactive past the configured timeout, J2Commerce syncs it to ActiveCampaign as an abandoned Deep Data order so your cart-recovery automations can trigger.
A shopper visits your storefront. If Enable Site-wide Snippet is on, the ActiveCampaign tracking snippet loads on every page and identifies logged-in shoppers to ActiveCampaign by email.
A product is saved or deleted. If Enable Product Catalog Sync is on, the product is automatically synced to — or removed from — ActiveCampaign's product catalog without any manual action.
Events Sent to ActiveCampaign
| Event | When It Fires | What Enables It |
|---|---|---|
| Placed order (Deep Data) | After a new order is saved | Automatic when Order Events is on |
| Paid for order | Order status matches Paid Order Status | Configurable status mapping |
| Order fulfilled | Order status matches Fulfilled Order Status | Configurable status mapping |
| Order cancelled | Order status matches Cancelled Order Status | Configurable status mapping |
| Order refunded | Order status matches Refunded Order Status | Configurable status mapping (disabled by default) |
| Abandoned cart (Deep Data) | Cart inactive past the abandonment timeout | Enable Abandoned Cart Recovery (logged-in shoppers only) |
| Contact registered/synced | Customer registers or places an order | Automatic |
Tips
- Set up cron first. The integration relies on J2Commerce's background queue. If Joomla's task scheduler isn't running via cron, contacts and orders queue up but never reach ActiveCampaign. Confirm your cron job is active before testing.
- Pause automations before a historic sync. Before clicking Sync Historic Orders, pause any ActiveCampaign flows triggered by order events so past customers don't receive confirmation-style emails.
- Use Test Connection before going live. Click Test Connection from the ActiveCampaign Dashboard after saving your credentials to confirm they work.
- The API Key is not your ActiveCampaign login password. Both the API URL and Key are found under your account's Developer/API settings, not your login credentials.
- Cart abandonment currently covers logged-in shoppers only. If you need to reach guest shoppers, keep this in mind when planning your recovery automations.
Troubleshooting
Contacts are not appearing in ActiveCampaign
Cause: The API URL/Key are missing, invalid, or the background queue isn't processing.
Solution:
- Go to J2Commerce -> Apps -> ActiveCampaign Integration -> Settings and confirm both API URL and API Key are filled in.
- Open the dashboard and click Test Connection. If it returns an error, the credentials are wrong or have been revoked.
- Go to System -> Scheduled Tasks and confirm the last run time is recent — contacts are delivered through J2Commerce's background queue.
- Turn on Debug Logging in the Advanced settings, reproduce the issue, then check the Joomla log for
plg_j2commerce_app_activecampaignerror entries.
The consent checkbox is not appearing at checkout
Cause: The setting is off, the app is disabled, or no API credentials are saved.
Solution:
- Confirm Show Consent Checkbox is set to Yes in the Checkout Consent settings.
- Confirm the app is enabled — the toggle in J2Commerce -> Apps should show a green checkmark.
- Confirm your API URL and Key are saved. The plugin skips all frontend output when no credentials are configured.
Abandoned cart events are not syncing
Cause: Recovery is disabled, the shopper was a guest, or the cron task scheduler isn't running.
Solution:
- Confirm Enable Abandoned Cart Recovery is set to Yes in the Abandoned Cart settings.
- Confirm the customer was logged in — guest carts are not yet synced.
- Confirm the cart has been inactive longer than the configured Abandonment Timeout.
- Confirm Joomla's Scheduled Tasks cron is running so the queue can process.
The site-tracking snippet is not appearing on my storefront
Cause: The snippet is disabled, no snippet was pasted, or the page is being cached.
Solution:
- Confirm Enable Site-wide Snippet is set to Yes in the Site Tracking settings.
- Confirm the Tracking Snippet field contains the JavaScript from ActiveCampaign (without the surrounding
<script>tags) — there is no auto-built fallback. - View your storefront's page source and search for the snippet just before
</body>. - If you use a caching extension or CDN with HTML caching, flush all caches and reload.
Test Connection returns an error about an invalid API key
Cause: The API URL or Key is incorrect, or the key was rotated in ActiveCampaign.
Solution: Copy both the API URL and API Key exactly as shown in ActiveCampaign under your Developer/API settings. Never prepend "Bearer" or any other prefix to the key. If the key was rotated or revoked, generate a new one and update the plugin settings.
Sync All Products shows 0 products queued
Cause: Product catalog sync is disabled, or no products are published.
Solution: Confirm Enable Product Catalog Sync is set to Yes in the Product Catalog Sync settings, and confirm your products are published, before clicking Sync All Products.