Klarna Invoice (Pay Later)
Klarna Invoice lets your customers receive their order first and pay later — within 14 or 30 days of delivery. Rather than requiring payment at checkout, the customer simply confirms their purchase and receives an invoice. This can increase conversion rates, especially for first-time buyers who are hesitant to enter card details or pay before seeing the goods.
This plugin is dedicated to the Klarna Pay Later / Invoice payment type only. It does not offer on-site card widgets, saved payment methods, or subscriptions. Checkout works via a Klarna-hosted payment page (HPP redirect), keeping payment entry completely off your site.
Requirements
- J2Commerce 6.0 or later installed and active
- Joomla 6.0 or later
- A Klarna merchant account with Pay Later / Invoice activated for your region
- Your site must be accessible over HTTPS for Klarna callbacks to reach it
Set Up a Klarna Merchant Account
If you already have Klarna API credentials with Pay Later enabled, skip to Enable the Plugin.
- Sign up for a Klarna merchant account at klarna.com if you do not already have one.
- Log into the Klarna Merchant Portal.
- Go to Settings -> API credentials.
- Note your API Username (UID) and generate an API Password.
- Confirm that the Pay Later / Invoice payment method is activated for your merchant account and region. If it is not visible, contact Klarna merchant support.
- For testing, create a separate set of sandbox/playground credentials — keep both sets handy.
Klarna's Pay Later / Invoice availability varies by country and merchant agreement. If invoice is not available in your Klarna Merchant Portal, contact Klarna to have it activated before configuring this plugin.
Purchase and download
This plugin is a separate add-on available from the J2Commerce Extensions Store. It is not included with the core J2Commerce 6 component.
- Go to the J2Commerce website and locate Klarna Invoice.
- Add it to your cart and complete checkout.
- Go to My Downloads under your account profile and find the plugin.
- Click Available Versions -> View Files -> Download Now to download the ZIP file.
Install the plugin
In the Joomla Administrator, go to System -> Install -> Extensions.
Upload the plg_j2commerce_payment_klarnainvoice.zip file.

Enable the Plugin
Once you have installed the App, you will need to enable it. There are two ways you can access the App.
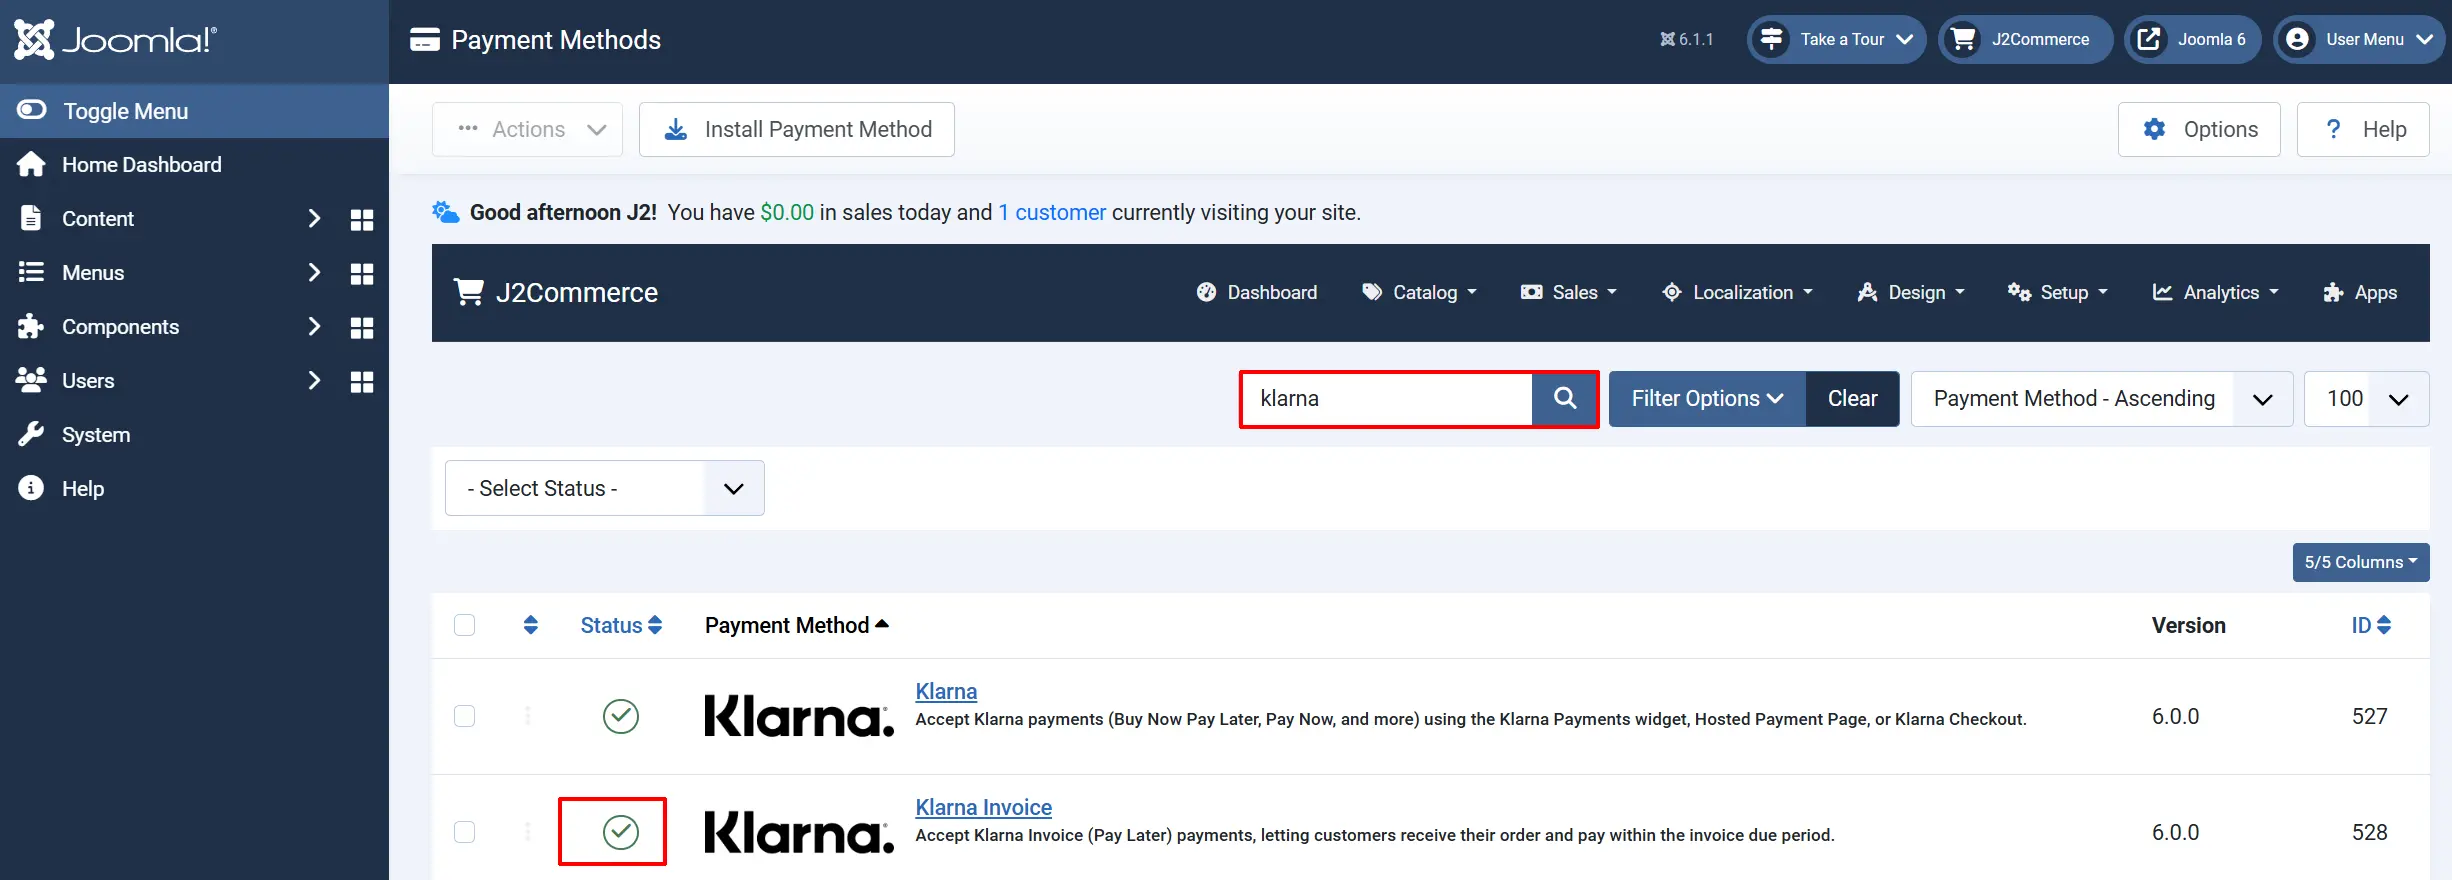
Option A: Go to the J2Commerce icon at the top right corner -> Setup -> Payment Methods
Option B: Go to Components on the left sidebar -> J2Commerce -> Dashboard -> Setup -> Payment Methods

To help you narrow down the list, you can do a search for Klarna Invoice, click the X, and it will turn into a green checkmark. It is now enabled and ready for setup.
Configure the Plugin
Click the Toggle Inline Help button at the top of any plugin configuration page to show a short description beneath each field.

Display Settings
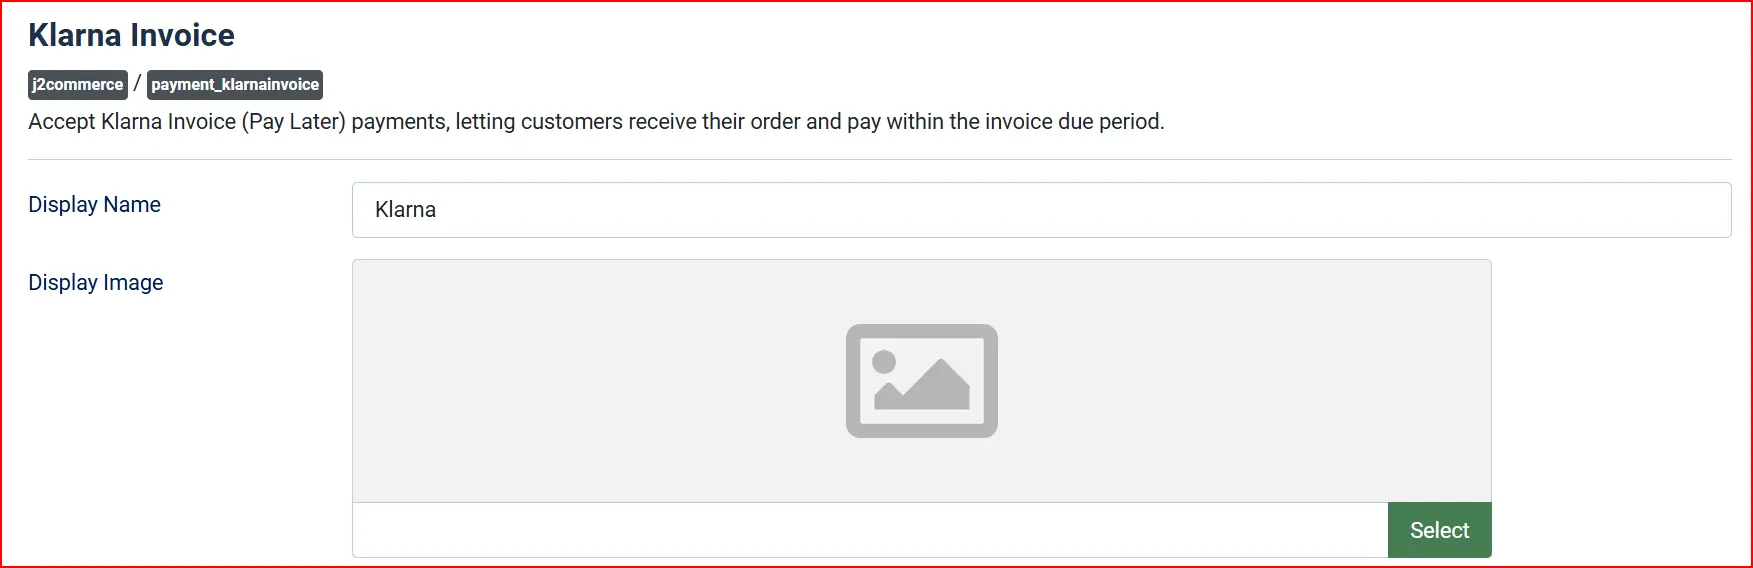
Display Name: The payment method name shown to shoppers at checkout — e.g., "Pay Later with Klarna"
Display Image: Optional logo or badge shown alongside the payment option at checkout
Invoice Due Days

Invoice Due Days: Number of days the customer has to pay the invoice after delivery. Options are 14 or 30
This setting controls the payment term shown to the customer at checkout — for example, "Pay within 14 days of delivery." The value you select must match the invoice payment terms configured in your Klarna merchant account.
Transaction Type
Authorize and Capture: Places and immediately captures the Klarna invoice when the order is confirmed. Recommended for most stores.
Authorize Only: Holds the invoice authorization without confirming it. You capture manually from the order view when you are ready to dispatch the order.
Region
Select the Klarna API region that matches your merchant account. Using the wrong region causes authentication errors.
Europe (EU): Your Klarna account is registered in a European country
North America (NA): Your Klarna account is registered in the US or Canada
Oceania (OC): Your Klarna account is registered in Australia or New Zealand
API Credentials

Toggle Sandbox Mode on while you are testing. In sandbox mode no real payments are processed and Klarna uses its playground environment. Turn this off before going live.
The Sandbox API credentials are separate from your live credentials. Fill in both sets so you can switch environments without losing your production keys.
Two credential sets are available — fill in both. The plugin automatically uses whichever set matches the current Sandbox Mode setting.
Live credentials (shown when Sandbox Mode is Off):
API Username (UID): Your live Klarna API username — typically a UUID starting with a region prefix such as PK99999_...
API Password: Your live Klarna API password
Sandbox credentials (shown when Sandbox Mode is On):
Sandbox API Username: Your playground/sandbox Klarna API username
Sandbox API Password: Your playground/sandbox Klarna API password
Unlike the full Klarna Payments plugin, this invoice-only plugin does not require a Client Identifier because it uses Klarna's Hosted Payment Page redirect rather than an on-site widget.
B2B Invoice (Optional)

Enable B2B: Allow business customers to use their company registration number for invoice payment
Company Number: Your business registration or company number for B2B invoicing (shown when Enable B2B is Yes)
Enable this if your store sells to businesses and you want to offer Klarna's business invoice option alongside the standard consumer invoice.
Template Layout: Choose the checkout template — Bootstrap 5 (default) or UIkit — to match your site's frontend framework
Callback URLs
The plugin displays read-only callback URLs that you register in your Klarna Merchant Portal so Klarna can notify your store of payment events.
Authorization Callback: Called when a shopper authorizes invoice payment
Fraud Notification: Called when Klarna flags a transaction for review
HPP Status Update: Called when the Hosted Payment Page session status changes
Copy each URL using the Copy button and paste it into the corresponding field in your Klarna Merchant Portal.
Callback URLs only work when your site is publicly reachable over HTTPS. They do not function on local development environments. Use a tunneling tool such as ngrok to test callbacks locally.
Order Status Automation
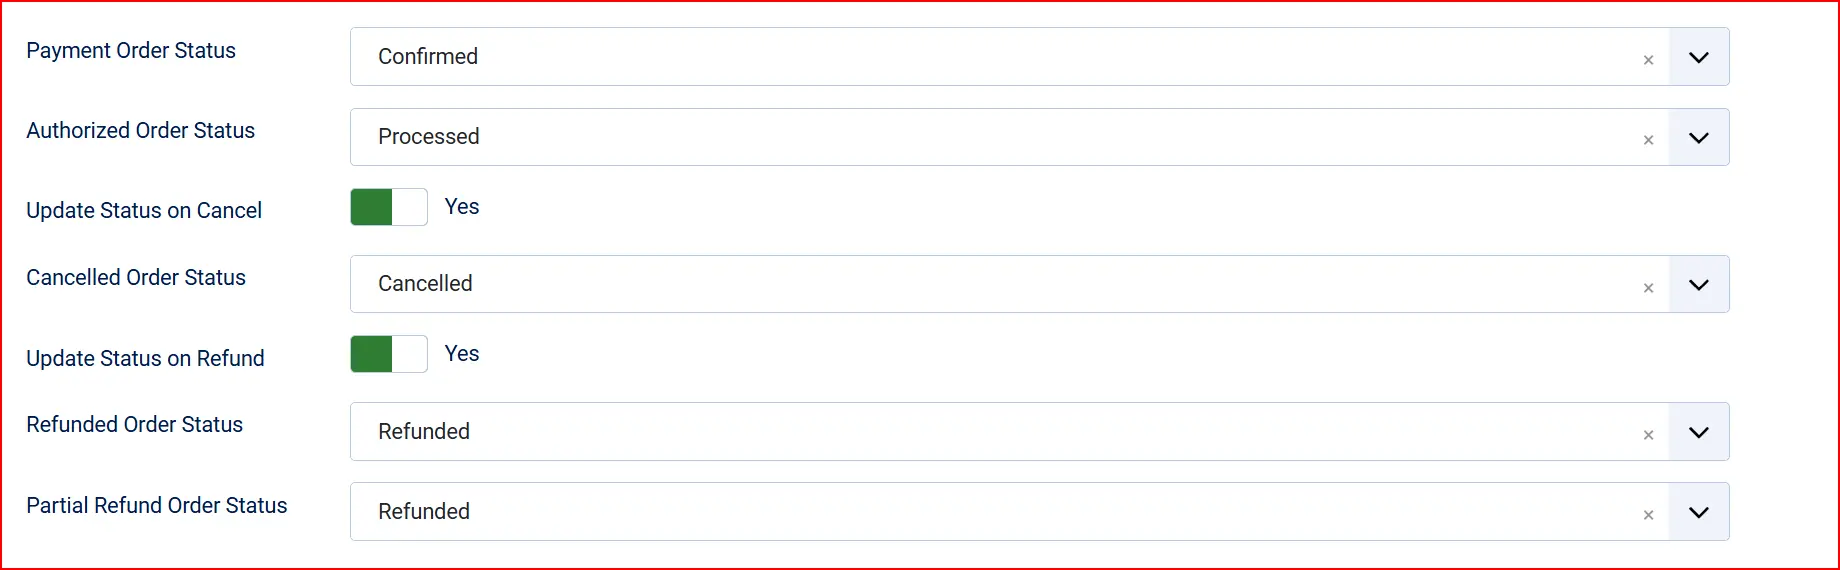
These settings control which order status J2Commerce applies at each point in the payment lifecycle.
Payment Order Status: Status applied when invoice payment is successfully confirmed and captured
Authorized Order Status: Status applied when payment is authorized but not yet captured (used with Authorize Only mode)
Update Status on Cancel: Automatically change the order status when an authorization is voided
Cancelled Order Status: Status to apply when an authorization is cancelled (shown when Update Status on Cancel is Yes)
Update Status on Refund: Automatically change the order status when a refund is processed
Refunded Order Status: Status to apply when a full refund is issued (shown when Update Status on Refund is Yes)
Partial Refund Order Status: Status to apply when a partial refund is issued (shown when Update Status on Refund is Yes)
If the order status you want is not listed, create it first under J2Commerce -> Setup -> Order Statuses.

Surcharge (Optional)
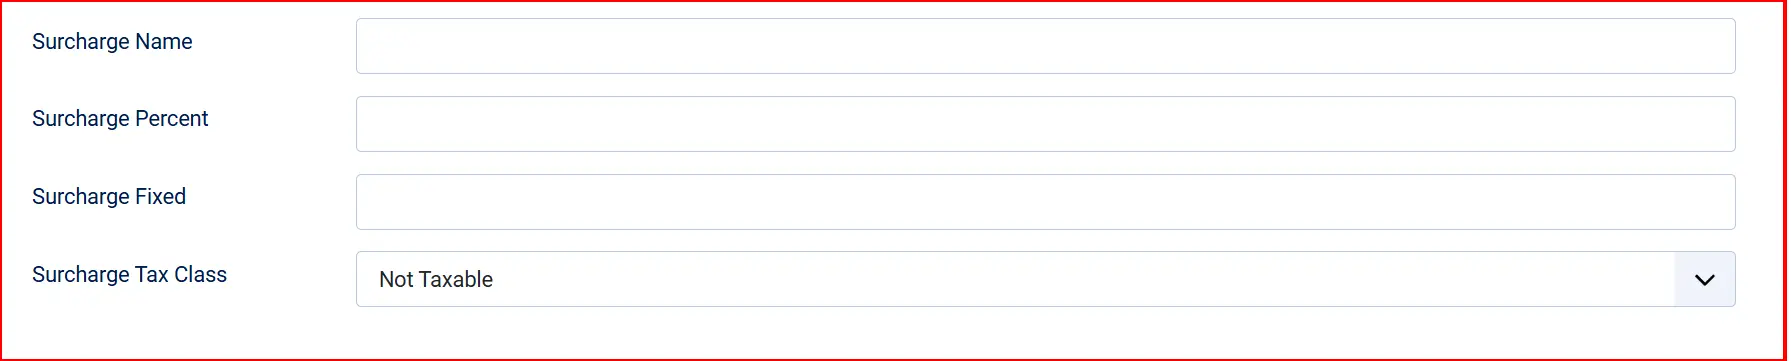
If you want to pass a payment handling fee on to customers who choose Klarna Invoice, complete these fields. Leave them blank if you do not charge a surcharge.
Surcharge Name: Label shown to the customer at checkout — e.g., "Invoice fee"
Surcharge Percent: Percentage of the order total added as a fee — e.g., 1.5 for 1.5%
Surcharge Fixed: Fixed amount added to every Klarna Invoice order — e.g., 0.50
Surcharge Tax Class: Tax profile to apply to the surcharge amount
Availability Restrictions (Optional)

Geozone Restriction: Limit Klarna Invoice to customers in a specific geozone. Leave blank to offer it to all locations.
Minimum Subtotal: Klarna Invoice is only shown when the cart subtotal is at or above this amount. Enter 0 for no minimum.
Maximum Subtotal: Klarna Invoice is hidden when the cart subtotal exceeds this amount. Enter -1 for no maximum.
Custom Messages (Optional)

These text areas let you insert custom HTML or text at specific points in the checkout flow.
Thank-You Article (Optional): Use the Thank You Message field to link a Joomla article that will be displayed to the customer after a successful Klarna Invoice payment, in addition to the standard J2Commerce order confirmation.
On Selection: When the customer selects Klarna Invoice as their payment method
Before Payment: Directly before the Klarna redirect button appears
After Payment: After a successful payment is confirmed
On Error: When a payment error occurs
On Cancel: When the customer cancels and returns from the Klarna payment page
Dashboard Icon and Debug (Optional)

Show Dashboard Icon: Add a Klarna Invoice shortcut to the J2Commerce dashboard
Icon Label: Label text for the dashboard shortcut (shown when Show Dashboard Icon is Yes)
Debug Logging: Log Klarna API requests and responses to the Joomla system log. Useful for troubleshooting — turn off in production.
Click Save in the toolbar when you have finished configuring the plugin.
How Checkout Works
When a shopper selects Klarna Invoice at checkout:
- The plugin creates a Klarna Hosted Payment Page (HPP) session using your API credentials.
- The checkout page shows the invoice due period — for example, "Pay within 14 days of delivery."
- The shopper clicks Place Order, and the plugin immediately redirects them to Klarna's hosted payment page.
- The shopper reviews the invoice terms and confirms their identity on the Klarna page.
- Klarna redirects the shopper back to your store and sends a callback to confirm the payment result.
- The plugin updates the order status and shows the customer their order confirmation.
Because this plugin uses Klarna's Hosted Payment Page, the entire invoice authorization happens on Klarna's servers — your site never handles any sensitive payment data.
Managing Orders
Once a Klarna Invoice payment is placed, the J2Commerce order view shows additional payment actions based on your Transaction Type setting.
Capture an Authorized Payment
When Transaction Type is Authorize Only, a Capture button appears in the order view. Click Capture to confirm the invoice with Klarna and trigger the payment period for the customer. This is the step that starts the clock on the invoice due date.
Void an Authorization
Before capturing, click Void to cancel the invoice authorization. This releases the hold without generating an invoice for the customer. Voiding cannot be undone.
Release Remaining Amount
If you have partially captured an order, a Release Remaining button allows you to release the uncaptured portion back to the customer. This is useful when an item in the order is out of stock and cannot be fulfilled.
Issue a Refund
After an invoice is captured, click Refund in the order view to return funds to the customer. You can issue:
- A full refund for the entire captured amount
- A partial refund for a specific amount (enter the amount in the refund field)
Payment Balance
The order view also shows a Payment Balance card summarizing:
- Order Total — the original order amount
- Refunded — the total amount refunded so far
- Net Paid — the amount the customer has effectively paid after refunds
- Balance Due — any outstanding amount remaining
Tips
- Start with Sandbox Mode on — Complete a full end-to-end test (checkout, capture, and refund) before switching to live credentials.
- Register all three callback URLs — Missing even one URL in your Klarna Merchant Portal can prevent order statuses from updating automatically.
- Use Authorize Only for pre-orders or made-to-order goods — Capture the invoice only when you are ready to dispatch, so the invoice due period starts from actual delivery.
- Match Invoice Due Days to your account — If your Klarna merchant agreement specifies 30-day invoices, set Invoice Due Days to
30. A mismatch can cause Klarna to reject the session. - Enable B2B only if needed — Turning on B2B does not affect consumer invoice orders; it only adds the company number option for business buyers.
- Turn off Debug Logging in production — Debug logs can contain sensitive API response data.
Troubleshooting
Klarna Invoice Does Not Appear at Checkout
Cause: Missing or incorrect API credentials, wrong region selected, or the shopper's cart total is outside your Minimum Subtotal / Maximum Subtotal limits.
Solution:
- Go to J2Commerce -> Setup -> Payment Methods -> Klarna Invoice.
- Confirm Sandbox Mode matches the credentials you have entered — sandbox credentials only work in sandbox mode.
- Verify the API Username and API Password are filled in correctly for the active mode.
- Confirm the Region matches the country your Klarna merchant account is registered in.
- Check Minimum Subtotal and Maximum Subtotal against the current cart total.
- Enable Debug Logging, attempt checkout, then review the Joomla system log for API error details.
Order Stays in Pending After Klarna Redirect
Cause: Klarna callbacks are not reaching your server. The callback URLs may not be registered in the Klarna Merchant Portal, or your server is blocking inbound requests from Klarna.
Solution:
- Open the plugin settings and copy the Authorization Callback URL.
- Log into your Klarna Merchant Portal and confirm that URL is registered as a callback endpoint.
- Confirm your site is publicly reachable over HTTPS (callbacks do not work without a public HTTPS address).
- Enable Debug Logging and check your server logs to see whether Klarna is sending requests and whether they are succeeding.
"Klarna API credentials are not configured" Error
Cause: The API Username or Password fields are empty for the active mode (sandbox or live).
Solution:
- Go to J2Commerce -> Setup -> Payment Methods -> Klarna Invoice.
- Check whether Sandbox Mode is on or off.
- Fill in the matching credential fields — Sandbox API Username and Sandbox API Password for sandbox mode, or API Username and API Password for live mode.
- Click Save.
Sandbox Warning Appears on Live Store
Cause: Sandbox Mode is still enabled after going live.
Solution:
- Go to J2Commerce -> Setup -> Payment Methods -> Klarna Invoice.
- Set Sandbox Mode to No.
- Confirm the API Username and API Password fields under the live credentials section are filled in with your live Klarna credentials.
- Click Save.
Klarna Invoice Not Available for Certain Customers
Cause: A Geozone Restriction, Minimum Subtotal, or Maximum Subtotal rule is filtering the method out, or Klarna's own eligibility rules are excluding those customers based on region or credit assessment.
Solution:
- Review the Geozone Restriction field — if set, confirm the customer's shipping address falls within that geozone.
- Check the Minimum Subtotal and Maximum Subtotal values against the customer's cart total.
- Confirm that Klarna Invoice is activated and available for the customer's country in your Klarna Merchant Portal.