Airwallex Payment
The Airwallex Payment plugin connects your J2Commerce store to Airwallex, a global payment platform that accepts credit and debit cards plus 160+ local payment methods across dozens of countries. Card details are collected through a secure on-site card form (the Airwallex Drop-in element) so the numbers never touch your server — this qualifies your store for the simplest PCI self-assessment level (SAQ-A). The plugin supports both immediate charges and authorize-only holds, lets logged-in customers save a card for faster checkout next time, and gives you Capture, Void, and Refund buttons right on the order screen.
Requirements
- Joomla 6.x
- J2Commerce 6.x
- PHP 8.3 or later
- An Airwallex merchant account
- Your store must be accessible over HTTPS
Get Your Airwallex Credentials
Before configuring the plugin you need three pieces of information from your Airwallex account: a Client ID, an API Key, and a Webhook Secret. You will get separate values for testing (sandbox) and for real transactions (production).
Sandbox (test) credentials
- Create a free sandbox account at demo.airwallex.com/signup if you don't already have one, or log in at demo.airwallex.com.
- In the sandbox web app, go to Account -> Developer -> API keys.
- Copy the Client ID and generate/copy the API Key — you will not be able to view the API Key again after leaving this screen, so store it somewhere safe.
Live (production) credentials
- Log in to the live Airwallex web app.
- Go to Settings -> Developer -> API keys.
- Copy your Client ID and generate/copy your API Key.
Webhook Secret
- In either the sandbox or live web app, go to Developer -> Webhooks.
- Add a notification URL (see the Webhooks section below for the exact URL to use).
- Copy the secret shown for that notification URL — you will paste it into the matching Webhook Secret field in the plugin settings.
Keep this browser tab open while you configure the plugin in Joomla.
Purchase and Download
This plugin is a separate add-on available from the J2Commerce Extensions Store. It is not included with the core J2Commerce 6 component.
- Go to the J2Commerce website and locate Airwallex Payment.
- Add it to your cart and complete checkout.
- Go to My Downloads under your account profile and find the plugin.
- Click Available Versions -> View Files -> Download Now to download the ZIP file.
Install the Plugin
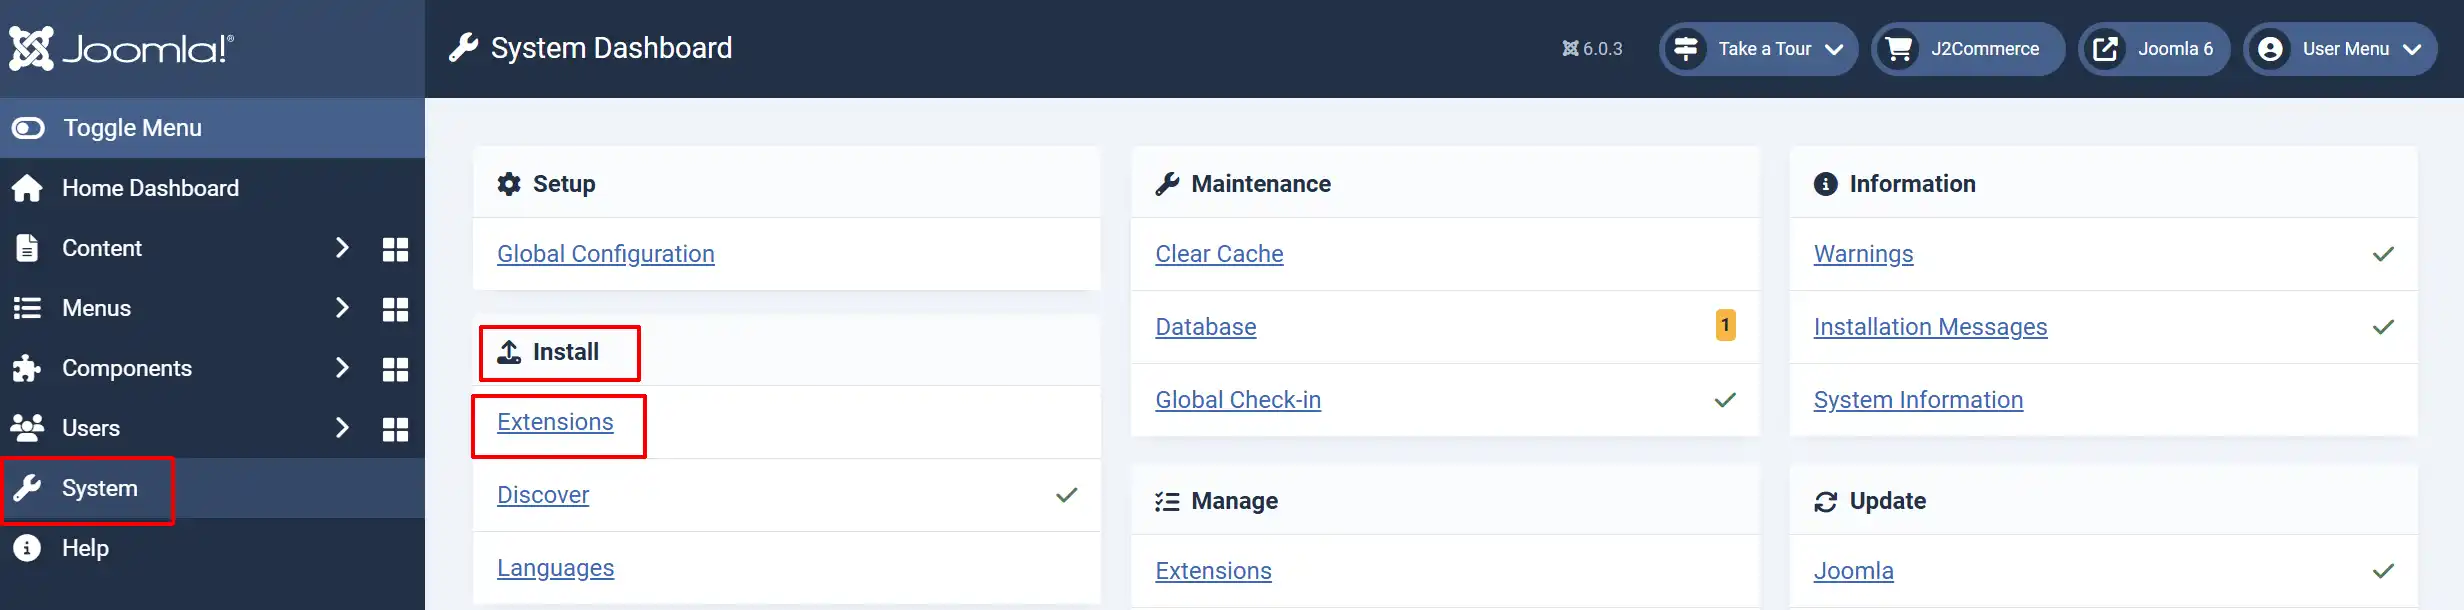
In the Joomla Administrator, go to System -> Install -> Extensions.
Upload the payment_airwallex.zip ZIP file or use the Install from URL option.
Enable the Plugin
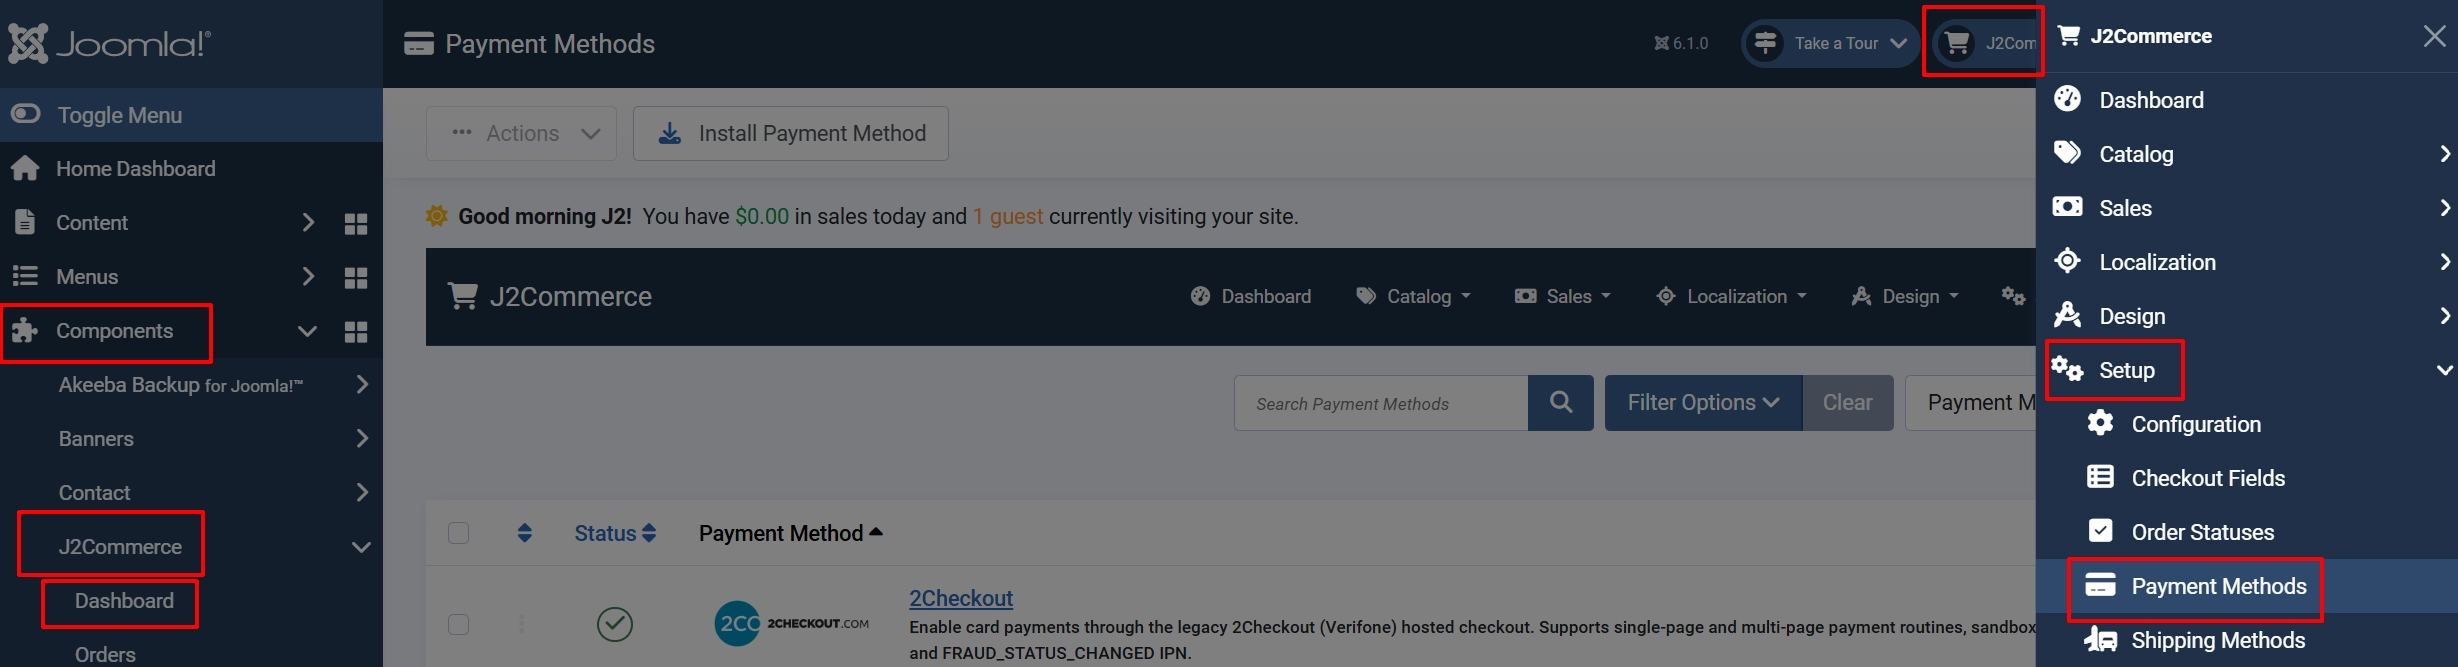
Once you have installed the plugin, you will need to enable it. There are two ways you can access it.
Option A: Go to the J2Commerce icon at the top right corner -> Setup -> Payment Methods
Option B: Go to Components on the left sidebar -> J2Commerce -> Dashboard -> Setup -> Payment Methods
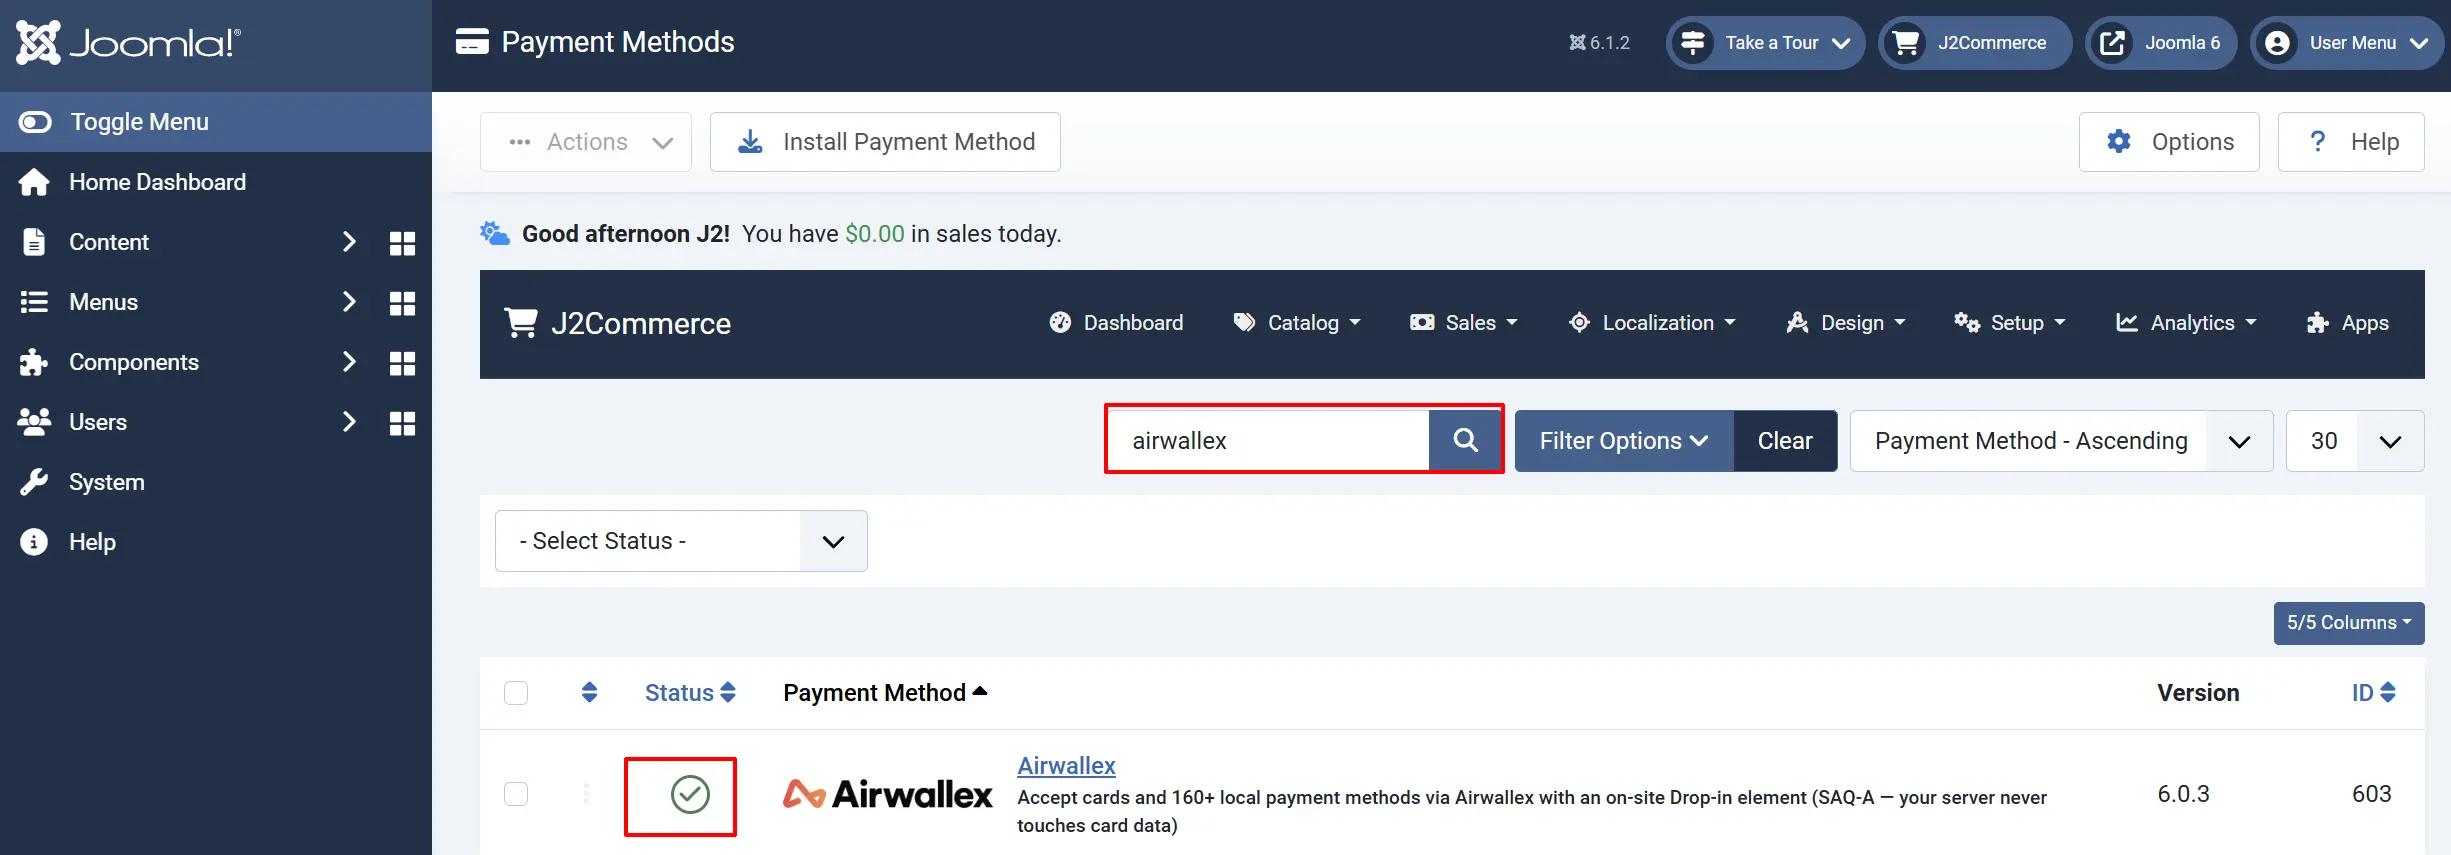
To help you narrow down the list, you can do a search for Airwallex Payment, click the X, and it will turn into a green checkmark. It is now enabled and ready for setup.
Configure the Plugin
Click the Airwallex Payment title to open its settings.
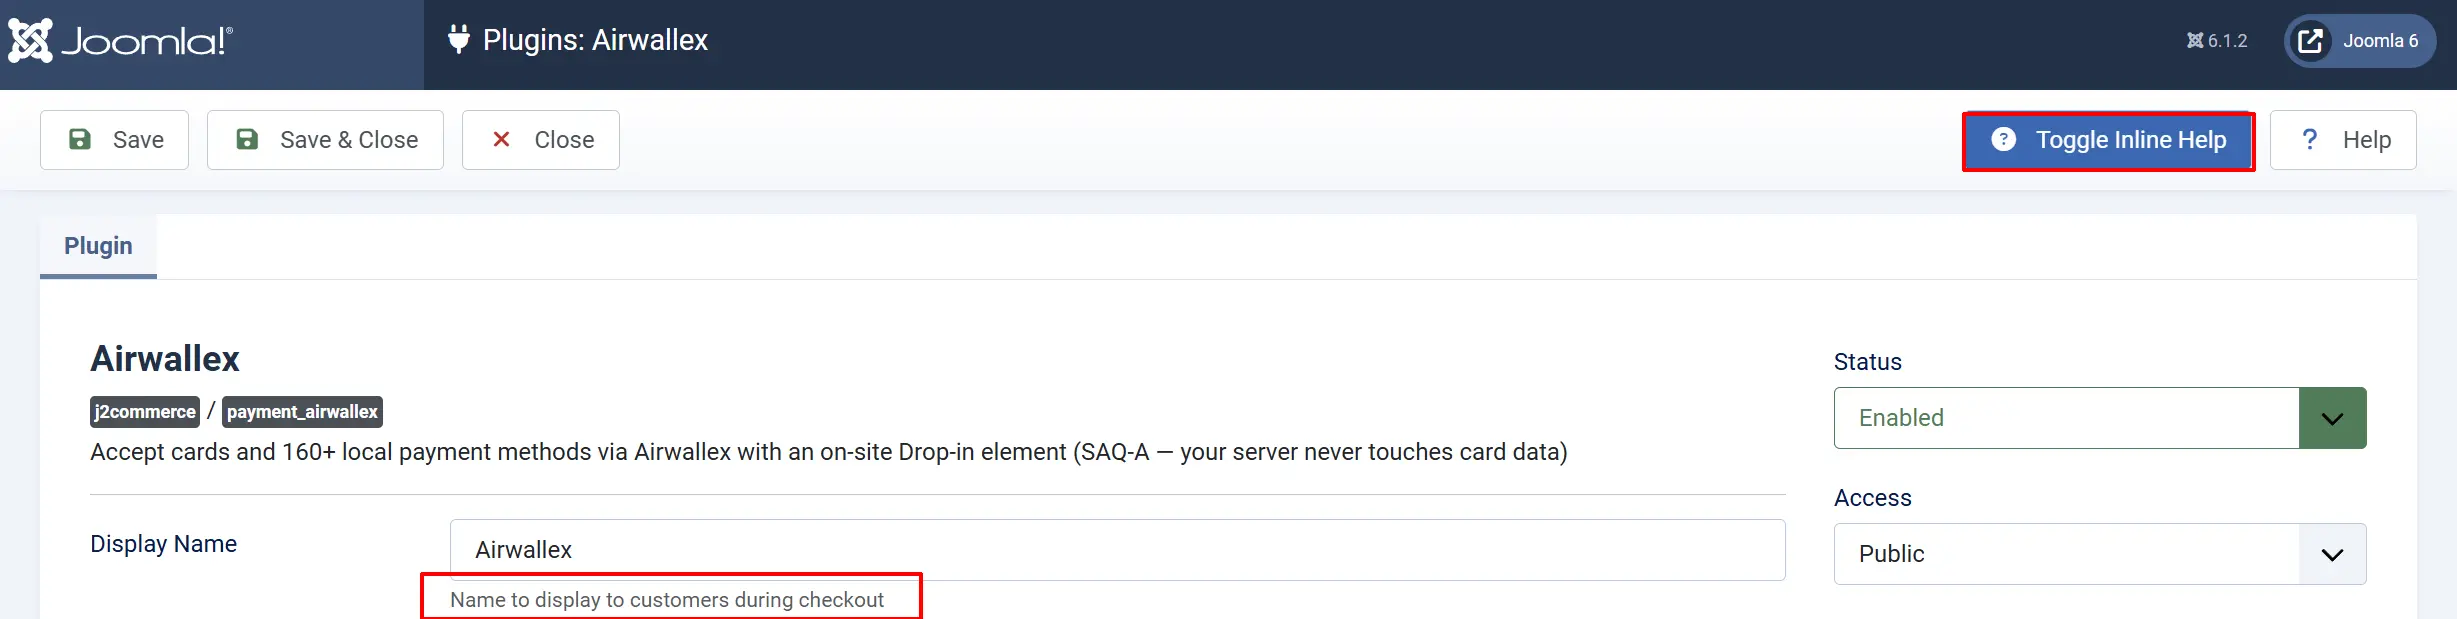
Click the Toggle Inline Help button at the top of any plugin settings screen to show a description below each field.
Appearance
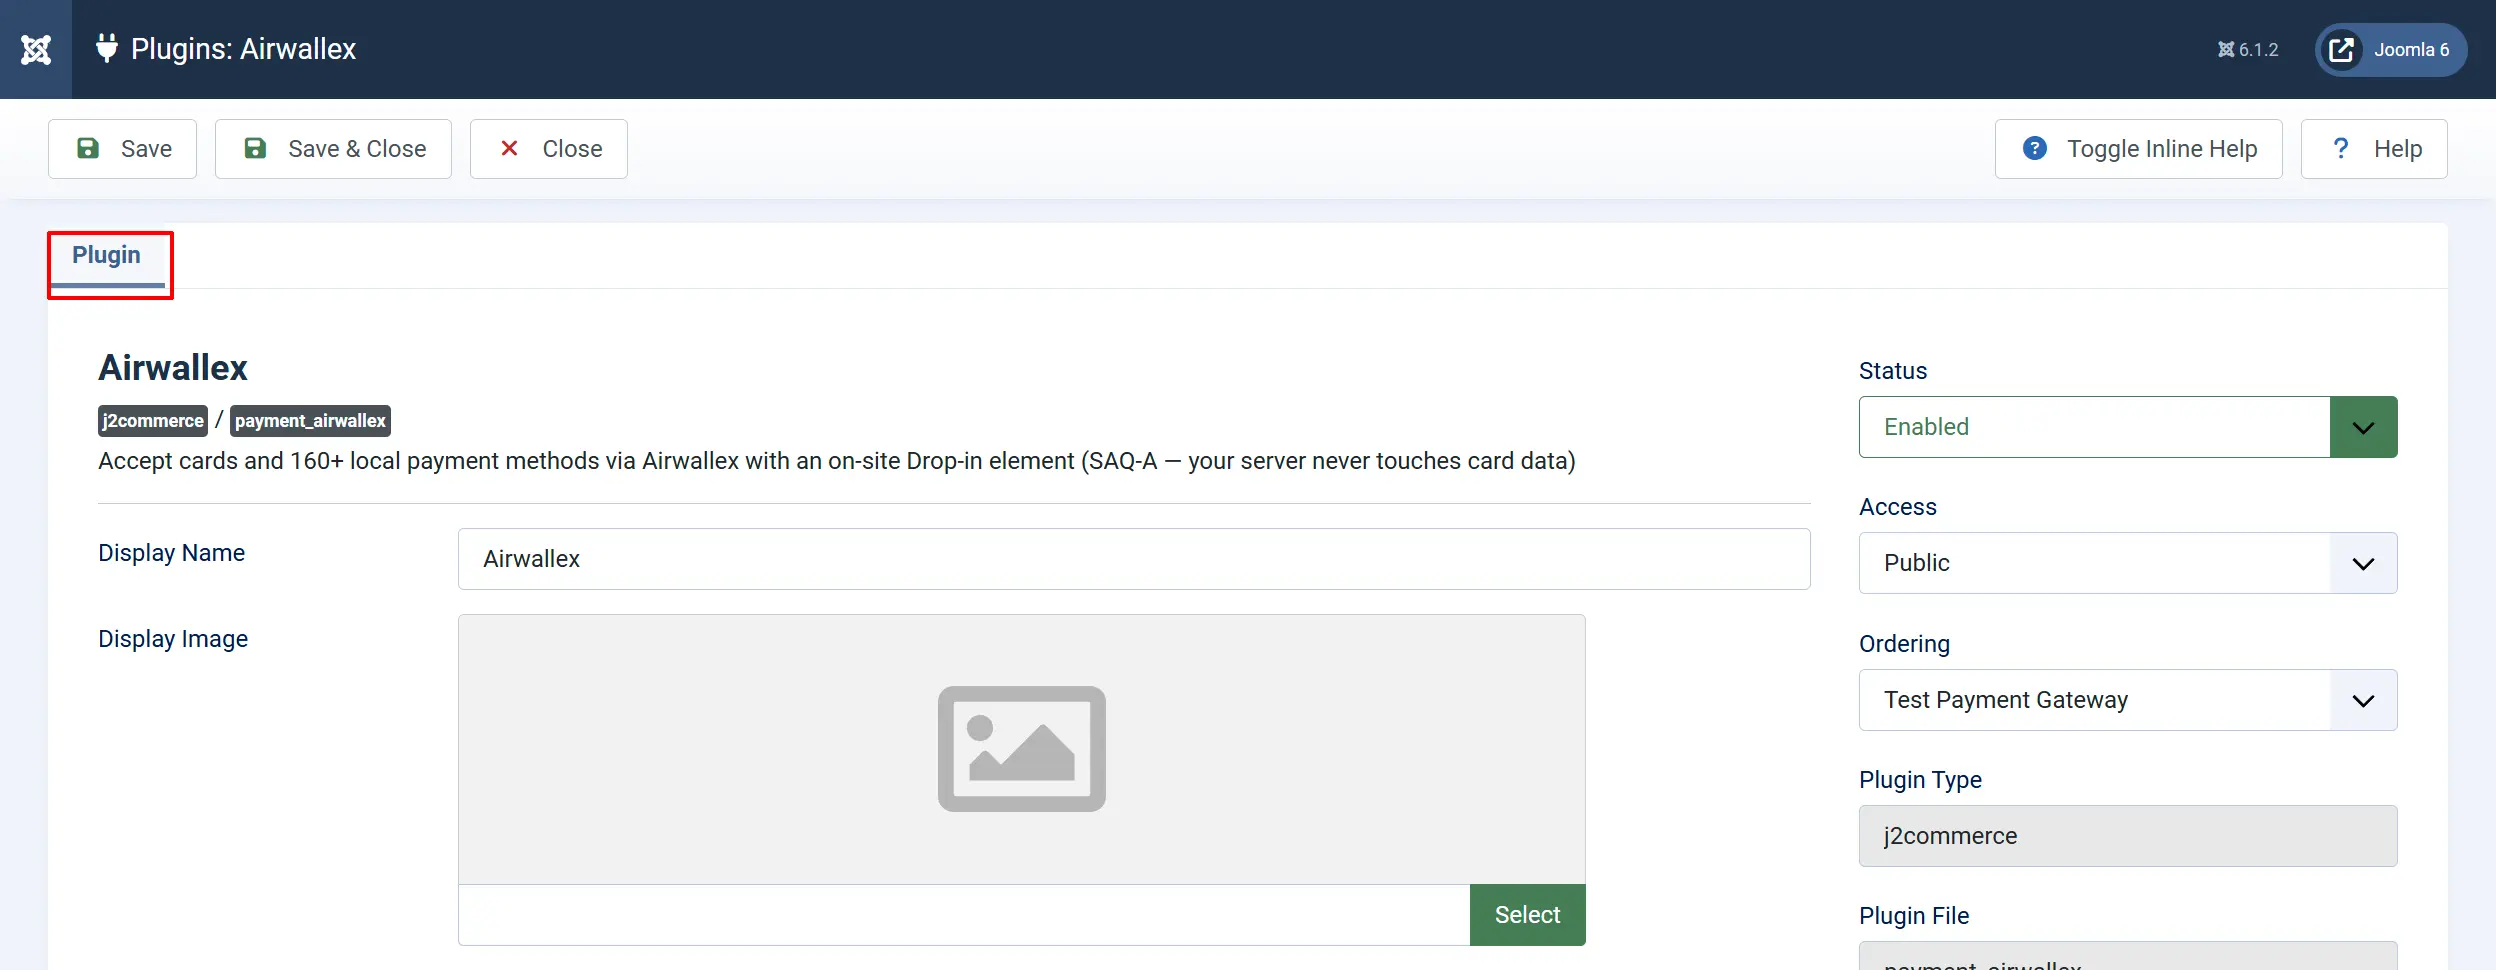
Display Name: Label shown to customers on the checkout page (default: "Airwallex")
Display Image: Optional logo or card-brand image to show beside the payment method name
Transaction Type
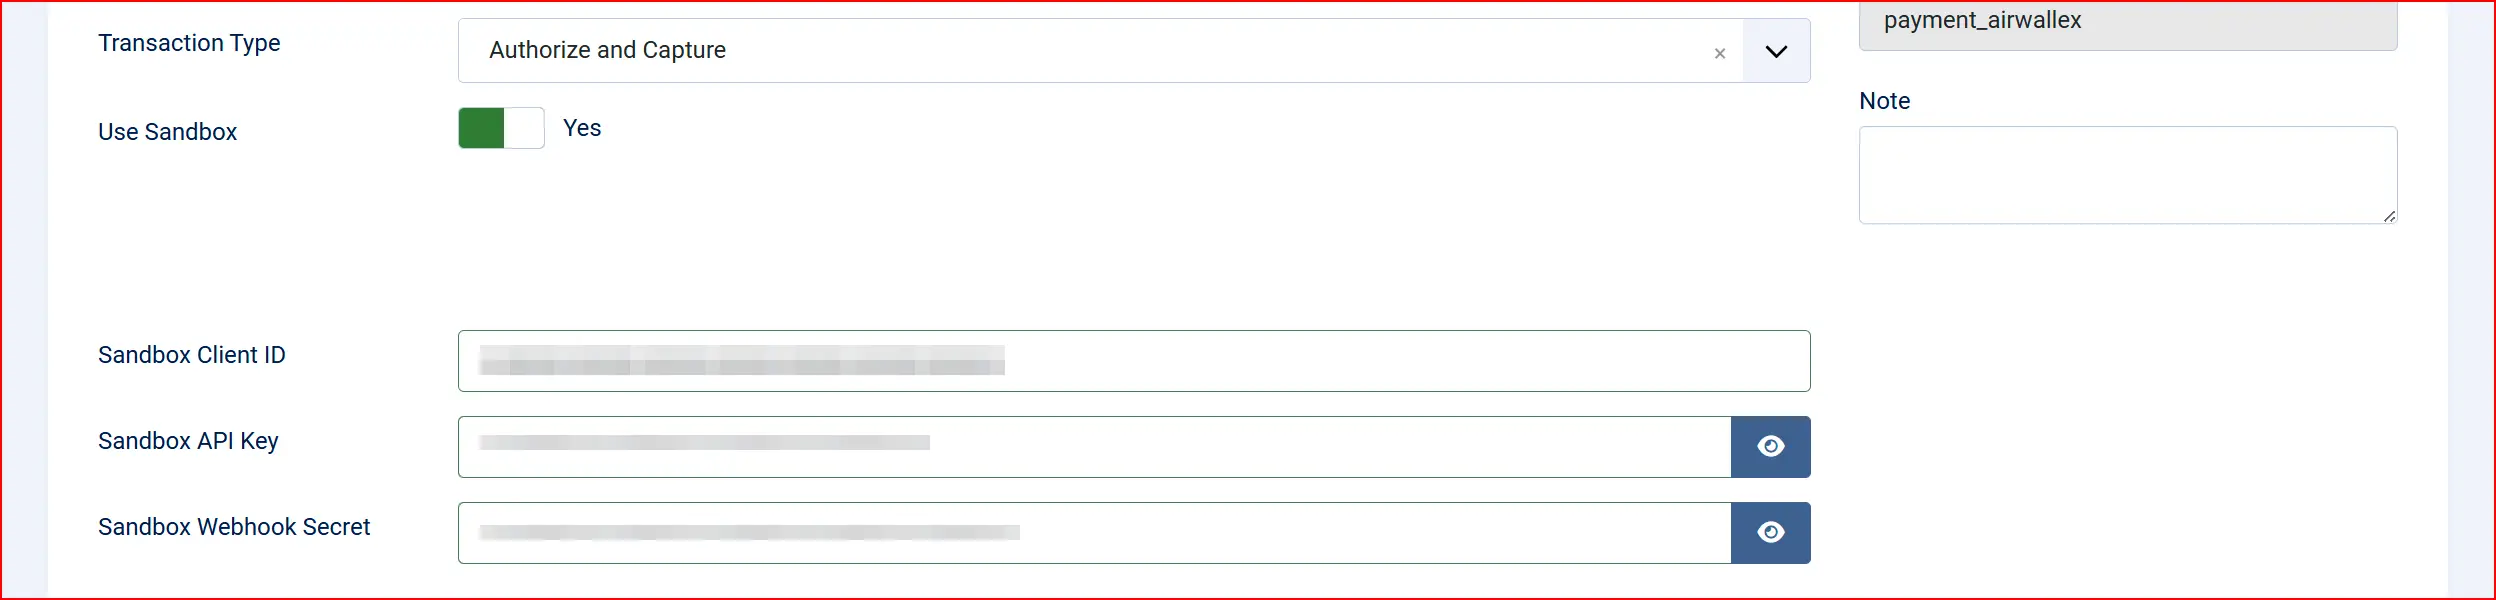
Transaction Type: Controls whether payment is collected immediately or held for manual capture
-
Authorize and Capture collects funds from the customer's card as soon as the order is placed. This is the recommended setting for most stores.
-
Authorize Only reserves the funds on the customer's card but does not collect them yet. You then manually capture the payment from the order admin when you are ready to ship.
Sandbox / Test Mode
Use Sandbox: When enabled, all transactions go to the Airwallex sandbox environment — no real money moves
Enable this during setup and testing. Disable it when you are ready to go live.
These fields appear when Use Sandbox is turned on. They work identically to the live fields but connect to the Airwallex sandbox environment.
Sandbox Client ID: Your sandbox Client ID from the sandbox web app
Sandbox API Key: Your sandbox API Key from the sandbox web app
Sandbox Webhook Secret: Your sandbox webhook notification secret
Live Credentials
These fields appear when Use Sandbox is turned off.
Client ID: Your Airwallex Client ID from Developer -> API keys
API Key: Your Airwallex API Key from Developer -> API keys
Webhook Secret: Required for webhook verification. Found on the notification URL under Developer -> Webhooks
Saved Cards & Checkout Template

Allow Saved Cards: Let logged-in customers save their card for faster checkout next time (default: enabled)
When enabled, customers see a "Save this card for future purchases" checkbox at checkout. On future visits, they can select a saved card instead of re-entering their details. Saved cards can also be used for automatic subscription renewals if you have the Subscriptions add-on installed. Customers manage their saved cards from a Payment Methods tab on their account profile page.
Checkout Template: Choose the sub-template used to render the Airwallex checkout form — match this to your site's front-end template style (Bootstrap 5 or UIkit)
Order Statuses

Order Status: Order status set when a payment completes successfully
Authorized Order Status: Order status set when a payment is authorized but not yet captured — only shown when Transaction Type is Authorize Only
Order Status on Void: Automatically update the order status when a transaction is voided
- Void Order Status: Status to apply after a void — only shown when Order Status on Void is enabled
Order Status on Refund: Automatically update the order status when a refund is processed
- Refund Order Status: Status to apply after a refund — only shown when Order Status on Refund is enabled
NOTE: If the status you want isn't listed in the dropdown menu, you can create a new one by going to J2Commerce -> Setup -> Order Statuses
Surcharge

Add an optional handling fee when customers choose Airwallex.
Surcharge Name: Label shown to the customer for the fee (e.g., "Card processing fee")
Surcharge Percent: Percentage of the order total to add as a fee (e.g., 1.5 for 1.5%)
Surcharge Fixed: Fixed amount to add as a fee regardless of order size
Surcharge Tax Class: Tax profile to apply to the surcharge amount
Leave both percent and fixed fields empty to charge no surcharge.
GeoZone Availability Restrictions

Geozone Restriction: Limit this payment method to customers in a specific geozone — leave blank to allow all locations
Minimum Order Subtotal: Hide Airwallex as a payment option when the cart subtotal is below this amount
Maximum Order Subtotal: Hide Airwallex when the cart subtotal is above this amount
Custom HTML Snippets
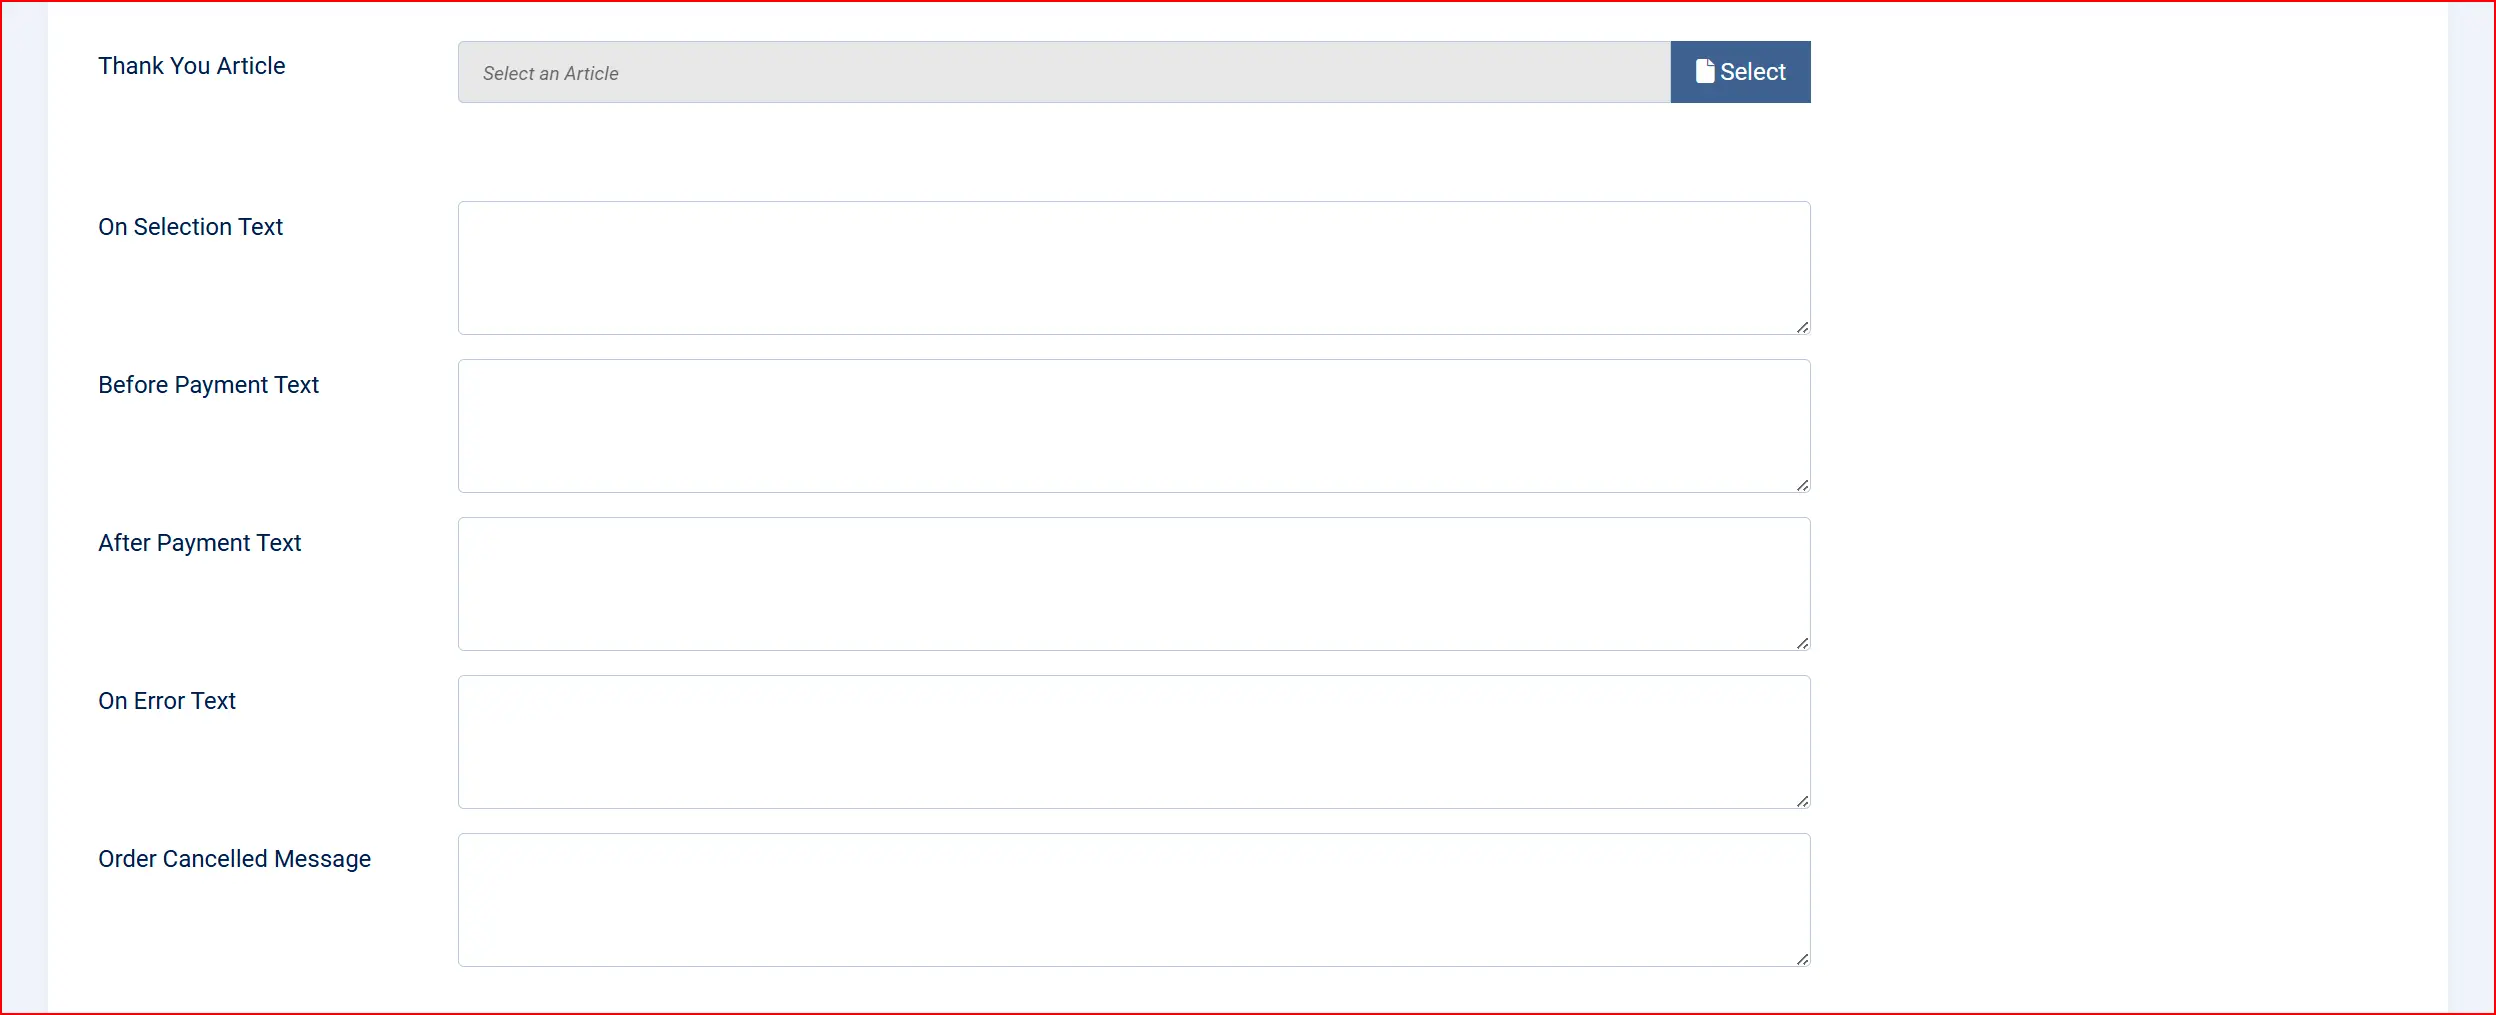
Thank-You Article: Optional Joomla article to display on the order confirmation page after a successful payment
The following optional fields let you inject custom text at different points in the payment flow.
On Selection Text: It displays when the customer selects Airwallex as their payment method
Before Payment Text: It displays just above the card form, before the customer enters card details
After Payment Text: It displays on the confirmation page after a successful payment
On Error Text: It displays when a payment attempt fails
Order Cancelled Message: It displays when the customer cancels or navigates away
Dashboard Icon

Show Dashboard Icon: Add a quick-access icon for this plugin to the J2Commerce dashboard
Dashboard Icon Label: Label for the icon; defaults to "Airwallex" if left blank
Debug Mode
Debug Mode: Record detailed API request and response data to administrator/logs/plg_j2commerce_payment_airwallex.php
Only enable this when diagnosing a specific problem. Disable it on live sites — debug logs can contain sensitive payment data.
How Checkout Works for Customers
- The customer adds items to the cart and proceeds to checkout.
- On the payment step, the customer selects Airwallex.
- If the customer has saved cards on file (and Allow Saved Cards is enabled), they see a list of saved cards plus a "Use a new card" option.
- If using a new card, the secure Airwallex card form loads directly on the page — card number, expiry date, and CVV fields appear inside protected iframes. Card data never touches your server.
- If saving is allowed, a "Save this card for future purchases" checkbox appears, checked by default.
- The customer clicks Place Order.
- If the customer's bank requires an extra verification step (3D Secure — sometimes called "Verified by Visa" or "Mastercard Identity Check"), a challenge screen appears; the customer completes it and is returned to the store.
- On success, the customer sees the order confirmation page.
Webhooks
Airwallex sends real-time notifications to your store when payment events occur, such as a payment succeeding or a refund completing. The plugin verifies every notification using an HMAC-SHA256 signature (the Webhook Secret you configured) so only genuine Airwallex events are processed, and it rejects any notification older than five minutes.
To receive webhooks, register your store's webhook URL in the Airwallex web app under Developer -> Webhooks. The URL format is:
https://your-site.com/index.php?option=com_ajax&format=raw&plugin=payment_airwallex&group=j2commerce&task=webhook
Replace your-site.com with your actual domain.
Supported webhook events:
| Event | What happens |
|---|---|
payment_intent.succeeded | Order status updated to Order Status (or advanced to it if the customer left the page before checkout finished) |
refund.succeeded | Refund finalized on the order |
refund.failed | Recorded in the debug log for review — no automatic order change |
payment_attempt.authorization_failed | Recorded in the debug log for review — no automatic order change |
payment_attempt.authentication_failed | Recorded in the debug log for review — no automatic order change |
payment_dispute.* | Recorded in the debug log for review — no automatic order change |
Managing Payments from the Order Screen
After an order is paid, you can take follow-up actions directly from the J2Commerce order detail page without leaving your admin panel.
Go to J2Commerce -> Sales -> Orders -> click the order number to open it. The Airwallex action buttons appear in the payment section.
Capture a Payment (Authorize Only mode only)
If you set Transaction Type to Authorize Only, payments are held but not collected. When you are ready to capture the funds:
- Open the order in J2Commerce -> Sales -> Orders.
- Click Capture and confirm the prompt.
- The funds are collected from the customer's card and the order status updates automatically.
Void a Payment
A void cancels an authorized payment before it has been captured. Once a payment has been captured, use the Refund button instead.
- Open the order.
- Click Void and confirm the prompt.
- The authorization is released — the customer is not charged and the hold on their card is removed.
If the Void button is not visible, the payment has already been captured and cannot be voided. Use Refund in that case.
Issue a Refund
You can refund a captured payment in full or in part.
- Open the order.
- Click Refund.
- Choose a full refund to return the entire amount, or enter a smaller amount for a partial refund.
- Click Process Refund to confirm.
The refund is sent to the customer's original card. Refunds may take a short time to finalize on the Airwallex side — the plugin records the final result when the refund.succeeded webhook arrives. If Order Status on Refund is enabled, the order status updates automatically.
Charge a Stored Card
If the customer who placed the order has a saved card on file, a Charge Stored Card panel appears on the order screen. This lets you manually collect payment on that order using one of their saved cards — useful for phone orders or split payments.
- Open the order.
- Select a saved card from the dropdown.
- Enter the amount and click Charge Now.
- Confirm the prompt. The order is updated and the customer receives a payment confirmation email.
Managing Saved Cards (My Profile)
When Allow Saved Cards is enabled, logged-in customers can manage their saved cards from a Payment Methods tab on their account profile page.
From this tab, customers can:
- View all cards they have saved, with the card brand and last 4 digits shown
- Add a new card (verified with a $0 authorization before it is saved — no charge is made)
- Remove a saved card
- Switch all of their active subscriptions to use a different saved card, if the Subscriptions add-on is installed
A saved card that is currently in use by an active subscription cannot be removed until the subscription is switched to a different card or canceled.
Testing Payments
Always test in sandbox mode before going live.
- Enable Use Sandbox in the plugin settings and enter your sandbox Client ID, API Key, and Webhook Secret.
- Place a test order on your storefront using an Airwallex test card:
| Card Number | Behavior |
|---|---|
4035501000000008 | Successful payment |
4012000300000013 | Bank verification (3D Secure) fails |
5307837360544518 (with an order total of 80.51) | Declined — insufficient funds |
Use any future expiry date and any 3-digit CVV with these test cards.
- Check that the order appears in J2Commerce -> Sales -> Orders with the correct status.
- Test a refund from the order screen to confirm it processes without errors.
- Check your Joomla log (System -> Logs) for any errors — enable Debug Mode temporarily if needed.
- When everything is working, disable Use Sandbox and replace the sandbox credentials with your live credentials.
Remember to turn off Use Sandbox before accepting real orders.
Troubleshooting
The payment form does not load on the checkout page
Cause: The Client ID or API Key is missing or incorrect, or the plugin is not enabled.
Solution:
- Go to J2Commerce -> Setup -> Payment Methods and verify the Airwallex plugin shows a green enabled indicator.
- Open the plugin settings and confirm the Client ID and API Key fields are filled in for the active environment (live or sandbox).
- Check that you are using the correct credentials for the mode you have enabled — sandbox and live keys are different and cannot be swapped.
- Clear the Joomla cache: System -> Clear Cache -> Delete All.
Orders are stuck in a pending status after payment
Cause: Airwallex webhooks are not being received, or the Webhook Secret is incorrect.
Solution:
- Confirm your webhook URL is registered in the Airwallex web app under Developer -> Webhooks and points to your store.
- Open the plugin settings and verify the Webhook Secret matches the value shown for that notification URL exactly — it is case-sensitive.
- Make sure your store's URL is publicly reachable over HTTPS. Webhooks cannot reach a site on localhost.
- Enable Debug Mode, attempt a test payment, then check System -> Logs for any webhook-related errors.
The Capture / Void / Refund buttons do not appear on the order
Cause: The order was not paid through Airwallex, or no transaction data was recorded.
Solution:
- Confirm the order's payment method is Airwallex (check the payment section of the order detail view).
- The buttons only appear when a transaction ID is stored on the order — if the checkout was interrupted before completion, no transaction data is saved.
- Enable Debug Mode and re-test a full checkout to confirm the transaction data is being stored correctly.
Card declined errors
Cause: The card details are incorrect, the card is not authorized for online transactions, or the bank declined the charge.
Solution:
- Ask the customer to double-check their card number, expiry date, and CVV.
- Ask them to try a different card or contact their bank.
- In sandbox mode, verify you are using a valid Airwallex test card from the table above.
"Add Card" fails on the customer profile page
Cause: The customer's browser blocked the Airwallex script, or the sandbox/live credentials were changed after the customer's session started.
Solution:
- Ask the customer to disable ad blockers or privacy extensions for your site and try again.
- Confirm the plugin's Client ID, API Key, and Webhook Secret are all filled in correctly for the current mode.
- Enable Debug Mode and check System -> Logs for the specific API error returned.
Missing credentials warning on the J2Commerce dashboard
Cause: The Client ID, API Key, or Webhook Secret field is empty.
Solution:
- Go to J2Commerce -> Setup -> Payment Methods -> Airwallex Payment.
- Fill in all three credential fields (Client ID, API Key, Webhook Secret) for whichever environment (live or sandbox) is currently active.
- Click Save to apply the changes.