NMI Payment
The NMI Payment plugin lets your customers pay by credit or debit card at checkout, processed securely through NMI (Network Merchants Inc). Card fields are rendered inside NMI-hosted iframes using Collect.js — a technique called tokenization (the card details are turned into a single-use code so your site never stores or even sees the real card number). This keeps your store at the simplest PCI compliance level (SAQ-A) while still providing a seamless on-page checkout experience.
You can choose to charge cards immediately at checkout or authorize them first and capture the funds manually from the order screen. Logged-in customers can save their card for faster future purchases, and the plugin handles full and partial refunds, voids, and subscription renewals directly from J2Commerce.
Requirements
- Joomla 6.x
- J2Commerce 6.x
- PHP 8.3 or later
- An NMI merchant account with API access enabled
- Your store must be accessible over HTTPS — NMI's Collect.js will not load over an insecure connection
Get Your NMI API Keys
Before configuring the plugin you need two keys from your NMI account. These are different in purpose:
- Security Key — a private server-side key that authorizes charges, refunds, and voids. Treat this like a password and never share it or expose it in a browser.
- Tokenization Key — a public key used by the Collect.js card form in the shopper's browser to convert card details into a safe single-use token. It is safe to use in a browser and cannot be used to charge cards on its own.
To find them:
- Log in to your NMI merchant portal (use sandbox.nmi.com for testing or secure.nmi.com for live accounts).
- Navigate to Settings -> Security Keys to find your Security Key.
- Navigate to Settings -> API Keys (or Tokenization Keys) to find your Tokenization Key.
Keep a separate set of sandbox keys (for testing) and live keys (for real transactions) — the plugin has dedicated fields for each.
Purchase and Download
This plugin is a separate add-on available from the J2Commerce Extensions Store. It is not included with the core J2Commerce 6 component.
Step 1: Go to the J2Commerce website -> Apps
Step 2: Locate the NMI Payment plugin -> click View Details -> Add to Cart -> Checkout
Step 3: Go to My Downloads under your account profile (top-right corner) -> find NMI Payment -> click Available Versions -> View Files -> Download Now to download the ZIP file
Install the App
In the Joomla Administrator, go to System -> Install -> Extensions.
Upload the payment_nmi.zip ZIP file or use the Install from URL option.

Enable the App
The plugin installs and enables itself automatically. No separate enable step is needed. However, it's important to know where to go to enable or disable it in the future .
There are two ways to reach the Apps list.
Option A: Go to the J2Commerce icon at the top right corner -> Apps
Option B: Go to Components on the left sidebar -> J2Commerce -> Apps

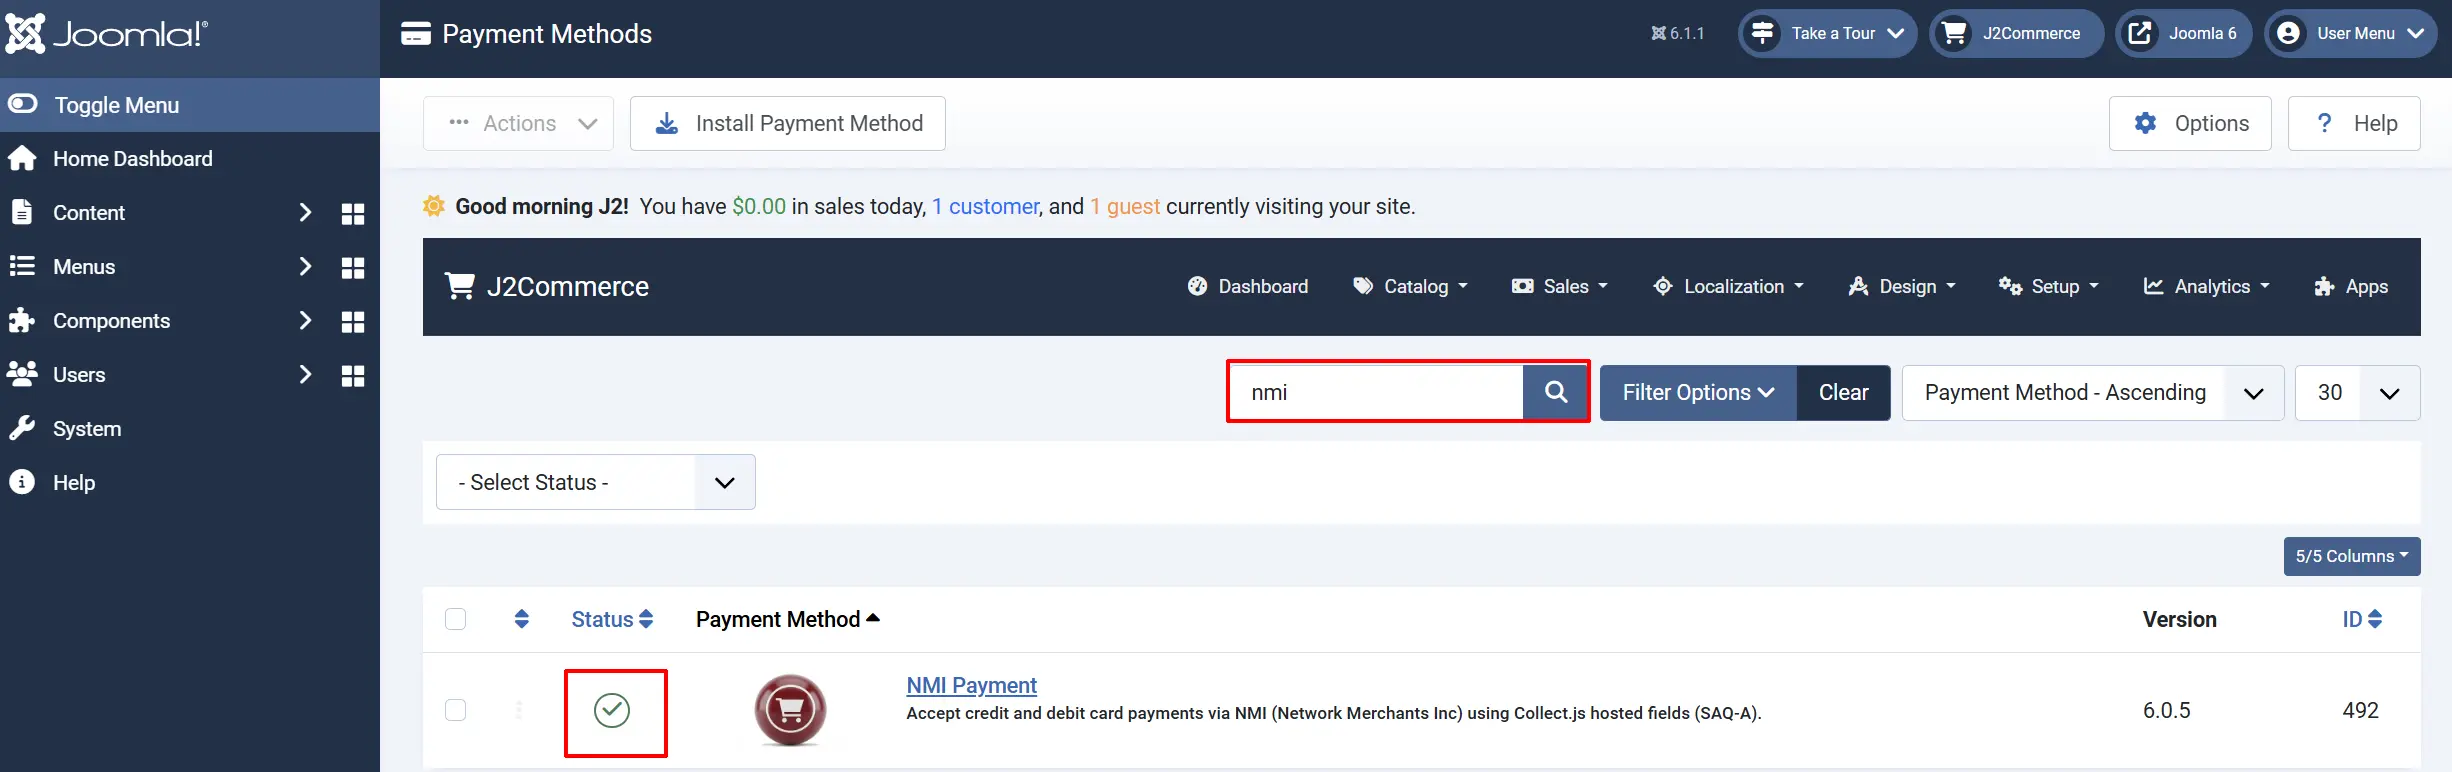
To help you narrow down the list, you can do a search for NMI Payment, click the X, and it will turn into a green checkmark. It is now enabled and ready for setup.
Configure the Plugin
Helpful tip: Click the Toggle Inline Help button in the toolbar and the app will show a description below each field as you configure it.

Configure the Plugin
Basic Settings
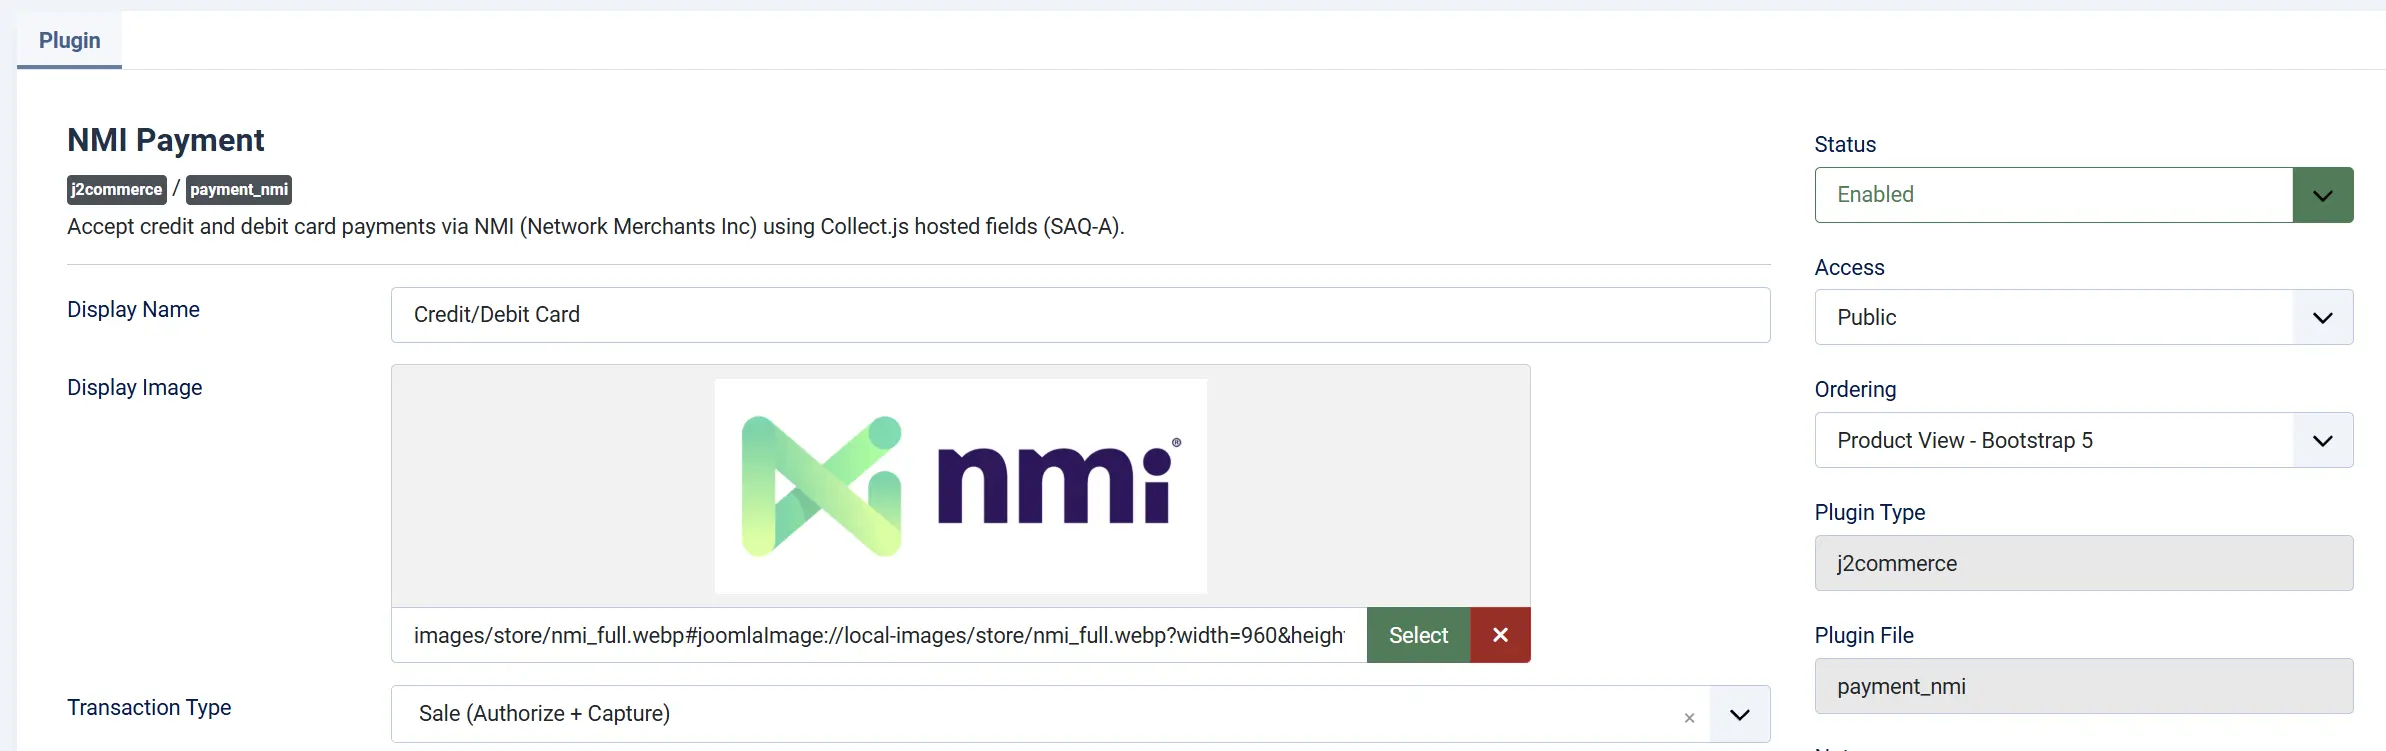
Display Name: The label shown to shoppers at checkout (e.g., "Credit/Debit Card").
Display Image: An optional logo shown at checkout alongside the display name.
Transaction Type: Sale (Authorize + Capture) charges the card immediately when the order is placed. Authorize Only reserves the funds without collecting them — you capture manually from the order screen later.
API Credentials
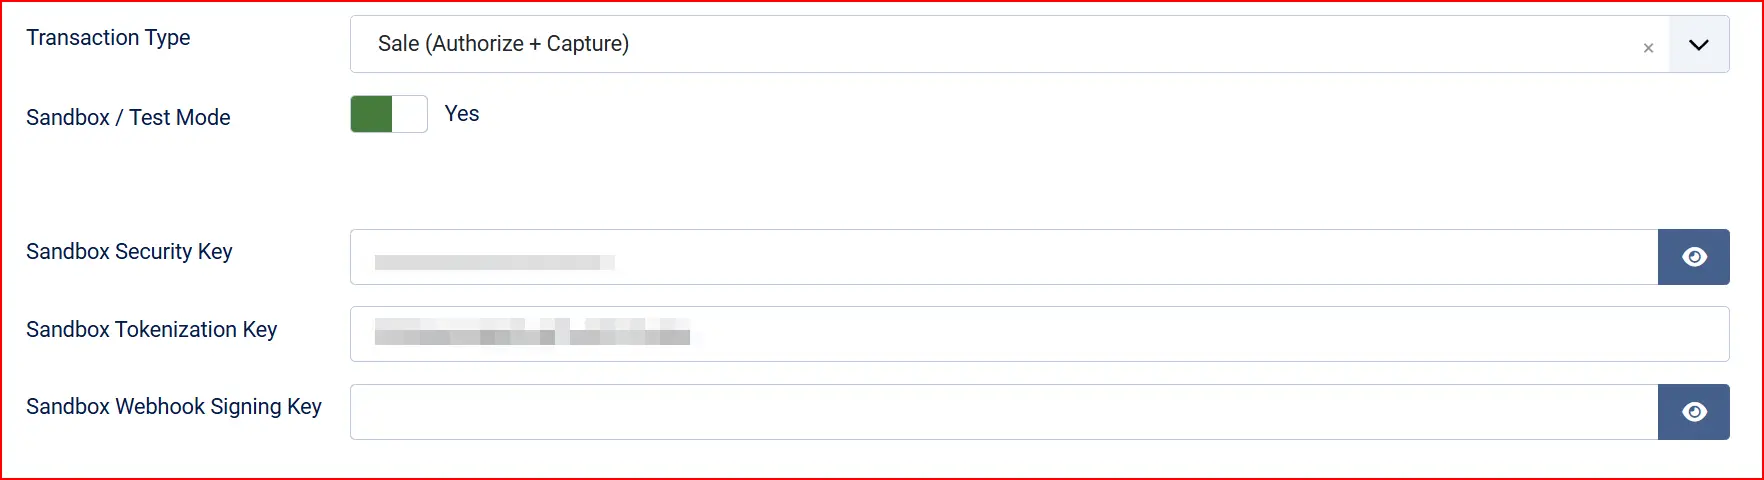
Sandbox / Test Mode: When enabled, all transactions go to sandbox.nmi.com. No real money moves. Switch this off only when you are ready to go live.
- Sandbox Credentials
These fields appear when Sandbox is set to Yes. They come pre-filled with verified J2Commerce test keys so you can start testing right away without needing your own sandbox account.
Sandbox Security Key: Pre-filled with a working NMI test security key.
Sandbox Tokenization Key: Pre-filled with a working NMI test tokenization key.
Sandbox Webhook Signing Key: Leave blank unless you are specifically testing webhook delivery.
- Live Credentials
These fields appear when Sandbox is set to No.
Live Security Key: Your NMI private security key for the live environment. Server-side only — never exposed to shoppers.
Live Tokenization Key: Your NMI public tokenization key for the live environment. Used by Collect.js in the shopper's browser.
Live Webhook Signing Key: Your NMI webhook signing key for the live environment (found under Settings -> Webhooks in your NMI portal). Used to verify that webhook notifications are genuinely from NMI. Leave blank if you are not using webhooks.
Saved Cards

Allow Saved Cards: Let logged-in customers save their card via the NMI Customer Vault for faster future purchases and automatic subscription renewals. Guests cannot save cards.
Template Style: Choose between the Bootstrap 5 layout (default for most themes) and the UIkit layout. Select the one that matches your active J2Commerce theme.
Order Status
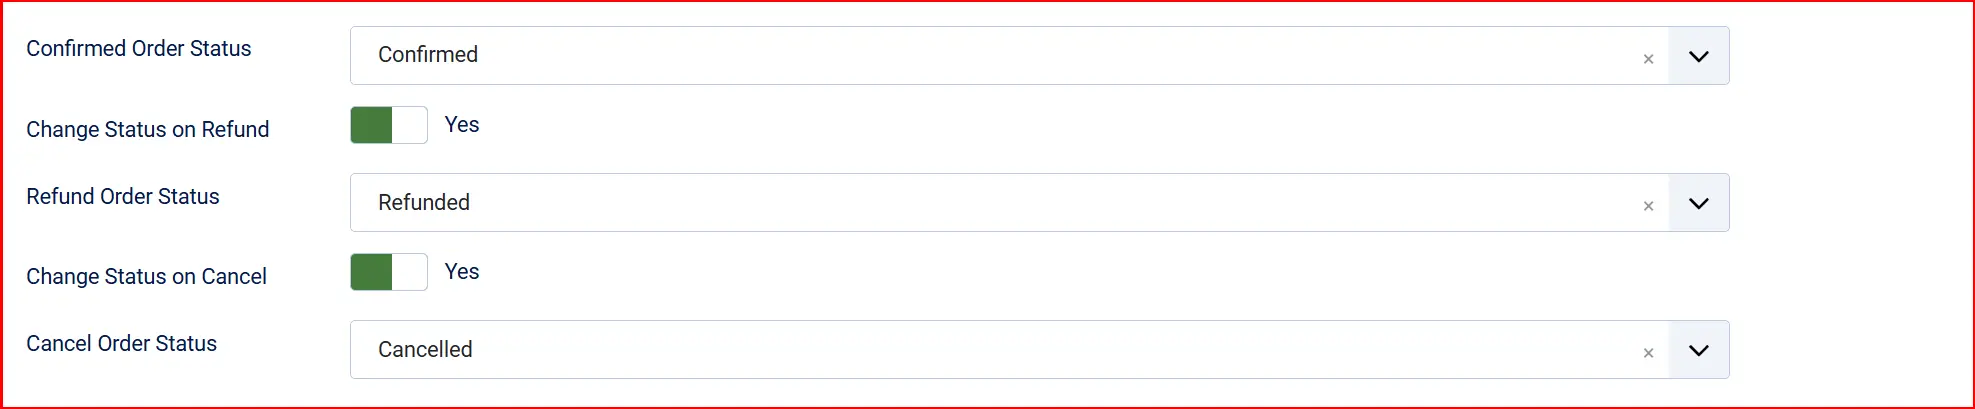
Confirmed Order Status (on payment): The status applied to the order after a successful payment.
- Authorized Status: The status applied when a payment is authorized but not yet captured (only appears when Transaction Type is set to Authorize Only).
Change Status on Refund: When enabled, the order status changes automatically when you issue a refund.
- Refund Order Status: The status to set on refund. Only visible when Change Status on Refund is enabled.
Change Status on Cancel: When enabled, the order status changes automatically when you void or cancel a payment.
- Cancel Order Status: The status to set on cancel/void. Only visible when Change Status on Cancel is enabled.
If the status you want is not listed in a dropdown, create a new one first by going to J2Commerce -> Setup -> Order Statuses.

Surcharge

Add an optional surcharge for using this payment method. Leave all three fields blank if you do not want to add one.
Surcharge Name: Label shown to the customer (e.g., "Card processing fee").
Surcharge Percent: A percentage added to the order subtotal (e.g., 1.5 for 1.5%).
Surcharge Fixed Amount: A fixed amount added to the order (e.g., 0.30 for 30 cents).
Surcharge Tax Class: Select a tax profile if the surcharge is taxable in your jurisdiction.
Availability Restrictions

Geozone Restriction: Limit this payment method to customers in a specific geozone (country/region). Leave blank to allow all locations.
Minimum Subtotal: Hide this method if the cart total falls below this amount. Leave blank for no minimum.
Maximum Subtotal: Hide this method if the cart total exceeds this amount. Leave -1 or leave blank for no maximum.
Custom Messages
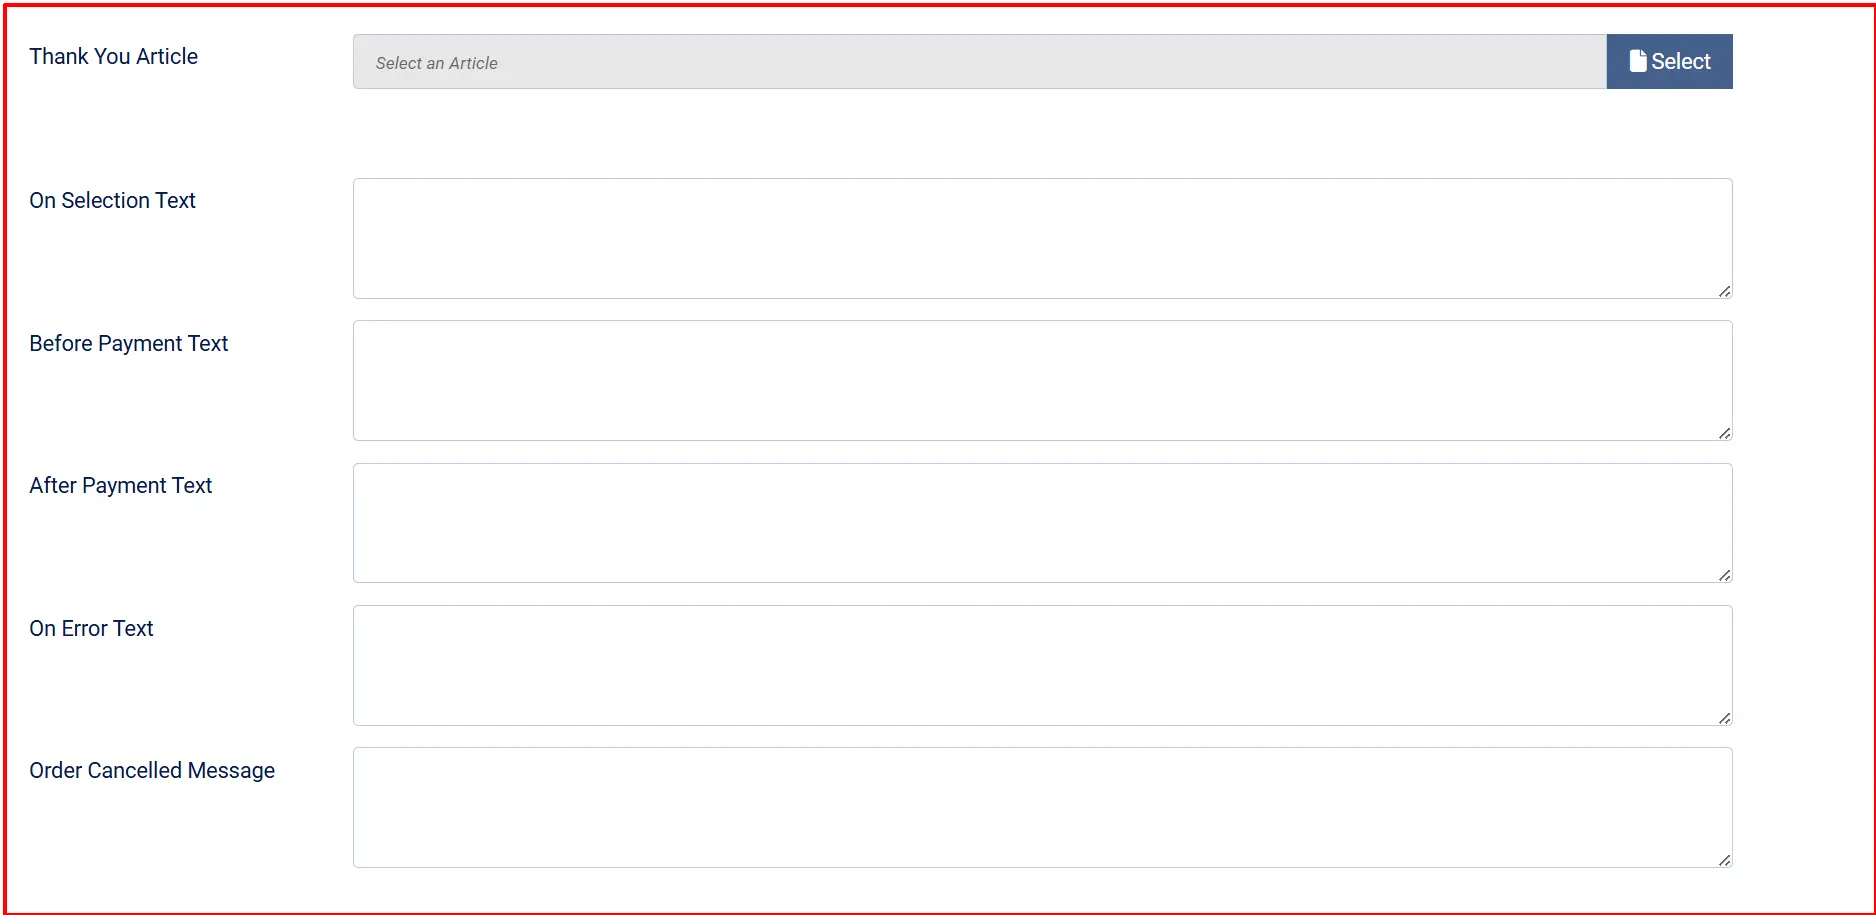
These optional text areas let you display short HTML messages to the customer at specific points during checkout.
Thank You Message Article: Select a Joomla article to display on the post-payment confirmation page. Optional — leave blank to use the default confirmation message.
On Selection: When the customer selects NMI as their payment method.
Before Payment: Just before the payment form loads.
After Payment: On the confirmation page after a successful payment.
On Error: When a payment fails.
Order Cancelled: When the customer cancels.
Dashboard Icon

Show Dashboard Icon: Add a quick-access icon for this plugin to the J2Commerce dashboard.
- Icon Label: Custom label for the icon.
Debug Mode: Log all API requests and responses to payment_nmi.php in your Joomla log directory. Useful when diagnosing problems. Do not enable on a live site — turn it off once your issue is resolved.
Checkout Experience
When a customer reaches the payment step at checkout they see:
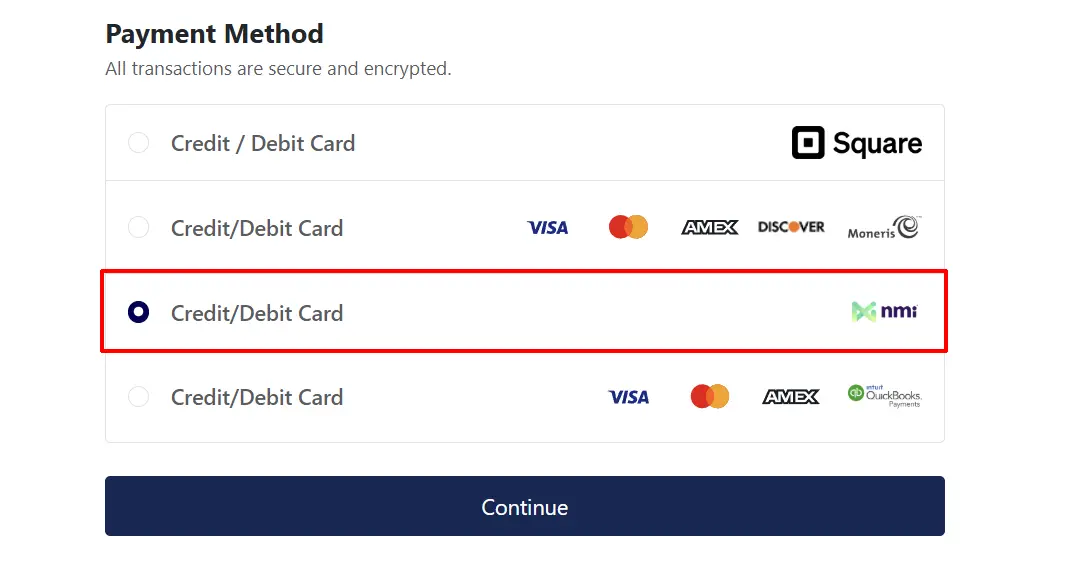
- Three card-entry fields rendered by NMI's Collect.js: Card Number, Expiry Date, and CVV. These fields look like part of your page but the actual inputs run inside NMI-hosted iframes — your site never handles raw card data.
- If the customer is logged in and Allow Saved Cards is enabled, any previously saved cards appear above the new-card form as radio buttons. The customer can pick a saved card or choose Use a New Card.
- If entering a new card and the customer is logged in, a Save this card for future purchases checkbox appears (if Allow Saved Cards is enabled).
- The customer clicks Place Order. Collect.js converts the card data into a single-use payment token, which is submitted to your server. Your server then sends the token to NMI to complete the transaction — the card number itself never passes through your site.
- On success, the customer lands on the order confirmation page.
Saved Cards
When Allow Saved Cards is enabled, logged-in customers can:
- Tick Save this card for future purchases at checkout to store their card via the NMI Customer Vault.
- Select a previously saved card at checkout without re-entering card details.
- Remove saved cards from their J2Commerce account profile.
Saved cards are also used automatically for subscription renewals if you have the Subscription Product app installed.
Refunds and Voids
From the J2Commerce order screen, the NMI panel provides three admin actions:
- Capture Payment — available when the transaction type is Authorize Only and the payment has been authorized but not yet captured. Click this to collect the funds.
- Issue Refund — refund all or part of a settled payment. Enter the amount or select Full refund to return the entire amount. The maximum refundable amount is shown.
- Cancel / Void — cancel an unsettled (pending) authorization. If the transaction has already settled, this button issues a refund automatically.
Webhooks
NMI can send webhook notifications to your site when a transaction status changes (for example, a delayed settlement or a chargeback). This lets J2Commerce update orders without the customer needing to return to your site.
To set up webhooks:
- Log in to your NMI portal -> Settings -> Webhooks.
- Add a new webhook endpoint pointing to:
https://yoursite.com/index.php?option=com_ajax&plugin=payment_nmi&group=j2commerce&format=raw&task=webhook - Copy the Webhook Signing Key that NMI generates and paste it into the matching field in the plugin settings (Live Webhook Signing Key or Sandbox Webhook Signing Key).
The plugin verifies every incoming webhook using HMAC-SHA256 signature validation to ensure it genuinely comes from NMI.
Subscriptions
If you have the Subscription Product app installed, NMI supports automatic subscription renewals using saved cards (Customer Vault). The renewal charge is processed server-side using the stored card token — no customer interaction is needed.
Testing in Sandbox Mode
The plugin comes pre-filled with working sandbox credentials, so you can test immediately without an NMI account.
Step 1: Ensure Sandbox / Test Mode is set to Yes in the plugin settings.
Step 2: Use a standard NMI sandbox test card at checkout:
| Card Number | Network | Result |
|---|---|---|
4111111111111111 | Visa | Approved |
4111111111111111 (amount 2.00) | Visa | Declined (use a different amount or card to test decline) |
5431111111111111 | Mastercard | Approved |
371449635398431 | Amex | Approved |
Use any future expiry date and any three-digit CVV. The sandbox does not process real money.
Step 3: When you are ready to go live, switch Sandbox to No, enter your live credentials, and save.
Troubleshooting
Payment method is not appearing at checkout
Cause: The plugin is disabled, the security key is blank, or a minimum/maximum subtotal restriction is hiding it.
Solution:
- Go to J2Commerce -> Setup -> Payment Methods and confirm the NMI plugin is enabled (green checkmark).
- Check that the correct Security Key and Tokenization Key are filled in for the active environment (sandbox or live).
- Review Minimum Subtotal and Maximum Subtotal settings — if your cart total falls outside those limits, the method is hidden by design.
- Check whether a Geozone Restriction is configured and whether the customer's billing address matches it.
Card form fields are blank or not loading
Cause: The tokenization key is missing or incorrect, or the store is not on HTTPS.
Solution:
- Confirm Live Tokenization Key (or Sandbox Tokenization Key) is filled in and correct.
- Verify your store loads over
https://— Collect.js will not initialize over an unencrypted connection. - Check the browser console for JavaScript errors. A "Failed to load resource" error for the Collect.js script indicates a key or HTTPS problem.
Payments fail with a "security key not configured" warning
Cause: The security key field is blank for the active environment.
Solution:
- Go to the NMI plugin settings.
- If Sandbox is Yes, fill in Sandbox Security Key. If Sandbox is No, fill in Live Security Key.
- Save the settings and test again.
Wrong host error — sandbox key rejected on live, or vice versa
Cause: Using a sandbox key against the live NMI host (secure.nmi.com) or a live key against the sandbox host (sandbox.nmi.com). The two environments do not share keys.
Solution:
- Confirm the Sandbox / Test Mode toggle matches the keys you are using.
- Sandbox keys only work when Sandbox is Yes. Live keys only work when Sandbox is No.
"Authorize Only" orders never get captured
Cause: Authorized payments must be captured manually from the order screen.
Solution:
- Go to J2Commerce -> Sales -> Orders and open the order.
- Find the NMI payment panel and click Capture Payment.
- Note that authorizations expire after a number of days (typically 7) — if the authorization has lapsed, you will need to ask the customer to place the order again.
Webhooks are not updating orders
Cause: The webhook endpoint URL is not registered in your NMI portal, or the signing key is incorrect.
Solution:
- Log in to the NMI portal -> Settings -> Webhooks and confirm the endpoint URL is correct.
- Copy the signing key from NMI and paste it into Live Webhook Signing Key (or Sandbox Webhook Signing Key) in the plugin settings.
- Enable Debug Mode temporarily and check
payment_nmi.phpin your Joomla log directory for incoming webhook activity. - Disable Debug Mode once the issue is resolved.