Nets Easy / DIBS Easy Payments
Nets Easy — formerly marketed as DIBS Easy — is a hosted-payment-page gateway from Nets Group, widely used across the Nordic countries and the broader EU. Customers are redirected to a secure Nets-hosted page to complete payment, so no card data ever touches your server. The gateway supports Visa, Mastercard, American Express, Dankort (Denmark), MobilePay, Vipps, Swish, and other local methods depending on your Nets agreement.
Requirements
- J2Commerce 6.0 or later installed and active
- Joomla 6.0 or later
- A Nets Easy merchant account (see below)
- Your site must be publicly reachable over HTTPS for payment return and webhook notifications
- A live Secret Key and Merchant Number from the Nets Easy portal
Set Up a Nets Easy Account
If you already have a Nets Easy account and your Secret Key, skip to Purchase and Download.
Create an Account
- Go to nets.eu/payments/easy and click Get started or Contact sales.
- Complete the merchant onboarding — Nets will review your application and activate your account.
- Once approved, log in to the Nets Easy portal.
Find Your Secret Key and Merchant Number
After logging in to the Nets Easy portal:
- Click your company name in the top-right corner, then Company.
- Select the Integrations tab.
- Under Secret key, copy the key for your live environment.
- Your Merchant number (also called merchant ID) is shown on the same screen.
For the test environment, the Nets Easy portal provides separate test credentials on the same Integrations screen. Copy both the test Secret Key and the test Merchant Number.
Keep your Secret Keys confidential. Anyone with a valid Secret Key can create payment sessions on your account. Never paste them into plain text files or share them over email.
Purchase and download
This plugin is a separate add-on available from the J2Commerce Extensions Store. It is not included with the core J2Commerce 6 component.
- Go to the J2Commerce website and locate Dibs Easy.
- Add it to your cart and complete checkout.
- Go to My Downloads under your account profile and find the plugin.
- Click Available Versions -> View Files -> Download Now to download the ZIP file.
Install the plugin
In the Joomla Administrator, go to System -> Install -> Extensions.
Upload the plg_j2commerce_payment_dibseasy.zip file.

Enable the Plugin
Once you have installed the App, you will need to enable it. There are two ways you can access the App.
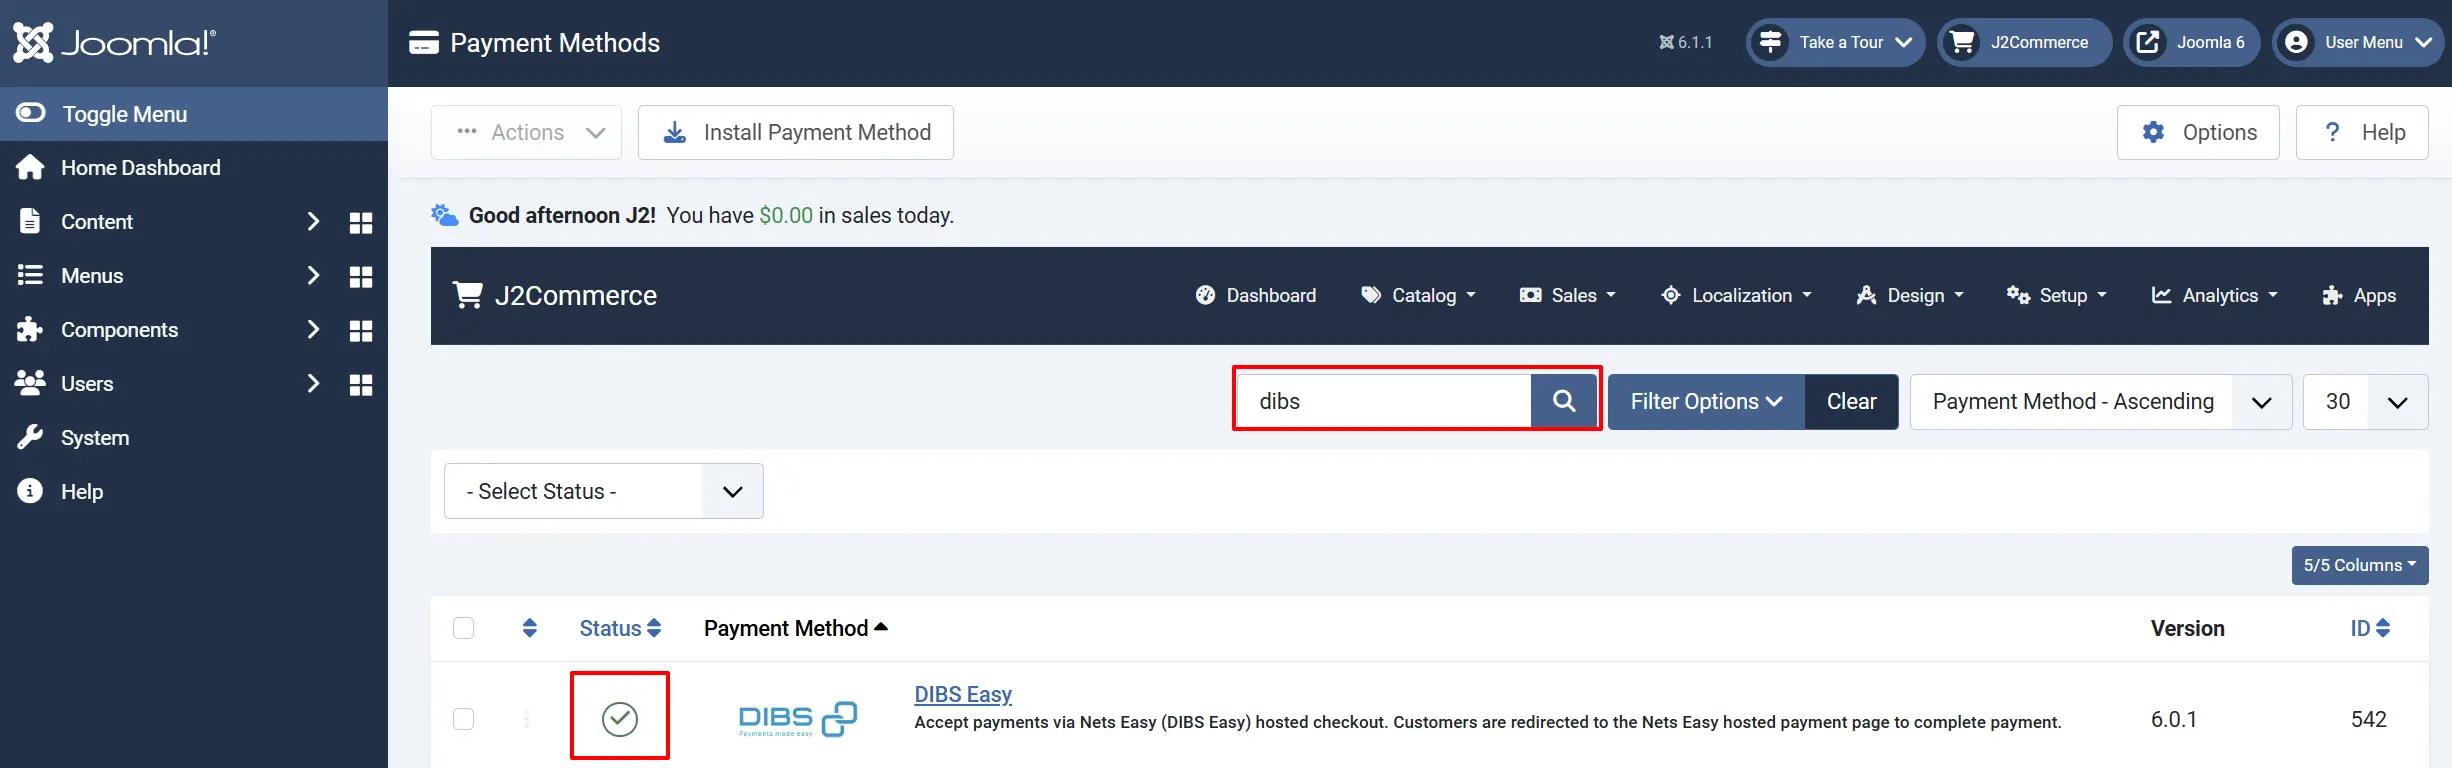
Option A: Go to the J2Commerce icon at the top right corner -> Setup -> Payment Methods
Option B: Go to Components on the left sidebar -> J2Commerce -> Dashboard -> Setup -> Payment Methods

To help you narrow down the list, you can do a search for Dibs Easy, click the X, and it will turn into a green checkmark. It is now enabled and ready for setup.
Configure the plugin
Click the Dibs Easy title next to the green checkmark to open the configuration screen.
Click the Toggle Inline Help button at the top of any plugin configuration page to show a short description beneath each field.

Display Settings
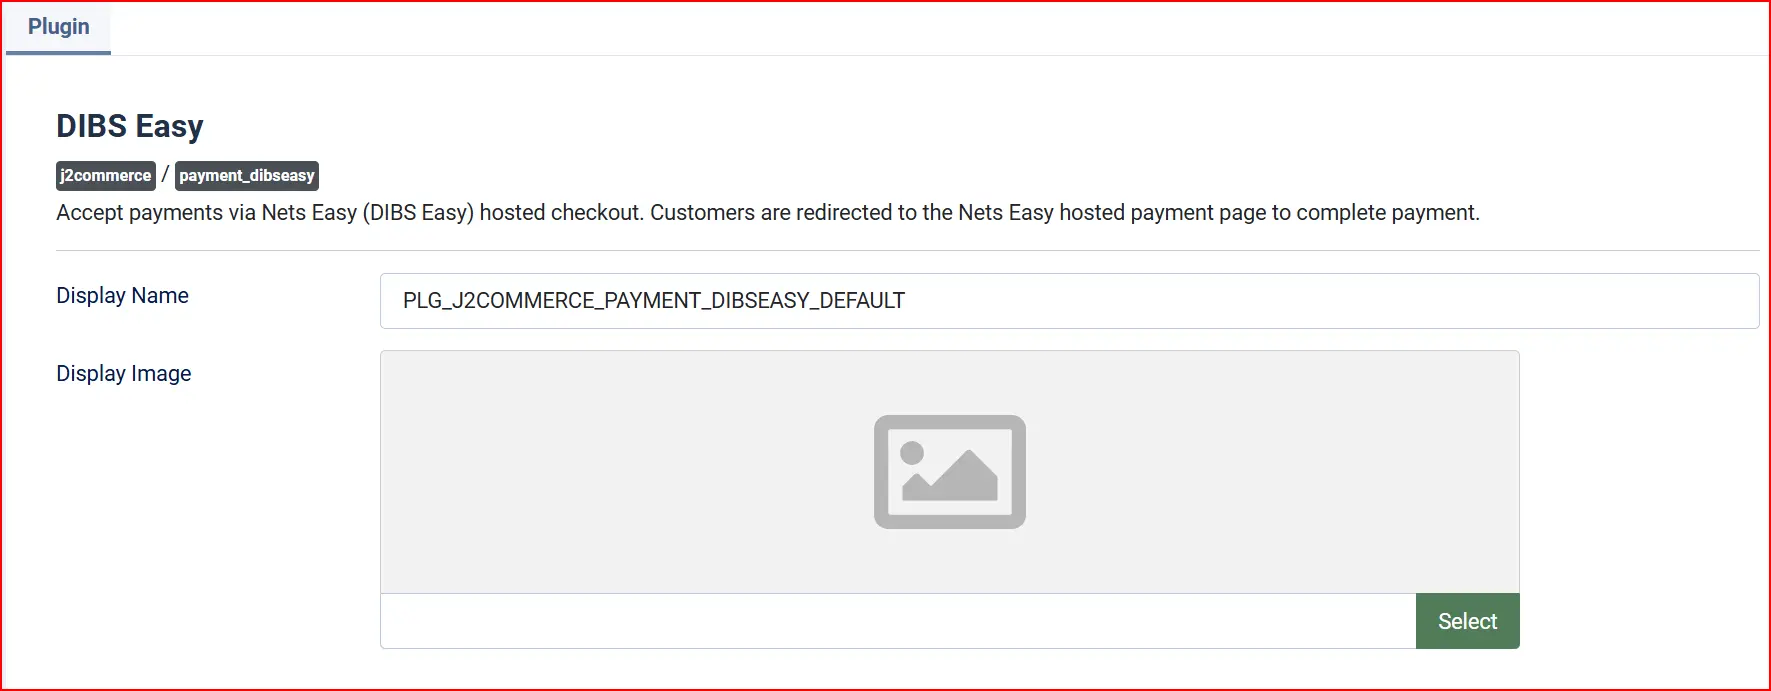
Display Name: The label shown to customers at checkout for this payment method.
Payment Image: An optional logo or image shown next to the payment option at checkout. Upload from your media library, or leave blank to show text only.
API Credentials
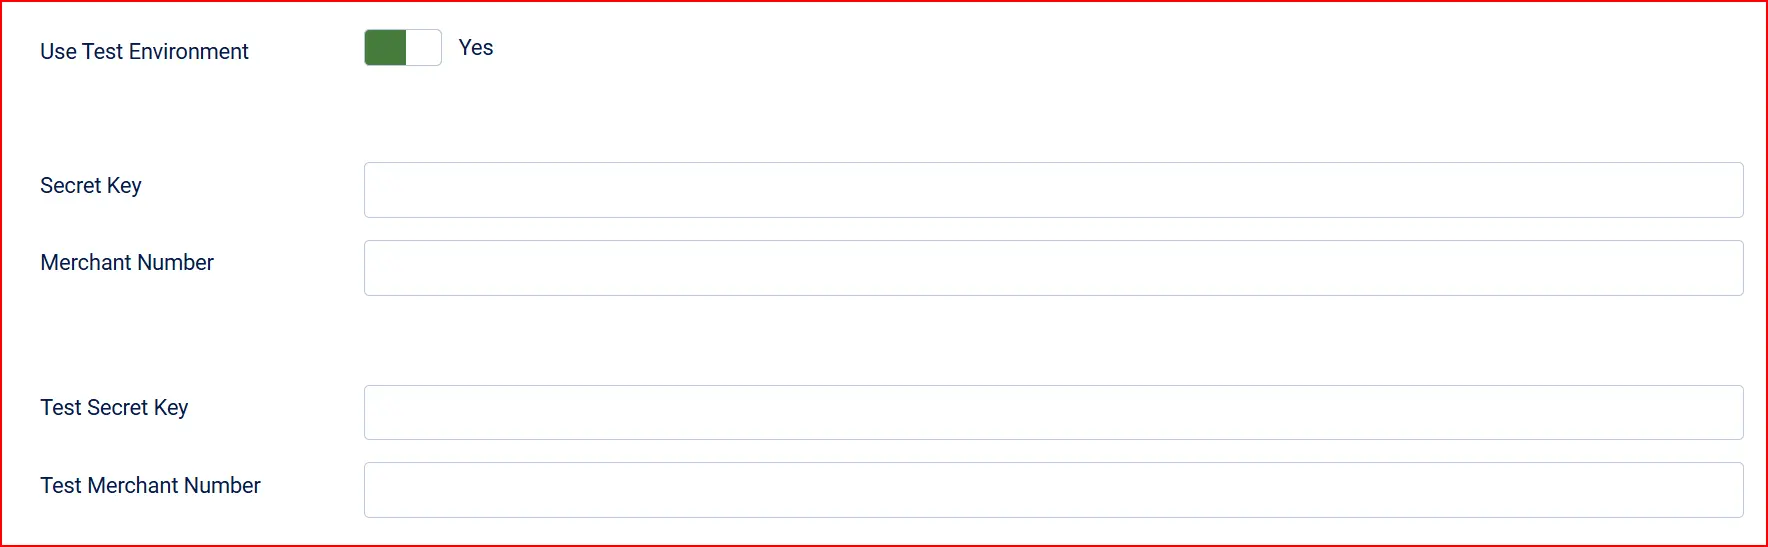
Use Test Environment: When set to Yes, the plugin connects to test.api.dibspayment.eu and uses your test credentials. Set to No for live payments.
Switch this to Yes whenever you are testing. Switch it back to No before going live.
Live Credentials
These credentials are used when Use Test Environment is set to No.
Secret Key: Your Nets Easy live Secret Key.
- Where to find: Nets Easy portal -> Company -> Integrations
Merchant Number: Your Nets Easy live Merchant Number. This field is optional for some integrations but recommended.
- Where to find: Same page as the Secret Key
Test Credentials
These credentials are used when Use Test Environment is set to Yes.
Test Secret Key: Your Nets Easy test Secret Key.
- Where to find: Nets Easy portal -> Company -> Integrations (test section)
Test Merchant Number: Your Nets Easy test Merchant Number (optional).
- Where to find: Same page as the Test Secret Key
Capture Settings

Auto Capture: When set to Yes, the plugin automatically captures (charges) the payment as soon as the customer returns from Nets and the payment is confirmed. When set to No, the payment is authorized only — money is reserved on the customer's card but not collected until you manually trigger capture.
Most stores should leave Auto Capture set to Yes. Set it to No only if your fulfilment process requires you to authorize now and charge later — for example, if you ship made-to-order products and want to capture payment at dispatch time.
Manual capture is handled at the order level. When auto-capture is off, the order will sit in an authorized state until you capture it using the controls in the order detail screen.
Confirmed Order Status: The J2Commerce order status to apply when Nets confirms a successful payment.
If the order status you want is not listed, create it first under J2Commerce -> Setup -> Order Statuses.

Surcharge

Add an optional extra fee when customers choose DIBS Easy as their payment method. Leave all three fields blank to add no surcharge.
Surcharge Label: Name shown for the surcharge line item at checkout.
Surcharge (%): A percentage of the order subtotal added as a surcharge. For example, enter 2 to add a 2% fee.
Surcharge (Fixed): A flat amount added to every order. Enter the amount in your store's base currency.
Surcharge Tax Class: A tax profile to apply to the surcharge amount. Leave blank if no tax applies to the surcharge.
Surcharges on card payments are regulated or prohibited in some countries — notably within the EU and EEA under the Payment Services Directive. Check local law before enabling a surcharge.
Geo Zone and Order Restrictions

Geo Zone: Restrict DIBS Easy to customers in a specific geographic zone. Select a geozone defined in J2Commerce (J2Commerce -> Localization -> Geo Zones). Leave blank to show the payment method to all customers.
Minimum Order Subtotal: Hide DIBS Easy if the order subtotal is below this amount. Leave blank for no minimum.
Maximum Order Subtotal: Hide DIBS Easy if the order subtotal is above this amount. Leave blank for no maximum.
Custom Messages
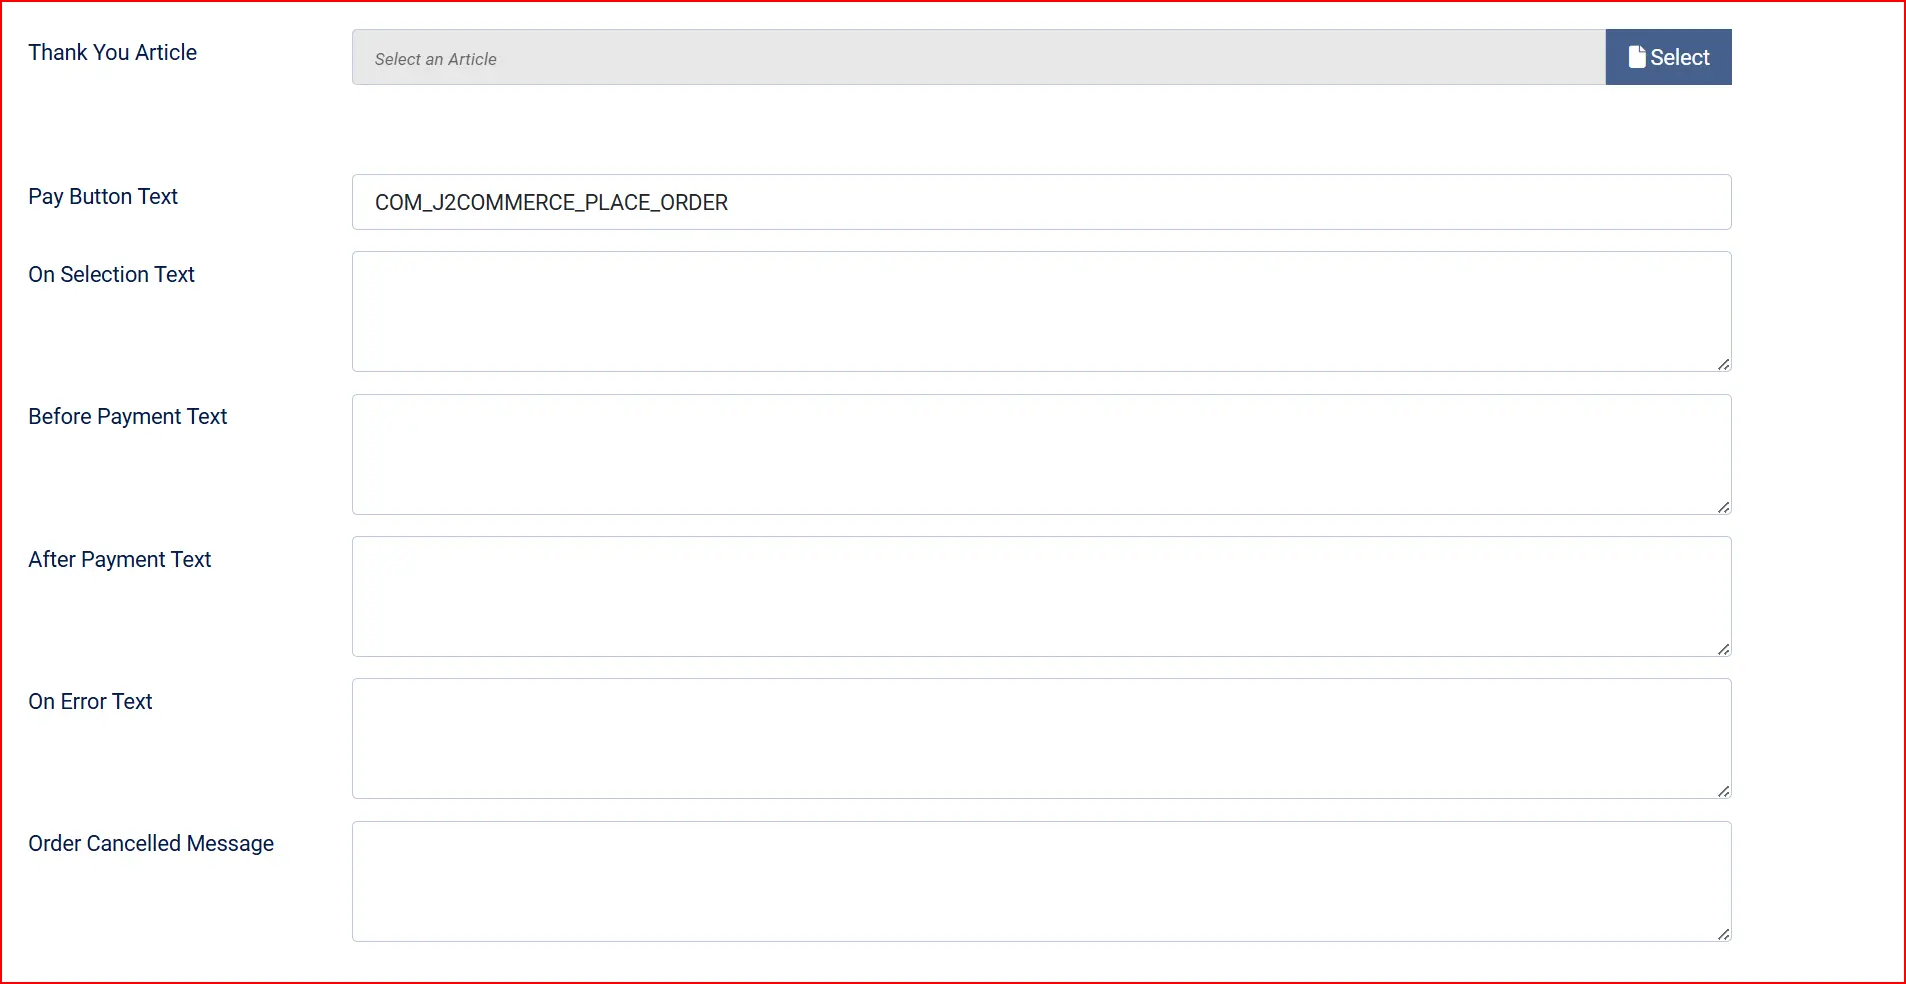
Thank You Article: Select a Joomla article to display on the order confirmation page after a successful payment. Leave blank to show J2Commerce's default confirmation message.
Pay Button Text: The label on the button that sends the customer to the Nets Easy hosted payment page.
Text on Method Selection: A message shown to the customer immediately after they select DIBS Easy at the payment step.
Text Before Payment: A message shown on the pre-payment confirmation screen, before the customer clicks the pay button.
Text After Successful Payment: A message shown after the customer returns from Nets with a successful payment.
Text on Payment Error: A message shown when the payment fails or encounters an error.
**Text on Payment Cancellation:**A message shown when the customer cancels the payment and returns to your store.
Leave any message field blank to show the built-in default text.
Additional Add-ons

Show Dashboard Icon: When set to Yes, a shortcut icon appears on the J2Commerce dashboard for quick access to this plugin's settings.
- Icon Label: The label shown under the dashboard icon. Only visible when Show Dashboard Icon is enabled.
Template Style: Select the CSS framework for this plugin's customer-facing templates (Bootstrap 5 or UIkit 3). Match this to your site's active template.
Debug Mode: When set to Yes, the plugin writes Nets Easy API requests and responses to administrator/logs/payment_dibseasy.php. Enable only while troubleshooting; set back to No in production.
How a Purchase Works
Here is what the customer experiences from start to finish:
- The customer adds products to the cart and proceeds to checkout.
- At the payment step, DIBS Easy (or your custom display name) appears as a payment option.
- The customer selects it. The on-selection message appears if you have configured one.
- The customer reviews the order and clicks the pay button (default label: Place Order).
- J2Commerce creates a payment session at Nets Easy and redirects the customer to the Nets Easy hosted payment page.
- On the Nets page, the customer enters their card details or selects a local payment method (Dankort, MobilePay, Vipps, Swish, and others depending on your Nets agreement).
- Nets processes the payment. If 3D Secure authentication is required, the bank challenge appears on the Nets page — the customer completes it there.
- After payment, Nets redirects the customer back to your store.
- J2Commerce verifies the payment with Nets, captures the charge (if Auto Capture is on), updates the order status, and shows the order confirmation page.
Sandbox Testing
Use the test environment to verify the complete payment flow without processing real money.
-
In the plugin settings, set Use Test Environment to Yes.
-
Enter your Test Secret Key and Test Merchant Number from the Nets Easy portal.
-
Save the settings.
-
Place a test order on your storefront.
-
On the Nets Easy test payment page, use the test card numbers provided by Nets:
- Visa:
4925000000000004(any future expiry, any CVV) - Mastercard:
5413000000000000 - Dankort:
5019994000000004
- Visa:
-
After a successful test payment, confirm the order status updated correctly in J2Commerce -> Sales -> Orders.
-
Enable Debug Mode and check
administrator/logs/payment_dibseasy.phpto review the full API exchange.
Webhook notifications from Nets cannot be delivered to a site running on localhost or behind a private network. If you are developing locally, webhooks will be skipped and order confirmation will rely solely on the customer return URL. Use a public URL (or an ngrok tunnel) to test the full webhook flow.
Going Live
When you are ready to accept real payments:
- In the plugin settings, set Use Test Environment to No.
- Enter your live Secret Key and Merchant Number.
- Save the settings.
- Place one real low-value transaction to confirm everything works end-to-end.
- Set Debug Mode to No.
Going-live checklist:
- Use Test Environment set to No
- Live Secret Key entered in the Secret Key field
- Live Merchant Number entered in the Merchant Number field
- Debug Mode set to No
- At least one real payment confirmed end-to-end
- Your site is publicly accessible over HTTPS
Refunds
You can issue full or partial refunds directly from the J2Commerce admin:
- Go to J2Commerce -> Orders and open the relevant order.
- Scroll to the Payment section on the order detail screen.
- Click Refund (Full) to return the entire amount, or Refund (Partial) to enter a specific amount.
- Confirm the refund.
J2Commerce sends the refund request to Nets Easy via the API. The customer receives their refund on the original payment method within a few business days, depending on their bank.
What Changed from J2Store
If you used the DIBS Easy plugin in J2Store 4, the J2Commerce 6 version includes several improvements:
- Native Joomla 6 MVC — rebuilt from the ground up with proper namespacing and Joomla 6 dependency injection, removing all FOF 2 dependencies.
- No jQuery — all frontend JavaScript has been rewritten in vanilla ES6.
- Joomla HttpFactory — HTTP calls to the Nets API now use the Joomla HttpFactory instead of raw cURL, so they respect your server's HTTP client configuration.
- Multi-currency-correct amounts — the plugin applies J2Commerce's currency conversion before sending amounts to Nets, so multi-currency stores charge the correct amount in the checkout currency.
- Idempotent capture — if the customer refreshes the return page, the plugin checks for an existing transaction before attempting a second capture. No double-charges on page reload.
- Authenticated webhooks — the webhook handler verifies the incoming payment ID against the Nets API before finalizing the order.
- Escaped output — all data shown in templates is properly escaped before output. Gateway error details are logged server-side rather than displayed to customers.
Troubleshooting
The pay button does not appear / shows a blank page
Cause: The plugin cannot create a payment session at Nets, usually because the Secret Key is wrong or the environment toggle is mismatched.
Solution:
- Verify that Use Test Environment matches which set of credentials you have entered. If it is set to Yes, the plugin uses the Test Secret Key — make sure that field is filled in.
- Double-check the Secret Key value: copy it again from the Nets Easy portal (Company -> Integrations) and paste it fresh.
- Enable Debug Mode and attempt the payment again. Open
administrator/logs/payment_dibseasy.phpand look for the Nets API response — the error message will identify the issue.
Payment is not completing on return from Nets
Cause: This usually has one of two causes: the capture setting is unexpected, or the webhook from Nets is not reaching your site.
Solution:
- Check whether Auto Capture is set to Yes. If it is set to No, the order will be in an authorized state — you need to capture it manually.
- Confirm your site has a public HTTPS URL. Nets cannot deliver webhooks to a server on a private network or
localhost. Without the webhook, the plugin relies entirely on the customer return URL. - Enable Debug Mode and check the log file. A successful authorization from Nets will appear as a
GET /v1/payments/[paymentId]response with apayment.summaryobject. If that log entry is missing, the return URL handler was not reached.
The order amount sent to Nets looks wrong (wrong currency or value)
Cause: The plugin converts the order total to minor units (for example, EUR 19.90 becomes 1990). A misconfigured currency in J2Commerce can produce an incorrect multiplier.
Solution:
- Go to J2Commerce -> Setup -> Configuration -> Store tab -> Currencies and confirm the active currency has the correct number of Decimal Places (2 for EUR/DKK/NOK/SEK, etc.).
- If you use multi-currency, confirm the Currency Value (exchange rate) for each active currency is current.
- Check the Debug log — the request sent to Nets includes the
amountfield in minor units. Compare it against the expected value for your test order.
Payment method does not appear at checkout for certain customers
Cause: A geozone restriction, minimum subtotal, or maximum subtotal is filtering it out.
Solution: Review the Geo Zone, Minimum Order Subtotal, and Maximum Order Subtotal fields in the plugin settings. Leave all three blank to show DIBS Easy to all customers without restriction.
Order status is stuck on "Pending" after a successful payment
Cause: Nets delivered the webhook but the plugin did not process it, or the webhook was not delivered at all.
Solution:
- Ensure your site URL is publicly reachable over HTTPS — Nets skips webhooks on localhost.
- Check that no firewall, CDN WAF, or Joomla security plugin is blocking POST requests to
index.php?option=com_ajax&.... - Enable Debug Mode and place a new test order. Look for webhook-related log entries. If the webhook arrives but fails, the error message will appear in the log.
- You can also manually update the order status from J2Commerce -> Sales -> Orders while you investigate.