Purchase Order Payment
The Purchase Order Payment plugin adds a Purchase Order option to your store's checkout page. It is designed for B2B stores that sell to business customers who pay on account — the customer enters their company's PO number at checkout, places the order, and you collect payment offline through your normal invoicing process.
No money moves through any payment gateway. The plugin simply records the PO number, creates the order with an admin-chosen status (typically Pending), and lets you confirm payment manually in the admin panel when the funds arrive.
This plugin has no API keys, no sandbox, no redirect, and no cron requirement. Setup takes just a few minutes.
Requirements
- Joomla 6.x
- J2Commerce 6.x
- PHP 8.3 or later
- The Purchase Order Payment add-on (separate download — see below)
Purchase and Download
This plugin is a separate add-on available from the J2Commerce Extensions Store. It is not included with the core J2Commerce 6 component.
- Go to the J2Commerce website and locate Purchase Order Payment.
- Add it to your cart and complete checkout.
- Go to My Downloads under your account profile.
- Click Available Versions -> View Files -> Download Now to download the ZIP file.
Installing the Plugin
You can install this Purchase Order Payment plugin using the Joomla installer. The following steps help you with a successful installation.
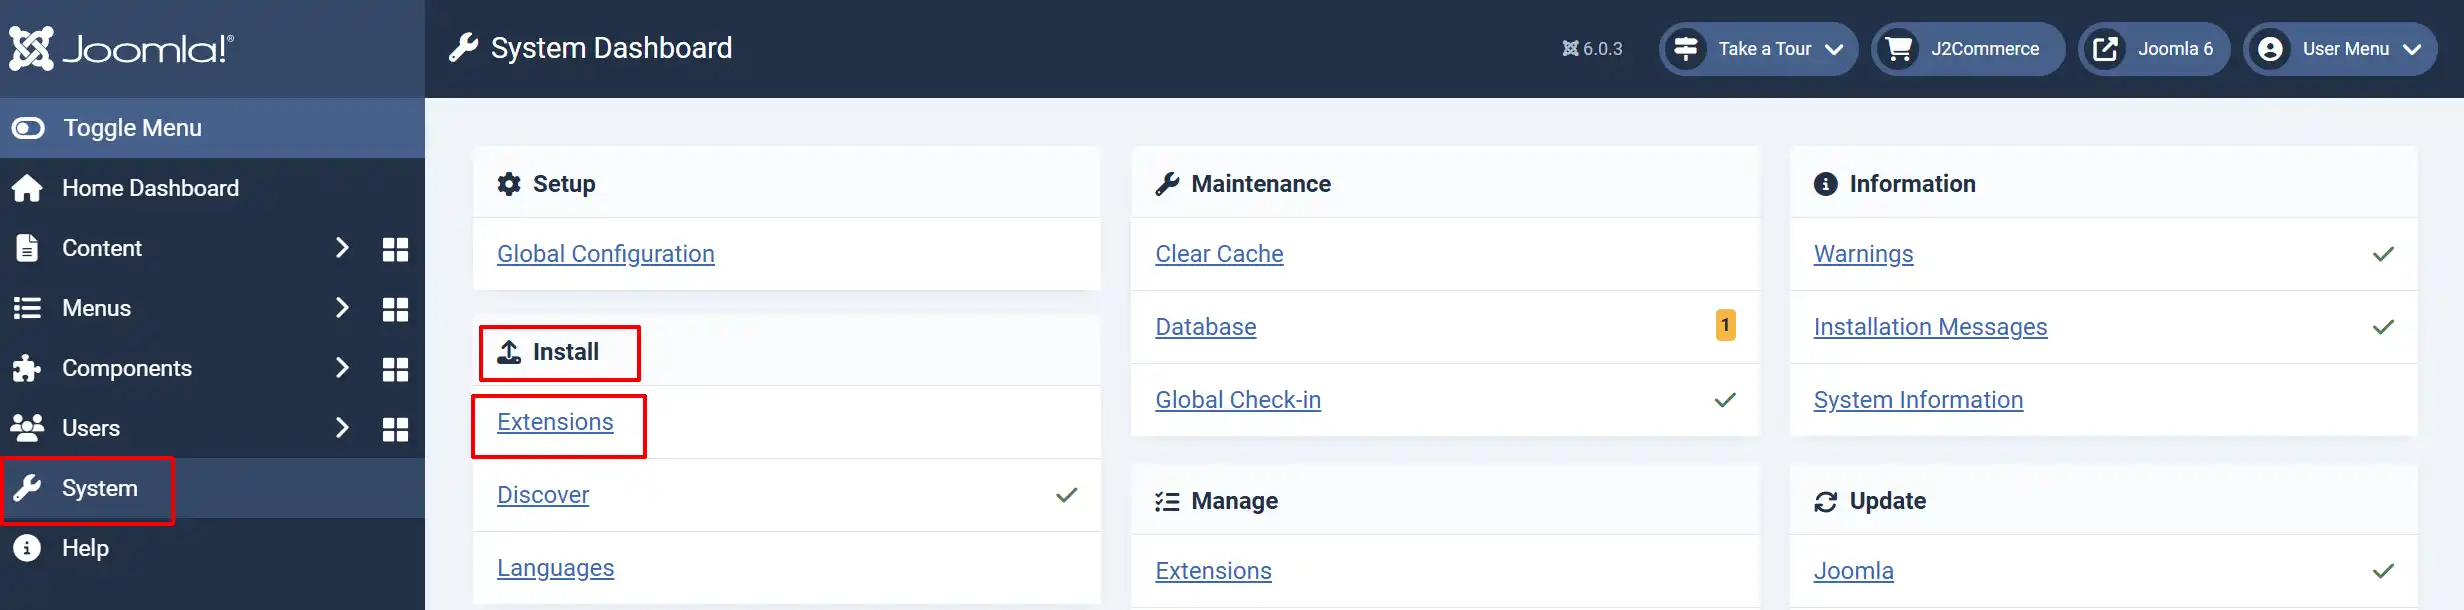
In the Joomla admin, go to System -> Install -> Extensions
Upload the payment_purchaseorder.zip file or use the Install from URL option.
Enable the Plugin
Once you have installed the extension, you will need to enable it. There are two ways you can access the extension.
Option A: Go to the J2Commerce icon at the top right corner -> Setup -> Payment Methods
Option B: Go to Components on the left sidebar -> J2Commerce -> Dashboard -> Setup -> Payment Methods
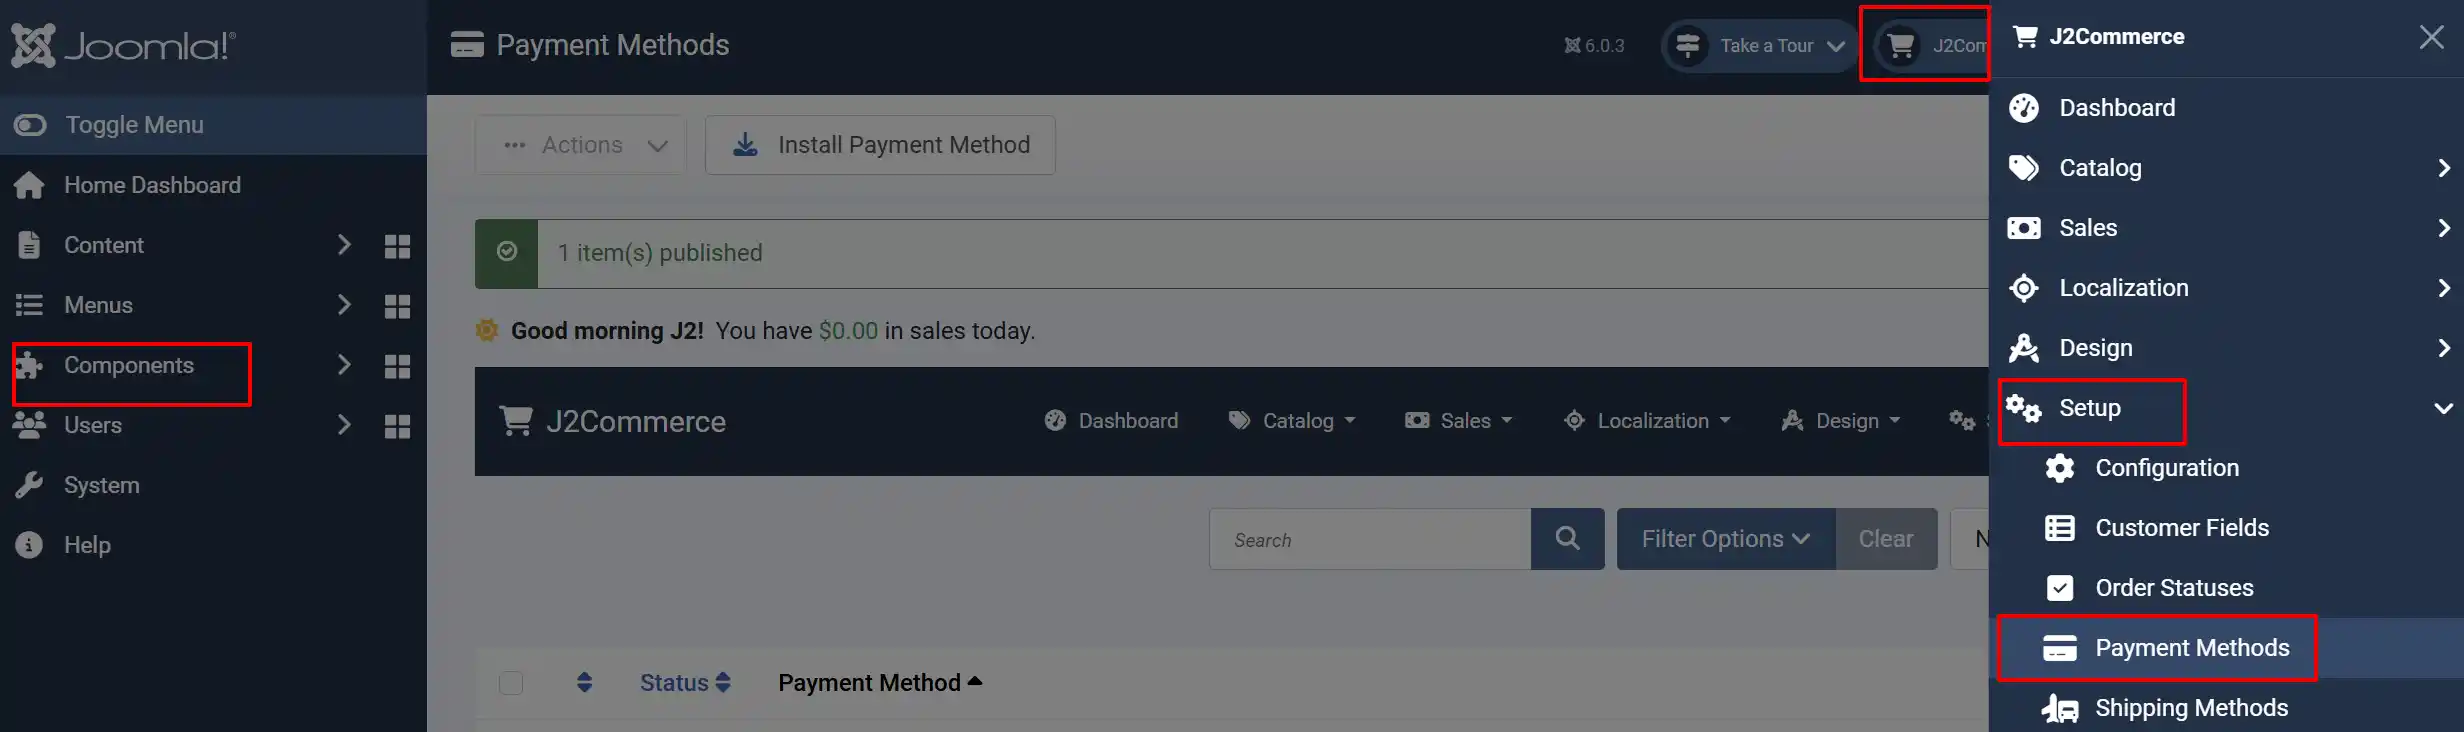
Look for Purchase Order Payment, click the X, and it will turn into a green checkmark. It is now enabled and ready for setup.
Configure the Plugin
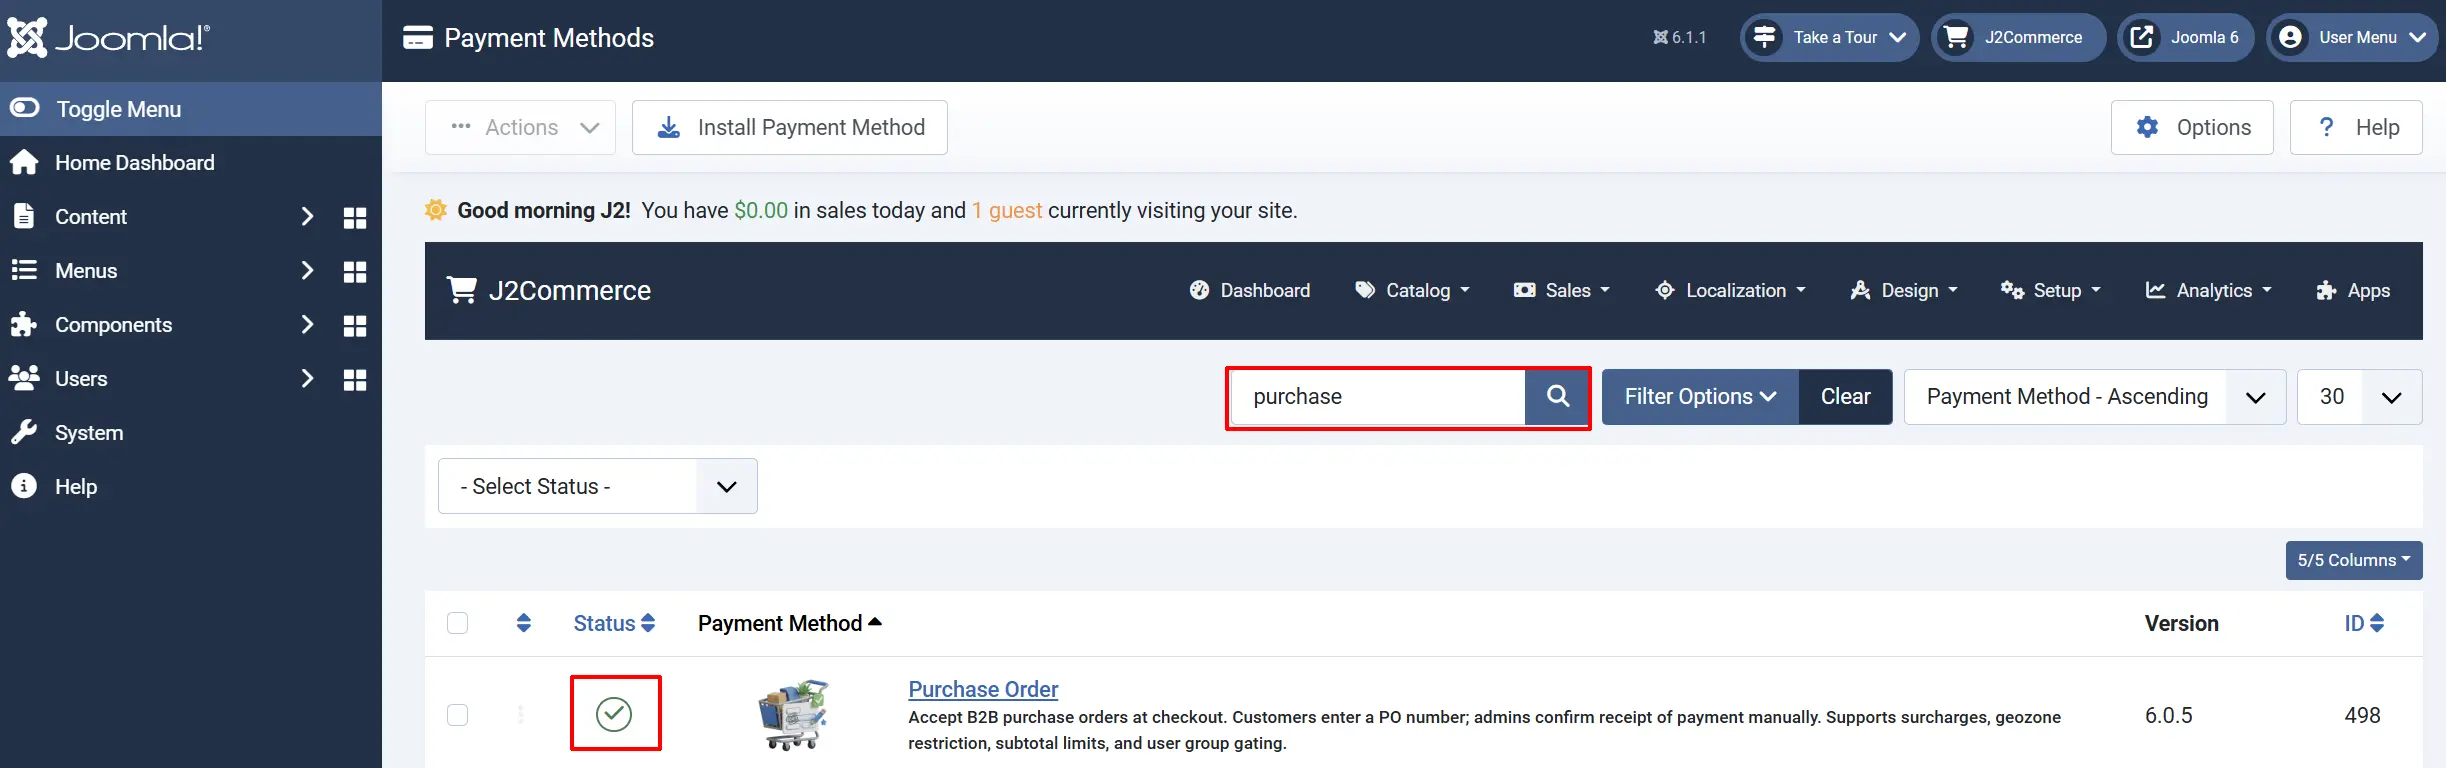
Click Purchase Order to open the settings screen.
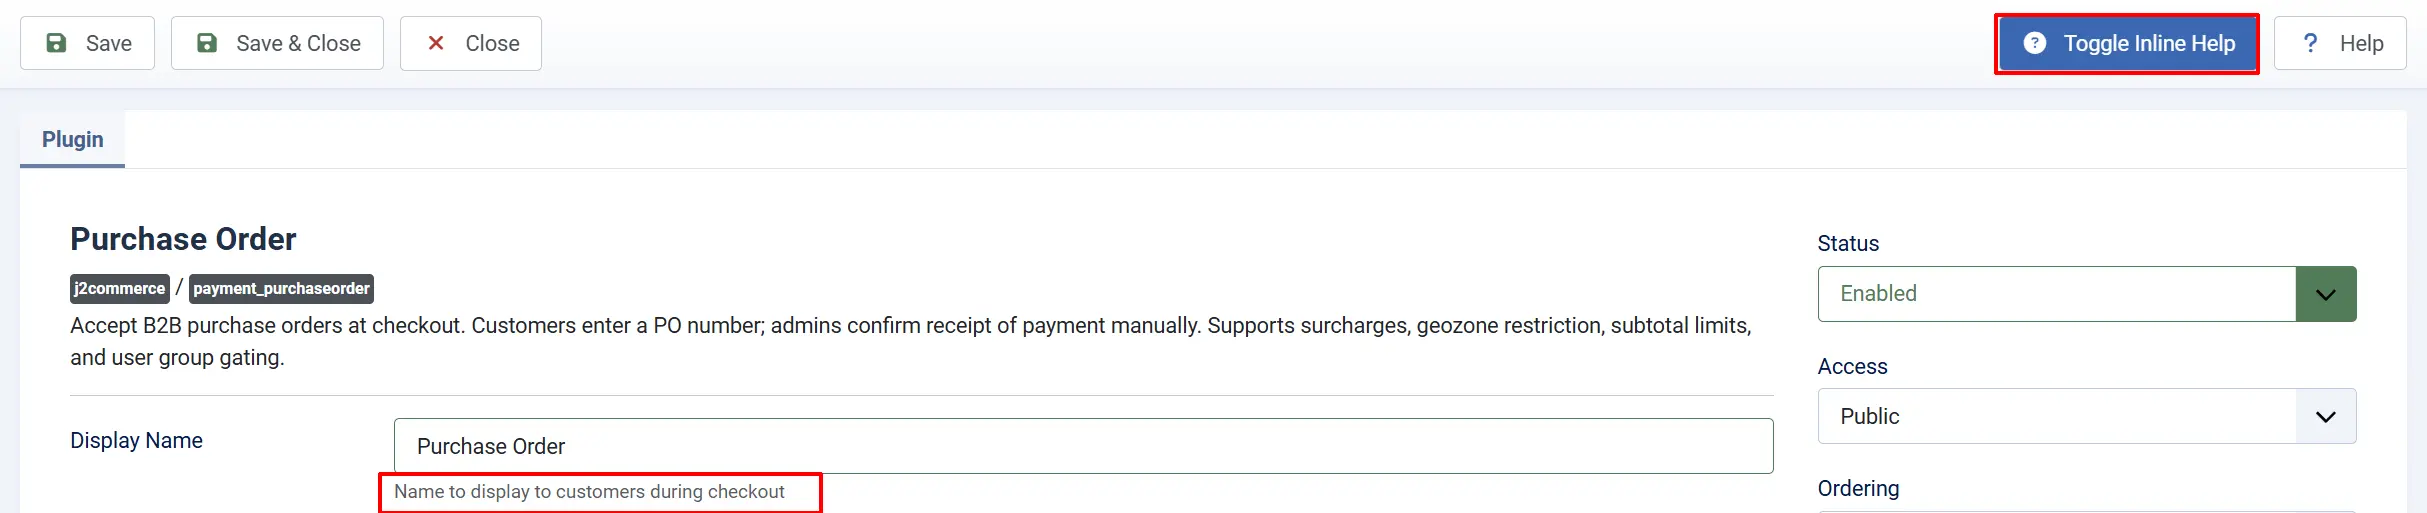
Click the Toggle Inline Help button at the top of any plugin settings screen to show a description below each field.
Appearance
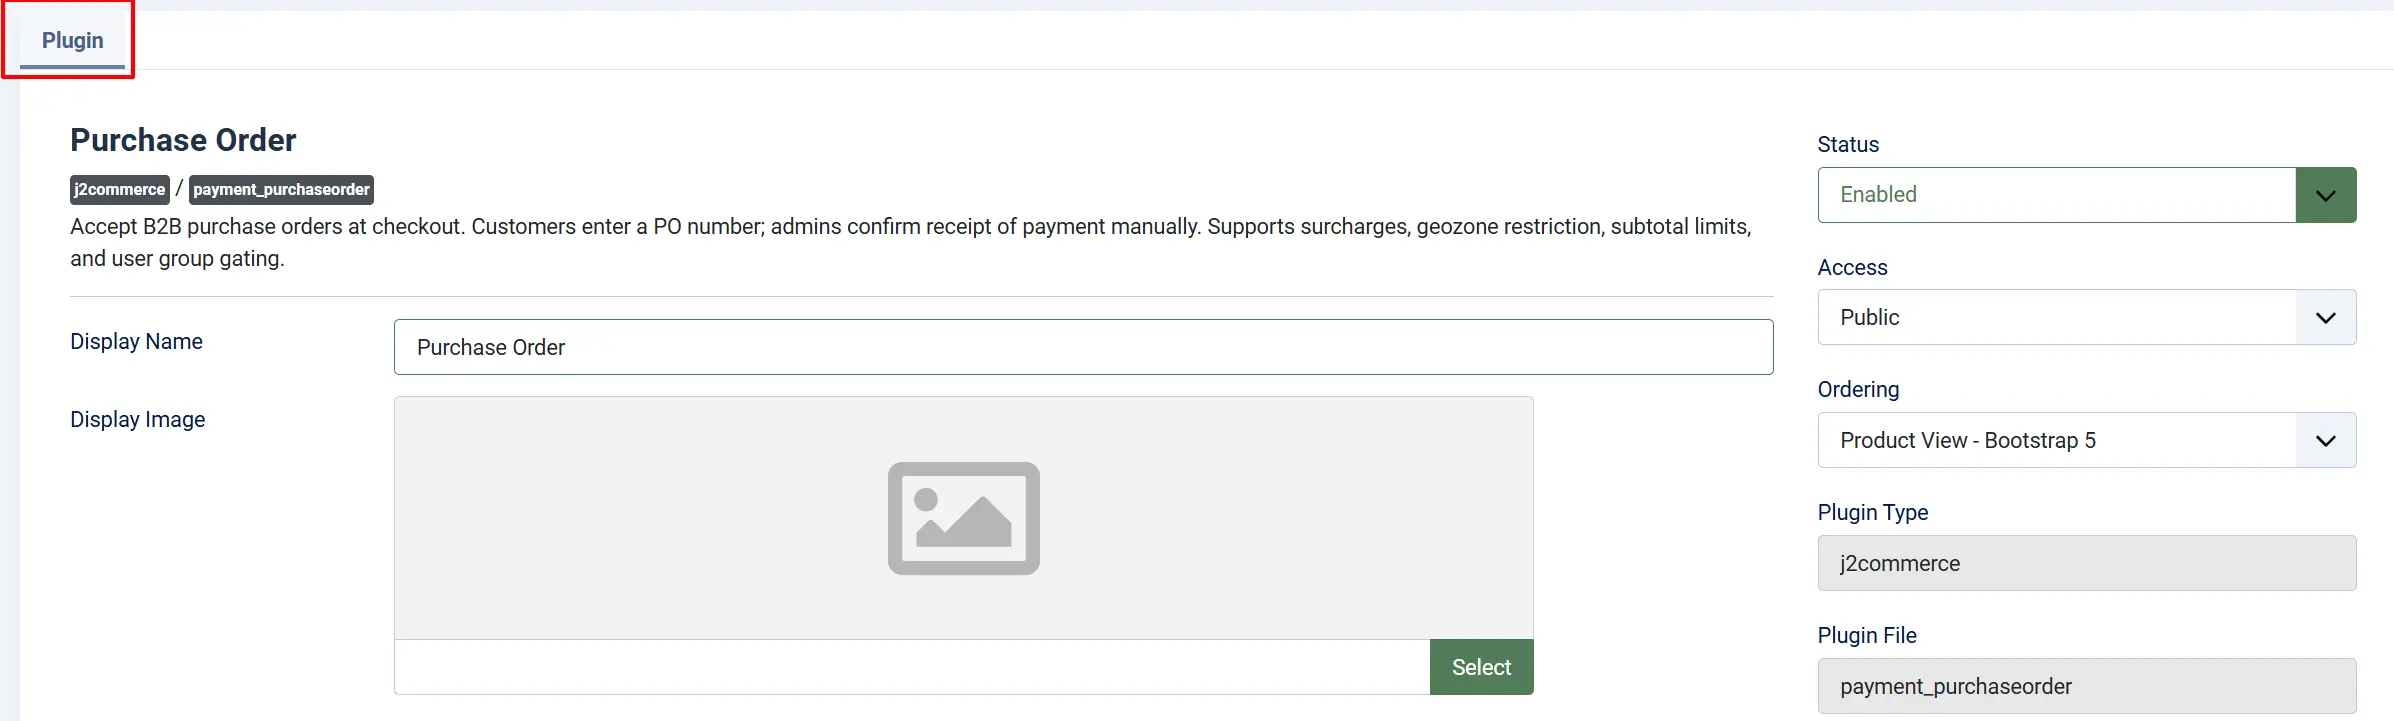
Display Name: The name shown to customers at checkout. Defaults to Purchase Order. You can change this to match your terminology — for example, "Pay by Purchase Order" or "Account / Invoice."
Display Image: An optional logo or image shown next to the payment method at checkout. Leave blank to show no image.
Purchase Order Number
These settings control whether and how customers enter their PO number at checkout.
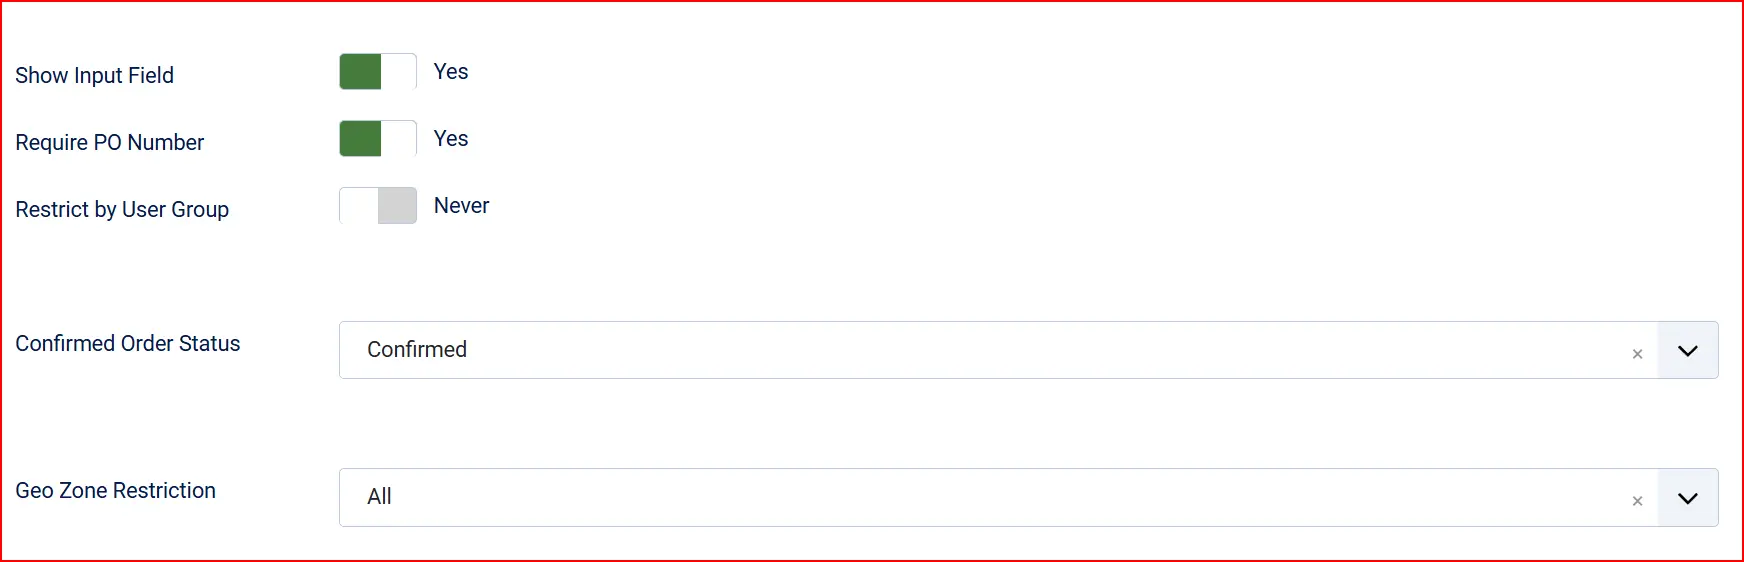
Show Input Field: Show the PO number input box when the customer selects this payment method
Require PO Number: Customer must enter a PO number before placing the order
Restrict by User Group: When on, the PO number is required only for specific user groups — everyone else can check out without one. Only visible when Require PO Number is Yes.
User Group(s): The user groups that must supply a PO number. Only visible when both Require PO Number and Restrict by User Group are Yes.
Guest customers are never counted as members of a required group. If Restrict by User Group is on, guests can always check out without entering a PO number regardless of which groups are selected.
Order Status
Confirmed Order Status: The J2Commerce order status applied when the order is placed using this method. Set this to your "Pending" or "Awaiting Payment" status. You will change it manually to a paid status once you receive the actual payment.
NOTE: If the order status you want isn't listed in the dropdown menu, you can create a new one by going to J2Commerce -> Setup -> Order Statuses

Geozone
Geozone Restriction: Limit this payment method to customers in a specific geozone — leave blank to allow all locations
Surcharge

Add an optional handling fee when a customer chooses Purchase Order.
Surcharge Name: The label shown to the customer — for example, "Purchase Order handling fee"
Surcharge Percent: A percentage of the order subtotal added as a fee
Surcharge Fixed: A fixed amount added regardless of order size
Surcharge Tax Class: A tax profile to apply to the surcharge — leave blank if no tax applies
Leave both Surcharge Percent and Surcharge Fixed empty to charge no surcharge.
Order Value Restrictions

Minimum Order Subtotal: Hide this option when the cart subtotal is below this amount (0 = no minimum)
Maximum Order Subtotal: Hide this option when the cart subtotal is above this amount (-1 = no maximum)
Leave Maximum Order Subtotal at -1 for no limit. Saving a blank value is treated as zero, which hides the payment method for all orders with any items in the cart.
Custom Messages
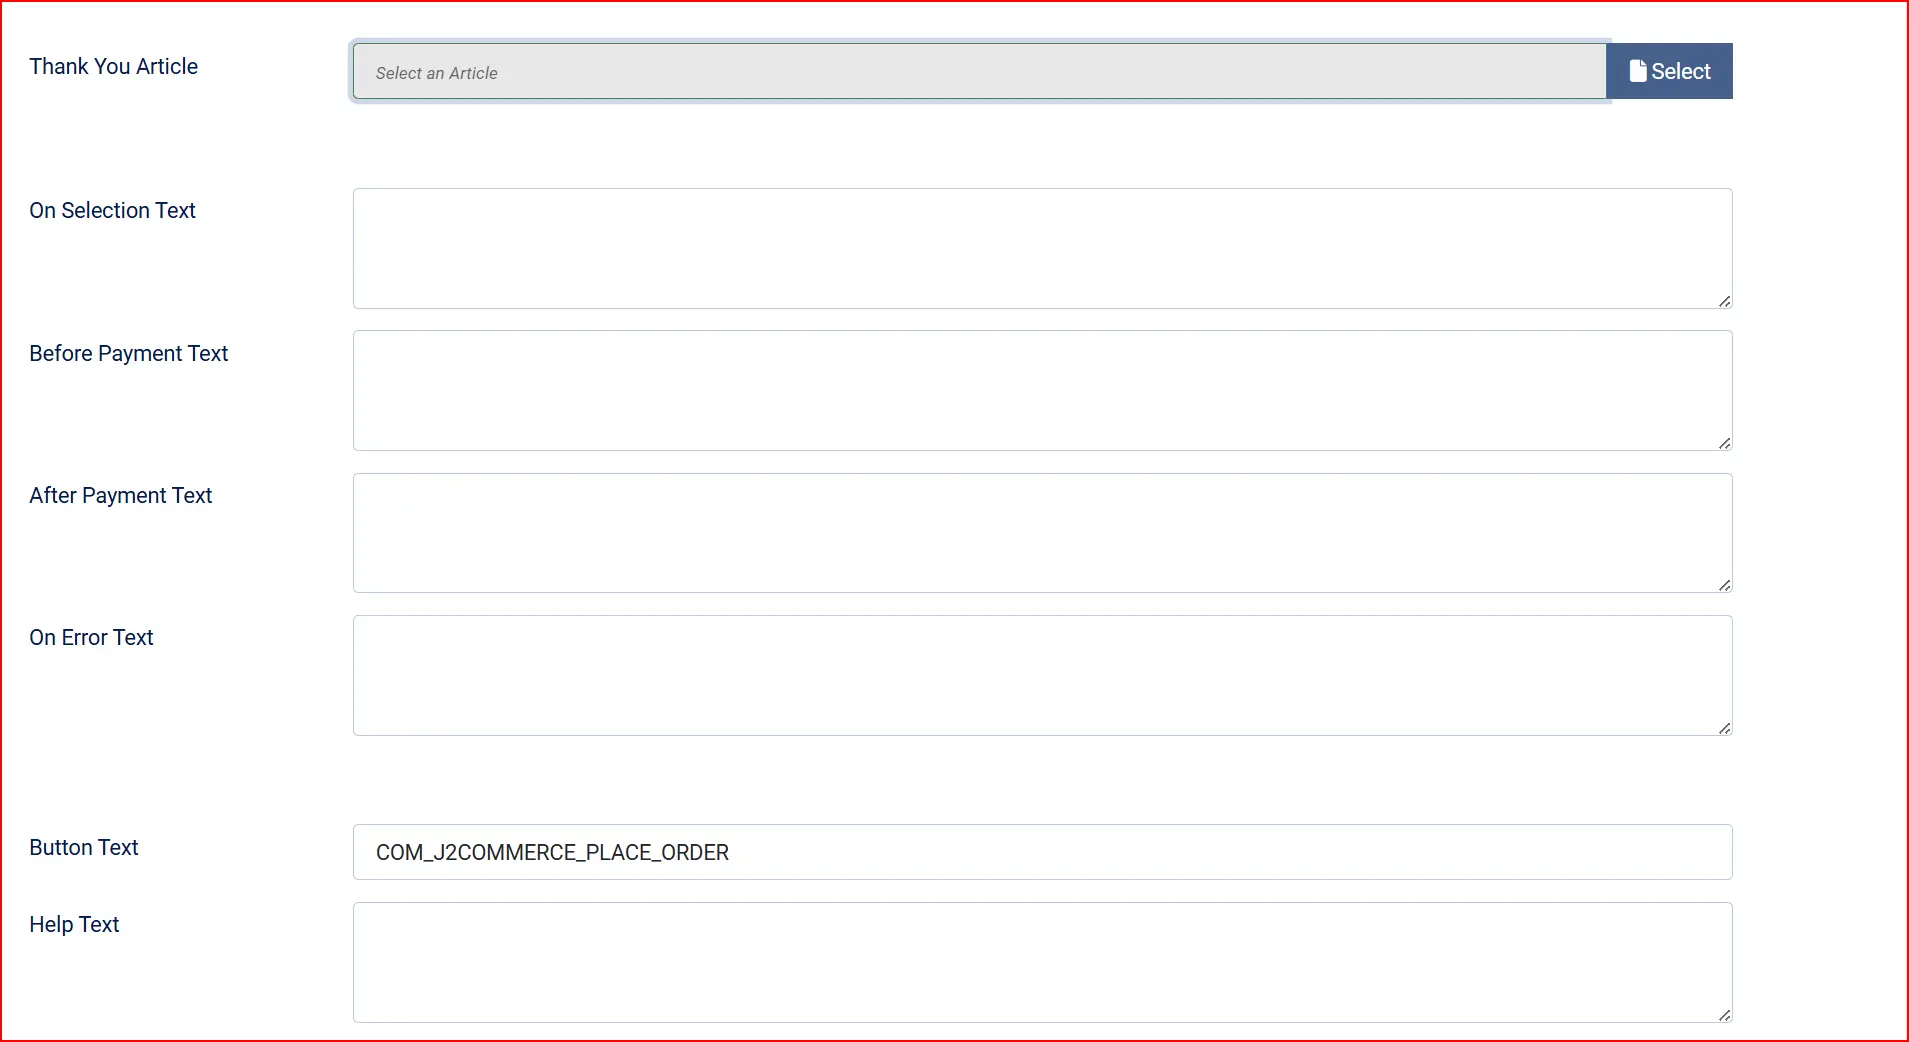
Thanks Message: Select an optional Joomla article to display on the order confirmation page after the customer places their order. Use this to give customers instructions on what happens next — for example, "Our team will review your purchase order and send a formal invoice within one business day."
These optional text areas let you show a message to the customer at each stage of the payment process.
Selection Text: When the customer selects Purchase Order at the checkout payment step
Before Payment Text: Just before the customer clicks the Place Order button
After Payment Text: On the order confirmation page after the order is placed
On Error Payment Text: If an error occurs during order processing
Button Text: The label on the checkout submit button. Defaults to Place Order.
Help Text: Optional descriptive text displayed beneath the PO number field at checkout — for example, "Enter the purchase order number from your procurement system." Leave blank to show no additional text.
Template Layout

Template Layout: The checkout layout template. Leave on the default (bootstrap5) unless you have a custom layout installed. The plugin includes layouts for both Bootstrap 5 and UIkit frontends.
Debug Mode
Debug: When turned on, the plugin writes a diagnostic log to administrator/logs/plg_j2commerce_payment_purchaseorder.log.php. Only enable this when diagnosing a problem — disable it on live sites.
How Checkout Works for Customers
The customer adds items to their cart and proceeds to checkout.
At the payment step, they select Purchase Order from the list of payment methods.
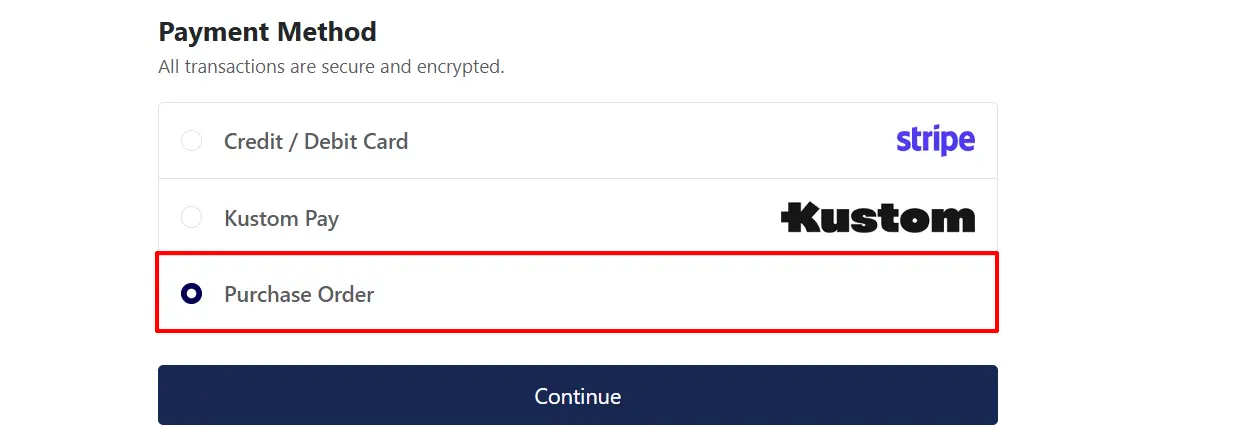
If Show Input Field is on, a PO number field appears. If the field is required (for their user group), they must enter a value before continuing.
The customer clicks Place Order.
The order is created immediately and they see an order confirmation page. If a Thanks Message article is configured, it appears here.
No redirect happens — the customer stays on your site throughout.
The order is placed in the status you configured in Confirmed Order Status and waits for you to confirm receipt of payment.
Confirming Payment (Admin)
When the actual payment arrives — by bank transfer, check, or whatever method your business uses — you confirm it manually in J2Commerce.
Go to J2Commerce -> Sales -> Orders.
Find and open the relevant order. The PO number entered by the customer is shown in the payment information panel.

Change the order status to your confirmed/paid status using the Order Status dropdown in the order detail screen.

The customer can also view their PO number on the order summary page in their customer account.
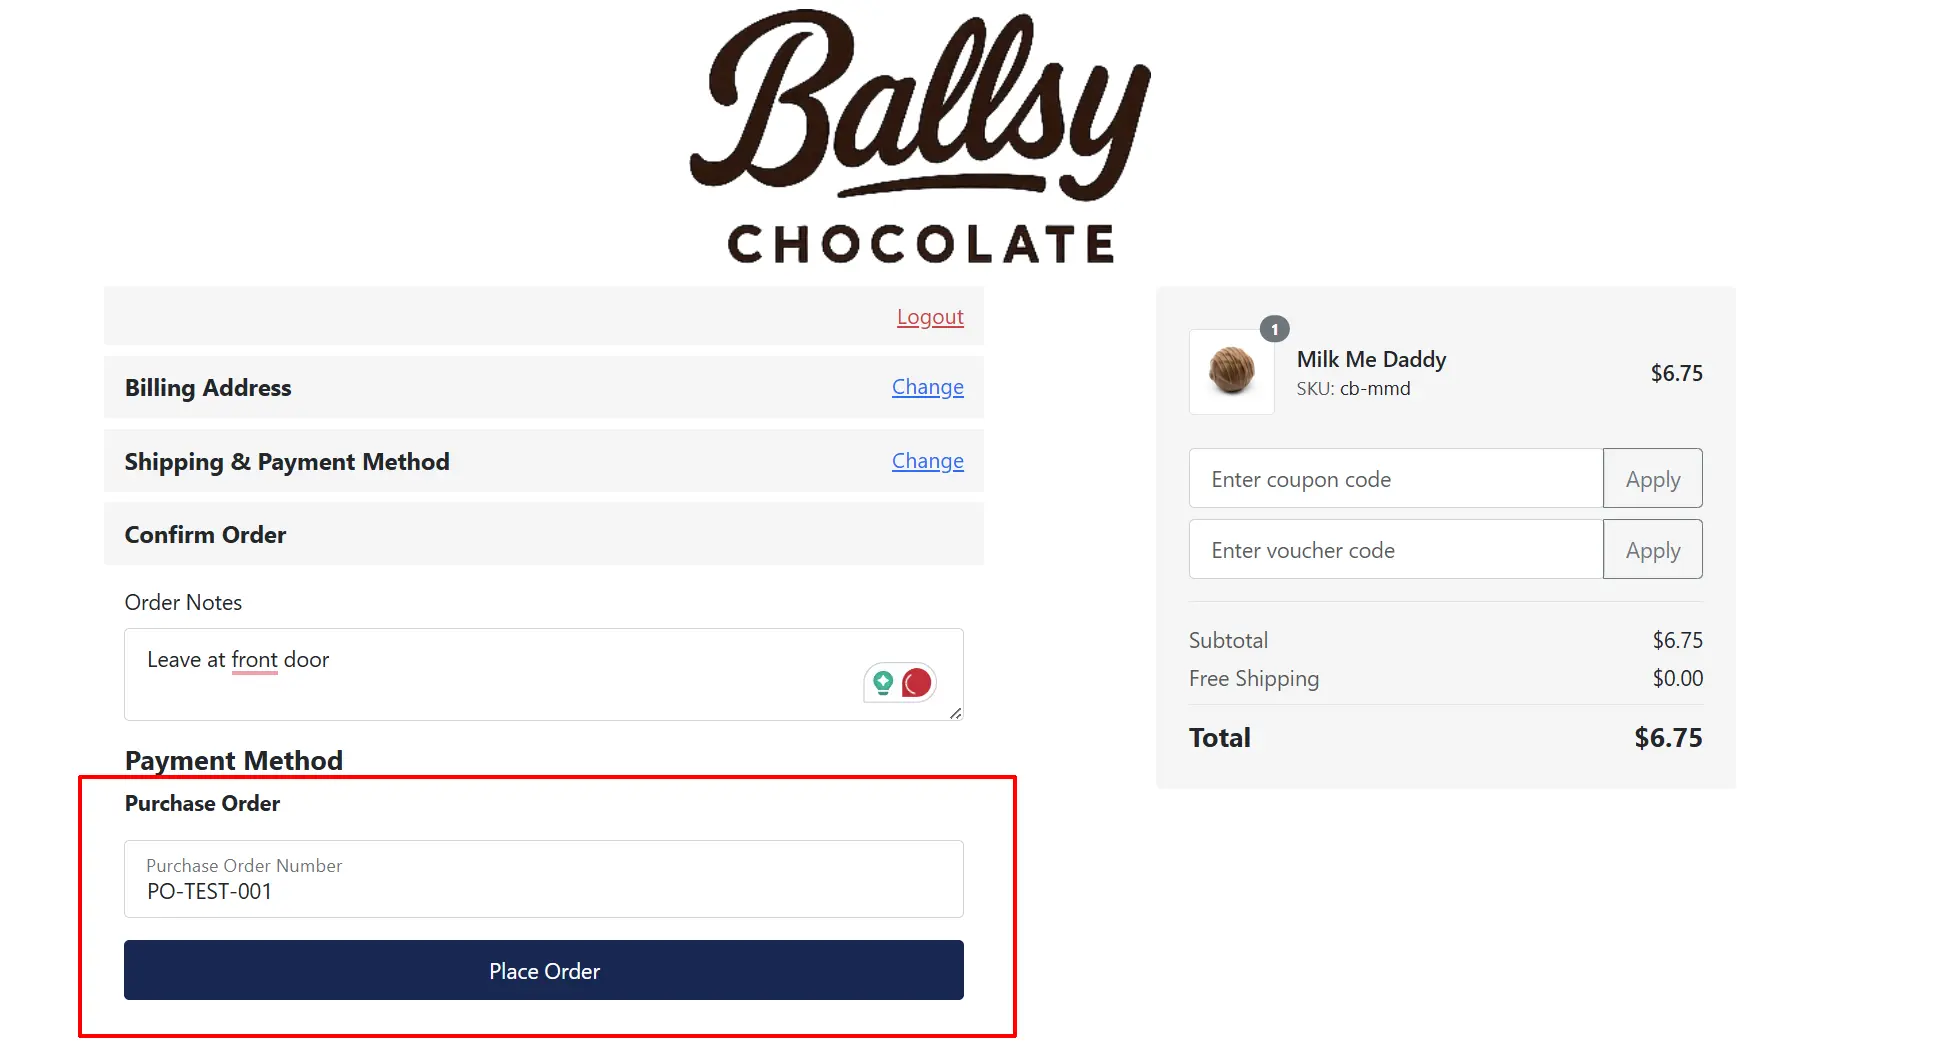
Testing the Plugin
- Enable the plugin and open the settings. Set Confirmed Order Status to a status that makes it easy to identify test orders (such as "Pending").
- Place a test order on your storefront, selecting Purchase Order at checkout.
- Enter a test PO number such as
PO-TEST-001and click Place Order. - Confirm the order confirmation page appears and shows the correct content.
- Go to J2Commerce -> Sales -> Orders and confirm the order appears with the correct status and the PO number you entered.
- Open the order and manually change the status to your paid status to verify that workflow.
- Test with Require PO Number turned on — try submitting without a PO number and confirm the validation message appears.
Multilingual
The Purchase Order Payment plugin ships with 21 language translations, including Arabic, Danish, Dutch, Finnish, French, German, Greek, Hebrew, Italian, Japanese, Norwegian, Polish, Brazilian Portuguese, European Portuguese, Russian, Spanish, Swedish, Traditional Chinese, and Turkish.
Troubleshooting
The PO number input field is not showing at checkout
Cause: The Show Input Field setting is turned off, or the plugin is not enabled.
Solution:
- Go to J2Commerce -> Setup -> Payment Methods and confirm the Purchase Order method has a green checkmark (enabled).
- Open the plugin settings and confirm Show Input Field is set to Yes.
- Save the settings, clear Joomla's cache (System -> Clear Cache), and reload the checkout page.
The Purchase Order option is missing from checkout entirely
Cause: The payment method is hidden by a geozone restriction, a subtotal limit, or a blank Maximum Order Subtotal value.
Solution:
- Open the plugin settings and check the Geozone Restriction field — if set, confirm the customer's shipping address falls within that geozone.
- Check Minimum Order Subtotal and Maximum Order Subtotal. A blank Maximum Order Subtotal value is treated as zero and hides the method for any order with items. Set it to
-1for no limit. - Confirm the cart subtotal falls between the configured minimum and maximum values.
The PO number is not required even though Require PO Number is set to Yes
Cause: The Restrict by User Group option is on, but the customer's account is not in any of the selected groups.
Solution:
- Open the plugin settings and locate Restrict by User Group. If it is set to Yes, the PO number is only required for users in the selected groups.
- Review the User Group(s) field and confirm the customer's Joomla user group is included.
- Remember that guest customers are never subject to the group requirement — to require a PO number from guests, turn Restrict by User Group off.
Where is the debug log?
Enable Debug in the plugin settings, then place a test order. The log is written to:
administrator/logs/plg_j2commerce_payment_purchaseorder.log.php
Access it via System -> Logs in the Joomla Administrator, or open the file directly on your server.