Culqi Payment Gateway
Culqi is Peru's leading payment gateway, founded in 2014 and now part of Banco de Crédito del Perú (BCP). It lets Peruvian and Latin American merchants accept Visa, Mastercard, American Express, Diners Club, and Yape directly on their store. Charges happen in real time — no redirect to a third-party site. The J2Commerce plugin handles card tokenization through Culqi's JavaScript library, then sends the charge from your server, so shoppers never leave your checkout.
Supported currencies: PEN (Peruvian soles) and USD.
This plugin is a separate add-on available from the J2Commerce Extensions Store. It does not ship with the core J2Commerce component.
Get Your Culqi API Keys
Culqi gives you four API keys: two for testing (sandbox) and two for live payments. You need all four before configuring the plugin.
Step 1: Log in to your Culqi dashboard at culqi.com. (If you don't have one, click on Login and then Sign up for Culqi.
Step 2: Go to Desarrollo (Development) -> Llaves (API Keys).
Step 3: Copy all four keys to a secure location:
| Key | Prefix | Use |
|---|---|---|
| Public Key (live) | pk_live_... | Safe to use in the browser |
| Secret Key (live) | sk_live_... | Server-only — never share |
| Sandbox Public Key | pk_test_... | Safe to use in the browser (testing) |
| Sandbox Secret Key | sk_test_... | Server-only — never share (testing) |
Publishable keys (those beginning with pk_) are safe to use in the browser. Secret keys (those beginning with sk_) are server-only credentials. Never share a secret key in email, chat, or screenshots. If a secret key is ever exposed, regenerate it immediately from the Culqi dashboard.
Purchase and Download
The Culqi app is a premium add-on available from the J2Commerce extension directory.
Step 1: Go to our J2Commerce website -> Apps
Step 2: Locate the Culqi App -> click View Details -> Add to cart -> Checkout.
Step 3: Go to your My Downloads under your profile button at the top right corner and search for the app. Click Available Versions -> View Files -> Download
Install the Plugin
In the Joomla Administrator, go to System -> Install -> Extensions.
Upload the plg_j2commerce_payment_culqi.zip ZIP file or use the Install from URL option.

Enable the Plugin
Once you have installed the App, you will need to enable it. There are two ways you can access the App.
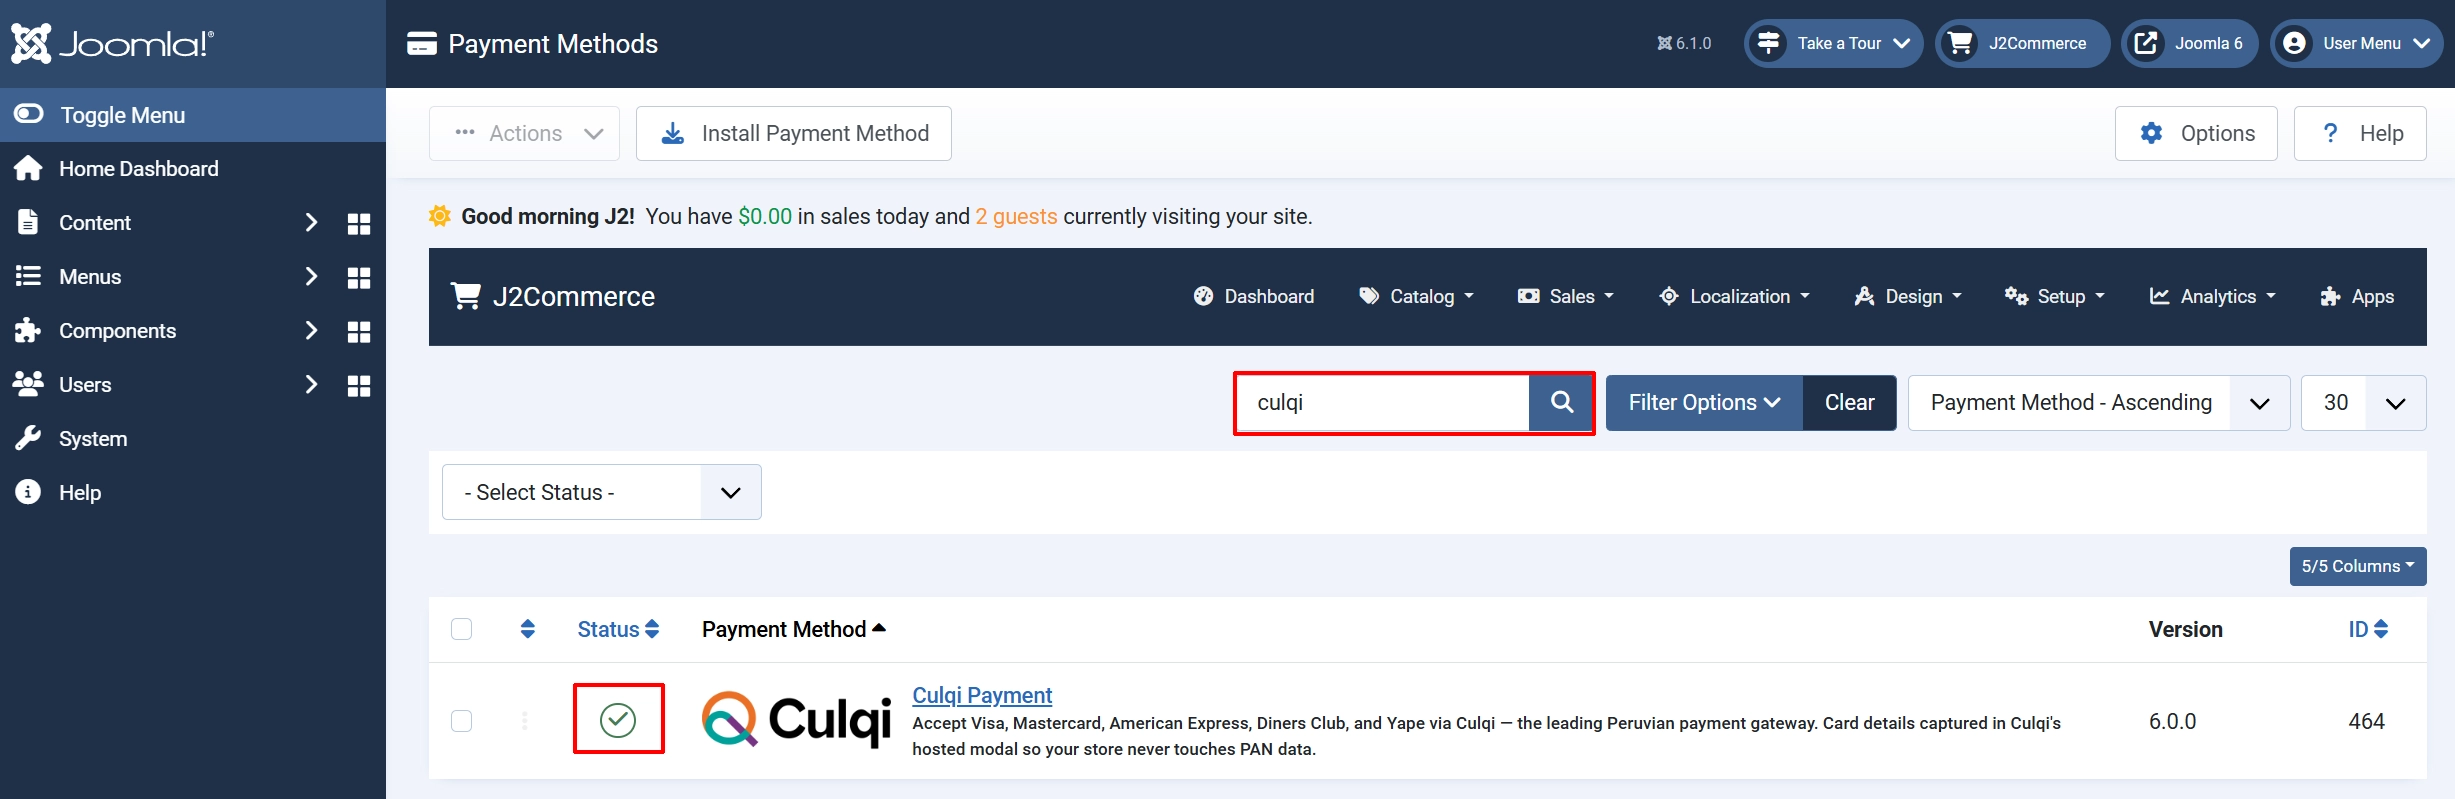
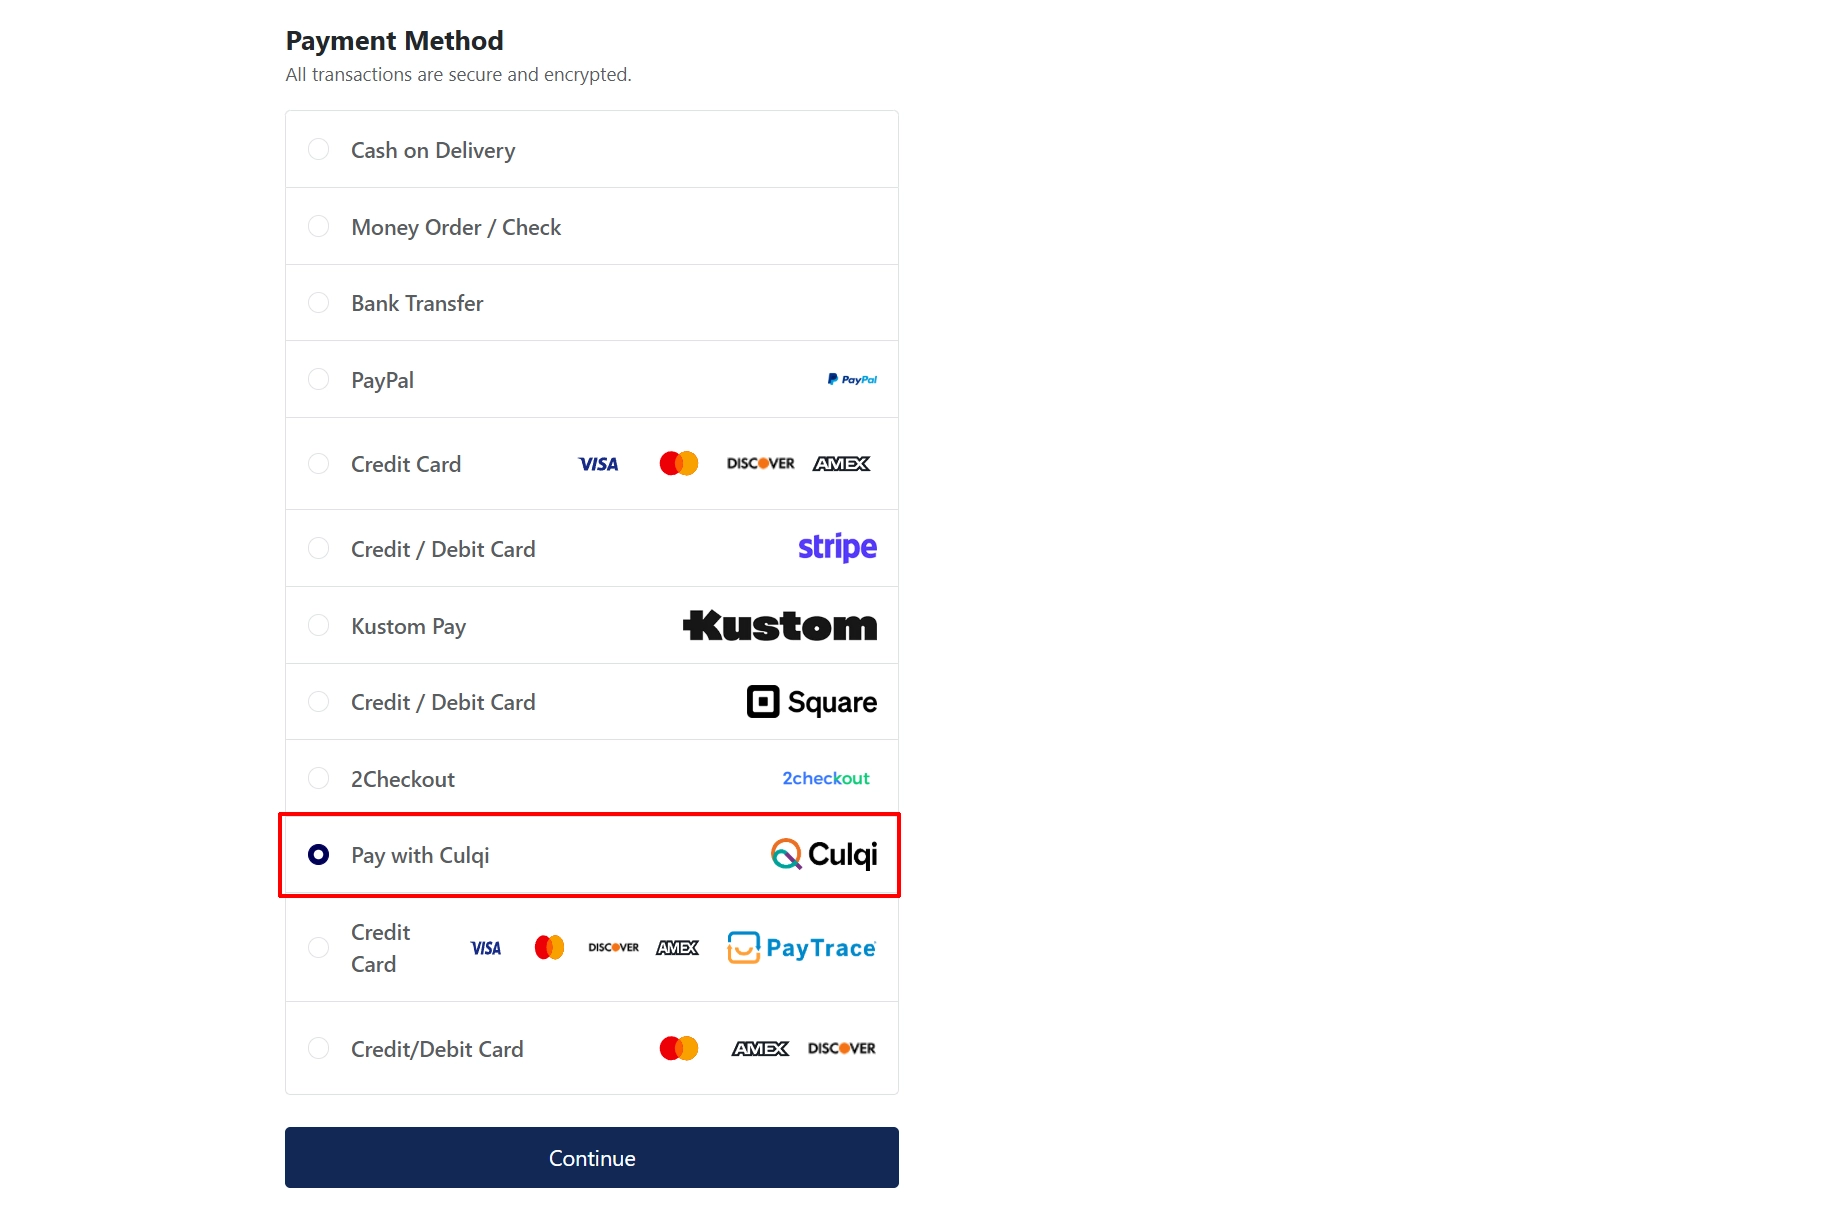
Option A: Go to the J2Commerce icon at the top right corner -> Setup -> Payment Methods
Option B: Go to Components on the left sidebar -> J2Commerce -> Dashboard -> Setup -> Payment Methods

To help you narrow down the list, you can do a search for Culqi, click the X, and it will turn into a green checkmark. It is now enabled and ready for setup.
Configuration
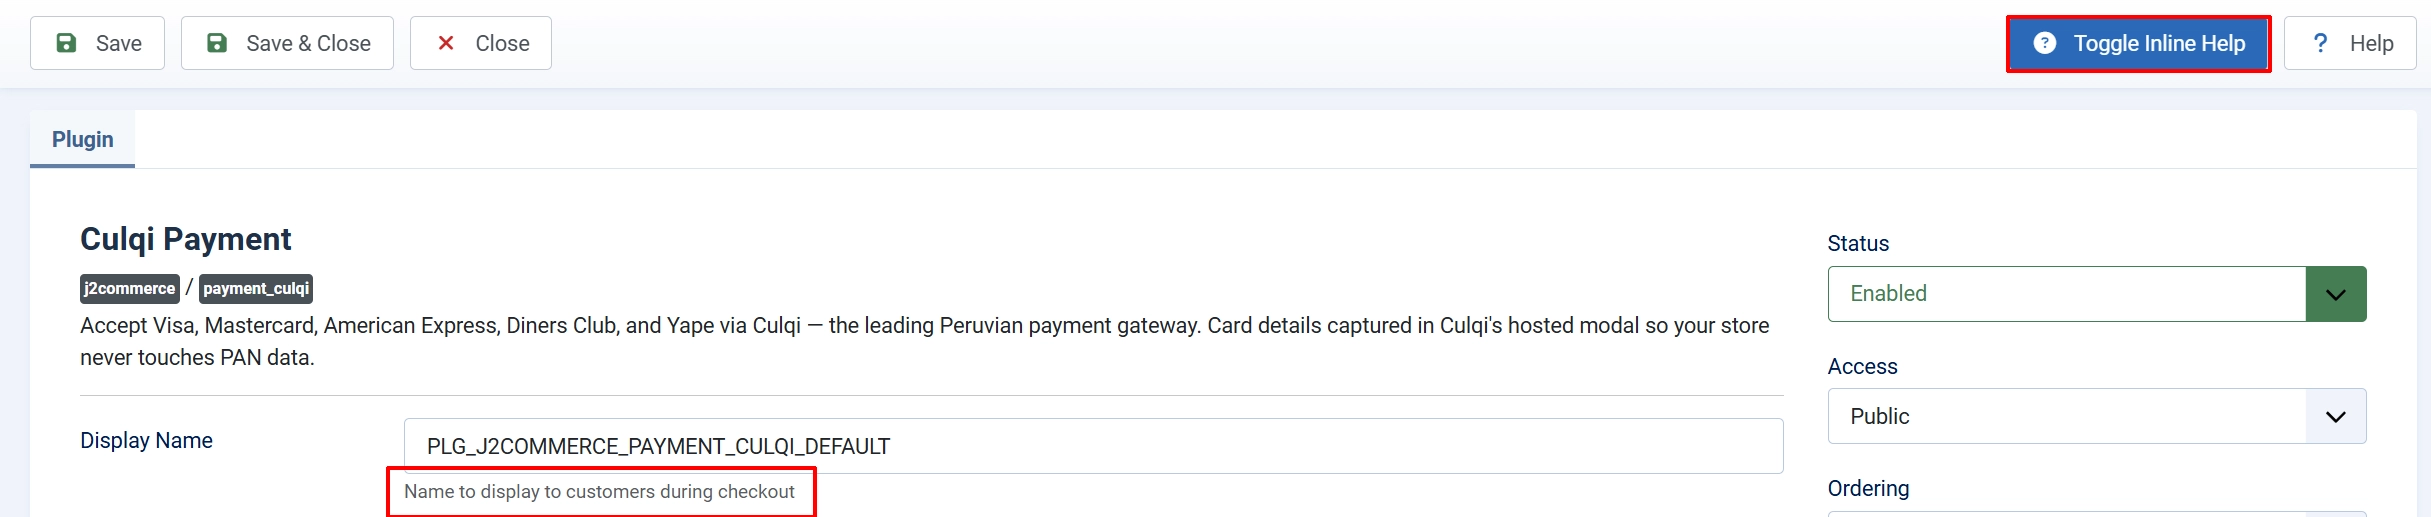
Tip: Click on the Toggle Inline Help button on any app/plugin you install and it will show a description below each section. See image below
Display Settings
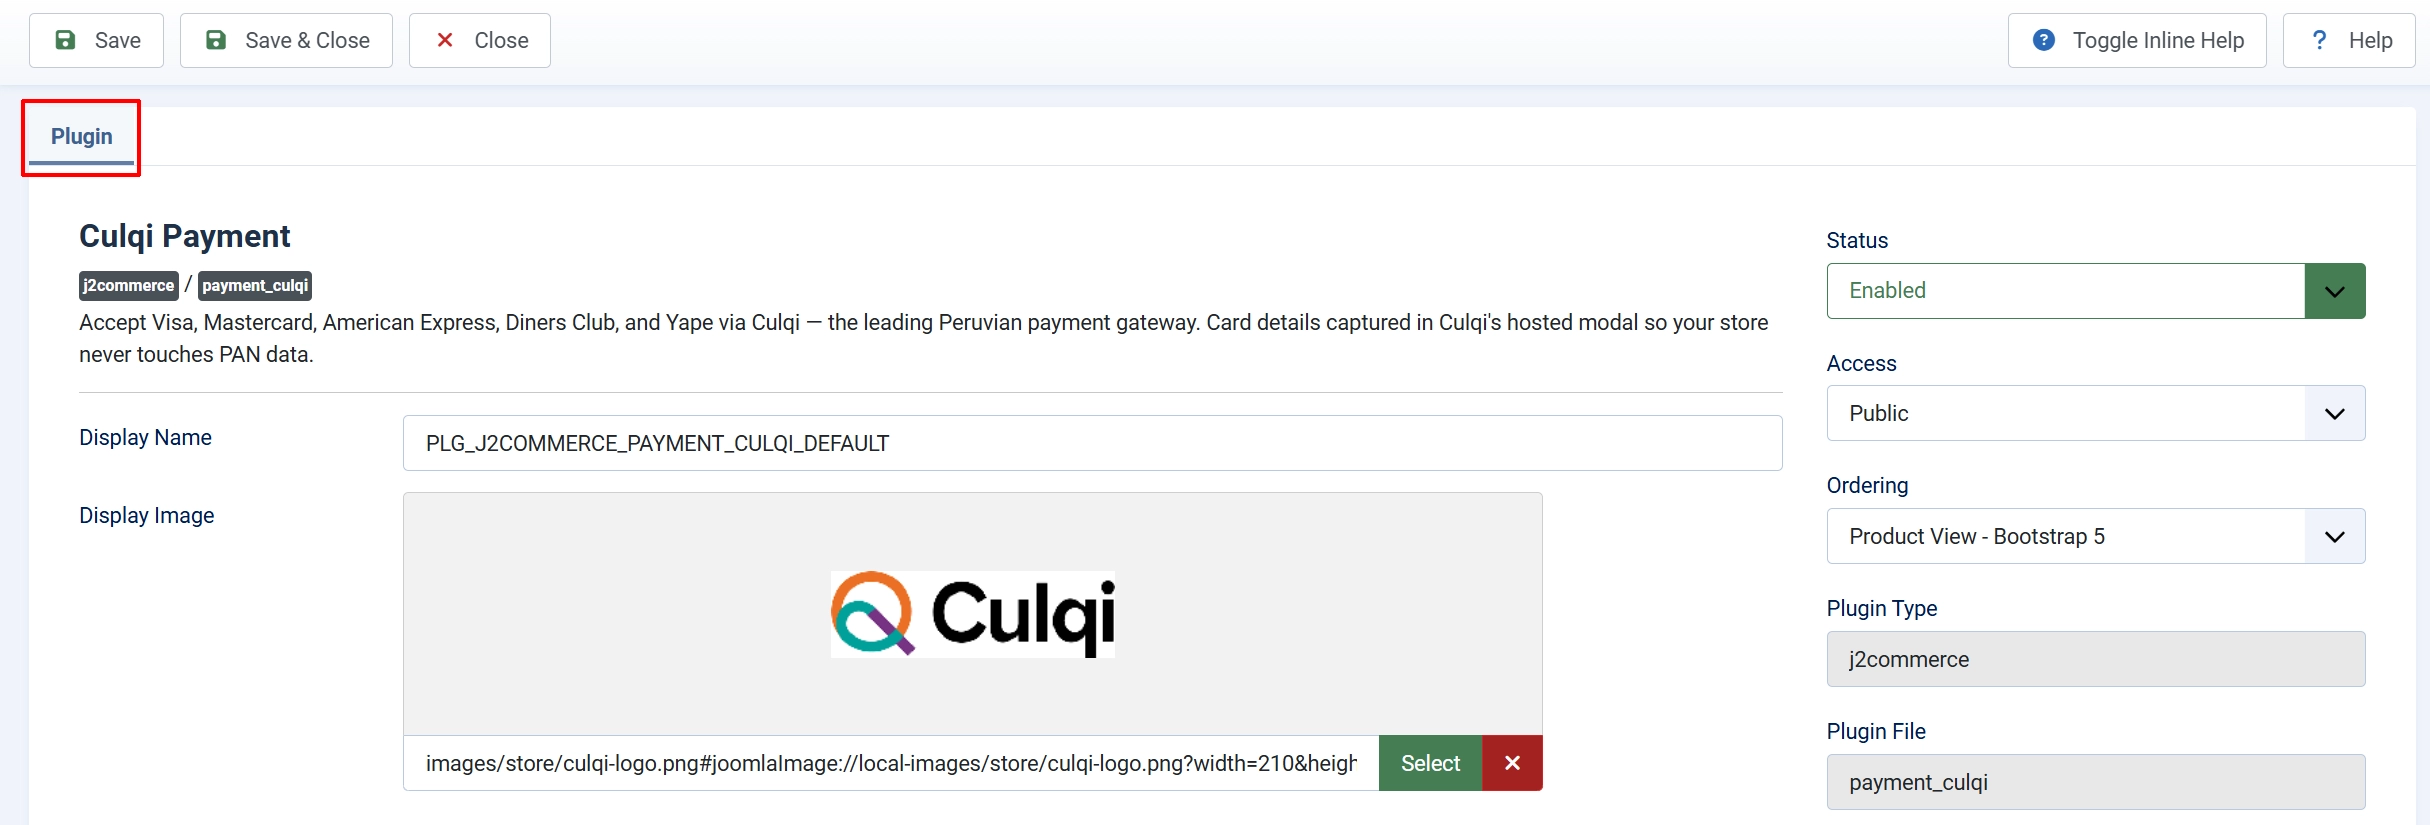
Display name: The label shoppers see at checkout when choosing a payment method.
Display image: Optional logo shown beside the payment option. Use a small PNG or WebP file from your media library.
Card-Entry Mode
Card-entry mode: How shoppers enter their card details.
-
Culqi hosted popup (recommended) — A secure modal window hosted by Culqi opens over your checkout page. Card data is sent directly from the shopper's browser to Culqi's servers. Your store never sees the raw card number. This mode qualifies for the simplest PCI-DSS compliance level, called SAQ-A. Most stores should use this option.
-
Inline checkout form — The card fields appear directly on your page, built from Culqi's JavaScript library. Card data is still tokenized client-side before reaching your server, but having card fields on your domain raises your PCI-DSS scope to SAQ A-EP. Choose this only if you have a specific UX reason to keep shoppers on the page and you are prepared to meet the additional SAQ A-EP requirements.
Company name: Heading text shown inside the Culqi hosted popup. Defaults to your plugin display name if blank.
Sandbox and API Keys

Sandbox mode: When enabled, test keys are used. No real money moves. Disable this before going live.
Live public key: Your pk_live_ key from the Culqi dashboard. Used by the browser JavaScript to tokenize cards.
Live secret key: Your sk_live_ key. Used server-side to create the charge. Keep this confidential.
Sandbox public key: Your pk_test_ key for test transactions.
Sandbox secret key: Your sk_test_ key for test transactions.
Fill in all four key fields even if you plan to test first. This way, switching from sandbox to live is just one toggle flip.
Installments (Cuotas)
Peruvian banks let shoppers pay in monthly installments. The plugin sends the installment count to Culqi, and the issuing bank handles splitting the charge.

Enable installments (cuotas): Offer installment plans at checkout.
Number of installments: Maximum months the shopper can choose. Most Peruvian issuers support up to 12. Visible only when installments are enabled.
Allow retry on failure: If a charge fails, keep the shopper on the confirm page with a Retry payment button instead of finalizing the order as failed.
Order Status
Order status after successful payment: The status is applied when Culqi confirms the charge.
Order status after failed payment: The status is applied when Culqi rejects the charge.
These fields show the order statuses you have defined in J2Commerce -> Sales -> Order Statuses. Match them to whatever terms make sense for your workflow.
NOTE: If the status you want isn't listed in the dropdown menu, you can create a new one by going to J2Commerce -> Setup -> Order Statuses

Surcharge (Optional)
You can pass along a processing fee to the shopper. Leave all three fields blank if you prefer to absorb the Culqi fee yourself.

Surcharge name: Label shown in the cart for the extra fee, for example "Payment processing fee".
Surcharge percent: A percentage of the order total added as a fee. Enter 2.5 for 2.5%.
Surcharge fixed: A flat amount added regardless of order total, for example 2.00.
Surcharge tax class: Apply a tax profile to the surcharge if your local rules require it.
If you set both a percent and a fixed amount, both are added together.
Availability Restrictions

Minimum subtotal: Hide Culqi as a payment option when the cart subtotal is below this amount. Leave blank for no minimum.
Maximum subtotal: Hide Culqi when the cart subtotal exceeds this amount. Leave blank for no maximum.
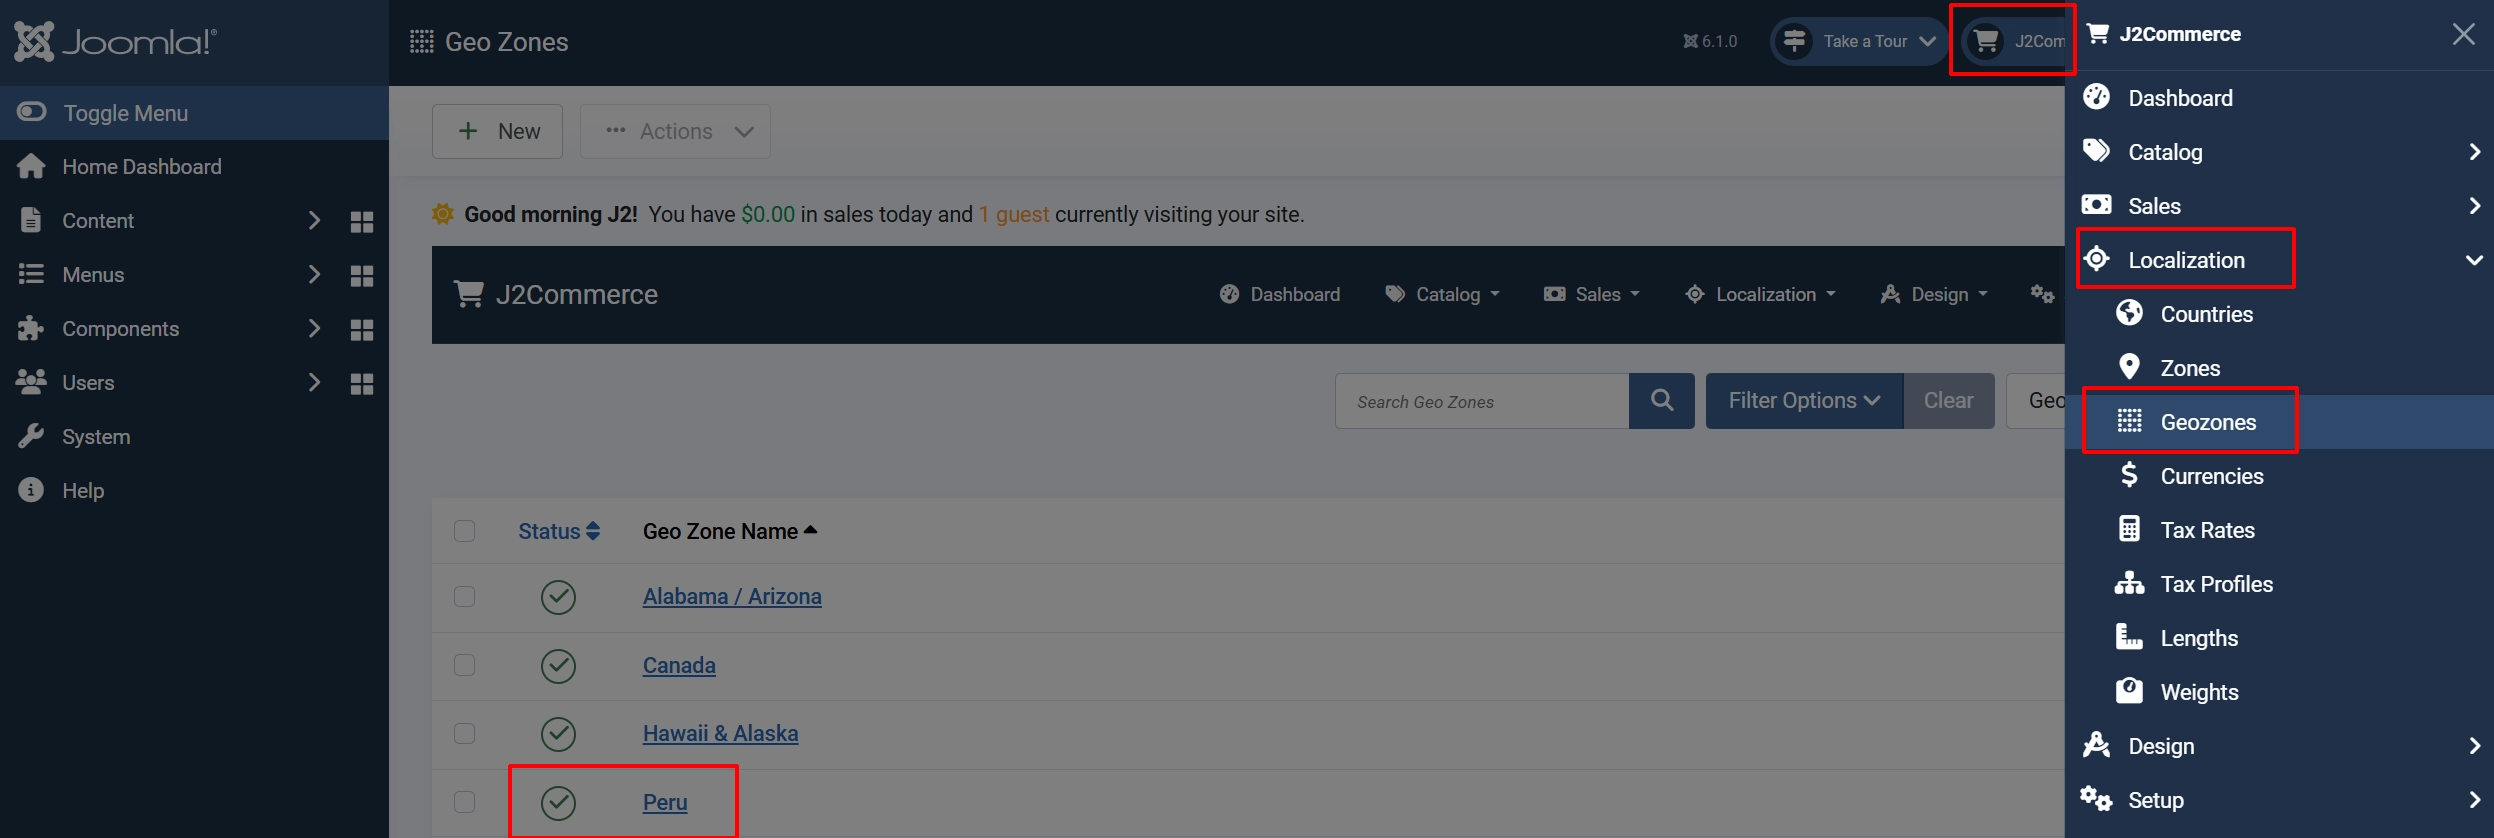
Geozone restriction: Limit Culqi to shoppers whose shipping address falls within a specific geozone. Useful if you only ship to Peru or certain LATAM countries. Leave blank to show Culqi to everyone.
To restrict Culqi to Peru only, create a geozone covering Peru under J2Commerce -> Localisation -> Geozones, then select it here.
Custom Messages
These four text areas let you write short HTML snippets shown at different points in the payment flow. Leave them blank to use the plugin's built-in messages.
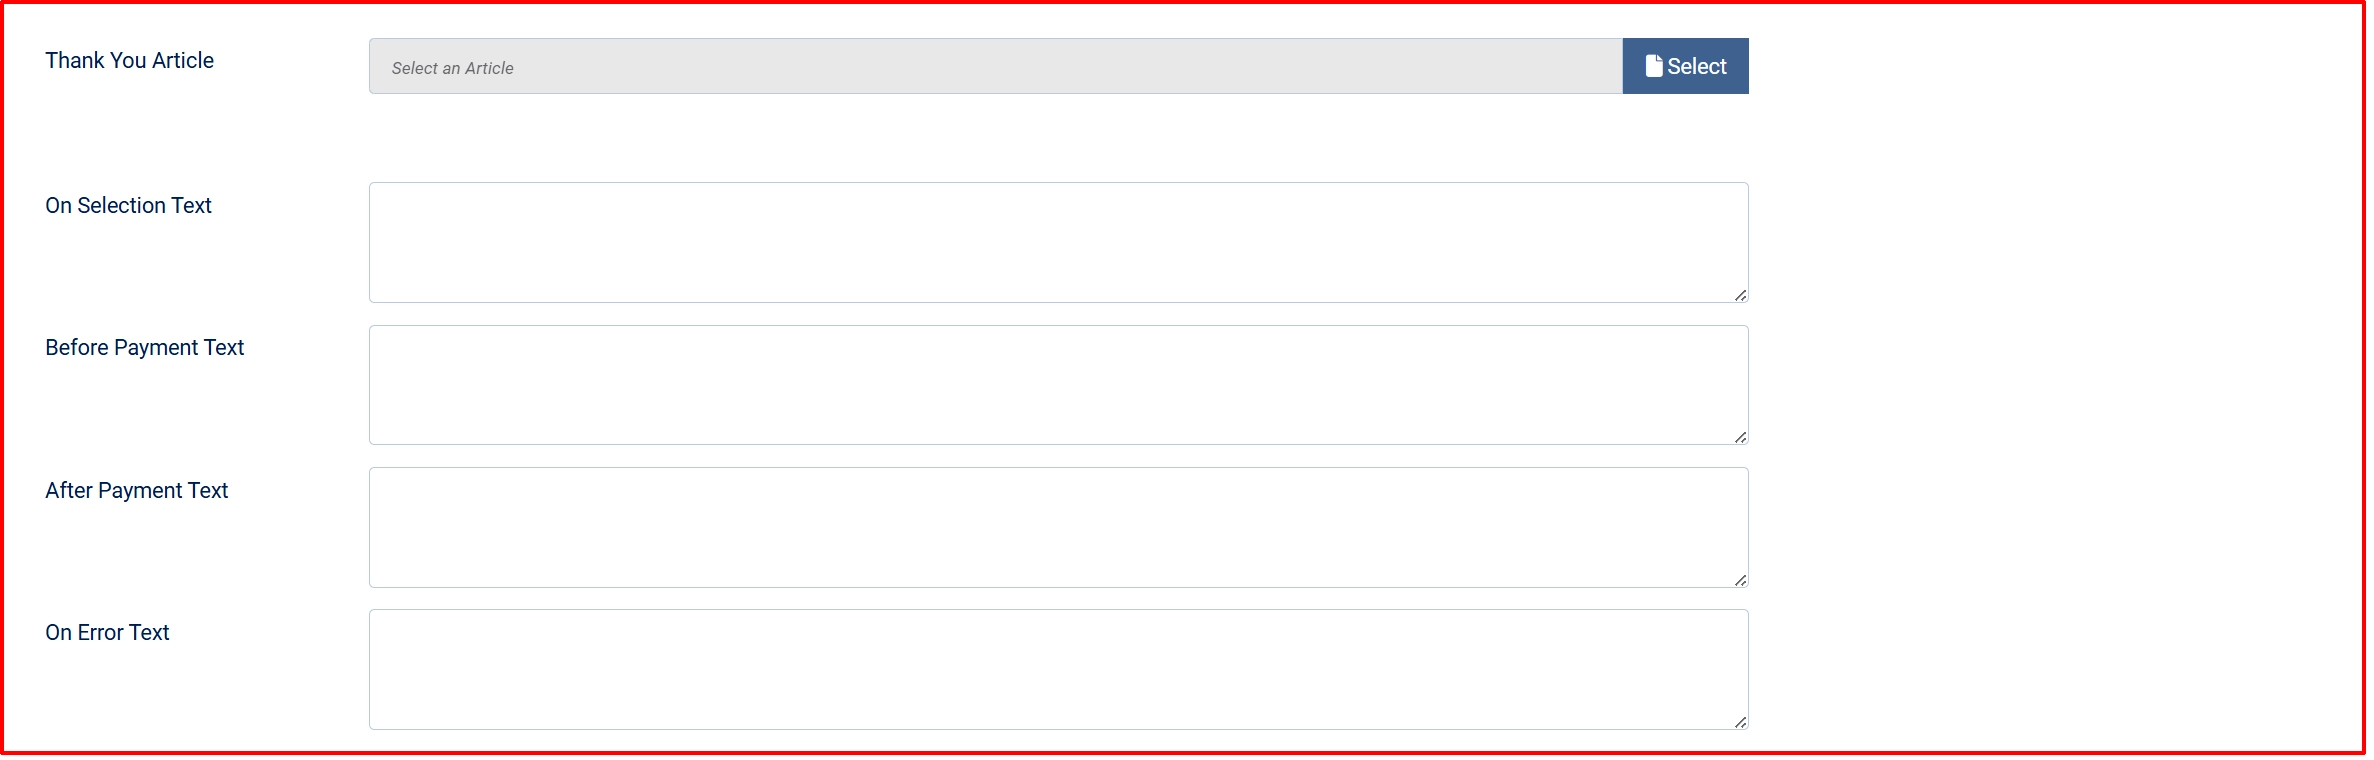
Thank-You Article: Pick an existing Joomla article to display on the order confirmation page after payment. This replaces the plugin's default success message with rich content you control.
On selection: Shown when the shopper picks Culqi as their payment method
Before payment: Shown on the payment confirmation page before the shopper clicks Pay
After payment: Shown on the thank-you page after a successful charge
On error: Shown when a charge fails
Button Text

Button text — Changes the label on the Pay button shoppers see on the confirm page. Defaults to "Place Order".
Debug Logging
Debug logging: Write request and response details to the Joomla log file. Errors are always logged regardless of this setting.
When debug logging is on, the log file is at:
[joomla_root]/logs/plg_j2commerce_payment_culqi.php
Turn debug logging off on a production site. Log files can grow quickly under normal traffic.
Testing in Sandbox
Before you take real money, verify the full checkout flow using Culqi's test cards.
-
Make sure Sandbox mode is set to Yes and your
pk_test_/sk_test_keys are saved. -
Add a product to the cart on your storefront, proceed through checkout, and choose Pay with Culqi (or whatever display name you set).
-
When the Culqi popup or inline form appears, enter one of the test cards below:
| Card brand | Number | Expiry | CVV |
|---|---|---|---|
| Visa | 4111 1111 1111 1111 | Any future date | 123 |
| Mastercard | 5111 1111 1111 1118 | Any future date | 123 |
-
Submit the form. The order should move to the status you configured for successful payment.
-
Check your Culqi dashboard under Transactions — a test charge should appear with a
TESTlabel. -
Check the order in J2Commerce -> Sales -> Orders to confirm the status and transaction ID were saved correctly.
If the charge fails, check logs/plg_j2commerce_payment_culqi.php for the error returned by Culqi.
Frontend View
Going Live
When you are satisfied with your sandbox tests, follow these steps to accept real payments.
- Log in to the Culqi dashboard and confirm your account is fully verified and activated for live transactions.
- In J2Commerce, go back to J2Commerce -> Setup -> Payment Methods and open the Culqi plugin.
- Paste your
pk_live_key into Live public key and yoursk_live_key into Live secret key. - Set Sandbox mode to No.
- Click Save.
- Place a small test order from a real card — even S/1 (one sol) is enough to confirm end-to-end connectivity.
- Log in to the Culqi dashboard and verify the real charge appears under Transactions without the
TESTlabel. - Confirm the order status updated correctly in J2Commerce.
You are now ready to accept live payments.
What's New in J2Commerce vs J2Store v4
If you used the Culqi plugin with J2Store v4, here is what changed in the J2Commerce version:
Vanilla JavaScript, no jQuery. The checkout handler is rewritten in plain ES6. No jQuery dependency means faster page loads and fewer potential conflicts with modern Joomla 6 templates.
Native Joomla 6 architecture. The plugin uses the standard Joomla 6 plugin system with a service provider and event subscribers. FOF 2 is gone entirely.
Double-charge guard. If a shopper double-clicks the Pay button, the plugin checks whether the order already has a successful Culqi transaction ID before calling the Culqi API a second time. The shopper sees the success redirect immediately without a duplicate charge.
PII and cardholder data redaction. The transaction details stored against each order are filtered to a safe whitelist: transaction ID, amount, currency, card brand, last four digits, and outcome codes. Fields that Culqi returns but that are not needed — client IP, user-agent, geolocation data, and customer email — are discarded before anything is written to the database.
Currency whitelist. The plugin immediately rejects charges when the order currency is anything other than PEN or USD. J2Store v4 would silently pass the wrong currency to Culqi and receive a cryptic API error. J2Commerce shows a clear message so you can fix the store configuration before a real shopper hits it.
Hosted popup is the new default. Previously the inline checkout form was the default. The hosted popup is now the default because it gives you PCI-DSS SAQ-A scope out of the box.
Idempotency in the success path. The success response is built from a single helper method called consistently from both the "charge succeeded" path and the "already charged" path. The shopper always lands on the same thank-you page.
Correct API key field names. The J2Store v4 plugin used trade_code for the public key and private_key for the secret key. The J2Commerce plugin uses public_key and secret_key, which match the names Culqi uses in their own dashboard and documentation.
"Installment" spelling corrected. J2Store used the British spelling instalment. J2Commerce uses the standard American English spelling installment throughout the admin interface.
Troubleshooting
"Culqi public and secret keys are not configured"
Cause: At least one of the required API keys for the active mode is missing.
Solution:
- Go to System -> Manage -> Plugins and open the Culqi plugin.
- If Sandbox mode is Yes, check that Sandbox public key and Sandbox secret key are filled in.
- If Sandbox mode is No, check that Live public key and Live secret key are filled in.
- Click Save and try again.
"Culqi does not accept [currency]. Supported currencies: PEN, USD"
Cause: Your store's active currency is not PEN or USD. Culqi's API only accepts these two currencies.
Solution:
- Go to J2Commerce -> Localisation -> Currencies and verify your default currency is PEN or USD.
- If you run a multi-currency store, use the Geozone restriction field in the plugin settings to show Culqi only to shoppers in countries where PEN or USD applies.
"Invalid token" or "Culqi tokenisation response was missing"
Cause: The Culqi JavaScript library could not tokenize the card. This usually means the public key is wrong, or the shopper's browser blocked the Culqi script.
Solution:
- Open your browser console while on the checkout page and look for JavaScript errors.
- Confirm the
pk_test_orpk_live_key in the plugin settings exactly matches what the Culqi dashboard shows — no extra spaces. - Check whether any browser extension (ad blocker, privacy tool) is blocking
checkout.culqi.com. Ask the shopper to try a different browser.
Card declined / charge fails
Cause: The issuing bank declined the charge. This is not a plugin configuration problem.
Solution:
- Enable Debug logging in the plugin settings temporarily.
- Check
logs/plg_j2commerce_payment_culqi.php— the log includes themerchant_messagereturned by Culqi, which explains the decline reason. - In sandbox mode, use only the test card numbers listed in the Testing section above. Real card numbers do not work in sandbox.
- If a real shopper's card is declined, they need to contact their bank or try a different card.
Failed payment email not arriving
Cause: The admin notification email address may not be set.
Solution:
- Go to J2Commerce -> Configuration and check the Admin email field.
- Also check your Joomla global configuration mailer settings under System -> Global Configuration -> Server.
Log file location
All Culqi plugin log entries — errors always, debug messages when debug is on — are written to:
[joomla_root]/logs/plg_j2commerce_payment_culqi.php
Check this file first whenever something goes wrong. The log records the Culqi API response, order ID, and any exception message from the charge attempt.
Limitations
The current version of the Culqi plugin has these known limitations:
- Single charge only. The plugin processes one-time payments. Recurring billing, subscriptions, and payment plans are not supported.
- No refunds from admin. Refunds must be issued directly from the Culqi dashboard. The plugin does not send refund API calls.
- No saved cards. Shoppers must enter their card details on every purchase. Culqi's saved-card (customer) API is not implemented in this version.
- No webhook listener. Culqi's charge API is synchronous — the plugin gets the charge result in the same HTTP request, so no webhook endpoint is needed for standard payment confirmation.