Payfast Payment
The Payfast plugin connects your J2Commerce store to Payfast, South Africa's leading online payment gateway. When a customer checks out, they are redirected to the Payfast-hosted payment page to complete their payment securely. Once Payfast confirms the payment via an Instant Transaction Notification (ITN), J2Commerce updates the order automatically.
Payfast is a South Africa-based gateway that only accepts ZAR (South African Rand). Your J2Commerce store currency must be set to ZAR before enabling this plugin. Orders in any other currency will be blocked at checkout.
Key features:
- Redirect to Payfast-hosted payment page — card details are entered on Payfast's servers, not yours
- ITN (Instant Transaction Notification) webhook — Payfast posts a secure server-to-server notification to finalize the order
- Subscription support using Payfast tokenization — automatic renewal billing without the customer re-entering card details
- Admin Refund button on the order detail screen (live accounts only)
- Sandbox mode for testing without processing real payments
- Debug logging for troubleshooting
Requirements
- PHP 8.3.0 or later
- Joomla 6.x
- J2Commerce 6.x
- A Payfast merchant account
- Your store currency set to ZAR (South African Rand)
- Your store must be accessible over HTTPS on a publicly reachable domain
Get Your Payfast Credentials
Before configuring the plugin you need three values from your Payfast merchant dashboard.
-
Log in to your Payfast account at https://www.payfast.co.za (or https://sandbox.payfast.co.za for sandbox).
-
Go to Settings -> Merchant Details to find your:
- Merchant ID — your unique Payfast merchant identifier
- Merchant Key — your unique Payfast merchant key
-
Go to Settings -> Security to find or set your:
- Passphrase — required for ITN signature verification and subscriptions. Keep this secret and never share it.
-
Note down these three values. You will paste them into the plugin settings.
Keep the Payfast tab open while you configure the plugin in Joomla.
Purchase and Download
This plugin is a separate add-on available from the J2Commerce Extensions Store. It is not included with the core J2Commerce 6 component.
Step 1: Go to the J2Commerce website and locate the Payfast Payment plugin.
Step 2: Click View Details -> Add to Cart -> Checkout.
Step 3: Go to My Downloads under your account profile, find the plugin, and click Available Versions -> View Files -> Download Now.
Install the Plugin
In the Joomla Administrator, go to System -> Install -> Extensions.
Upload the payment_payfast.zip package ZIP file or use the Install from URL option.

Enable the Plugin
Once you have installed the App, you will need to enable it. There are two ways you can access the App.
Option A: Go to the J2Commerce icon at the top right corner -> Setup -> Payment Methods
Option B: Go to Components on the left sidebar -> J2Commerce -> Dashboard -> Setup -> Payment Methods

To help you narrow down the list, you can do a search for Payfast, click the X, and it will turn into a green checkmark. It is now enabled and ready for setup.
Configure the Plugin
Click the Payfast title to open its settings.
Click the Toggle Inline Help button at the top of the settings screen to show a description below each field.
Payfast Credentials
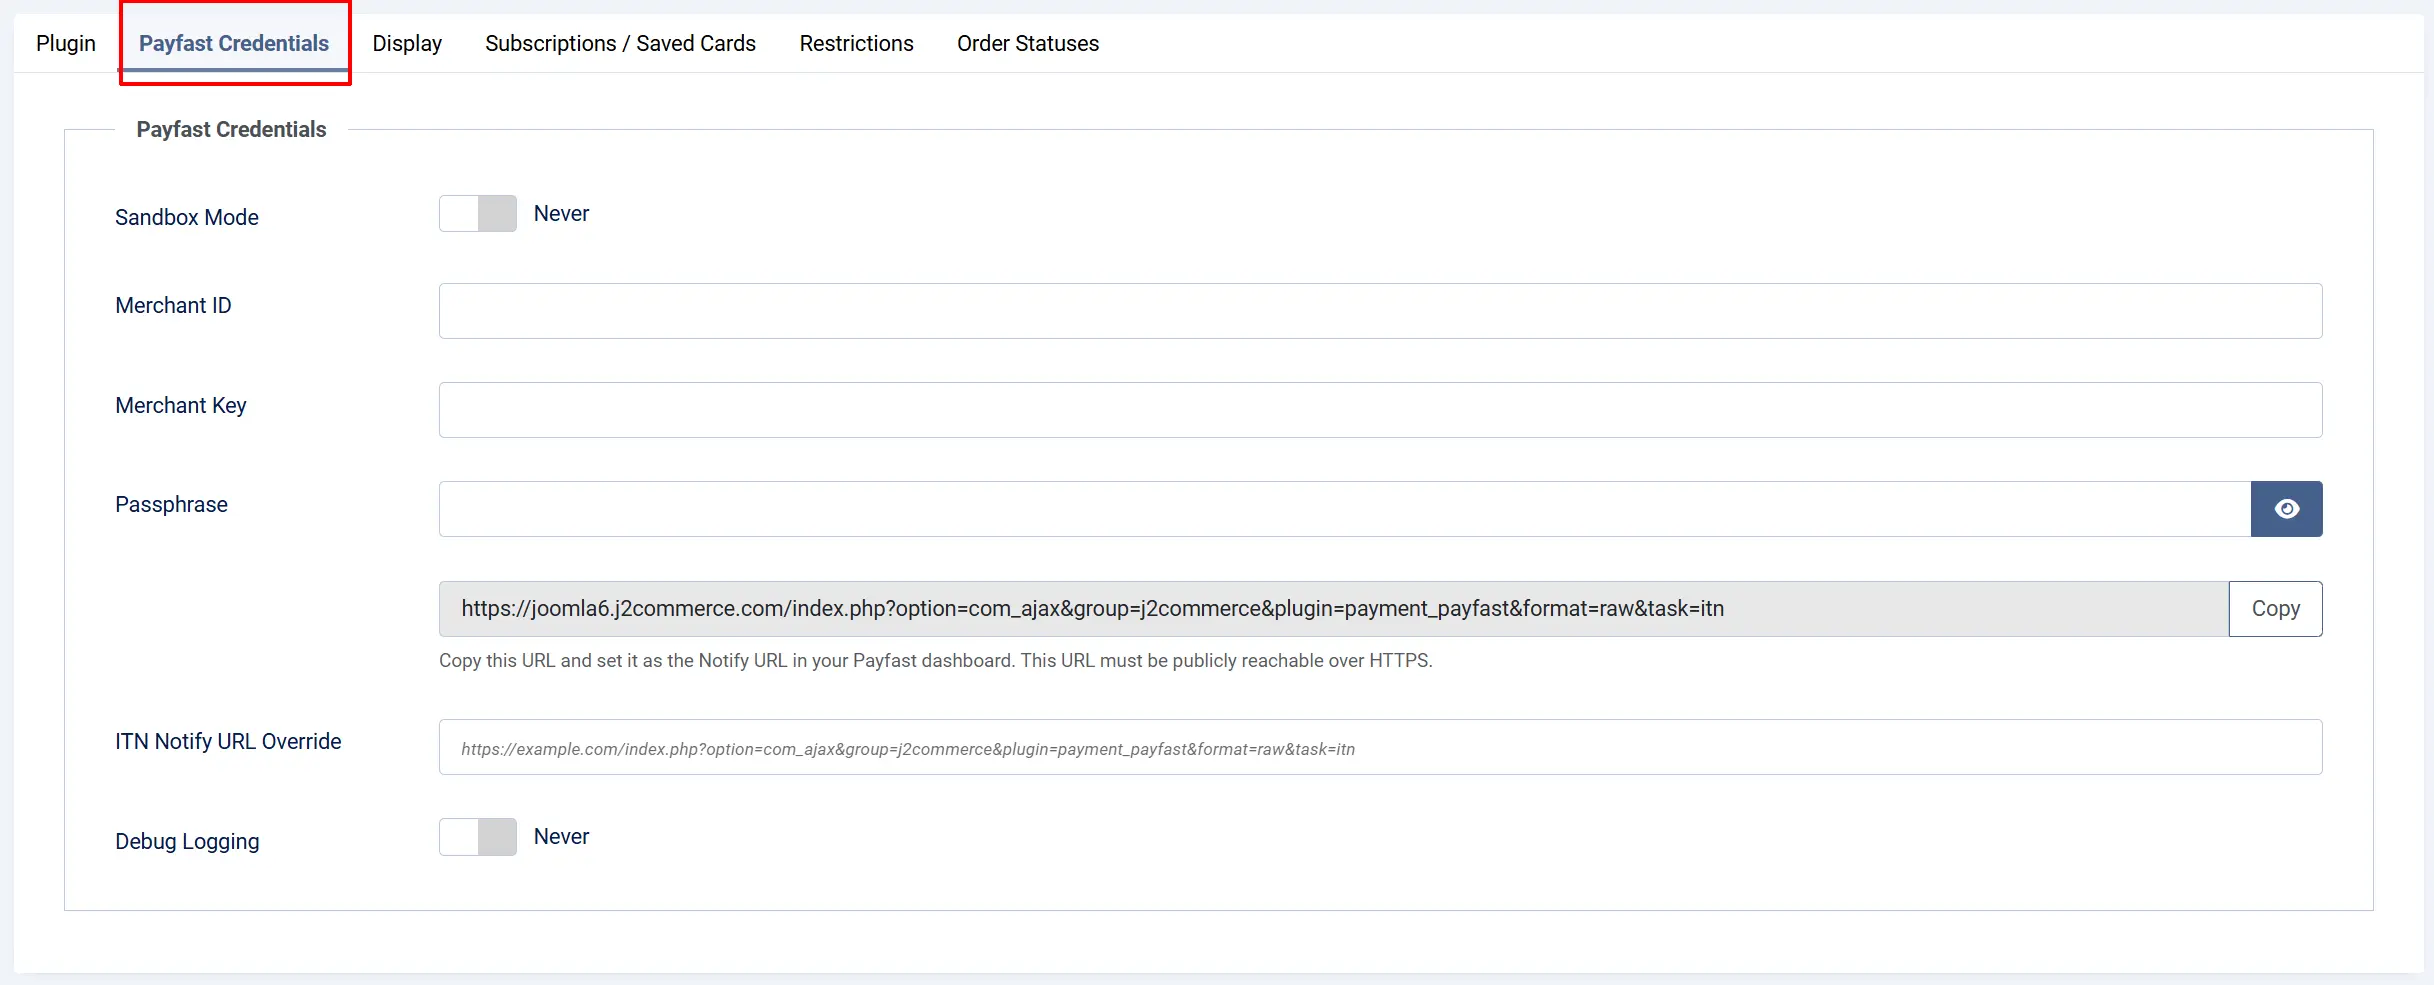
Sandbox Mode: Toggle between sandbox (test) mode and live mode. When enabled, all transactions go to sandbox.payfast.co.za — no real money is processed. Disable this when you are ready to accept real payments.
Merchant ID: Your Payfast Merchant ID from the Payfast dashboard.
Merchant Key: Your Payfast Merchant Key from the Payfast dashboard.
Passphrase: Your Payfast security passphrase. This is required for ITN signature validation and for subscriptions. Never share or log this value.
ITN Notify URL: This read-only field shows the URL that Payfast will POST the ITN notification to. Copy this URL and paste it into the Notify URL field in your Payfast dashboard settings.
ITN Notify URL Override: Leave this blank under normal hosting. Use this only if your store is behind a reverse proxy, load balancer, or tunnel (such as ngrok during local development) and the auto-detected URL above is not publicly reachable. Enter the full public HTTPS URL that Payfast should use instead.
Debug Logging: When enabled, the plugin writes API request and response details to the Joomla log. Sensitive values (passphrase, merchant key) are never logged. Disable this on production once everything is working.
Copying Your ITN URL to Payfast
After saving the plugin settings at least once, copy the value shown in the ITN Notify URL field, then:
- Log in to your Payfast account at https://www.payfast.co.za.
- Go to Settings -> Configuration.
- Paste your ITN URL into the Notify URL field.
- Save your Payfast settings.
Payfast must be able to reach this URL over HTTPS. If your store is on localhost, use the ITN Notify URL Override field (see above) with a public ngrok tunnel instead.
Display Settings
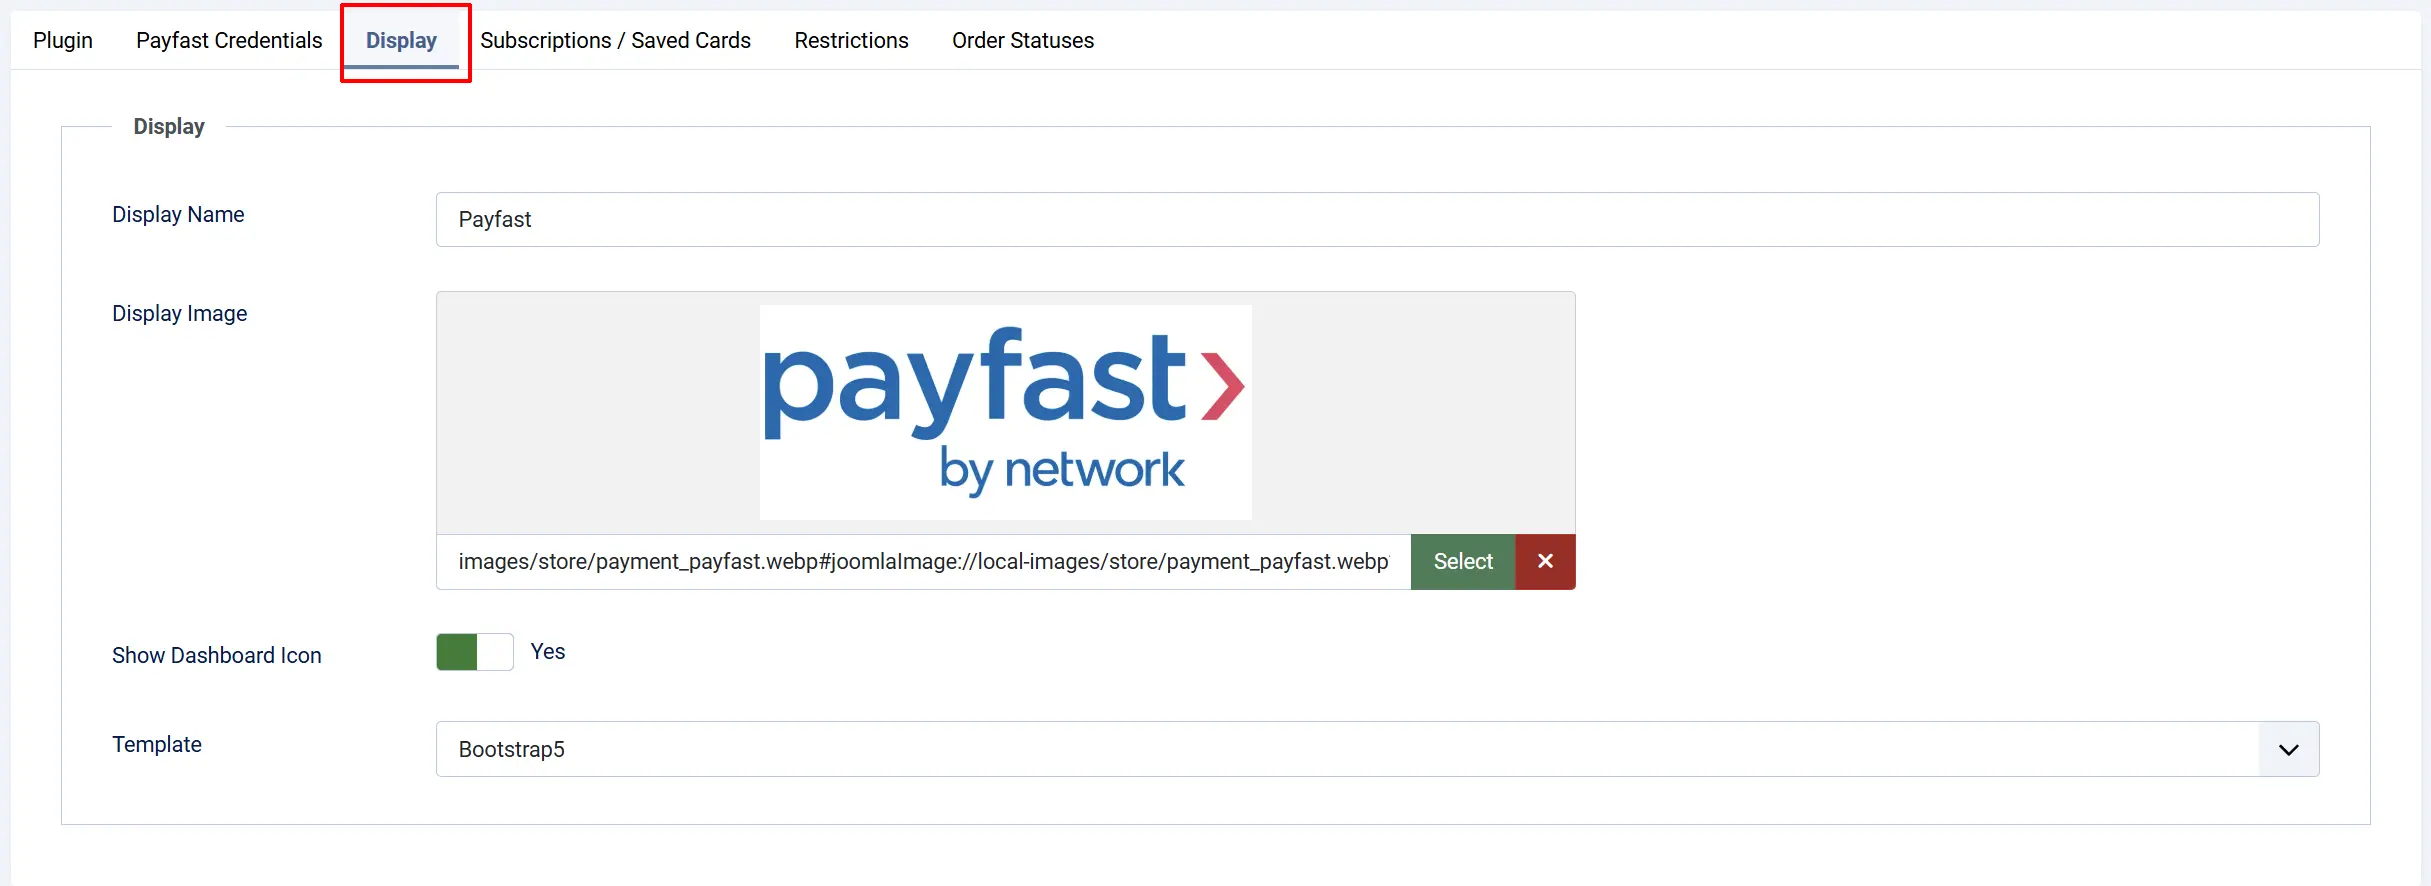
Display Name: The name shown to customers at checkout, for example "Pay via Payfast". Defaults to Payfast.
Display Image: Optional logo shown beside the payment method name at checkout. Choose or upload an image in the Media Manager.
Template: Choose the checkout template layout. Select Bootstrap 5 for standard Joomla templates or UIkit for UIkit-based templates such as YOOtheme Pro.
Subscriptions / Saved Cards

Enable Tokenized Subscriptions: When enabled, subscription products will use Payfast's tokenization feature (type 2) so that renewal charges can be processed automatically without the customer re-entering their card details. Disable this if your store does not sell subscription products.
Restrictions

Geo Zone: Limit this payment method to customers in a specific geographic zone. Leave at -- All Zones -- to allow customers from any location.
Minimum Subtotal: Hide Payfast at checkout when the order subtotal (in ZAR) is below this amount. Enter 0 for no minimum.
Maximum Subtotal: Hide Payfast at checkout when the order subtotal (in ZAR) is above this amount. Enter 0 for no maximum.
Order Statuses
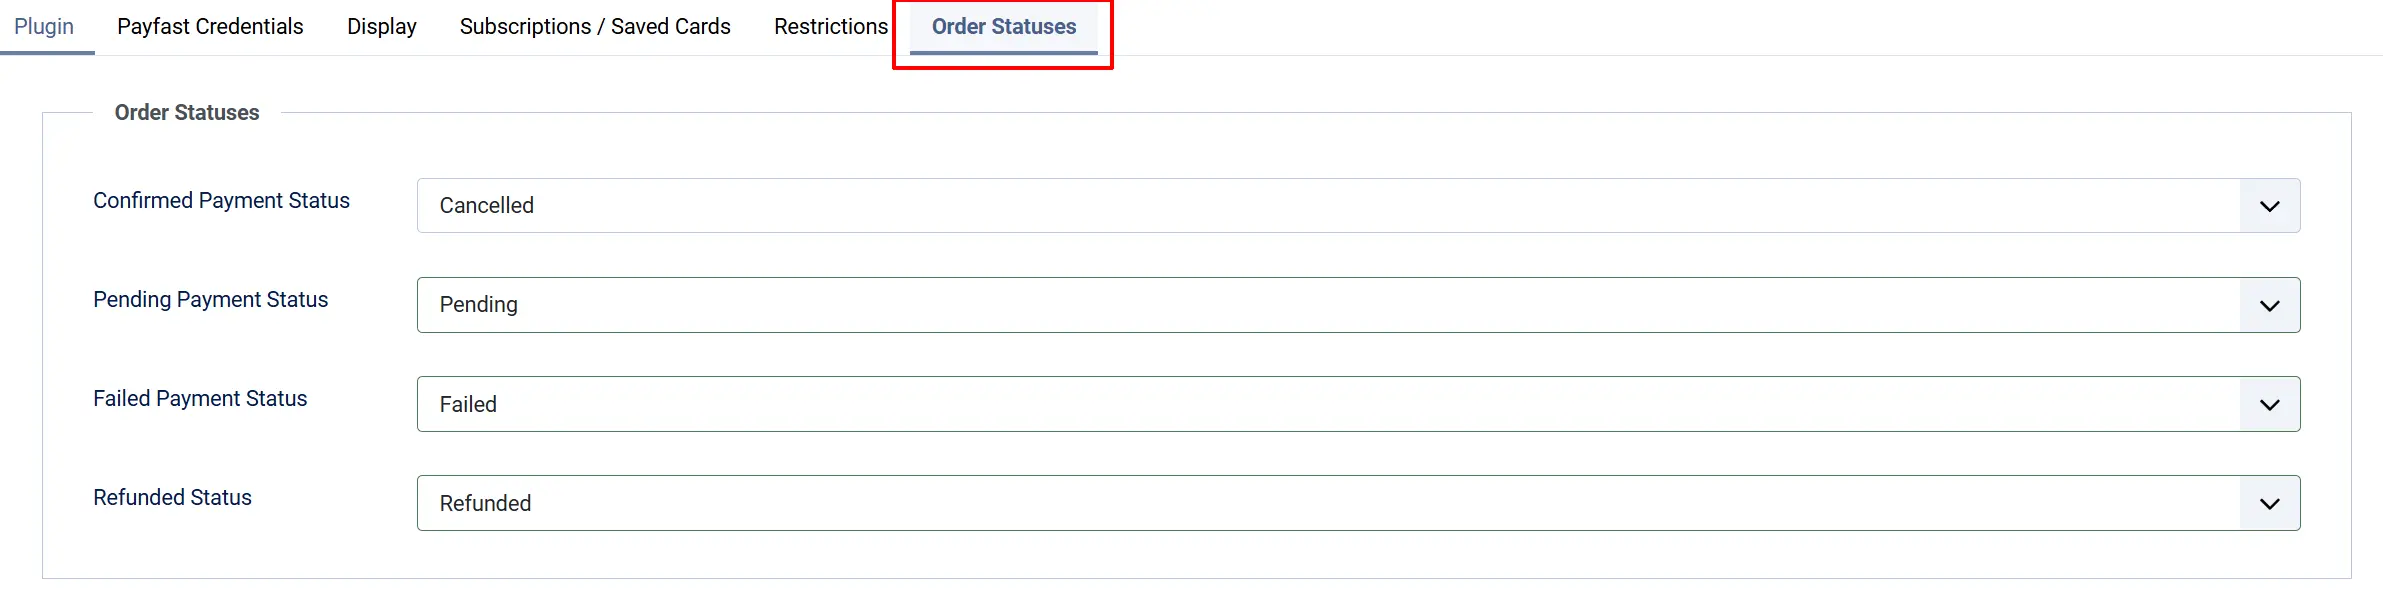
These settings control which J2Commerce order status is applied at each stage of the payment lifecycle. If the status you want is not listed, create it first at J2Commerce -> Setup -> Order Statuses.
Confirmed Payment Status: Applied when Payfast ITN confirms payment_status=COMPLETE
Pending Payment Status: Applied while waiting for ITN confirmation after redirect
Failed Payment Status: Applied when ITN reports payment_status=CANCELLED or FAILED
Refunded Status: Applied after a successful admin-initiated refund (leave empty to keep the current status)
How Checkout Works for Customers
Here is what a customer experiences when they choose Payfast at checkout:
- The customer adds items to the cart and proceeds to checkout.
- On the payment step, they select Payfast (shown with the display name and optional logo you configured).
- A short message is displayed: "You will be redirected to Payfast to complete your payment securely."
- The customer clicks Pay Now via Payfast and is redirected to the Payfast-hosted payment page.
- On the Payfast page, the customer enters their card details or chooses another Payfast payment option (EFT, instant EFT, etc., depending on their account).
- After completing payment, the customer is returned to your store's confirmation page.
- In the background, Payfast sends an ITN notification to your store. J2Commerce receives this, validates the signature, and updates the order status to Confirmed (or whichever status you configured).
The customer will see a "Your payment is being processed" message if they return to the store before ITN arrives. Once ITN is received and validated, the order status updates automatically.
Sandbox Testing
Always test in sandbox mode before going live.
- Enable Sandbox Mode in the plugin settings.
- Enter your sandbox Merchant ID, Merchant Key, and Passphrase (obtained from https://sandbox.payfast.co.za).
- Place a test order and complete checkout — you will be redirected to
sandbox.payfast.co.za. - Check that the order appears in J2Commerce -> Sales -> Orders with the expected status.
Payfast sandbox mode does not support refunds or card-update actions — these require a live merchant account. Test refunds on your live account after going live.
When your store is on localhost, Payfast cannot deliver ITN notifications to localhost. Use a tool like ngrok to create a public tunnel, then paste the public URL into ITN Notify URL Override in the plugin settings.
When you are ready to go live:
- Set Sandbox Mode to No.
- Replace the test credentials with your live Merchant ID, Merchant Key, and Passphrase.
- Confirm the ITN Notify URL in your Payfast dashboard points to your live store.
- Save the settings.
Refunds
You can trigger a refund directly from the J2Commerce order detail screen — no need to log in to the Payfast dashboard.
- Go to J2Commerce -> Sales -> Orders and open the order.
- Click the Refund button in the payment section.
- A dialog appears with a Refund Amount (ZAR) field. Leave it empty for a full refund, or enter a specific amount for a partial refund.
- For EFT-method orders, Payfast may require you to supply bank account details (Account Holder Name, Bank, Branch Code, Account Number, and Account Type). Fill these in if the dialog requests them.
- Enter an optional Reason and click Confirm Refund.
The refund is submitted to Payfast and the order history is updated.
Refunds require a live Payfast account. Refund functionality is not available in sandbox mode. If you click Refund while sandbox mode is active, you will see the message "Refund unavailable in sandbox".
Subscription Renewals
If you sell subscription products with J2Commerce and Enable Tokenized Subscriptions is turned on, Payfast handles renewal billing automatically using its token (type 2) system.
When a customer completes their first subscription order through Payfast:
- Payfast stores a reusable billing token against the transaction.
- J2Commerce records this token on the subscription record.
- When a renewal comes due, J2Commerce submits an ad-hoc charge to Payfast using the stored token — no customer interaction required.
The customer sees Payfast subscription charges appear on their bank statement under the merchant name configured in your Payfast account.
Troubleshooting
Orders stay in Pending status after the customer pays
Cause: Payfast could not deliver the ITN notification to your store. This is usually because the ITN URL is not publicly reachable.
Solution:
- Go to J2Commerce -> Setup -> Payment Methods -> Payfast and copy the ITN Notify URL.
- Log in to your Payfast account, go to Settings -> Configuration, and confirm this URL is set as the Notify URL.
- Make sure your store is accessible over HTTPS at that domain. Payfast cannot reach a
localhostaddress — use the ITN Notify URL Override field with a public ngrok tunnel for local testing. - Enable Debug Logging in the plugin settings, place a test order, and check the Joomla log (System -> Logs) for ITN-related entries.
Payfast option does not appear at checkout
Cause: The plugin is disabled, or your store currency is not set to ZAR.
Solution:
- Go to J2Commerce -> Setup -> Payment Methods and confirm Payfast shows a green enabled indicator.
- Go to J2Commerce -> Setup -> Configuration -> Store tab and verify the Currency is set to ZAR (South African Rand).
- If a Geo Zone restriction is configured, confirm the customer's address falls within that zone.
Signature validation fails (ITN rejected)
Cause: The Passphrase in the plugin settings does not match the passphrase set in your Payfast account, or it was recently changed in one place but not the other.
Solution:
- Log in to your Payfast account and go to Settings -> Security.
- Copy the current passphrase exactly (it is case-sensitive).
- Paste it into the Passphrase field in the plugin settings and save.
Refund fails with "Refund unavailable in sandbox"
Cause: The plugin is still in sandbox mode. Payfast does not allow refund API calls in sandbox.
Solution: To test the Refund button, switch to a live account and use a real — but small — test transaction.
"Payfast only accepts ZAR" error at checkout
Cause: Your J2Commerce store currency is not set to ZAR.
Solution: Go to J2Commerce -> Setup -> Configuration -> Store tab and set the Default Currency to ZAR (South African Rand). Save and clear the Joomla cache.