Paymate
Paymate is an Australian hosted payment gateway that redirects shoppers to a secure Paymate-hosted page to complete their payment. Your store never handles card data. After payment, Paymate redirects the shopper back to your site and J2Commerce updates the order status automatically.
Supported currencies: AUD, EUR, NZD, GBP, USD.
Paymate is a separate add-on, not included with the core J2Commerce package. Purchase and download it from the J2Commerce Extensions Store.
Prerequisites
- J2Commerce installed and configured on your Joomla 6 site.
- A Paymate merchant account. Sign up at paymate.com.au.
- Your Paymate Username (the merchant login name, not your email address).
Finding Your Paymate Username
Your Paymate Username is the merchant ID passed to the Paymate gateway (the mid parameter). It is the username you created when you registered your Paymate merchant account — not your email address.
Log in to your Paymate merchant dashboard at paymate.com.au and look for the Username shown in your account profile or settings. Copy this value — you will paste it into the plugin settings below.
Purchase and download
This plugin is a separate add-on available from the J2Commerce Extensions Store. It is not included with the core J2Commerce 6 component.
- Go to the J2Commerce website and locate Paymate.
- Add it to your cart and complete checkout.
- Go to My Downloads under your account profile and find the plugin.
- Click Available Versions -> View Files -> Download Now to download the ZIP file.
Install the plugin
In the Joomla Administrator, go to System -> Install -> Extensions.
Upload the plg_j2commerce_payment_paymate.zip file.

Enable the Plugin
Once you have installed the App, you will need to enable it. There are two ways you can access the App.
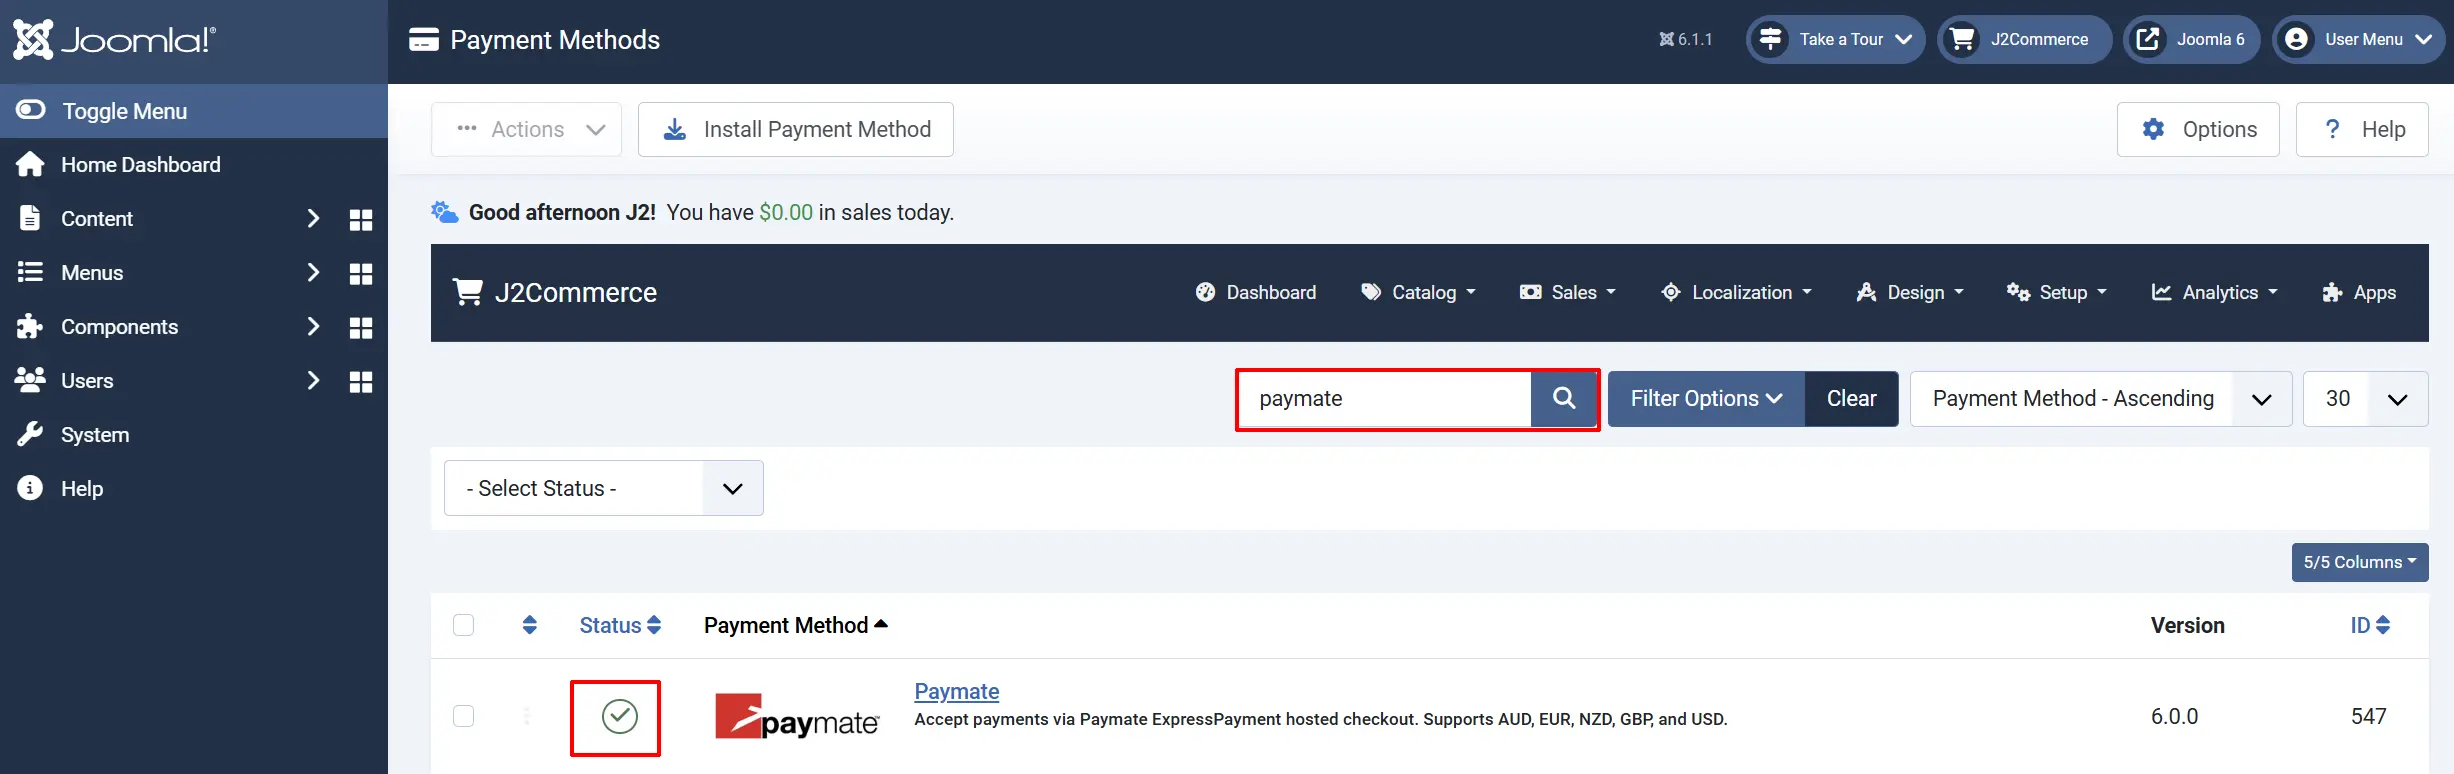
Option A: Go to the J2Commerce icon at the top right corner -> Setup -> Payment Methods
Option B: Go to Components on the left sidebar -> J2Commerce -> Dashboard -> Setup -> Payment Methods

To help you narrow down the list, you can do a search for Paymate, click the X, and it will turn into a green checkmark. It is now enabled and ready for setup.
Configure the plugin
Click the Paymate title next to the green checkmark to open the configuration screen.
Click the Toggle Inline Help button at the top of any plugin configuration page to show a short description beneath each field.

Gateway Settings tab
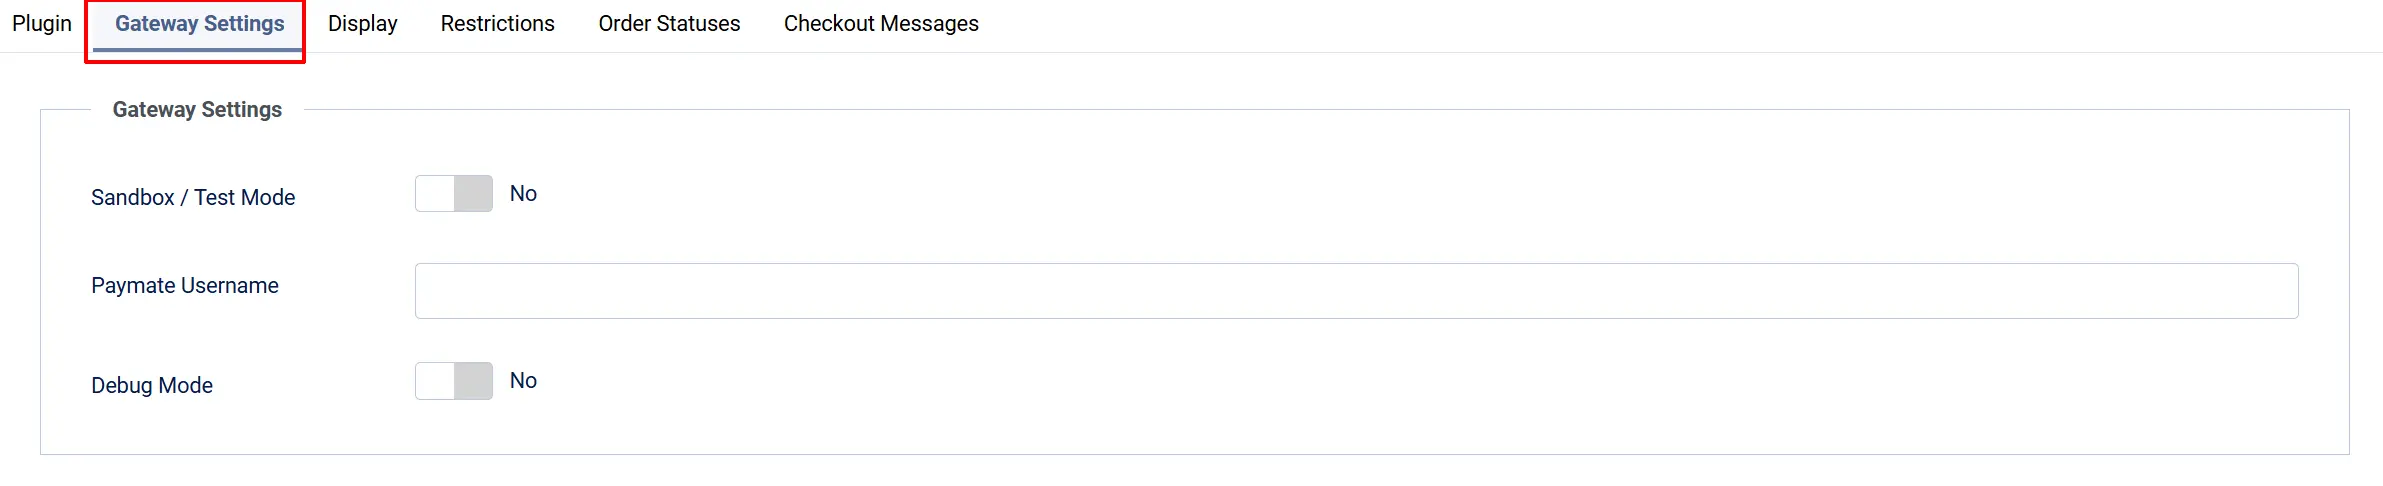
Sandbox / Test Mode: Enables test mode. Payments are not charged.
Paymate Username: Your live Paymate merchant username (mid). Only shown when Sandbox is off.
Sandbox Username: Your Paymate test account username. Only shown when Sandbox is on.
Debug Mode: Logs gateway requests and responses to administrator/logs/.
To go live: make sure Sandbox / Test Mode is set to No, then enter your live Paymate Username.
Display tab
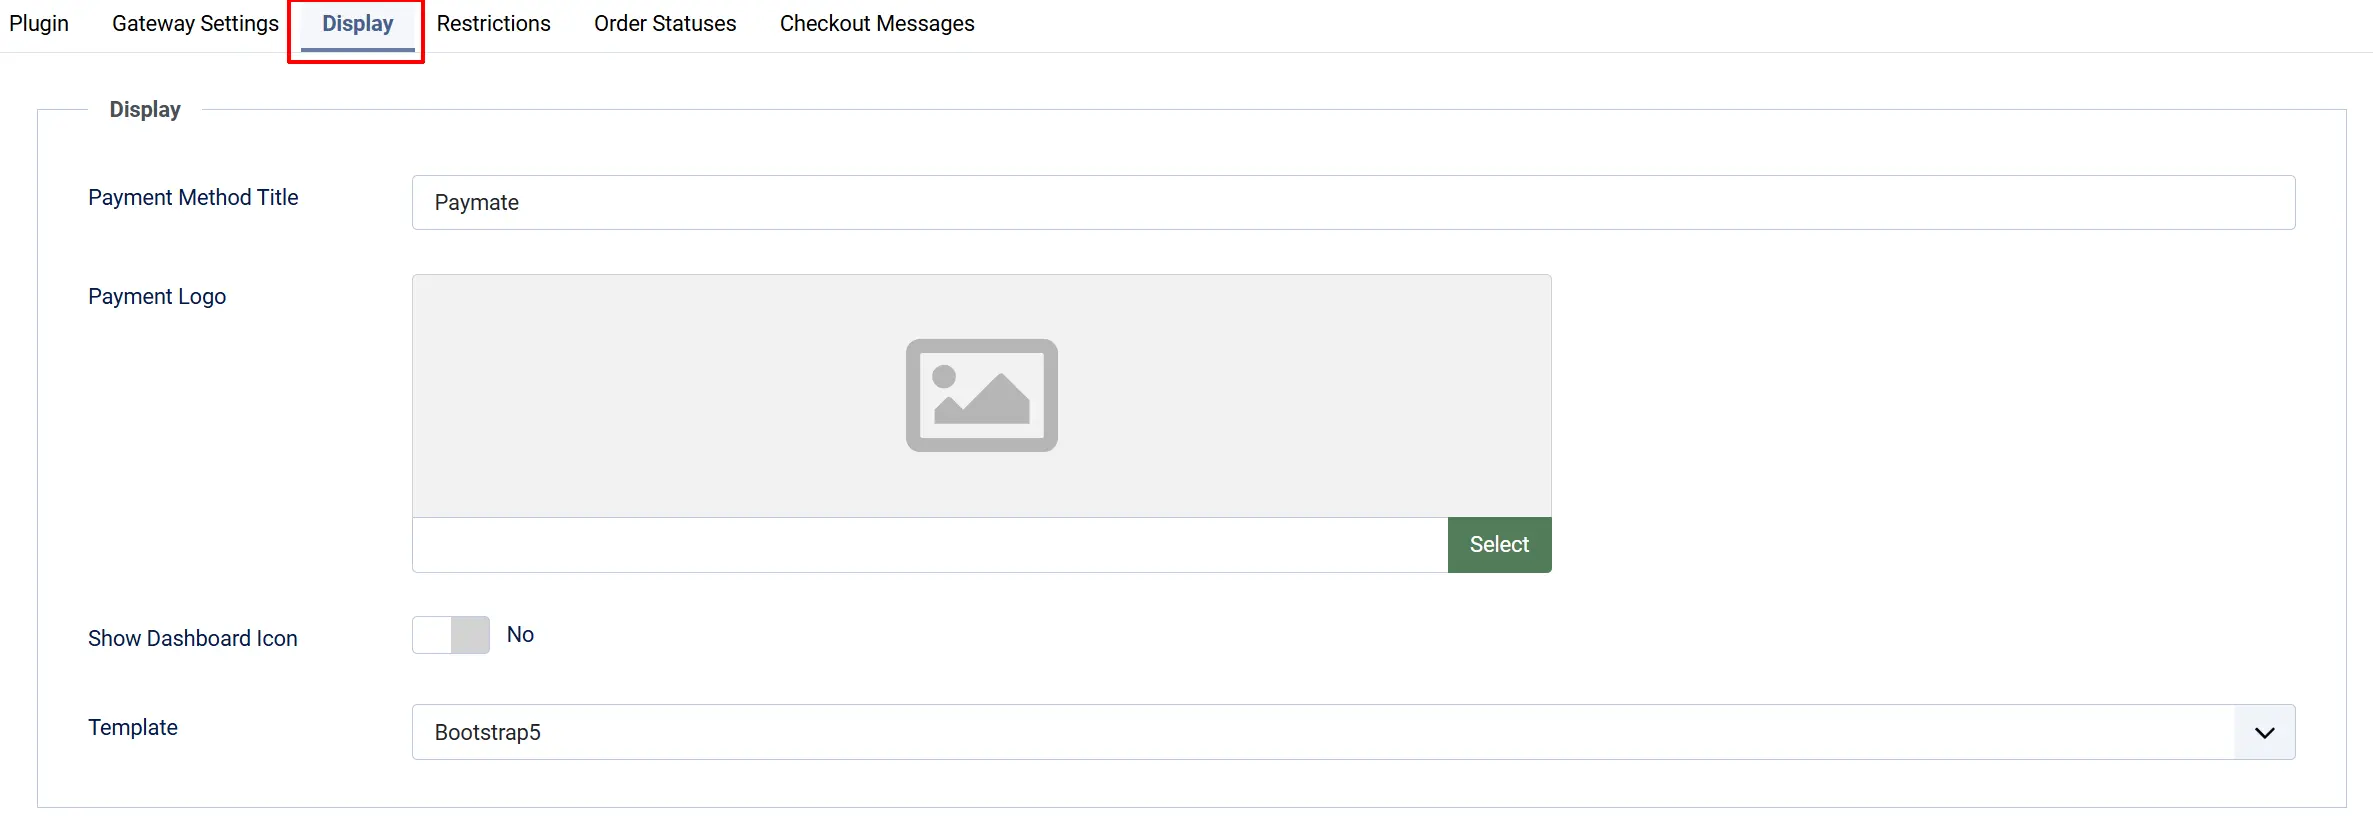
Payment Method Title: Name shown to shoppers at checkout.
Payment Logo: Optional logo image. Upload via the Joomla Media Manager.
Show Dashboard Icon: Adds a Paymate quick-icon to the J2Commerce admin dashboard.
Template: Choose between Bootstrap 5 or UIkit checkout layouts.
Restrictions (Optional) tab
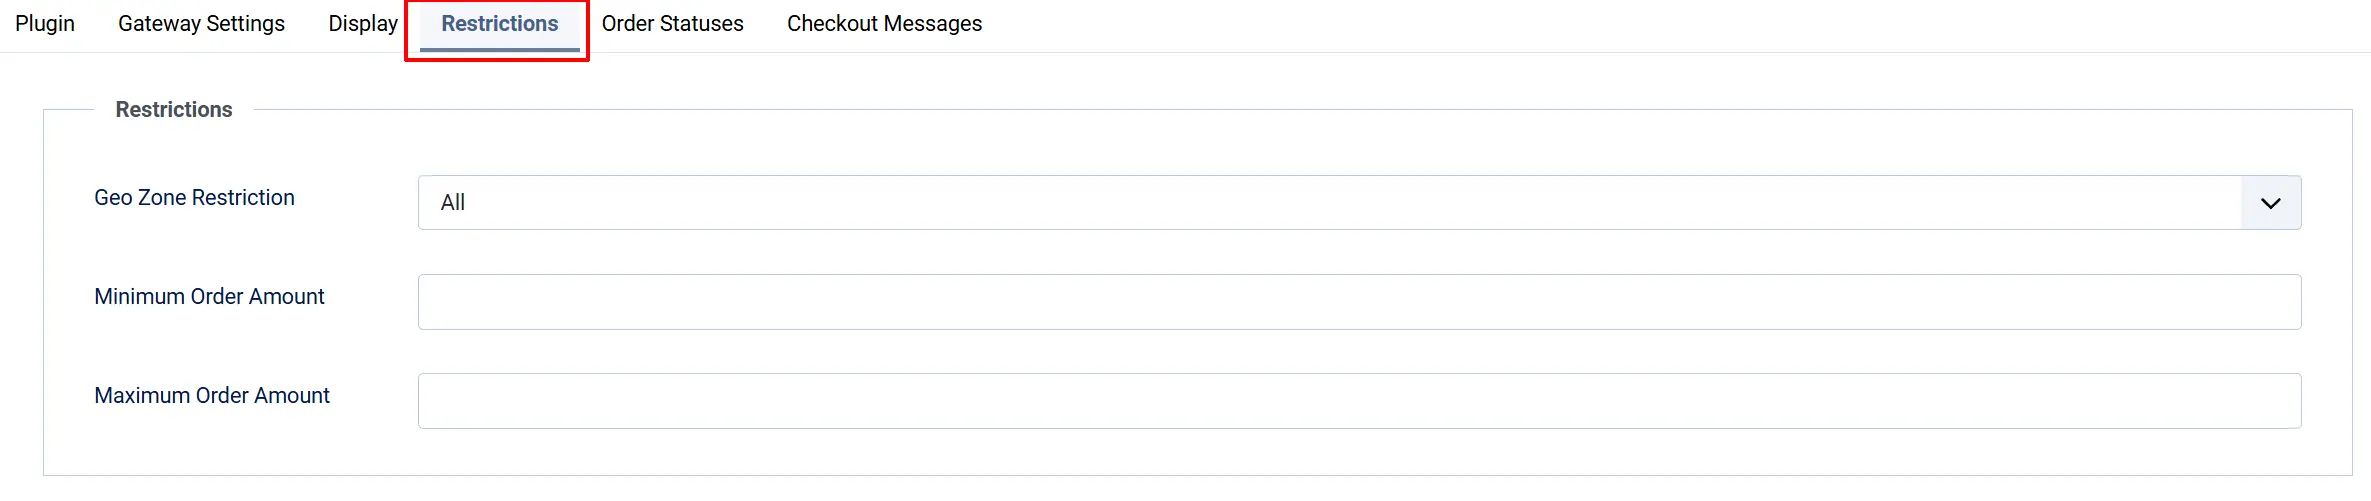
On the Restrictions tab you can limit when Paymate appears at checkout:
Geo Zone Restriction: Restrict to a specific geographic zone (e.g., Australia only). Leave as All Geo Zones to make it available everywhere.
Minimum Order Amount: Hide Paymate for orders below this value. Leave blank to disable.
Maximum Order Amount: Hide Paymate for orders above this value. Leave blank to disable.
Because Paymate only accepts AUD, EUR, NZD, GBP, and USD, the plugin automatically hides the payment method when a shopper's cart currency is outside that set — regardless of any geozone restriction you configure.
Order Status tab
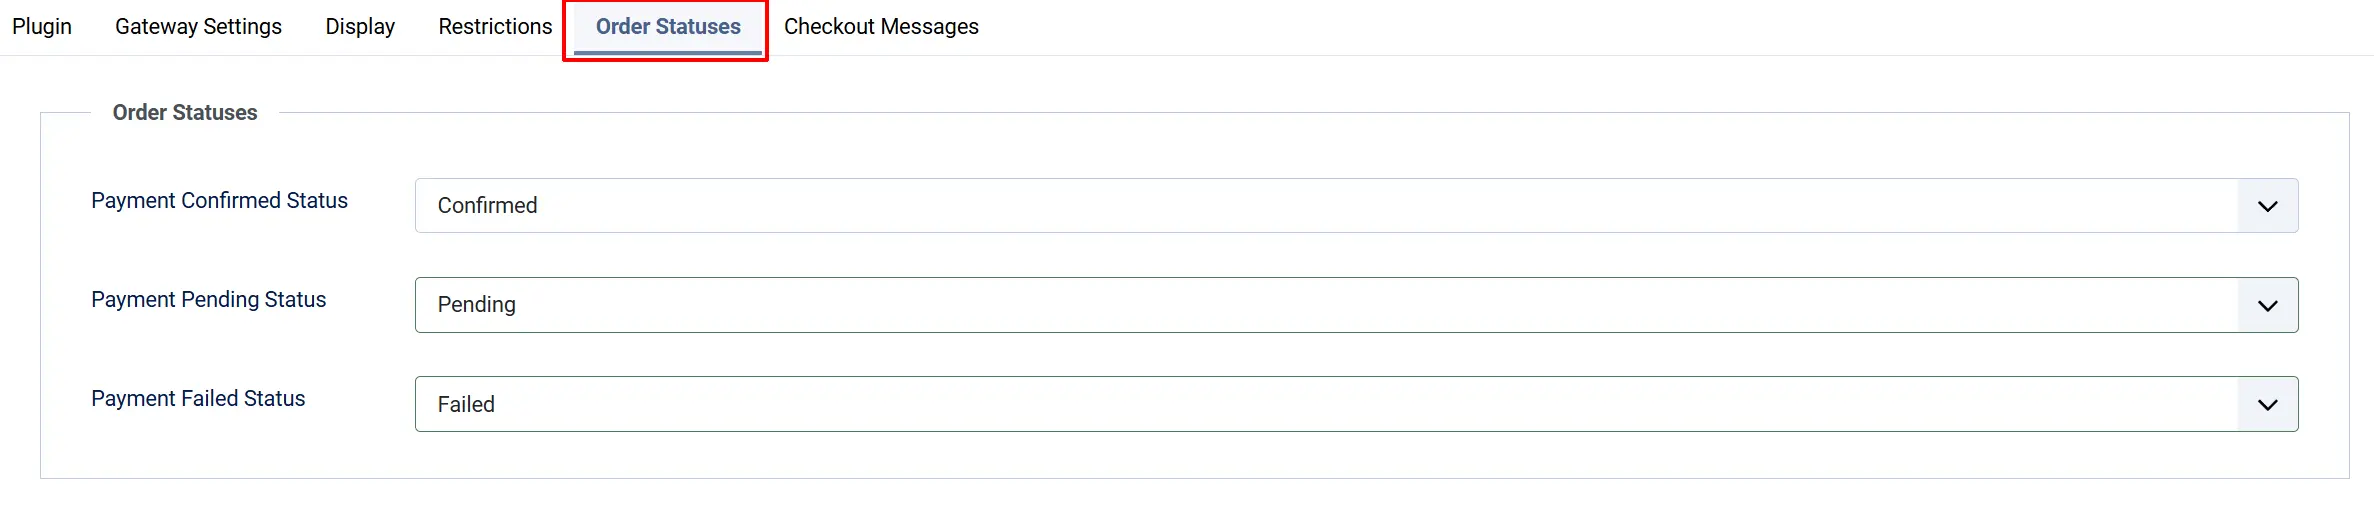
On the Order Statuses tab, choose the J2Commerce order status that should be applied for each Paymate gateway response:
Payment Confirmed Status: Paymate returns responseCode=PA (Approved).
Payment Pending Status: Paymate returns responseCode=PP (Pending) — payment is accepted but awaiting settlement.
Payment Failed Status: Paymate returns responseCode=PD or another declined code.
Paymate ExpressPayment is a legacy hosted-redirect gateway that does not send a signed server-to-server confirmation after payment. The result arrives only through the browser redirect, as URL parameters. This is a property of the Paymate gateway protocol, not a J2Commerce defect.
What this means for your store:
- The plugin performs a server-side amount check when Paymate echoes the
amtparameter back. If the amount does not match the order total, the confirmation is rejected and the order is routed to the Pending status for manual review. - If Paymate does not echo an amount at all, the plugin will also route the order to Pending rather than auto-confirming it, because the amount check cannot be completed.
- A determined attacker who intercepts or replays the redirect cannot easily forge a confirmed payment without also supplying the correct amount, but the protection depends on Paymate including that parameter.
Recommended actions:
- Verify every order against your Paymate merchant portal before fulfilling. Cross-reference the transaction ID shown in the J2Commerce order view with the transaction in your Paymate account.
- For digital goods or auto-fulfilled products, set the Payment Confirmed Status to a status that does not trigger automatic delivery (for example, create a custom Awaiting Reconciliation status). Only move the order to a fulfilling status after you have verified the payment in your Paymate portal.
- Enable Debug Mode during initial testing so you have a complete log of every redirect and status change.
If the order status you want is not listed, create it first under J2Commerce -> Setup -> Order Statuses.

Checkout Message tab
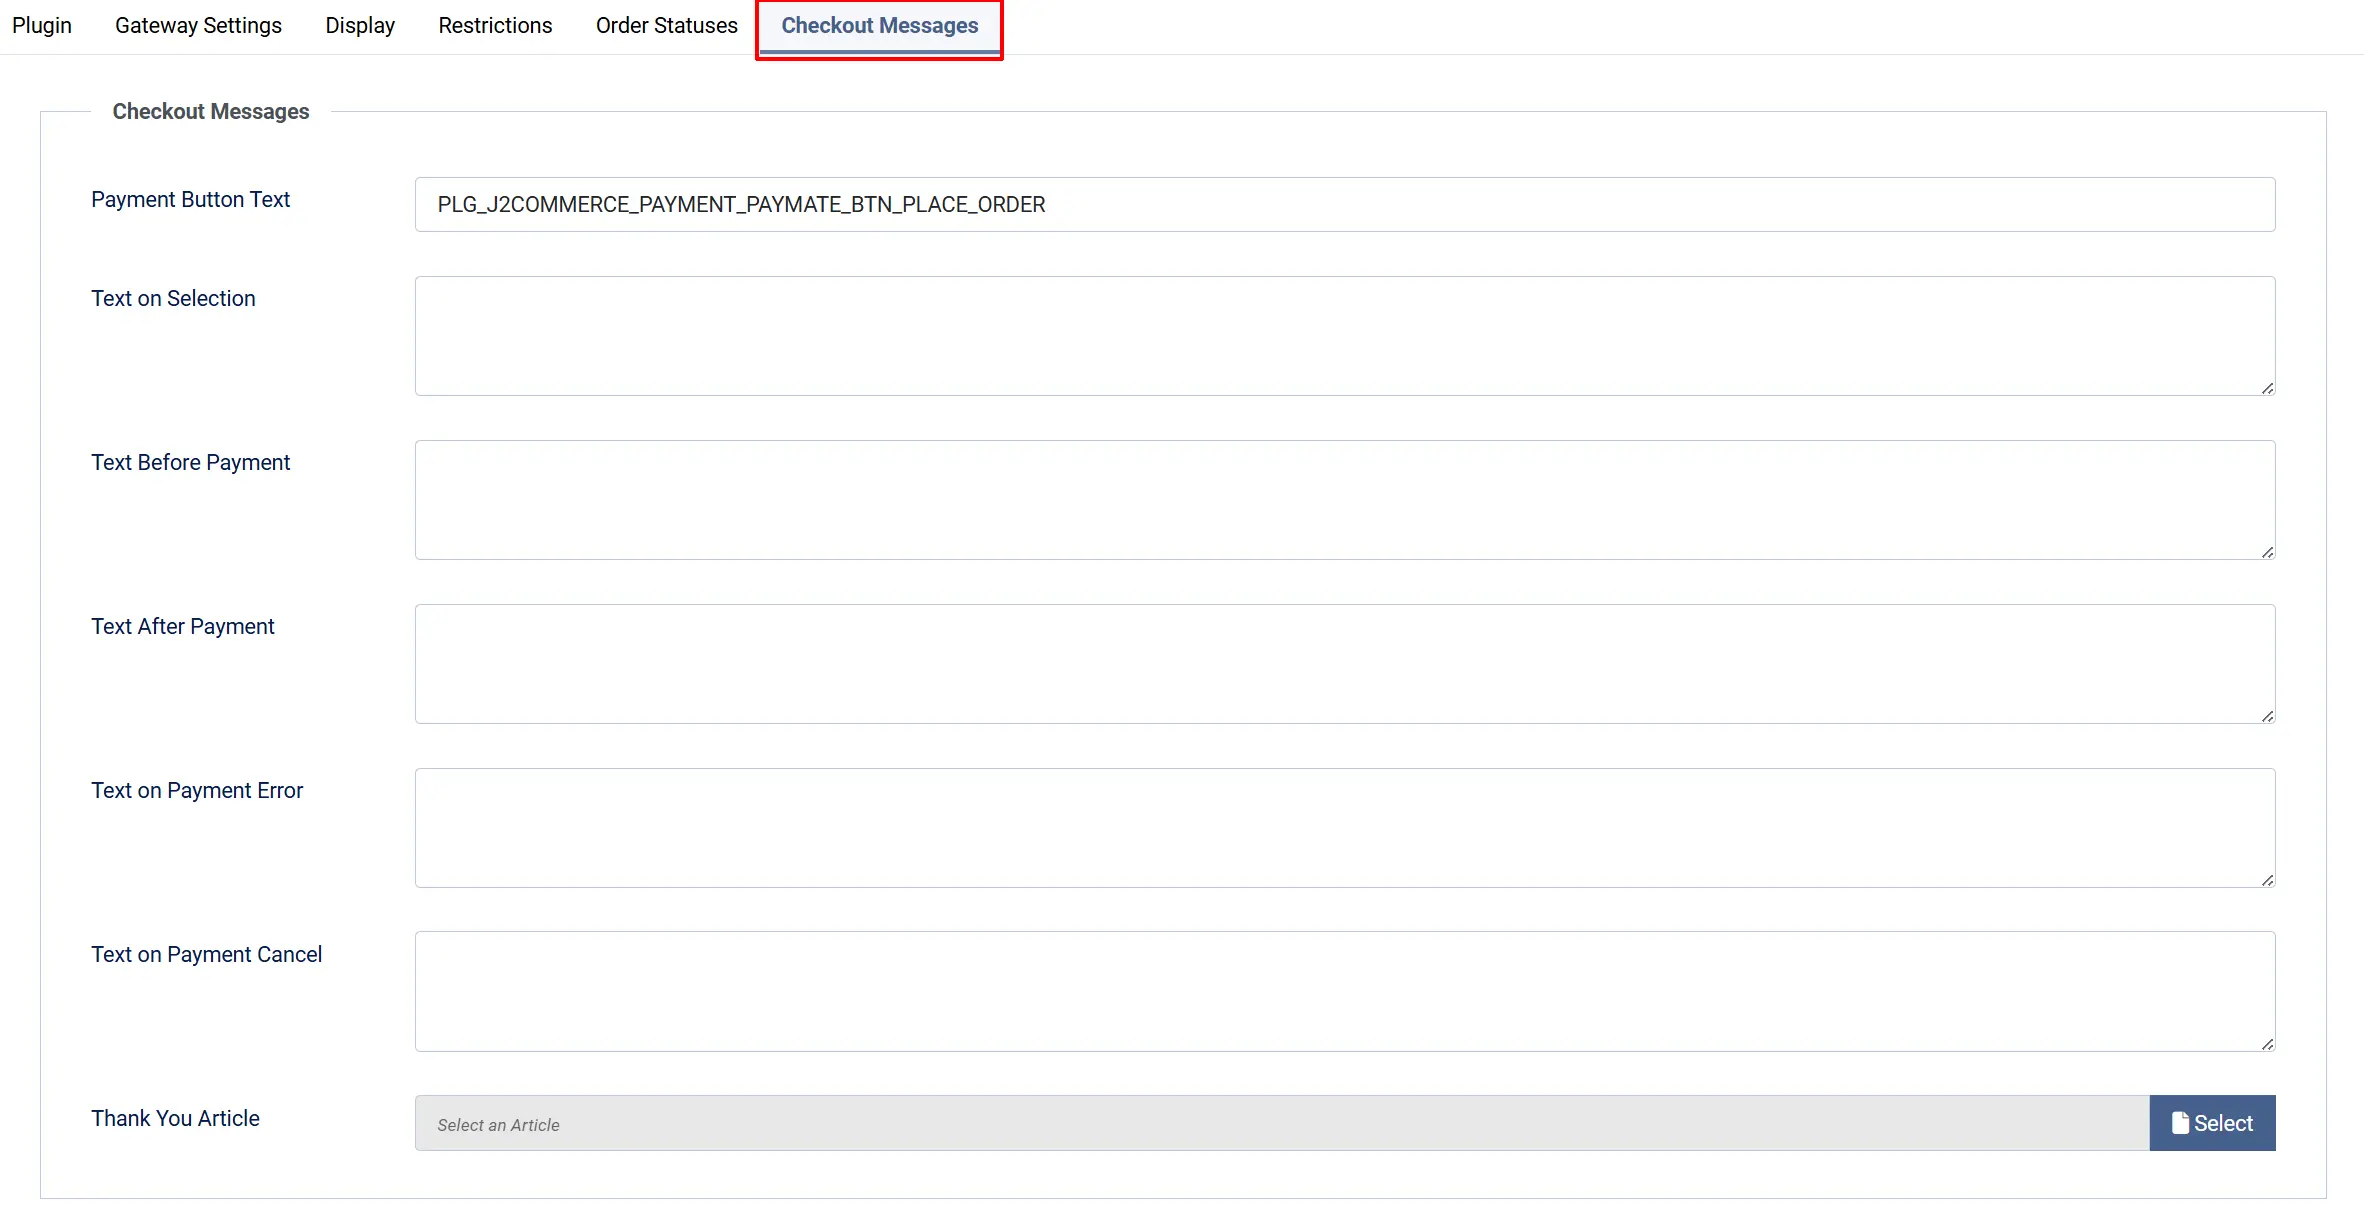
On the Checkout Messages tab, customise the text shown to shoppers at each stage:
Payment Button Text: Label on the button shoppers click to go to Paymate. Default: Place Order.
Text on Selection: Brief description shown when a shopper selects Paymate as their payment method.
Text Before Payment: Message displayed above the Pay Now button before the shopper is redirected to Paymate.
Text After Payment: Message displayed when the shopper returns after a pending payment.
Text on Payment Error: Message displayed if an error occurs during order processing.
Text on Payment Cancel: Message displayed when the shopper clicks Cancel on the Paymate page and returns to your store.
Thank You Article: Optional Joomla article displayed on the confirmation page after a successful payment. Select an article using the picker.
How the Checkout Flow Works
Here is what a shopper experiences:
-
The shopper adds items to their cart and proceeds to checkout.
-
On the payment step, Paymate appears in the list of payment options (alongside any logo you uploaded).
-
After choosing Paymate, the shopper sees any text you configured in Text on Selection and then clicks Place Order (or the button text you set).
-
J2Commerce saves the customer's order and redirects the shopper's browser to the Paymate ExpressPayment hosted page.
-
The shopper enters their payment details on Paymate's secure page. Your site never sees the card information.
-
Paymate processes the payment and redirects the shopper back to your store.
-
J2Commerce reads the result and updates the order status:
- Approved (PA): order moves to your Payment Confirmed Status.
- Pending (PP): order moves to your Payment Pending Status and the shopper sees the Text After Payment message.
- Declined (PD): order moves to your Payment Failed Status and the shopper sees the Text on Payment Error message.
-
The shopper sees the order confirmation page (and the Thank You Article if you configured one).
What Is New in J2Commerce vs the J2Store Version
If you are upgrading from the J2Store v4 Paymate plugin, here is what has changed in the J2Commerce 6 version:
- Native Joomla 6 architecture. The plugin uses the Joomla 6 DI container, event system, and MVC patterns. There is no standalone
notify.phpentry file — the return URL is handled by the core J2Commerce checkout controller. - Multi-currency gate. The plugin automatically hides itself for unsupported currencies (AUD, EUR, NZD, GBP, USD) so shoppers in other currencies never see a payment method that will fail.
- Geozone and subtotal restrictions. New controls to limit Paymate to specific shipping zones or order value ranges.
- Configurable order-status mapping. You now choose which J2Commerce status maps to Approved, Pending, and Failed outcomes instead of using hardcoded status IDs.
- Server-side amount verification. When Paymate echoes back the charged amount on the return URL, the plugin validates it against the order total and rejects mismatches. Orders are routed to Pending when the amount cannot be verified, rather than auto-confirming.
- No standalone entry file. The old
notify.phpfile has been removed. All return URL handling goes through the standard J2Commerce checkout task, which is protected by Joomla session handling.
Troubleshooting
Paymate does not appear at checkout
Possible causes and solutions:
- Username not saved. Go to J2Commerce -> Setup -> Payment Methods, open the Paymate plugin, and confirm Paymate Username is filled in. The payment method is hidden if the username is blank.
- Wrong currency. Paymate only accepts AUD, EUR, NZD, GBP, and USD. If your store or the shopper's active currency is outside this set, Paymate is automatically hidden. Check your store's active currencies in J2Commerce -> Setup -> Configuration -> Currencies.
- Geozone restriction. If you configured a Geo Zone Restriction, Paymate only appears for shoppers whose shipping address falls within that zone. Check the geozone settings and the shopper's shipping address.
- Subtotal restriction. If you set a Minimum or Maximum Order Amount, orders outside that range will not show Paymate. Verify the shopper's cart subtotal is within range.
- Plugin not enabled. Go to System -> Manage -> Extensions, search for Paymate, and confirm the plugin is enabled.
- Dashboard warning. Log in to the J2Commerce admin. If a warning banner appears saying the username is not configured, follow the link to fix it.
Payment is not confirming — order stays in Pending
Paymate ExpressPayment does not send a server-to-server notification. The order is updated only when the shopper is redirected back to your site after payment.
- Shopper closed the browser before returning. The redirect did not complete. The order will remain in whatever state it was before payment. Log in to your Paymate merchant portal to check whether the payment succeeded, then update the order status manually in J2Commerce -> Sales -> Orders.
- Amount not echoed by Paymate. If Paymate did not include the
amtparameter in the return URL, the plugin routes the order to Pending for manual reconciliation (by design — see the reconciliation callout above). Verify in your Paymate portal and update the status manually. - Amount mismatch. If Paymate returns a different amount than the order total, the plugin rejects the confirmation and logs an error. Enable Debug Mode and review the log file in
administrator/logs/to see the exact values.
The shopper was charged but the order shows Failed
This is the most important scenario to watch for with Paymate. Because the result arrives only through the browser redirect, a network problem, browser closure, or redirect failure after Paymate processed the payment can result in J2Commerce not receiving the confirmation.
Always verify against your Paymate merchant portal before concluding a payment did not go through. If the Paymate portal shows the payment as successful, update the J2Commerce order status manually.
Enabling Debug Logging
- Open the Paymate plugin settings (J2Commerce -> Setup -> Payment Methods -> Paymate).
- On the Gateway Settings tab, set Debug Mode to Yes.
- Click Save.
- Reproduce the issue (make a test payment).
- Open
administrator/logs/on your server and look for a log file namedplg_j2commerce_payment_paymate.php. - When you are finished investigating, set Debug Mode back to No to keep your logs clean in production.