Credova Financing
The Credova plugin integrates Credova's Buy-Now-Pay-Later (BNPL) financing platform with J2Commerce. Customers can apply for financing directly from your product pages and complete their financing application at checkout. The plugin displays "as low as $X/mo" widgets on product listing pages, product detail pages, and at checkout — and processes the financing application result via Credova's hosted application flow.
This plugin is a separate add-on available from the J2Commerce Extensions Store. It is not included with the core J2Commerce 6 component.
Prerequisites
- J2Commerce is installed and active on your Joomla site
- A Credova merchant account — contact Credova to apply
- Your Credova Store Code (Username) and Password for both production and sandbox environments
Purchase and Download
- Go to the J2Commerce website and navigate to Payment Plugins.
- Locate Credova Financing and click View Details -> Add to Cart -> Checkout.
- After purchase, go to My Downloads under your profile and search for the plugin. Click Available Versions -> View Files -> Download Now.
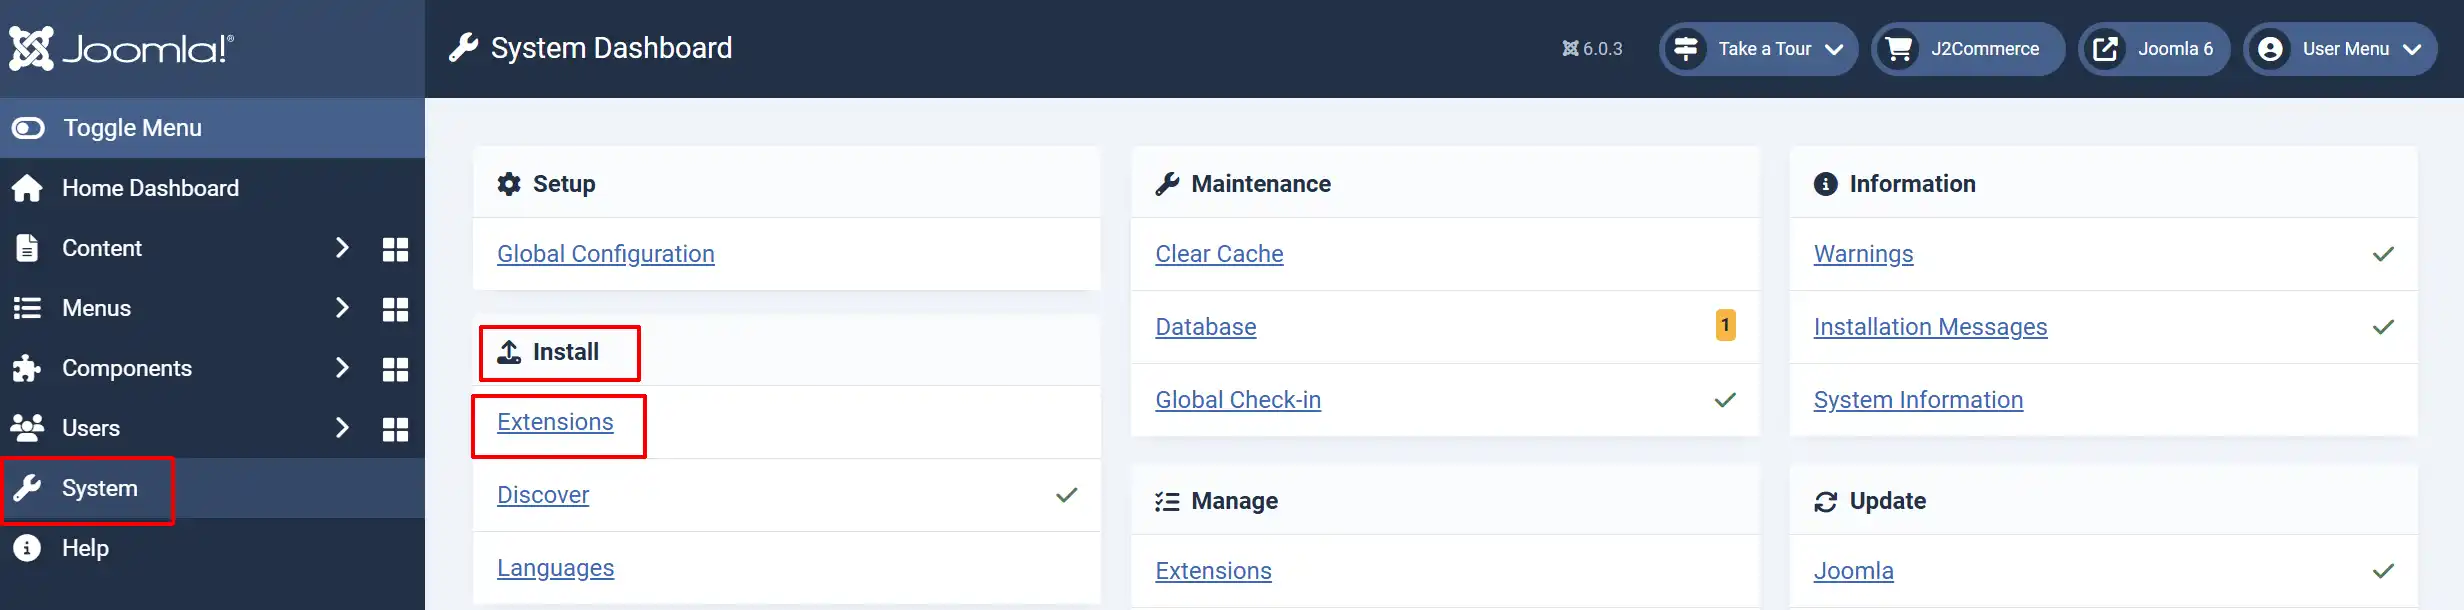
Installing the Plugin
- In the Joomla admin, go to System -> Install -> Extensions.
- Upload the
payment_credova.zippackage file.
Enable the Plugin
After installation, navigate to the payment methods list:
- Option A: Go to the J2Commerce icon at the top right corner -> Setup -> Payment Methods
- Option B: Go to Components -> J2Commerce -> Dashboard -> Setup -> Payment Methods
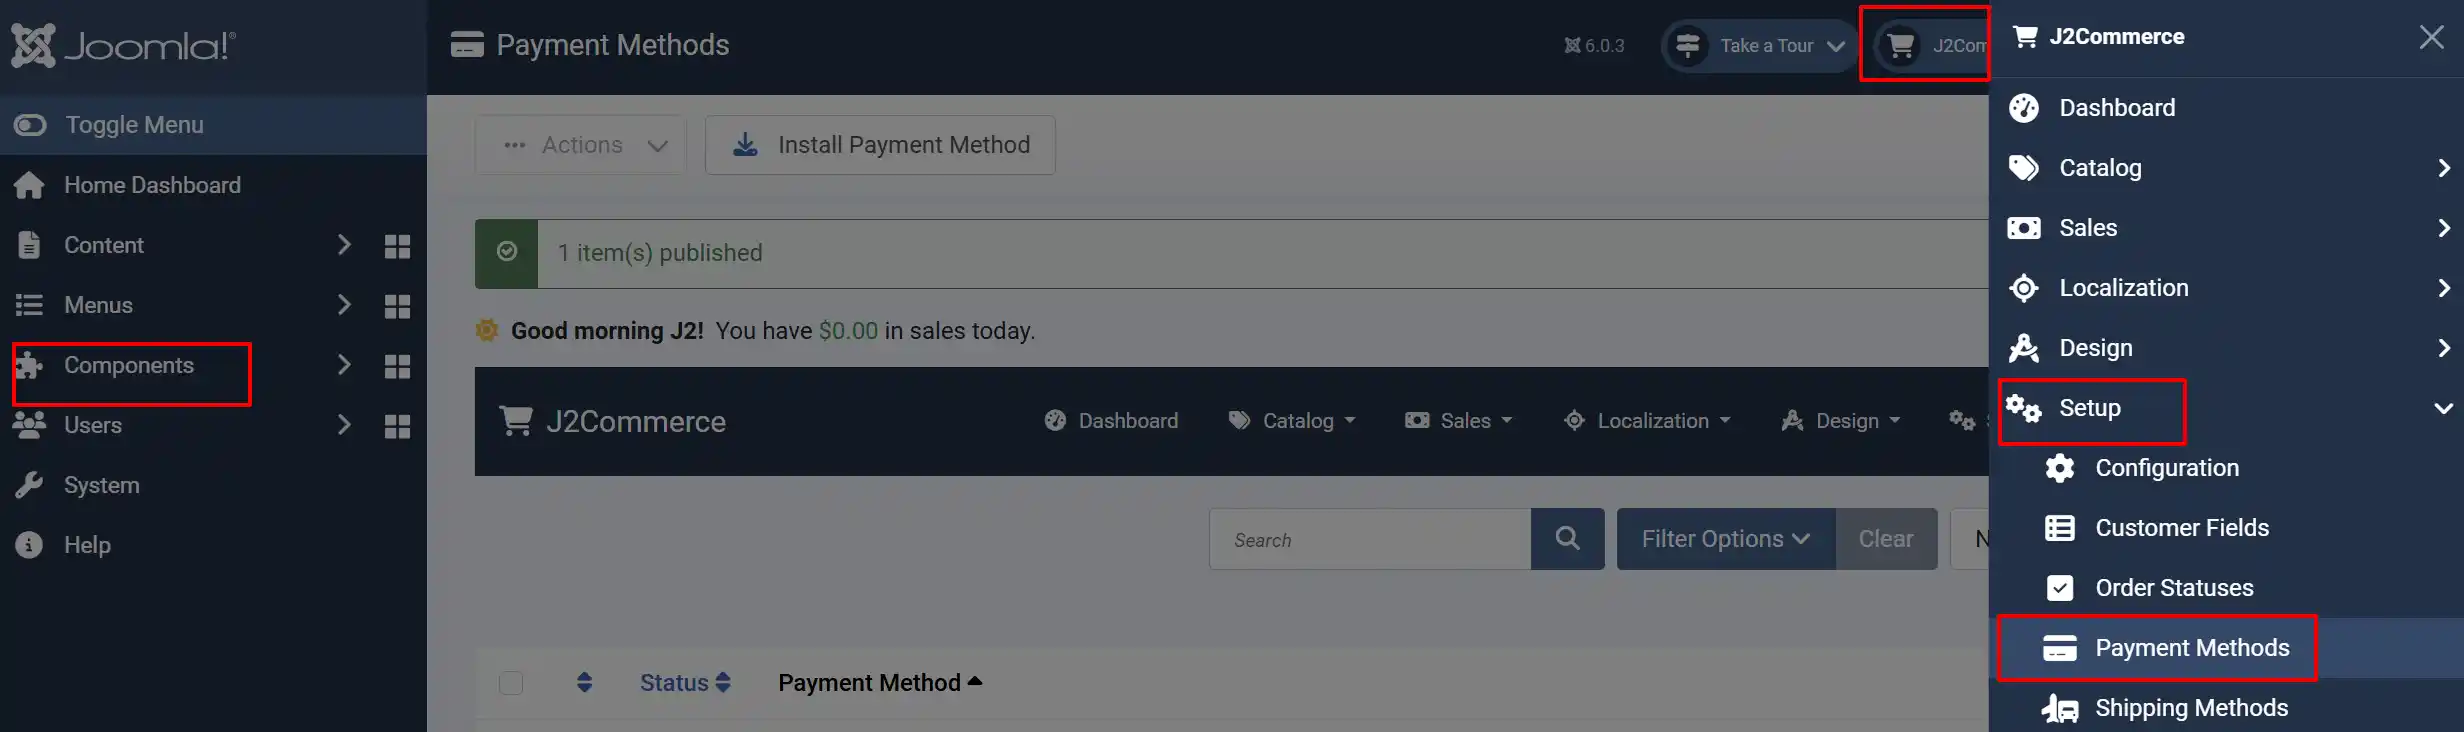
Find Credova Financing in the list, click the status toggle to enable it, then click the plugin name to open its settings.
Click the Toggle Inline Help button at the top of the plugin settings page to display a description below every field.
Configuring the Plugin
Click the Toggle Inline Help button in the toolbar and the app will show a description below each field as you configure it.
Display Settings
Display Name: The label shown to customers at checkout when they select Credova as their payment method. Default is Credova Financing.
Template Style: The frontend layout framework used to render checkout and product-page widgets. Match this to your Joomla template:
- Bootstrap 5 — recommended for most Joomla sites
- UIkit — use if your template is UIkit-based (e.g., YOOtheme Pro)
Sandbox Mode
Use Sandbox (Test Mode): Set to Yes to use the Credova sandbox environment for testing. No real financing applications are submitted. Set to No for live transactions.
Always test with sandbox mode enabled before going live.
Credentials
| Field | Description |
|---|---|
| Store Code (Username) | Your Credova production store code / username |
| Password | Your Credova production account password |
| Sandbox Store Code (Username) | Your Credova sandbox store code for test transactions |
| Sandbox Password | Your Credova sandbox account password for test transactions |
The plugin uses the production credentials when Use Sandbox is No, and the sandbox credentials when it is Yes.
Order Status
Order Status After Payment: The order status to set when Credova returns a Signed (approved) result. Most stores use Confirmed or Processing here.
NOTE: If the status you want isn't listed in the dropdown menu, you can create a new one by going to J2Commerce -> Setup -> Order Statuses

Surcharge
Add an optional surcharge to orders paid via Credova.
| Field | Description |
|---|---|
| Surcharge Name | Label shown to customers for the surcharge (e.g., Financing Fee) |
| Surcharge Percent | Percentage of the order subtotal added as a surcharge |
| Surcharge Fixed | Fixed amount added as a surcharge |
| Surcharge Tax Class | Tax profile applied to the surcharge amount |
You can use a percentage, a fixed amount, or both together.
Geo-Zone and Subtotal Restrictions
Geo-Zone Restriction: Limit Credova availability to customers in a specific geo-zone. Leave empty to make Credova available to all customers.
Minimum Subtotal: Hide Credova at checkout if the cart subtotal is below this amount.
Maximum Subtotal: Hide Credova at checkout if the cart subtotal exceeds this amount.
Financing Widget Settings
These settings control where and how the "as low as $X/mo" widget appears on your store.
Brand Categories
Brand Categories: Select the Joomla content categories whose products should display the Credova financing widget. Only products within these categories show the widget. Leave empty to show the widget on all products.
Widget Display Position
Widget Display Position: Choose where the financing widget appears on individual product pages.
| Option | Where It Appears |
|---|---|
| After Article Title | Immediately below the product title |
| Before Product Price | Just above the product price |
| After Product Price | Just below the product price |
| Before Add to Cart Button | Just above the Add to Cart button |
| After Add to Cart Button | Just below the Add to Cart button |
Finance Amount Limits
Minimum Finance Amount: The minimum product price required to display the financing widget. Products priced below this threshold will not show the widget.
Maximum Finance Amount: The maximum product price up to which the widget is displayed. Products priced above this threshold will not show the widget.
Show Widget On
| Setting | Description |
|---|---|
| Show Widget on Category Pages | Display the financing widget on product listing and category pages |
| Show Widget on Product Pages | Display the financing widget on individual product detail pages |
| Show Widget in Checkout Payment Row | Display the "as low as $X/mo" estimate next to Credova in the checkout payment method list |
Brand Appearance
Hide Credova Brand Logo: Set to Yes to hide the Credova brand logo inside the widget button.
Widget Text Color: Hex color code for the financing widget text (e.g., #000000 for black). Leave blank to use the Credova default.
Thank You Article
Thank You Article: Select a Joomla article to display on the order confirmation page after a successful financing application.
Custom Messages
These text fields let you customize messages shown to customers during the payment flow.
| Field | When It Appears |
|---|---|
| On Selection | When the customer selects Credova as their payment method |
| On Before Payment | On the payment redirect page before the customer proceeds to Credova |
| On After Payment | On the confirmation page after a completed financing application |
| On Error Payment | When a financing error occurs |
| On Cancel Payment | When the customer cancels the Credova application |
Dashboard Icon
Show Dashboard Icon: When enabled, a Credova tile appears on the J2Commerce dashboard and the quick icons module for easy access to financing activity.
Icon Label: The label for the dashboard icon tile.
Debug Mode
Debug Mode: When enabled, detailed Credova API activity is written to administrator/logs/payment_credova.php.
Enable debug mode only while troubleshooting. Disable it in production — logs can grow large and may contain transaction details.
How the Financing Flow Works
Product Page
- When a customer views a product in one of the configured Brand Categories, the Credova financing widget appears in the configured Widget Display Position.
- The widget displays the estimated lowest monthly payment (e.g., "As low as $49/mo with Credova Financing").
- Clicking the widget opens the Credova financing calculator popup, powered by Credova's JavaScript SDK.
Checkout
- The customer adds a product to the cart and proceeds to checkout.
- If Show Widget in Checkout Payment Row is enabled, the estimated monthly payment appears beside the Credova payment option.
- The customer selects Credova Financing as their payment method and clicks Place Order.
- J2Commerce creates a pending order and sends the order details to the Credova API.
- The customer is redirected to Credova's hosted financing application.
- The customer completes the financing application on Credova's secure servers.
- Credova redirects the customer back to your store's confirmation page.
Order Completion
When Credova returns a Signed (approved) status:
- The order status is updated to the status configured in Order Status After Payment.
- The Credova Application ID is stored as the transaction ID on the order.
- The order history is updated with a note confirming the financing approval and the application ID.
If the application is declined or cancelled, the order remains in a Pending state and the order history notes the outcome.
Sandbox Testing
- Set Use Sandbox (Test Mode) to Yes.
- Enter your Credova Sandbox Store Code and Sandbox Password.
- Place a test order through the checkout using Credova.
- On the Credova sandbox application page, complete the test application flow.
- Confirm the order status updates correctly in J2Commerce -> Sales -> Orders.
- Enable Debug Mode and review
administrator/logs/payment_credova.phpto inspect the API request and response.
Going Live Checklist
Before accepting real financing applications:
- Use Sandbox (Test Mode) is set to No
- Your production Store Code and Password are entered
- At least one Brand Category is selected (or you have verified widget visibility with no restriction)
- Minimum Finance Amount and Maximum Finance Amount are set appropriately for your products
- Order Status After Payment is set to the correct post-approval status
- Debug Mode is set to No
- You have completed a full end-to-end test order using sandbox credentials before switching to production
Troubleshooting
Financing widget does not appear on product pages
Cause: The product's category is not in the Brand Categories list, or the product price falls outside the configured finance amount limits.
Solution:
- Go to the Credova plugin settings and check the Brand Categories field. Add the Joomla category for the product.
- Verify the product price is within the Minimum Finance Amount and Maximum Finance Amount range.
- Check which Widget Display Position is configured and confirm the position is supported by your template.
- Enable Debug Mode and check the browser console for JavaScript errors from the Credova SDK.
Customer is not redirected to Credova at checkout
Cause: The Credova API returned an error when creating the financing application, or the store credentials are incorrect.
Solution:
- Enable Debug Mode and check
administrator/logs/payment_credova.phpfor the API error. - Confirm the correct credentials are entered for the active environment (sandbox or production).
- Verify your Credova account is active and in good standing.
Order stays Pending after the customer returns from Credova
Cause: The Credova application was not approved (status was not Signed), or the customer cancelled the application.
Solution:
- Check the order history in J2Commerce -> Sales -> Orders for a note from Credova about the application outcome.
- Enable Debug Mode and check
administrator/logs/payment_credova.phpto see the status returned by the Credova API. - If the application was approved on Credova's side but the order is still Pending, contact J2Commerce support with the Credova Application ID and the debug log.
Sandbox mode warning
Cause: Use Sandbox (Test Mode) is set to Yes.
Solution: If you are ready to go live, open the Credova plugin settings and set Use Sandbox (Test Mode) to No, then verify your production credentials are entered.
Widget shows incorrect pricing
Cause: The Credova SDK calculates the displayed monthly estimate based on the product price at the time the page loads. If pricing changes (e.g., after variant selection), the widget may not update automatically.
Solution: This is a Credova SDK behavior. For stores with variable pricing that changes significantly based on variant selection, consider setting the Widget Display Position to After Add to Cart Button to reduce confusion, or contact Credova support for guidance on dynamic pricing integration.
Support
- J2Commerce documentation: docs.j2commerce.com
- J2Commerce support: www.j2commerce.com/support
- Credova merchant support: credova.com