Clover Payment
The Clover Payment plugin connects your J2Commerce store to Clover Ecommerce, letting you accept credit and debit cards either on your site (iframe) or via a Clover-hosted payment page. It supports both immediate sale and authorize-then-capture workflows, saved cards for returning customers and subscriptions, and full order management from the J2Commerce order view.
Requirements
- J2Commerce installed and configured
- An active Clover merchant account with Ecommerce enabled
- Clover Ecommerce API credentials (Merchant ID, Public Key, Private Key, Webhook Secret)
Get Your Clover Keys
You need four values from your Clover developer dashboard. The table below tells you where to find each one.
| Credential | Where to find it |
|---|---|
| Merchant ID (mId) | Your Clover Dashboard URL — it is the 13-character code after /merchants/ (for example 18753RFVD3ZY1). This is NOT your MID or account number. |
| Public Key | Clover PAKMS (the tokenization key service). It begins with pkp_. Use this in the Public Key field. |
| Private / API Key | Your Clover Ecommerce API secret key. Keep this private — never share it or expose it in a browser. |
| Webhook Secret | The secret used to verify Clover webhook signatures. Copy it when you set up your webhook endpoint in the Clover Developer Dashboard. |
Clover has separate credentials for sandbox (testing) and production (live). Copy the right set into the matching fields in the plugin — using sandbox keys on a live store prevents real payments from going through.
Purchase and download
This plugin is a separate add-on available from the J2Commerce Extensions Store. It is not included with the core J2Commerce 6 component.
- Go to the J2Commerce website and locate Clover.
- Add it to your cart and complete checkout.
- Go to My Downloads under your account profile and find the plugin.
- Click Available Versions -> View Files -> Download Now to download the ZIP file.
Install the plugin
In the Joomla Administrator, go to System -> Install -> Extensions.
Upload the plg_j2commerce_payment_clover.zip file.

Enable the Plugin
Once you have installed the App, you will need to enable it. There are two ways you can access the App.
Option A: Go to the J2Commerce icon at the top right corner -> Setup -> Payment Methods
Option B: Go to Components on the left sidebar -> J2Commerce -> Dashboard -> Setup -> Payment Methods

To help you narrow down the list, you can do a search for Clover, click the X, and it will turn into a green checkmark. It is now enabled and ready for setup.

Configure the Plugin
Click the Clover title next to the green checkmark to open the configuration screen.
Click the Toggle Inline Help button at the top of any plugin configuration page to show a short description beneath each field.

Display Settings

These fields connect the plugin to your Clover account.
Display Name: The name shoppers see at checkout, e.g. "Credit / Debit Card"
Display Image: Optional logo shown next to the payment name at checkout
Integration Mode: Iframe (on-site) keeps shoppers on your site; Hosted Checkout (redirect) sends them to a Clover-hosted payment page
Payment Action: Sale (capture immediately) charges the card at checkout; Authorize only reserves the funds for manual capture later
Credentials
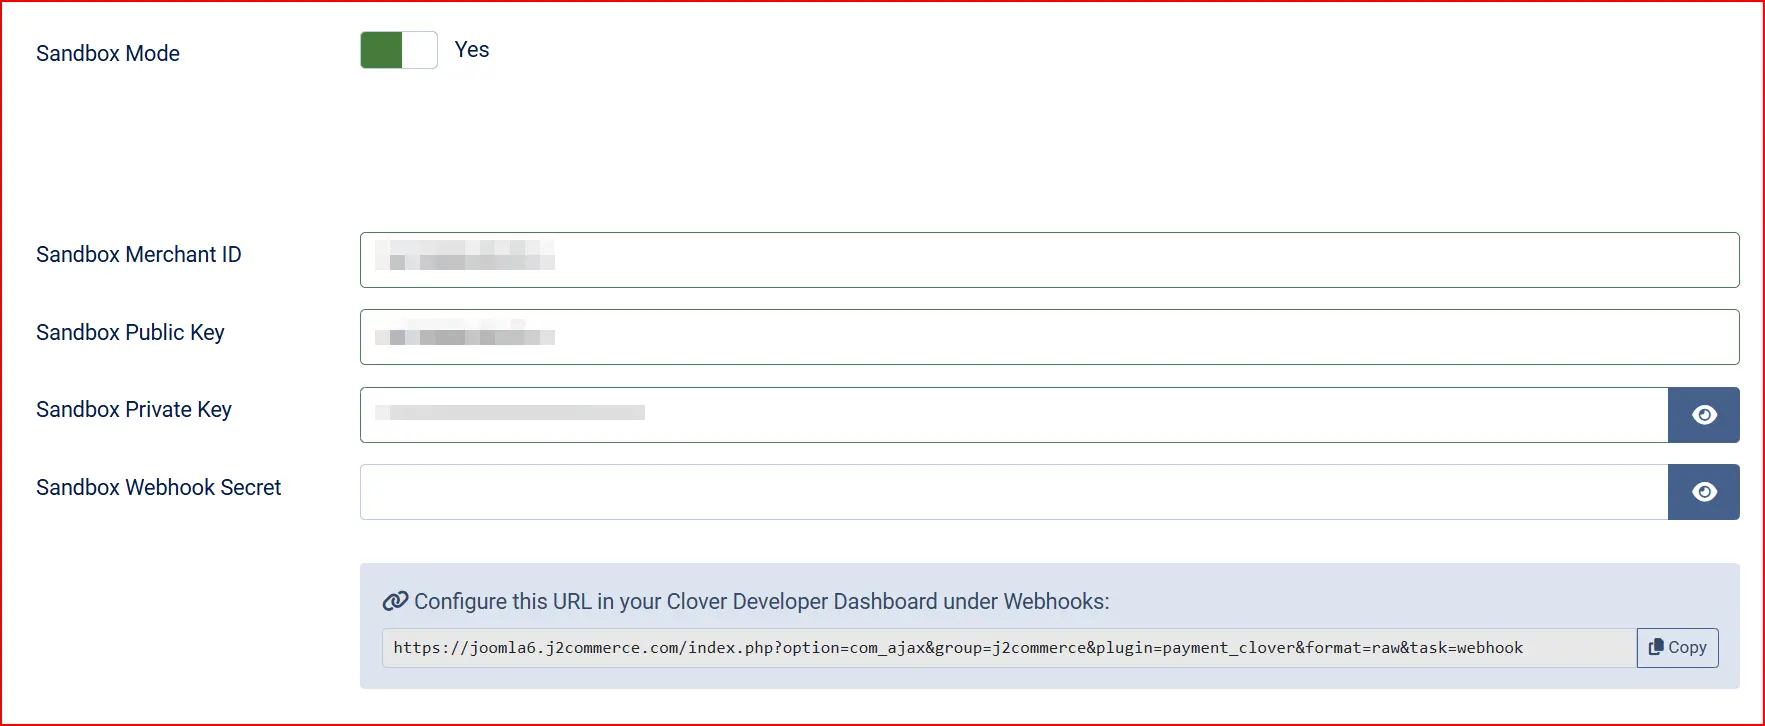
Sandbox Mode: Set to Yes while testing; set to No to accept real payments
Merchant ID: Your live Clover merchant mId (13 characters)
Public Key: Your live PAKMS tokenization key (begins with pkp_)
Private Key: Your live Clover API secret key
Webhook Secret: Your live webhook secret from the Clover Developer Dashboard
Sandbox Merchant ID: Merchant mId for sandbox testing
Sandbox Public Key: PAKMS tokenization key for sandbox testing
Sandbox Private Key: API secret key for sandbox testing
Sandbox Webhook Secret: Webhook secret for sandbox testing
Webhook URL
The plugin displays two read-only URLs — one for live and one for sandbox. You must register these in your Clover Developer Dashboard under Webhooks so that Clover can notify your store when a payment is confirmed.
If your site is on a local or development domain, the plugin will show a warning. Clover cannot reach local URLs, so webhook notifications will not arrive during local testing. Use a tunnel service to expose your site publicly while testing webhooks.
Checkout Options

These settings control how the payment form appears and what card features are available.
Allow Saved Cards: Let logged-in customers save cards for faster checkout and automatic subscription renewals
Template Style: Choose the checkout template (Bootstrap 5 or UIkit, depending on your site theme)
Order Status
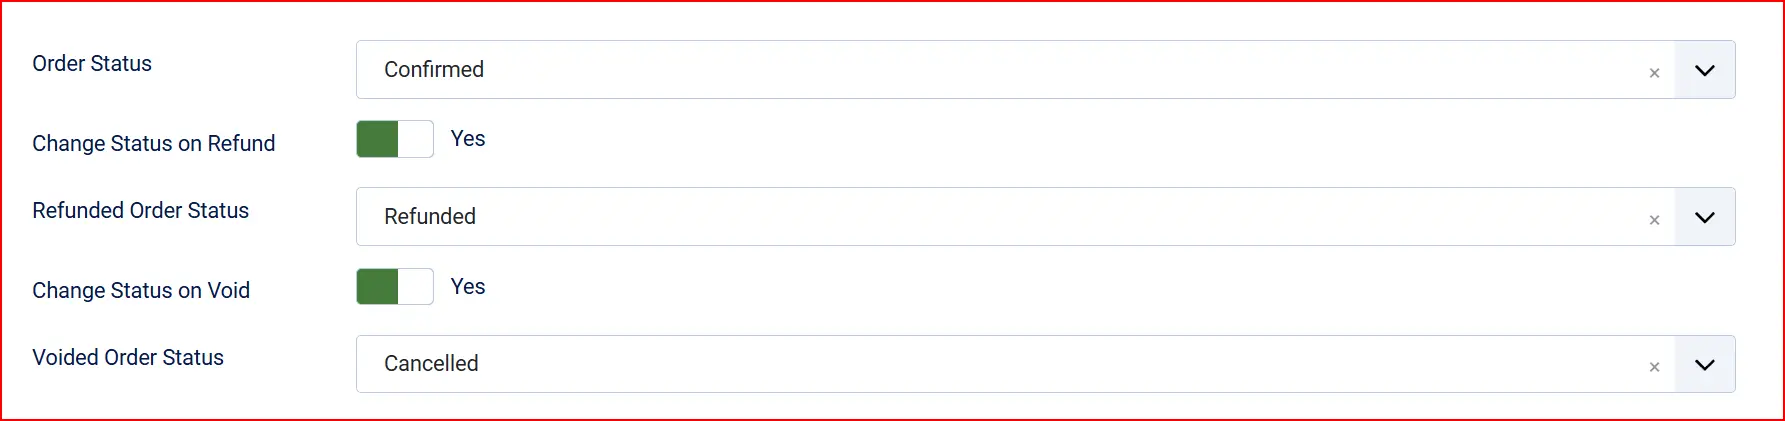
These settings determine which order status is applied after each payment event.
Payment Status: Status applied after a successful Sale payment (e.g. Confirmed)
Authorized Status: Status applied when a payment is Authorized but not yet captured. Visible only when Payment Action is set to Authorize only
Change Status on Refund: Enable to automatically change the order status when a refund is processed
- Refund Order Status: The status to apply after a refund (shown only when the option above is enabled)
Change Status on Void: Enable to automatically change the order status when an authorization is voided
- Void Order Status: The status to apply after a void (shown only when the option above is enabled)
Surcharge (Optional)
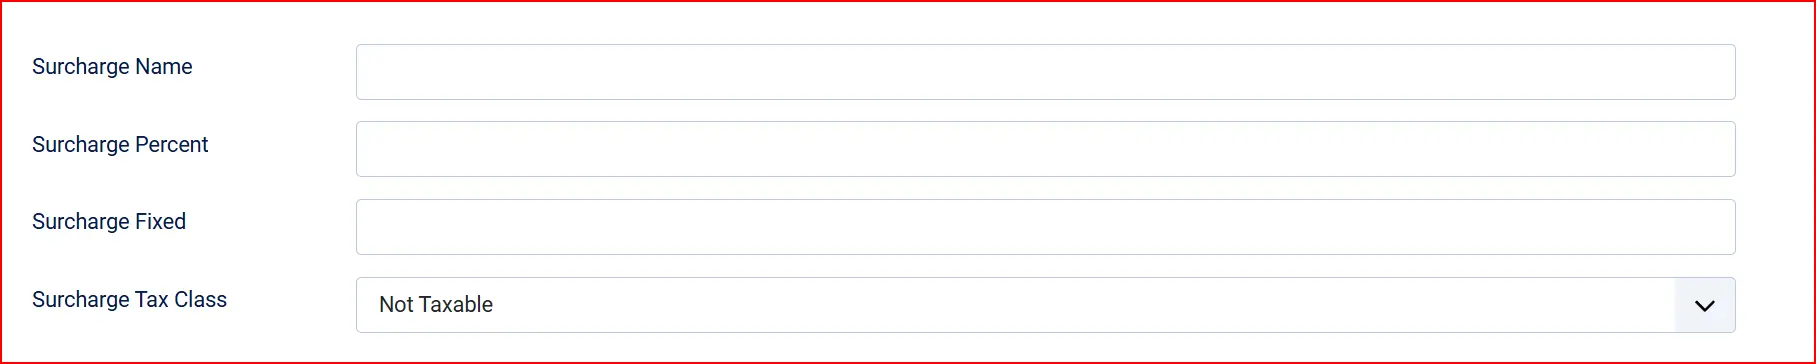
Add a surcharge to cover payment processing costs. Leave all fields at zero if you do not want to charge a surcharge.
Surcharge Name: Label shown to shoppers for the surcharge line item
Surcharge Percent: Percentage of the order total added as a surcharge (e.g. 2.5 for 2.5%)
Surcharge Fixed Amount: Flat amount added per order regardless of total
Surcharge Tax Class: Tax class applied to the surcharge amount
Restrictions (Optional)

Restrict when Clover Payment appears at checkout.
Geo Zone Restriction: Limit the payment method to customers in a specific geo zone
Minimum Subtotal: Hide Clover Payment when the cart total is below this amount (leave at 0 for no minimum)
Maximum Subtotal: Hide Clover Payment when the cart total exceeds this amount (leave at 0 for no maximum)
Custom Checkout Messages
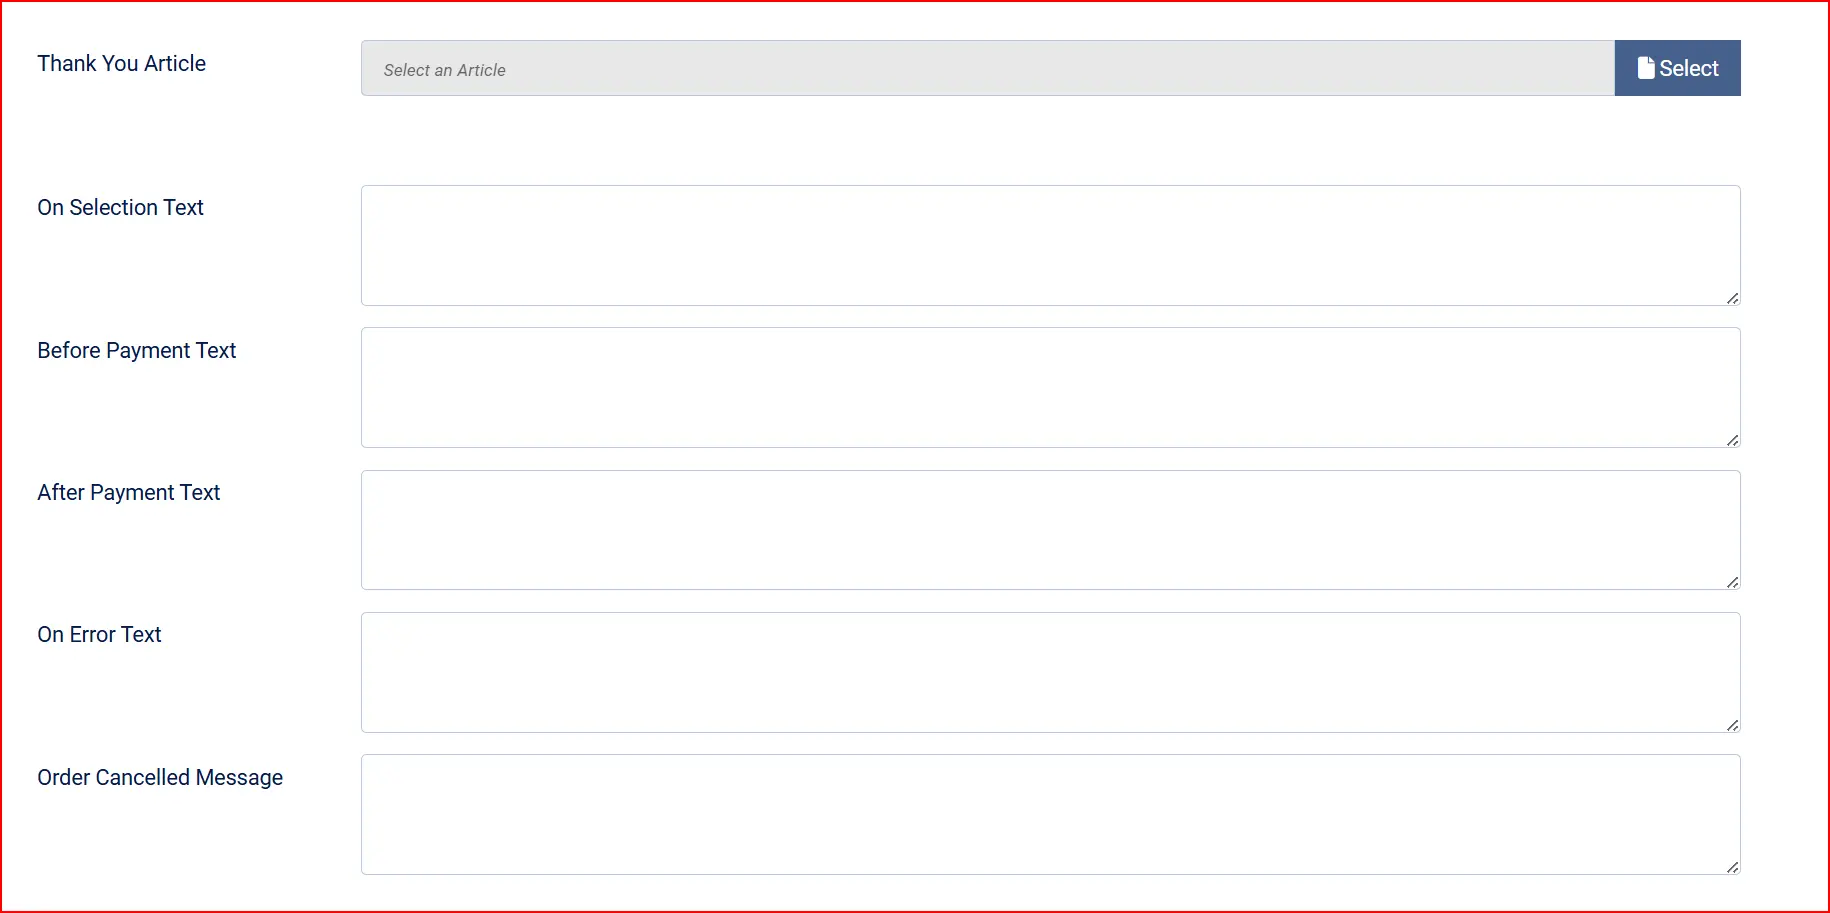
Thank You Message: Select a Joomla article to display as the confirmation message after payment
On Selection: Message displayed when the shopper selects Clover Payment at checkout
Before Payment: Message displayed just before the payment form
After Payment: Message displayed after a successful payment
On Error: Message displayed when a payment error occurs
Order Cancel: Message displayed when a shopper cancels
Extra Settings

Show Dashboard Icon: Display a shortcut icon on the J2Commerce dashboard
- Icon Label: Custom label for the dashboard icon
Debug Logging: Log detailed request and response data for troubleshooting. Turn off after debugging
How It Works
When a shopper reaches checkout and selects Clover Payment:
Iframe mode: A secure card form loads directly on your checkout page. Card details are tokenized in the browser and sent to Clover — your server never sees raw card numbers.
Hosted Checkout mode: The shopper is redirected to a Clover-hosted payment page. After paying, they are returned to your store.
In both modes, Clover sends a webhook notification to confirm the payment. J2Commerce updates the order status when the webhook arrives, so orders stay accurate even if a shopper closes their browser before the confirmation page loads.
If you choose Authorize only, the card is reserved but not charged at checkout. You capture the funds manually from the order view when you are ready to fulfill the order.
Managing Payments from the Order
Once an order has been paid through Clover, you can manage it from the order view in J2Commerce -> Sales -> Orders. Depending on the payment's current state, you may see buttons to:
- Capture Payment — charge a payment that was only authorized (Authorize only mode).
- Void Authorization — cancel an authorized payment before it settles.
- Refund — return money to the customer after settlement. You can issue a full or partial refund.
- Charge Saved Card — bill a card the customer saved previously, for manual renewals or recovery charges.
The available actions depend on where the payment is in its lifecycle. An authorized payment can be captured or voided. A settled payment can be refunded but not voided.
Tips
- Test in sandbox first — Set Sandbox Mode to Yes, enter your sandbox credentials, and place a test order before going live.
- Set up the webhook before going live — Without the webhook, orders may stay in Pending status even after the shopper pays successfully.
- Use Authorize only for pre-orders — Authorize the card at purchase and capture funds only when the item ships.
- Enable saved cards for subscriptions — If you sell subscription products, saved cards allow automatic renewal charges.
- Turn off Debug Logging after troubleshooting to keep your log files manageable.
Troubleshooting
Clover Payment Does Not Appear at Checkout
Cause: The plugin is disabled, or an availability rule is filtering it out.
Solution:
- Go to J2Commerce -> Setup -> Payment Methods and confirm Clover Payment shows a green checkmark.
- Open the Clover settings and check Minimum Subtotal, Maximum Subtotal, and Geo Zone Restriction — the cart may fall outside these limits.
- Confirm the customer's location matches any geo zone you have set.
Payment Fails or Is Declined
Cause: Incorrect API credentials, or sandbox keys used on a live store (or the reverse).
Solution:
- Open the Clover settings and confirm Sandbox Mode matches your environment (Yes for testing, No for live).
- Re-copy the Merchant ID, Public Key, Private Key, and Webhook Secret from your Clover dashboard for the matching environment.
- Save and place a new test order.
Order Stays Pending After a Successful Payment
Cause: The webhook URL is not registered in Clover, so your store does not receive the payment confirmation.
Solution:
- Open the Clover settings and copy the Webhook URL for your environment (live or sandbox).
- In your Clover Developer Dashboard, go to Webhooks and add that URL as an endpoint.
- Confirm the Webhook Secret in the plugin matches the secret shown in your Clover dashboard.
Cannot Save or Reuse a Card
Cause: Allow Saved Cards is turned off, or the customer is not logged in.
Solution:
- Open the Clover settings and set Allow Saved Cards to Yes, then click Save.
- Confirm the customer has a Joomla account and is logged in at checkout — saved cards are only available to registered customers.
Need More Detail to Diagnose a Problem
Cause: You need to see what Clover is returning for a failing request.
Solution:
- Open the Clover settings and set Debug Logging to Yes.
- Reproduce the problem with a test order.
- Check the
payment_clover.phplog file in your site's log folder. - Turn Debug Logging back to No when you are finished.