Bank Transfer Payment
The Bank Transfer plugin lets your customers pay by transferring money directly to your bank account. During checkout, customers see your bank account details, place their order, and then complete the transfer through their own bank. You confirm receipt of the payment manually, and J2Commerce updates the order status automatically.
This is an offline payment method — no payment gateway or API credentials are needed. It is ideal for stores that prefer direct bank payments, operate in regions where online payment gateways are limited, or want to avoid transaction fees.
Requirements
- PHP 8.3.0+
- Joomla! 6.x
- J2Commerce 6.x
Enable the Plugin
This plugin ships with J2Commerce 6 and is available immediately after installation. Because it requires your bank details before it can be used, it is not enabled automatically.
There are three ways you can access the plugin.
Option A: Go to the J2Commerce icon at the top right corner -> Setup -> Payment Methods
Option B: Go to Components on the left sidebar -> J2Commerce -> Dashboard -> Setup -> Payment Methods
Option C: Go to Settings on the left sidebar -> Manage -> Plugins
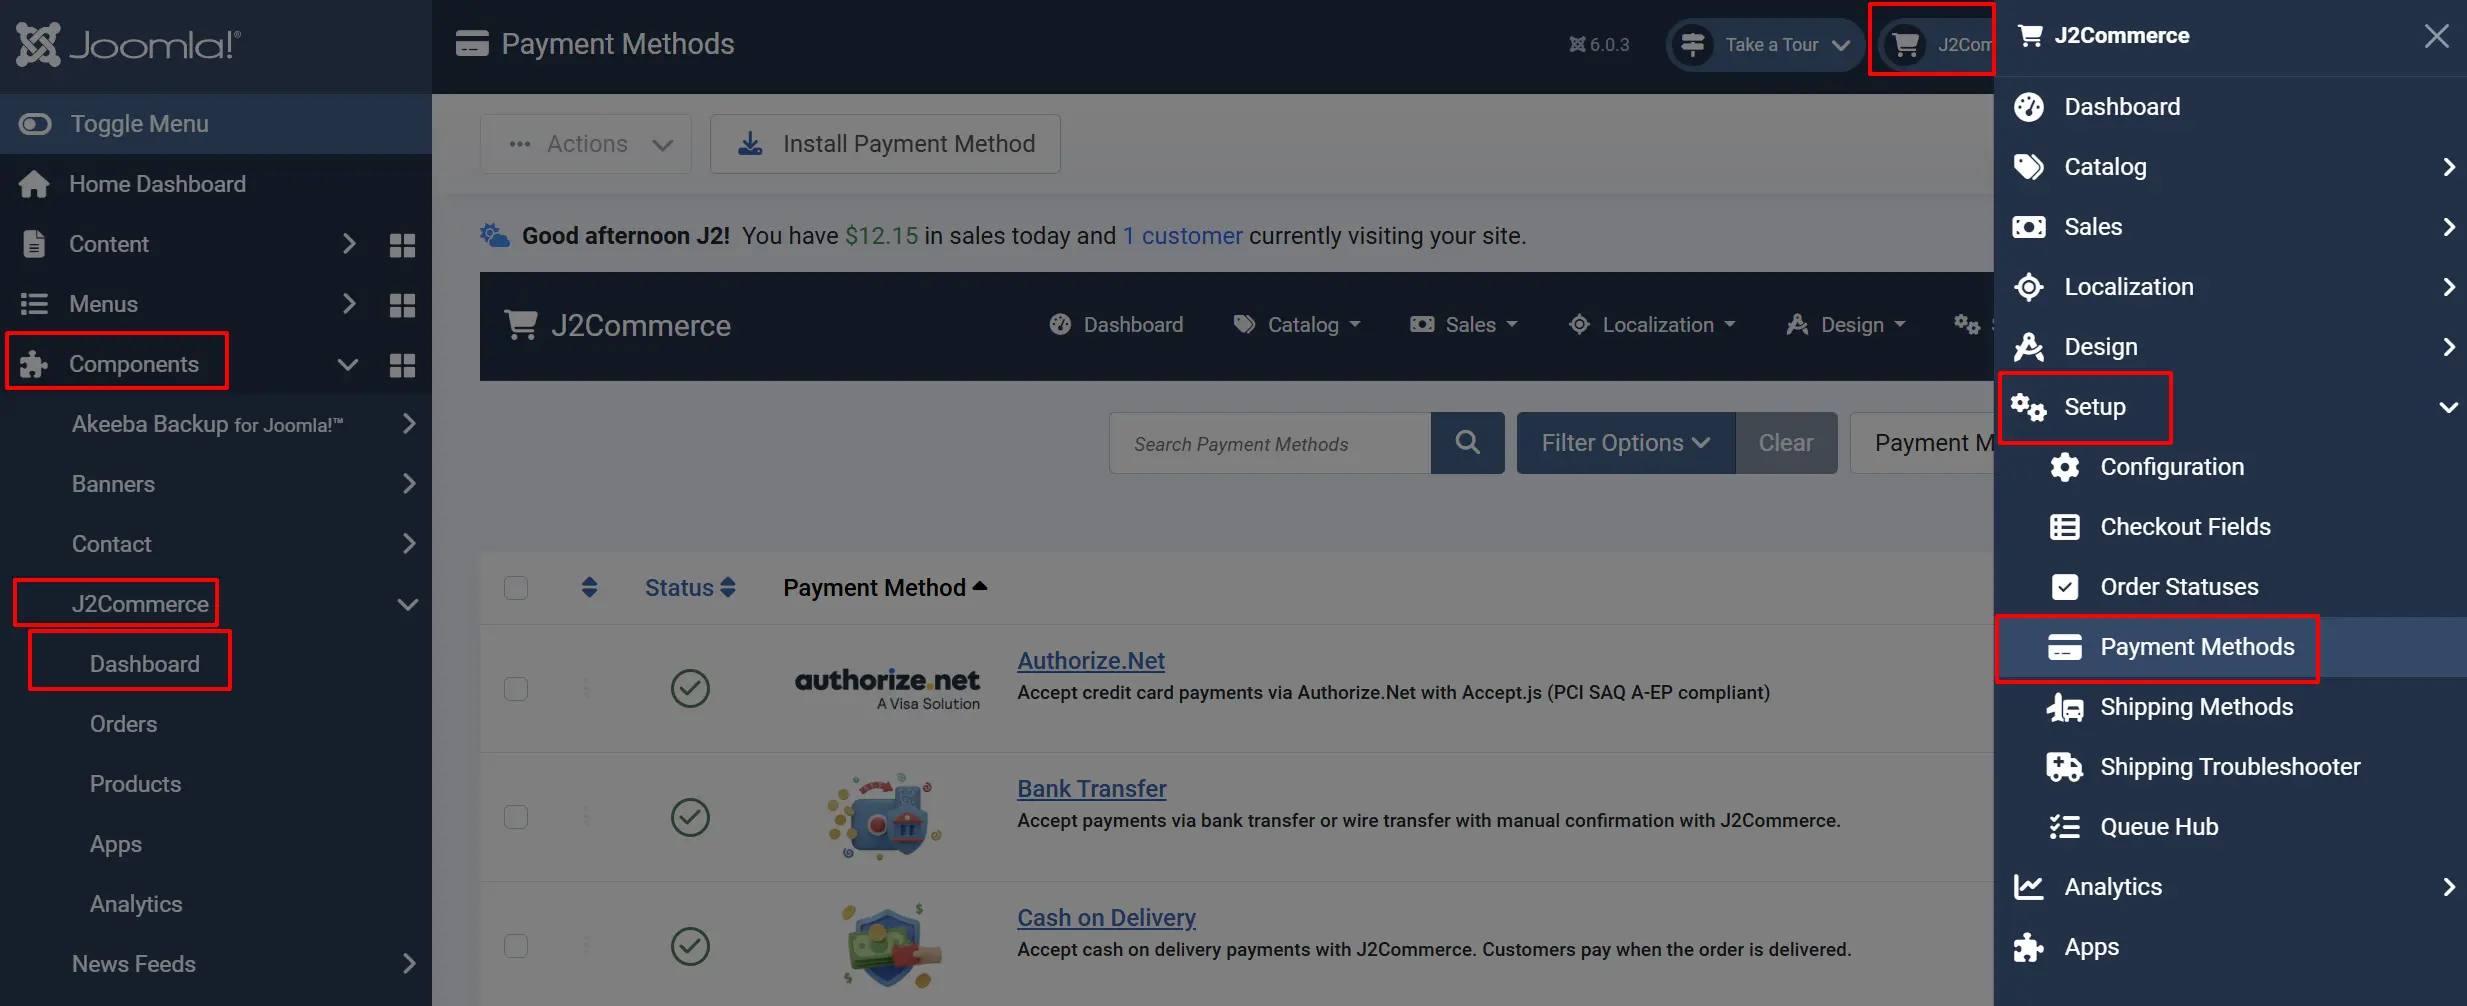
Look for Bank Transfer, click the X, and it will turn into a green checkmark. It is now enabled and ready for setup.
Configuration
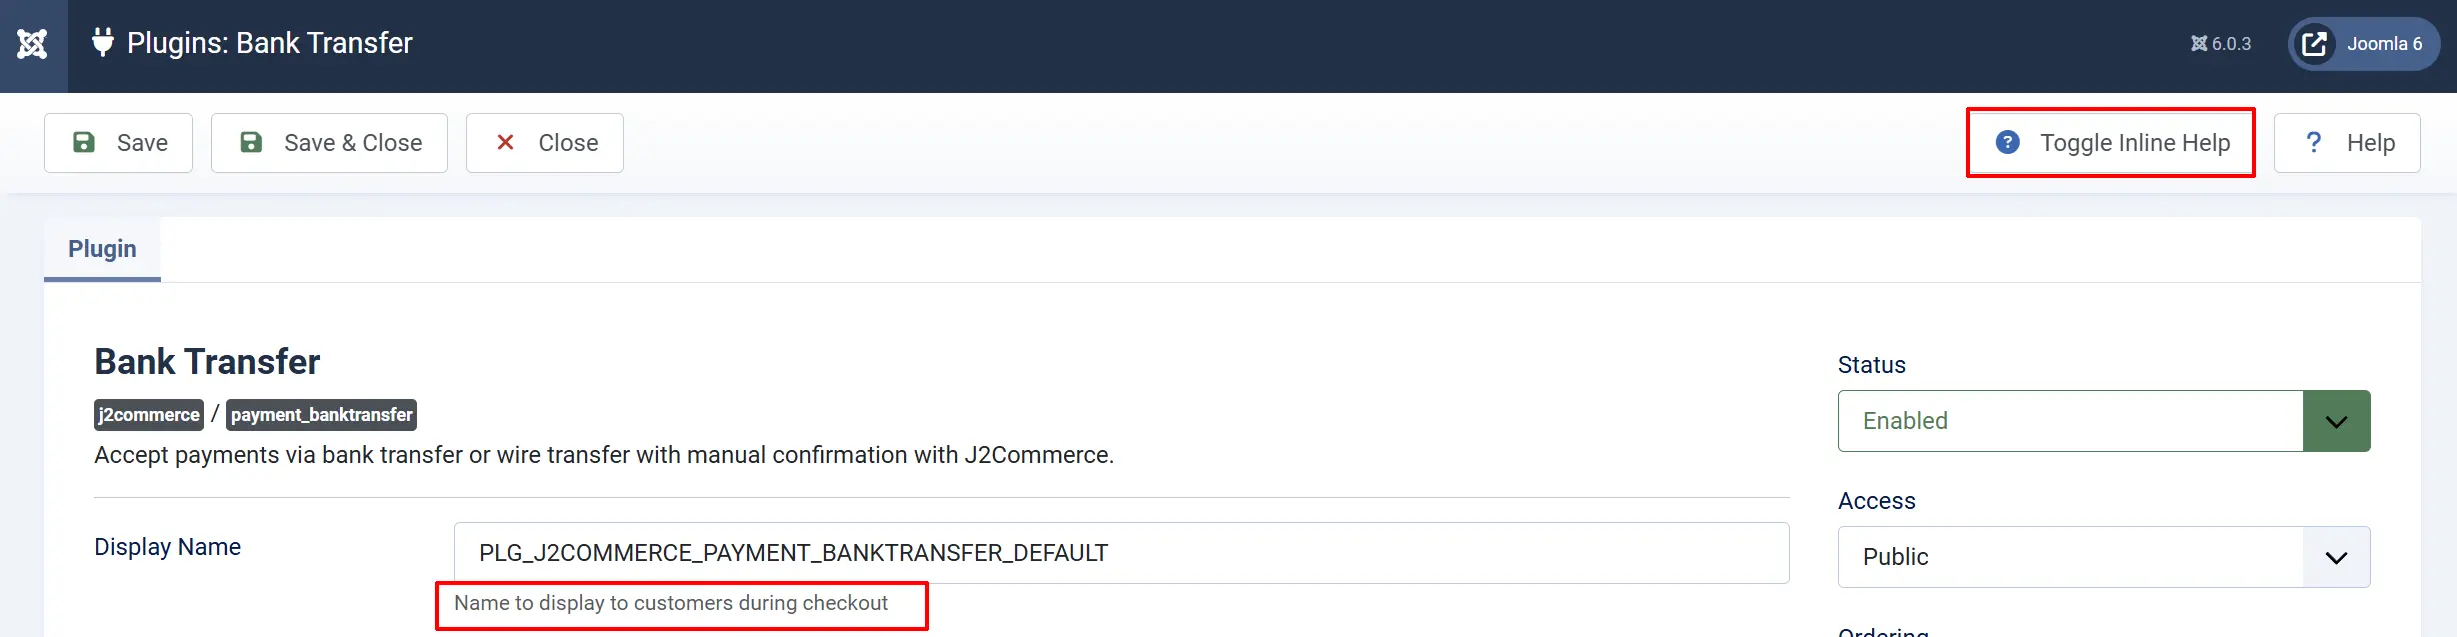
After enabling the plugin, click the Bank Transfer title to open the settings.
Tip: Click on the Toggle Inline Help button on any app/plugin you install and it will show a description below each section. See image below
Display Settings
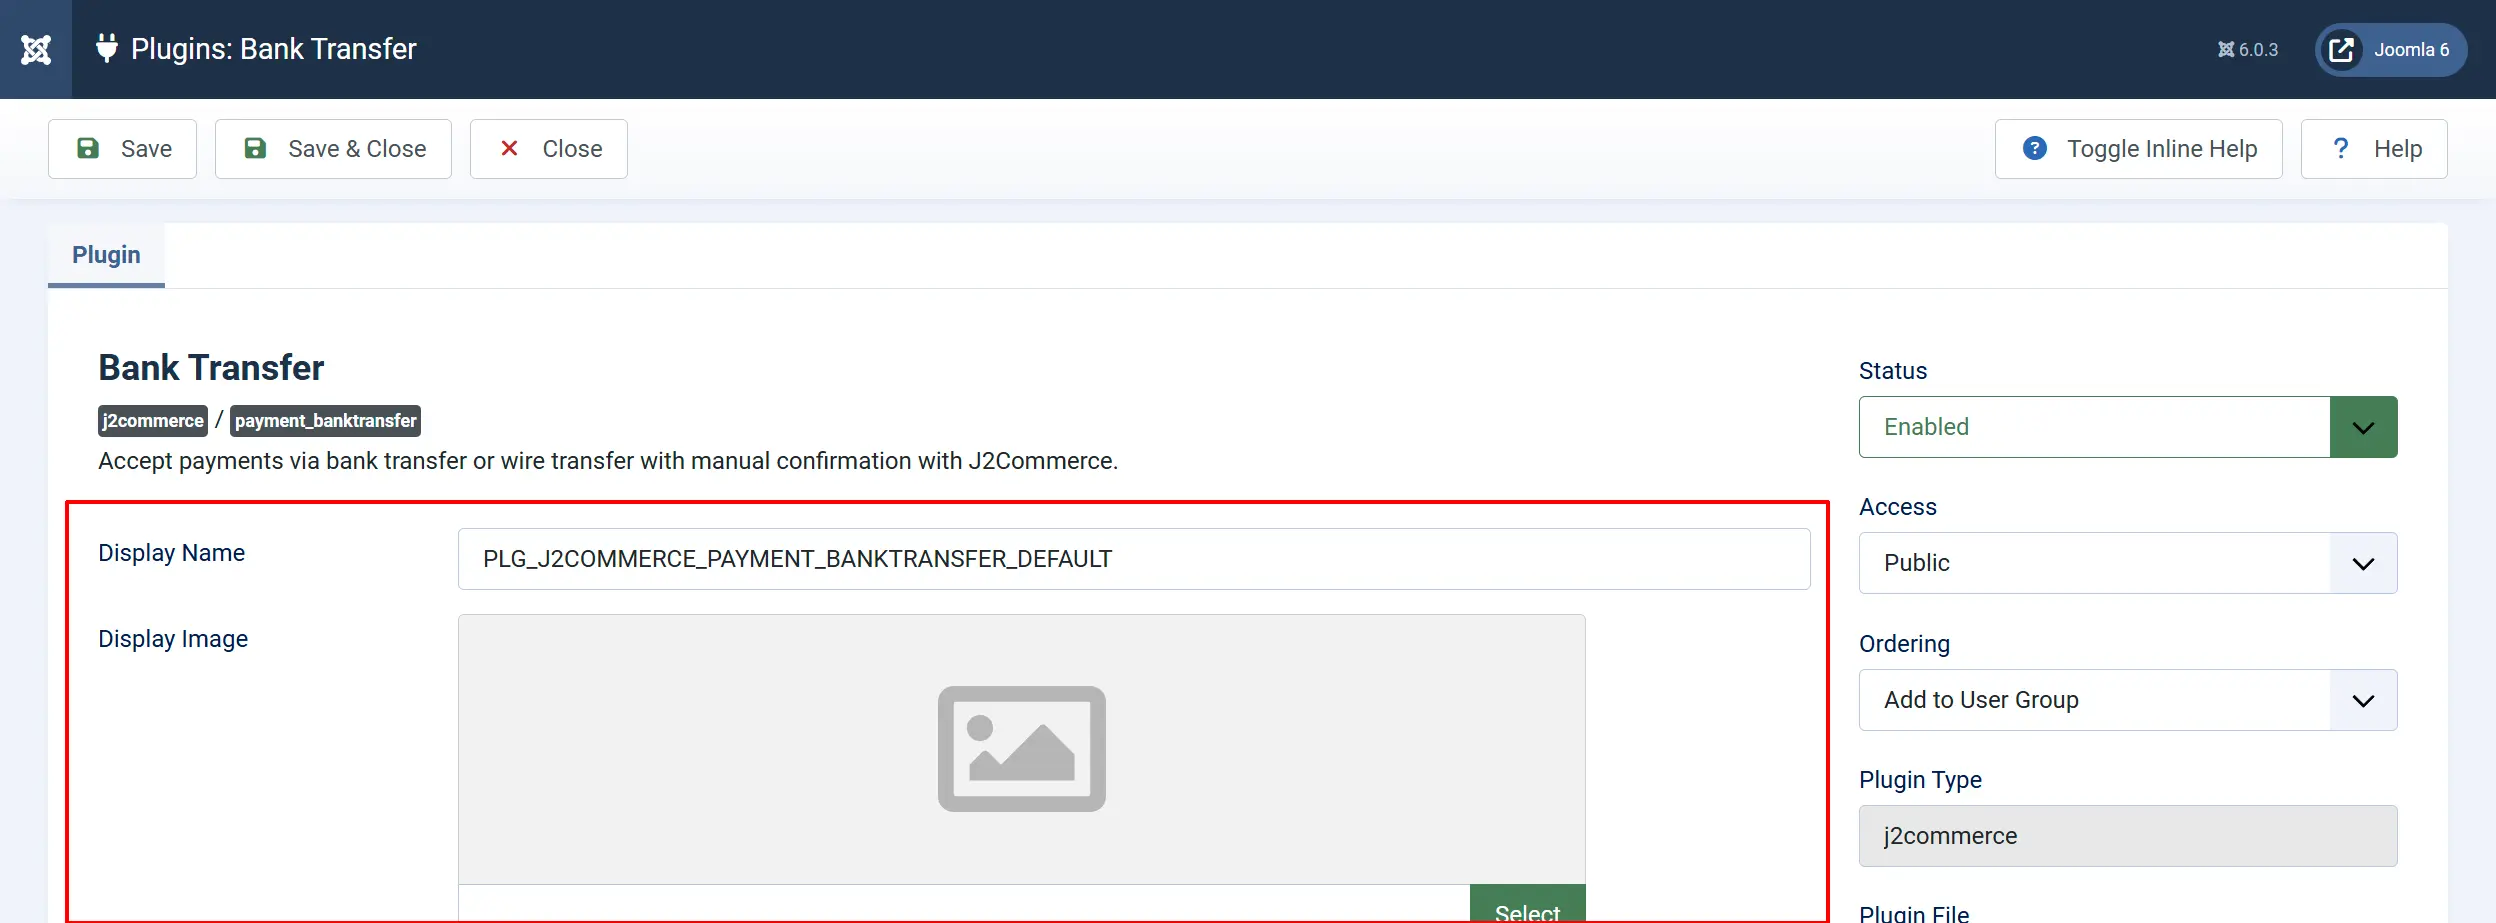
Display Name: The label shown to customers at checkout (e.g., "Bank Transfer", "Wire Transfer", or "Direct Bank Payment").
Display Image: Optional logo or image shown next to the payment option at checkout. Upload a bank or payment icon to help customers recognise the method.
Bank Details

This is the most important field. Enter the bank account information your customers need to complete the transfer.
Bank Details: Your bank account details displayed to customers during checkout. Include everything they need: bank name, account holder name, account number or IBAN, routing number or SWIFT/BIC code, and any reference instructions.
Strip HTML Tags: When set to Yes, removes HTML formatting from the bank details and converts line breaks to plain text. Useful if you want a clean, unformatted display.
Example bank details:
Bank Name: First National Bank
Account Holder: Your Store Name LLC
IBAN: GB29 NWBK 6016 1331 9268 19
SWIFT/BIC: NWBKGB2L
Reference: Please use your Order Number as the payment reference.
Always include a note asking customers to use their order number as the payment reference. This makes it much easier to match incoming transfers to the correct orders.
Order Status
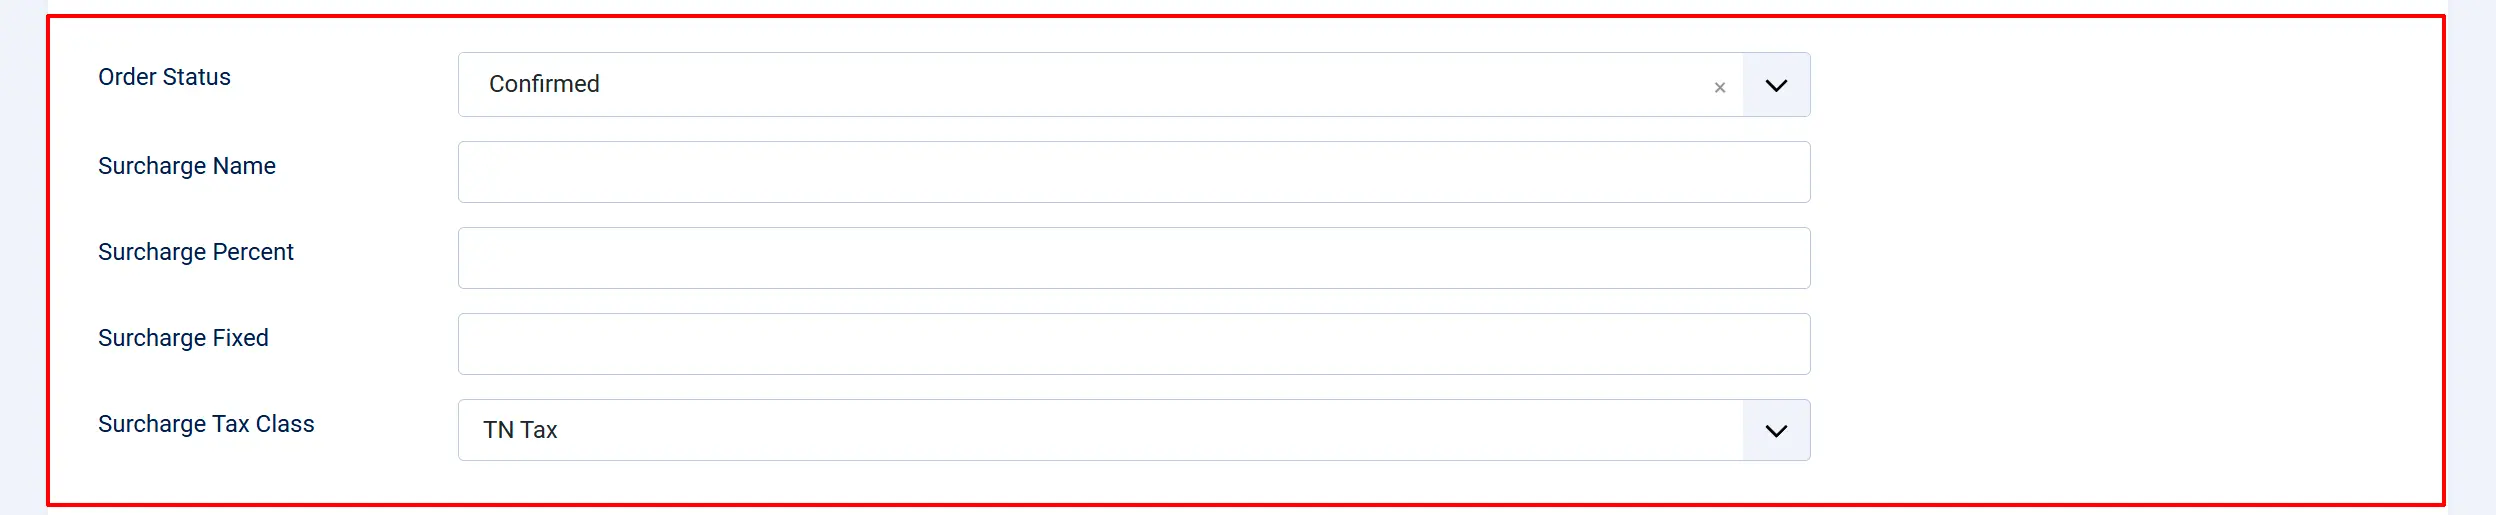
Order Status: The order status set after payment is confirmed. Choose the status that best represents a confirmed but not-yet-shipped order (e.g., "Confirmed" or "Processing").
Surcharge Settings
Add an optional fee to orders that use bank transfer. This can cover administrative costs or encourage other payment methods.
Surcharge Name: Label shown to the customer for the surcharge (e.g., "Bank Transfer Fee").
Surcharge Percent: Percentage fee applied to the order total (subtotal + shipping + tax). Enter a number without the % sign.
Surcharge Fixed: Flat fee added to the order regardless of total. Can be combined with a percentage surcharge.
Surcharge Tax Class: If your surcharge is taxable, select the tax profile to apply. Leave empty for no tax on the surcharge.
Leave all surcharge fields empty if you do not want to charge a fee. Most stores do not add a surcharge for bank transfers.
NOTE: If the status you want isn't listed in the dropdown menu, you can create a new one by going to J2Commerce -> Setup -> Order Statuses

Restrictions

Geozone Restriction:
Limit this payment method to customers in specific geographic zones. Only customers whose billing address falls within the selected geozone will see Bank Transfer as a payment option. Leave it empty to make it available to all customers.
Custom Messages
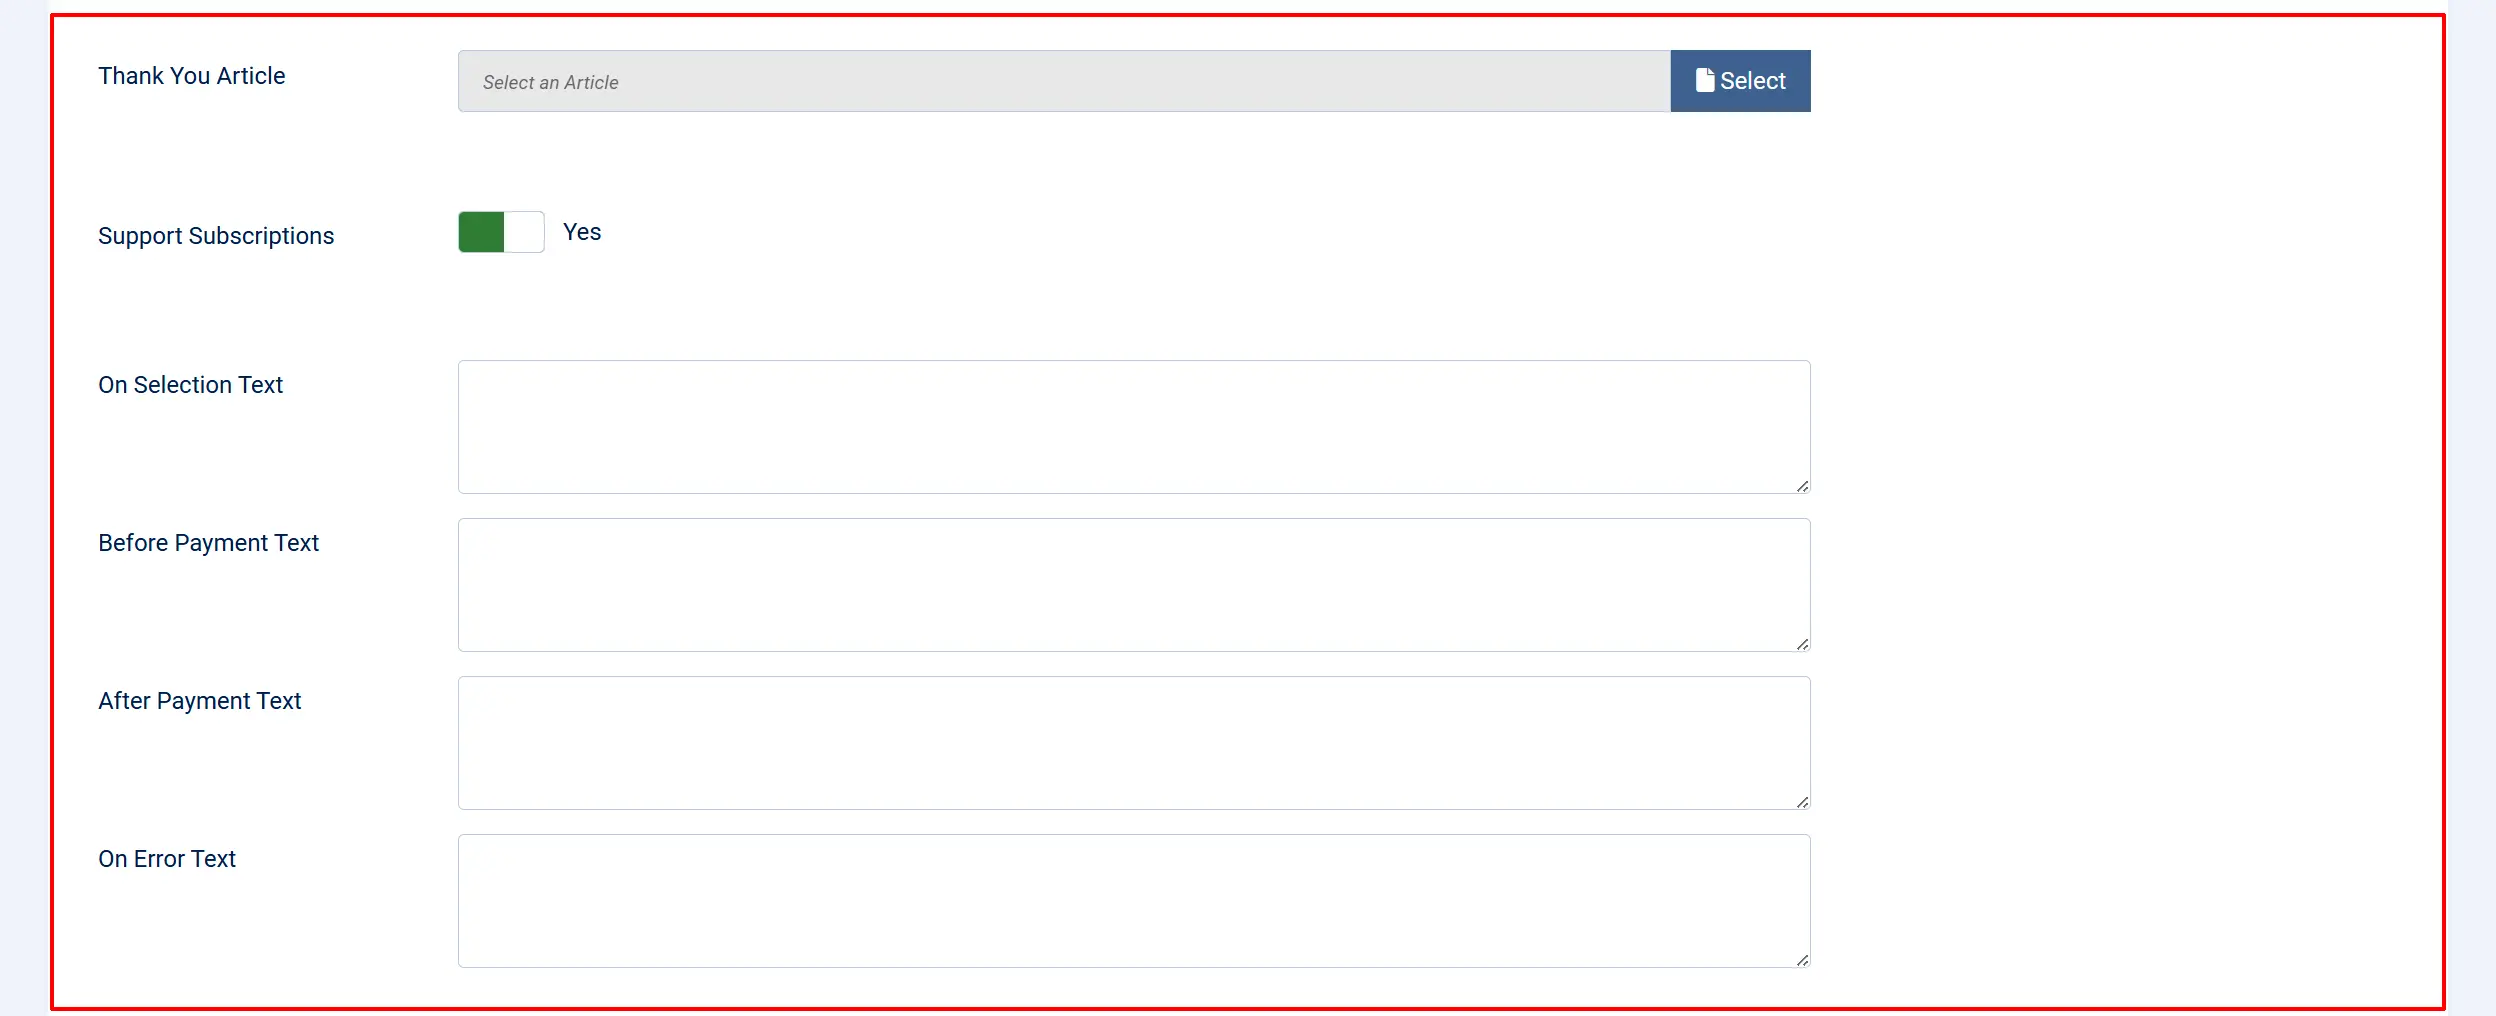
These fields let you add custom text at different stages of the checkout process. All fields support HTML.
Thank You Article: Select a Joomla article to display on the order confirmation page after checkout. Use this for detailed payment instructions, estimated processing times, or return policies.
Support Subscription: Enable this if you sell subscription products and want to allow bank transfer as a payment option for subscriptions. Renewal payments require manual confirmation each time.
On Selection: Text displayed when the customer selects Bank Transfer as their payment method. Use this to briefly explain what will happen next.
Before Payment: Text displayed on the payment confirmation page, alongside your bank details. Use this for instructions like "Please transfer the total amount to the account below."
After Payment: Text displayed after the customer confirms their order. Use this for a thank-you message and next steps, such as "We will process your order once we receive your transfer."
On Error: Text displayed if something goes wrong during payment processing. Leave empty to use the default error message.
Additional Settings

Button Text: The text on the confirmation button at checkout (e.g., "Place Order" or "Confirm Order").
Template Style: Override the default payment templates with a custom sub-template from your Joomla template. For advanced users only.
How It Works
Here is what happens when a customer chooses Bank Transfer at checkout:
1. Customer selects Bank Transfer
During checkout, the customer sees "Bank Transfer" (or your custom display name) as a payment option. If you added text in the On Selection field, it appears here.
2. Customer reviews bank details
On the payment confirmation page, your bank account details are displayed along with any text from the Before Payment field. The customer reviews the information and clicks the Place Order button.
3. Order is placed
J2Commerce creates the order and sets the status to the value you configured in Order Status. The customer sees your After Payment message and any content from the Thank You Article.
4. Customer transfers the money
The customer logs into their own bank and transfers the order total to your account, using the order number as a reference.
5. You confirm payment
When you see the transfer in your bank account, open the order in J2Commerce -> Sales -> Orders, verify the amount, and update the order status to reflect that payment has been received (e.g., change it to "Confirmed" or "Processed"). J2Commerce records this status change in the order history.
Tips
- Include clear payment instructions. In the Before Payment field, tell customers exactly what to do: "Transfer the total amount shown below to our bank account. Use your order number as the payment reference."
- Use the Thank You Article for detailed instructions. Create a Joomla article with step-by-step transfer instructions, expected processing times, and your customer service contact details. Link it in the Thank You Article field.
- Ask for the order number as a reference. This is the single most important instruction. Without it, matching transfers to orders is time-consuming.
- Check your bank details carefully. A wrong digit in the IBAN or account number means customers send money to the wrong place. Double-check everything before going live.
- Set a reasonable order status. Use a status like "Pending" or "Awaiting Payment" so you can easily filter orders that are waiting for bank transfers in your order list.
- Consider geographic restrictions. Bank transfers are common in Europe (especially Germany, Netherlands, and Austria) but less common in other regions. Use the Geozone Restriction to show this payment method only where it makes sense.
Troubleshooting
Bank Transfer does not appear at checkout
Cause: The plugin is disabled or the customer's billing address is outside the allowed geozone.
Solution:
- Go to J2Commerce -> Setup -> Payment Methods and verify that Bank Transfer shows a green checkmark (enabled).
- If you set a Geozone Restriction, verify that the customer's billing country and zone are included in that geozone. Go to J2Commerce -> Localisation -> Geozones to check.
- Clear your site cache at Home Dashboard -> System -> Clear Cache.
Bank details are not displayed during checkout
Cause: The Bank Details field is empty.
Solution:
- Go to J2Commerce -> Setup -> Payment Methods and click Bank Transfer.
- Enter your bank account details in the Bank Details field.
- Click Save & Close.
Bank details show raw HTML tags
Cause: HTML formatting is being displayed as text instead of being rendered.
Solution:
- Open the Bank Transfer settings.
- Set Strip HTML Tags to No if you want HTML formatting (bold text, line breaks, etc.) to render properly.
- If you want plain text only, set it to Yes and use simple line breaks in your bank details instead of HTML tags.
Customer did not include the order number as a reference
Cause: The payment instructions did not clearly ask for it, or the customer overlooked the instruction.
Solution:
- Update the Bank Details and Before Payment fields to prominently ask customers to include their order number.
- Contact the customer directly using the email address from their order to confirm which order the transfer belongs to.
- In the future, consider adding the instruction in bold:
<strong>IMPORTANT: Use your order number as the payment reference.</strong>
Order status does not update after confirming payment
Cause: Bank transfer is an offline payment method — J2Commerce cannot detect when money arrives in your bank account. You must update the status manually.
Solution:
- Go to J2Commerce -> Sales -> Orders.
- Open the order.
- Change the order status to the appropriate value (e.g., "Confirmed").
- Click Save.
The order history will record the status change with a timestamp.