Square Payment
The Square plugin lets your customers pay using credit and debit cards processed securely through Square's payment platform. Choose between two checkout experiences: Embedded Card Form (the card form loads directly on your checkout page) or Hosted Checkout (customers are redirected to a Square-hosted payment page). Both modes support refunds, webhooks for automatic order updates, and saved cards for returning customers.
Prerequisites
- J2Commerce is installed and active on your Joomla site
- A Square account (see the setup steps below)
- API credentials from the Square Developer Dashboard: Application ID, Access Token, and Location ID
Set Up a Square Account
If you already have a Square account and API credentials, skip ahead to Purchase and Download.
Create a Square Account
- Go to squareup.com and click Sign Up.
- Enter your email address and create a password.
- Complete the onboarding steps Square requires for your country.
Creating a Square account is free.
Get Your API Credentials
After your account is active:
- Log in to the Square Developer Dashboard.
- Click New Application (or open an existing application).
- On the application's Credentials tab you will find your Application ID and Access Token.
- To find your Location ID, go to the Locations tab.
- Copy all three values and keep them somewhere safe — you will paste them into the plugin settings.
Use Sandbox Credentials for Testing: The Square Developer Dashboard has a Sandbox tab alongside Production on the Credentials page. Use sandbox credentials while you are setting up — no real money is processed. Switch to production credentials only when you are ready to go live.
Purchase and Download
This plugin is a separate add-on available from the J2Commerce Extensions Store. It does not come with the core J2Commerce 6 component.
Step 1: Go to the J2Commerce website -> Payment Plugins
Step 2: Locate the Payment_Square plugin -> click View Details -> Add to Cart -> Checkout
Step 3: Go to your My Downloads under your profile button at the top right corner and search for the plugin. Click Available Versions -> View Files -> Download Now
Installing the Plugin
In the Joomla admin, go to System -> Install -> Extensions
Upload the plugin ZIP file or use the Install from URL option.

Enable the Plugin
Once installed, you need to enable it. There are two ways to reach the payment methods list.
Option A: Go to the J2Commerce icon at the top right corner -> Setup -> Payment Methods
Option B: Go to Components in the left sidebar -> J2Commerce -> Dashboard -> Setup -> Payment Methods
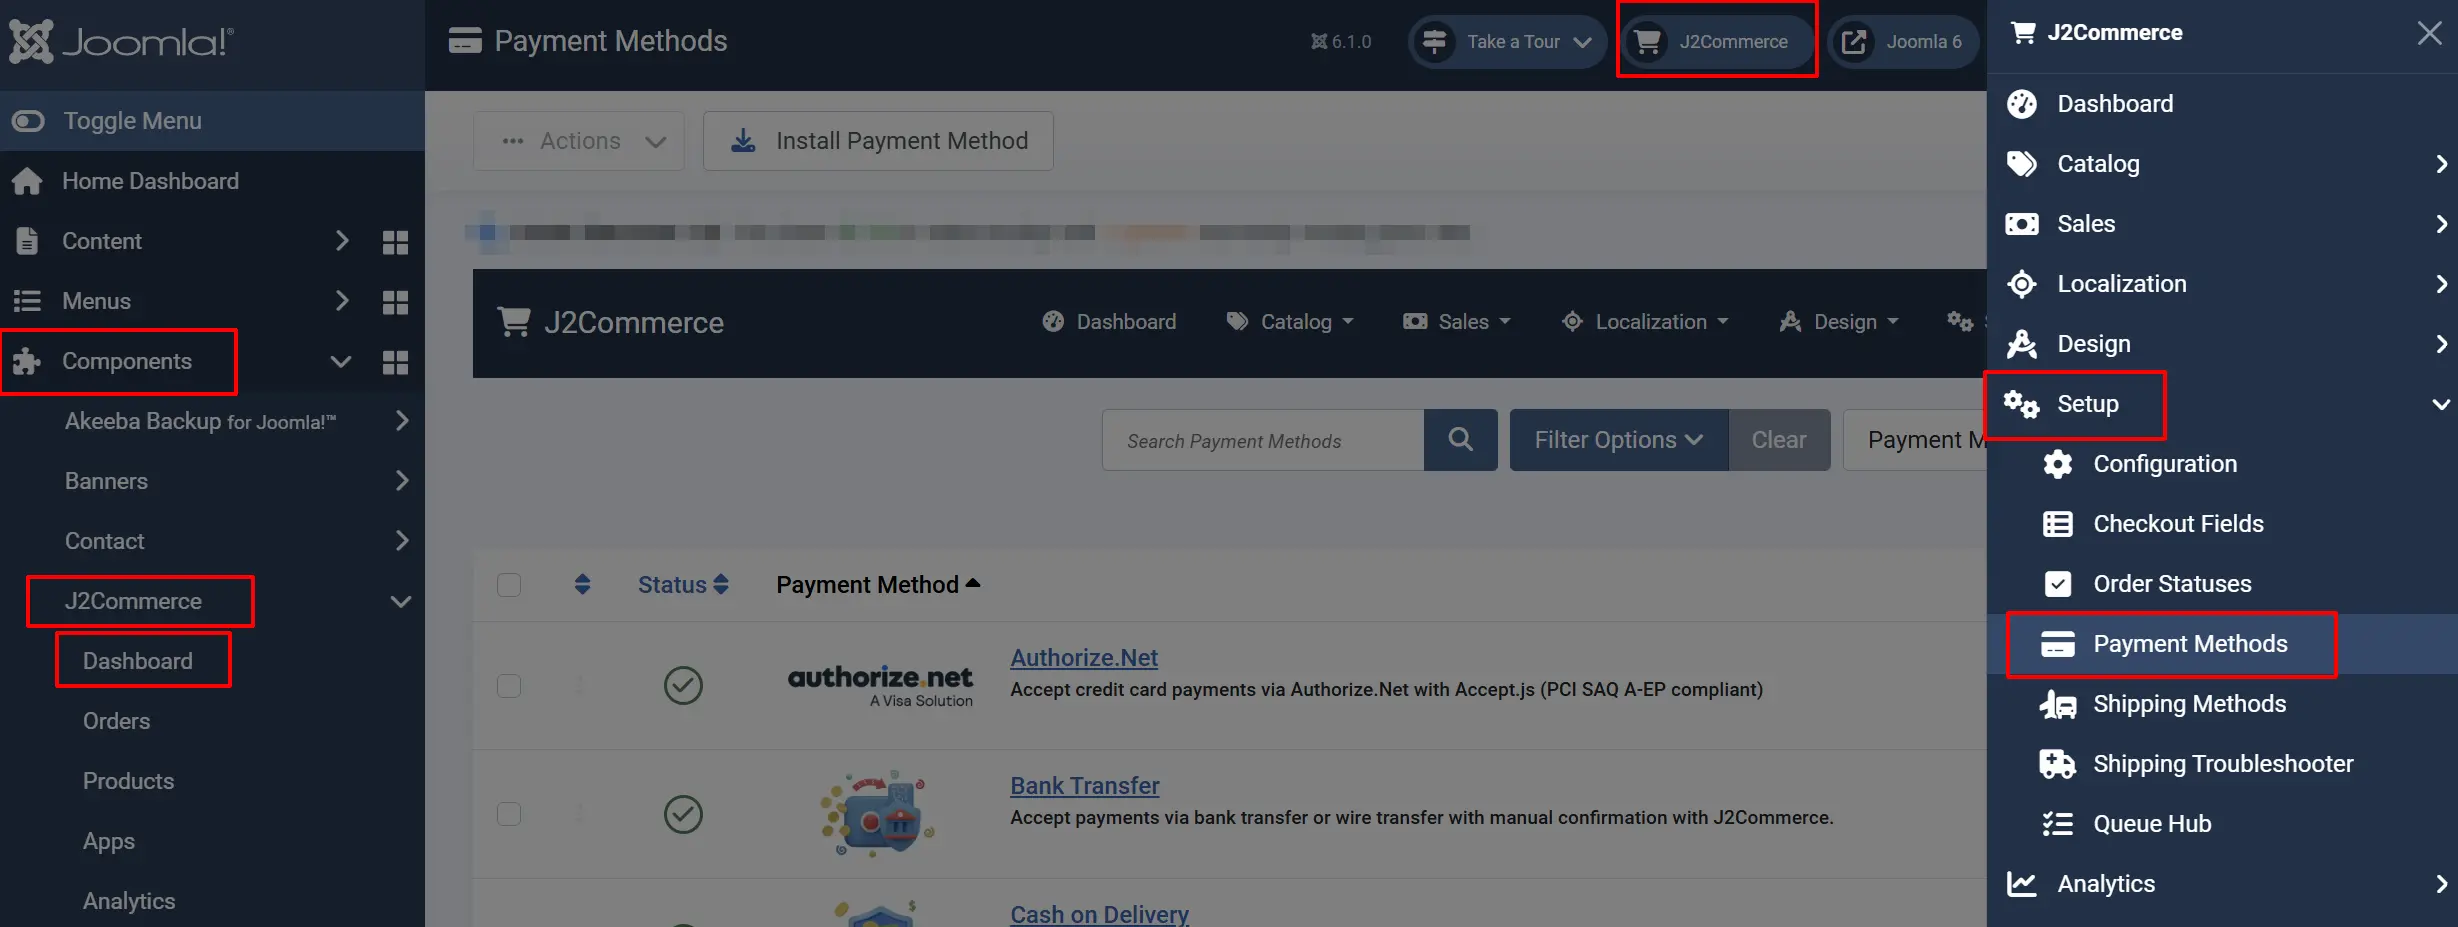
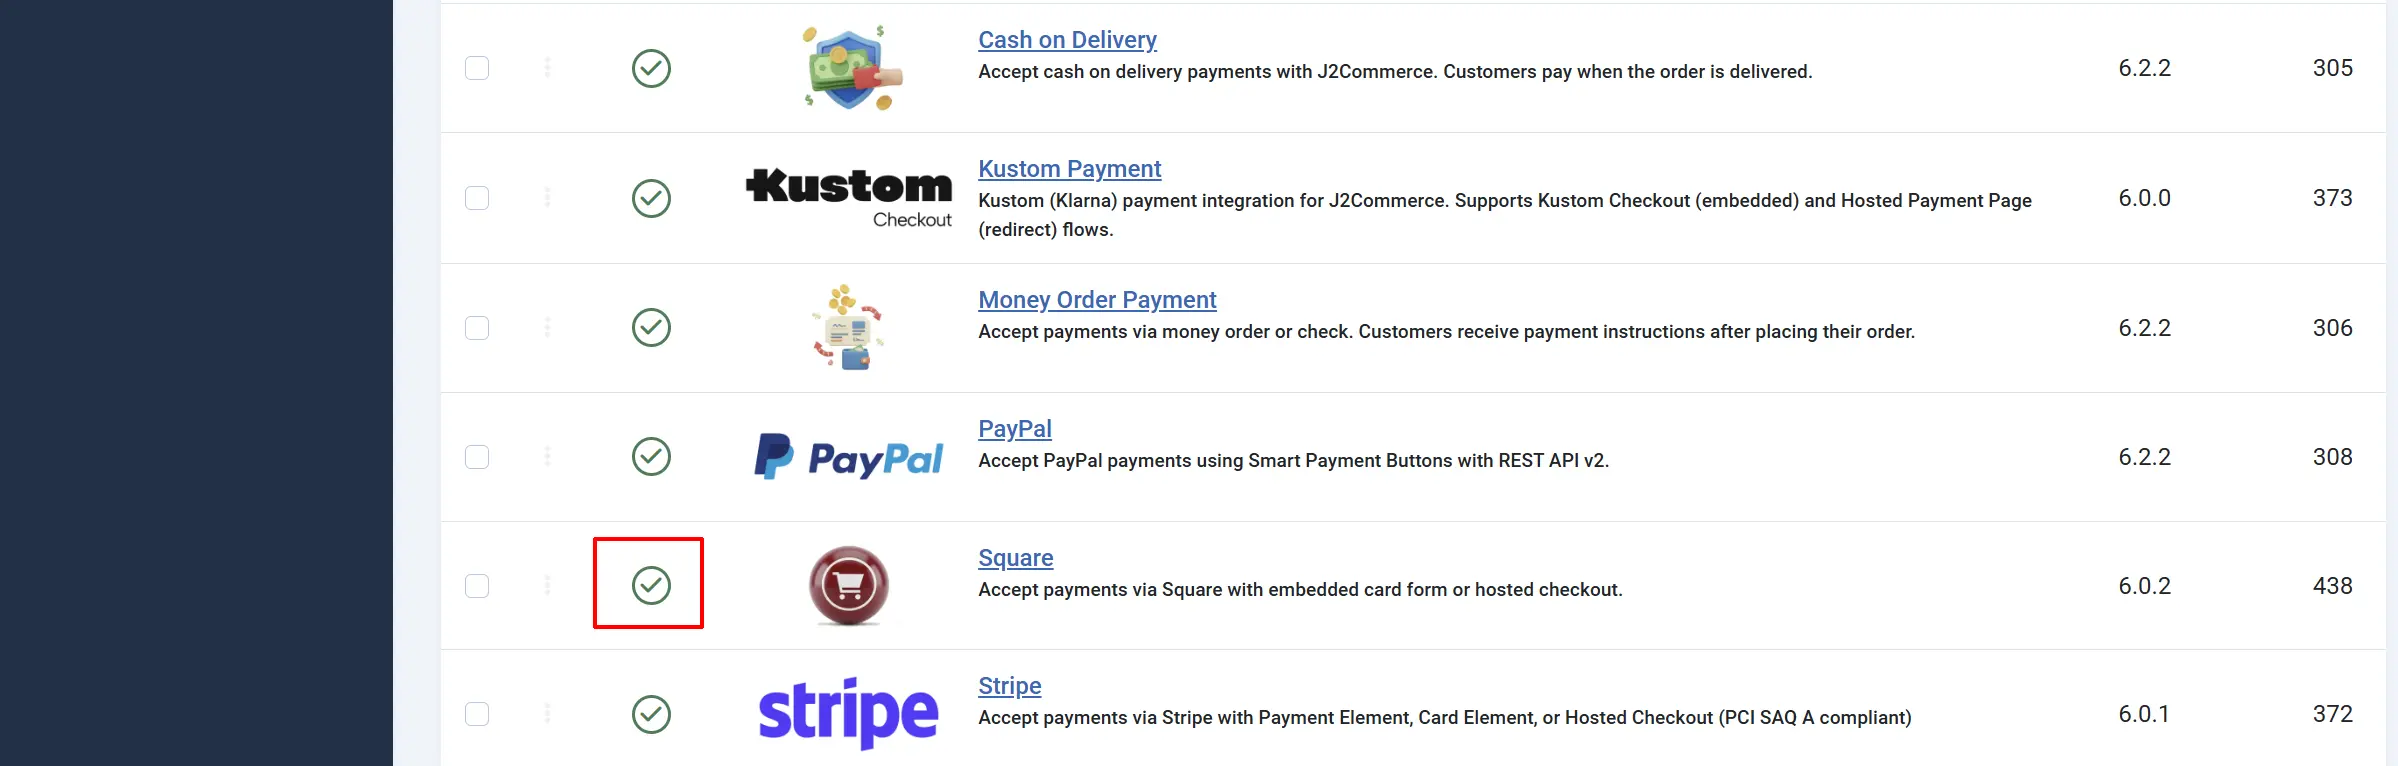
Find Square, click the X, and it turns into a green checkmark. Square is now enabled and ready for configuration.
Configuring the Plugin
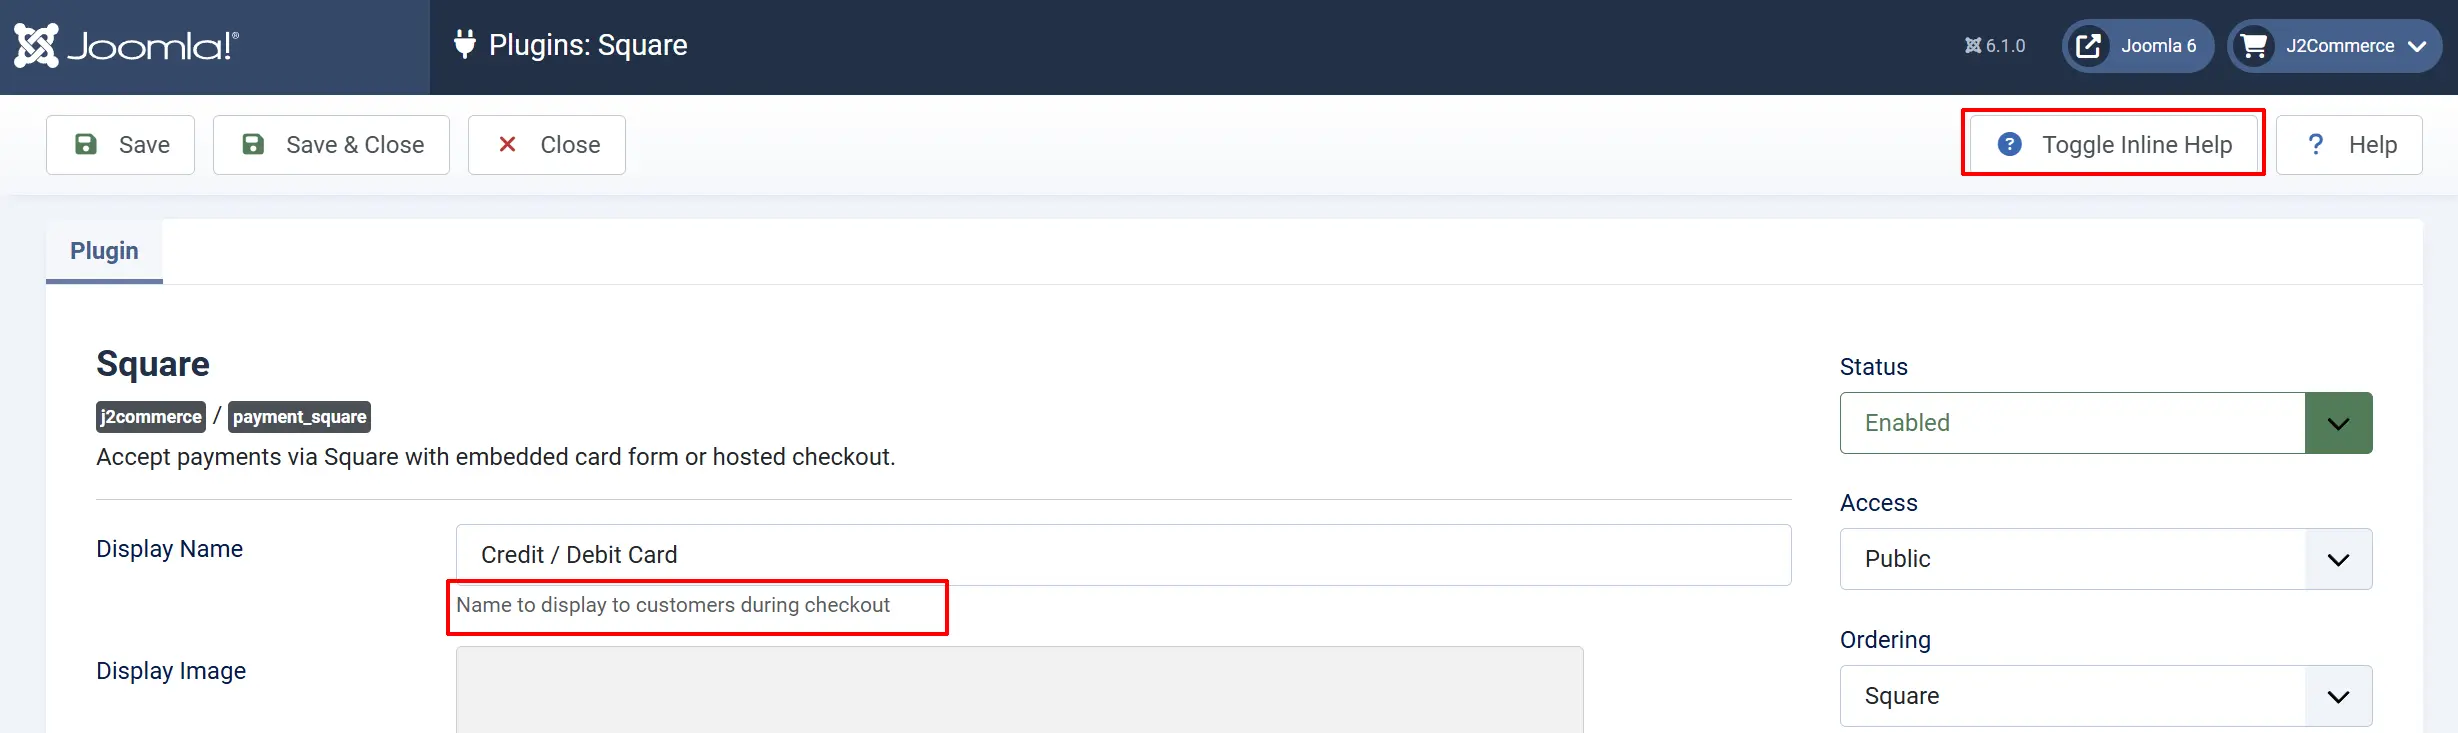
After enabling the plugin, click the Square title to open the settings.
Click the Toggle Inline Help button at the top of the plugin settings page to display a description below every field.
Display Settings tab

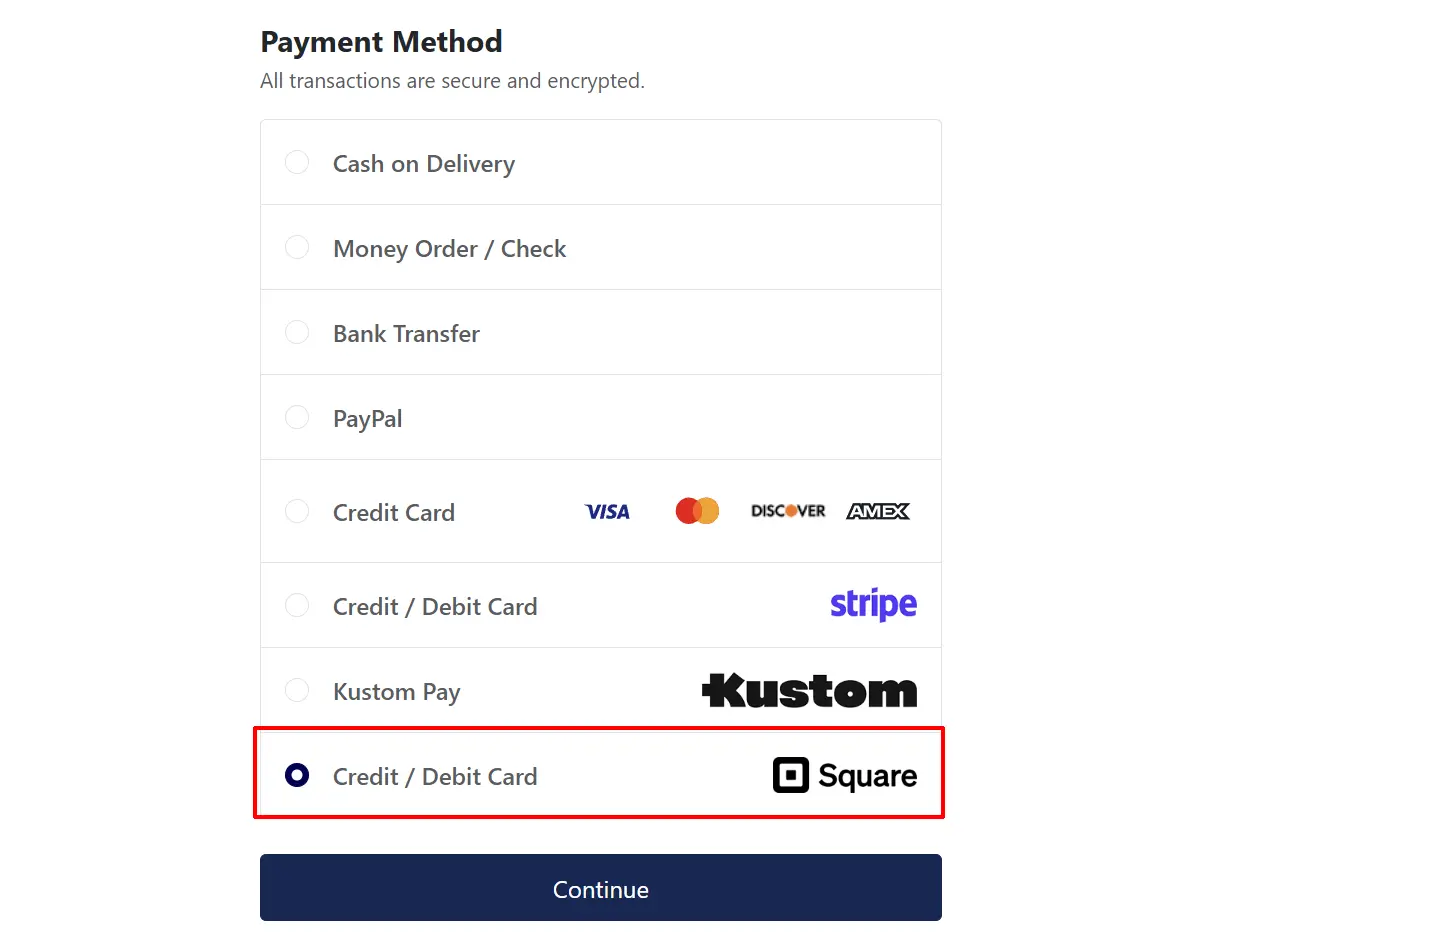
Display Name: The label shown to customers at checkout. Default is Credit / Debit Card.
Display Image: Optional logo shown next to the payment option at checkout. The plugin ships with the Square logo as its default image.
Checkout & Capture Mode

View the frontend examples of both Embedded and Hosted options towards the bottom of this document.
-
Checkout Mode: Choose how the payment form is presented to customers.
-
Embedded Card Form: The Square card input loads directly on your J2Commerce checkout page. Customers never leave your site. This is the recommended option. The card form loads directly on your checkout page
-
Hosted Checkout: Customers are redirected to a Square-hosted payment page. After completing payment, Square redirects them back to your confirmation page.
-
-
Capture Method: Choose when Square charges the customer's card.
-
Automatic: The card is charged immediately when the customer places the order. The order status updates to your configured paid status right away. Use this for most stores.
-
Manual (Authorize Only): The card is authorized but not charged. You must manually capture the payment from the J2Commerce order admin. Use this for backorders or when you need to verify stock before charging.
-
Sandbox Mode
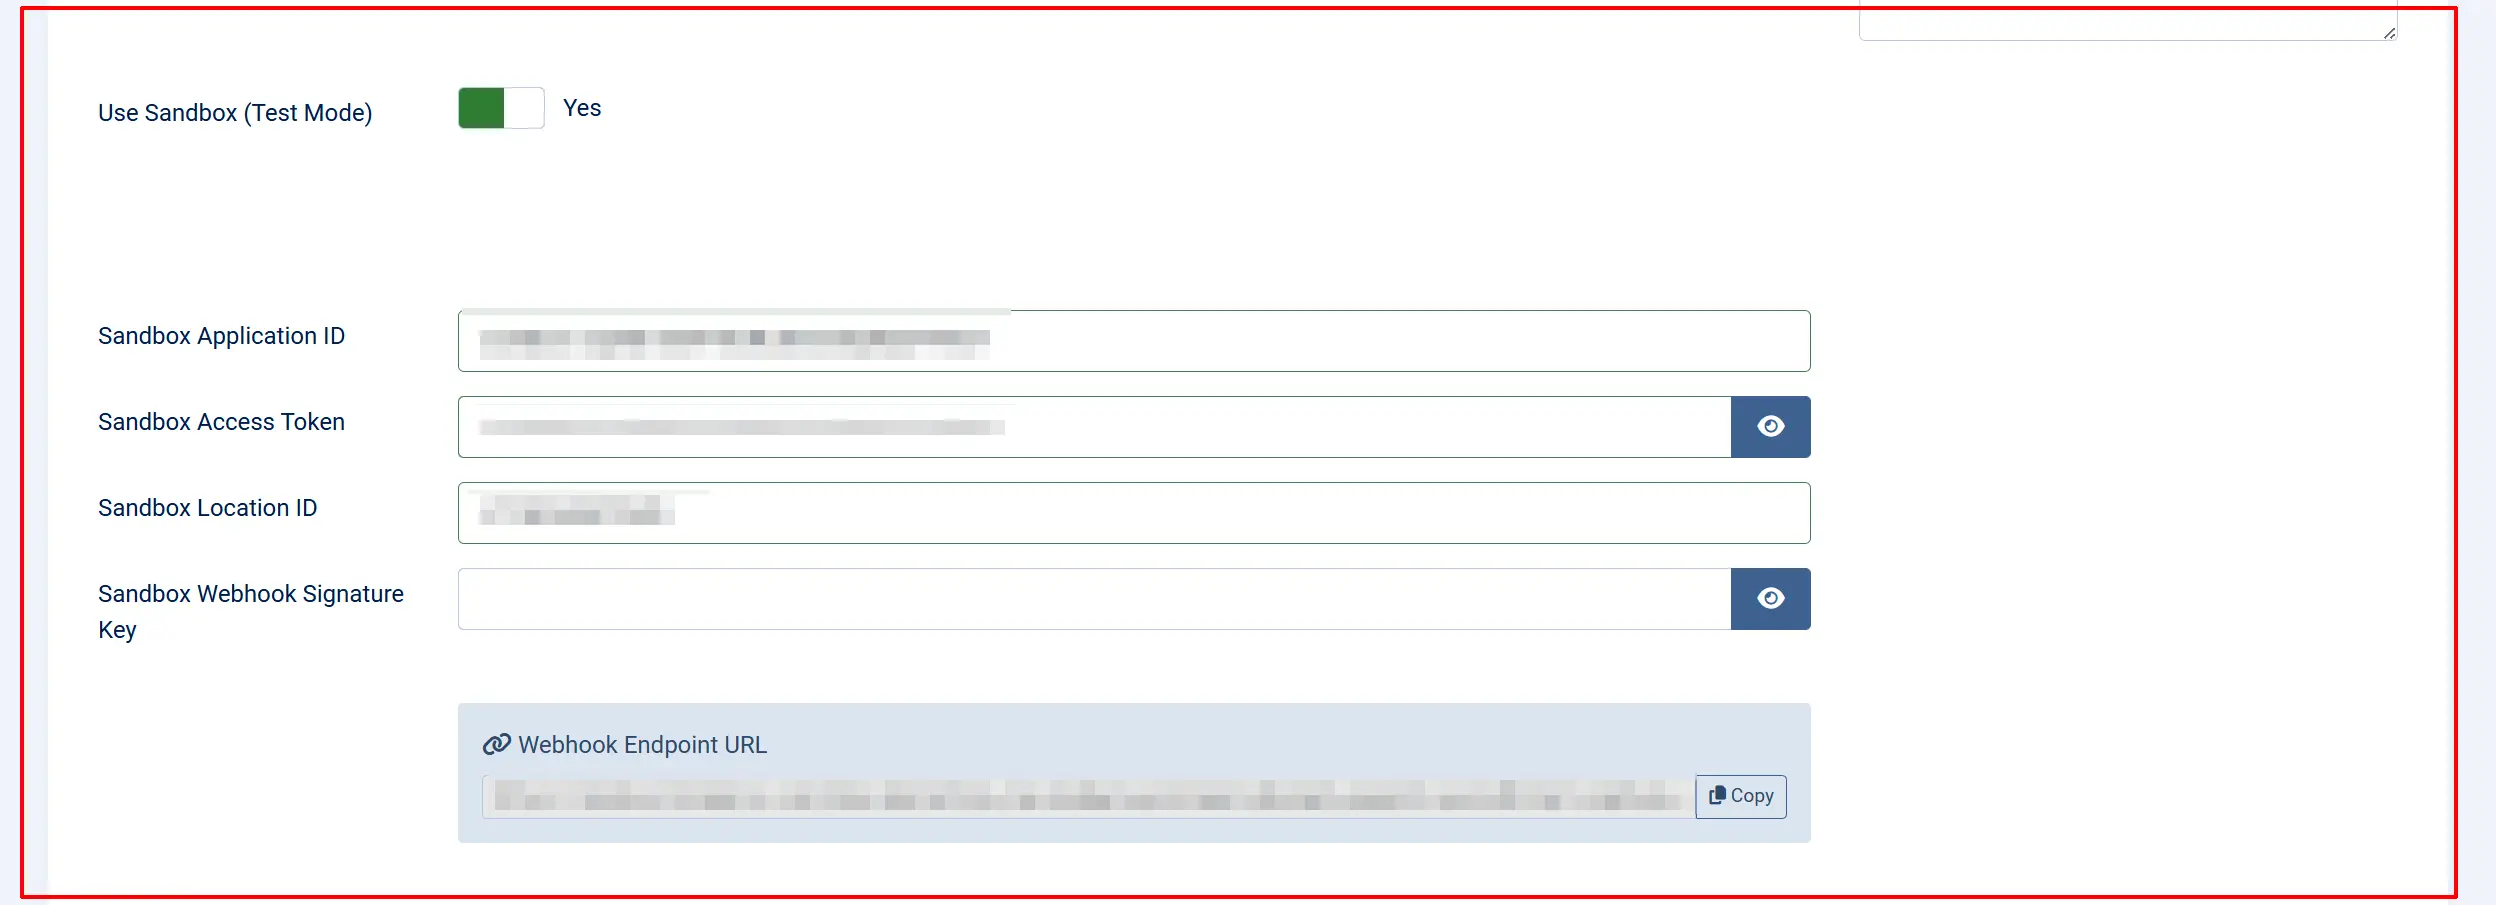
Use Sandbox (Test Mode): Switch Yes to use Square's sandbox environment. No real payments are processed.
Turn sandbox mode on while you are setting up and testing. Switch it off before going live.
When sandbox mode is active, a warning banner appears on the J2Commerce dashboard so you cannot accidentally forget.
Production API Credentials
These fields appear when Use Sandbox (Test Mode) is set to No.
Application ID: Your Square production Application ID from the Square Developer Dashboard.
Access Token: Your Square production Access Token. Keep this value secret — never share it publicly.
Location ID: Your Square production Location ID. Payments are associated with this location in your Square account.
Webhook Signature Key: The signature key generated by Square for your production webhook endpoint. This verifies that incoming webhook events are authentic (see Webhooks below).
Webhook Endpoint URL: A read-only display field showing the URL you need to register in the Square Developer Dashboard. Click Copy to copy it to your clipboard.
If your site is on a local development URL (localhost, .local, .test), the plugin shows a warning instead of the webhook URL. Webhooks require a publicly accessible server.
Sandbox API Credentials
These fields appear when Use Sandbox (Test Mode) is set to Yes.
Sandbox Application ID: Your Square sandbox Application ID.
Sandbox Access Token: Your Square sandbox Access Token.
Sandbox Location ID: Your Square sandbox Location ID.
Sandbox Webhook Signature Key: The signature key for your sandbox webhook endpoint.
Saved Cards

Allow Saved Cards: When set to Yes, logged-in customers can save their card details with Square for faster checkout on future orders. The card is stored in Square's vault — J2Commerce never holds raw card numbers.
When this is enabled, a Saved Cards section appears at checkout for returning customers who have previously saved a card. They can select an existing card or enter a new one.
Template Style: Choose the frontend layout for the card form and saved card display. Available options depend on which template plugins are installed.
- Bootstrap 5 — Use with Bootstrap 5 based Joomla templates (recommended for most sites).
- UIkit — Use if your Joomla template is UIkit-based (e.g., YOOtheme Pro).
- Leave blank to use the default layout.
Order Status
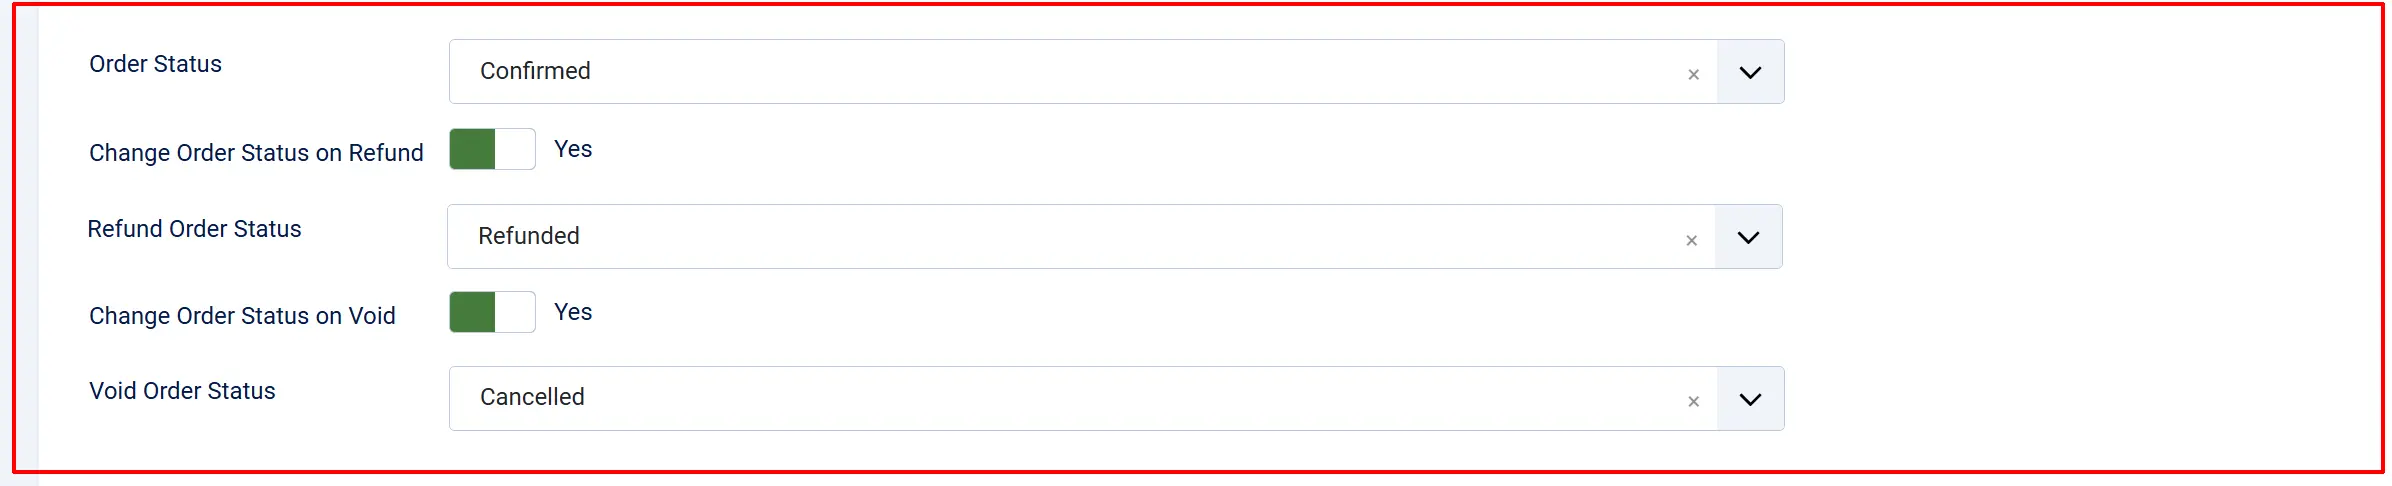
Order Status: The order status is applied after a successful payment. Most stores choose Confirmed or Processing for paid orders.
Refund Settings
Change Order Status on Refund: Set to Yes to automatically update the order status whenever a refund is processed via Square.
Refund Order Status: The order status to set when a full refund is processed (shown when Change Order Status on Refund is Yes). A common choice is Refunded or Cancelled.
Void Settings
Change Order Status on Void: Set to Yes to automatically update the order status when an authorized payment is voided.
Void Order Status: The order status to set when a void is processed (shown when Change Order Status on Void is Yes).
NOTE: If the status you want isn't listed in the dropdown menu, you can create a new one by going to J2Commerce -> Setup -> Order Statuses

Surcharge

Add an optional surcharge to orders paid via Square. This is useful if you want to pass on Square's processing fee to customers — check your local laws and Square's terms before doing this.
Surcharge Name: Label shown to customers for the surcharge (e.g., Processing Fee).
Surcharge Percent: Percentage of the order subtotal added as a surcharge.
Surcharge Fixed: Fixed amount added as a surcharge.
Surcharge Tax Class: Tax profile to apply to the surcharge amount.
You can combine a percentage and a fixed amount — both are added together.
Geo-Zone Restriction & Subtotals

Geo-Zone Restriction: Limit Square availability to customers in a specific geo-zone. Leave empty to show Square to all customers regardless of location.
Minimum Subtotal: Hide Square if the cart subtotal is below this amount. Leave empty for no minimum.
Maximum Subtotal: Hide Square if the cart subtotal exceeds this amount. Leave empty for no maximum.
Thank You Page & Custom Messages
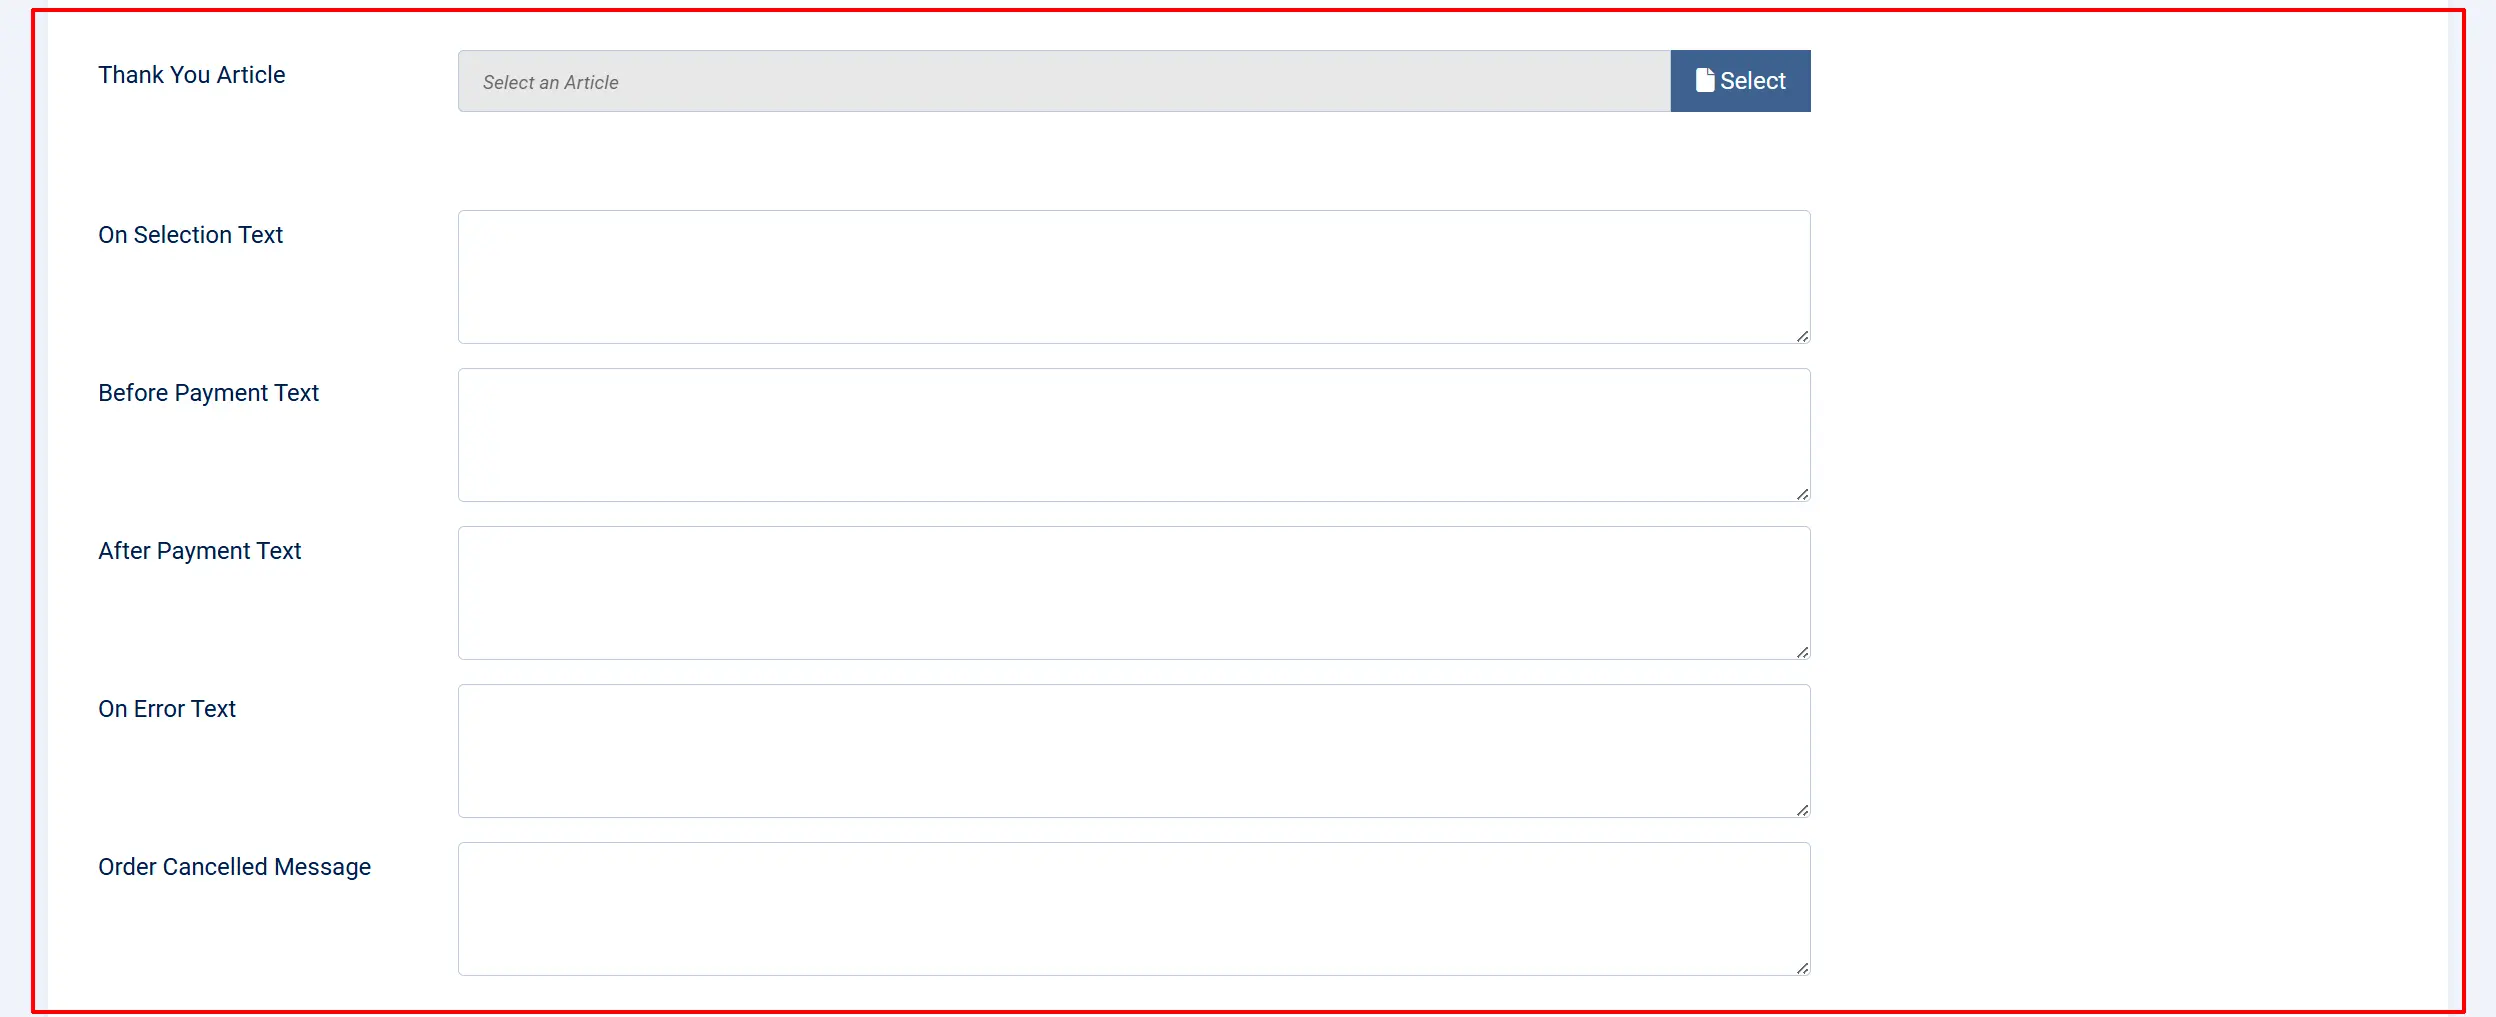
Thank You Article: Select a Joomla article to display after a successful payment. This is shown on the confirmation page alongside the standard confirmation message.
Custom Messages
These text fields let you customize messages shown to customers at different points in the payment process.
| Field | When It Appears |
|---|---|
| On Selection | When the customer selects Square as their payment method |
| On Before Payment | On the payment page before the customer clicks Pay |
| On After Payment | On the confirmation page after a successful payment |
| On Error Payment | When a payment error occurs |
| On Cancel Payment | When the customer cancels and returns to the cart |
Dashboard Icon

Show Dashboard Icon: When enabled, this plugin adds a tile to the J2Commerce dashboard and the quick icons module.
Icon Label: The label for the dashboard icon tile (shown when Show Dashboard Icon is Yes).
Debug Mode
Debug Mode: Write detailed Square API activity to administrator/logs/payment_square.php.
Enable debug mode only while troubleshooting. Disable it in production — logs can grow large and may contain transaction details.
Webhooks
Webhooks allow Square to notify your store automatically when payment events occur. Without webhooks, order status updates only happen during the active checkout flow — meaning server-to-server confirmations (such as delayed payment completions) would not reach your store.
Register Your Webhook in Square
The plugin settings page displays a Webhook Endpoint URL — copy this URL, then follow these steps in the Square Developer Dashboard.
- Log in to the Square Developer Dashboard and open your application.
- Go to the Webhooks tab and click Add Webhook.
- Paste the Webhook Endpoint URL from the J2Commerce plugin settings into the URL field.
- Select the events to listen for. Recommended events:
| Square Event | What Happens in J2Commerce |
|---|---|
payment.created | New payment recorded |
payment.updated | Order status updated on payment completion |
refund.created | Refund recorded |
refund.updated | Order status updated on refund completion |
- Click Save to create the webhook endpoint.
- Square displays a Signature Key for the new endpoint. Click Show to reveal it.
- Copy the signature key.
- Paste it into the Webhook Signature Key field in the J2Commerce Square plugin settings.
- Click Save in J2Commerce.
Sandbox and production each have separate webhook endpoints and signature keys. Configure them independently under the respective credential sections in the plugin settings.
Webhook-Triggered Updates
If webhooks are configured, Square can update order statuses automatically:
| Square Event | What Happens in J2Commerce |
|---|---|
payment.updated (Completed) | Order status updated based on your Order Status setting |
refund.updated (Completed) | Order status updated if Change Order Status on Refund is Yes |
Payment Balance
The order view shows a Payment Balance summary when a refund has been processed:
- Order Total — the original order amount
- Refunded — the total refunded so far
- Net Paid — amount retained after refunds
- Balance Due — outstanding amount (shown in red if positive)
Checkout Experience
Embedded Card Form
When Checkout Mode is set to Embedded Card Form and the customer selects Square at checkout:
- The Square card input form loads directly on your J2Commerce checkout page.
- The customer sees a secure card entry field (card number, expiry, CVV).
- If Allow Saved Cards is enabled and the customer has previously saved a card, they see a list of saved cards and can select one or enter a new card.
- The customer clicks Place Order.
- Square tokenizes the card data in the browser — raw card details never touch your server.
- The payment is processed and the customer is taken to the order confirmation page.

Hosted Checkout
When Checkout Mode is set to Hosted Checkout:
- The customer selects Square at checkout and clicks Place Order.
- A message — "Redirecting to Square for payment..." — appears briefly.
- The customer is redirected to a Square-hosted payment page.
- They complete payment on Square's secure servers.
- Square redirects them back to your J2Commerce confirmation page.
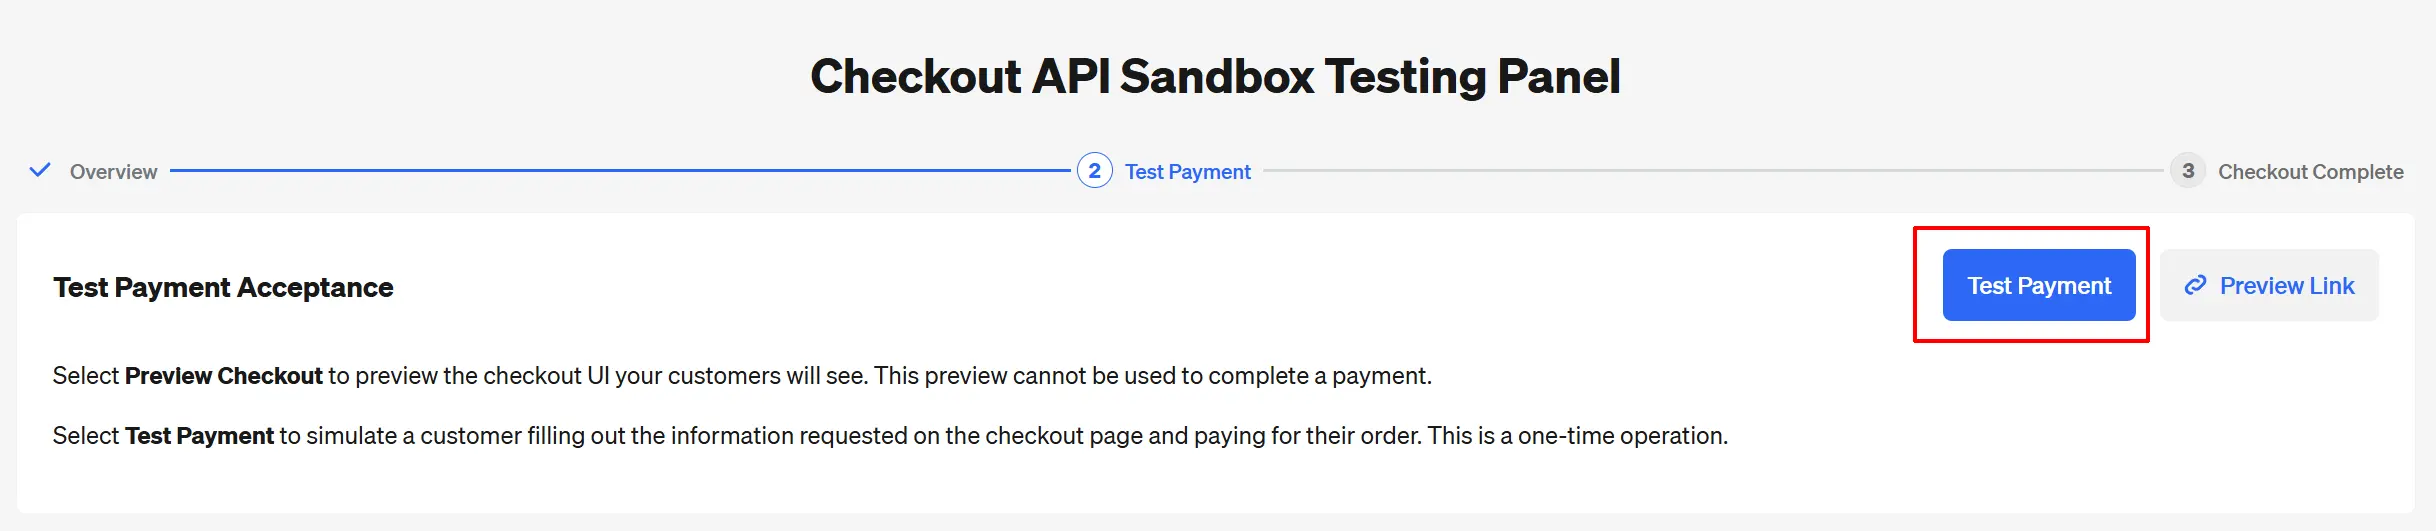
Checkout API Sandbox Testing Panel
When in Sandbox Mode and using the Hosted option, you will receive a Sandbox message the first time you're testing the checkout process.
- Click Next
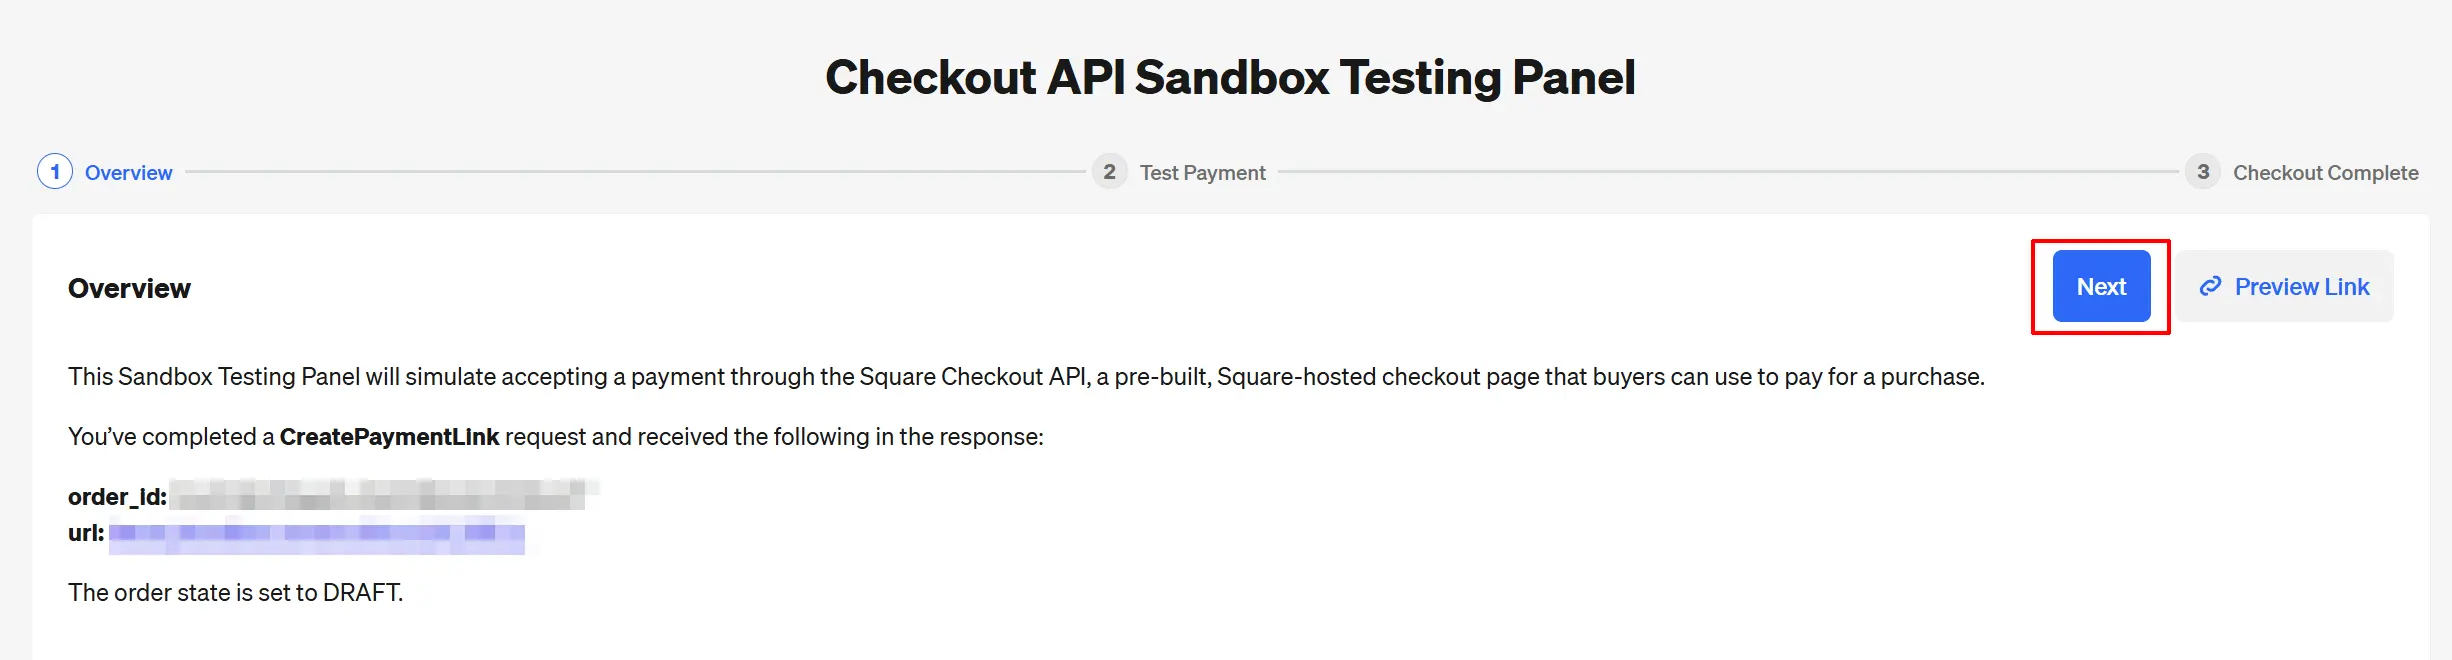
- Then click Test Payment. You will receive a successful message. Log back into the backend and you will find the order in the order section. J2Commerce -> Sales -> Orders
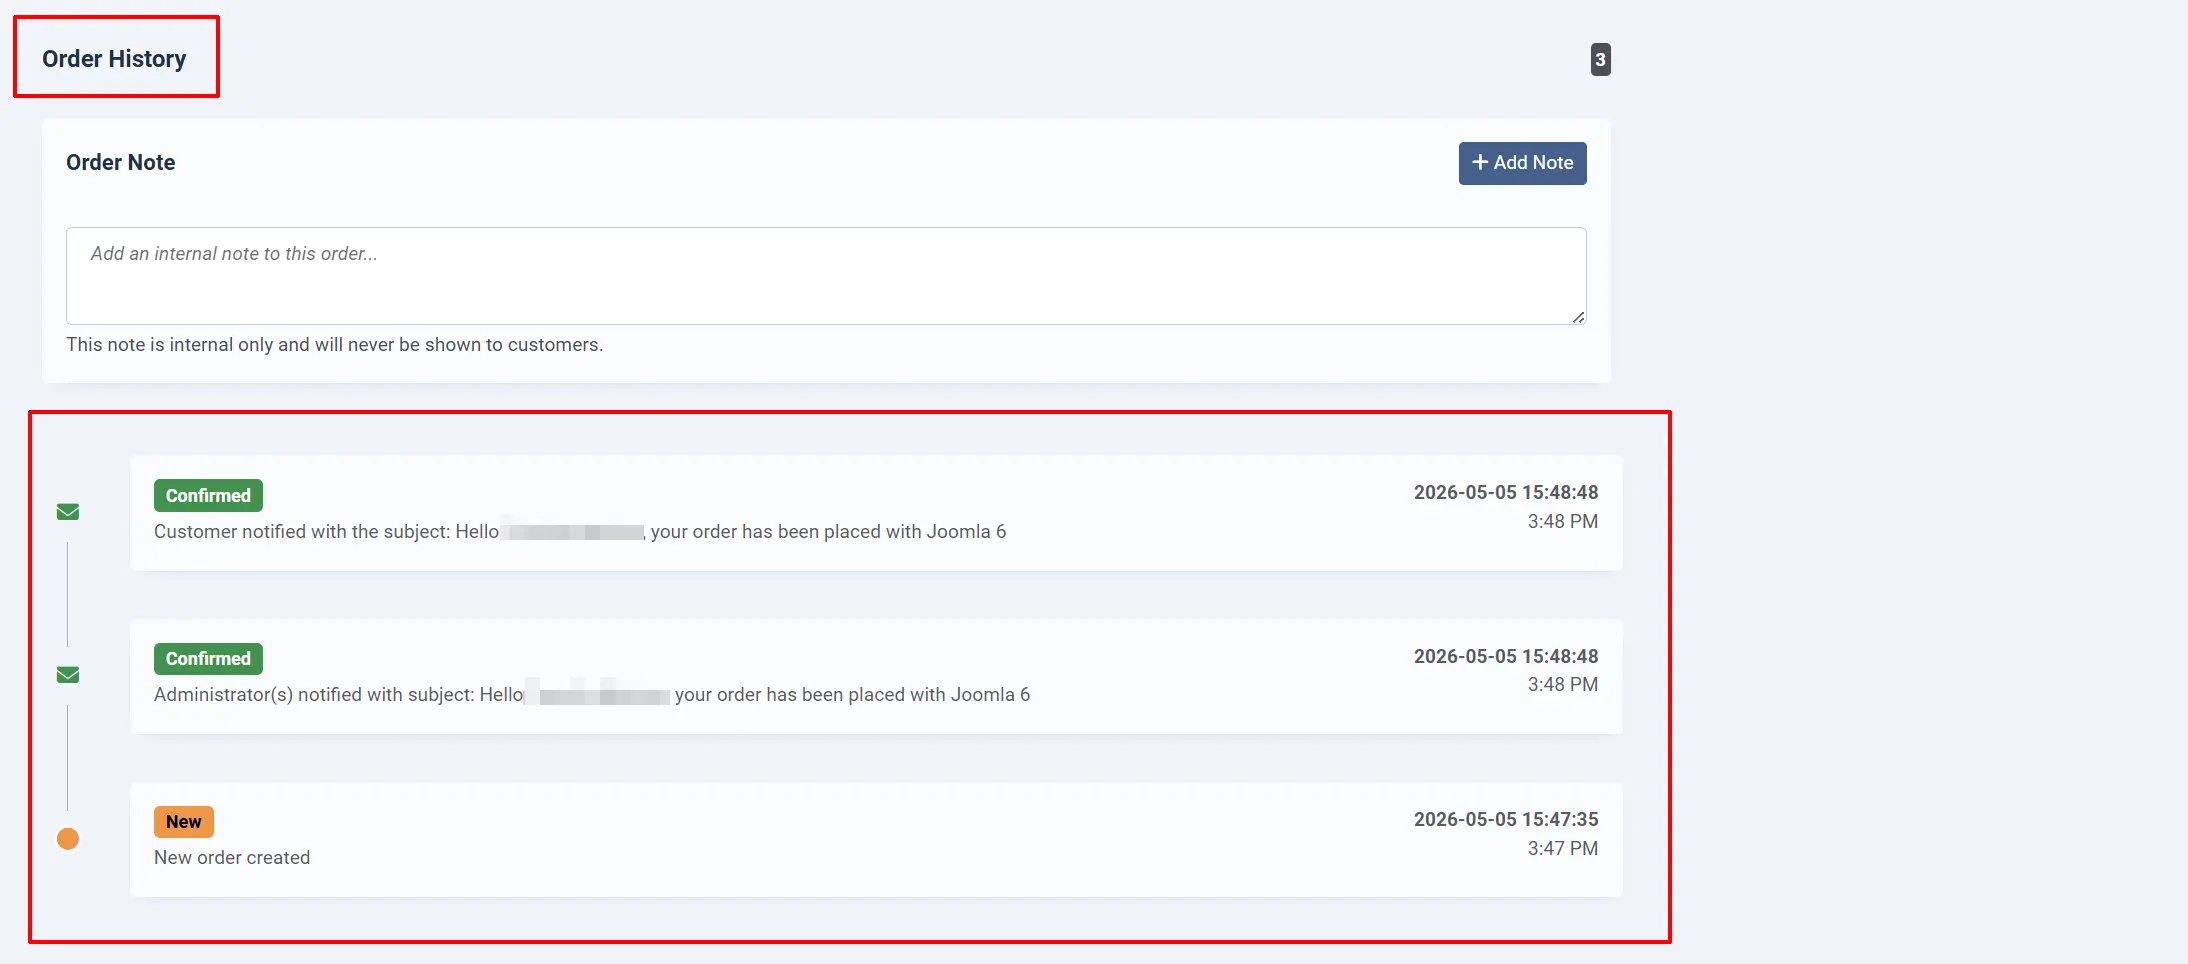
Order History
Once a customer pays, J2Commerce records the transaction details on the order:
- Order status is updated to the status you configured (default: Confirmed).
- Transaction ID — the Square payment ID — is stored with the order.
- Transaction status — Completed, Authorized, or Partially Refunded — is tracked.
- Order history is updated with a payment note including the amount and transaction ID.
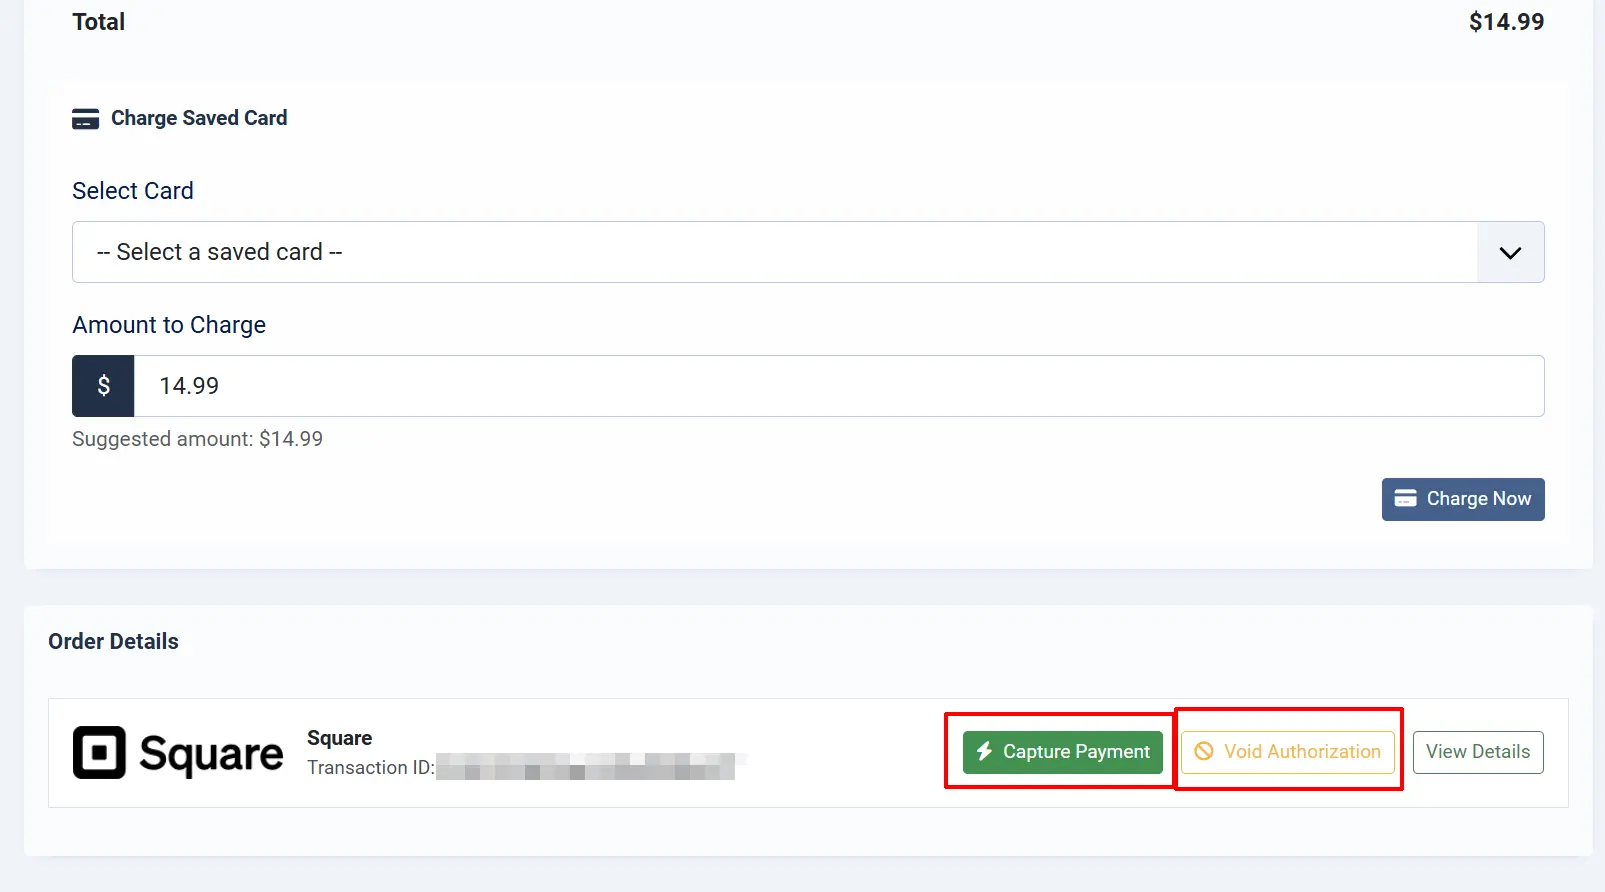
Capture Authorized Payments (Manual Capture)
If you set Capture Method to Manual (Authorize Only), payments are authorized but not charged. To capture a payment:
- Go to J2Commerce -> Sales -> Orders and open the order.
- Find the Payment section in the order view.
- Click Capture Payment to charge the authorized amount.
- The order status updates and the order history is updated with a capture note.
You can also click Void Authorization to cancel the authorization without charging the customer.
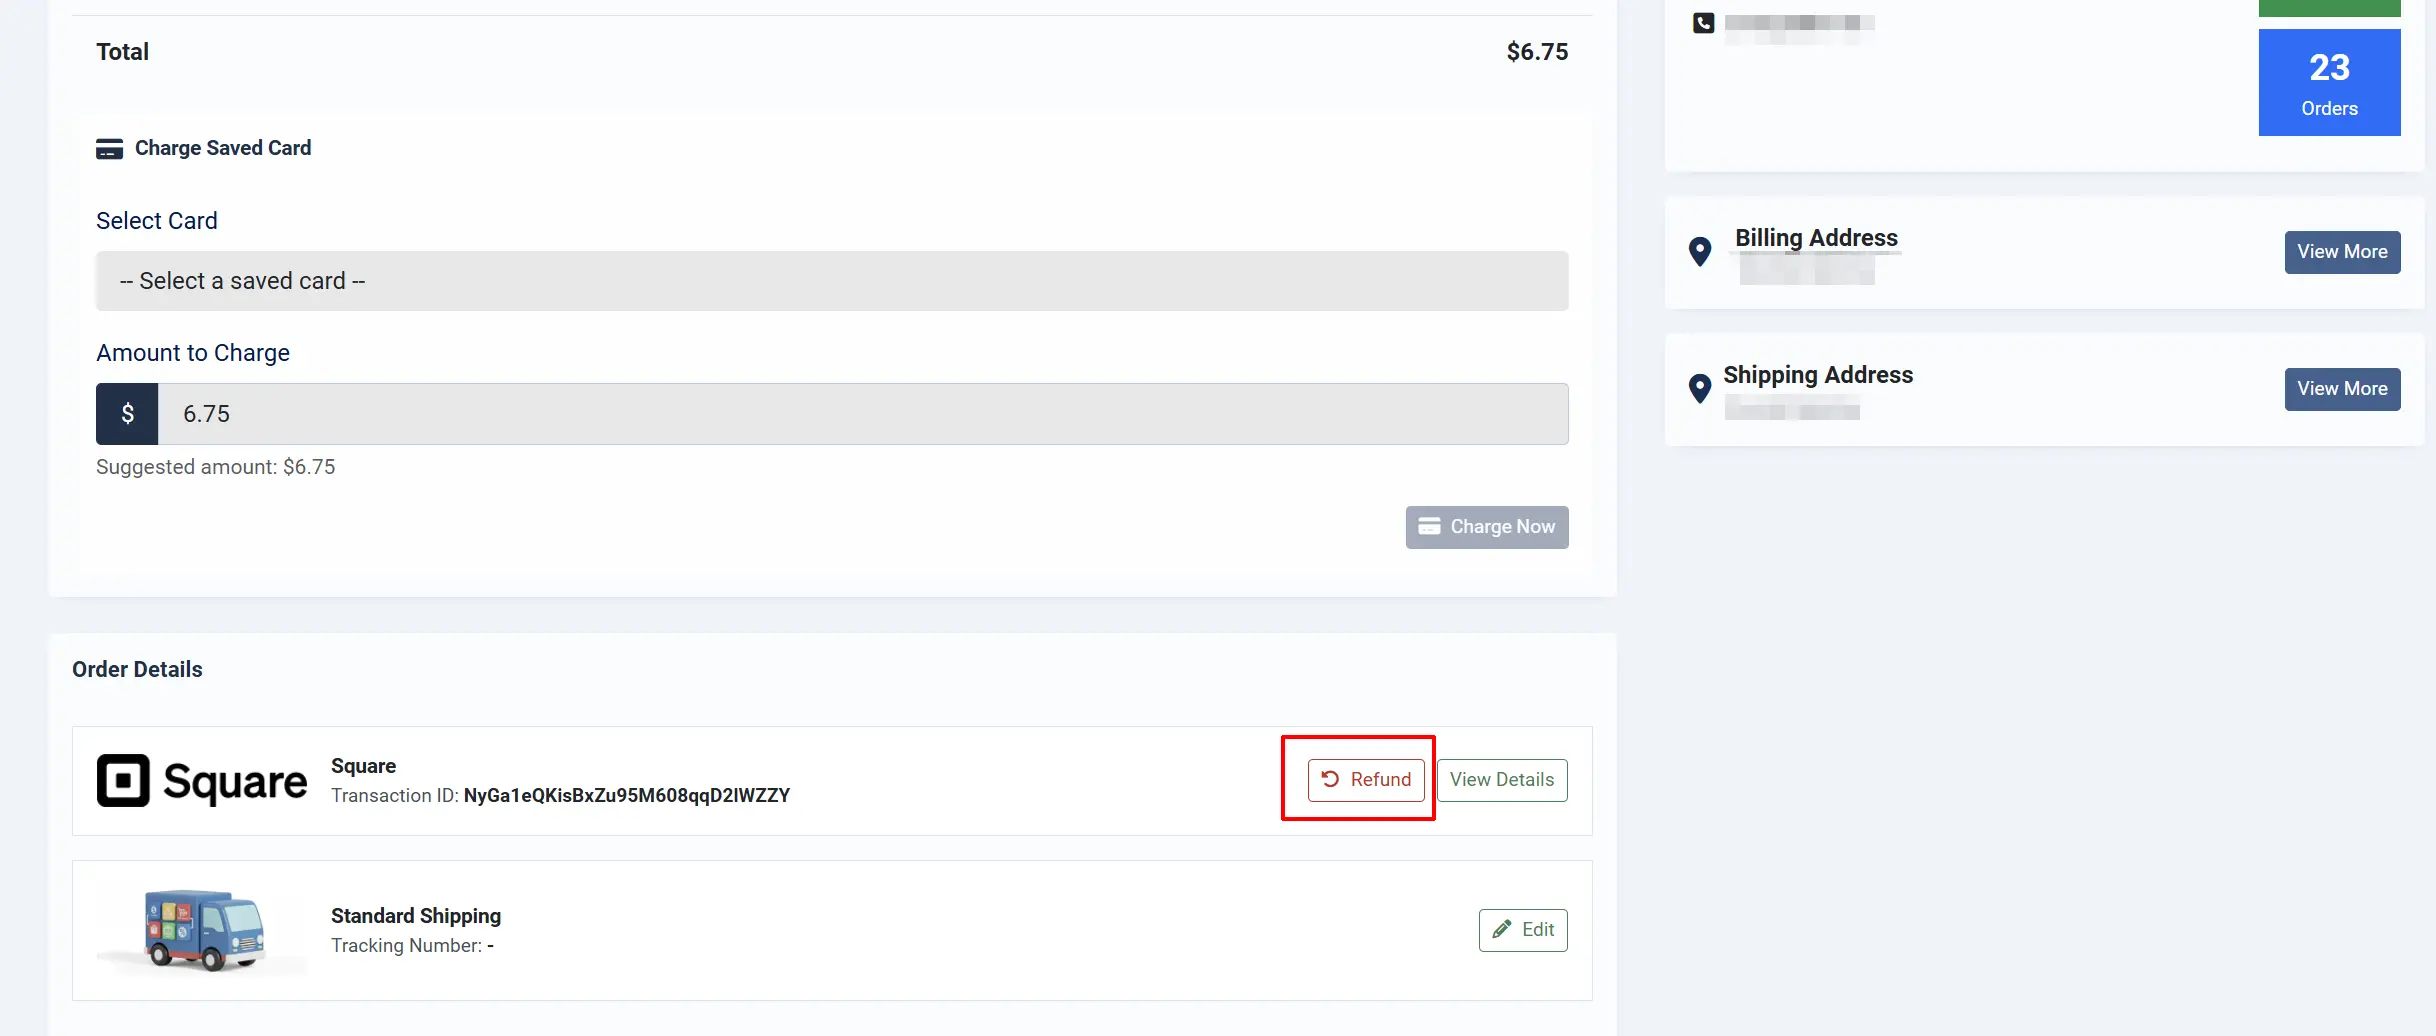
Refunds
Issue a refund directly from the order in J2Commerce:
- Go to J2Commerce -> Orders and open the order.
- Find the Payment section.
- Click Refund.
- Choose Full refund to refund the entire amount, or choose Partial refund and enter a specific amount.
- Click Process Refund.
The refund is sent to Square via the API. If you enabled Change Order Status on Refund, the order status updates automatically.
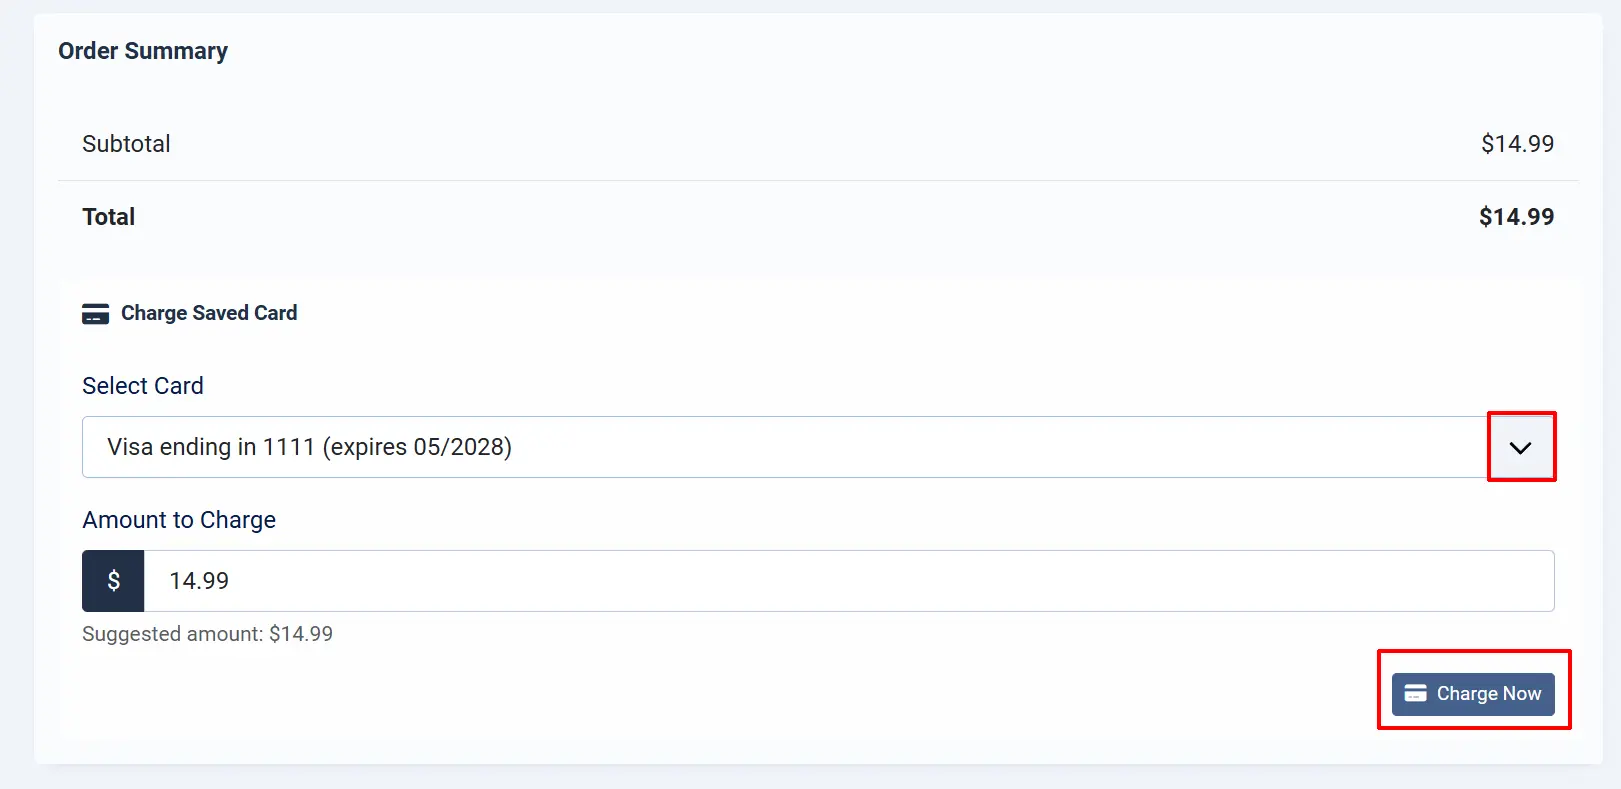
Charge a Saved Card
For orders placed by returning customers who have saved cards:
- Go to J2Commerce -> Orders and open the order.
- If the customer has saved Square cards, a Charge Saved Card section appears below the order summary.
- Select a card from the dropdown.
- Enter the amount to charge (defaults to the order total).
- Click Charge Now.
This is useful for manual reorders, phone orders, or collecting payment for shipping adjustments.
Saved Cards (Customer Profile)
When Allow Saved Cards is enabled, customers can manage their saved cards from the frontend:
- Log in to the frontend of your site.
- Go to My Account -> Payment Methods.
- View saved cards with their card type, last 4 digits, and expiry date.
- Delete any cards they no longer want stored.
- Set a card as the renewal default (used for subscription renewals).
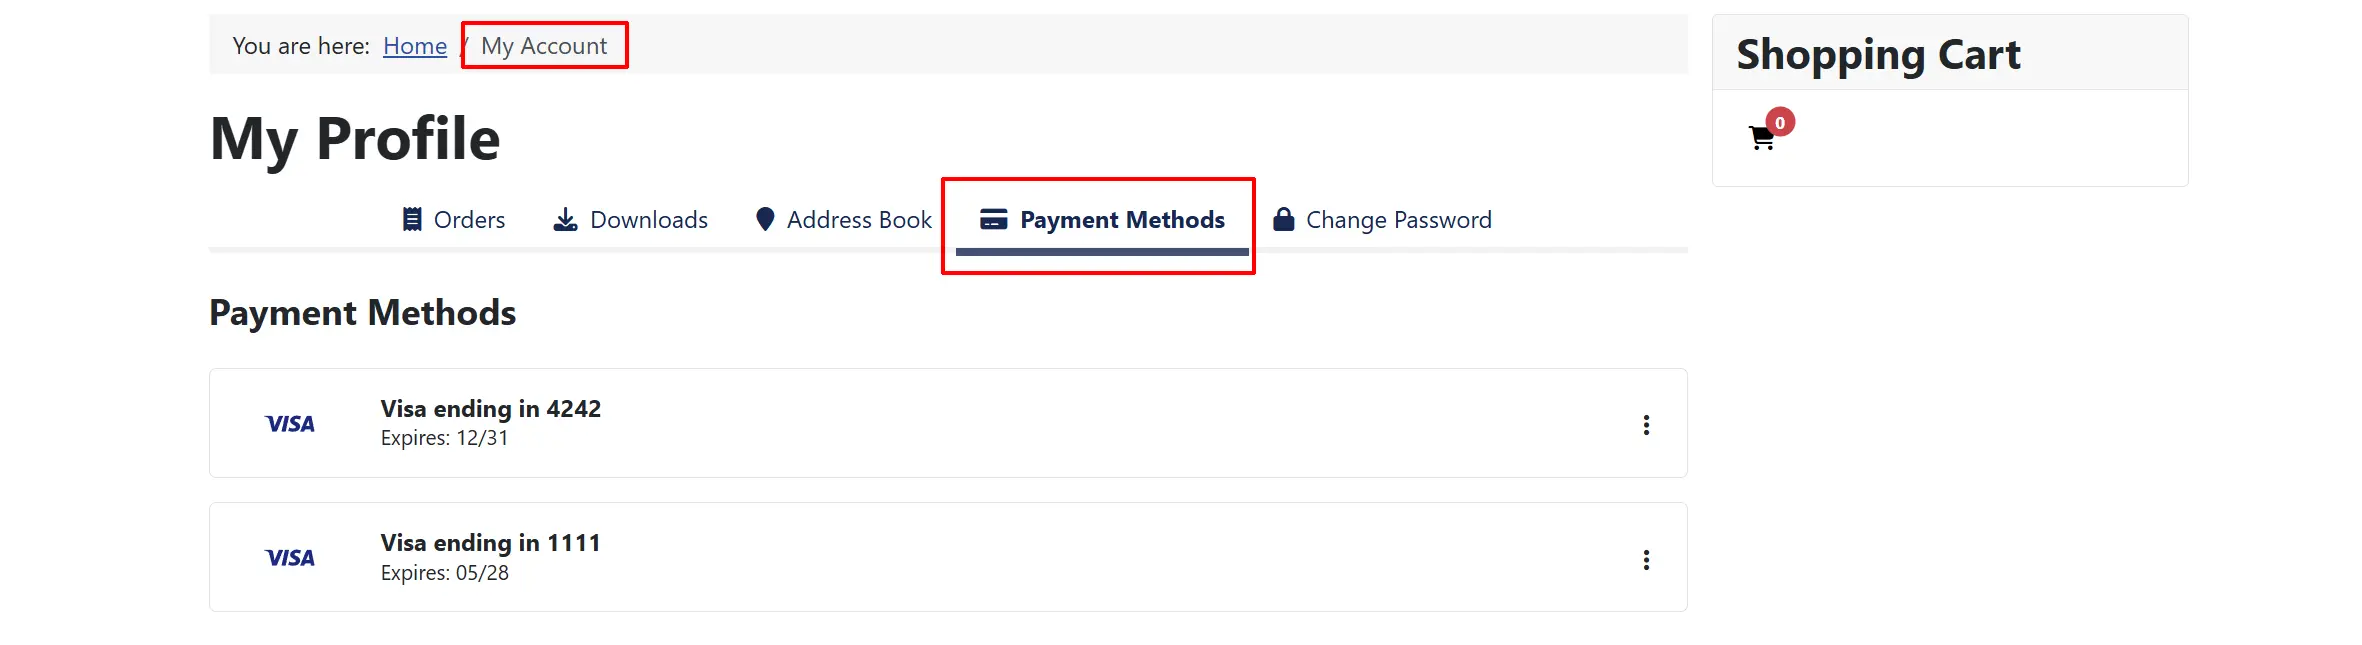
Saved cards are only available when the customer checks out using the Embedded Card Form mode. The Hosted Checkout mode does not save cards to the customer's profile.
Going Live Checklist
Before accepting real payments, confirm the following:
- Use Sandbox (Test Mode) is set to No
- Your live Application ID, Access Token, and Location ID are entered
- The production Webhook Endpoint URL is registered in your Square Developer Dashboard
- The production Webhook Signature Key is saved in the plugin settings
- You have placed a test order using a real card with a small amount and then issued a refund
- Debug Mode is set to No
Troubleshooting
API credentials mismatch — payments not going through
Cause: The Application ID, Access Token, or Location ID are from the wrong environment (sandbox credentials entered in production or vice versa).
Solution:
- Log in to the Square Developer Dashboard and open your application.
- Check whether Use Sandbox (Test Mode) in J2Commerce matches the environment your credentials are from.
- When Sandbox is No, use the Production credentials. When Sandbox is Yes, use the Sandbox credentials.
- Enable Debug Mode and check
administrator/logs/payment_square.phpfor the full API error.
Payment succeeds but the order stays Pending
Cause: Webhooks are not configured, so J2Commerce does not receive the payment confirmation from Square.
Solution:
- Register the webhook URL in the Square Developer Dashboard (see Webhooks above).
- Enter the Webhook Signature Key in the plugin settings.
- Confirm the webhook endpoint shows a green status in the Square Developer Dashboard.
Payment form does not appear at checkout
Cause: The Application ID or Location ID is missing, or the plugin is disabled.
Solution:
- Go to J2Commerce -> Setup -> Payment Methods and confirm Square is enabled (green checkmark).
- Check that Application ID and Location ID are filled in for the correct environment (sandbox or production).
- Enable Debug Mode and check the browser console for JavaScript errors related to Square Web Payments SDK.
Refund fails with an error
Cause: The transaction ID is missing from the order, or the payment has already been fully refunded.
Solution:
- Open the order and verify that a Transaction ID is recorded in the Payment section.
- If the Transaction ID is empty, the payment may not have completed correctly — check the debug log.
- Log in to your Square Dashboard and verify the payment status there directly.
Sandbox warning on the J2Commerce dashboard
Cause: Use Sandbox (Test Mode) is set to Yes.
Solution: If you are ready to go live, open the Square plugin settings and set Use Sandbox (Test Mode) to No, then enter your production credentials.
Saved cards not showing at checkout
Cause: Allow Saved Cards is disabled, the customer is not logged in, or the customer has not previously checked out using the Embedded Card Form mode.
Solution:
- Verify Allow Saved Cards is set to Yes in the plugin settings.
- Confirm the customer is logged in — saved cards require an active login session.
- Saved cards are only created during an embedded checkout. Customers who previously used Hosted Checkout will not have saved cards.
Support
For help with the Square plugin:
- J2Commerce documentation: docs.j2commerce.com
- J2Commerce support: www.j2commerce.com/support
- Square Developer Dashboard: developer.squareup.com/apps
- Square developer documentation: developer.squareup.com/docs
- Square support: squareup.com/help