Klarna Payments
Klarna is a global payment provider that lets shoppers choose how they want to pay — pay now with a card or bank transfer, pay later in one interest-free installment, or split the cost over several months. Adding Klarna to your J2Commerce store can reduce cart abandonment and increase average order value by giving customers flexible, low-friction payment options at checkout.
The plugin supports two checkout modes: Klarna Payments, which embeds a Klarna widget directly on your checkout page, and Hosted Payment Page (HPP), which redirects shoppers to a Klarna-hosted payment screen. Both modes support refunds, order status automation, saved payment methods for returning customers, and subscriptions.
Requirements
- J2Commerce 6.0 or later installed and active
- Joomla 6.0 or later
- A Klarna merchant account (see below)
- Your site must be publicly reachable over HTTPS for Klarna callbacks to work
Set Up a Klarna Merchant Account
If you already have Klarna API credentials, skip to Configure the Plugin.
- Go to klarna.com and sign up for a merchant account for your region.
- Once approved, log into the Klarna Merchant Portal.
- Navigate to Settings -> API credentials (or Klarna Payments -> Credentials).
- Note your API Username (UID) and generate an API Password. Both are needed below.
- For the on-site Klarna Payments widget, also note your Client Identifier (starts with
klarna_test_client_in sandbox, similar prefix for live). - For sandbox/playground testing, Klarna provides a separate set of credentials — keep both sets handy.
Klarna's available payment methods (Pay Now, Pay Later, Pay Over Time) vary by country and merchant agreement. If a particular method does not appear at checkout, check your Klarna Merchant Portal to confirm it is activated for your account and region.
Purchase and download
This plugin is a separate add-on available from the J2Commerce Extensions Store. It is not included with the core J2Commerce 6 component.
- Go to the J2Commerce website and locate Klarna.
- Add it to your cart and complete checkout.
- Go to My Downloads under your account profile and find the plugin.
- Click Available Versions -> View Files -> Download Now to download the ZIP file.
Install the plugin
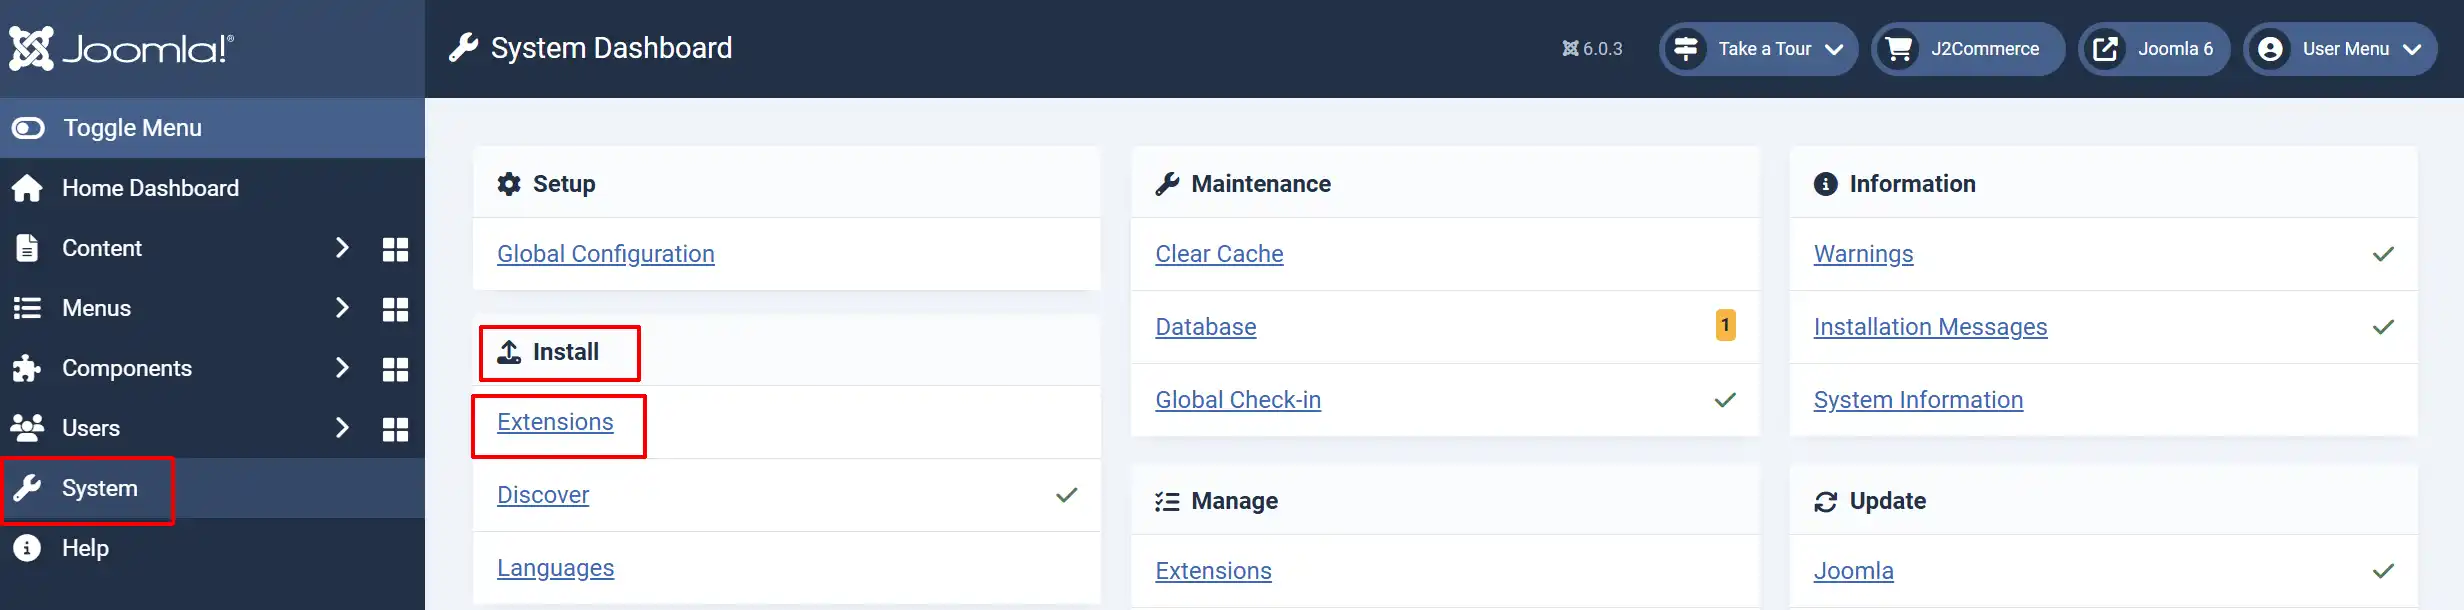
In the Joomla Administrator, go to System -> Install -> Extensions.
Upload the plg_j2commerce_payment_klarna.zip file.
Enable the Plugin
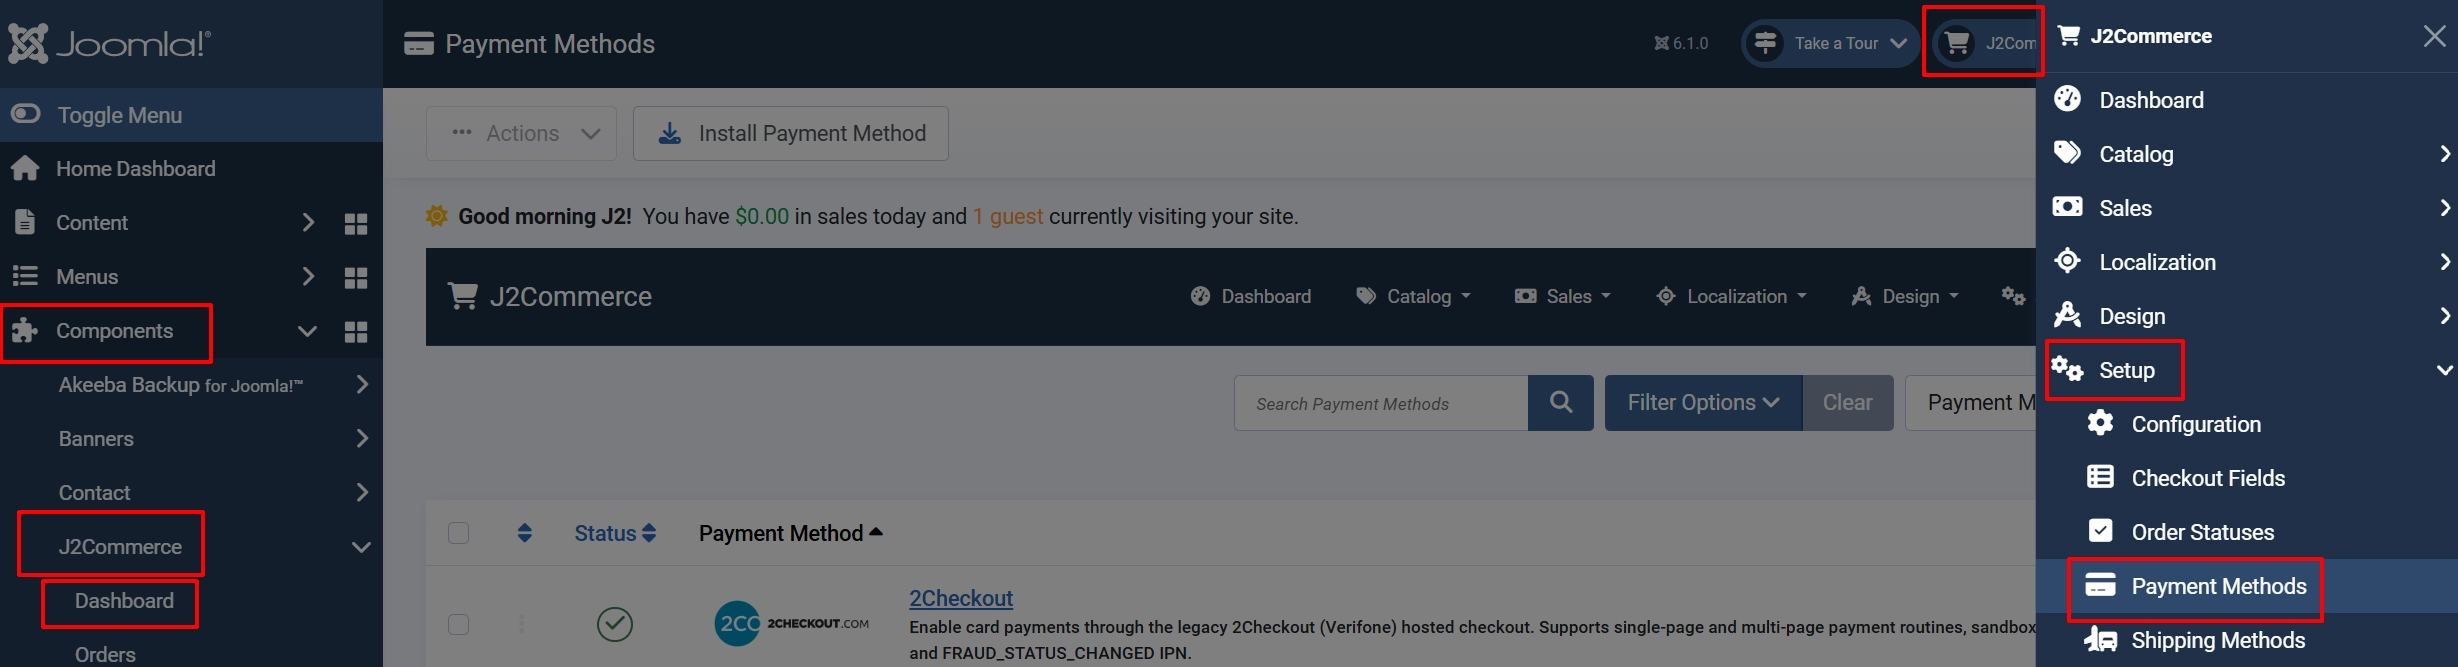
Once you have installed the App, you will need to enable it. There are two ways you can access the App.
Option A: Go to the J2Commerce icon at the top right corner -> Setup -> Payment Methods
Option B: Go to Components on the left sidebar -> J2Commerce -> Dashboard -> Setup -> Payment Methods
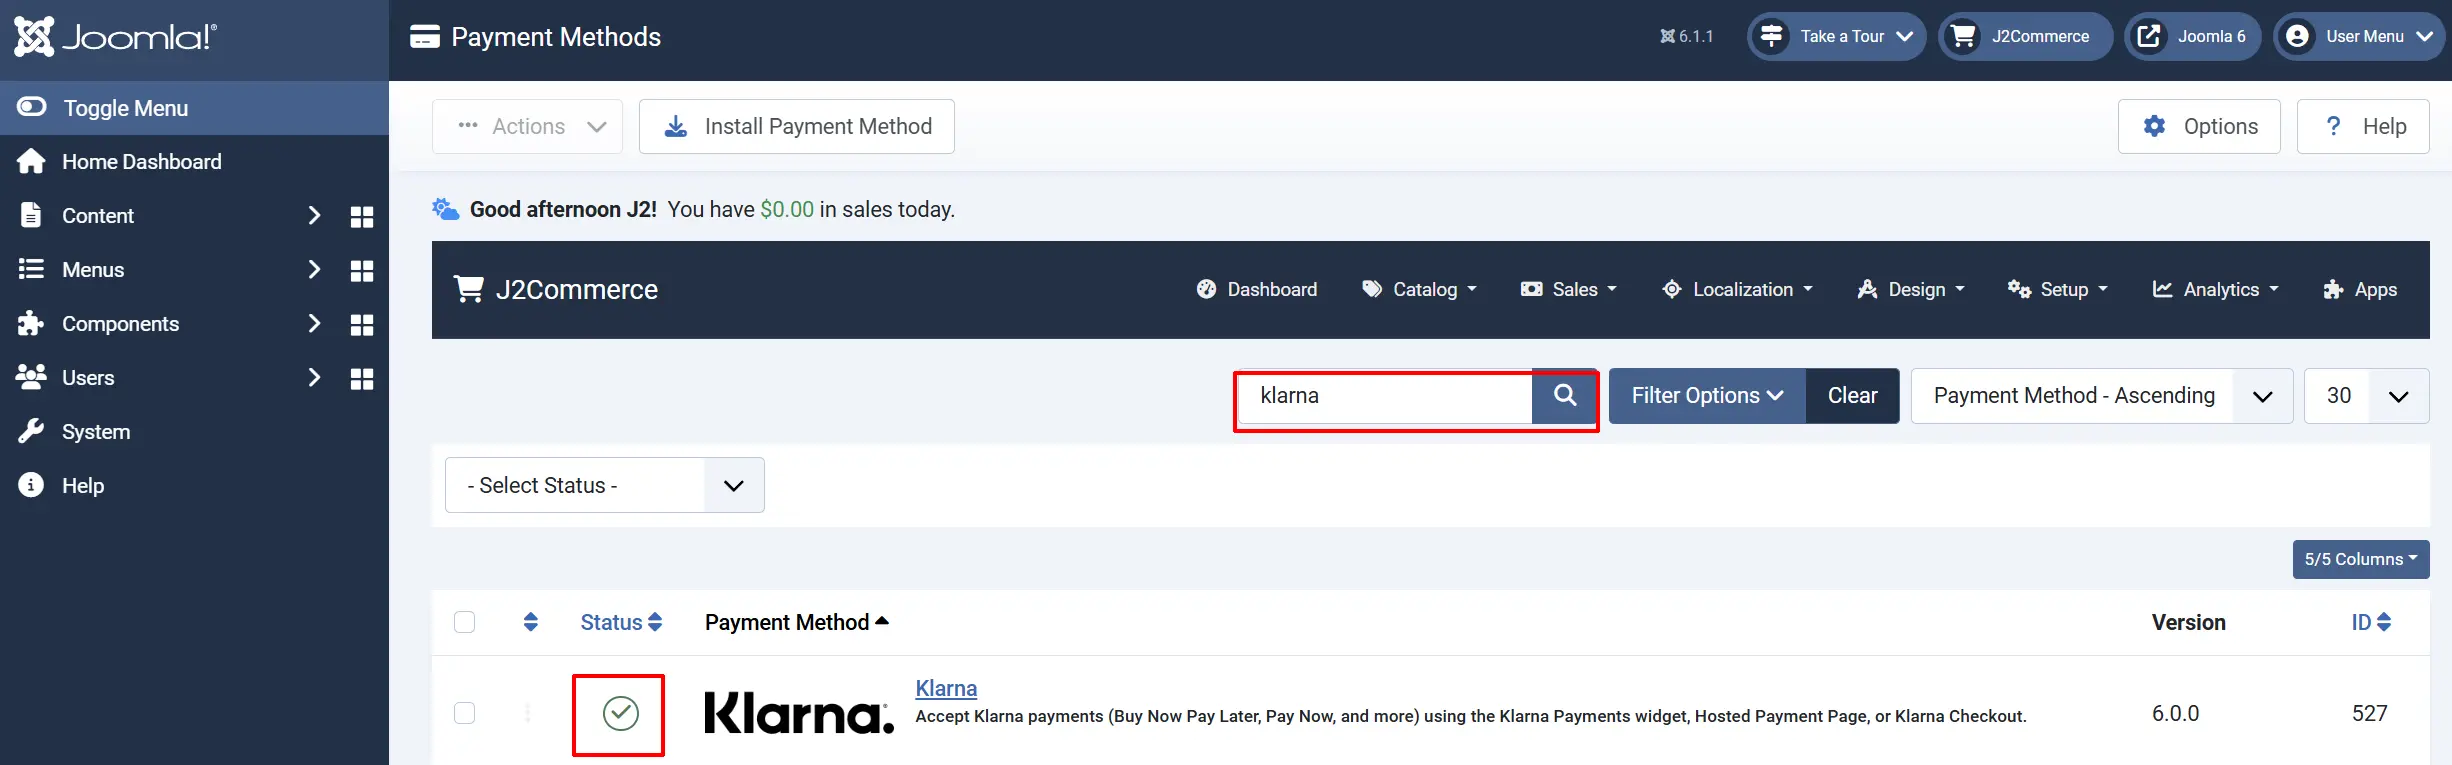
To help you narrow down the list, you can do a search for Klarna, click the X, and it will turn into a green checkmark. It is now enabled and ready for setup.
Configure the Plugin
Click the Toggle Inline Help button at the top of any plugin configuration page to show a short description beneath each field.

Display Settings
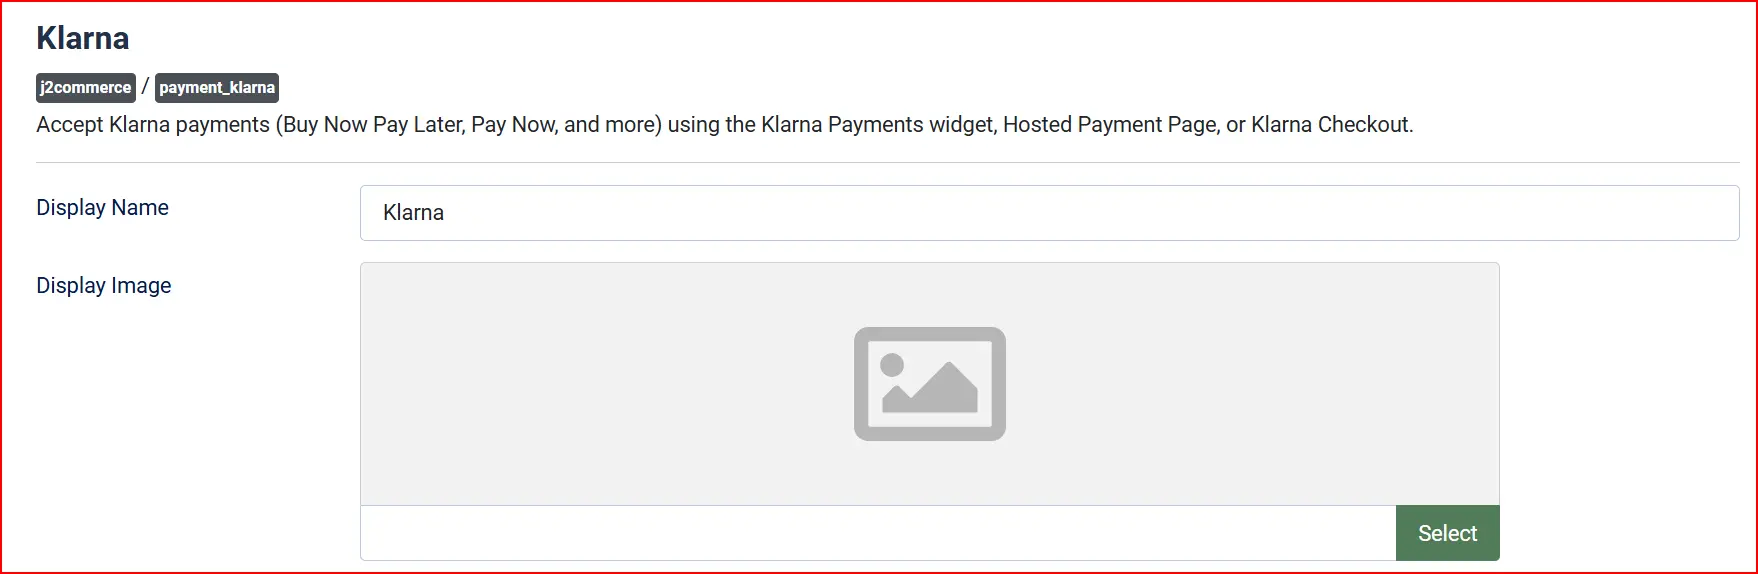
Display Name: The name shown to shoppers at checkout — e.g., "Pay with Klarna"
Display Image: Optional logo or badge shown next to the payment option
Checkout Mode

- Checkout Mode: Choose Klarna Payments (on-site widget — recommended) to keep shoppers on your checkout page, or Hosted Payment Page (redirect) to send shoppers to a Klarna-hosted payment screen.
Klarna Payments (on-site widget) keeps the shopper on your checkout page and renders Klarna's payment UI inside an iframe — it requires the Client Identifier in addition to your API username and password. Hosted Payment Page redirects shoppers off-site; only your API username and password are needed.
- HPP Payment Methods (Hosted Payment Page only)
When Checkout Mode is set to Hosted Payment Page, you can restrict which payment options appear on the Klarna page. Leave this blank to show all available options for your account.
Pay Now: Immediate payment by card or bank transfer
Pay Later: Single interest-free deferred payment
Pay Over Time: Installment payments spread over several months
Direct Debit: Bank debit payment
Direct Bank Transfer: Real-time bank transfer
Transaction Type
-
Authorize and Capture: Charges the shopper immediately when the order is placed. Recommended for most stores.
-
Authorize Only: Places a hold on the shopper's payment method but does not charge it. You capture manually from the order view when you are ready to ship.
Region
Select the Klarna API region that matches your merchant account. Using the wrong region will result in authentication errors.
Europe (EU): Your Klarna account is registered in a European country
North America (NA): Your Klarna account is registered in the US or Canada
Oceania (OC): Your Klarna account is registered in Australia or New Zealand
Sandbox Mode
Toggle Sandbox Mode on while you are testing. In sandbox mode, no real payments are processed and Klarna uses its playground environment. Turn this off before going live.
The Sandbox credentials (username, password, and client identifier) are separate from your live credentials. Fill in both sets so you can switch between environments without losing your live keys.
API Credentials
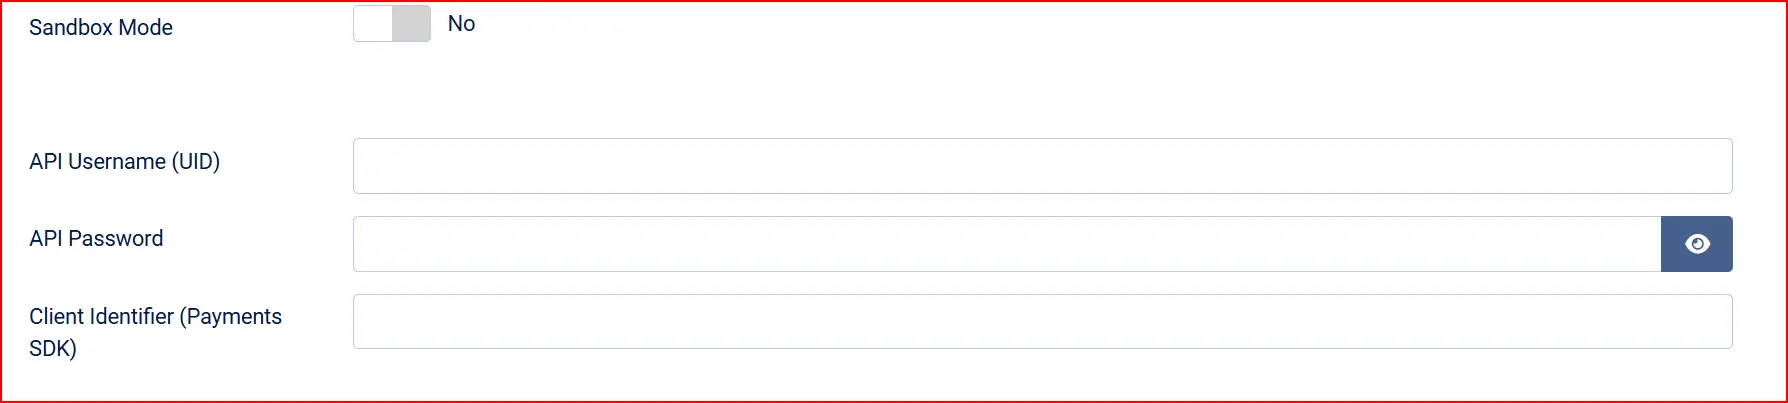
Two sets of credentials are available — fill in both. The plugin automatically uses whichever set matches the current Sandbox Mode setting.
Live credentials (shown when Sandbox Mode is Off):
API Username (UID): Your live Klarna API username — typically a UUID starting with a region prefix such as PK99999_...
API Password: Your live Klarna API password — starts with klarna_...
Client Identifier: Your live Klarna Payments JS SDK client identifier (required for on-site widget mode only)
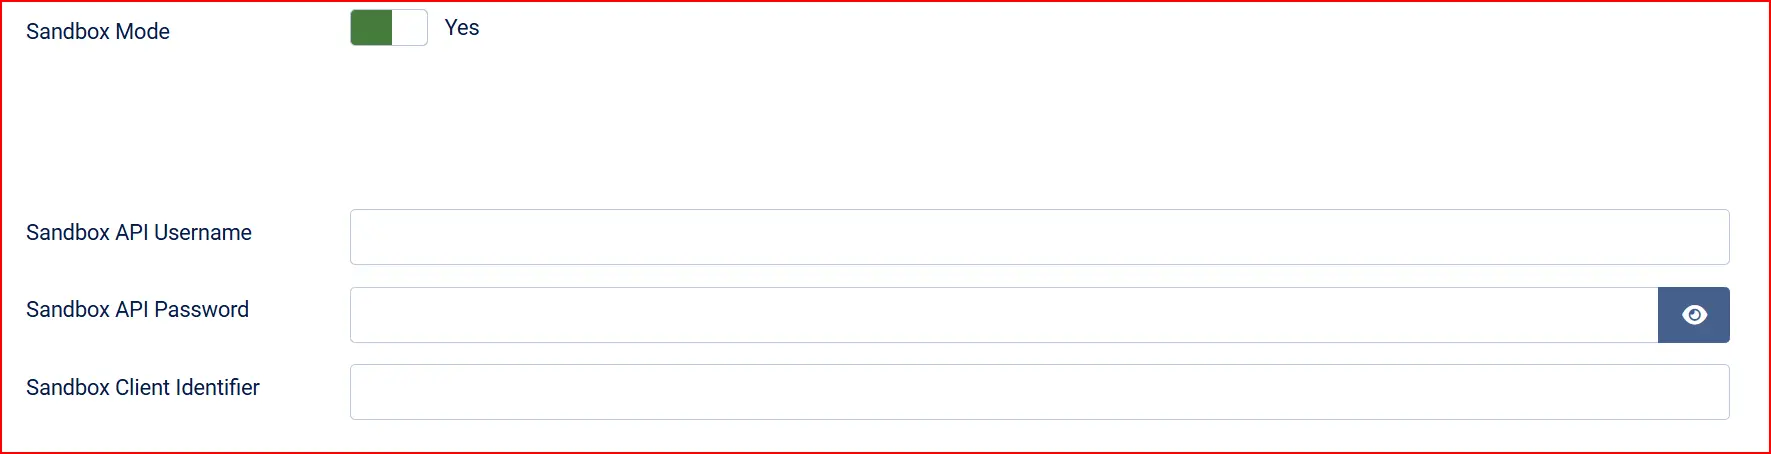
Sandbox credentials (shown when Sandbox Mode is On):
Sandbox API Username: Your playground/sandbox Klarna API username
Sandbox API Password: Your playground/sandbox Klarna API password
Sandbox Client Identifier: Your sandbox Klarna Payments JS SDK client identifier (on-site widget mode only)
Callback URLs
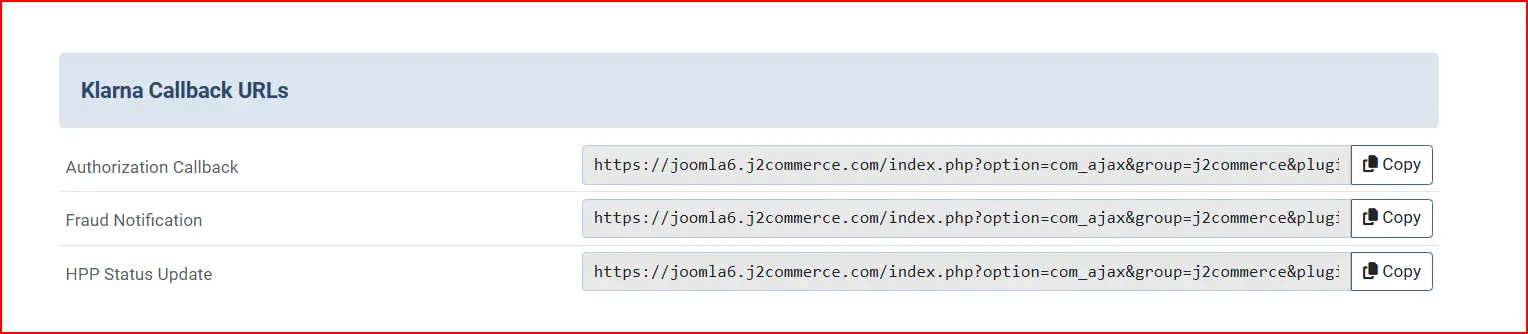
The plugin displays read-only callback URLs that you register in your Klarna Merchant Portal so Klarna can notify your store of payment events. There are three URLs:
- Authorization Callback — called when a shopper authorizes payment
- Fraud Notification — called when Klarna flags a transaction for review
- HPP Status Update — called when a Hosted Payment Page session status changes (HPP mode only)
Copy each URL using the Copy button and paste it into the corresponding field in your Klarna Merchant Portal.
Callback URLs are not available on local development environments. Use a tunneling tool such as ngrok to test callbacks on a local site.
Subscriptions and Saved Payment Methods

Enable Subscriptions: Allow Klarna Customer Tokens to be created for recurring subscription payments. Requires the Subscription Product app to also be installed and enabled.
Allow Saved Payment Methods: Let customers save their Klarna payment method for faster future checkouts.
Order Status Automation
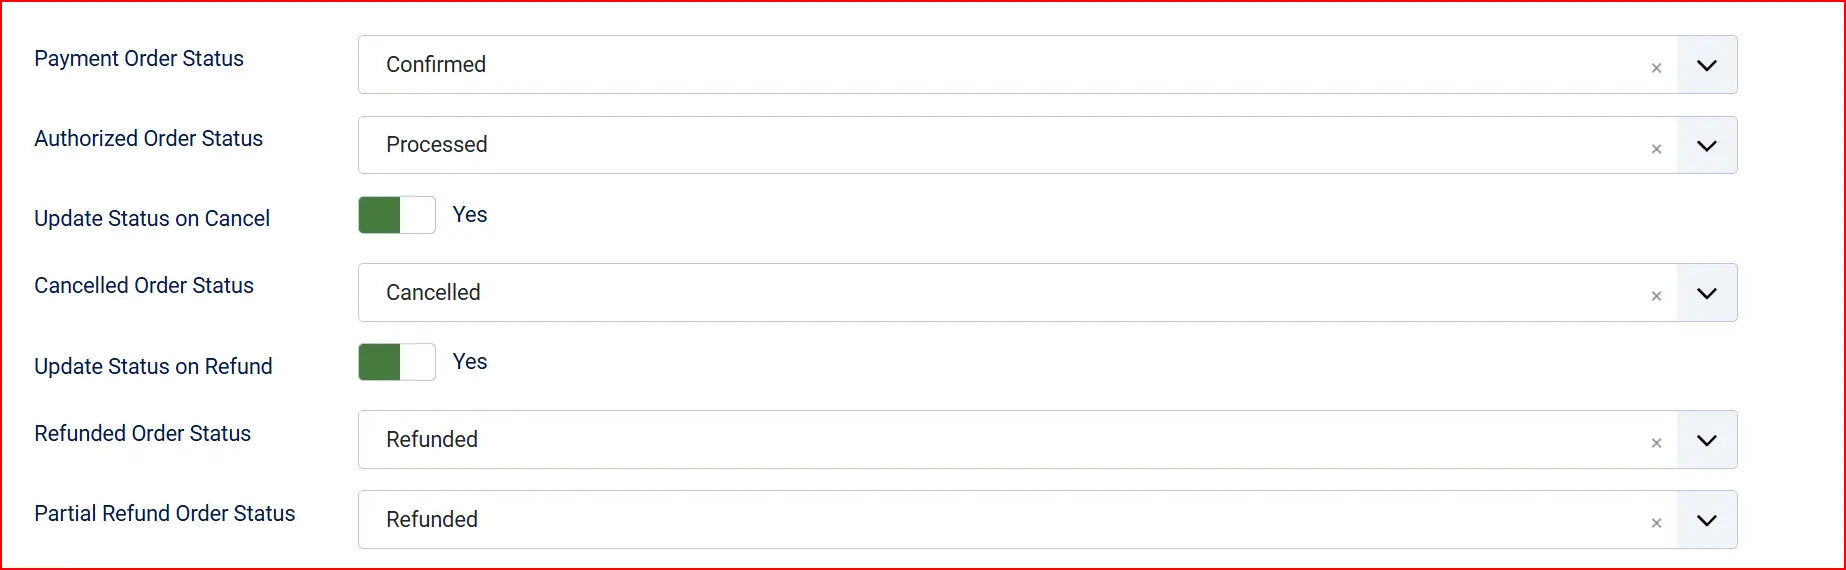
Control which order status J2Commerce applies at each point in the payment lifecycle.
Payment Order Status: Status applied when payment is successfully completed and captured.
Authorized Order Status: Status applied when payment is authorized but not yet captured (used with Authorize Only mode).
Update Status on Cancel: Toggle on to automatically change the order status when an authorization is voided.
Cancelled Order Status: Status to apply when an authorization is cancelled (shown when Update Status on Cancel is Yes).
Update Status on Refund: Toggle on to automatically change the order status when a refund is processed.
Refunded Order Status: Status to apply when a full refund is issued (shown when Update Status on Refund is Yes).
Partial Refund Order Status: Status to apply when a partial refund is issued (shown when Update Status on Refund is Yes).
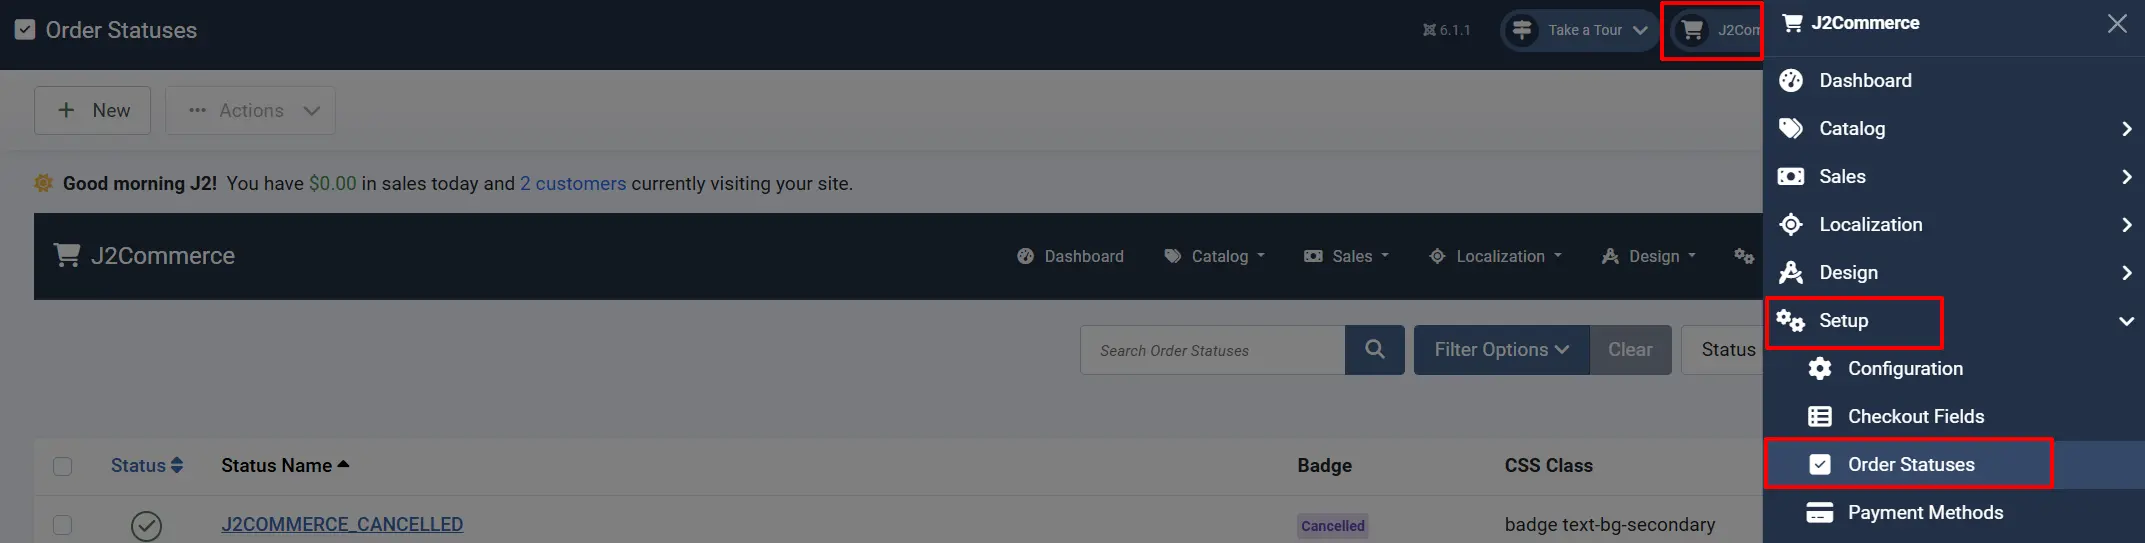
If the order status you want is not listed, create it first under J2Commerce -> Setup -> Order Statuses.
Surcharge (Optional)
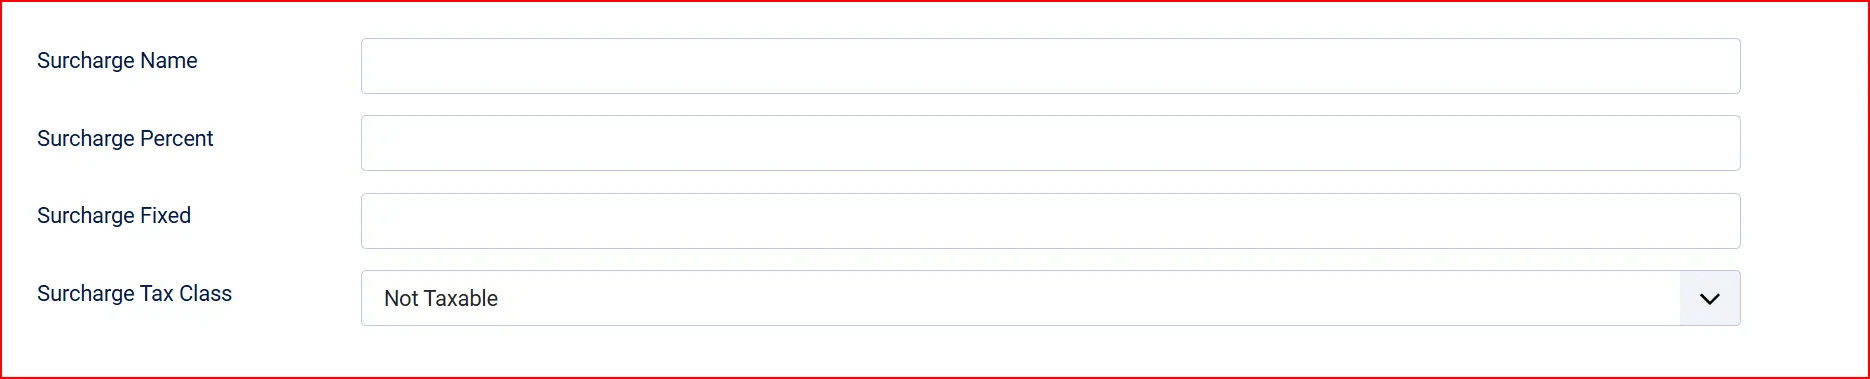
If you want to pass a payment surcharge on to customers who choose Klarna, complete these fields. Leave them blank if you do not charge a surcharge.
Surcharge Name: Label shown to the customer — e.g., "Klarna fee"
Surcharge Percent: Percentage of the order total added as a fee — e.g., 1.5 for 1.5%
Surcharge Fixed: Fixed amount added to every Klarna order — e.g., 0.30
Surcharge Tax Class: Tax profile to apply to the surcharge amount
Availability Restrictions (Optional)

Geozone Restriction: Limit Klarna to customers in a specific geozone. Leave blank to offer Klarna to all locations.
Minimum Subtotal: Klarna is only shown when the order subtotal is at or above this amount. Enter 0 for no minimum.
Maximum Subtotal: Klarna is hidden when the order subtotal exceeds this amount. Enter -1 for no maximum.
Custom Messages (Optional)
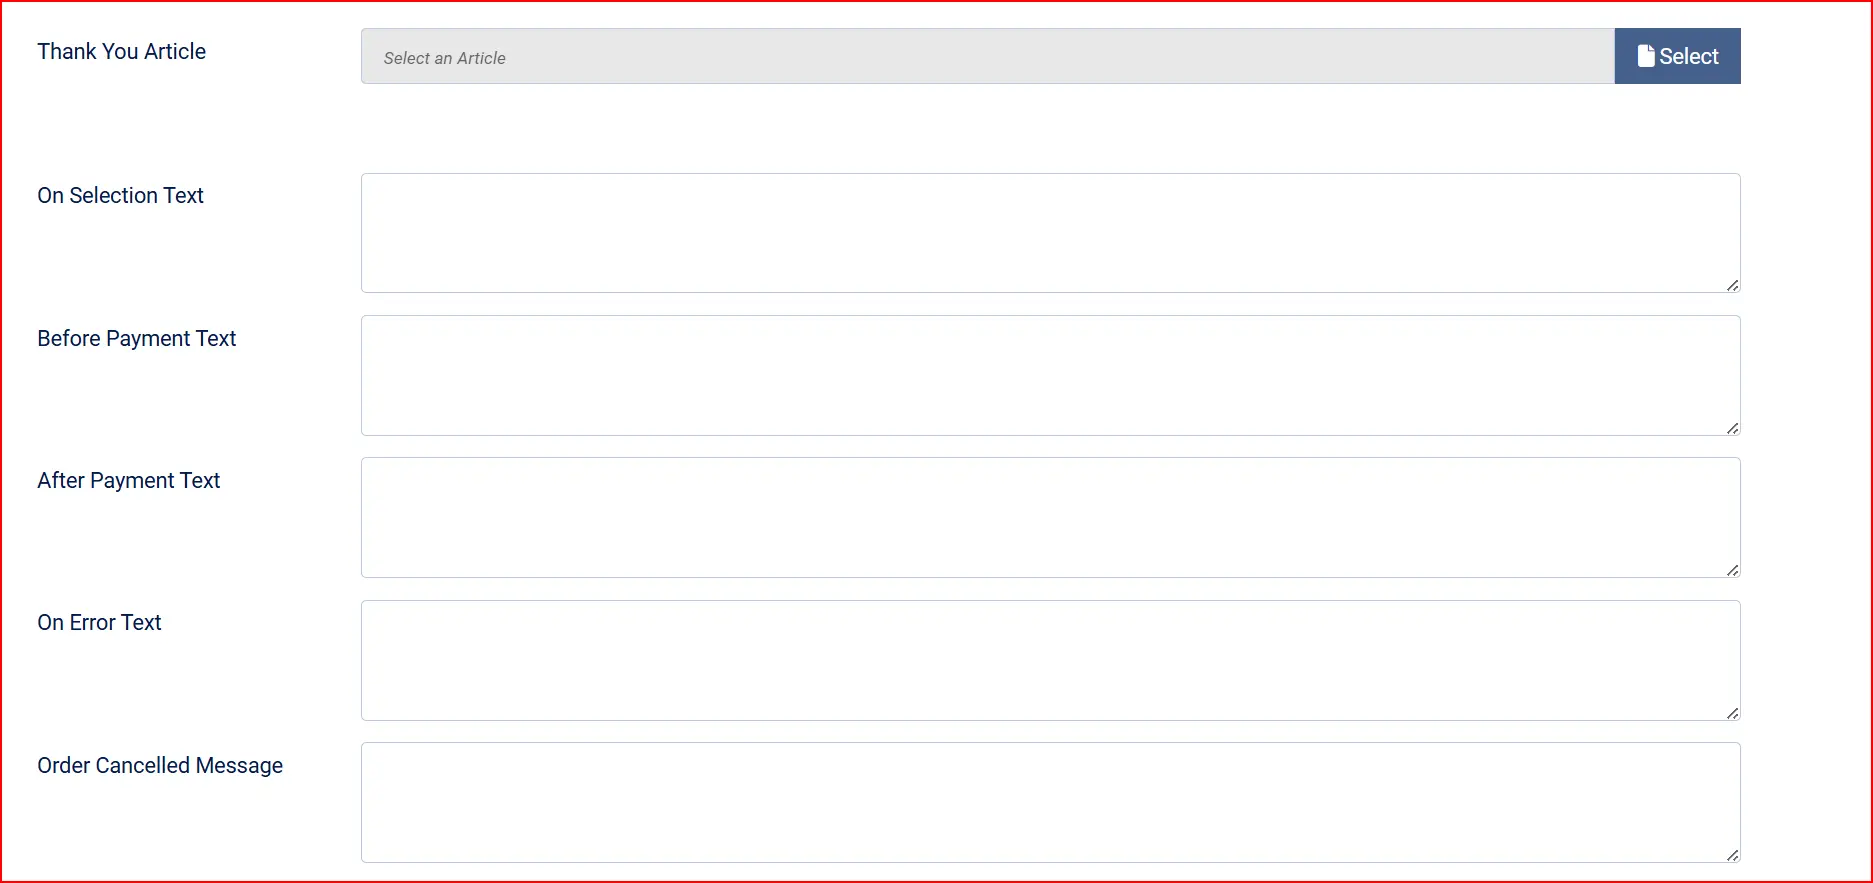
These text areas let you insert custom HTML or text at specific points during the checkout process.
Thank-You Article: Use the Thank You Message field to link a Joomla article that will be shown to the customer after a successful Klarna payment, in addition to the standard J2Commerce order confirmation.
On Selection: When the customer selects Klarna as their payment method
Before Payment: Directly before the Klarna payment widget or redirect button renders
After Payment: After a successful payment is completed
On Error: When a payment error occurs
On Cancel: When the customer cancels and returns from the Klarna page
Dashboard Icon (Optional)

Show Dashboard Icon: Add a Klarna shortcut to the J2Commerce dashboard.
- Icon Label: Label text for the dashboard icon (shown when Show Dashboard Icon is Yes).
Debug Logging: Log Klarna API requests and responses to the Joomla system log. Helpful for troubleshooting — turn off in production.
Click Save in the toolbar when you have finished configuring the plugin.
How Checkout Works
Klarna Payments (On-Site Widget)

When a shopper selects Klarna at checkout:
- The plugin creates a Klarna payment session using your API credentials.
- The Klarna Payments JavaScript widget loads in the checkout page — shoppers see their available Klarna options (Pay Now, Pay Later, Pay Over Time) directly on your site.
- The shopper selects their preferred option and authorizes the payment within the widget.
- The plugin captures the authorization (or leaves it as authorized-only, depending on your Transaction Type setting) and places the order.
Hosted Payment Page (HPP)
When a shopper selects Klarna at checkout:
- The plugin creates a Klarna HPP session and redirects the shopper to Klarna's hosted payment page.
- The shopper completes their payment on Klarna's site.
- Klarna redirects the shopper back to your store and sends a callback to confirm the payment result.
- The plugin updates the order status accordingly.
Managing Orders
Once a Klarna payment is placed, the J2Commerce order view shows additional payment actions depending on your Transaction Type setting.
Capture an Authorized Payment
When Transaction Type is set to Authorize Only, a Capture button appears in the order view. Click Capture to collect the funds from the shopper. This is the step that actually charges the customer.
Void an Authorization
Before capturing, you can click Void to cancel the authorization entirely. This releases the hold on the shopper's payment method without charging them. Voiding cannot be undone.
Issue a Refund
After a payment is captured, click Refund in the order view to return funds to the shopper. You can issue:
- A full refund for the entire captured amount
- A partial refund for a specific amount (enter the amount in the refund field)
Charge a Saved Klarna Token
If a customer has a saved Klarna payment method and Allow Saved Payment Methods is enabled, an admin can charge that saved method directly from the order view using Charge Saved Klarna Token.
Saved Payment Methods
When Allow Saved Payment Methods is enabled, logged-in customers see a Saved Klarna Methods section at checkout after their first Klarna purchase. They can:
- Select a previously saved method for faster checkout
- Choose Use a new payment method to use a different Klarna option
- Delete saved methods from their account area
Subscriptions
When Enable Subscriptions is turned on and the Subscription Product app is also installed, Klarna Customer Tokens are created at the time of the initial subscription purchase. These tokens are used to charge renewal orders automatically without the customer returning to checkout.
Subscription support requires the Subscription Product app plugin, which is a separate add-on available from the J2Commerce website.
Tips
- Start with Sandbox Mode on — Test the full checkout flow, including refunds and callbacks, before switching to live credentials.
- Register all three callback URLs — Missing even one URL in your Klarna Merchant Portal can prevent orders from updating correctly.
- Use "Authorize Only" for pre-orders or made-to-order goods — Capture the payment when you are ready to ship rather than charging the customer up front.
- Restrict by geozone if needed — If Klarna is only approved for certain countries in your merchant agreement, use the Geozone Restriction setting to hide it from ineligible customers automatically.
- Enable debug logging only when troubleshooting — Debug logs can contain sensitive API responses; disable this in production.
Troubleshooting
Klarna Widget Does Not Appear at Checkout
Cause: Missing or incorrect API credentials, wrong region selected, or the Client Identifier is blank (on-site widget mode).
Solution:
- Go to J2Commerce -> Setup -> Payment Methods -> Klarna.
- Confirm Sandbox Mode matches your credential type — sandbox credentials only work in sandbox mode, and live credentials only work with sandbox mode off.
- Verify the API Username, API Password, and Client Identifier are filled in correctly.
- Confirm the Region matches the country your Klarna merchant account is registered in.
- Enable Debug Logging, place a test order, then check System -> System Information -> PHP Information or the Joomla log file for API error details.
Orders Stay in Pending After Klarna Payment
Cause: Klarna callbacks are not reaching your server — the callback URLs may not be registered in your Klarna Merchant Portal, or your server is blocking the requests.
Solution:
- Open the plugin settings and copy the Authorization Callback URL.
- Log into your Klarna Merchant Portal and confirm that URL is registered as a callback endpoint.
- Confirm your site is publicly reachable over HTTPS (callbacks do not work on local development environments without a tunneling tool).
- Enable Debug Logging and check your server logs to see whether Klarna is sending requests and whether they are succeeding.
"Klarna API credentials are not configured" Error
Cause: The API Username or Password fields are empty for the active mode (sandbox or live).
Solution:
- Go to J2Commerce -> Setup -> Payment Methods -> Klarna.
- Check whether Sandbox Mode is on or off.
- Fill in the corresponding credential fields — Sandbox API Username and Sandbox API Password for sandbox mode, or API Username and API Password for live mode.
- Click Save.
Klarna Not Showing for Certain Customers
Cause: A Geozone Restriction, Minimum Subtotal, or Maximum Subtotal rule is filtering Klarna out for those customers.
Solution:
- Go to the plugin settings and review the Geozone Restriction field — if set, confirm the customer's shipping address falls within that geozone.
- Check the Minimum Subtotal and Maximum Subtotal values against the customer's cart total.
- Also confirm that Klarna's own eligibility rules are not blocking the shopper — for example, Klarna may not be available for certain currencies or order amounts based on your merchant agreement.
Sandbox Warning Appears on Live Store
Cause: Sandbox Mode is still enabled after you went live.
Solution:
- Go to J2Commerce -> Setup -> Payment Methods -> Klarna.
- Set Sandbox Mode to No.
- Confirm the API Username, API Password, and Client Identifier fields (under the live credentials section) are filled in with your live Klarna credentials.
- Click Save.