DoorDash Same-Day Delivery
The DoorDash Delivery plugin connects your J2Commerce store to DoorDash Drive, DoorDash's on-demand local delivery API. When a customer reaches the shipping step at checkout, the plugin calls the DoorDash Drive API in real time and shows a live delivery fee with an estimated arrival time. After the order is paid, a Dasher is automatically dispatched to pick up the order from your store and deliver it to the customer — no phone calls, no manual coordination.
This plugin is ideal for local retailers, restaurants, boutiques, florists, and any business that needs to deliver within a few miles on the same day.
Requirements
- PHP 8.3.0+
- Joomla! 6.x
- J2Commerce 6.x
- A DoorDash Developer account with a Drive API application
- Three credentials from your DoorDash Developer Portal: Developer ID, Key ID, and Signing Secret
Getting Your DoorDash Credentials
Before you can configure the plugin, you need API credentials from the DoorDash Developer Portal.
-
Sign in to your DoorDash Developer Portal.
-
Create or open a Drive API application.
-
In your application settings, locate the Credentials section. You will find three values:
- Developer ID — a UUID that identifies your developer account
- Key ID — a UUID that identifies this specific API key
- Signing Secret — a base64url-encoded value used to sign API requests (keep this private)
-
Copy all three values. You will paste them into the plugin settings in the next section.
DoorDash provides separate sandbox credentials and production credentials. Use sandbox credentials while testing so no real deliveries or charges occur.
Purchase and Download the Plugin
Step 1: Go to our J2Commerce website > Extension
Step 2: Locate the DoorDash Extension -> click View Details -> Add to cart -> Checkout.
Step 3: Go to your My Downloads under your profile button at the top right corner and search for the app. Click Available Versions -> View Files -> Download
Install the Plugin
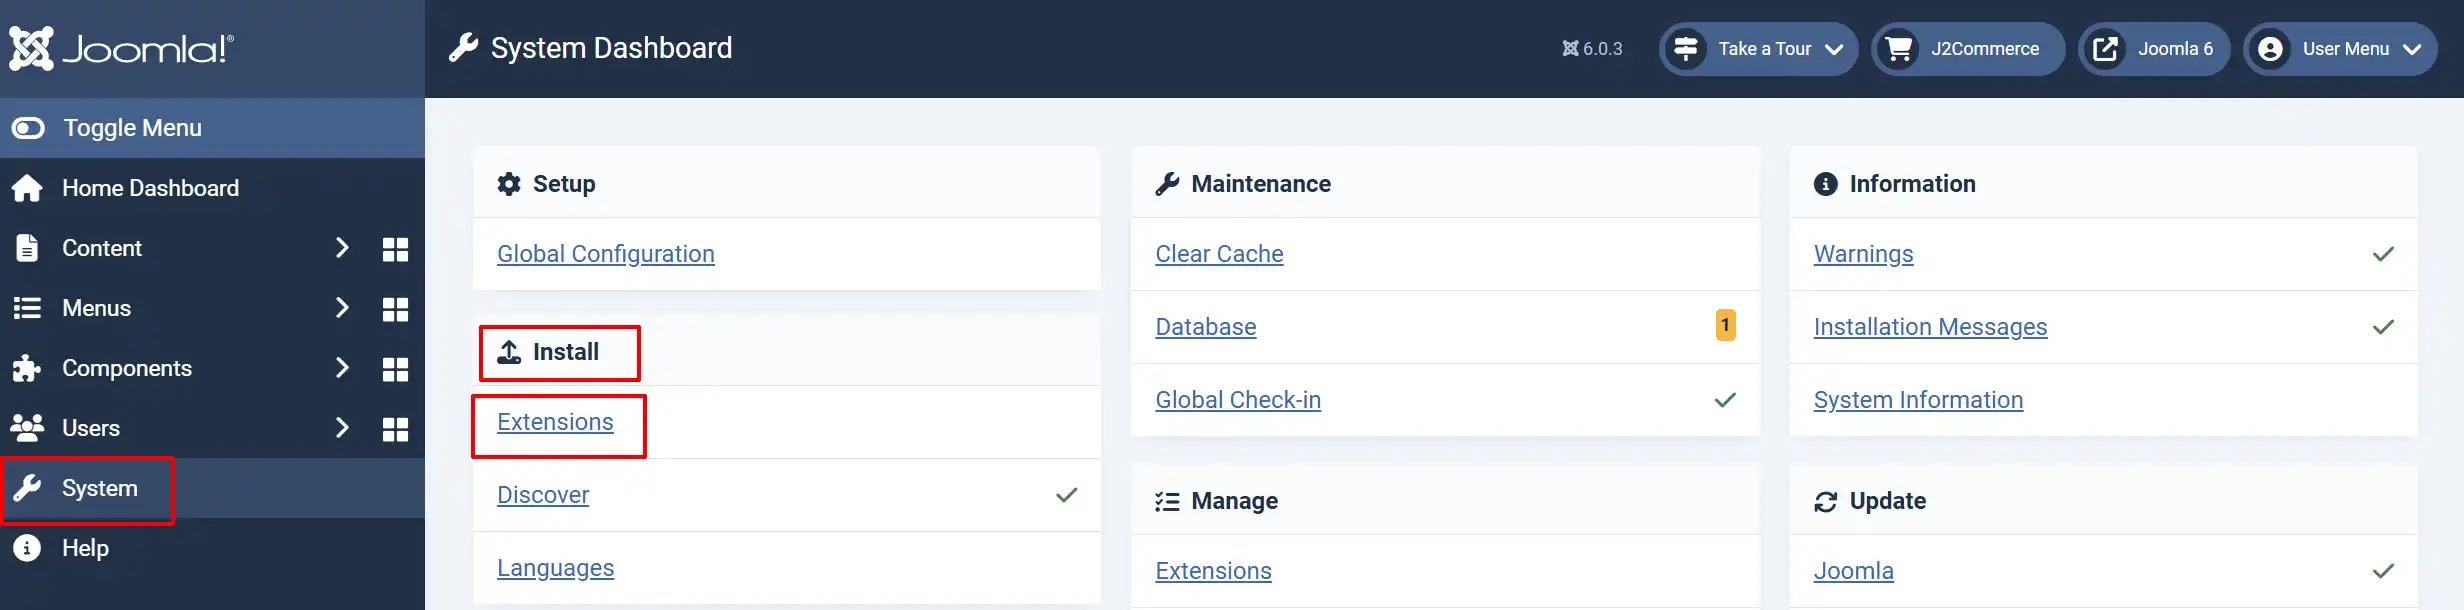
Go to System -> Install -> Extensions.
Upload the shipping_doordash.zip package file
Enable the Plugin
There are two ways you can access the Plugin.
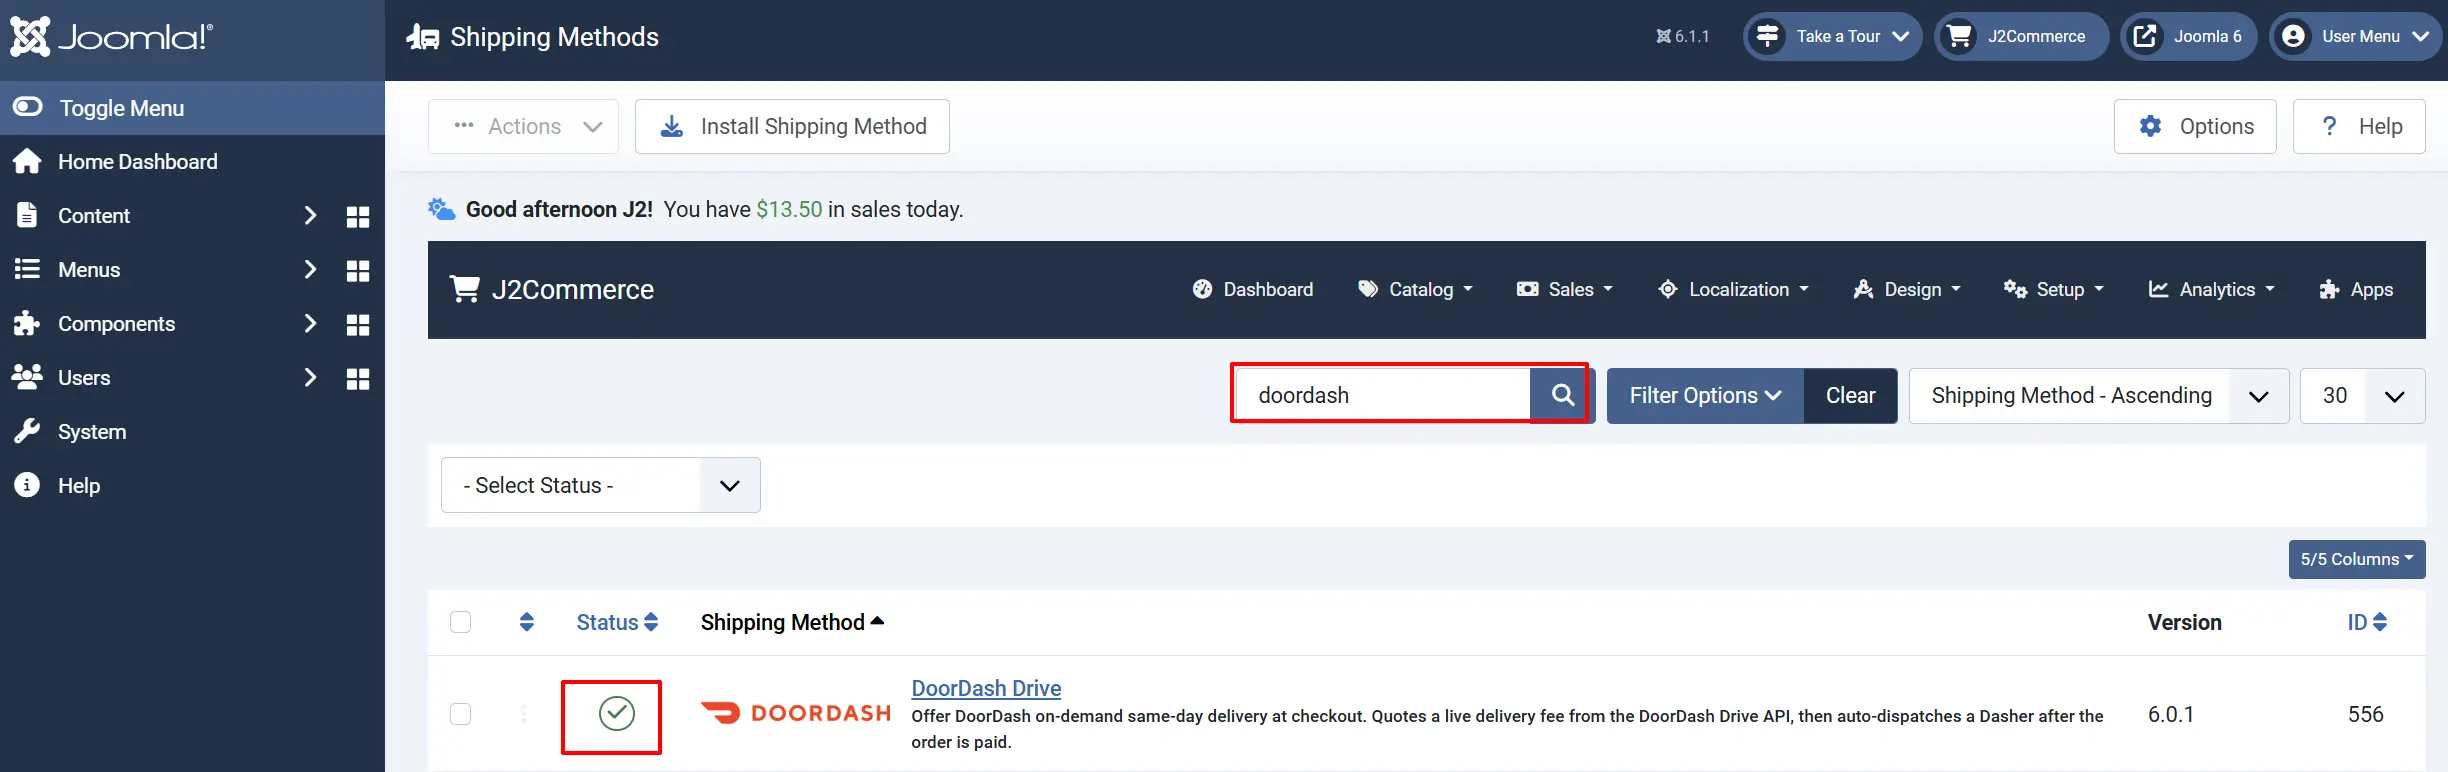
Option A: Go to the J2Commerce icon at the top right corner -> Setup -> Shipping Methods
Option B: Go to Components on the left sidebar -> J2Commerce -> Dashboard -> Setup -> Shipping Methods

Look for DoorDash, click the X, and it will turn into a green checkmark. It is now enabled and ready for setup.
Configure the Plugin
Once you click on the DoorDash Title next to the green checkmark, you are ready to start setting up the parameters.
Helpful Tip: Click on the Toggle Inline Help button on any app/plugin you install and it will show a description below each section. See image below

API Credentials tab
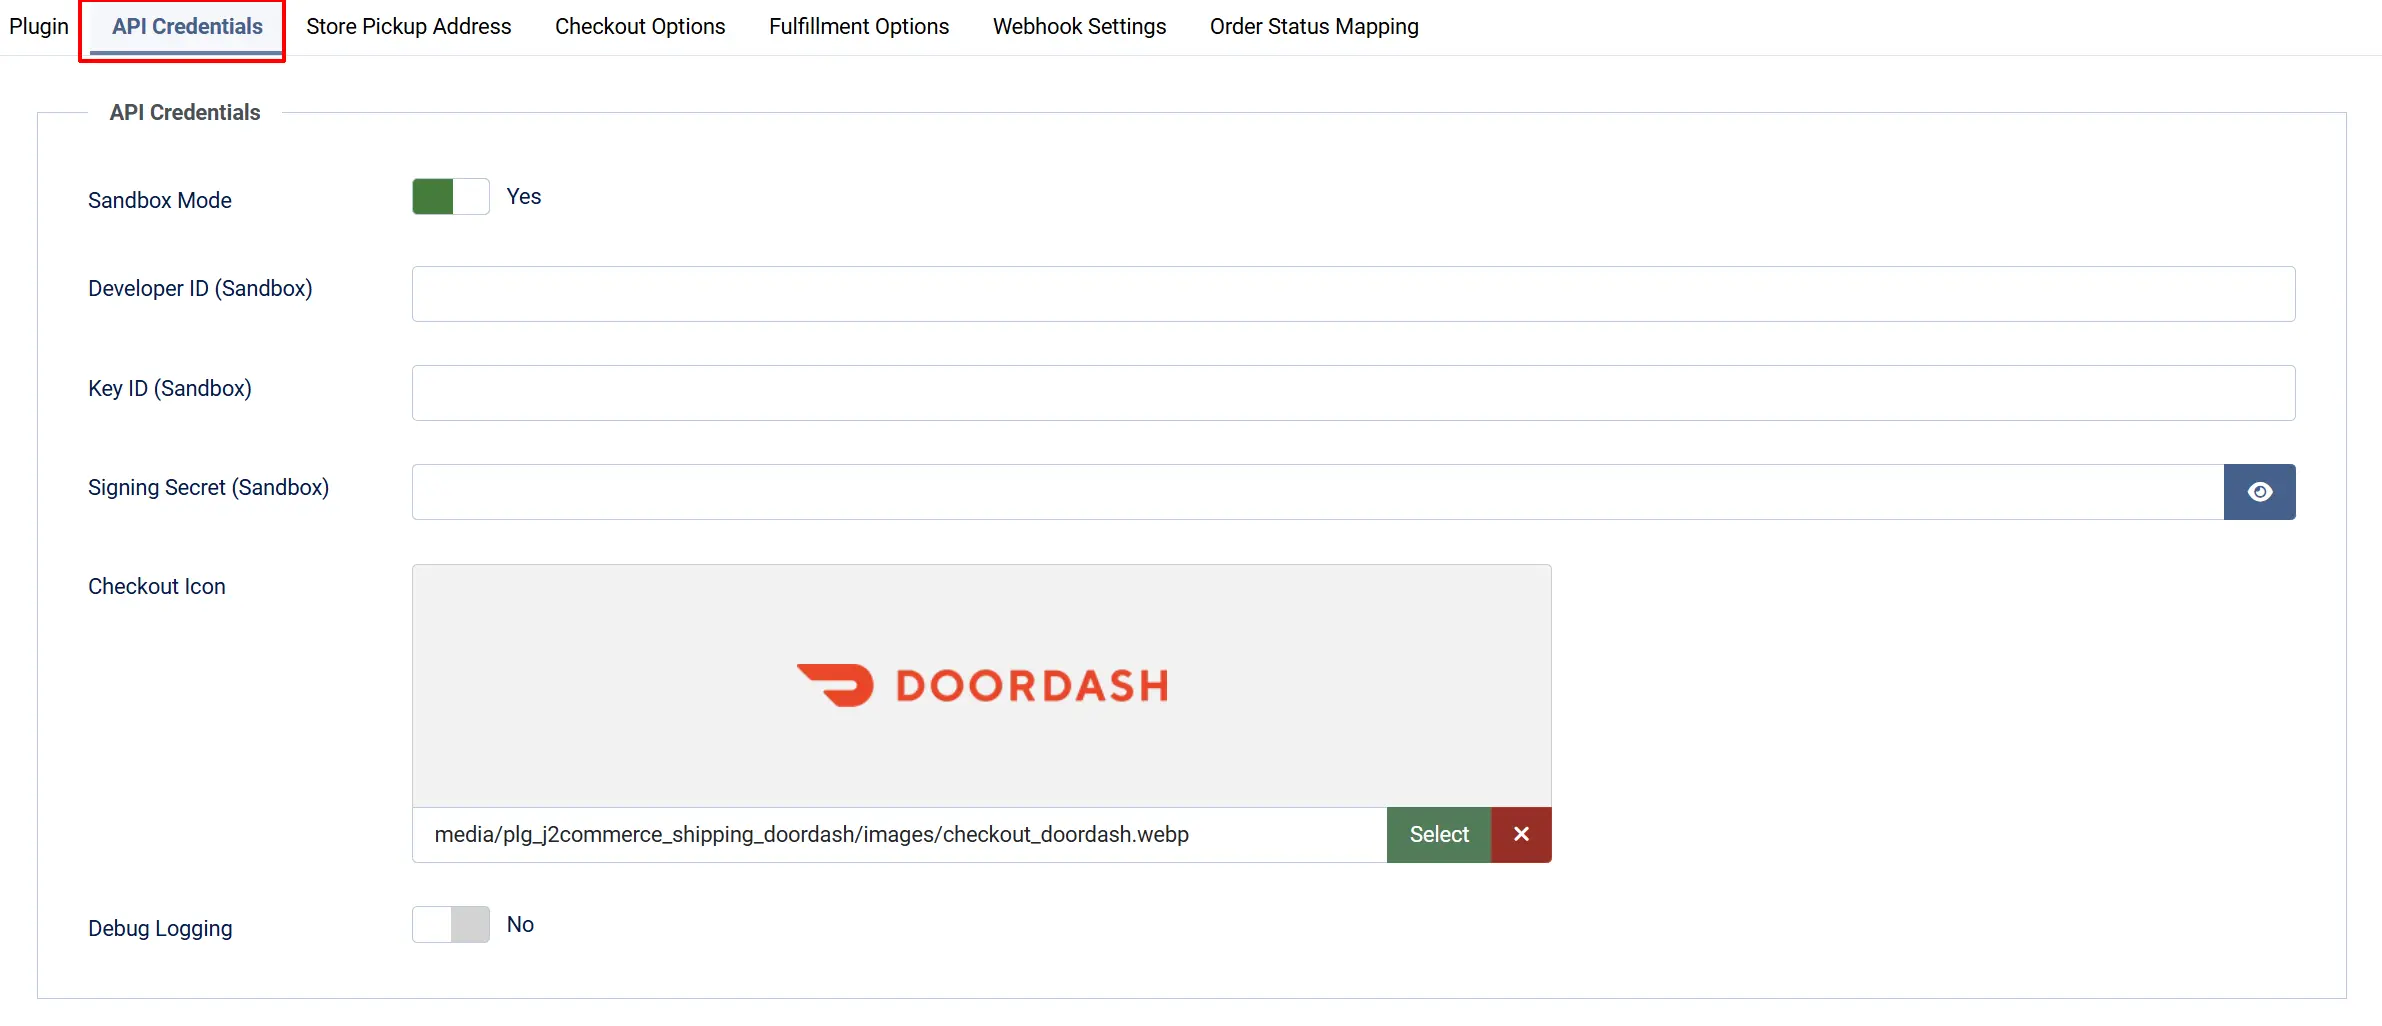
Sandbox Mode: When enabled, the plugin uses your sandbox credentials (shown below). No real Dasher is dispatched and no real fee is charged. Turn this off only when you are ready to go live.
Developer ID (Sandbox): Your DoorDash Drive sandbox Developer ID (UUID). Shown only when Sandbox Mode is on.
Key ID (Sandbox): Your DoorDash Drive sandbox Key ID (UUID). Shown only when Sandbox Mode is on.
Signing Secret (Sandbox): Your DoorDash sandbox Signing Secret (base64url-encoded). Keep this private. Shown only when Sandbox Mode is on.
Developer ID (Production): Your DoorDash Drive production Developer ID. Shown only when Sandbox Mode is off.
Key ID (Production): Your DoorDash Drive production Key ID. Shown only when Sandbox Mode is off.
Signing Secret (Production): Your DoorDash production Signing Secret. Keep this private. Shown only when Sandbox Mode is off.
Checkout Icon: Logo shown next to the DoorDash option at checkout. Defaults to the bundled DoorDash logo.
Debug Logging: When enabled, all DoorDash API calls and responses are written to a log file. Turn this off in production — it generates large logs.
Store Pickup Address tab
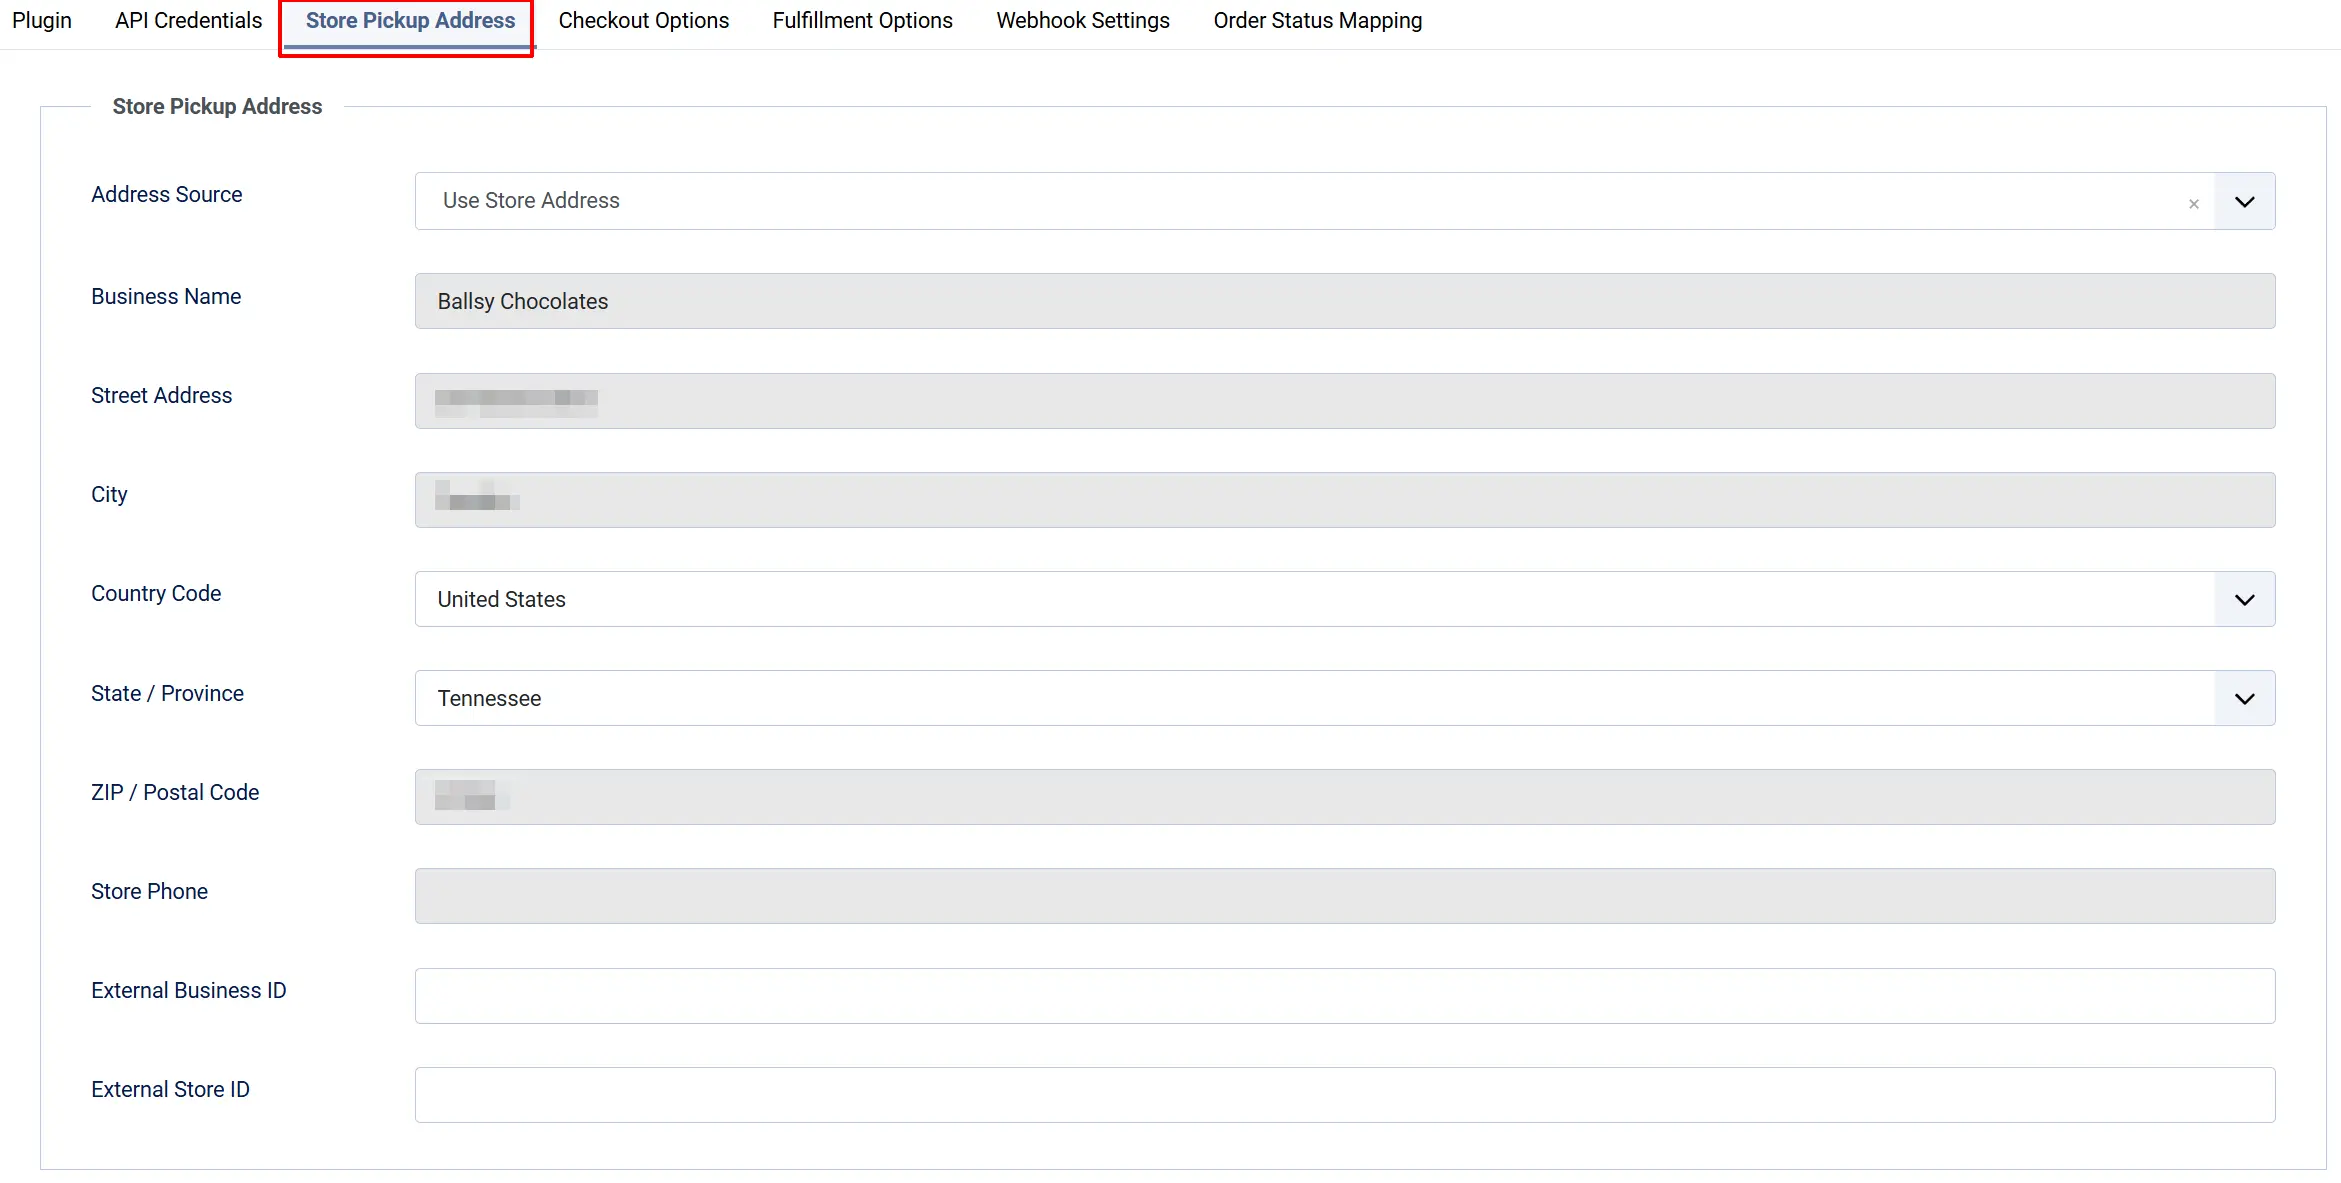
These fields tell DoorDash where your Dasher should pick up the order.
Address Source: Choose Use Store Address to pull the address already configured in J2Commerce, or Add New Address to enter a different pickup location (for example, a warehouse separate from your billing address).
Business Name: Your store name as shown to the Dasher at pickup.
Street Address: Pickup street address (for example, 123 Main St).
City: Pickup city.
State / Province: Pickup state or province. The list is filtered by the country selected below.
ZIP / Postal Code: Pickup ZIP or postal code.
Country: Pickup country.
Store Phone: Phone number the Dasher may call at pickup (E.164 format recommended, for example +16505551234).
External Business ID: Optional. If you have a pre-onboarded DoorDash business, enter its external_business_id here. This field and External Store ID must be filled in together — DoorDash rejects one without the other. Leave both blank to use the pickup address above.
External Store ID: Optional. The external_store_id of your pre-onboarded DoorDash store. Requires External Business ID to also be set.
If you choose Use Store Address, the plugin reads your address from J2Commerce configuration automatically. The individual fields below it are ignored.
External Business ID and External Store ID must be set together. Filling in one without the other causes DoorDash to reject every quote and dispatch request with a validation error. Either fill in both or leave both blank.
Checkout Options tab
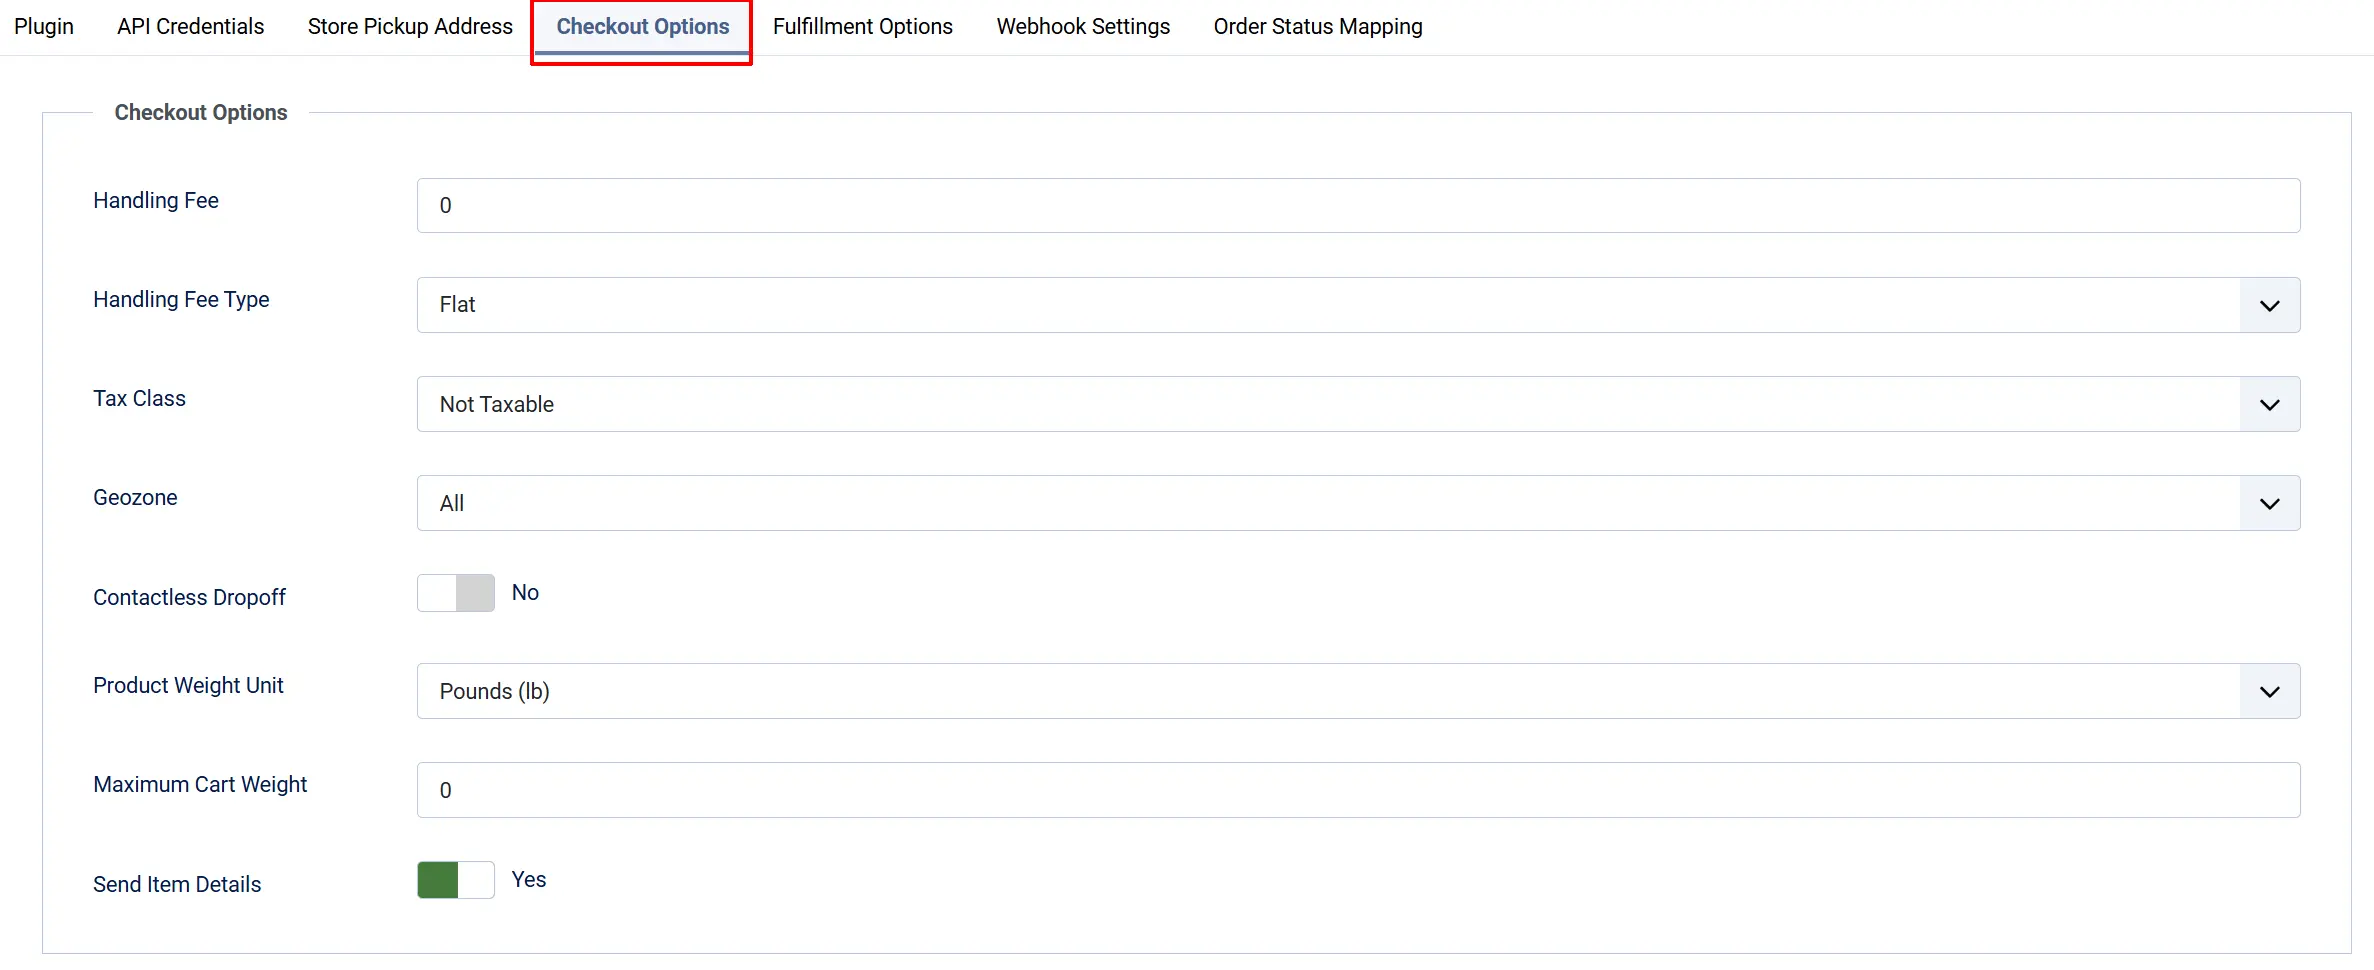
Handling Fee: A fixed or percentage amount added to the DoorDash delivery fee before it is shown to the customer. Enter 0 to pass the fee through unchanged.
Handling Fee Type: Flat adds a fixed dollar amount to every delivery fee. Percent adds a percentage of the delivery fee.
Tax Class: Apply a J2Commerce tax profile to the delivery fee. Leave at None to use the tax amount DoorDash returns instead.
Geozone: Only offer DoorDash delivery to customers whose address falls within the selected geozone. Leave as All Zones to show the option everywhere.
Contactless Dropoff: Request that the Dasher leave the package at the door without requiring a signature or handoff.
Fulfillment Options tab
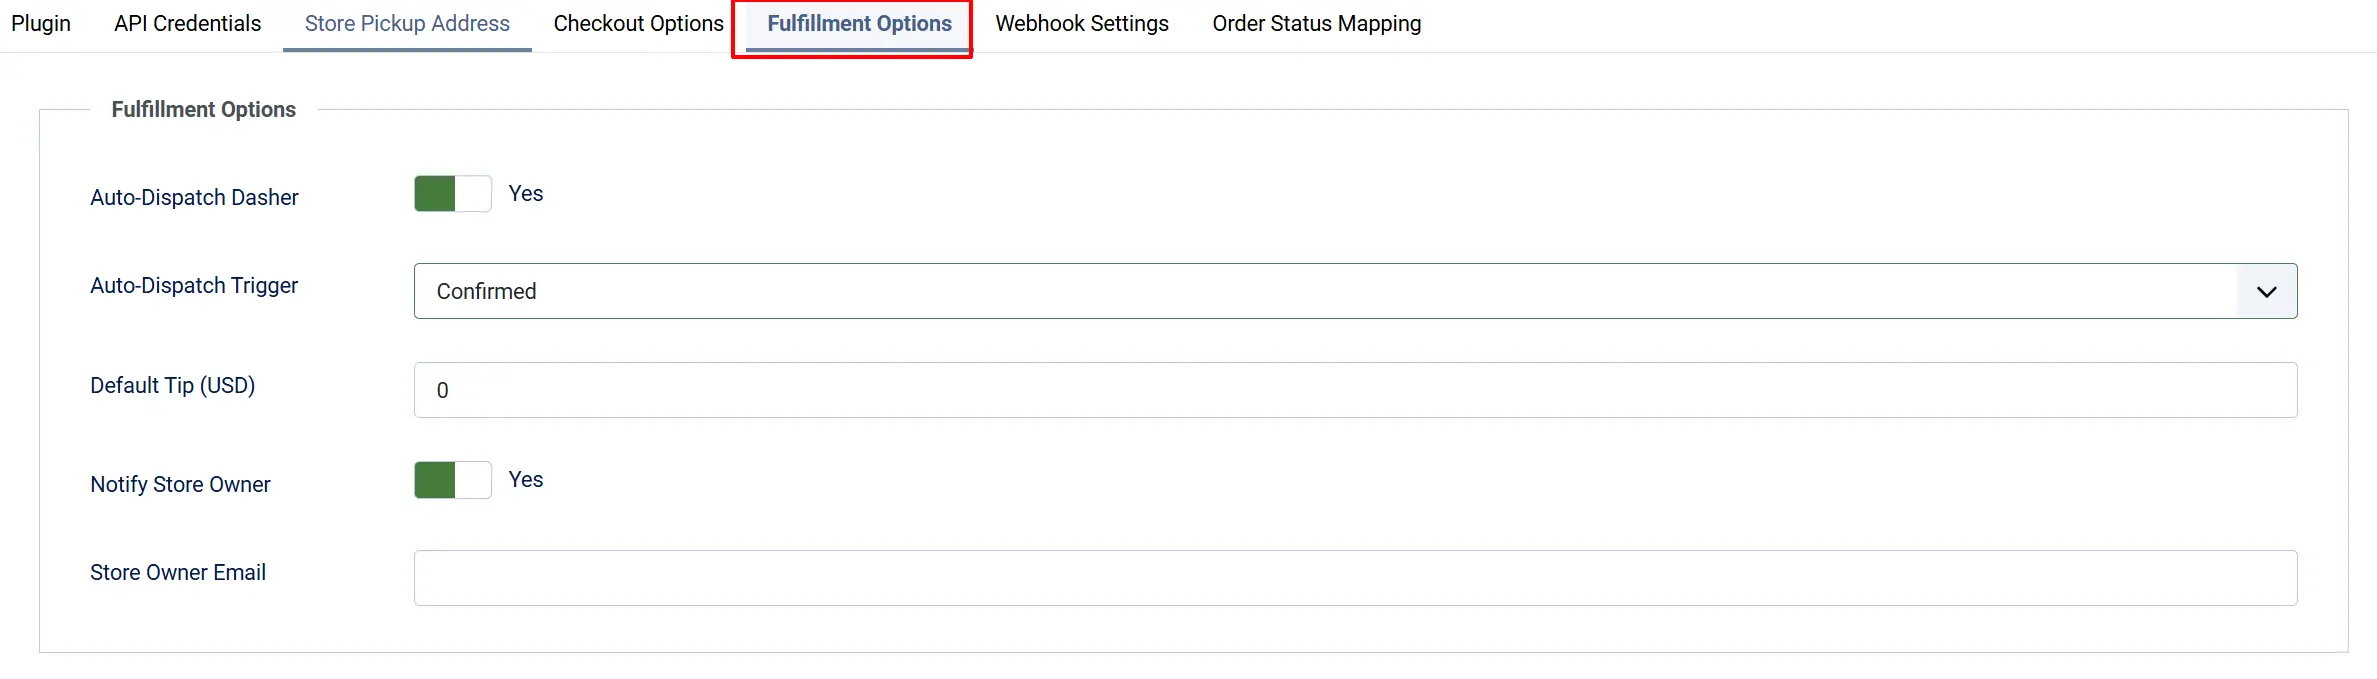
Auto-Dispatch Dasher: When enabled, a Dasher is automatically dispatched as soon as the order is paid. Turn this off to dispatch every delivery manually from the order view.
Auto-Dispatch Trigger: Visible only when Auto-Dispatch Dasher is on. Leave as None to dispatch immediately after payment. Or choose a specific order status (for example, Confirmed) to delay dispatch until the order reaches that status — useful if you want to verify the order before a Dasher arrives.
Default Tip (USD): A tip amount (in dollars) added to every dispatch, for example 5.00 for a $5 tip. You can adjust this per order from the order view before the Dasher picks up.
Notify Store Owner: When enabled, an email is sent to the store owner address when a Dasher is dispatched.
Store Owner Email: The email address for dispatch notifications. If left blank, the plugin uses the Joomla global From Email address.
Webhook Settings tab

DoorDash sends real-time delivery status updates (Dasher confirmed, picked up, delivered, cancelled) to a webhook URL on your site. Setting up the webhook keeps your order statuses in sync automatically without you needing to click Refresh Status on every order.
Webhook Username: A username of your choice. DoorDash sends this in a Basic-Auth header on every webhook request. Must match what you configure in the DoorDash Developer Portal.
**Webhook Password:**A password of your choice (use something strong). Must match the DoorDash Developer Portal setting.
Your webhook URL follows this pattern:
https://[your-site]/index.php?option=com_ajax&plugin=shipping_doordash&group=j2commerce&task=shippingplugin.ajax&action=processWebhook&format=raw
Replace [your-site] with your store's domain. Copy this URL and paste it into the Webhook Settings section of your DoorDash Drive application in the DoorDash Developer Portal. Configure the Basic Auth username and password in the portal to match what you entered above.
Order Status tab
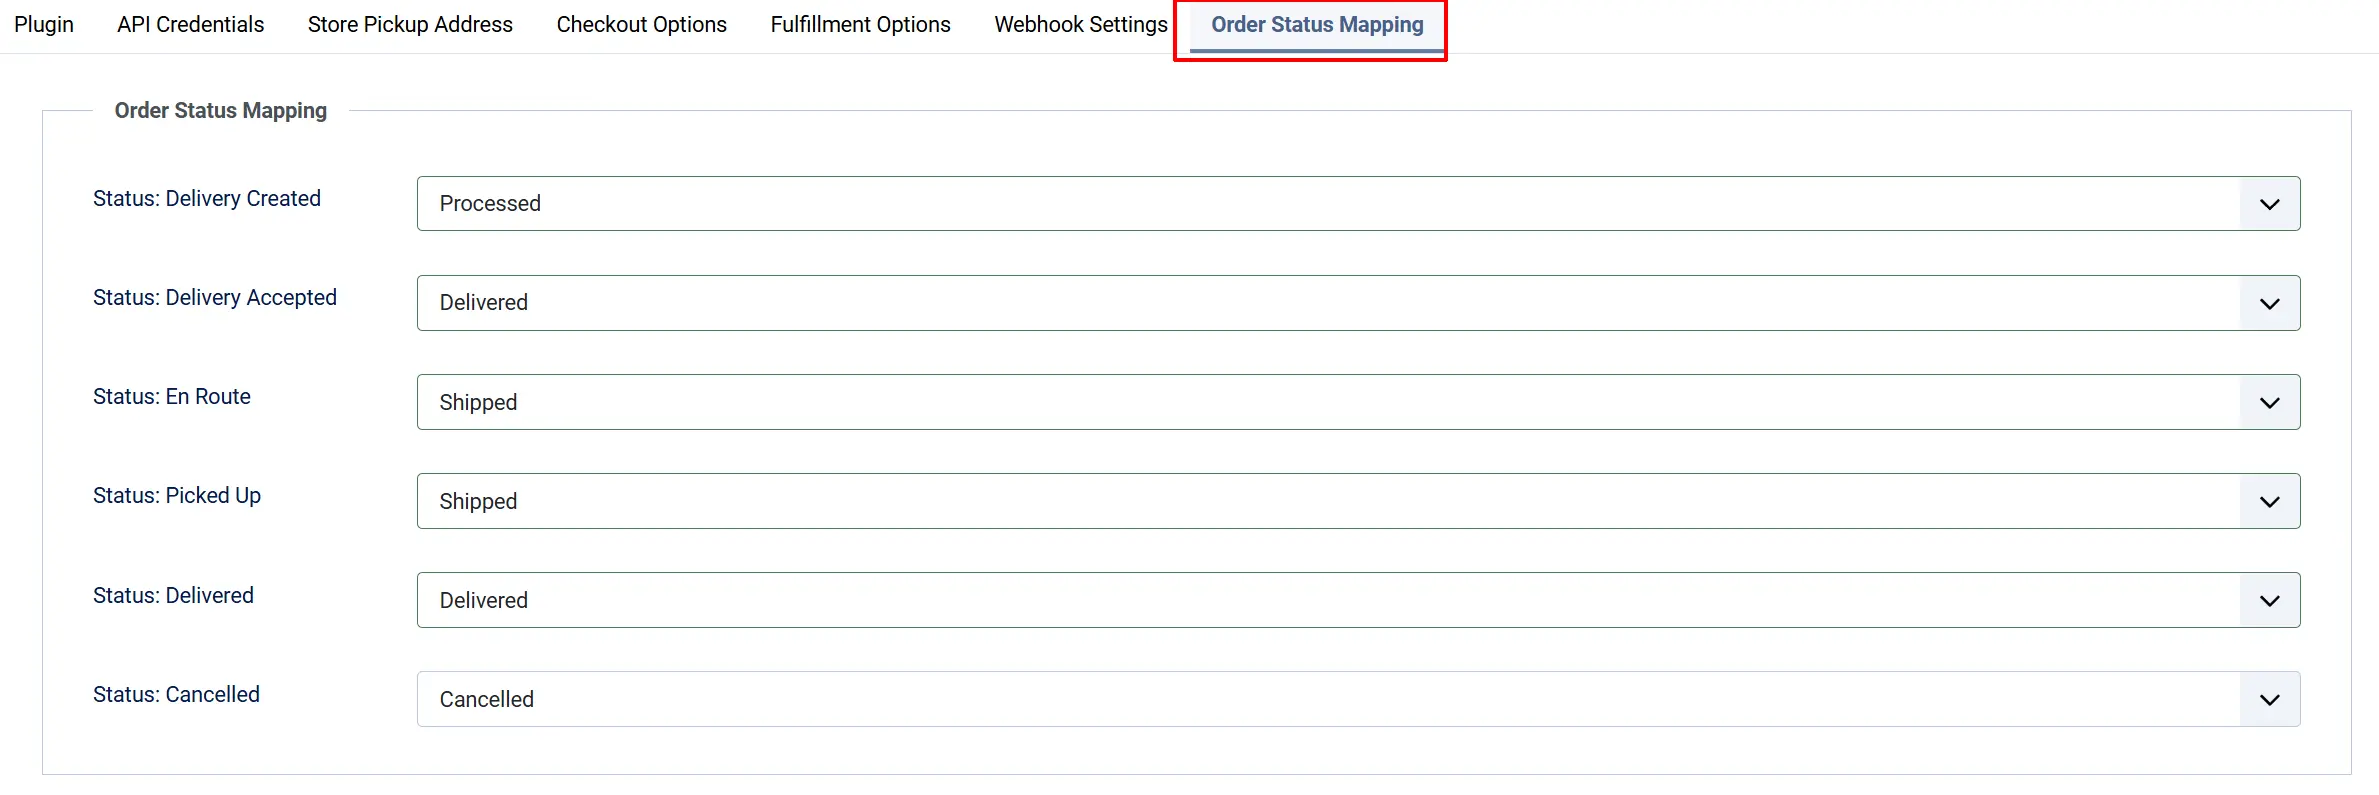
These settings control which J2Commerce order status is applied automatically when DoorDash reports a delivery milestone. Leave a field at None to skip that milestone.
Status: Delivery Created: When the delivery is first created in DoorDash (before a Dasher is confirmed).
Status: Delivery Accepted: When DoorDash confirms a Dasher has accepted the delivery.
Status: En Route: When the Dasher is confirmed as arriving at the dropoff address.
Status: Picked Up: When the Dasher picks up the order from your store.
Status: Delivered: When the order is successfully delivered to the customer.
Status: Cancelled: When the delivery is cancelled.
Sandbox vs. Production Testing
With Sandbox Mode turned on, the plugin calls DoorDash's sandbox environment. The delivery fee returned is simulated, no real Dasher is dispatched, and no charge appears on your DoorDash account.
Use sandbox mode to:
- Verify that rates appear at checkout
- Test the dispatch, cancel, and refresh actions in the order view
- Test that webhooks arrive at your endpoint
When you are satisfied that everything works, go back to the plugin settings, turn Sandbox Mode off, enter your production credentials, and click Save.
Use the Debug Logging toggle during testing to see exactly what the plugin sends to DoorDash and what DoorDash sends back. Check the log at System -> Logs in the Joomla administrator. Turn debug logging off before going live.
How It Works
-
Customer enters their shipping address at checkout. The plugin checks whether the address falls within your configured geozone (if any).
-
The plugin calls the DoorDash Drive API. It sends your store's pickup address and the customer's destination to DoorDash, which returns a live delivery fee and an estimated arrival time.
-
The rate appears at checkout. The customer sees "DoorDash Same-Day Delivery" with the fee and an estimated arrival such as "Estimated arrival by 2:45 PM". If you set a handling fee, it is added before display.
-
The customer places the order. The delivery fee is added to the order total. The DoorDash quote reference is saved with the order.
-
Payment is completed. If Auto-Dispatch Dasher is on (and no trigger status is set), the plugin immediately accepts the saved quote in DoorDash, converting it from a price estimate into a real dispatched delivery. A Dasher is assigned by DoorDash automatically.
-
The store owner receives a notification email (if enabled) when the Dasher is dispatched, showing the delivery status and estimated arrival.
-
DoorDash sends webhook events as the delivery progresses. The plugin receives these and updates the order status automatically — Dasher confirmed, picked up, delivered, cancelled.
-
You can monitor and manage the delivery from the order view. A DoorDash Delivery panel appears at the bottom of every order that used DoorDash at checkout. From this panel you can dispatch manually, refresh the current status, view the Dasher's name and estimated arrival, track the delivery on a map, edit the tip or dropoff instructions, cancel, request a refund, redeliver, and rate the Dasher.
Managing a Delivery from the Order View
Open any DoorDash order in J2Commerce -> Sales -> Orders and scroll to the DoorDash Delivery panel at the bottom of the page.
Dispatching a Dasher: If Auto-Dispatch is turned off — or if you want to re-dispatch after a cancellation — click Dispatch Dasher. A confirmation dialog shows the delivery fee that will be billed to your DoorDash account. Click Proceed to confirm.
Refreshing Delivery Status: Click Refresh Status to pull the latest delivery information from DoorDash immediately, without waiting for a webhook event.
Tracking the Delivery: Click Track Delivery to open the DoorDash tracking page in a new tab. The customer-facing tracking link shows real-time Dasher location.
Editing a Delivery: Click Edit Delivery to adjust the tip amount, add dropoff instructions (for example, "Leave at back door"), or toggle contactless delivery — but only while the Dasher has not yet picked up the order.
Cancelling a Delivery: Click Cancel Delivery and confirm the prompt. If a Dasher has already been assigned, DoorDash may not allow the cancellation (a notice will appear). In that case, use Request Refund or Redeliver instead.
A cancellation fee may apply if a Dasher has already been assigned to the delivery when you cancel.
Requesting a Refund: Click Request Refund and choose the reason that best describes the issue (for example, "Never delivered" or "Delivered late"). DoorDash reviews the request and decides whether to grant it. This is a DoorDash-side refund of the delivery fee — it does not automatically refund the customer's product payment in J2Commerce.
Redelivering an Order: If a delivery was cancelled or completed but the item needs to be sent again, click Redeliver. This dispatches a brand-new Dasher for the same order and bills your DoorDash account for a new delivery fee.
Rating the Dasher: After a delivery is completed, click Rate Dasher to leave a thumbs up or thumbs down rating with an optional reason and comment.
Viewing Dasher History: Click Dasher History to see all Dashers who were assigned to the delivery, including any who were reassigned before pickup.
Troubleshooting
No DoorDash rate appears at checkout
Cause: Credentials are missing or incorrect, the pickup address is incomplete, or DoorDash does not serve the customer's delivery address.
Solution:
- Go to J2Commerce -> Setup -> Shipping Methods, click DoorDash Drive to open the settings.
- Confirm Sandbox Mode is set correctly and the matching credentials (sandbox or production) are filled in. All three fields — Developer ID, Key ID, and Signing Secret — must be present.
- Check the Store Pickup Address tab — the plugin requires at minimum a street address and ZIP/postal code (or a complete J2Commerce store address if you selected Use Store Address).
- Enable Debug Logging temporarily, clear the Joomla cache, and attempt a checkout. Review the log at System -> Logs for any API error messages, then disable debug logging again.
- If the error is "not serviceable", the customer's address is outside DoorDash's delivery range. No rate will appear — this is expected behavior.
"Invalid credentials" or 401 error in the debug log
Cause: The Developer ID, Key ID, or Signing Secret was copied incorrectly, or the credentials belong to the wrong environment.
Solution:
- In your DoorDash Developer Portal, copy the credentials again carefully. The Signing Secret in particular is a long base64url-encoded string — a single missing character will cause every request to fail.
- Confirm that Sandbox Mode matches the environment your credentials belong to.
- Save the plugin settings and test again.
"External Business ID and External Store ID" error (400)
Cause: One of the two fields is filled in but the other is blank. DoorDash requires both together or neither.
Solution:
Either fill in both External Business ID and External Store ID, or clear both fields to use the pickup address instead.
Dispatch fails with "already dispatched" message
Cause: A delivery has already been dispatched for this order and is still active (not cancelled or completed).
Solution:
Check the DoorDash Delivery panel in the order view. If the delivery is active, use Track Delivery or Refresh Status to see the current state. If you need to cancel and redispatch, cancel the current delivery first, then click Dispatch Dasher again.
Order status is not updating when the delivery progresses
Cause: The webhook is not configured in the DoorDash Developer Portal, or the username and password do not match.
Solution:
- Copy your webhook URL from the plugin settings (see the Webhook Settings section above for the URL format).
- In your DoorDash Developer Portal, go to Webhook Settings and confirm a webhook is registered pointing to your site's URL, with the correct Basic Auth username and password.
- Make sure the Webhook Username and Webhook Password in the plugin settings exactly match what you entered in the DoorDash Developer Portal.
- You can still update status manually by clicking Refresh Status in the order view.