AtoShip Multi-Carrier Shipping
The AtoShip shipping plugin connects your J2Commerce store to the AtoShip multi-carrier shipping platform. With AtoShip, you can offer your customers real-time shipping rates from USPS, UPS, FedEx, and DHL at checkout. You can also purchase and print shipping labels, track packages, and automatically update order statuses when deliveries are complete -- all from within your J2Commerce admin panel.
This plugin is ideal for stores that ship physical products and want to offer accurate, carrier-calculated shipping rates instead of flat-rate or weight-based estimates.
Requirements
- with PHP 8.3.0 +
- Joomla! 6.x
- J2Commerce 6.x
What You Can Do with AtoShip
- Real-time shipping rates at checkout from up to four major carriers
- Buy and print shipping labels directly from the order screen
- Track packages with automatic status updates
- Auto-advance orders to "Shipped" or "Delivered" status
- Batch label creation for fulfilling multiple orders at once
- Insurance option when creating labels
- Webhook integration for fully automated tracking updates
Prerequisites
- J2Commerce 6 installed and enabled on your Joomla 6 site
- An AtoShip account at atoship.com
- At least one product in your store marked as shipping enabled
- A valid ship-from address (your warehouse or business address)
Create an AtoShip Account
Step 1: Create Your AtoShip Account
Before configuring the plugin, you need an AtoShip account with API credentials.
-
Go to atoship.com and click Sign Up (or Get Started).
-
Complete the registration form with your business details.
-
Verify your email address.
-
Log in to the AtoShip dashboard.
-
Once logged in, click on your profile at the bottom left corner -> My Account -> API Key tab -> Add API Key

-
Pop-up window: Enter your company name -> copy your Sandbox API key (starts with
ak_test_) for testing, or your Production API Key (Live API key) (starts withak_live_)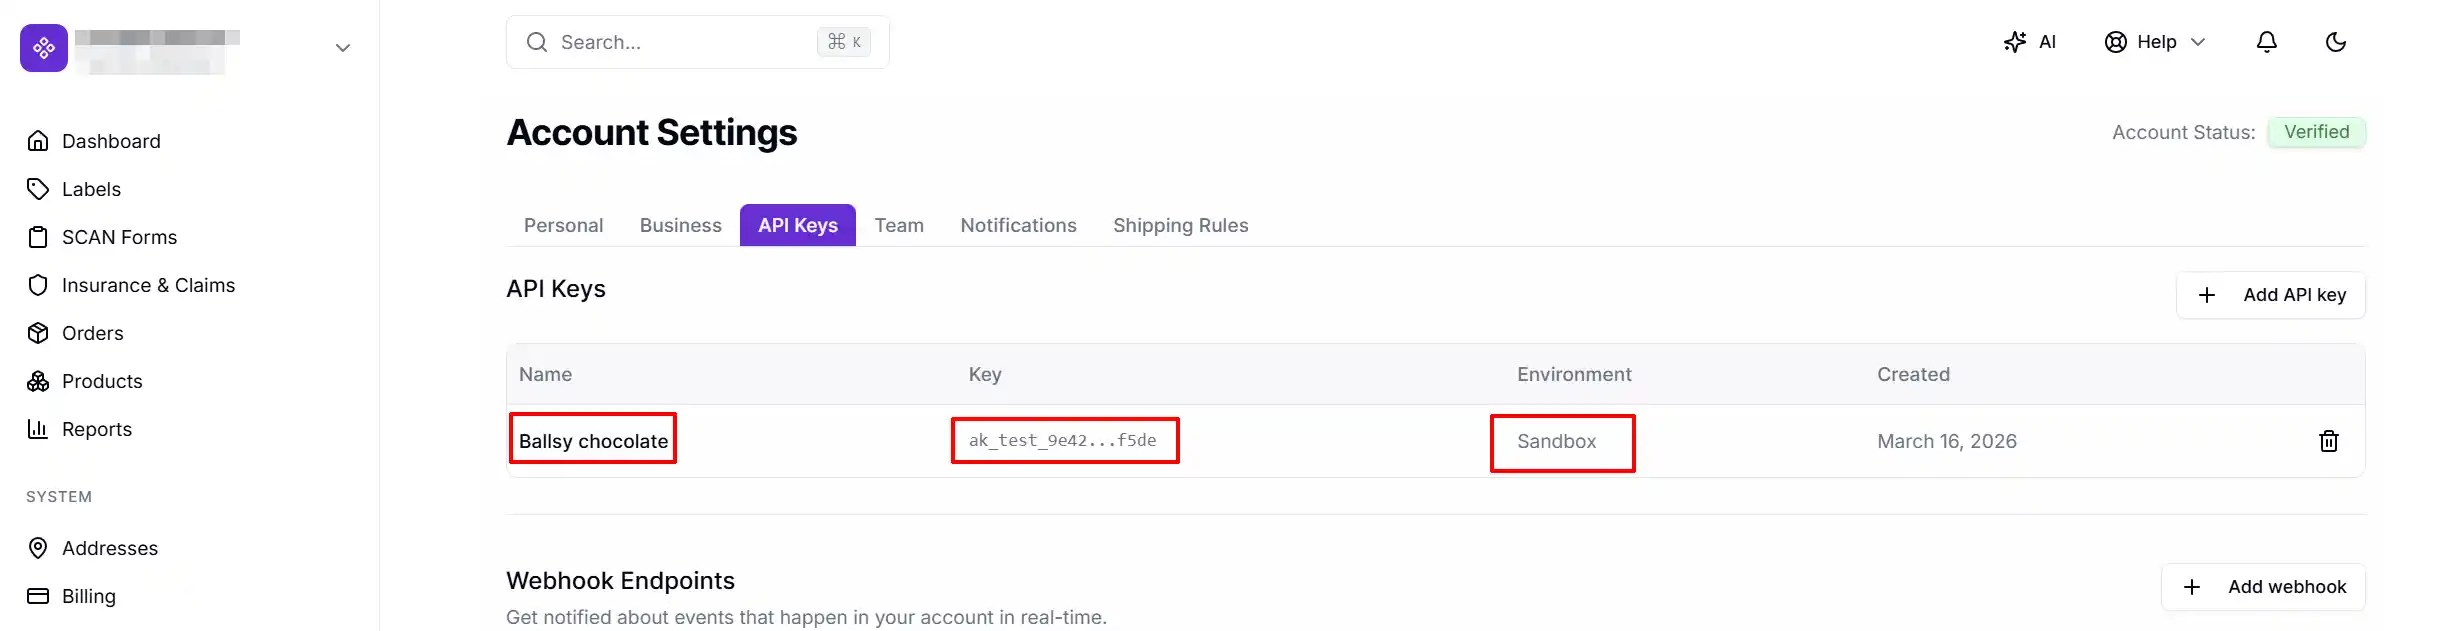
NOTE: Keep both keys handy — you will enter them in the plugin settings below.
Purchase and Download the Plugin
Step 1: Go to our J2Commerce website > Extension
Step 2: Locate the AtoShip Extension -> click View Details -> Add to cart -> Checkout.
Step 3: Go to your My Downloads under your profile button at the top right corner and search for the app. Click Available Versions -> View Files -> Download
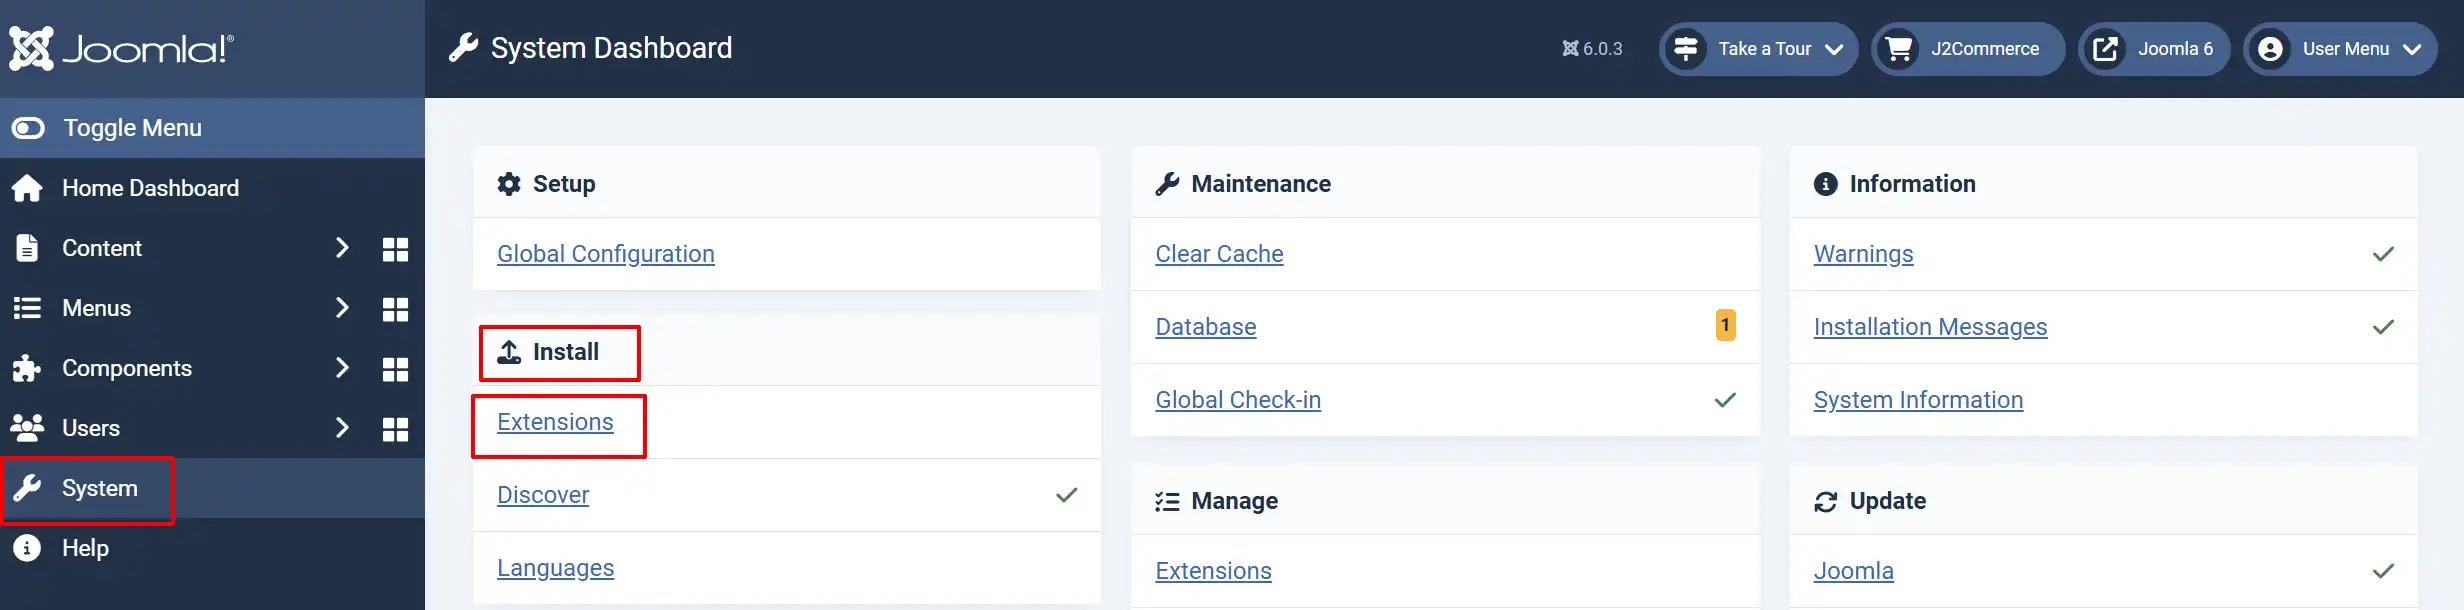
Install the Plugin
Go to System -> Install -> Extensions.
Upload the shipping_atoship.zip package file
Enable the Plugin
There are two ways you can access the Plugin.
Option A: Go to the J2Commerce icon at the top right corner -> Setup -> Shipping Methods
Option B: Go to Components on the left sidebar -> J2Commerce -> Dashboard -> Setup -> Shipping Methods

Look for AtoShip, click the X, and it will turn into a green checkmark. It is now enabled and ready for setup.

Configure the Plugin
Once you click on the AtoShip Title next to the green checkmark, you are ready to start setting up the parameters.
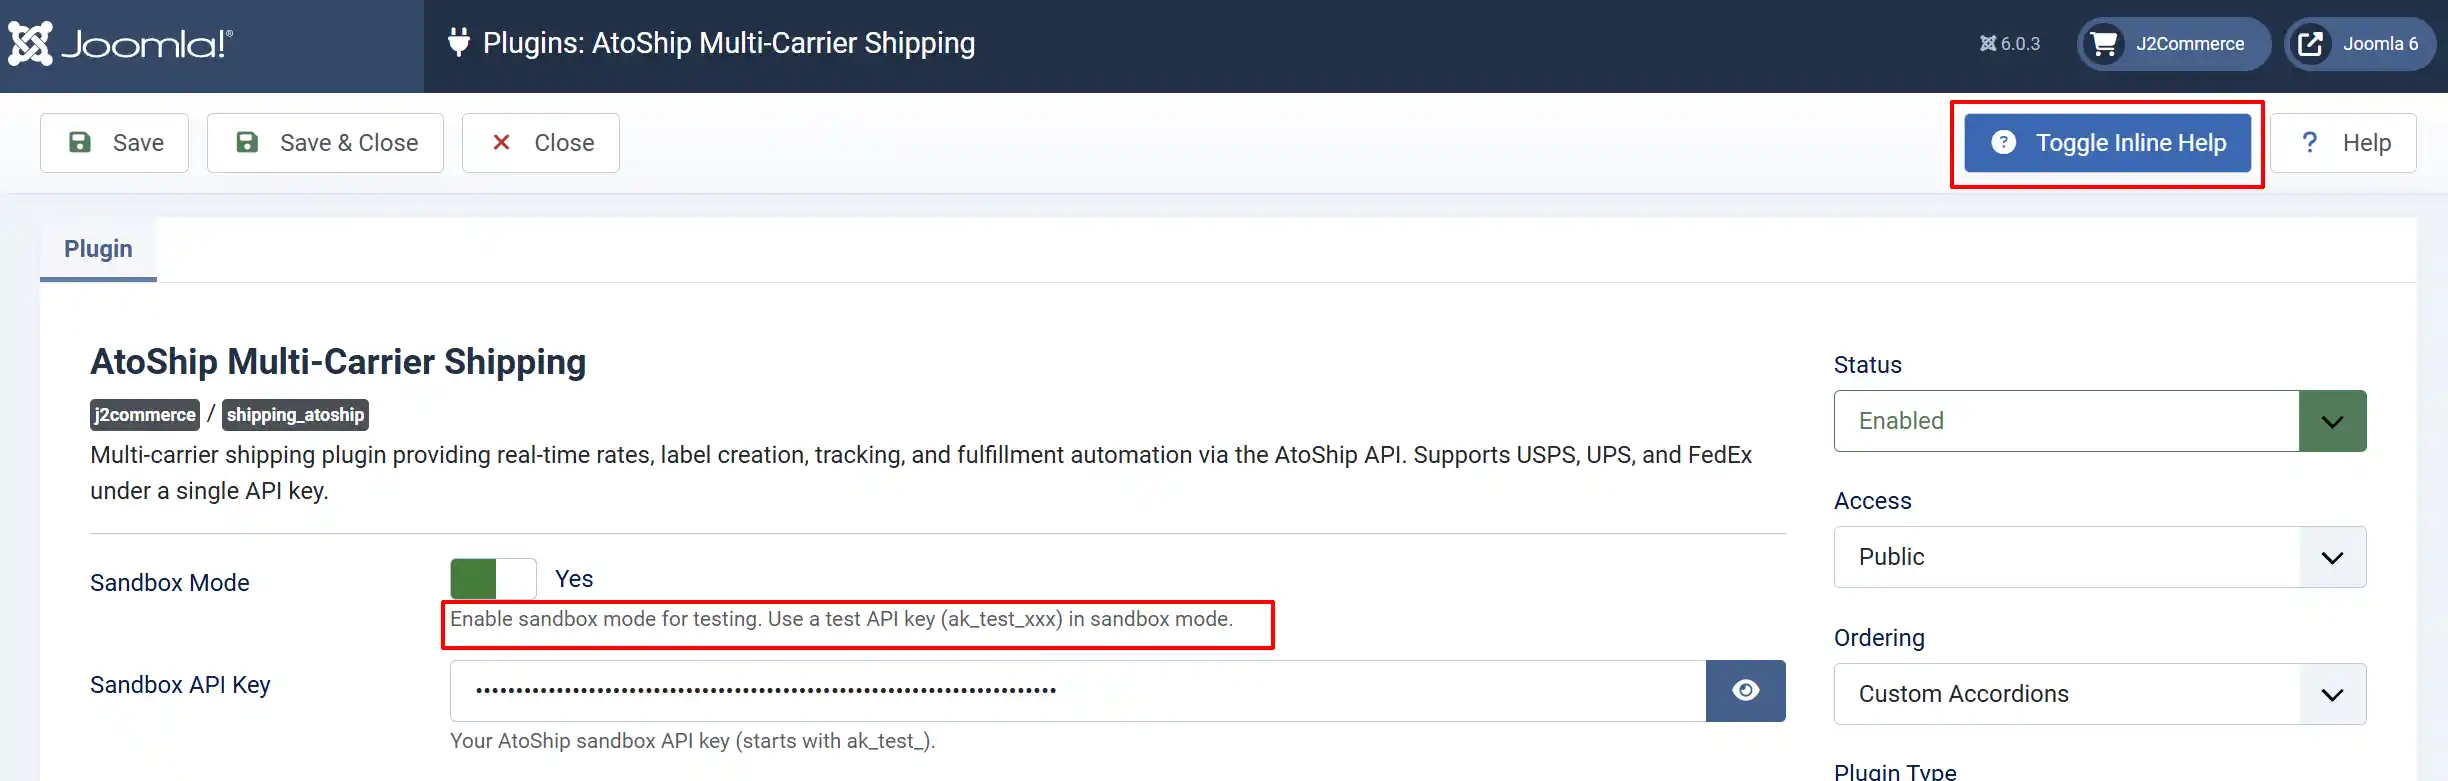
Helpful Tip: Click on the Toggle Inline Help button on any app/plugin you install and it will show a description below each section. See image below
API Credentials
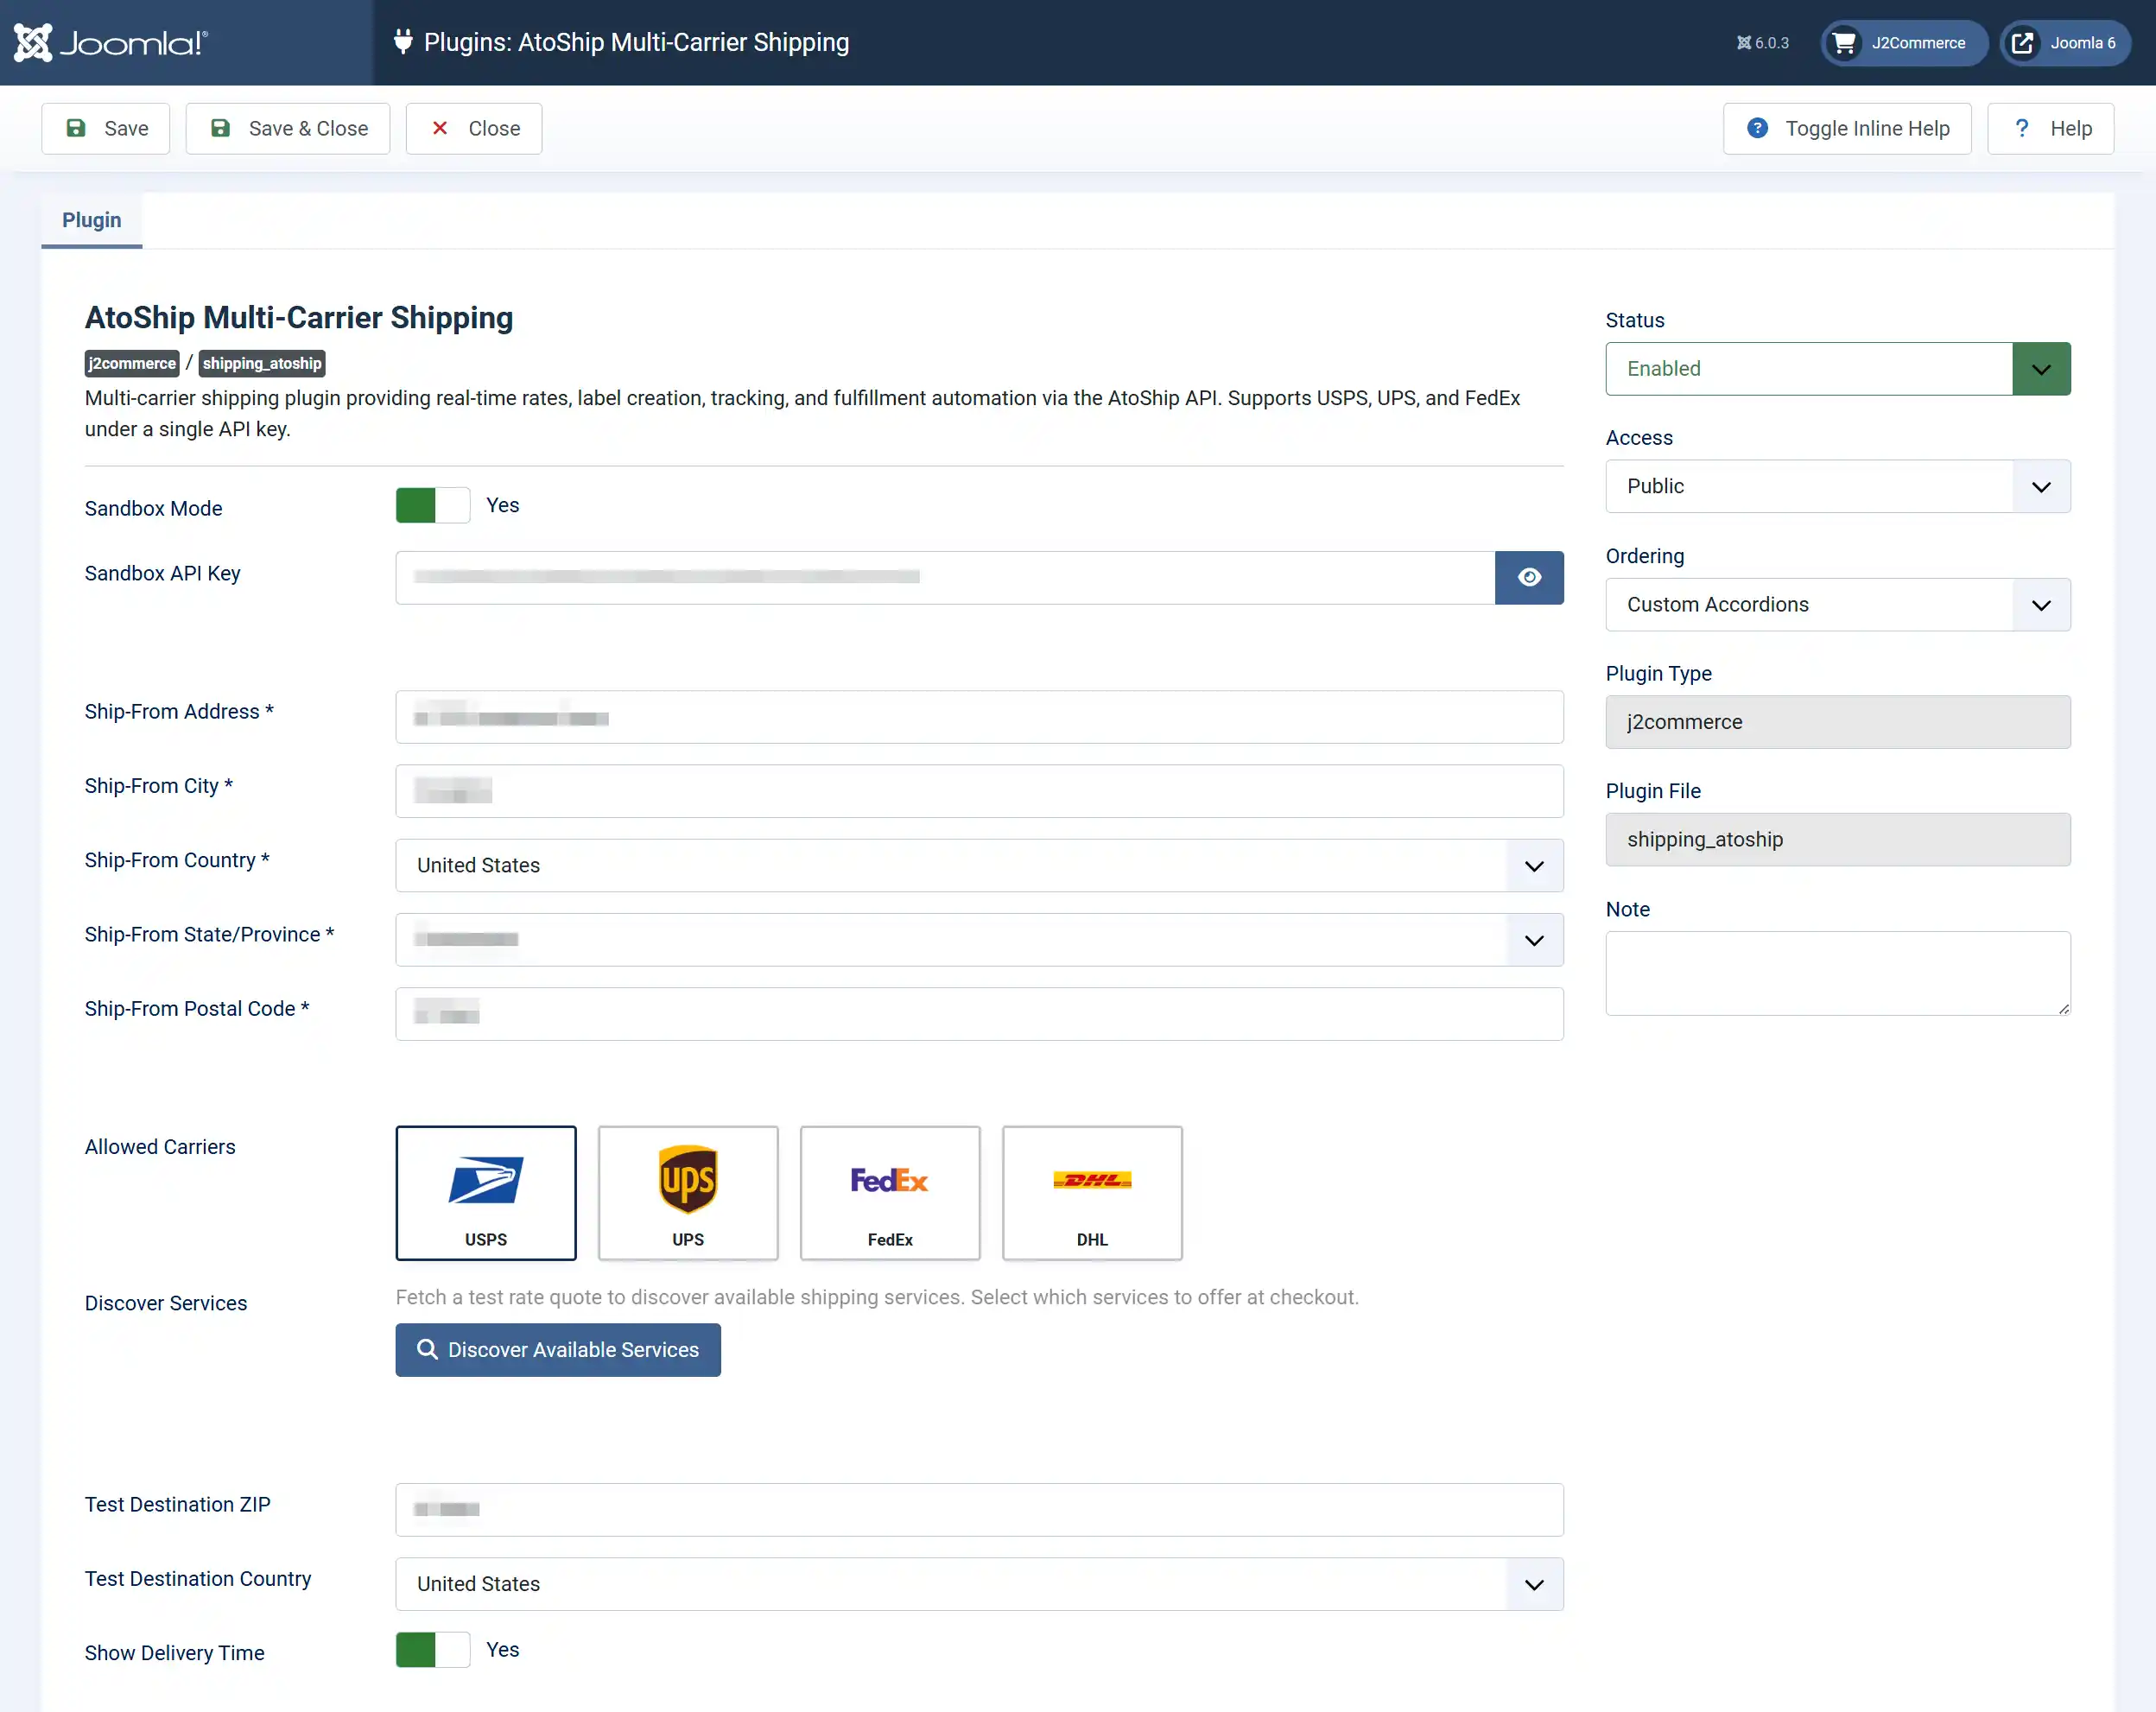
Sandbox Mode: When set to 'Yes', the plugin uses your test API key and no real charges are made. Set to 'No' for live shipments.
Sandbox API Key: Your test API key (starts with ak_test_). Only visible when Sandbox Mode is 'Yes'.
Live API Key: Your production API key (starts with ak_live_). Only visible when Sandbox Mode is 'No'.
Start with Sandbox Mode enabled. Enter your sandbox key, save, and test the checkout flow. Switch to the live key when you are ready to accept real orders.
Tip: Always start with Sandbox Mode enabled. This lets you test the entire workflow -- rates at checkout, label creation, and tracking -- without incurring any real shipping charges. In sandbox mode, if the AtoShip API returns no rates, the plugin automatically generates four demo rates so you can test the checkout flow.
Ship-From Address
The ship-from address is your warehouse or business location. AtoShip uses this as the origin for all rate calculations and labels.
Ship-From Address: Street address of your warehouse or fulfilment location
Ship-From City: City of the origin address
Ship-From Country: Country of the origin address
Ship-From State/Province: State or province (updates automatically when you change the country)
Ship-From Postal Code: ZIP or postal code of the origin address
All five fields are required. Save the plugin after filling it in — the service discovery tool relies on this address.
Make sure your state code is the standard 2-letter abbreviation (e.g., CA for California, NY for New York, TX for Texas). Using the full state name will cause rate calculation errors.
Select Your Carriers
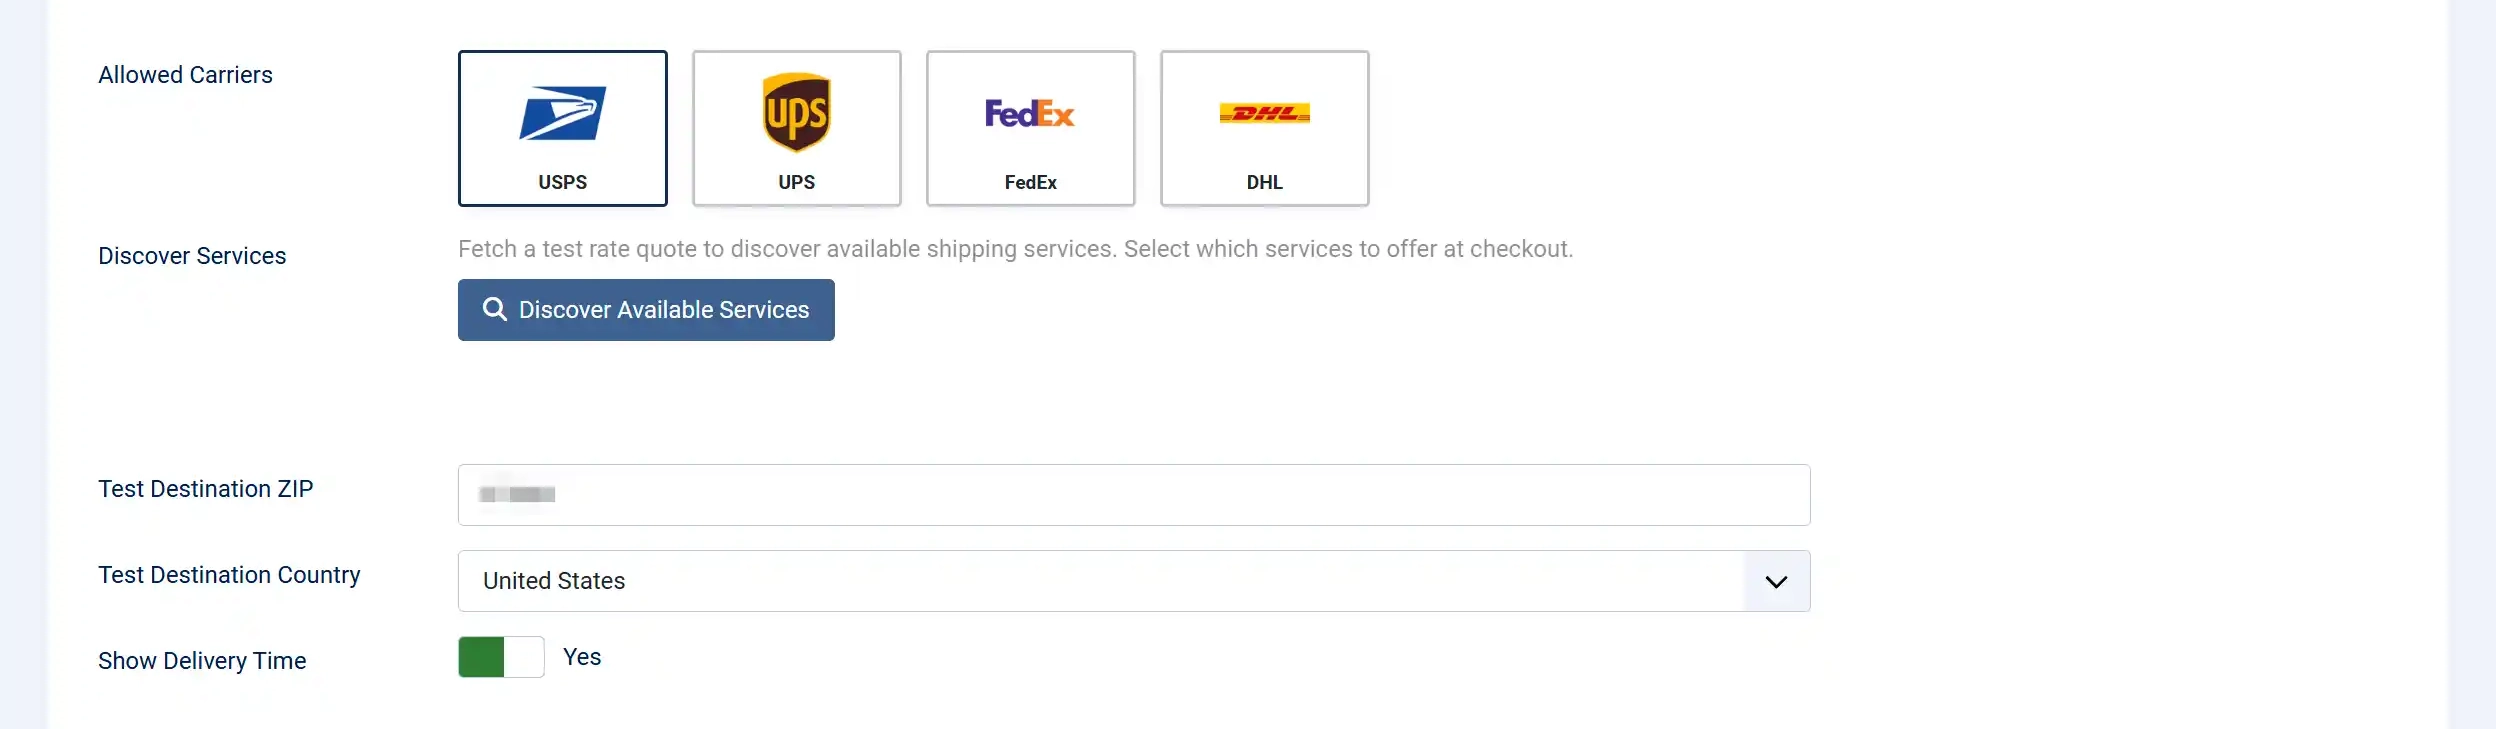
The Allowed Carriers section shows four carrier cards with logos: USPS, UPS, FedEx, and DHL. Only checked carriers will appear as shipping options at checkout.
Start with one or two carriers to keep the checkout simple. You can always add more later.
Discover and Select Services
Each carrier offers multiple shipping services (e.g., USPS Priority Mail, UPS Ground, FedEx Express). The Discover Services tool lets you see which services are available for your origin address and select which ones to offer at checkout.
Run the Service Discovery
- Scroll to the Test Destination ZIP and Test Destination Country fields.
- Enter a representative customer ZIP code and country code. The defaults (
10001andUS) work well for testing US-based shipping. - Click the Discover Available Services button.
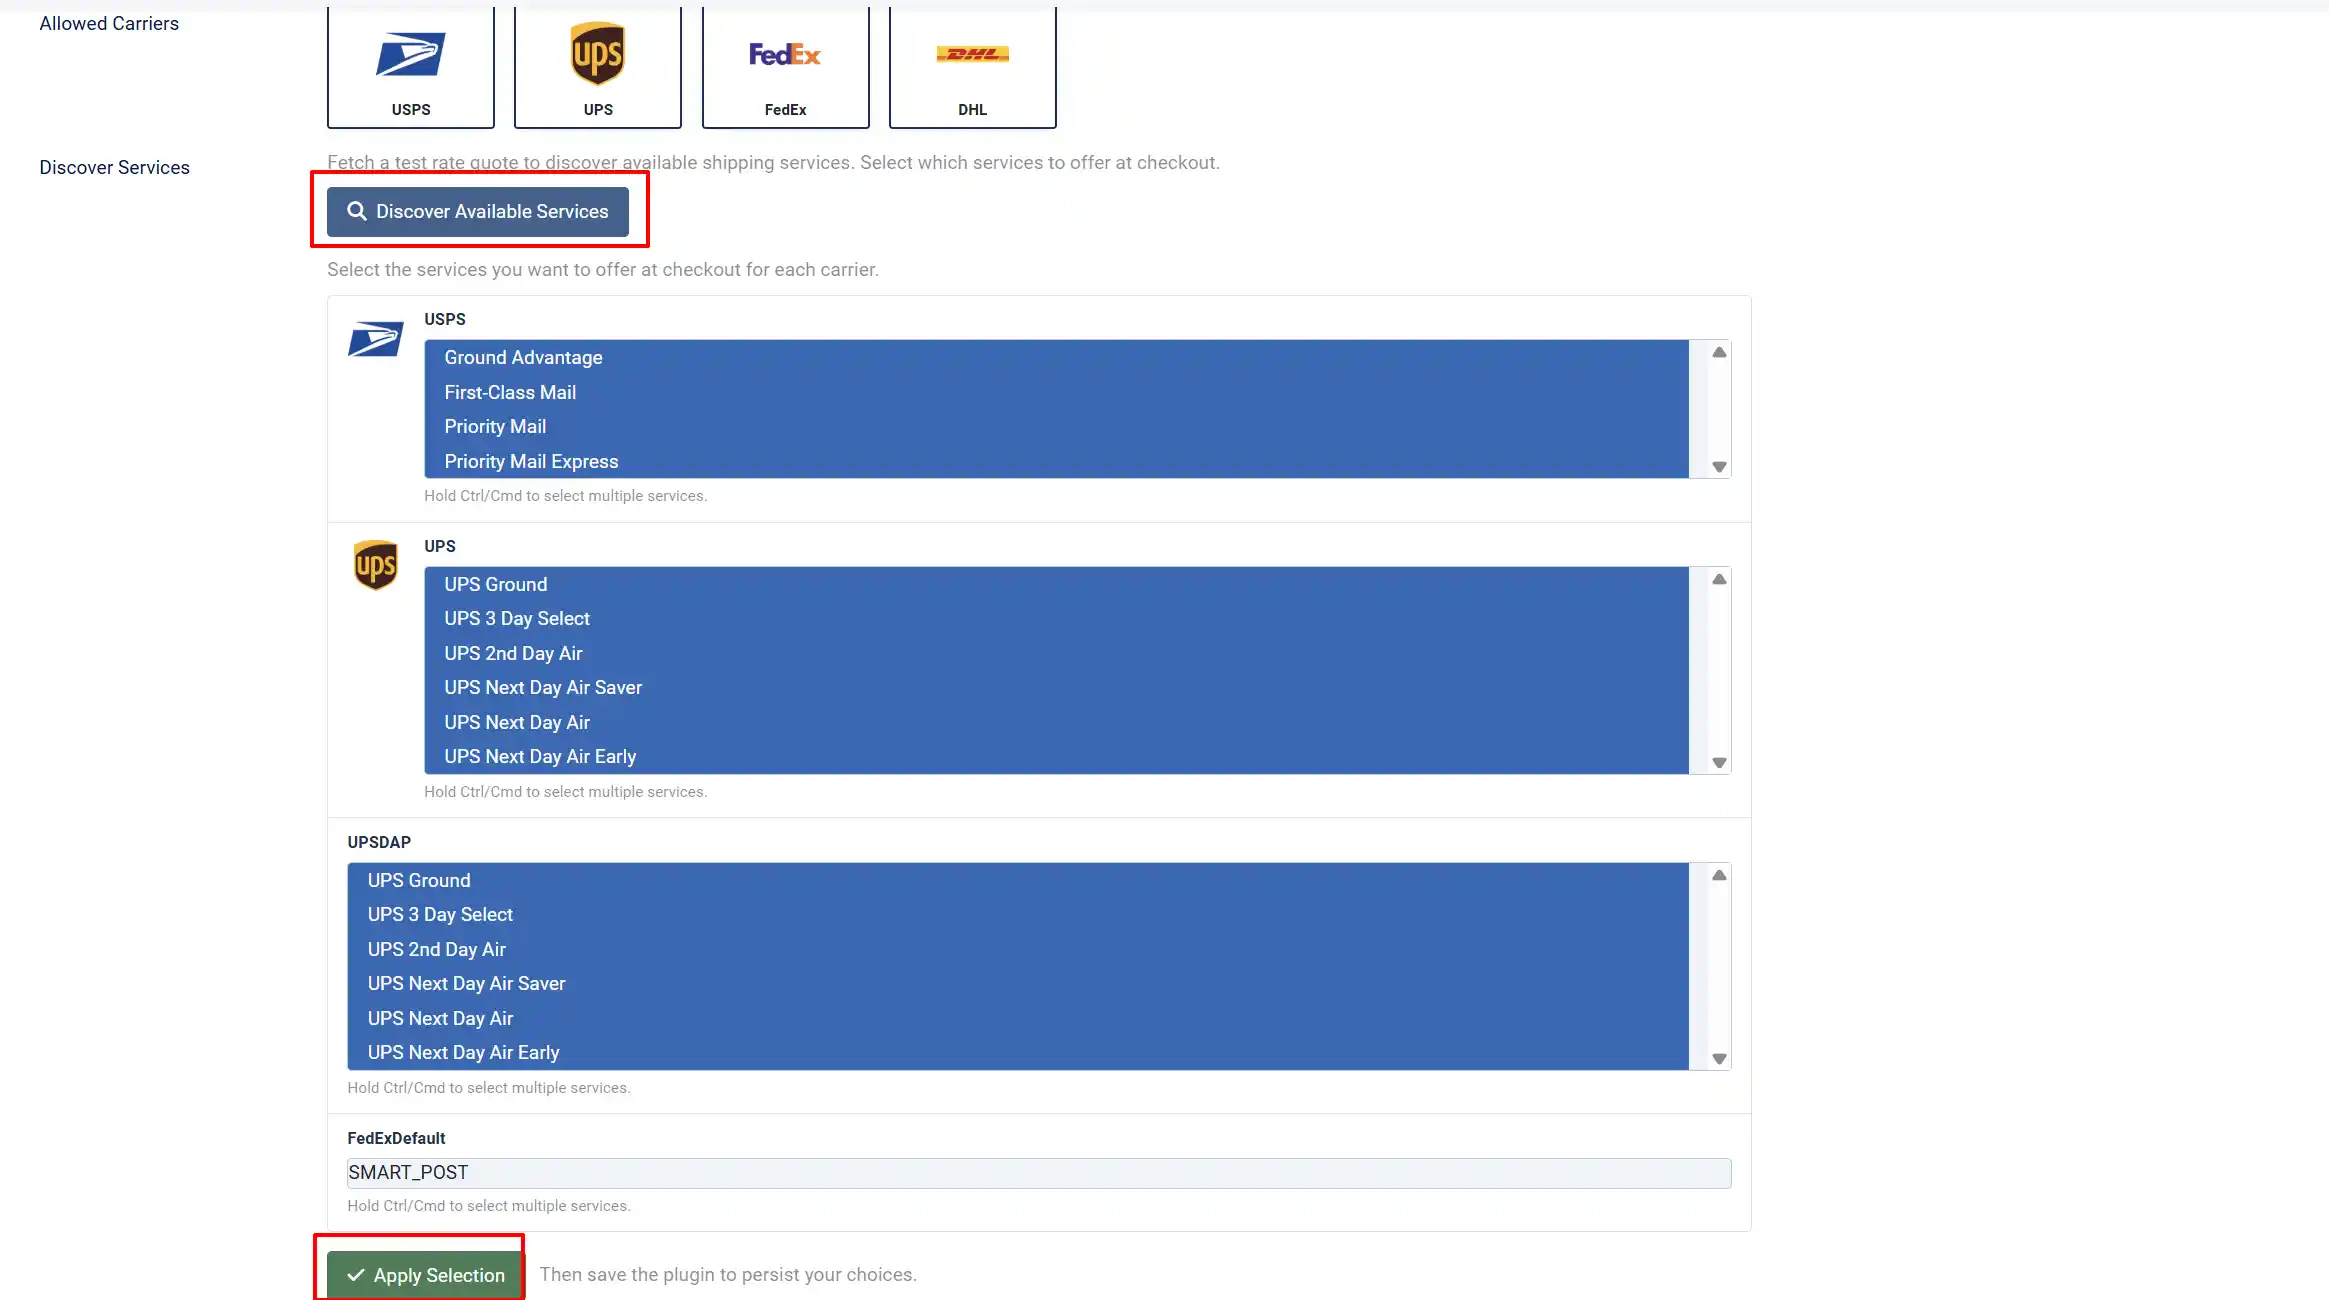
If no services appear in live mode, verify that your AtoShip account has at least one carrier account connected in the AtoShip dashboard. The plugin queries the AtoShip API and displays all available services grouped by carrier.
Select Your Service
After saving your Ship-From address, use the Discover Available Services button to fetch a live rate quote and see which services your AtoShip account can offer.
Test Destination ZIP: Postal code used for the discovery rate quote
Test Destination Country: Country used for the discovery rate quote
- For each carrier, you will see a list of available services (e.g., Priority Mail, Priority Mail Express, First-Class Package).
- Hold Ctrl (Windows) or Cmd (Mac) to select multiple services.
- Select only the services you want to show at checkout. Fewer options keep the checkout cleaner.
- Click Apply Selection to save your choices.
- Click Save at the top of the page to persist your selection.
You must click both Apply Selection and then Save the plugin. If you only click Apply Selection without saving, your service choices will be lost when you leave the page.
Show Delivery Time
Show Delivery Time: When set to Yes, estimated delivery days appear below each shipping option at checkout (e.g., "3 Business Days").
Set Package Defaults

These defaults are used when your products do not have their own weight and dimension values configured. It is best practice to set weight and dimensions on each product, but these defaults ensure rate calculations always work.
Weight Unit: The unit for all weight values. Choose LBS (pounds) or KGS (kilograms).
Dimension Unit: The unit for all dimension values. Choose IN (inches) or CM (centimeters)
Default Weight: Fallback weight per item when a product has no weight set.
Default Length: Fallback package length.
Default Width: Fallback package width
Default Height: Fallback package height
For the most accurate rates, set real weights and dimensions on each product in J2Commerce -> Catalog -> Products.
- Set the Weight Unit and Dimension Unit to match the units you use on your products.
- Set reasonable default values for weight and dimensions. These should represent a typical package from your store.
- Click Save.
The plugin calculates the total parcel weight by summing the weight of each item in the cart multiplied by its quantity. For dimensions, it uses the largest length, width, and height across all items. Setting accurate product weights gives your customers the most accurate rates.
Configure Rate Adjustments (Optional)
These settings let you adjust the rates returned by AtoShip before they are shown to customers.
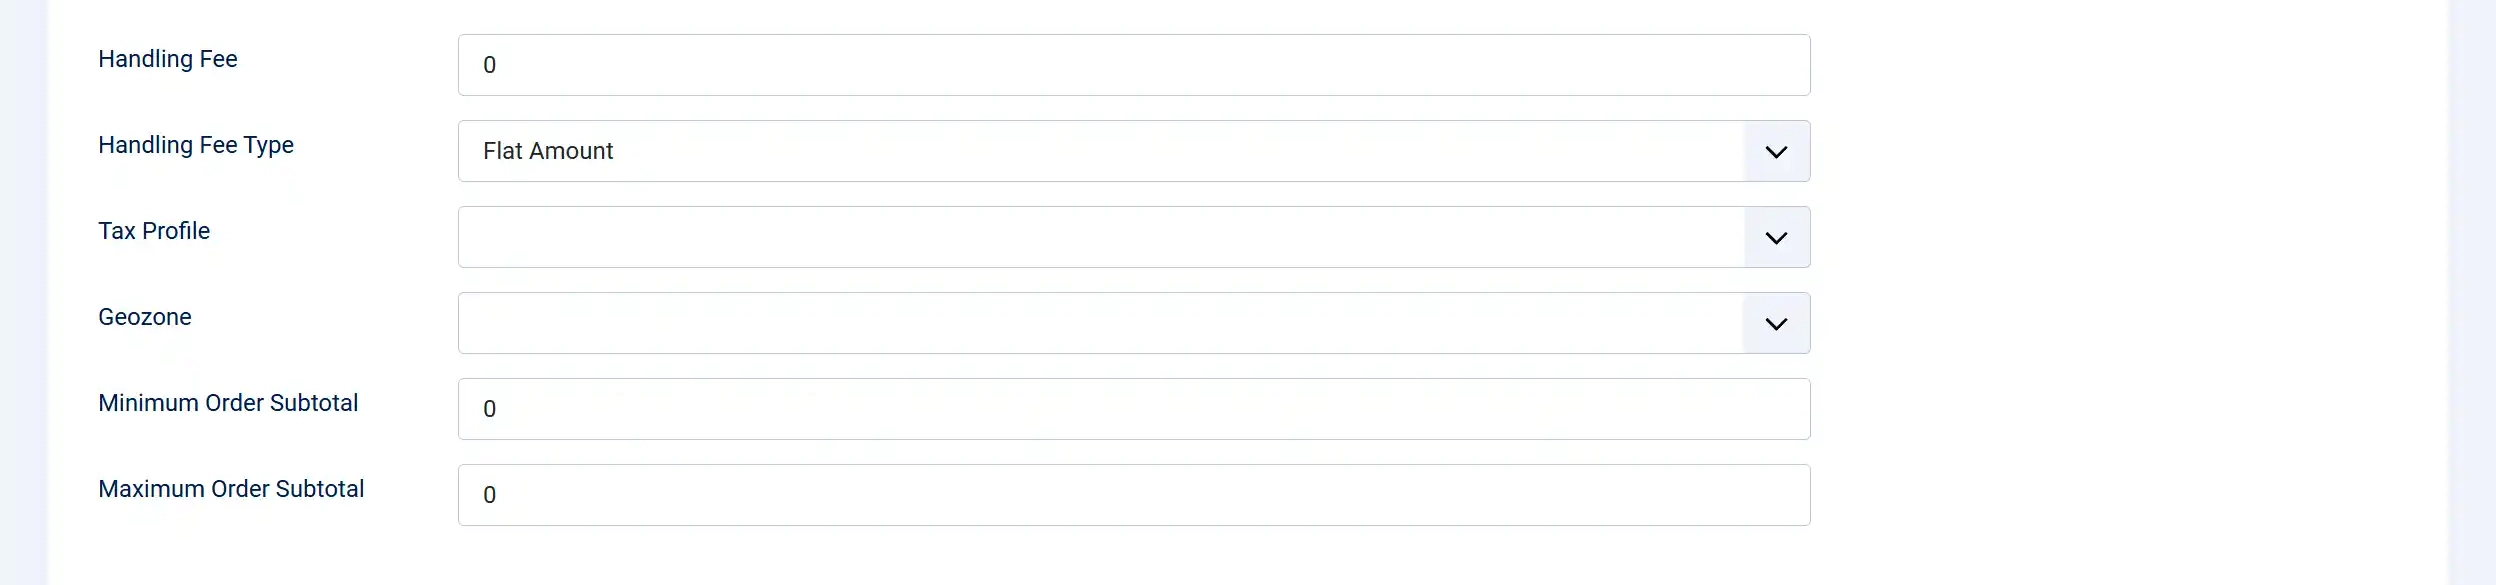
Handling Fee: An additional fee added to each shipping rate. Use this to cover packaging materials or labor.
Handling Fee Type: How the handling fee is calculated: Flat (fixed amount) or Percent (percentage of the shipping rate).
Show Delivery Time: Displays estimated business days next to each rate at checkout
Tax Profile: If shipping is taxable in your jurisdiction, select a J2Commerce tax profile. Leave as None to not charge tax on shipping.
Geozone: Restrict this shipping method to customers in a specific geographic zone. Leave as All to show rates to all customers.
Minimum Order Subtotal: Only show AtoShip rates when the cart subtotal is at or above this amount. Set to 0 to disable.
Maximum Order Subtotal: Only show AtoShip rates when the cart subtotal is below this maximum (set to 0 to disable)
Examples:
- To add a $2.50 packing fee to every shipment, set Handling Fee to
2.50and Handling Fee Type to Flat. - To add a 10% markup on shipping rates, set the Handling Fee to
10and Handling Fee Type to Percent. - To only offer AtoShip for orders over $25, set the Subtotal Minimum to
25.
Configure Label and Tracking Settings
These settings control what happens when you create shipping labels and how tracking updates affect your orders.
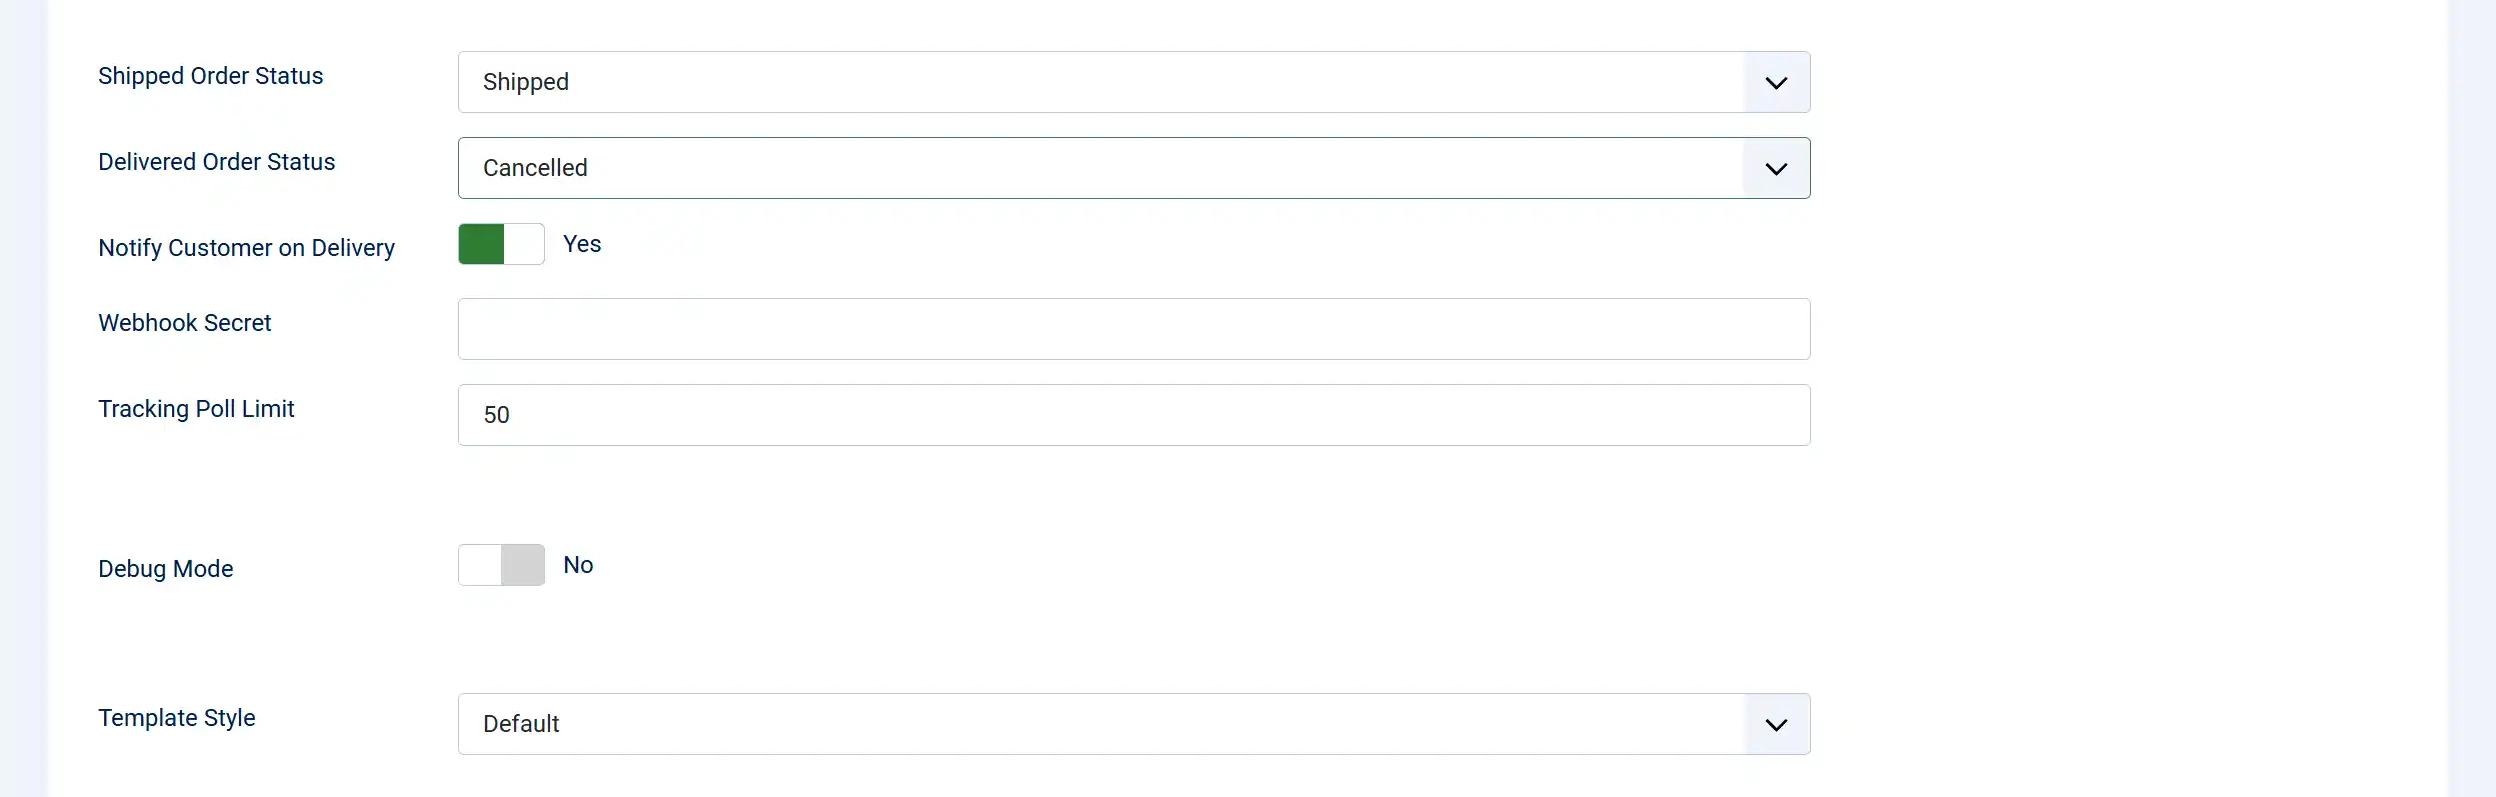
Shipped Order Status: The order status to set automatically when a shipping label is created.
Delivered Order Status: The order status to set automatically when tracking shows the package was delivered.
Notify Customer on Delivery: Send an email to the customer when the package tracking status changes to "Delivered".
Webhook Secret: The HMAC-SHA256 secret key from your AtoShip dashboard. Required for automatic tracking updates via webhooks.
Tracking Poll Limit: Maximum number of shipments to check for tracking updates during each cron job run.
- Set the Shipped Order Status and Delivered Order Status to match your store's order workflow.
- Leave the Webhook Secret and Notify Customer on Delivery for now -- these are covered in the Automated Tracking section below.
- Click Save.
Enable Debug Mode (Optional)
Enable debug mode temporarily if rates are not appearing or labels fail to create. Disable it in production.
Debug Mode: When enabled, all AtoShip API requests and responses are logged to administrator/logs/shipping_atoship.php. Useful for troubleshooting rate or label issues.
Turn this on temporarily if you experience problems. Remember to turn it off in production to avoid growing log files.
Webhook Setup (Optional)
Webhooks allow AtoShip to push delivery events to your store automatically, so order statuses update without waiting for the cron job.
- In the AtoShip dashboard, open Settings -> Webhooks.
- Create a new webhook endpoint using this URL format:
https://your-site.com/index.php?option=com_j2commerce&task=shipping.pluginAjax&plugin=shipping_atoship&action=processWebhook
- Enable these events:
shipment.tracking_updated,label.created,label.failed,order.cancelled. - Copy the webhook Secret from AtoShip and paste it into the Webhook Secret field in the plugin settings.
- Save the plugin.
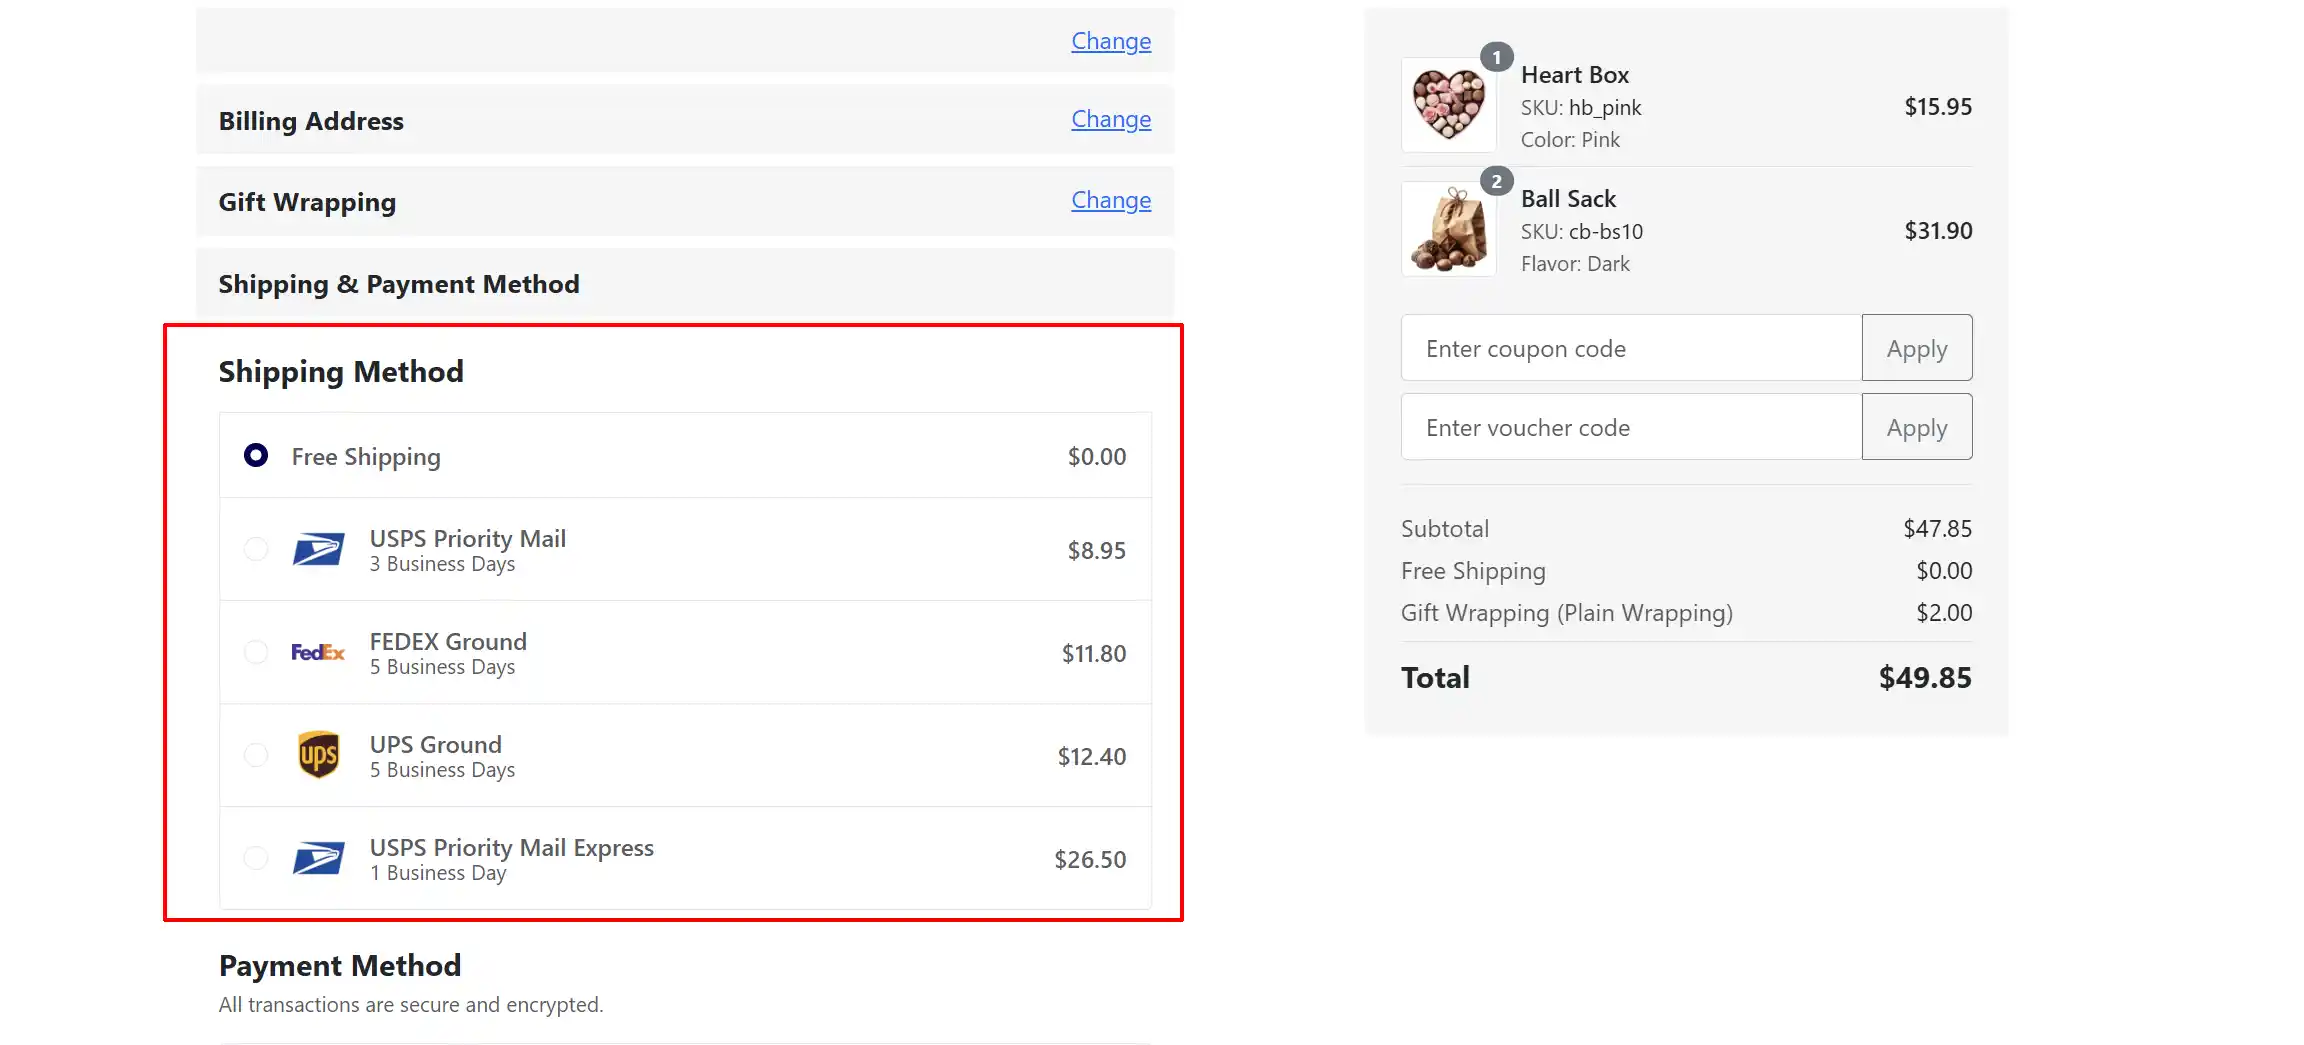
Test at Checkout
With configuration complete, test the shipping rates at checkout:
- Add one or more shippable products to your cart.
- Proceed to checkout.
- Enter a shipping address (use a real address for accurate rates).
- On the shipping step, you should see AtoShip rates listed with carrier names, service names, prices, and estimated delivery times.
If you are in Sandbox Mode and no real rates are returned, the plugin will display four demo rates (USPS Priority Mail, USPS Priority Mail Express, UPS Ground, and FedEx Ground) so you can complete the test checkout.
Frontend View
Go Live
Once you are satisfied with testing:
- Go to J2Commerce -> Shipping -> Shipping Methods and open the AtoShip configuration.
- Set Sandbox Mode to No.
- Paste your Live API Key (starts with
ak_live_) into the Live API Key field. - Click Save.
Your store is now using real AtoShip rates and can create real shipping labels.
Note: Make sure you have funds in your AtoShip account before creating live shipping labels. The plugin checks your balance before each label purchase and will alert you if the balance is insufficient.
Creating Shipping Labels
When an order is placed with an AtoShip shipping method, you can purchase and print a shipping label directly from the order screen.
Open the Order
- Go to J2Commerce -> Sales -> Orders.
- Click on the order number to open the order detail view.
Check Your Balance
The plugin automatically checks your AtoShip account balance before opening the label creation form.
- If your balance is sufficient, the label creation form opens normally.
- If your balance is insufficient, you will see a modal showing your current balance, the estimated label cost, and a link to the AtoShip billing dashboard where you can add funds.
Create the Label
-
Click the Create Shipping Label button. You will find this button:
- In the order toolbar at the top of the page, or in the Shipping Information card within the order details

A modal window opens with the label creation form:
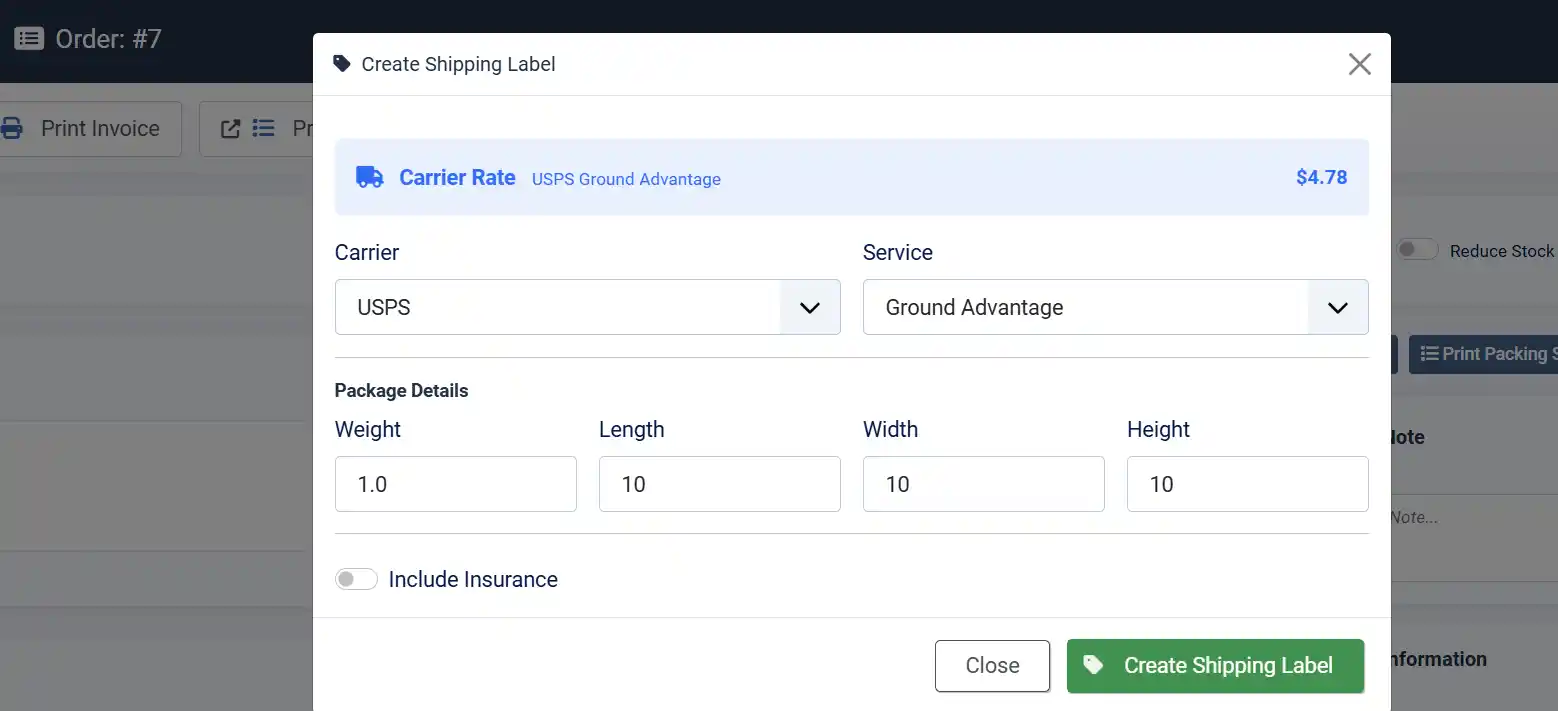
| Field | Description | Pre-filled With |
|---|---|---|
| Carrier | The shipping carrier | The carrier the customer selected at checkout |
| Service | The specific shipping service | The service the customer selected at checkout |
| Weight | Total package weight | Sum of all order item weights |
| Length | Package length | Your configured default length |
| Width | Package width | Your configured default width |
| Height | Package height | Your configured default height |
| Include Insurance | Toggle to add shipping insurance | Off |
| Insurance Amount | The insured value (shown only when insurance is toggled on) | The order subtotal |
- Review and adjust the package details if needed. The carrier and service are pre-filled from the customer's checkout selection.
- Toggle Include Insurance if you want to insure the shipment.
- Click Create Shipping Label.
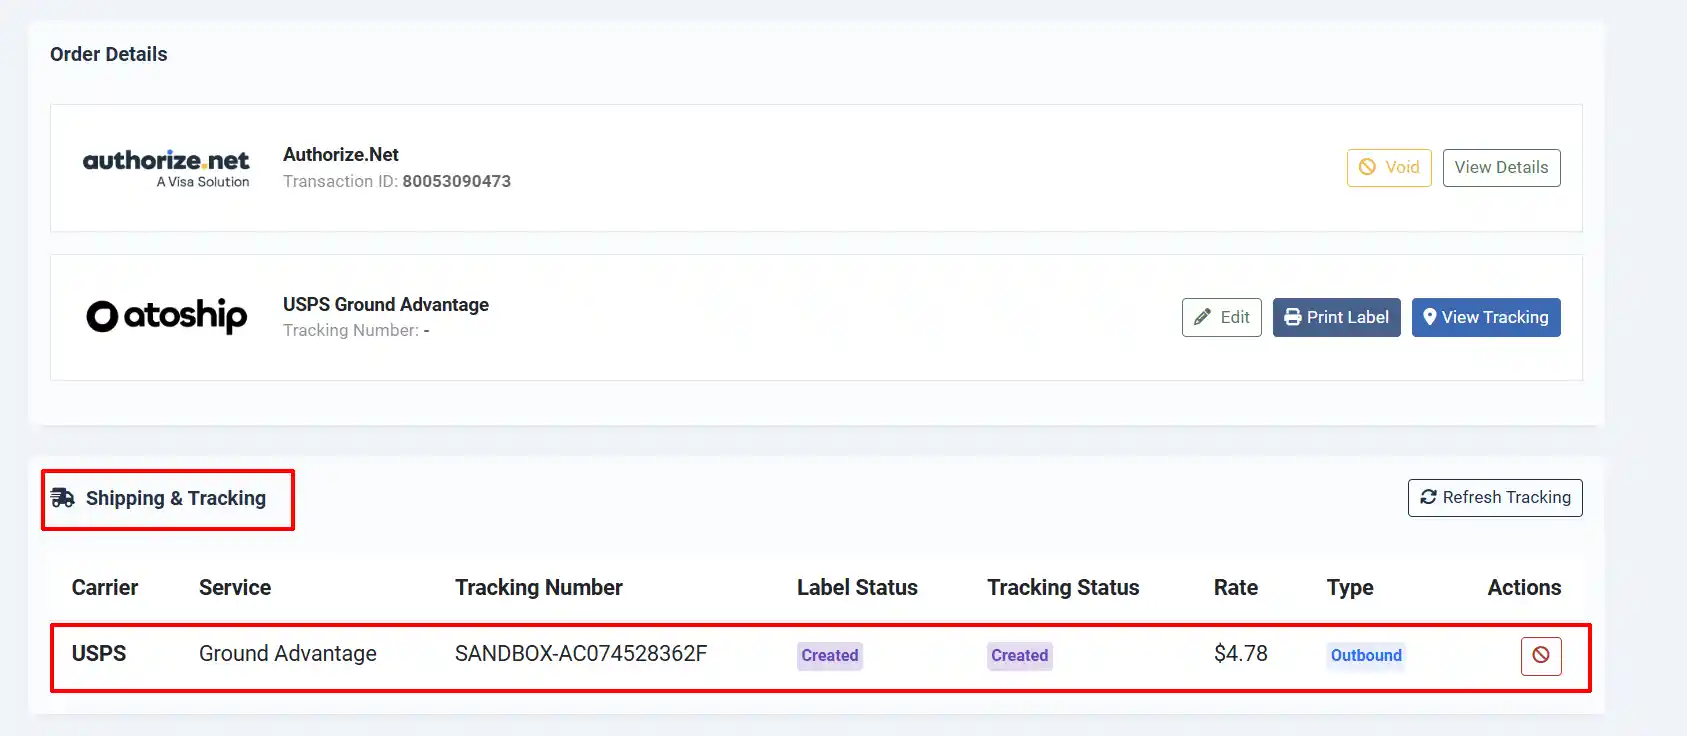
Once created, the order history records the tracking number and the label URL appears as View Label and Print Label buttons on the order screen.
To cancel a label, click Void Label. You can then create a new label if needed.
What Happens Next
After the label is created:
- A shipping label is purchased through AtoShip and stored in your order.
- The tracking number is saved to the order's shipping information.
- The order status automatically changes to your configured "Shipped" status.
- A history note is added to the order: "Label created for order #X with tracking number: Y by AtoShip".
- The page reloads to show the new label and tracking information.
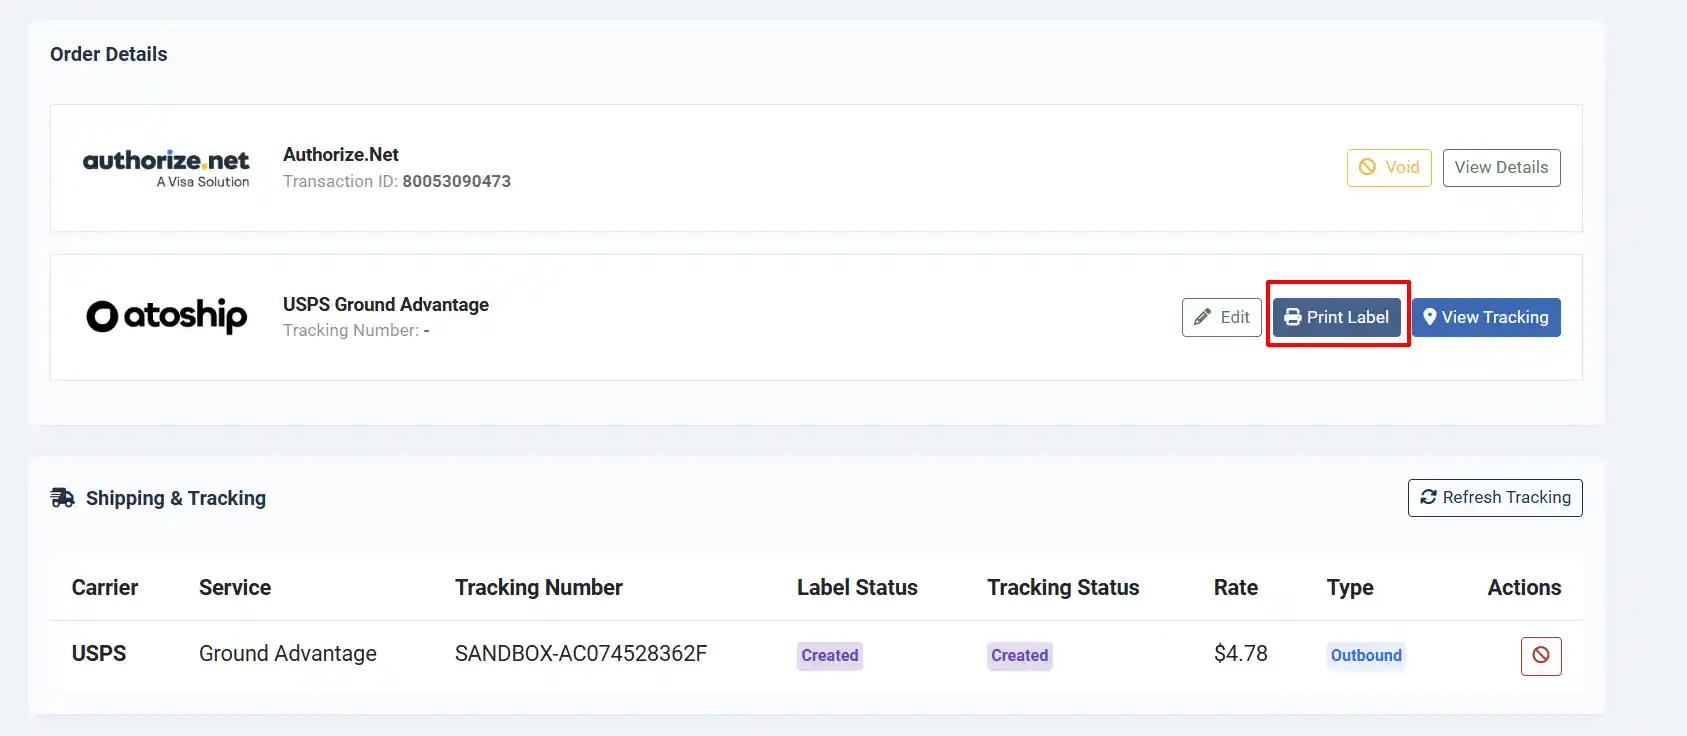
Print the Label
After the label is created, you have two options to access it:
- Click Print Label in the order toolbar -- this opens the label PDF in a new browser tab.
- Click View Label to open the label in a new tab for viewing or downloading.
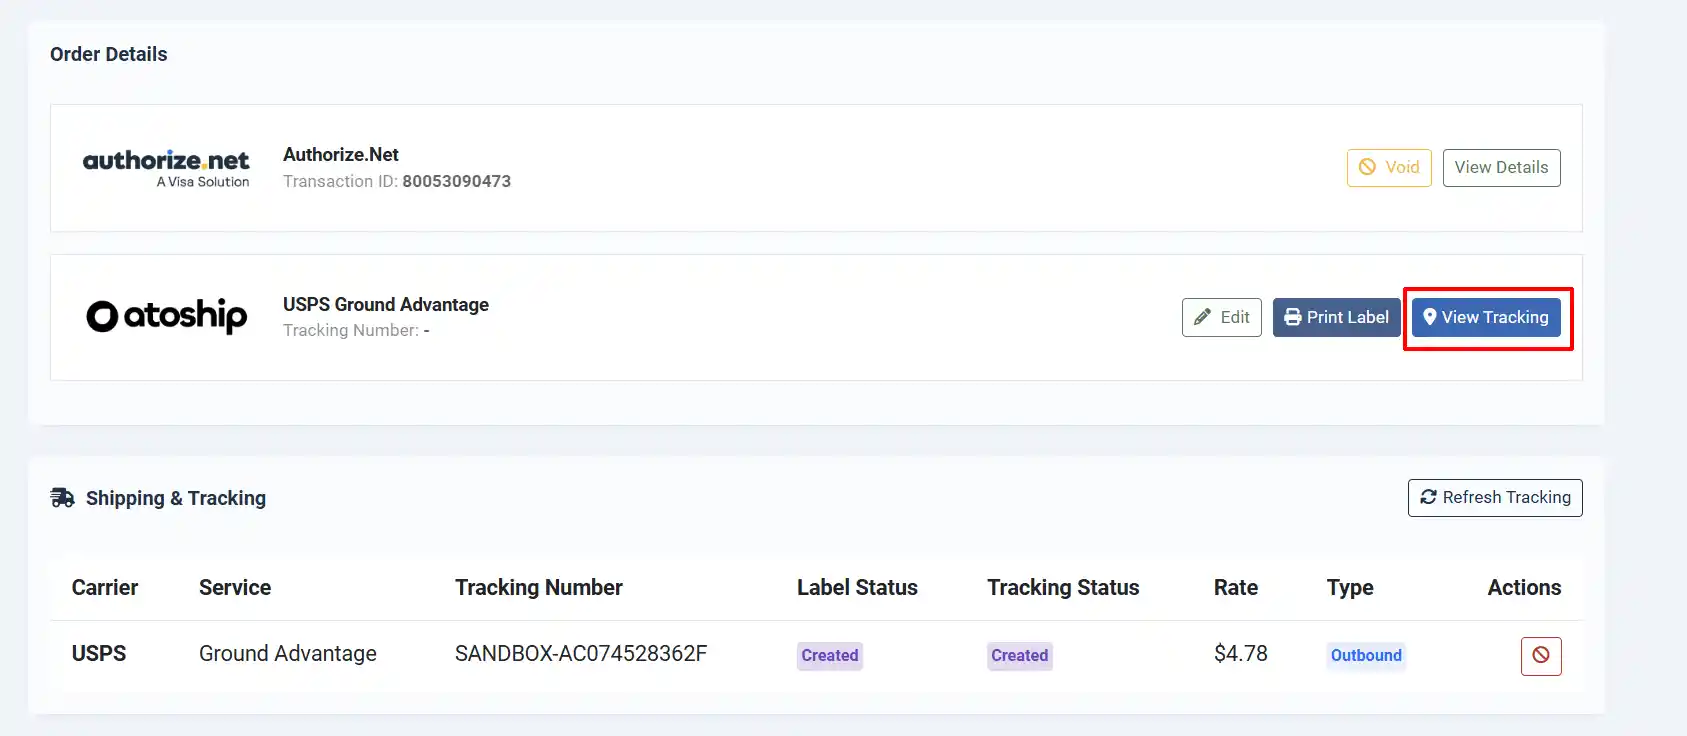
Tracking
Once a shipping label has been created, the Shipping & Tracking panel appears in the order detail view. This panel shows all labels for the order with their current tracking status.
- Carrier and service name
- Tracking number (links directly to the carrier tracking page)
- Label status (
created,purchased,voided) - Tracking status (
in_transit,out_for_delivery,delivered, etc.) - Label type (outbound or return)
- Carrier rate charged
Click Refresh Tracking to pull the latest status from AtoShip immediately. The cron job also polls tracking automatically based on the Tracking Poll Limit setting.
Tracking Status Badges
| Status | Badge Color | Meaning |
|---|---|---|
| Created | Grey | Label has been created but not yet scanned by the carrier |
| Purchased | Blue | Label has been purchased and is ready for pickup |
| In Transit | Blue | Package is moving through the carrier network |
| Out for Delivery | Yellow | Package is on the delivery vehicle |
| Delivered | Green | Package has been delivered |
| Return to Sender | Red | Package is being returned |
| Failure | Red | Delivery failed |
| Voided | Dark | Label has been voided/cancelled |
Manual Tracking Refresh
To check for the latest tracking status:
- Open the order detail view.
- In the Shipping & Tracking panel, click the Refresh Tracking button (the circular arrows icon in the card header).
- The plugin queries AtoShip for the latest tracking information and updates the status.
- If the package has been delivered and you have configured a Delivered Order Status, the order status updates automatically.
Clicking the Tracking Number
If a tracking URL is available, the tracking number in the table is a clickable link that opens the carrier's tracking page in a new browser tab.
Voiding a Label
If you need to cancel a shipping label (e.g., the order was cancelled or you need to create a new label with different details):
- Open the order detail view.
- In the Shipping & Tracking panel, find the label you want to void.
- Click the red Void button (the circle-with-line icon) on the right side of the label row.
- Confirm the voiding in the dialog that appears.
The label status changes to Voided (dark badge) and the void button is removed. You can then create a new label if needed.
Note: Voiding a label may not be possible after the carrier has scanned the package. Check your AtoShip account for carrier-specific void policies.
Checking Your AtoShip Balance
Before creating a label, the plugin checks your AtoShip account balance. If the balance is insufficient to cover the label cost, a warning appears with a link to the AtoShip billing dashboard to add funds.
Batch Label Creation
If you have many orders to fulfill at once, you can create shipping labels in bulk from the orders list.
-
Go to J2Commerce -> Sales -> Orders.
-
Check the boxes next to the orders you want to create labels for.
-
Click the Create AtoShip Labels button in the toolbar.
-
The plugin processes each order:
- For 10 or fewer orders, labels are created one by one with a progress bar showing the current status (e.g., "3/7").
- For more than 10 orders, the batch is queued for background processing.
-
When complete, a summary shows how many labels were created and how many failed (if any).
-
The page reloads to show updated order statuses.
Batch label creation uses the carrier and service that each customer selected at checkout, along with the default package dimensions from your plugin configuration. If you need to customize dimensions for specific orders, create those labels individually.
Automated Tracking with Webhooks
For fully automated tracking updates, configure webhooks so AtoShip pushes status changes to your store in real-time. This means you do not need to manually click "Refresh Tracking" -- the statuses update automatically.
Get Your Webhook URL
Your webhook URL follows this format:
https://yoursite.com/index.php?option=com_j2commerce&task=shippingplugin.ajax&plugin=shipping_atoship&action=processWebhook
Replace yoursite.com with your actual domain name.
Configure AtoShip Webhooks
-
Log in to your AtoShip dashboard.
-
Go to Settings -> Webhooks (or Integrations -> Webhooks).
-
Click Add Webhook (or Create Endpoint).
-
Paste your webhook URL from Step 1.
-
Enable the following events:
shipment.tracking_updatedlabel.createdlabel.failedorder.cancelled
-
Copy the Webhook Secret that AtoShip generates for this endpoint.
-
Save the webhook in AtoShip.
Add the Webhook Secret to J2Commerce
- In Joomla Administrator, go to J2Commerce -> Shipping -> Shipping Methods and open the AtoShip configuration.
- Paste the Webhook Secret into the Webhook Secret field.
- Click Save.
The plugin now verifies incoming webhook payloads using HMAC-SHA256 to ensure they are genuinely from AtoShip.
What Webhooks Automate
| AtoShip Event | What Happens in J2Commerce |
|---|---|
| Tracking updated | The label's tracking status is updated in your order |
| Package delivered | Order status changes to your configured "Delivered" status; customer email sent (if enabled) |
| Label voided or order cancelled | The label is marked as voided in your order |
| Label created | Informational -- no automatic action |
Automated Tracking with Cron (Alternative)
If you prefer not to use webhooks, or as a backup, you can use Joomla's built-in task scheduler to poll AtoShip for tracking updates on a schedule.
Set Up the Cron Task
- In Joomla Administrator, go to System -> Scheduled Tasks.
- Create a new task of type J2Commerce Cron.
- Set the Command to
atoship_track. - Set the schedule to run every 1-4 hours (more frequent = more up-to-date tracking, but uses more API calls).
- Enable and save the task.
Each time the cron runs, it checks tracking for up to Tracking Poll Limit (default: 50) shipments that have not yet reached a final status (delivered, returned, or failed).
You can use both webhooks and cron together. Webhooks provide instant updates for most events, while the cron job acts as a safety net for any missed webhook deliveries.
Configuration Reference
All Settings at a Glance
| Section | Setting | Default | Description |
|---|---|---|---|
| API | Sandbox Mode | Yes | Use test API key (no real charges) |
| API | Sandbox API Key | -- | Test API key (ak_test_...) |
| API | Live API Key | -- | Production API key (ak_live_...) |
| Origin | Origin Address | -- | Ship-from street address |
| Origin | Origin City | -- | Ship-from city |
| Origin | Origin State | -- | Ship-from state code (e.g., CA) |
| Origin | Origin Postal Code | -- | Ship-from ZIP (required) |
| Origin | Origin Country | US | Ship-from country code |
| Carriers | Allowed Carriers | USPS | Which carriers to include |
| Services | Test Destination ZIP | 10001 | ZIP for service discovery |
| Services | Test Destination Country | US | Country for service discovery |
| Services | Show Delivery Time | Yes | Show estimated days at checkout |
| Package | Weight Unit | LBS | LBS or KGS |
| Package | Dimension Unit | IN | IN or CM |
| Package | Default Weight | 1 | Fallback item weight |
| Package | Default Length | 10 | Fallback package length |
| Package | Default Width | 10 | Fallback package width |
| Package | Default Height | 10 | Fallback package height |
| Rates | Handling Fee | 0 | Extra fee per rate |
| Rates | Handling Fee Type | Flat | Flat amount or percentage |
| Rates | Tax Profile | None | Tax profile for shipping charges |
| Rates | Geo Zone | All | Restrict to a geographic zone |
| Rates | Subtotal Minimum | 0 | Minimum cart value (0 = off) |
| Rates | Subtotal Maximum | 0 | Maximum cart value (0 = off) |
| Tracking | Shipped Order Status | Shipped | Auto-set on label creation |
| Tracking | Delivered Order Status | Delivered | Auto-set on delivery |
| Tracking | Notify on Delivery | No | Email customer on delivery |
| Tracking | Webhook Secret | -- | HMAC secret from AtoShip |
| Tracking | Tracking Poll Limit | 50 | Max shipments per cron run |
| Debug | Debug | No | Log API requests/responses |
Tips
- Set product weights accurately. The more accurate your product weights, the more accurate the shipping rates your customers see. This prevents surprises at label creation time.
- Use the service discovery tool after changing carriers. If you enable a new carrier, run the Discover Available Services tool again to see and select the new carrier's services.
- Check your AtoShip balance regularly. The plugin checks your balance before each label purchase, but keeping sufficient funds prevents delays in order fulfillment.
- Enable webhooks for the best tracking experience. Webhooks update tracking in real-time without any manual action from you or your staff.
- Use debug mode sparingly. It is helpful for troubleshooting but generates large log files over time. Turn it off once your issue is resolved.
Troubleshooting
No shipping rates appear at checkout
Cause: The most common causes are missing configuration, carrier account issues, or address problems.
Solution:
- Verify that the plugin is enabled in System -> Manage -> Plugins.
- Check that the Origin Postal Code is filled in (it is required).
- Confirm that at least one carrier is checked in Allowed Carriers.
- Run the Discover Available Services tool and make sure you have selected at least one service.
- Check that your customer's shipping address includes a valid postal code.
- If using a Geo Zone restriction, verify the customer's address falls within that zone.
- If using Subtotal Minimum/Maximum, check that the cart total meets the threshold.
- Enable Debug mode and check
administrator/logs/shipping_atoship.phpfor API errors.
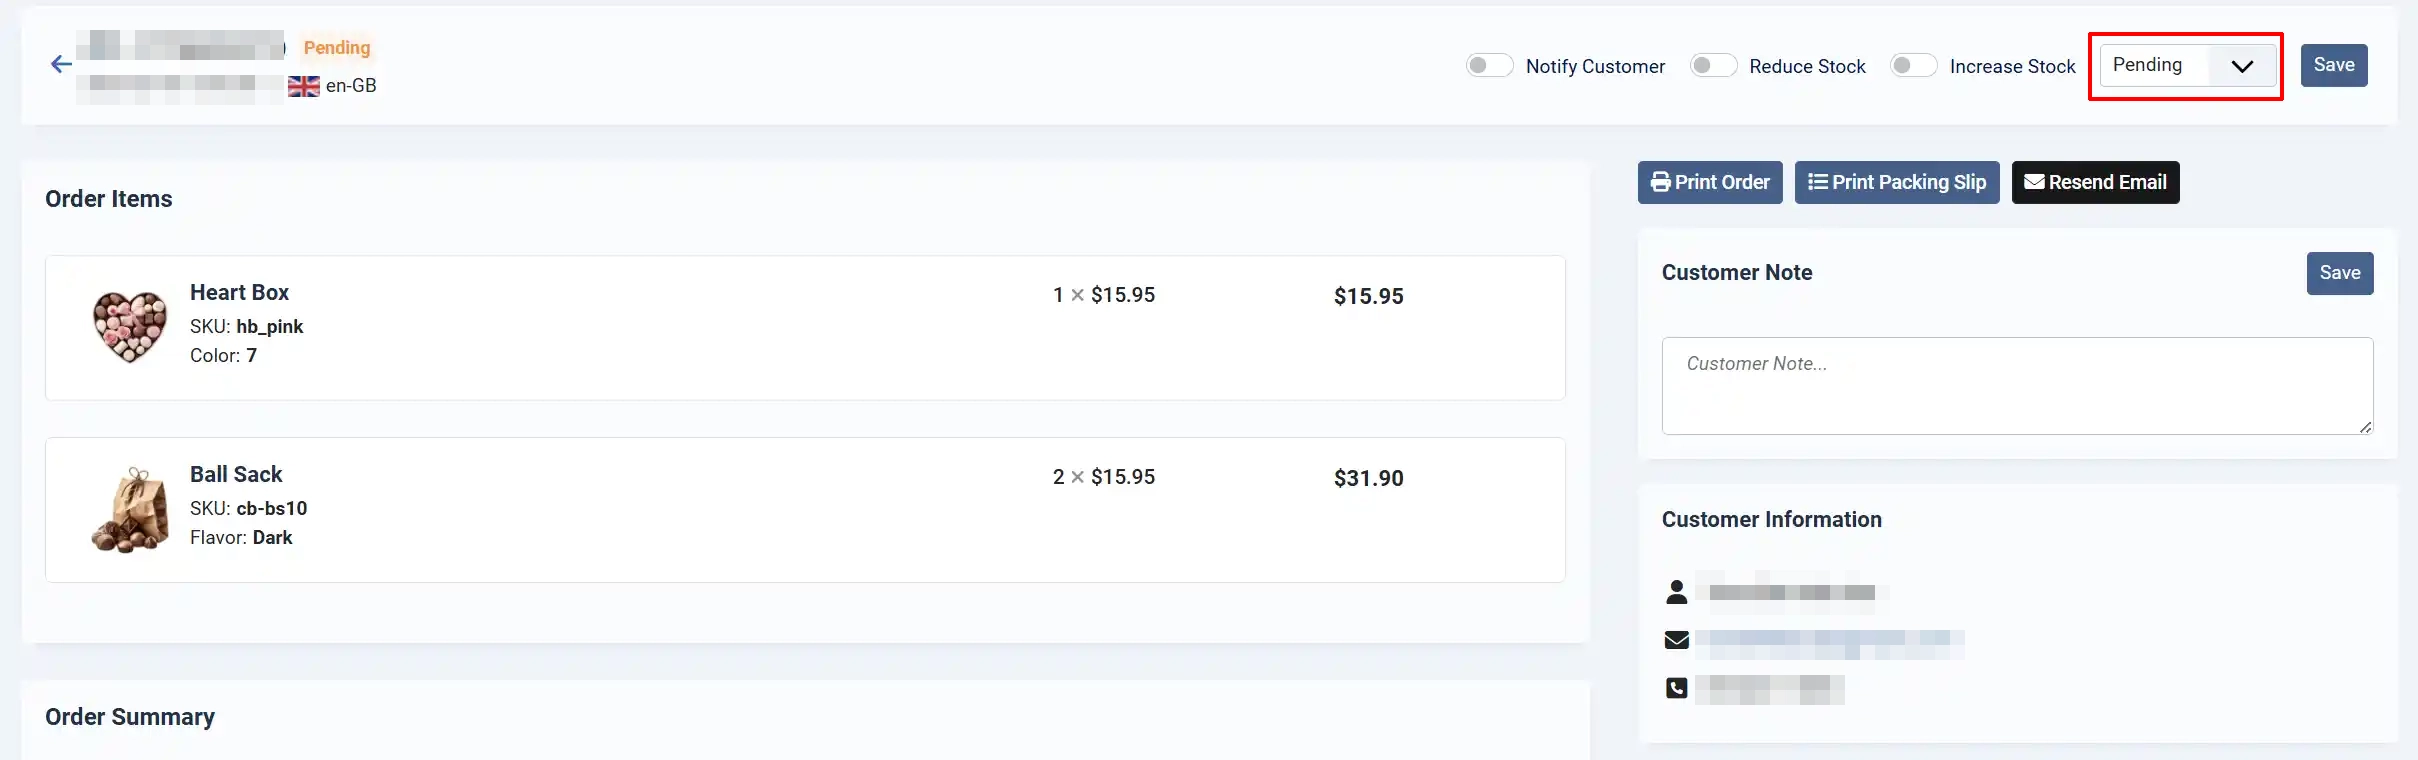
The Green Create a Shipping Label doesn't appear
Cause: The order status in the payment method is not set as Confirmed
Solution:
-
Go to J2Commerce -> Setup -> Payment Method
-
Go into each payment method option and change the Order Status from Pending to Confirmed

-
Go back into the customer's order (J2Commerce -> Sales -> Orders)
-
Switch the status from Pending to Confirmed
-
Click on the Save button next to the status
Service discovery returns no services
Cause: Your AtoShip account does not yet have a carrier account linked, or the test destination ZIP is invalid.
Solution: Log in to your AtoShip dashboard and connect at least one carrier account under Carriers. Then return to the plugin settings, verify the Test Destination ZIP, and click Discover Available Services again.
Label creation fails with "Insufficient Balance"
Cause: Your AtoShip account credit balance is lower than the cost of the label.
Solution: Click Add Funds in AtoShip Dashboard in the warning message, top up your account, and try again.
Order status does not update to "Shipped" after label creation
Cause: The Shipped Order Status field is set to a status ID that does not exist, or the setting is blank.
Solution: Go to plugin settings and select a valid order status in the Shipped Order Status field, then save.
Delivery status never updates automatically
Cause: The webhook is not configured, or the cron job is not running.
Solution: Either configure the webhook URL in the AtoShip dashboard (see Webhook Setup above), or ensure Joomla's Task Scheduler is running so the tracking poll cron executes regularly.
"Insufficient Balance" when creating a label
Cause: Your AtoShip account does not have enough funds to purchase the label.
Solution:
- Log in to your AtoShip dashboard.
- Go to Billing and add funds to your account.
- Return to the order and try creating the label again.
Rates are different from what I expected
Cause: The rates depend on package weight, dimensions, origin address, and destination address. Default values may not match your actual packages.
Solution:
- Set accurate weight and dimensions on each product in your J2Commerce product editor.
- Review the Default Weight and default dimension values in the plugin configuration.
- Check if you have a Handling Fee configured that is adding to the rates.
Label creation fails with an error
Cause: The AtoShip API rejected the request, usually due to address validation or missing data.
Solution:
-
Enable Debug mode in the plugin settings.
-
Try creating the label again.
-
Check
administrator/logs/shipping_atoship.phpfor the full API error message. -
Common issues include:
- Invalid or incomplete destination address on the order
- Package weight or dimensions outside carrier limits
- Selected carrier/service not available for the route
Tracking status is not updating
Cause: Tracking updates require either webhooks or cron to be configured.
Solution:
- For webhook users: Verify the webhook URL and secret are correct in both AtoShip and J2Commerce. Check that the correct events are enabled in AtoShip.
- For cron users: Check that the scheduled task is enabled and running in System -> Scheduled Tasks.
- You can always click Refresh Tracking in the order's Shipping & Tracking panel for a manual update.
- Note: In Sandbox Mode, tracking updates are not available because no real shipments are created.
Sandbox mode shows demo rates instead of real rates
Cause: This is expected behavior. When Sandbox Mode is enabled and the AtoShip API returns no rates, the plugin generates four demo rates for testing purposes.
Solution: This is not a problem -- it allows you to test the full checkout and label workflow. When you switch to live mode with a real API key, you will see actual carrier rates.