EasyShip Multi-Carrier Shipping
The EasyShip shipping plugin connects your J2Commerce store to the EasyShip global multi-carrier shipping platform. With EasyShip, you can offer your customers real-time shipping rates from 550+ couriers worldwide at checkout. You can also buy and print shipping labels, create return labels, track packages, and automatically update order statuses when deliveries arrive — all from within your J2Commerce admin panel.
This plugin is ideal for stores that ship physical products internationally and want carrier-calculated rates, built-in duties estimates, and a single dashboard across hundreds of couriers.
Requirements
- PHP 8.3.0+
- Joomla! 6.x
- J2Commerce 6.x
What You Can Do with EasyShip
- Real-time shipping rates at checkout from 550+ couriers worldwide
- Buy and print shipping labels directly from the order screen
- Return labels for easy customer returns
- Track packages with automatic checkpoint updates
- Auto-advance orders to "Shipped" or "Delivered" status
- Batch label creation for fulfilling multiple orders at once
- Insurance option when creating labels (or auto-insure all shipments)
- Webhook integration for fully automated, real-time tracking updates
- Address validation before label purchase to catch bad addresses early
- Item categories and HS codes for smooth international customs declarations
- Duties and taxes estimates displayed at checkout for international orders
- Commercial invoice download for international shipments
- Health check diagnostics to verify API connectivity, run test rate quotes, and create webhook subscriptions from the plugin settings screen
Prerequisites
- J2Commerce 6 is installed and enabled on your Joomla 6 site
- An EasyShip account at app.easyship.com
- At least one product in your store is marked as shipping enabled
- A valid ship-from address (your warehouse or business address)
Create an EasyShip Account
Step 1: Create Your EasyShip Account
Before configuring the plugin, you need an EasyShip account with API credentials.
Go to app.easyship.com and click Sign Up.
Complete the registration form with your business details.
Verify your email address and log in.
Navigate to Connect: Click on Connect in the left-hand sidebar.
Select API Integration: Click on the API Integration option.
Configure Integration:
-
Enter a name for your integration (e.g., your store's name).
-
For the integration type, select I'm developing a custom integration or My platform isn't listed.
Generate and Copy: Click Connect. Your Access Token will be displayed on the screen. Be sure to copy it immediately and store it securely, as it serves as your API key for authentication.
You can choose between a Production token for live shipments or a Sandbox token for testing purposes during this process.
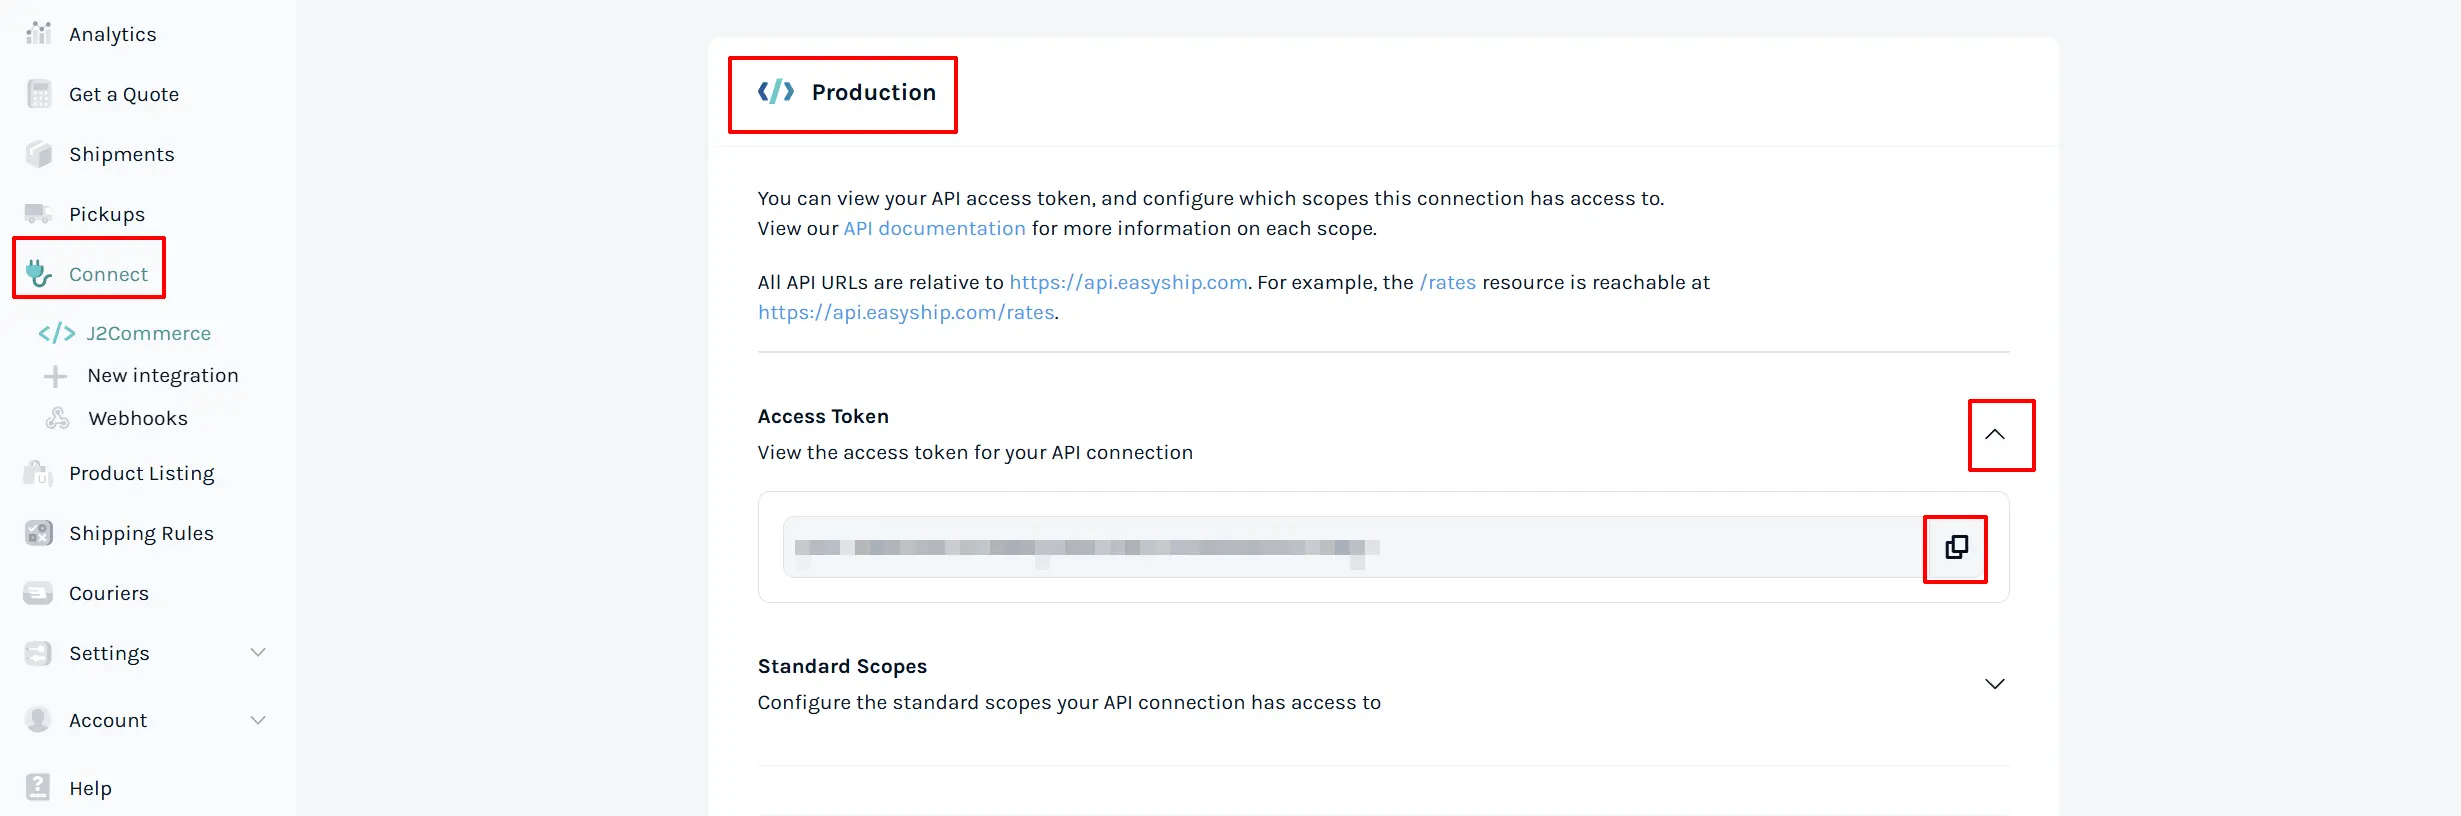
In the EasyShip dashboard, go to Settings -> API (or Connect -> API).
Click Create Token and give it a descriptive name (e.g., "J2Commerce").
Copy your Sandbox API token (starts with sand_) for testing, or your Production API token (starts with prod_) for live shipments.
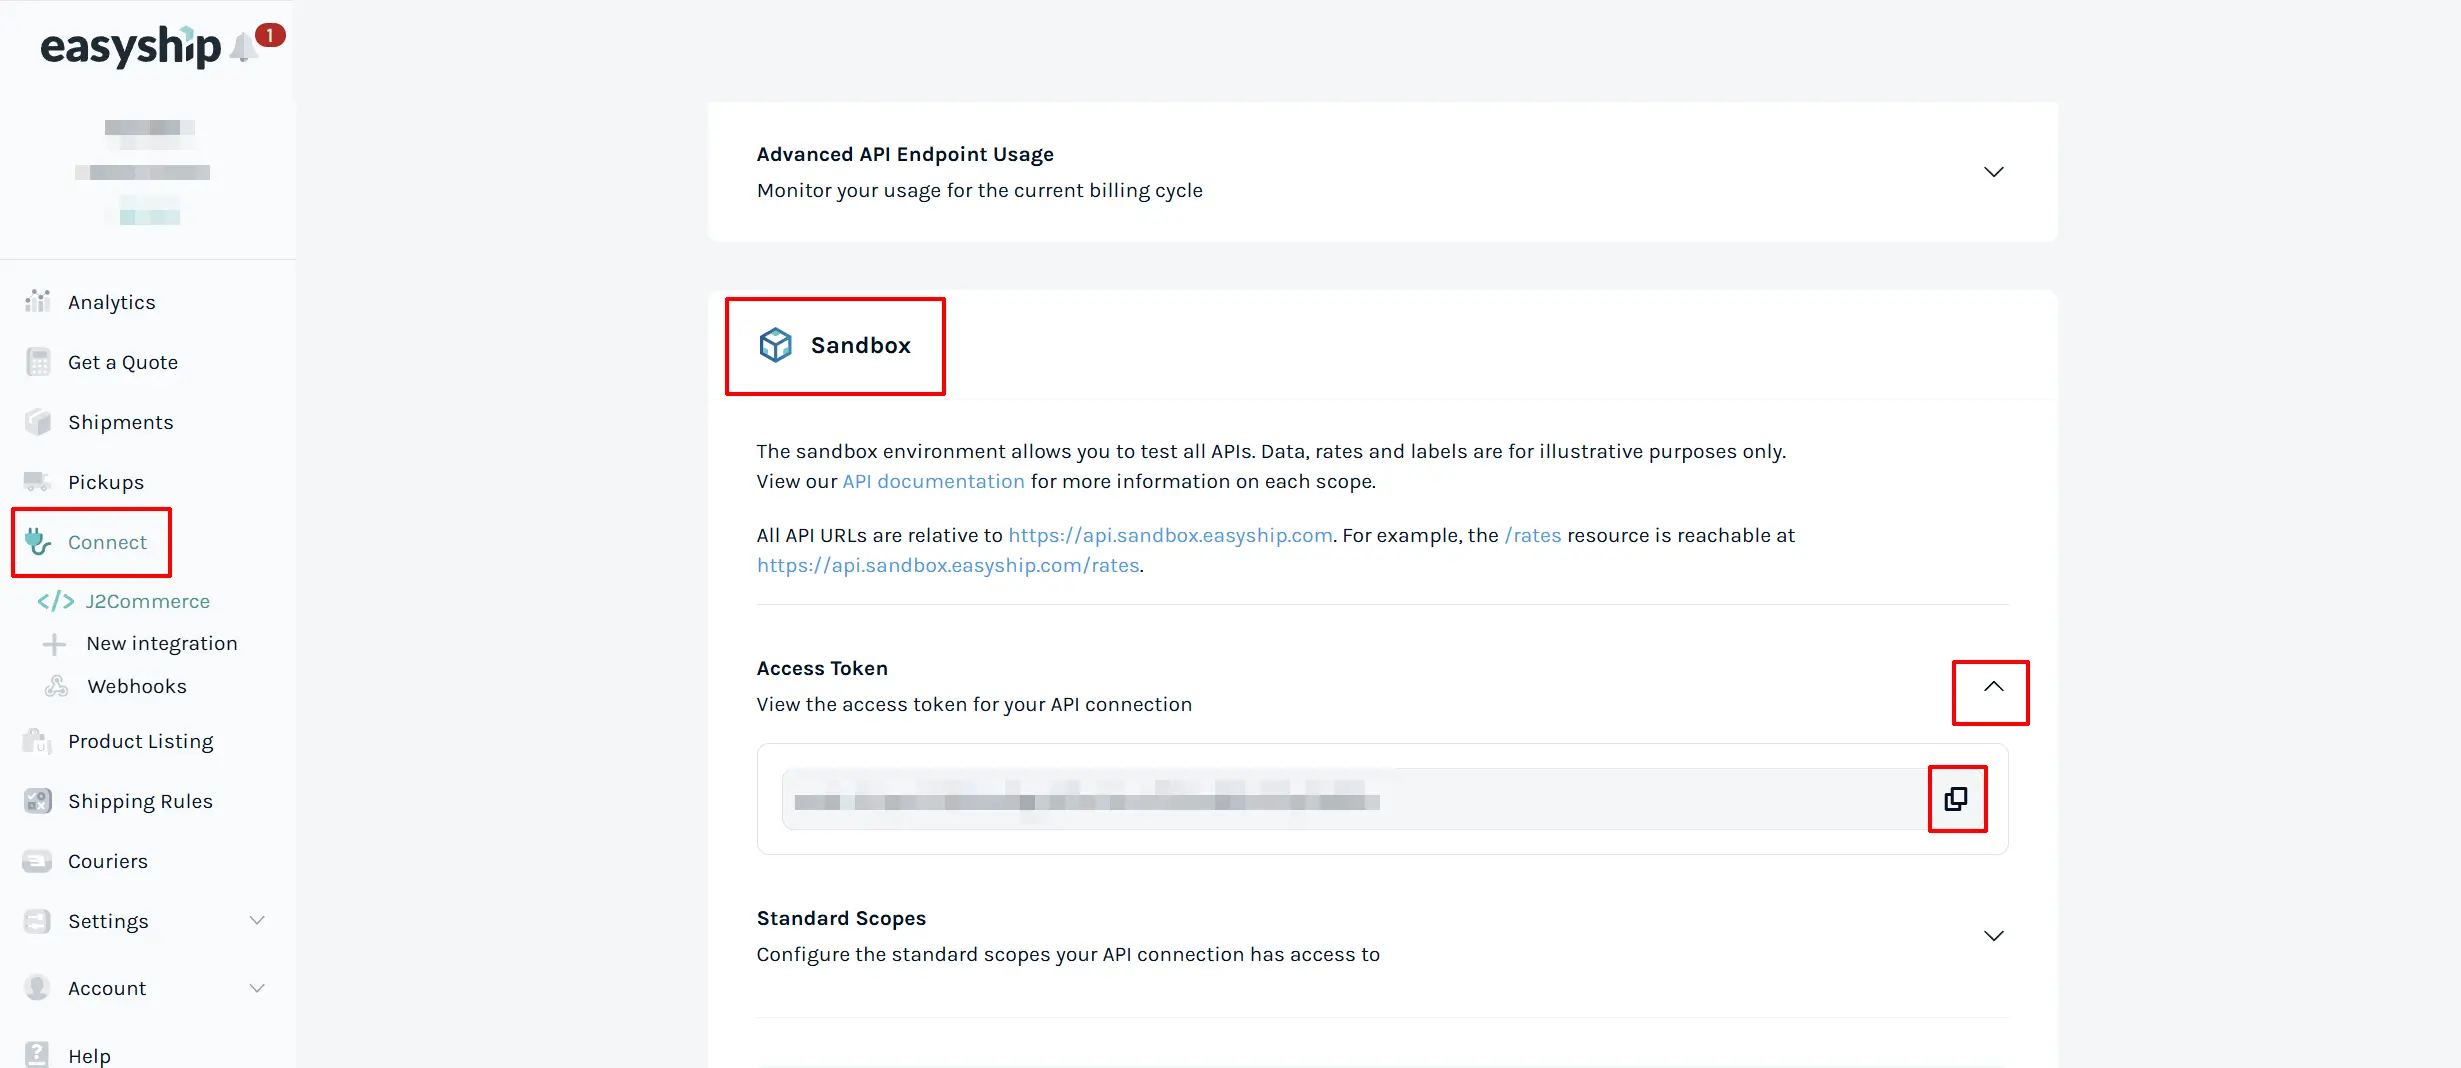
Keep both tokens handy — you will enter them in the plugin settings below.
Purchase and Download the Plugin
Step 1: Go to our J2Commerce website > Extensions.
Step 2: Locate the EasyShip extension -> click View Details -> Add to cart -> Checkout.
Step 3: Go to My Downloads under your profile button at the top right corner and search for the plugin. Click Available Versions -> View Files -> Download.
Install the Plugin
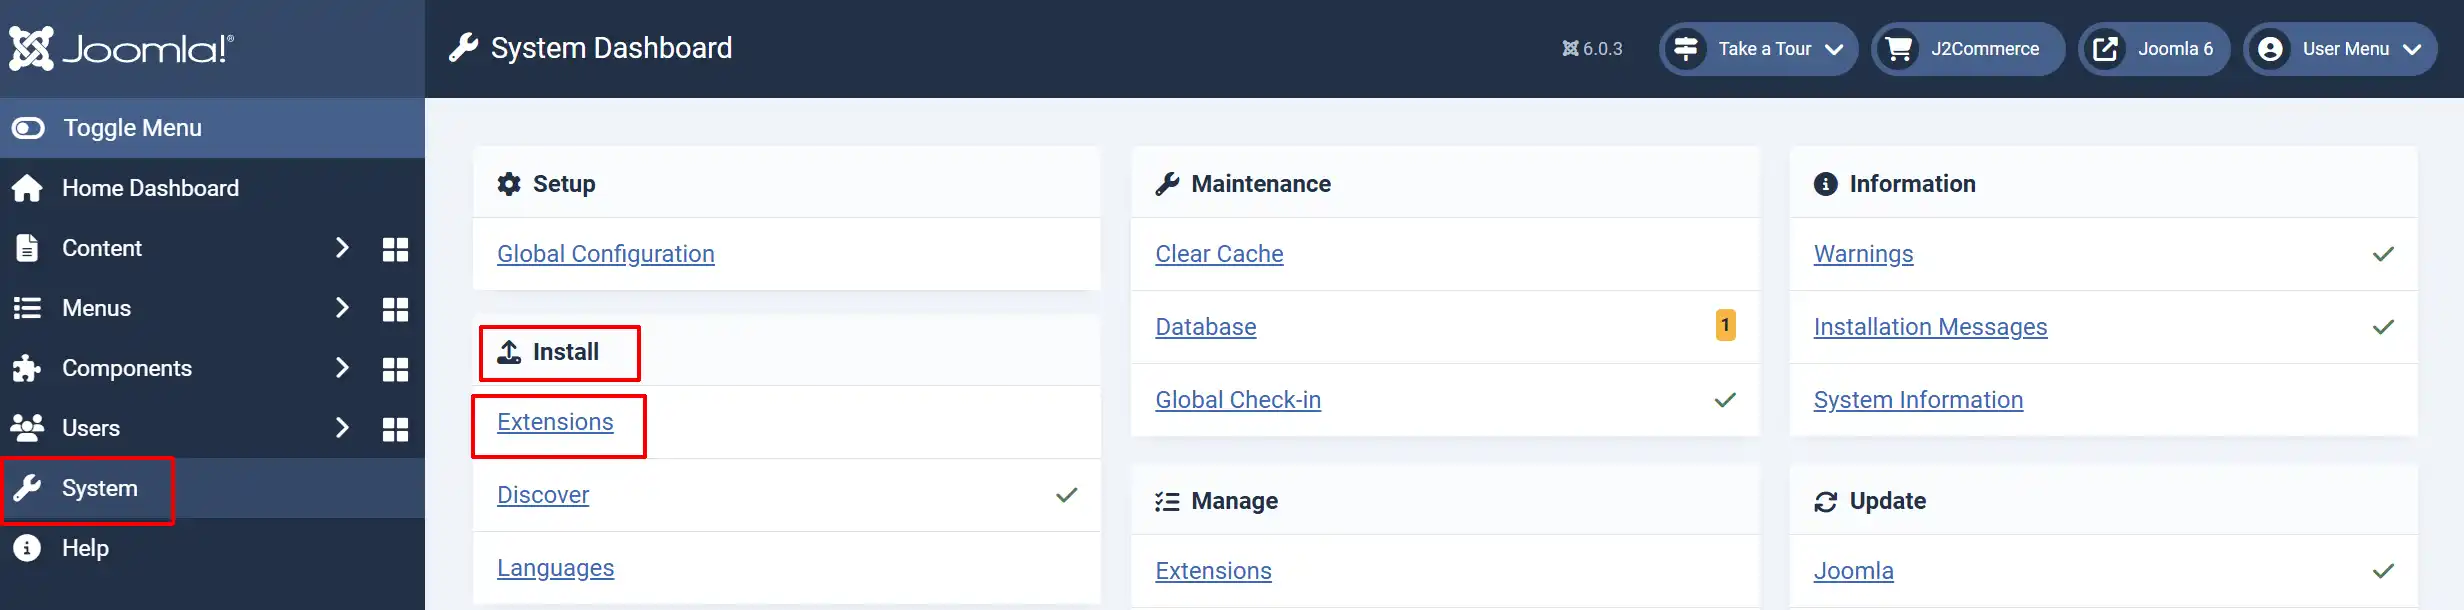
Go to System -> Install -> Extensions.
Upload the shipping_easyship.zip package file.
Enable the Plugin
There are two ways you can access the plugin.
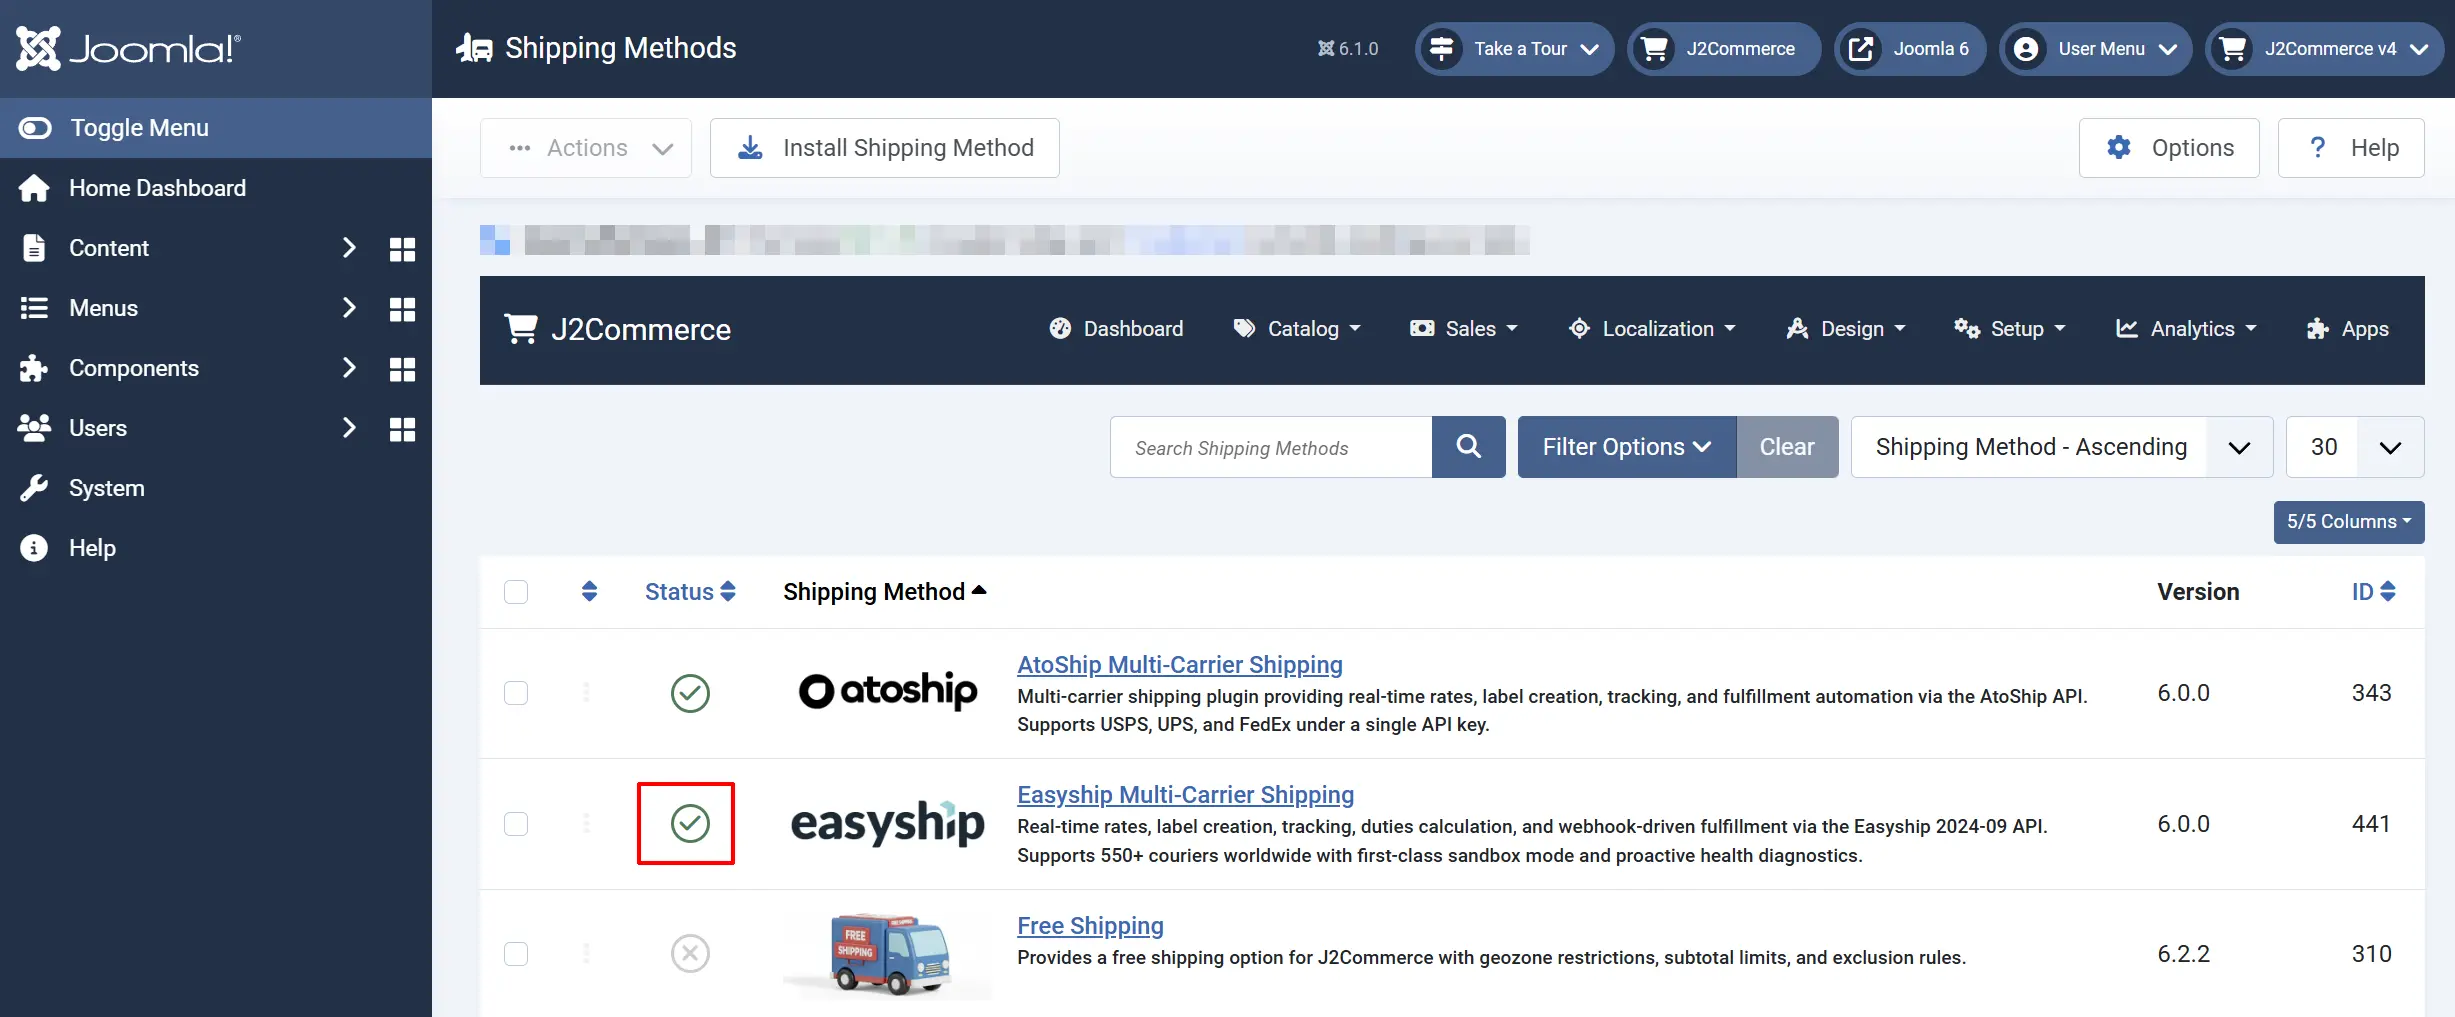
Option A: Go to the J2Commerce icon at the top right corner -> Setup -> Shipping Methods.
Option B: Go to Components on the left sidebar -> J2Commerce -> Dashboard -> Setup -> Shipping Methods.
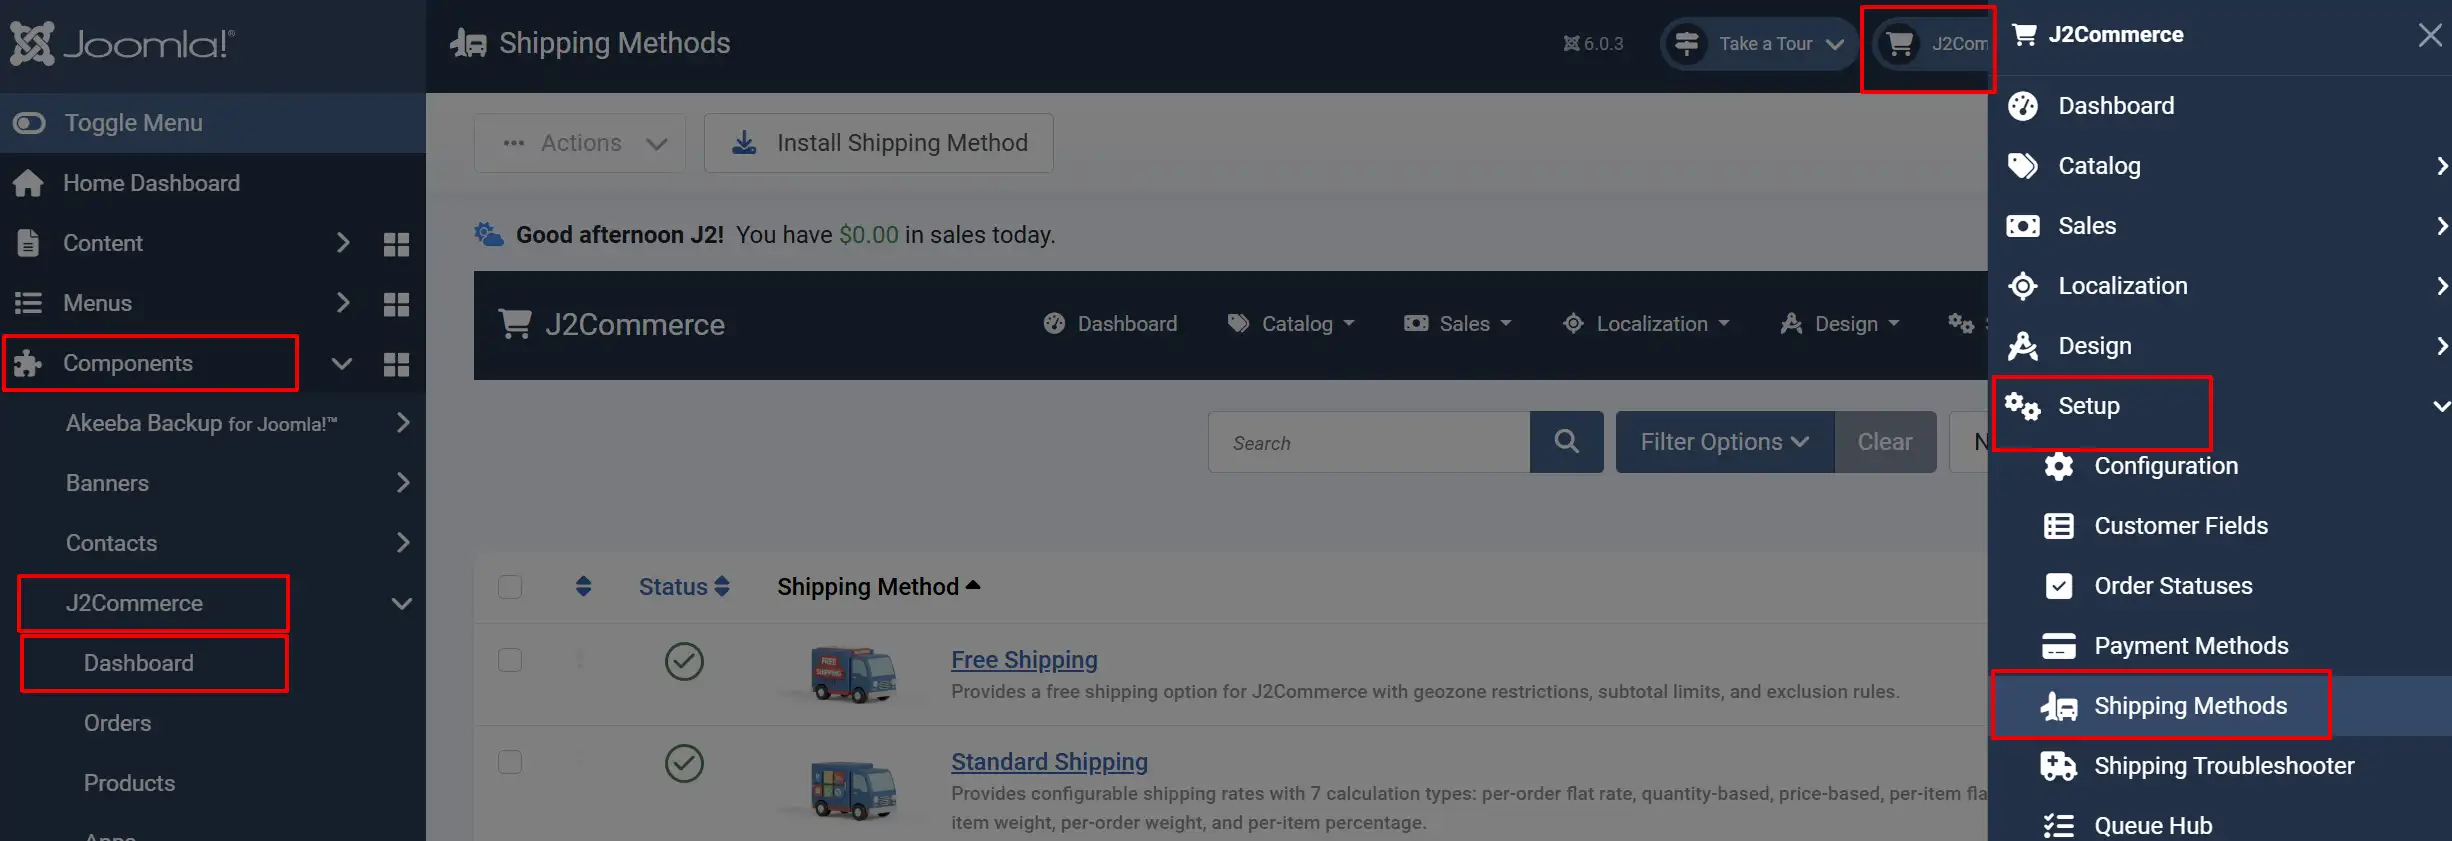
Look for EasyShip, click the X, and it will turn into a green checkmark. It is now enabled and ready for setup.
Configure the Plugin
Click the EasyShip title next to the green checkmark to open the configuration screen.
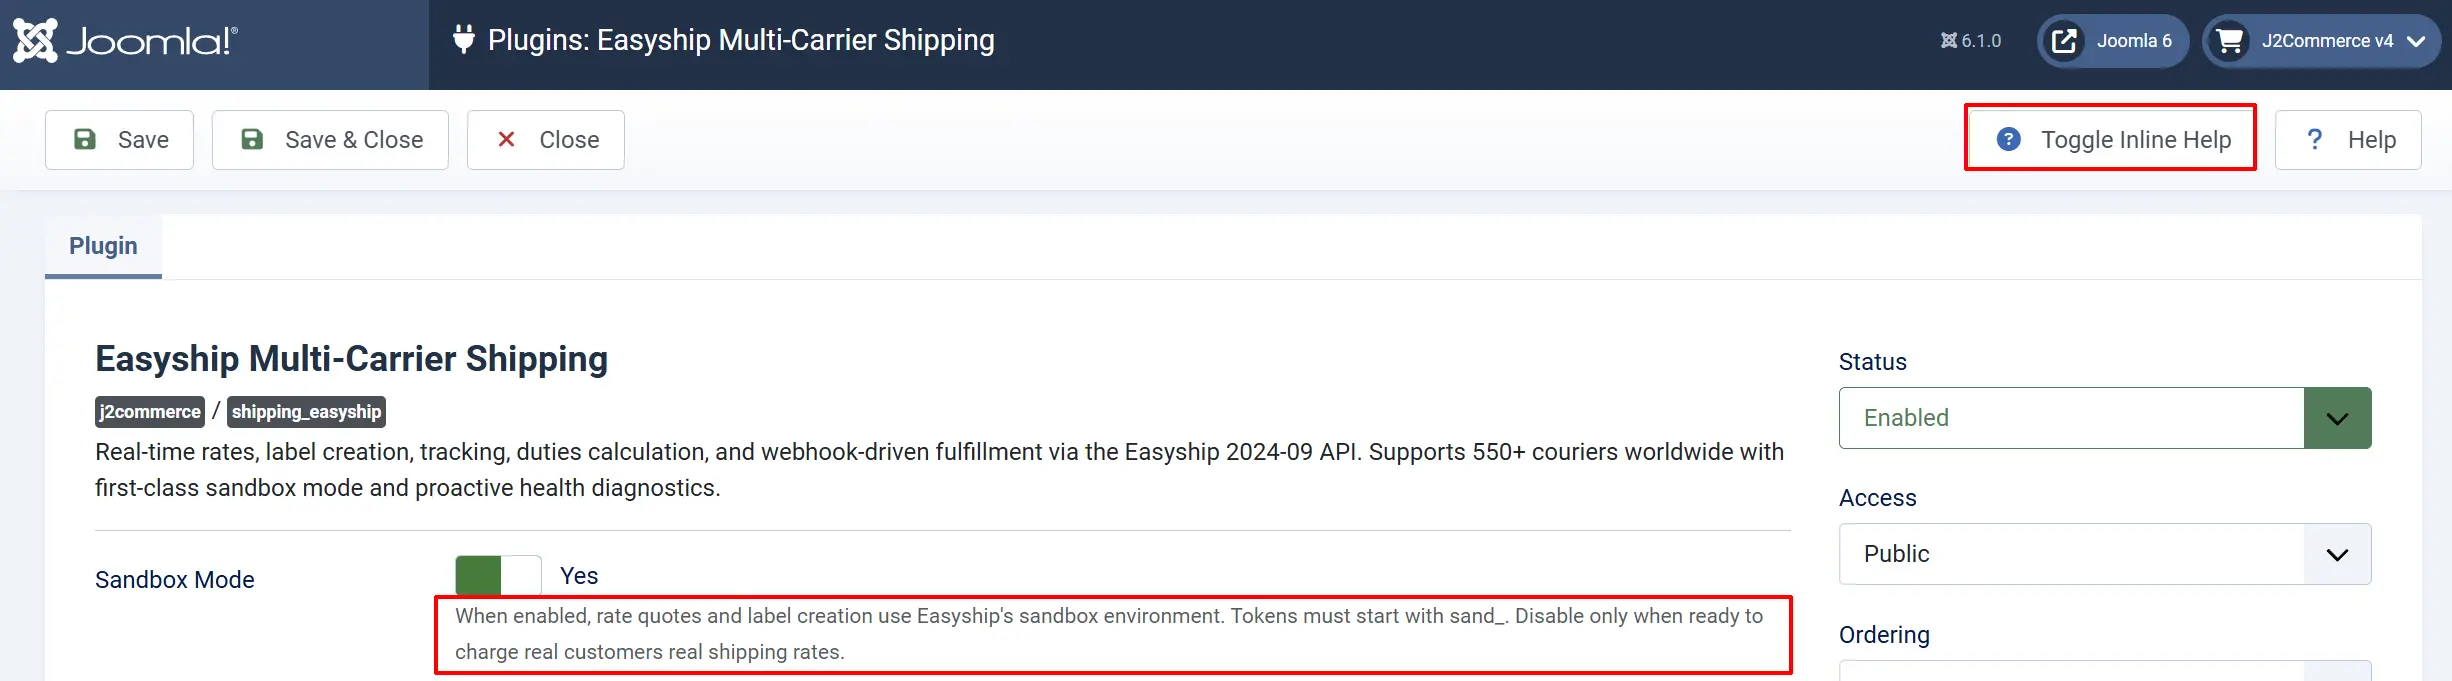
Helpful Tip: Click the Toggle Inline Help button at the top of any plugin configuration screen to display a description below each field.
API Credentials
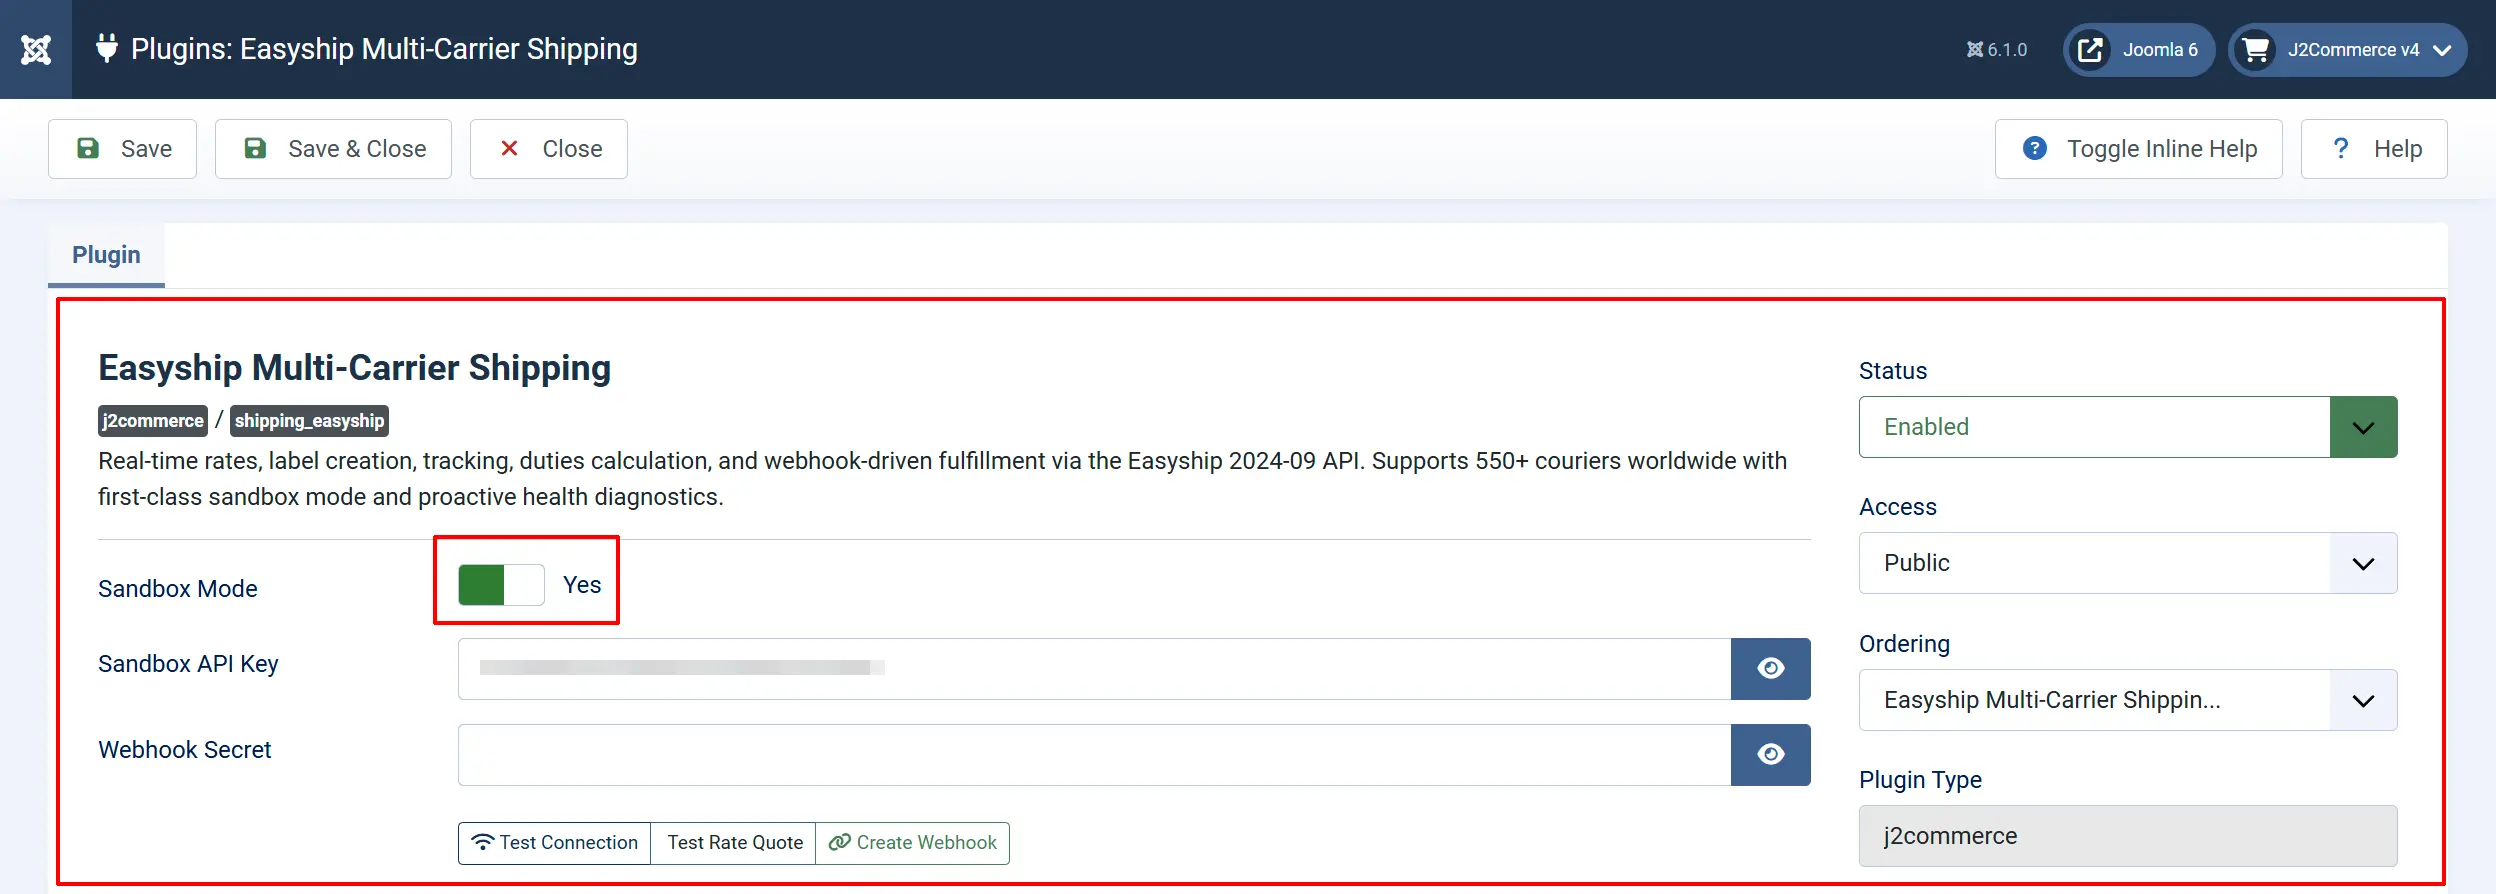
Sandbox Mode: When set to Yes, the plugin uses your sandbox API token and no real shipping charges are made. Set to No for live shipments.
Sandbox API Key: Your sandbox EasyShip API token (starts with sand_). Only visible when Sandbox Mode is Yes.
Production API Key: Your production EasyShip API token (starts with prod_). Only visible when Sandbox Mode is No.
Webhook Secret: The HMAC signing secret returned by EasyShip when you create a webhook subscription. Starts with webh_. You can generate one automatically using the Create Webhook button in the Health Check panel — see Webhook Setup below.
Start with Sandbox Mode enabled. Enter your sandbox token, save, and test the checkout flow. Switch to the production token when you are ready to accept real orders.
Always start with Sandbox Mode enabled. This lets you test the entire workflow — rates at checkout, label creation, and tracking — without incurring real shipping charges.
Connection and Webhook Diagnostics (Health Check)
The Connection and Webhook Diagnostics panel gives you three one-click diagnostic tools directly inside the plugin configuration screen. Save the plugin first after entering your API token so the credentials are applied.
Test Connection: Verifies that the plugin can reach EasyShip with your current API token and displays your account name on success.
Test Rate Quote: Sends a sample rate request using your origin address and confirms that EasyShip returns rates.
Create Webhook: Automatically creates a webhook subscription in EasyShip for the event types you have selected, saves the generated webhook secret to the Webhook Secret field, and marks the webhook as configured.
Use Test Connection any time rates stop appearing at checkout. A failed connection test usually means the API token has been revoked or the wrong token type (sandbox vs. production) is entered.
Ship-From Address
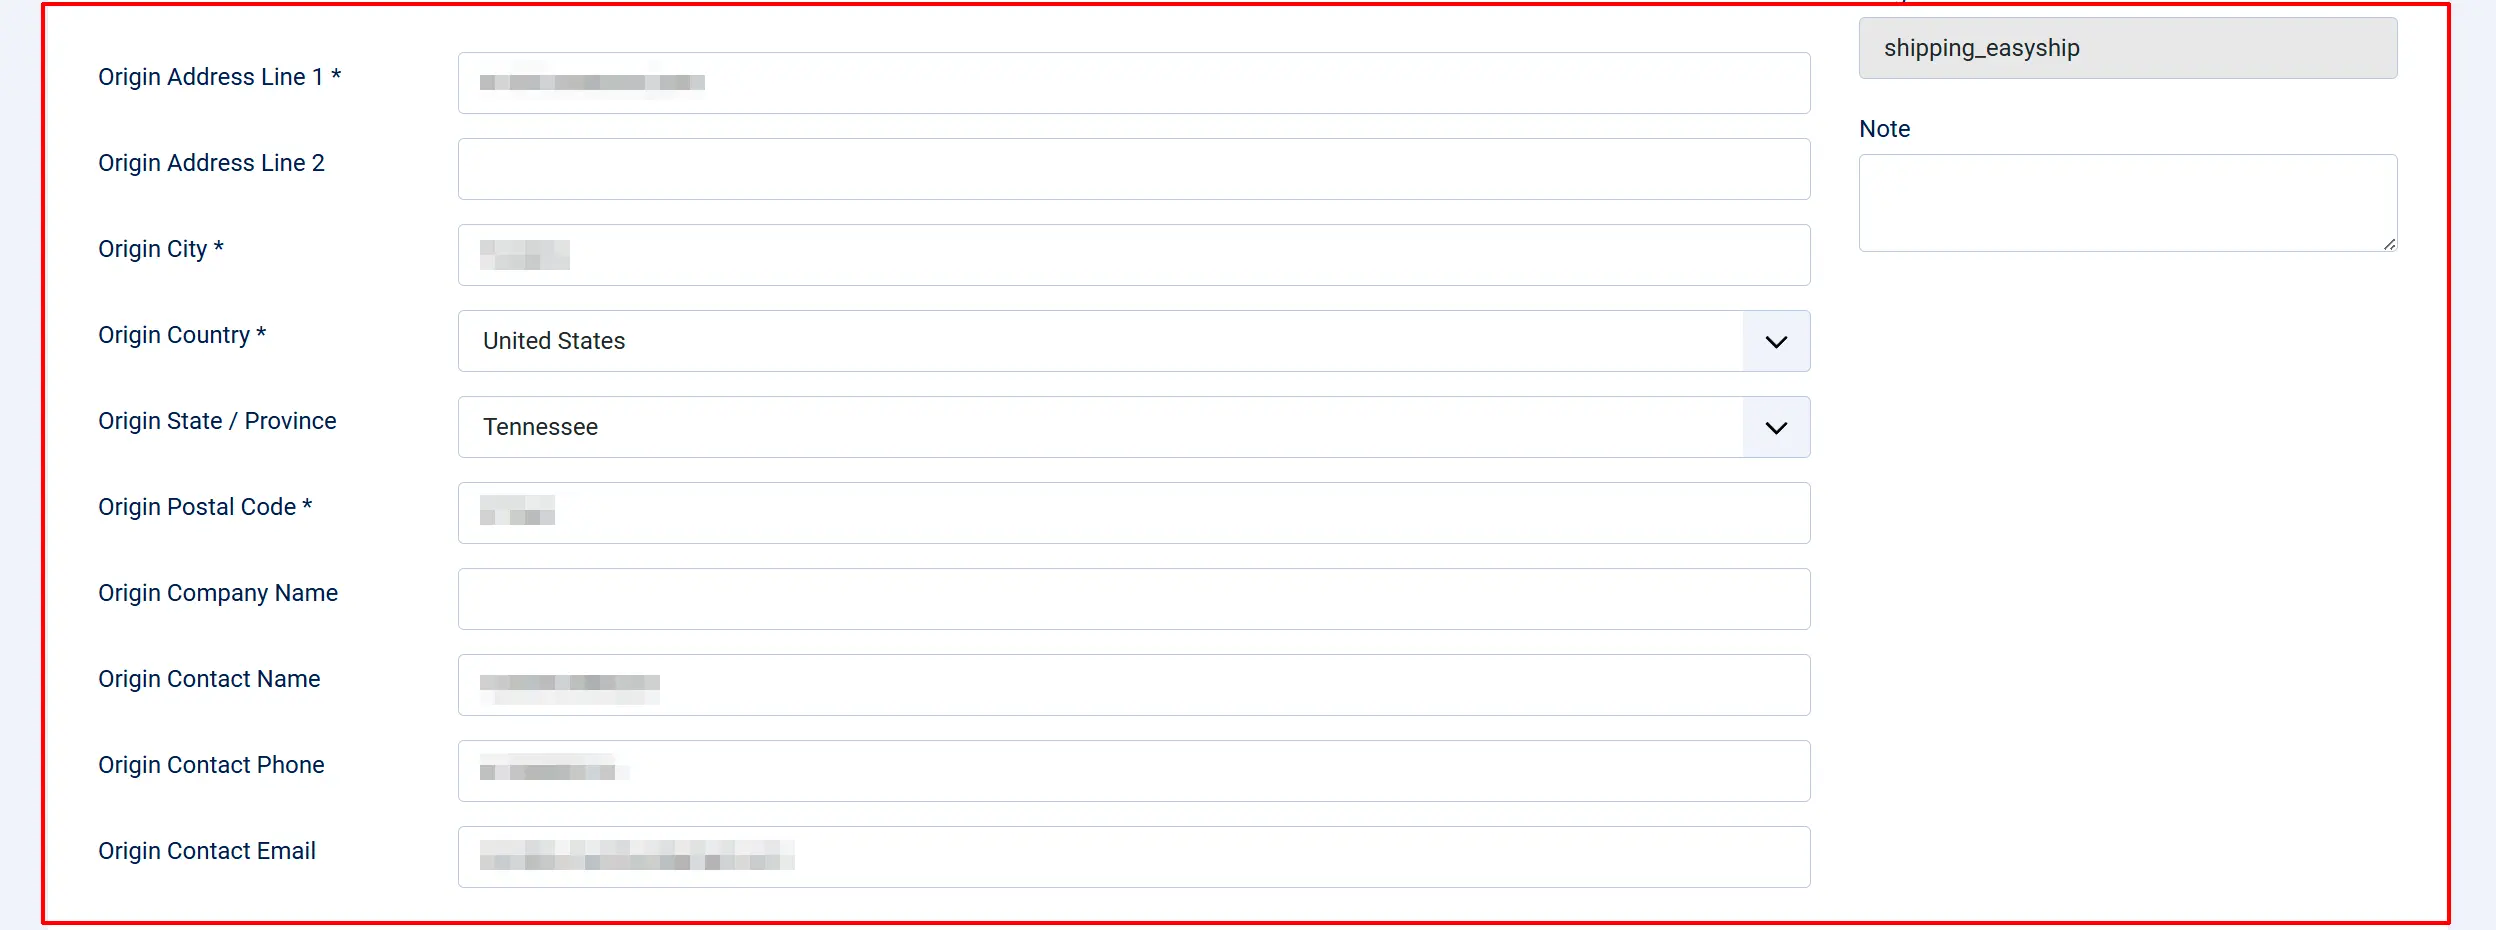
The ship-from address is your warehouse or business location. EasyShip uses this as the origin for all rate calculations and label creation.
Origin Address Line 1: Street address of your shipping origin.
Origin Address Line 2: Optional second line (suite, floor, unit).
Origin City: City of the shipping origin.
Origin Country: Country of the shipping origin.
Origin State / Province: State or province (updates automatically when you change the country).
Origin Postal Code: ZIP or postal code of the shipping origin.
Origin Company Name: Company name printed on the shipping label. Defaults to your Joomla site name.
Origin Contact Name: Contact name printed on the shipping label.
Origin Contact Phone: Contact phone number for the shipping origin.
Origin Contact Email: Contact email address for the shipping origin.
All address fields marked required must be filled in before EasyShip can return rates or create labels.
The company name, contact name, phone, and email are printed on the label and included in customs documentation. For international shipments, these fields are particularly important.
Set Package Defaults
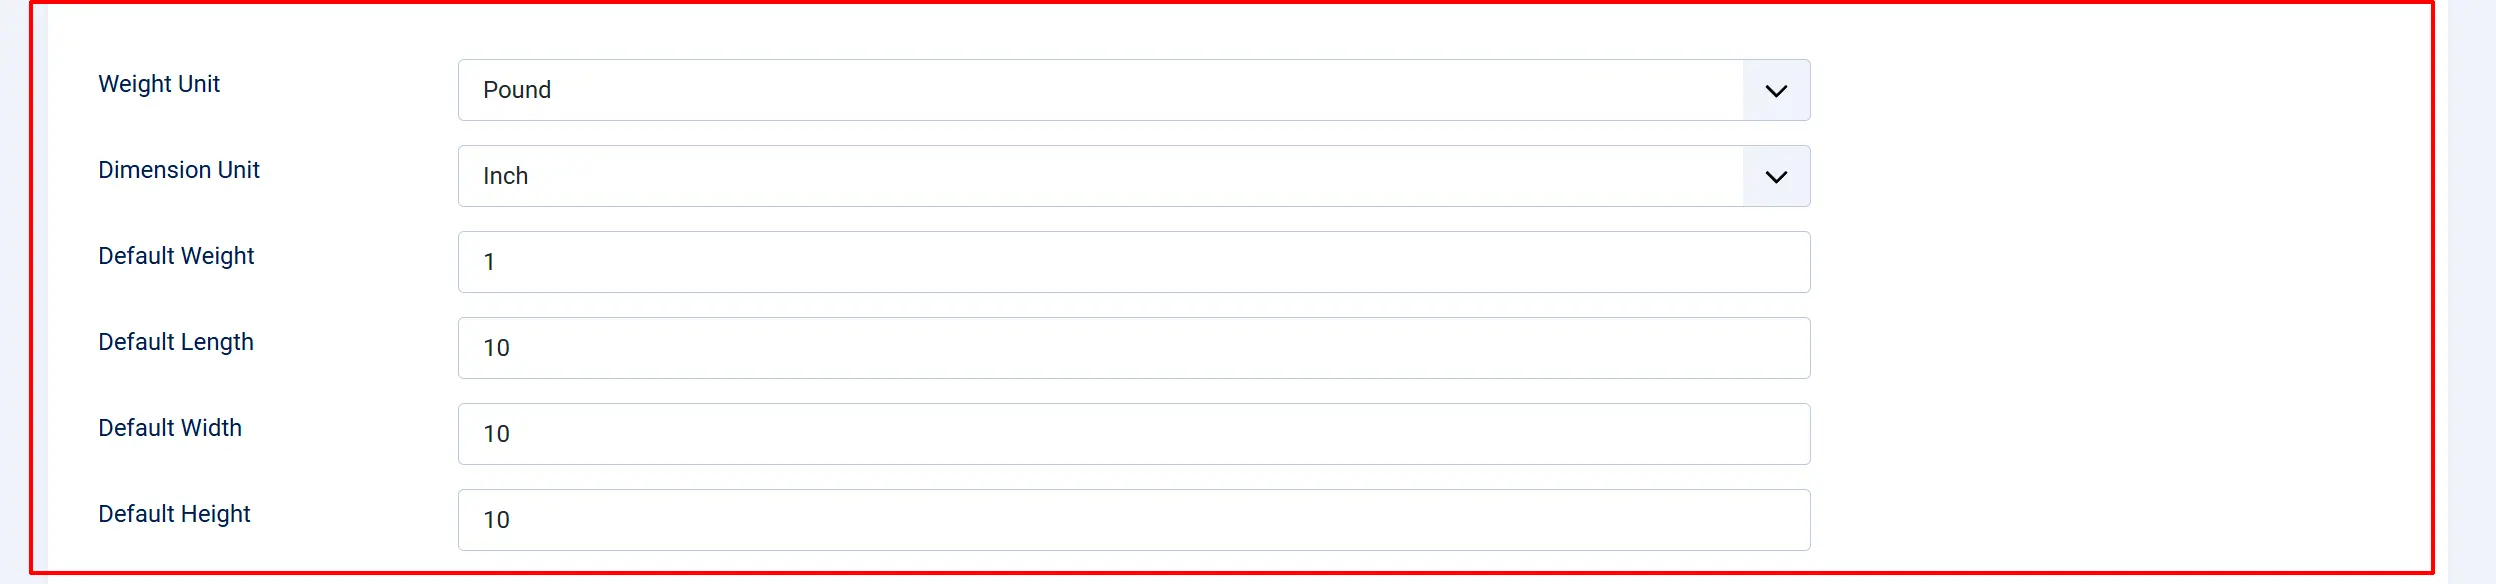
These defaults are used when your products do not have their own weight and dimension values configured. Setting them ensures rate calculations always work even if a product is missing measurements.
Weight Unit: The weight unit for all parcel data sent to EasyShip. Choose kg or lb.
Dimension Unit: The dimension unit for all parcel data sent to EasyShip. Choose cm or in.
Default Weight: Fallback weight per item when a product has no weight set.
Default Length: Fallback package length.
Default Width: Fallback package width.
Default Height: Fallback package height.
For the most accurate rates, set real weights and dimensions on each product in J2Commerce -> Catalog -> Products.
- Set the Weight Unit and Dimension Unit to match the units you use on your products.
- Enter reasonable fallback values for weight and dimensions that represent a typical package from your store.
- Click Save.
The plugin calculates the total parcel weight by summing each item's weight multiplied by its quantity. For dimensions, it uses the largest length, width, and height across all items in the cart. Accurate product weights give your customers the most accurate rates.
Select Your Carriers

The Allowed Carriers field shows a multi-select list of carriers linked to your EasyShip account, each displayed with its logo. Only rates from selected carriers are offered at checkout. Leave the field empty to allow all carriers linked to your EasyShip account.
Connect the carriers you want to offer under Couriers in your EasyShip dashboard before returning to J2Commerce to configure this field. Carriers you have not yet connected to EasyShip will not appear in rate results.
Configure Rate Adjustments (Optional)
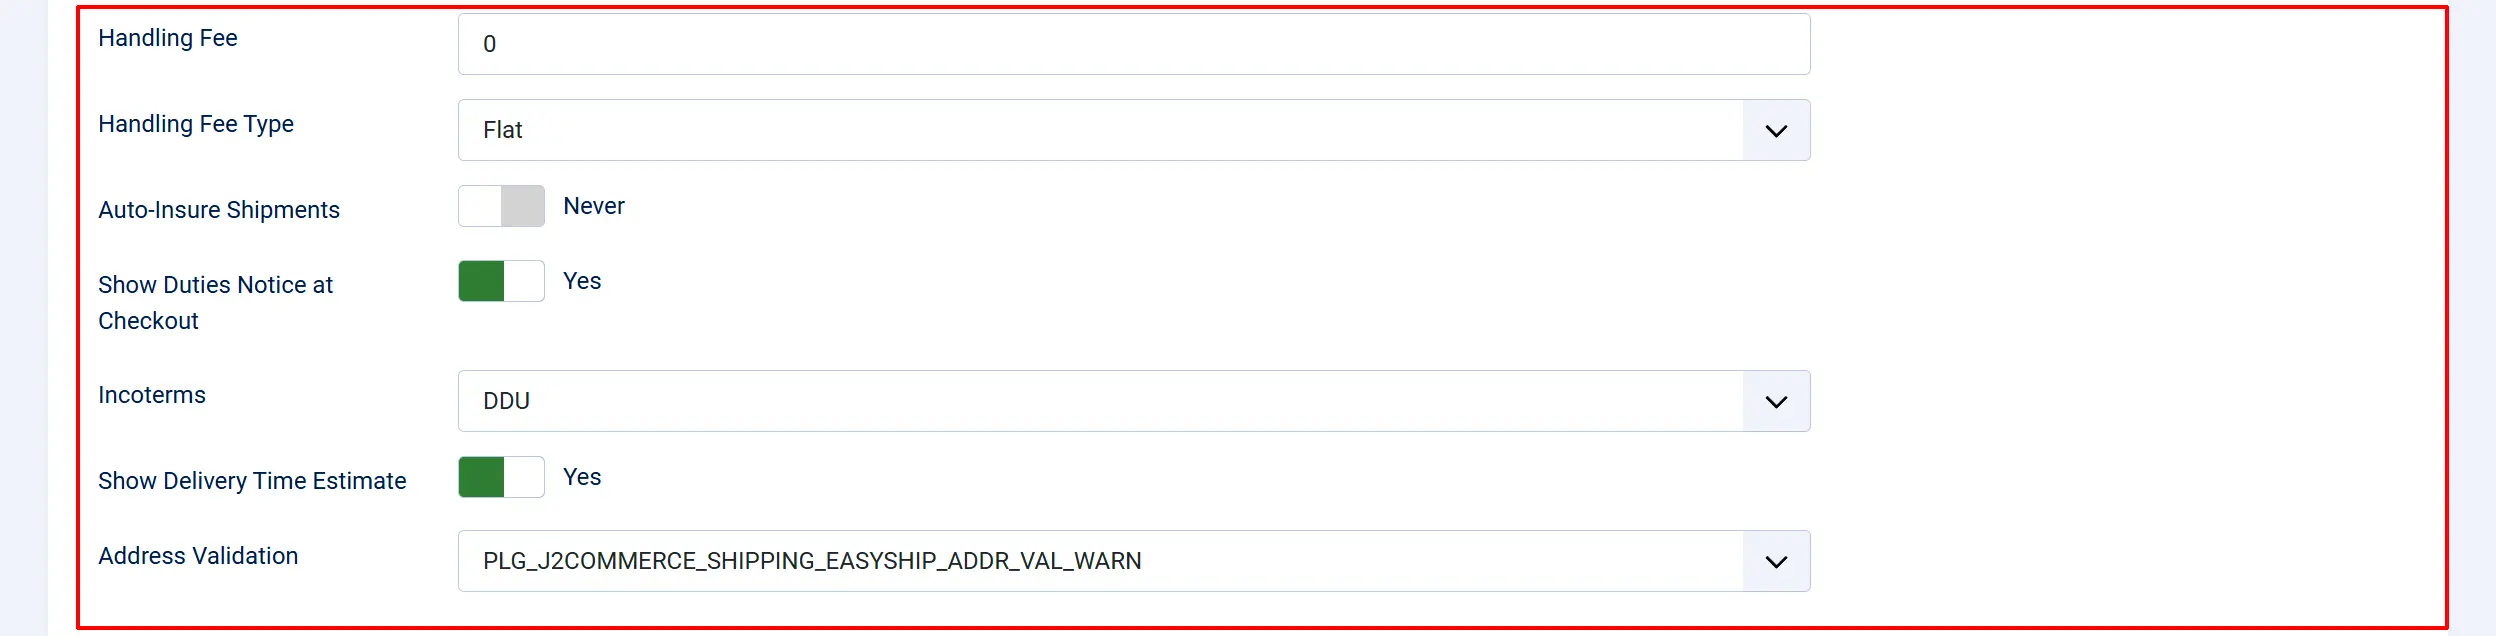
These settings let you adjust the rates returned by EasyShip before they are shown to customers, and restrict which customers see EasyShip rates.
Handling Fee: An additional fee added to each shipping rate. Use this to cover packaging materials or labor costs.
Handling Fee Type: How the handling fee is calculated: Flat (a fixed amount added per rate) or Percent (a percentage of the raw carrier rate).
Auto-Insure Shipments: When enabled, every label is created with insurance equal to the declared customs value. You can also toggle insurance per-label when creating individual labels.
Show Duties Notice at Checkout: When enabled, international customers see an estimated duties and taxes disclosure (DDU).
Incoterms: DDU means duties and taxes are paid by the recipient on delivery. DDP (v2) means they are collected at checkout.
Show Delivery Time Estimate: Display estimated business days in the rate label at checkout. When set to Yes, estimated delivery days appear below each shipping option at checkout (e.g., "3 - 5 business days").
Address Validation: Check the destination address before label purchase. Off = no check; Warn = show advisory; Block = prevent label if invalid. It controls how EasyShip validates the customer's shipping address before allowing label creation.
| Option | Behavior |
|---|---|
| Off | No address check is performed. |
| Warn | An advisory is shown if the address appears invalid, but label creation is still allowed. |
| Block | Label creation is blocked until the address is corrected. |
The default is Warn, which gives store owners a heads-up about potentially bad addresses without preventing label creation. Use Block for high-value shipments where an undeliverable address is especially costly.
Shipping Class
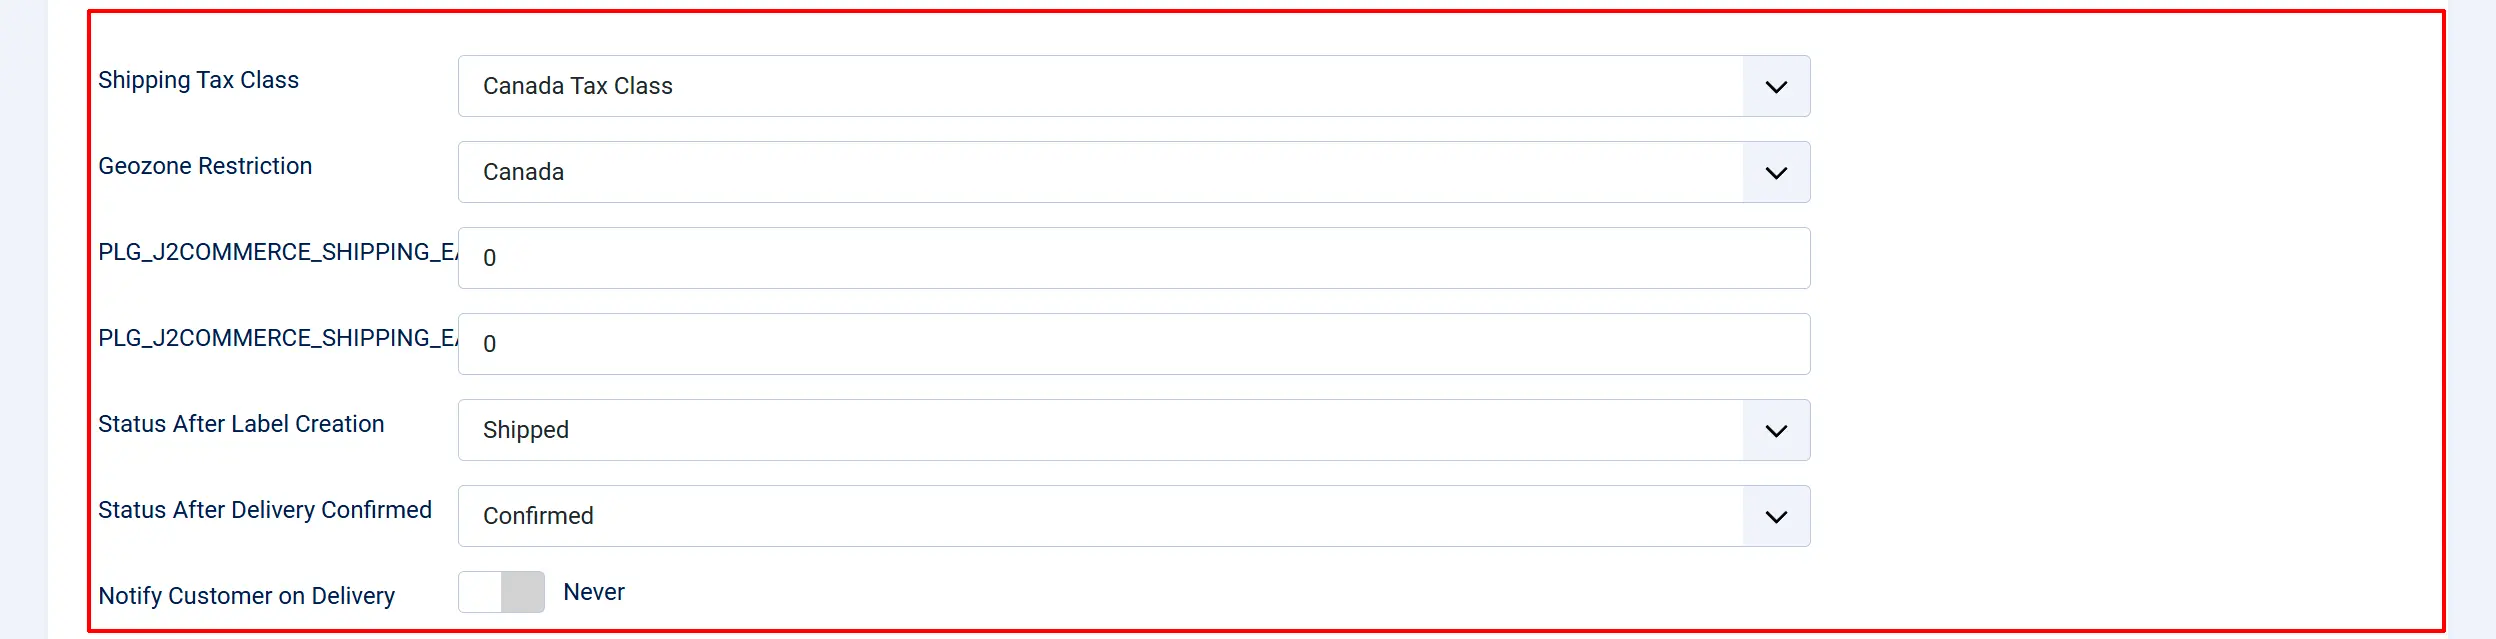
Shipping Tax Class: Apply this tax class to shipping charges. If shipping is taxable in your jurisdiction, select a J2Commerce tax profile. Leave as None to not charge tax on shipping.
Geozone Restriction: Restrict EasyShip rates to customers shipping to destinations within the selected geozone. Leave as All Zones to show rates to all customers worldwide.
Minimum Cart Subtotal: Only show EasyShip rates when the cart subtotal is at or above this amount. Set to 0 to disable.
Maximum Cart Subtotal: Only show EasyShip rates when the cart subtotal is at or below this maximum. Set to 0 to disable.
Examples:
- To add a $2.50 packing fee, set Handling Fee to
2.50and Handling Fee Type to Flat. - To add a 10% markup on all rates, set Handling Fee to
10and Handling Fee Type to Percent. - To only offer EasyShip for orders over $50, set Minimum Cart Subtotal to
50.
Item Categories (Customs)
The Item Categories field assigns a default customs product category to items that do not have an HS (Harmonized System) code set. EasyShip requires a product category for international customs declarations.
The dropdown is populated live from your EasyShip account's category list when the plugin configuration screen loads. If an individual product has an HS code entered in J2Commerce, that HS code takes priority over this default category.
Setting an accurate default category reduces the likelihood of customs delays for international shipments. Categories include options such as Electronics, Fashion, Health & Beauty, Toys, Books, and many others.
Configure Label and Tracking Settings
These settings control what happens automatically when you create shipping labels and how tracking updates affect your orders.

Status After Label Creation: The order status to set automatically when a shipping label is created.
Status After Delivery Confirmed: The order status to set automatically when EasyShip tracking reports the package as delivered.
Notify Customer on Delivery: Send an order status notification email to the customer when delivery is confirmed by EasyShip.
Label Format and Size

Label Format: The output format for generated shipping labels. Options are URL (a direct link), PDF, PNG, or ZPL (for thermal label printers).
Label Size: Physical size for generated labels: A4, A5, or 4x6 (standard thermal label size, the default).
Commercial Invoice Size: Page size for international commercial invoice downloads: A4, 4x6, or None (disables commercial invoice download).

Webhook Event Types: Select which EasyShip event types to subscribe to when you use the Create Webhook button. Available events:
- Label Created
- Label Failed
- Tracking Checkpoints Created
- Tracking Status Changed
- Shipment Cancelled
- Credit Balance Low
Tracking Poll Limit: Maximum number of shipments to check for tracking updates during each cron job run. Default is 50.
- Set Status After Label Creation and Status After Delivery Confirmed to match your store's order workflow.
- Select the webhook event types you want to subscribe to.
- Leave the Webhook Secret field for now — it is covered in the Webhook Setup section below.
- Click Save.
Enable Debug Mode (Optional)
Enable debug mode temporarily if rates are not appearing at checkout or labels fail to create. Disable it in production environments.
Debug Logging: When enabled, all EasyShip API requests and responses are written to administrator/logs/plg_j2commerce_shipping_easyship.php. Useful for diagnosing rate or label issues.
Turn debug logging on only while troubleshooting. Large stores can generate significant log files if debug logging is left on permanently.
Webhook Setup (Optional)
Webhooks allow EasyShip to push delivery events to your store automatically, so order statuses update in real-time without waiting for the cron job.
Option A: Create the Webhook Automatically (Recommended)
- In the plugin configuration screen, select the Webhook Event Types you want to subscribe to.
- Click Save to save your event type selection.
- In the Connection and Webhook Diagnostics panel, click Create Webhook.
- The plugin creates the webhook subscription in EasyShip automatically, then saves the generated secret to the Webhook Secret field.
- Click Save again to persist the secret.
Option B: Create the Webhook Manually
- In the EasyShip dashboard, open Settings -> Webhooks.
- Create a new webhook endpoint using this URL format:
https://your-site.com/index.php?option=com_j2commerce&task=shippingplugin.ajax&plugin=shipping_easyship&action=processWebhook
- Enable the following events:
shipment_label_created,shipment_label_failed,shipment_tracking_checkpoints_created,shipment_tracking_status_changed,shipment_cancelled,credit_balance_low. - Copy the Webhook Secret that EasyShip generates for this endpoint.
- Paste the secret into the Webhook Secret field in the plugin configuration and click Save.
EasyShip signs all webhook payloads with HMAC-SHA256. The plugin verifies this signature automatically using your webhook secret to ensure requests are genuinely from EasyShip.
Test at Checkout
With configuration complete, test the shipping rates at checkout:
- Add one or more shippable products to your cart.
- Proceed to checkout.
- Enter a shipping address (use a real address for accurate rates).
- On the shipping step, you should see EasyShip rates listed with carrier names, service names, prices, and estimated delivery times.
In Sandbox Mode, the checkout display is prefixed with [SANDBOX] next to each rate so you can tell at a glance that you are in test mode.
Frontend View
Go Live
Once you are satisfied with testing:
- Go to J2Commerce -> Shipping -> Shipping Methods and open the EasyShip configuration.
- Set Sandbox Mode to No.
- Paste your Production API Key (starts with
prod_) into the Production API Key field. - Click Save.
Your store is now using real EasyShip rates and can create real shipping labels.
Make sure you have a sufficient credit balance in your EasyShip account before creating live labels. EasyShip deducts the label cost from your pre-funded wallet.
Creating Shipping Labels
When an order is placed with an EasyShip shipping method, you can purchase and print a shipping label directly from the order screen.
Open the Order
- Go to J2Commerce -> Sales -> Orders.
- Click on the order number to open the order detail view.
Create the Label
-
Click the Create Label button. You will find this button:
- In the order toolbar at the top of the page, or
- In the Shipping Information card within the order details.
A modal window opens with the label creation form:
| Field | Description | Pre-filled With |
|---|---|---|
| Carrier | The carrier and service for this label | The courier the customer selected at checkout |
| Weight | Total package weight | Sum of all order item weights |
| Length | Package length | Your configured default length |
| Width | Package width | Your configured default width |
| Height | Package height | Your configured default height |
| Add Insurance | Toggle to add shipping insurance | Your Auto-Insure Shipments default |
| Insurance Amount | Insured value (shown when insurance is toggled on) | The order customs value |
- Review and adjust the package details if needed. The carrier is pre-filled from the customer's checkout selection.
- Toggle Add Insurance if you want to insure this specific shipment.
- Click Purchase Label.
What Happens Next
After the label is created:
- A shipping label is purchased through EasyShip and the URL is stored on the order.
- The tracking number is saved to the order's shipping information.
- The order status automatically changes to your configured Status After Label Creation.
- A history note is added to the order: "Easyship label created for order [number] (tracking [tracking number])".
- The page reloads to show the new label and tracking information.
Print the Label
After the label is created, you have two options to access it:
- Click Print Label in the Shipping and Tracking panel — this opens the label in a new browser tab.
- Click Download Commercial Invoice to download the customs invoice for international shipments (if commercial invoice is enabled in your settings).
Return Labels
EasyShip supports return shipments, allowing customers to send products back to you using a pre-paid label generated from the original outbound shipment.
When to Use Return Labels
Use this feature when a customer needs to return an item and you want to provide them with a pre-paid return shipping label.
Create a Return Label
- Open the original order in J2Commerce -> Sales -> Orders.
- In the Shipping and Tracking panel, click the Create Return Label button. This button only appears when the outbound label exists and has not been voided.
- A confirmation modal appears showing the original outbound tracking number.
- Click Create Return Label in the modal to generate the return shipment.
Once created, the return label appears as a separate entry in the Shipping and Tracking panel with a Return badge. The return tracking number and label URL are stored on the order.
The return label is generated through EasyShip using the same courier as the original outbound shipment. Share the return label URL or PDF with your customer via email so they can print it themselves.
Tracking
Once a shipping label has been created, the Shipping and Tracking panel appears in the order detail view. This panel shows the current label with its tracking status and a full checkpoint timeline.
The panel displays:
- Carrier and service name
- Tracking number (links directly to the carrier tracking page when a tracking URL is available)
- Current tracking status badge
- Label type (outbound or return)
- All tracking checkpoints with timestamps and locations
Click Refresh Tracking to pull the latest status from EasyShip immediately. The cron job also polls tracking automatically based on your Tracking Poll Limit setting.
Tracking Status Badges
| Status | Badge Color | Meaning |
|---|---|---|
| Created | Grey | Label has been created but not yet scanned by the carrier |
| In Transit | Blue | Package is moving through the carrier network |
| Out for Delivery | Teal | Package is on the delivery vehicle |
| Delivered | Green | Package has been delivered |
| Return to Sender | Yellow | Package is being returned to the sender |
| Exception | Red | A delivery exception has occurred |
| Cancelled | Red | The shipment has been cancelled |
| Voided | Dark | Label has been voided |
Manual Tracking Refresh
To check for the latest tracking status immediately:
- Open the order detail view.
- In the Shipping and Tracking panel, click the Refresh Tracking button (the circular arrows icon).
- The plugin queries EasyShip for the latest tracking information and updates the status and checkpoints.
- If the package has been delivered and you have configured a Status After Delivery Confirmed, the order status updates automatically.
Customer Tracking Panel
Customers can view their own tracking information from the order detail page in their J2Commerce account. When a label has been created for an order, the customer-facing view displays:
- The tracking number (as a clickable link to the carrier tracking page when available)
- The current tracking status badge
- A reverse-chronological list of tracking checkpoints with location and timestamp
This panel appears automatically on the customer's order detail page once a label exists for the order. No additional configuration is required. The panel shows only the tracking information relevant to the customer — it does not display label management controls or admin-only fields.
Voiding a Label
If you need to cancel a shipping label (for example, the order was cancelled or you need to create a new label with different dimensions):
- Open the order detail view.
- In the Shipping and Tracking panel, find the label you want to void.
- Click the red Void Label button.
- Confirm the action in the dialog that appears.
The label status changes to Voided (dark badge) and the void button is removed. You can then create a new label if needed.
Voiding a label cancels the EasyShip shipment and may refund the label cost to your EasyShip account, depending on whether the carrier has already scanned the package. Check your EasyShip account for carrier-specific void policies.
Batch Label Creation
If you have many orders to fulfill at once, you can create shipping labels in bulk from the orders list.
-
Go to J2Commerce -> Sales -> Orders.
-
Check the boxes next to the orders you want to create labels for.
-
Click the Create EasyShip Labels button in the toolbar.
-
The plugin processes each order:
- For 10 or fewer orders, labels are created one by one with a progress indicator.
- For more than 10 orders, the batch is queued for background processing.
-
When complete, a summary shows how many labels were created and how many failed (if any).
-
The page reloads to show updated order statuses.
Batch label creation uses the carrier that each customer selected at checkout, along with your default package dimensions from the plugin configuration. If you need custom dimensions for specific orders, create those labels individually.
Automated Tracking with Webhooks
For fully automated tracking updates, webhooks allow EasyShip to push status changes to your store in real-time. Order statuses update automatically without any manual action.
Get Your Webhook URL
Your webhook URL follows this format:
https://yoursite.com/index.php?option=com_j2commerce&task=shippingplugin.ajax&plugin=shipping_easyship&action=processWebhook
Replace yoursite.com with your actual domain name.
Configure EasyShip Webhooks
The easiest way is to use the Create Webhook button in the plugin's diagnostics panel (see Webhook Setup above). For manual setup:
- Log in to your EasyShip dashboard.
- Go to Settings -> Webhooks.
- Click Create Webhook.
- Paste your webhook URL.
- Enable the event types you want to subscribe to.
- Copy the Webhook Secret that EasyShip generates.
- Paste the secret into the Webhook Secret field in the J2Commerce plugin settings and click Save.
What Webhooks Automate
| EasyShip Event | What Happens in J2Commerce |
|---|---|
| Tracking Checkpoints Created | New checkpoint entries are added to the order history |
| Tracking Status Changed | The label's tracking status is updated in your order |
| Package Delivered | Order status changes to your configured "Delivered" status; customer email sent if enabled |
| Label Created | Label status updates to In Transit |
| Label Failed | Label status updates to Exception |
| Shipment Cancelled | Label is marked as Voided in your order |
| Credit Balance Low | Informational — no automatic action |
Automated Tracking with Cron (Alternative)
If you prefer not to use webhooks, or as a backup, you can use Joomla's built-in task scheduler to poll EasyShip for tracking updates on a schedule.
Set Up the Cron Task
- In Joomla Administrator, go to System -> Scheduled Tasks.
- Create a new task of type J2Commerce Cron.
- Set the Command to
easyship_track. - Set the schedule to run every 1-4 hours (more frequent = more up-to-date tracking, but uses more API calls).
- Enable and save the task.
Each time the cron runs, it checks tracking for up to Tracking Poll Limit (default: 50) shipments that have not yet reached a final status (delivered, return to sender, cancelled, or exception).
You can use both webhooks and cron together. Webhooks provide instant updates for most events, while the cron job acts as a safety net for any missed webhook deliveries.
Duties and Taxes for International Shipments
When a customer ships internationally, EasyShip calculates estimated import duties and taxes as part of the rate quote. The plugin displays these estimates to customers at checkout so there are no surprises on delivery.
How It Works
The Incoterms setting in your plugin configuration controls who pays:
| Setting | Meaning |
|---|---|
| DDU (Delivered Duty Unpaid) | The recipient pays import duties and taxes on delivery. An estimate is shown at checkout. |
| DDP (Delivered Duty Paid) | Duties and taxes are collected at checkout. The total includes them in the shipping charge. |
When Show Duties Notice at Checkout is enabled and the shipment is international with a DDU incoterm, customers see an advisory message similar to: "Import duties and taxes may be due on delivery. Estimated: $12.50."
This notice only appears when EasyShip returns a non-zero import tax or duty estimate for the specific carrier rate and destination. Domestic shipments are not affected.
For stores primarily shipping within one country, you can leave Incoterms set to DDU and disable Show Duties Notice at Checkout to keep the checkout cleaner.
Configuration Reference
All Settings at a Glance
| Section | Setting | Default | Description |
|---|---|---|---|
| API | Sandbox Mode | Yes | Use sandbox token (no real charges) |
| API | Sandbox API Key | — | Sandbox token (sand_...) |
| API | Production API Key | — | Production token (prod_...) |
| API | Webhook Secret | — | HMAC signing secret from EasyShip (webh_...) |
| Origin | Origin Address Line 1 | — | Ship-from street address |
| Origin | Origin Address Line 2 | — | Optional suite / unit |
| Origin | Origin City | — | Ship-from city |
| Origin | Origin Country | — | Ship-from country |
| Origin | Origin State / Province | — | Ship-from state or province |
| Origin | Origin Postal Code | — | Ship-from ZIP (required) |
| Origin | Origin Company Name | — | Printed on labels |
| Origin | Origin Contact Name | — | Printed on labels |
| Origin | Origin Contact Phone | — | Printed on labels |
| Origin | Origin Contact Email | — | Printed on labels |
| Package | Weight Unit | kg | kg or lb |
| Package | Dimension Unit | cm | cm or in |
| Package | Default Weight | 1 | Fallback item weight |
| Package | Default Length | 10 | Fallback package length |
| Package | Default Width | 10 | Fallback package width |
| Package | Default Height | 10 | Fallback package height |
| Carriers | Allowed Carriers | (all) | Carriers to include at checkout |
| Rates | Handling Fee | 0 | Extra fee per rate |
| Rates | Handling Fee Type | Flat | Flat amount or percentage |
| Rates | Auto-Insure Shipments | No | Apply insurance to every label |
| Rates | Show Duties Notice | Yes | Show import duties estimate at checkout |
| Rates | Incoterms | DDU | DDU = recipient pays; DDP = collected at checkout |
| Rates | Show Delivery Time Estimate | Yes | Show estimated days at checkout |
| Rates | Address Validation | Warn | Off / Warn / Block |
| Rates | Tax Profile | None | Tax class for shipping charges |
| Rates | Geozone Restriction | All Zones | Restrict to a geographic zone |
| Rates | Minimum Cart Subtotal | 0 | Minimum cart value (0 = off) |
| Rates | Maximum Cart Subtotal | 0 | Maximum cart value (0 = off) |
| Tracking | Status After Label Creation | Shipped | Auto-set when label is created |
| Tracking | Status After Delivery Confirmed | Delivered | Auto-set when delivered |
| Tracking | Notify Customer on Delivery | No | Email customer on delivery confirmation |
| Tracking | Webhook Event Types | (all) | Events to subscribe to via webhook |
| Tracking | Tracking Poll Limit | 50 | Max shipments per cron run |
| Labels | Label Format | URL | URL / PDF / PNG / ZPL |
| Labels | Label Size | 4x6 | A4 / A5 / 4x6 |
| Labels | Commercial Invoice Size | A4 | A4 / 4x6 / None |
| Debug | Debug Logging | No | Log API requests/responses |
Tips
- Set product weights accurately. The more accurate your product weights, the more accurate the shipping rates your customers see. This also prevents surprises when you create the actual shipping label.
- Connect your carriers in EasyShip first. Before configuring the Allowed Carriers field in J2Commerce, link your carrier accounts in your EasyShip dashboard. Only connected carriers return rates.
- Use the health check diagnostics. After entering your API token, click Test Connection and Test Rate Quote before testing the frontend. This pinpoints configuration issues immediately.
- Enable webhooks for the best tracking experience. Webhooks update tracking in real-time without any manual action from you or your staff. The Create Webhook button in the diagnostics panel makes setup effortless.
- Use debug mode sparingly. It is helpful for troubleshooting but generates large log files over time. Turn it off once your issue is resolved.
- Review item categories for international shipments. Assigning accurate customs categories reduces the likelihood of customs delays. Individual products can also have HS codes entered in the J2Commerce product editor.
Troubleshooting
No shipping rates appear at checkout
Cause: The most common causes are missing configuration, no carriers connected in EasyShip, or an address problem.
Solution:
- Verify that the plugin is enabled in J2Commerce -> Setup -> Shipping Methods.
- Check that the Origin Postal Code and Origin Country are filled in.
- In the plugin settings, click Test Connection to confirm the API token is valid.
- Click Test Rate Quote to confirm EasyShip returns rates from your origin.
- Log in to your EasyShip dashboard and confirm at least one carrier account is connected under Couriers.
- If using a Geozone Restriction, verify the customer's destination falls within that zone.
- If using Minimum/Maximum Cart Subtotal, confirm the cart total meets the threshold.
- Enable Debug Logging and check
administrator/logs/plg_j2commerce_shipping_easyship.phpfor API error details.
Label creation fails
Cause: The EasyShip API rejected the shipment request, usually due to an address issue, missing data, or insufficient account credit.
Solution:
-
Enable Debug Logging in the plugin settings.
-
Try creating the label again.
-
Check
administrator/logs/plg_j2commerce_shipping_easyship.phpfor the full error message. -
Common causes:
- Invalid or incomplete destination address on the order
- Package weight or dimensions outside the carrier's limits
- Insufficient credit in your EasyShip account
- The selected carrier is not available for the origin-destination route
Create Label button does not appear on the order screen
Cause: The order status may not be set to Confirmed, which is required before label creation buttons appear.
Solution:
- Go to J2Commerce -> Setup -> Payment Methods.
- Open each payment method and change the Order Status from Pending to Confirmed.
- Return to the order and change its status to Confirmed, then click Save.
Address validation is blocking label creation
Cause: The Address Validation setting is set to Block and EasyShip considers the destination address invalid.
Solution:
- Review the destination address on the order for typos or missing fields (city, postal code, state).
- Correct the address in the order if needed.
- If the address is correct and the validation is a false positive, temporarily change Address Validation to Warn to allow label creation, then file a support inquiry with EasyShip.
Tracking is not updating automatically
Cause: Webhooks are not configured, or the cron job is not running.
Solution:
- For webhook users: Use the Test Connection button and verify the webhook secret is saved. Confirm the correct events are enabled in both the plugin and your EasyShip dashboard.
- For cron users: Check that the scheduled task with command
easyship_trackis enabled and running in System -> Scheduled Tasks. - You can always click Refresh Tracking in the Shipping and Tracking panel for a manual update.
Health check shows "Could not reach EasyShip"
Cause: The API token is incorrect, has been revoked, or the wrong token type is being used (sandbox token in production mode, or vice versa).
Solution:
- Check that Sandbox Mode matches the type of token you have entered (sandbox tokens start with
sand_, production tokens start withprod_). - Log in to your EasyShip dashboard and verify the token is active under Settings -> API.
- Generate a new token if needed and update the plugin configuration.
Sandbox mode is showing real-looking rates
Cause: This is expected behavior. EasyShip's sandbox environment returns realistic-looking rate data, but no real labels are purchased and no charges are made.
Solution: This is not a problem. The rates in sandbox mode are realistic test data from EasyShip's sandbox API. When you switch to production mode, real carrier rates and real label purchases apply.
Webhook events are not being received
Cause: The webhook URL is not publicly accessible, the secret does not match, or the wrong events are subscribed.
Solution:
- Verify your site is accessible from the internet (not behind a local firewall or development tunnel that has expired).
- Confirm the webhook URL in EasyShip exactly matches the format shown in the Webhook Setup section above.
- Check that the Webhook Secret in the plugin matches the secret shown in your EasyShip dashboard for this webhook endpoint.
- Enable Debug Logging and attempt to trigger a webhook event to see what the plugin receives.