Auto-Coupon Pop Up
The Auto-Coupon Pop Up app reads a coupon code directly from the page URL and applies it to the visitor's cart automatically — no typing required. A branded modal then appears to confirm whether the code was accepted, expired, not yet active, or not eligible, keeping shoppers informed at every step.
Requirements
- with PHP 8.3.0 +
- Joomla! 6.x
- J2Commerce 6.x
Purchase and Download
Step 1: Go to our J2Commerce website -> Apps
Step 2: Locate the Auto-Coupon Pop Up App -> click View Details -> Add to cart -> Checkout.
Step 3: Go to your My Downloads under your profile button at the top right corner and search for the app. Click Available Versions -> View Files -> Download Now
Install the App
You can install this Auto-Coupon Pop Up App using the Joomla installer. The following steps help you with a successful installation.
In the Joomla admin, go to System -> Install -> Extensions
Upload the plugin ZIP file or use the Install from URL option.
 (1)-a6689f12b23b8e992f5c2a169737672f.webp)
Enable the App
Once you have installed the App, you will need to enable it. There are two ways you can access the extension.
Option A: Go to the J2Commerce icon at the top right corner -> Apps
Option B: Go to Components on the left sidebar -> J2Commerce -> Apps
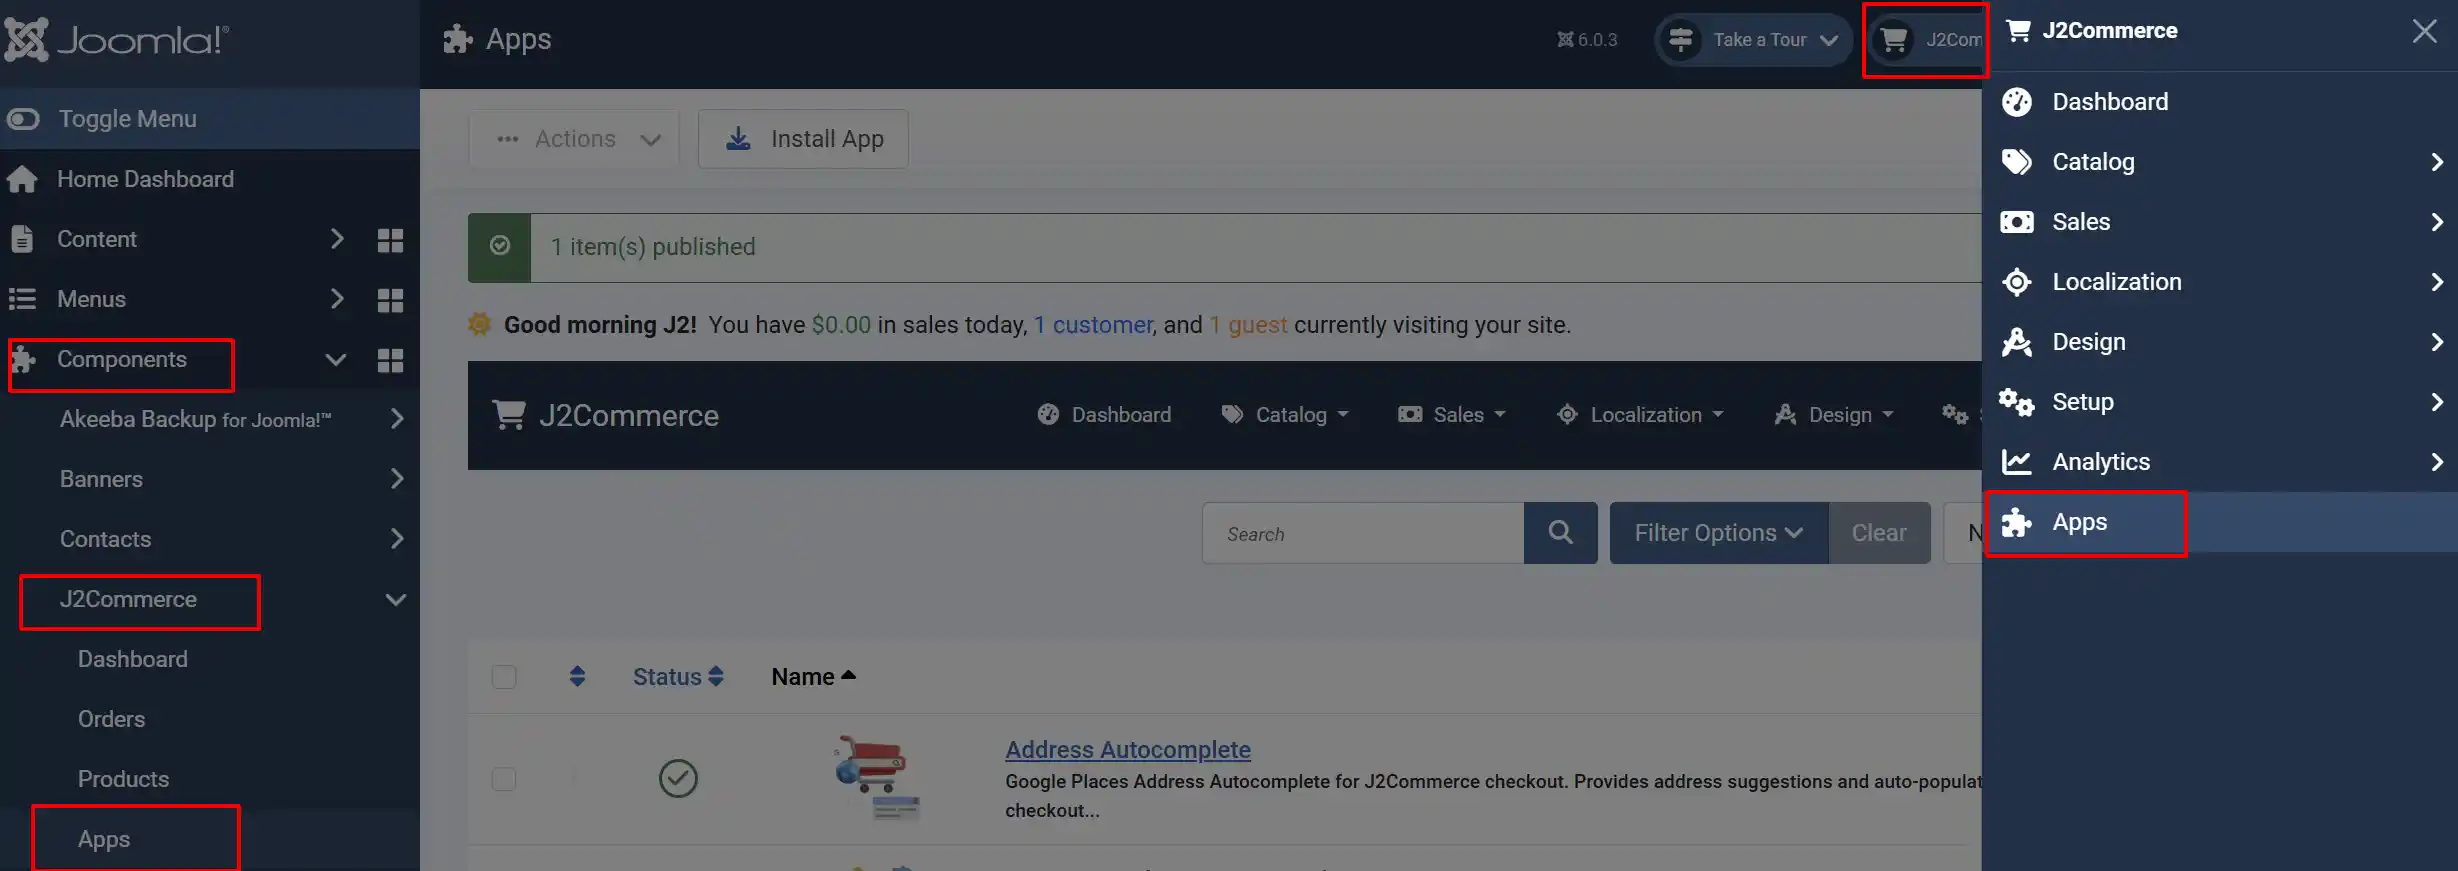
Search for Auto-Coupon Pop Up, click the X, and it will turn into a green checkmark. It is now enabled and ready for setup.
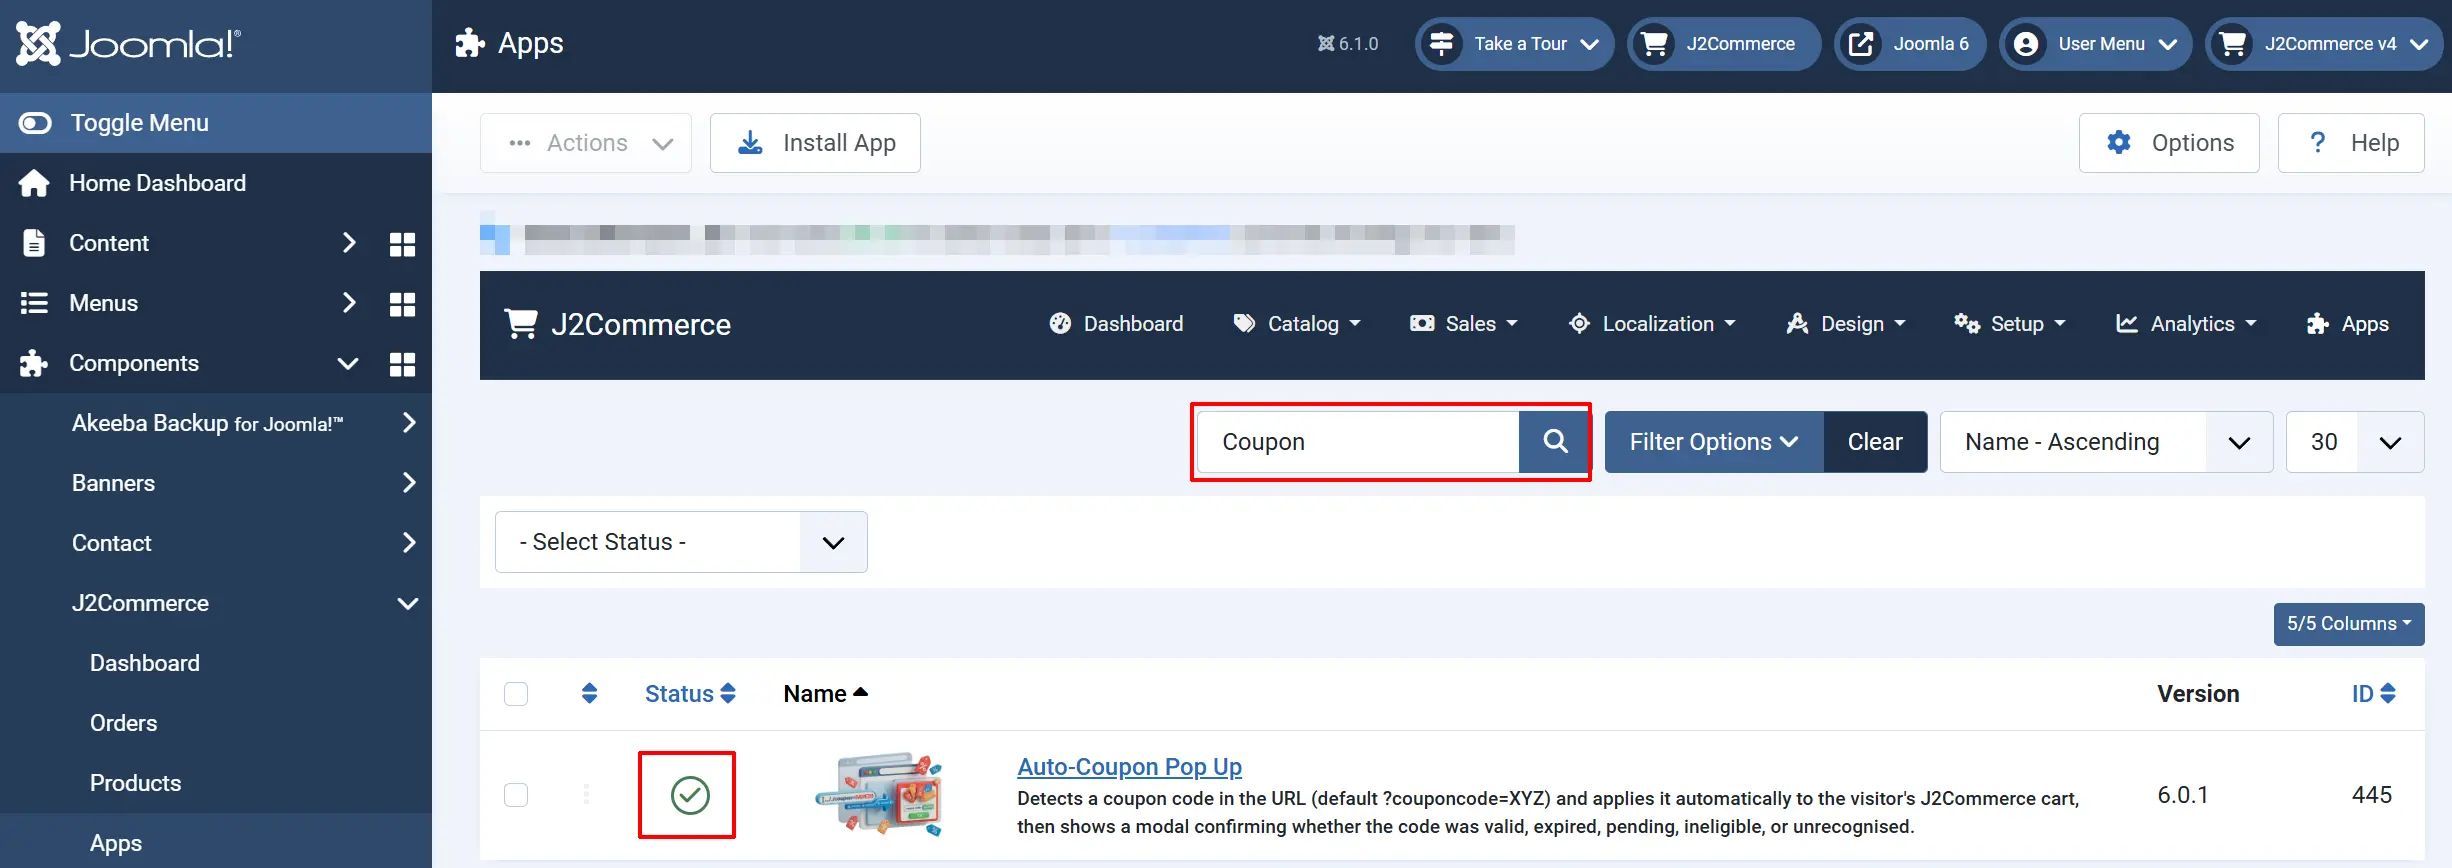
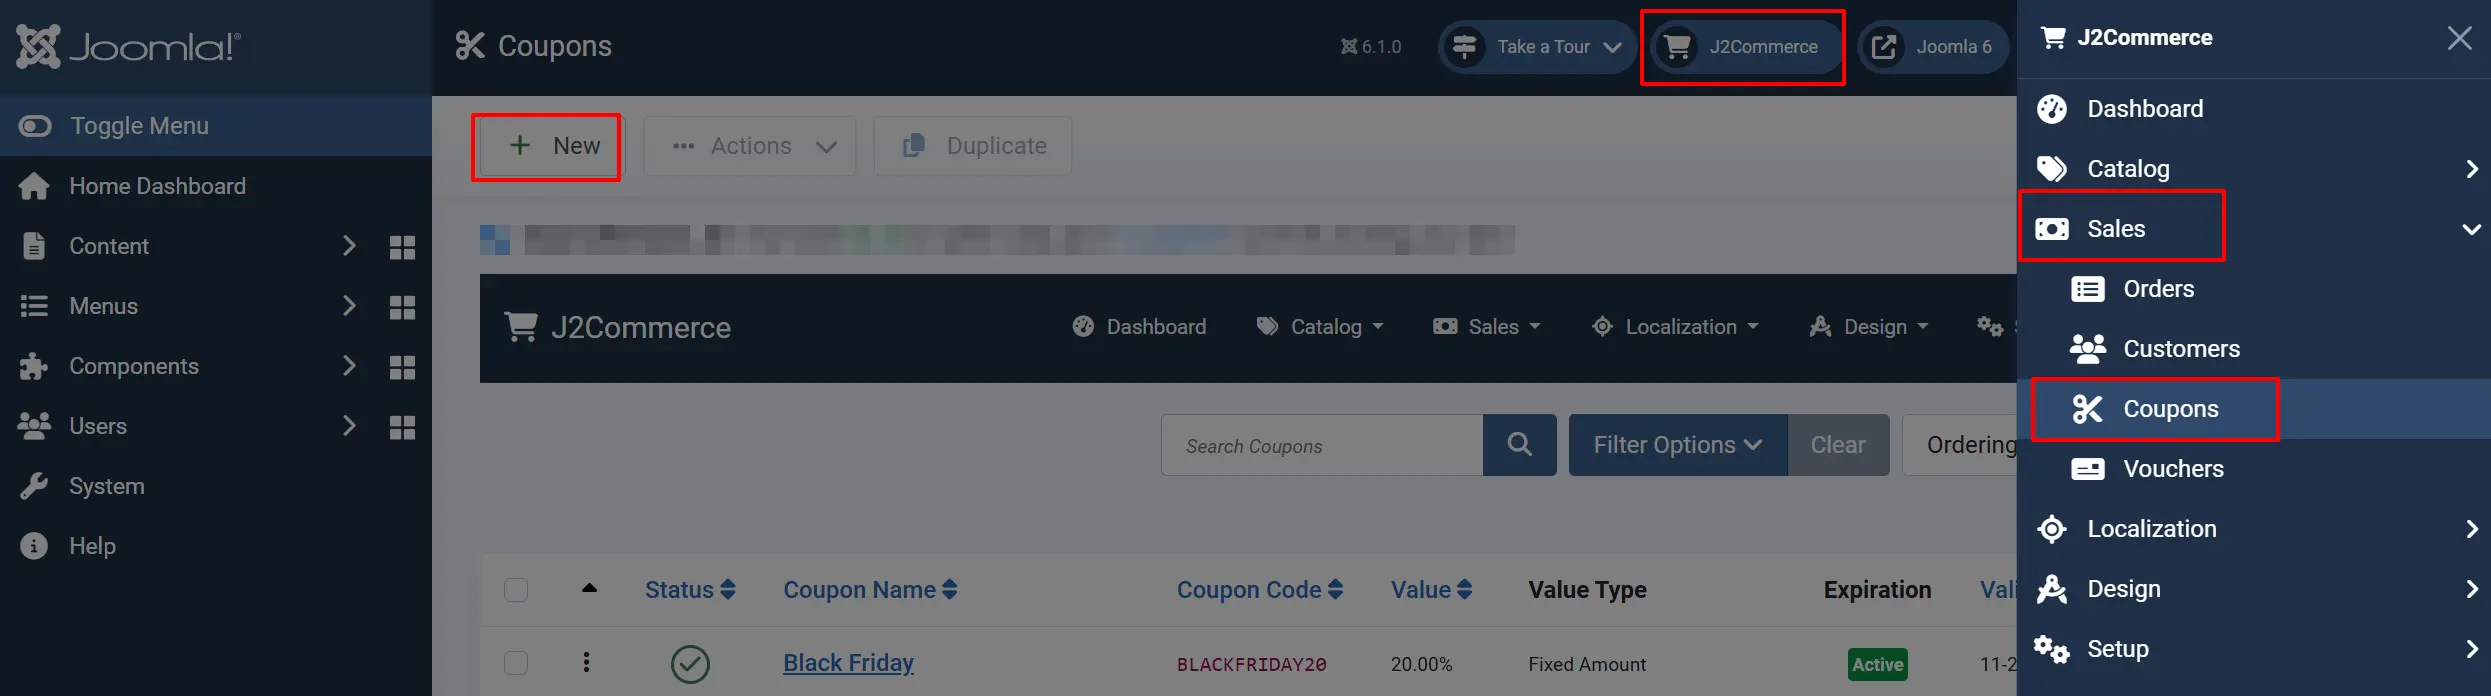
Before Configuring the APP
In order for the app to work, you need to create an active coupon by going to J2Commerce -> Sales -> Coupons -> New
Configure the App
Once you click on the Auto-Coupon Pop Up title next to the green checkmark, you are ready to start setting up the parameters.
Click the Toggle Inline Help button in the toolbar and the app will show a description below each field as you configure it.
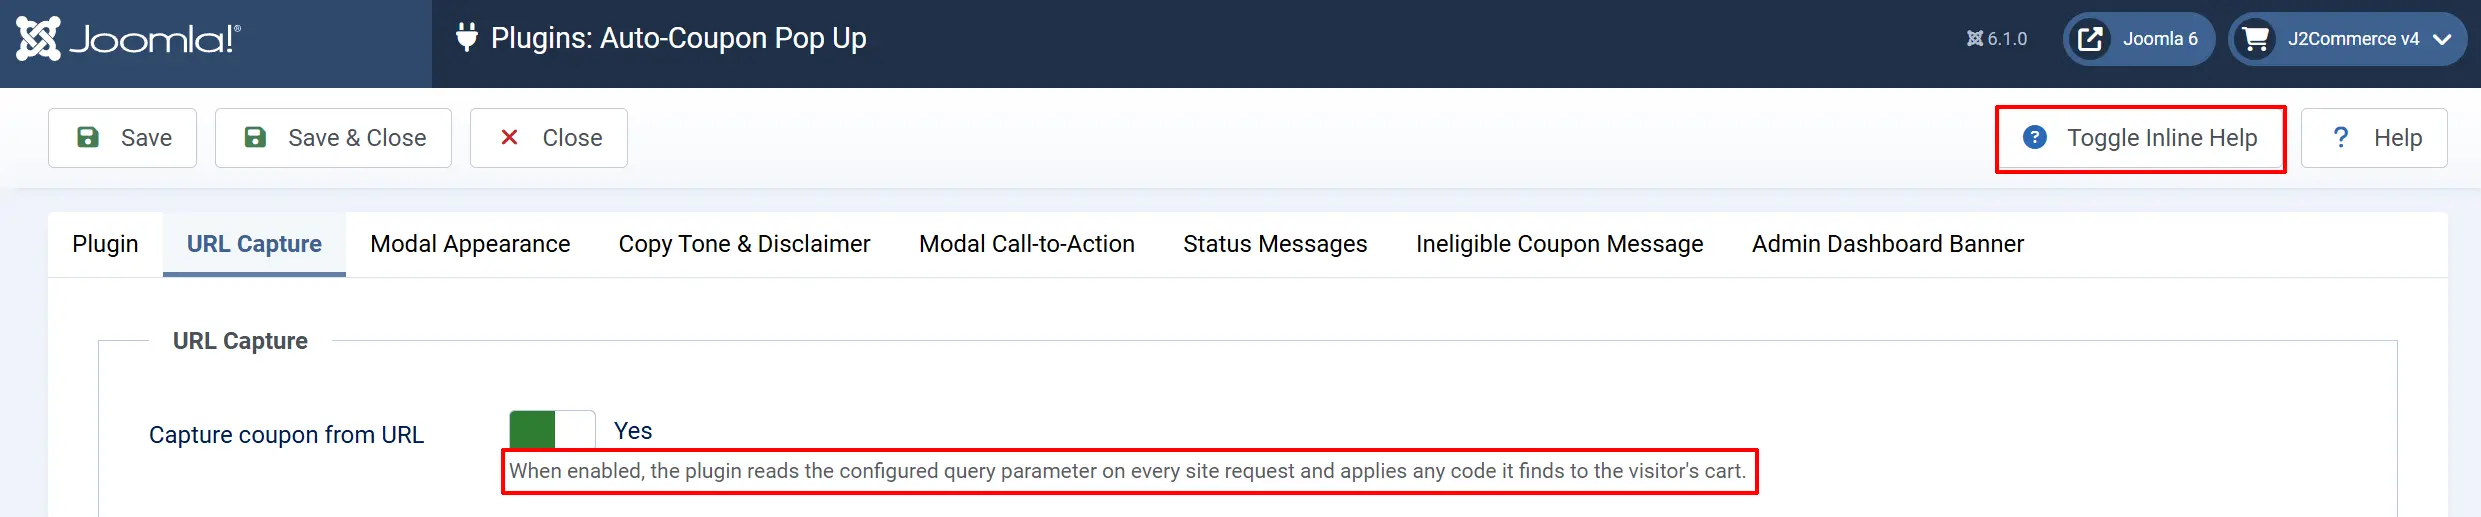
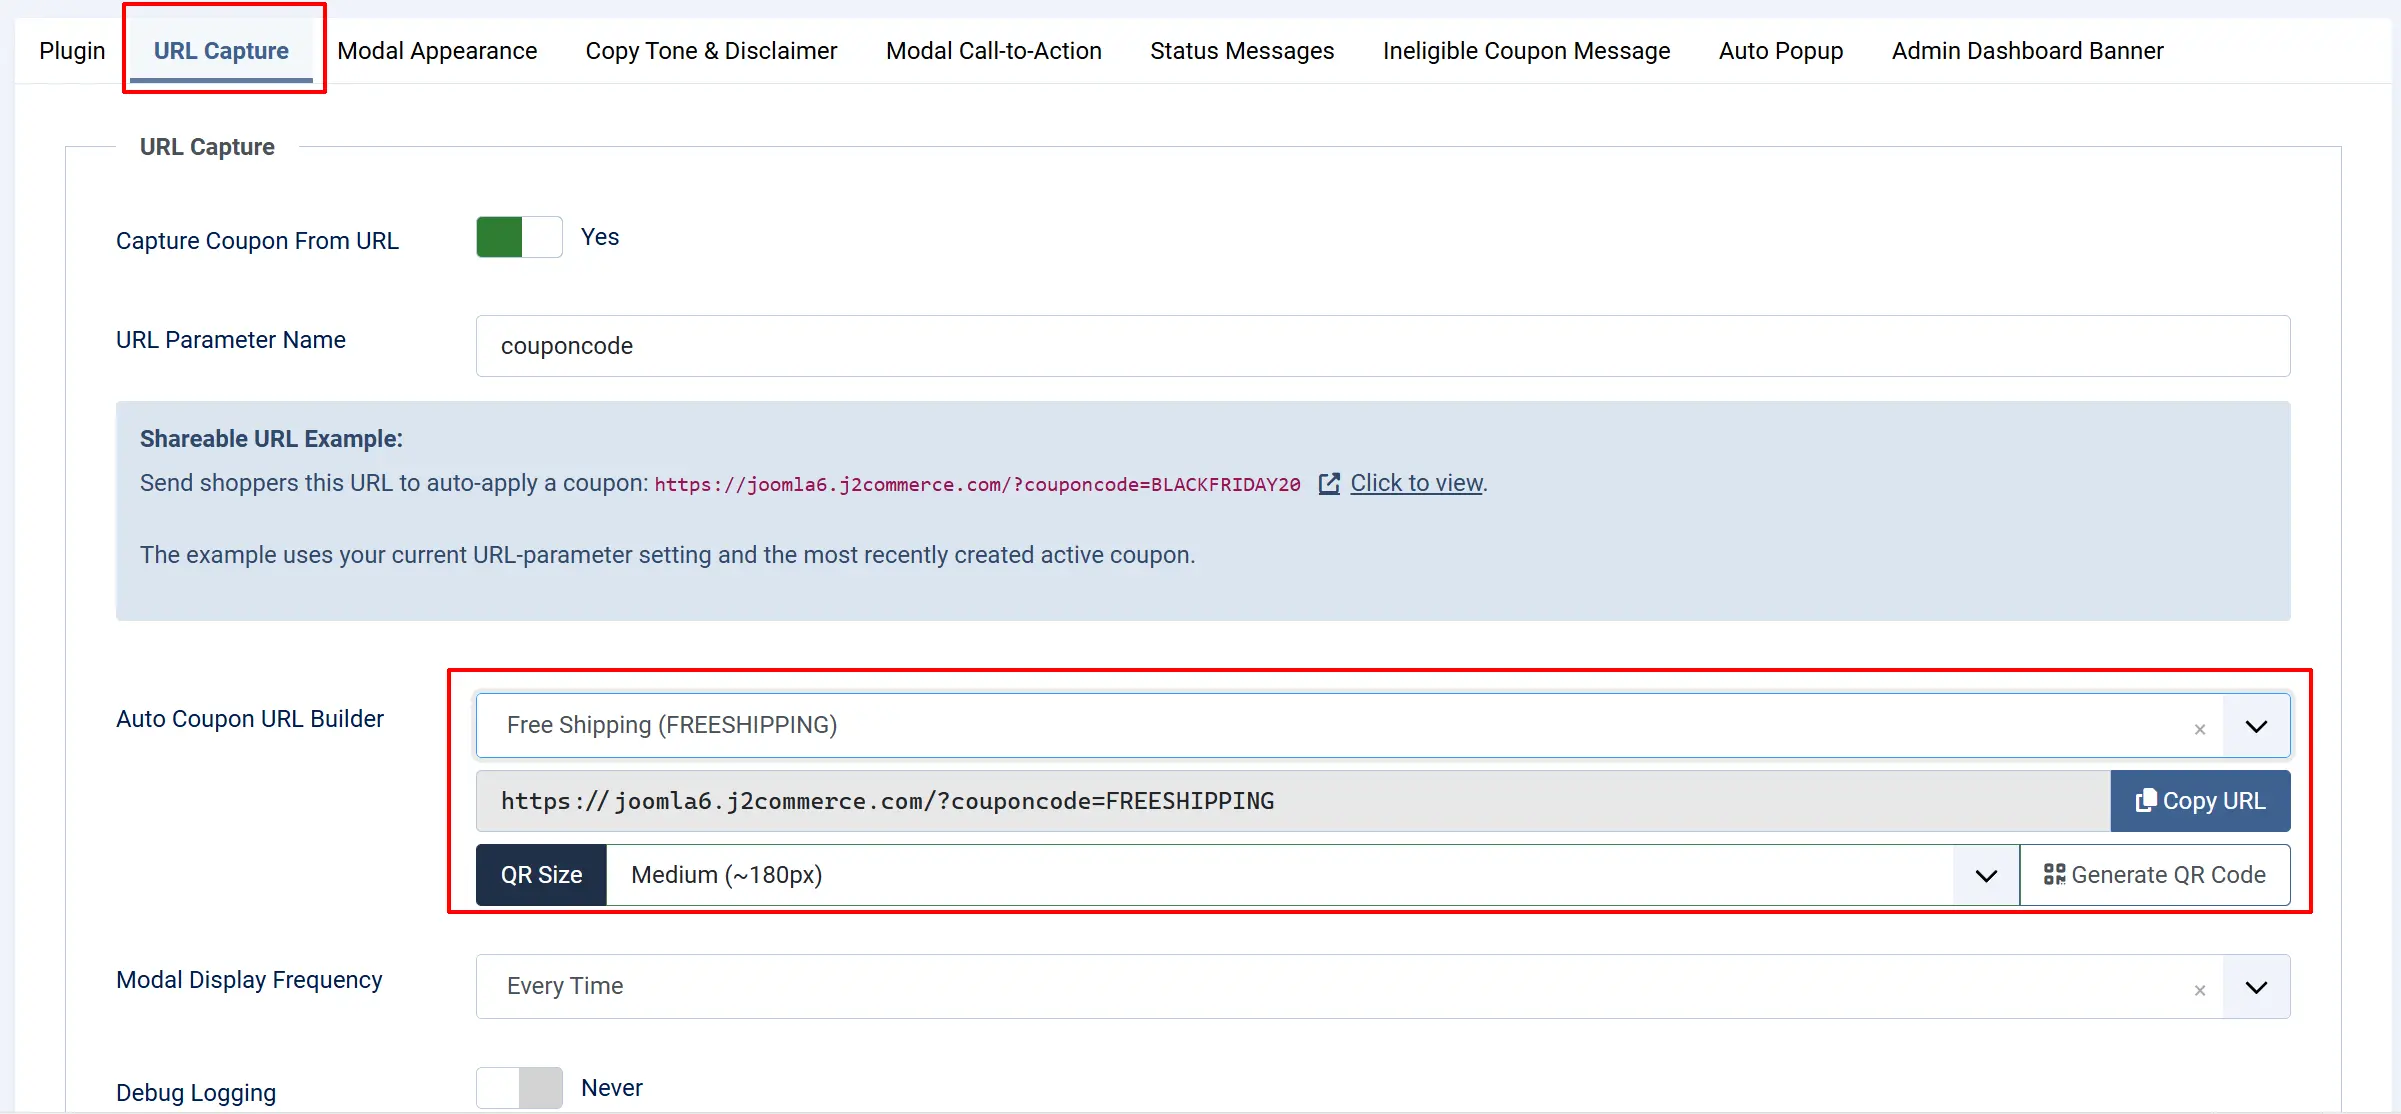
URL Capture tab
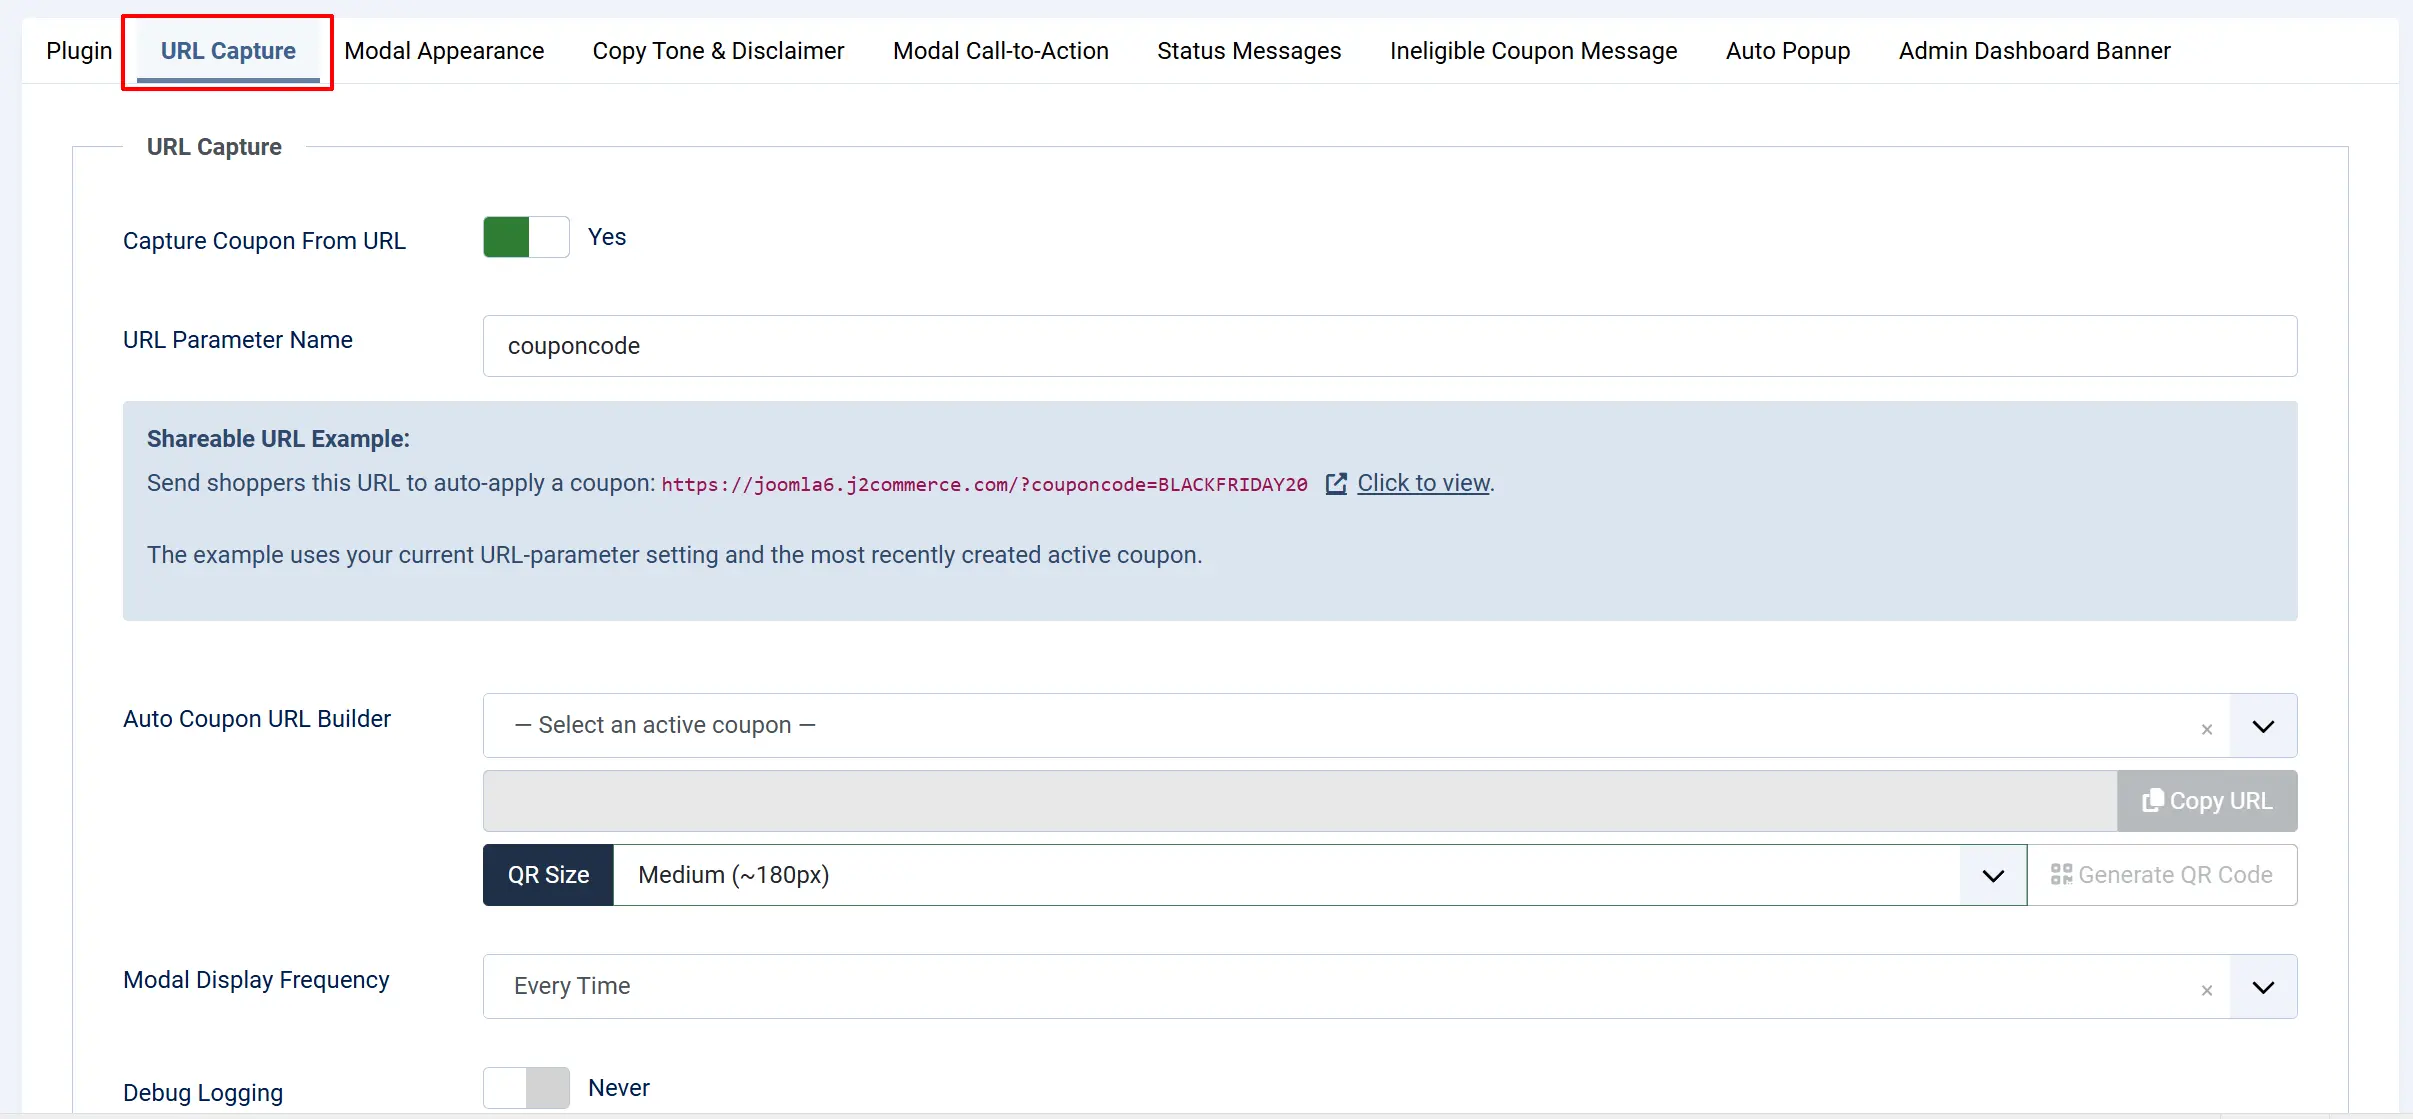
This tab controls how the plugin detects a coupon code in the page URL and how often the modal is shown.
-
Capture coupon from URL — Turn this on to allow the plugin to read a coupon code from the URL on every page load and apply it to the visitor's cart automatically. Leave it off if you want to pause the feature without disabling the whole plugin.
-
URL parameter name — The query string key the plugin looks for. The default is
couponcode, so a URL likehttps://yoursite.com/sale?couponcode=PROMO10triggers the plugin. Change this only if your marketing platform uses a different parameter name. Use letters, numbers, and underscores only.The image below shows where the parameter name will appear in the URL
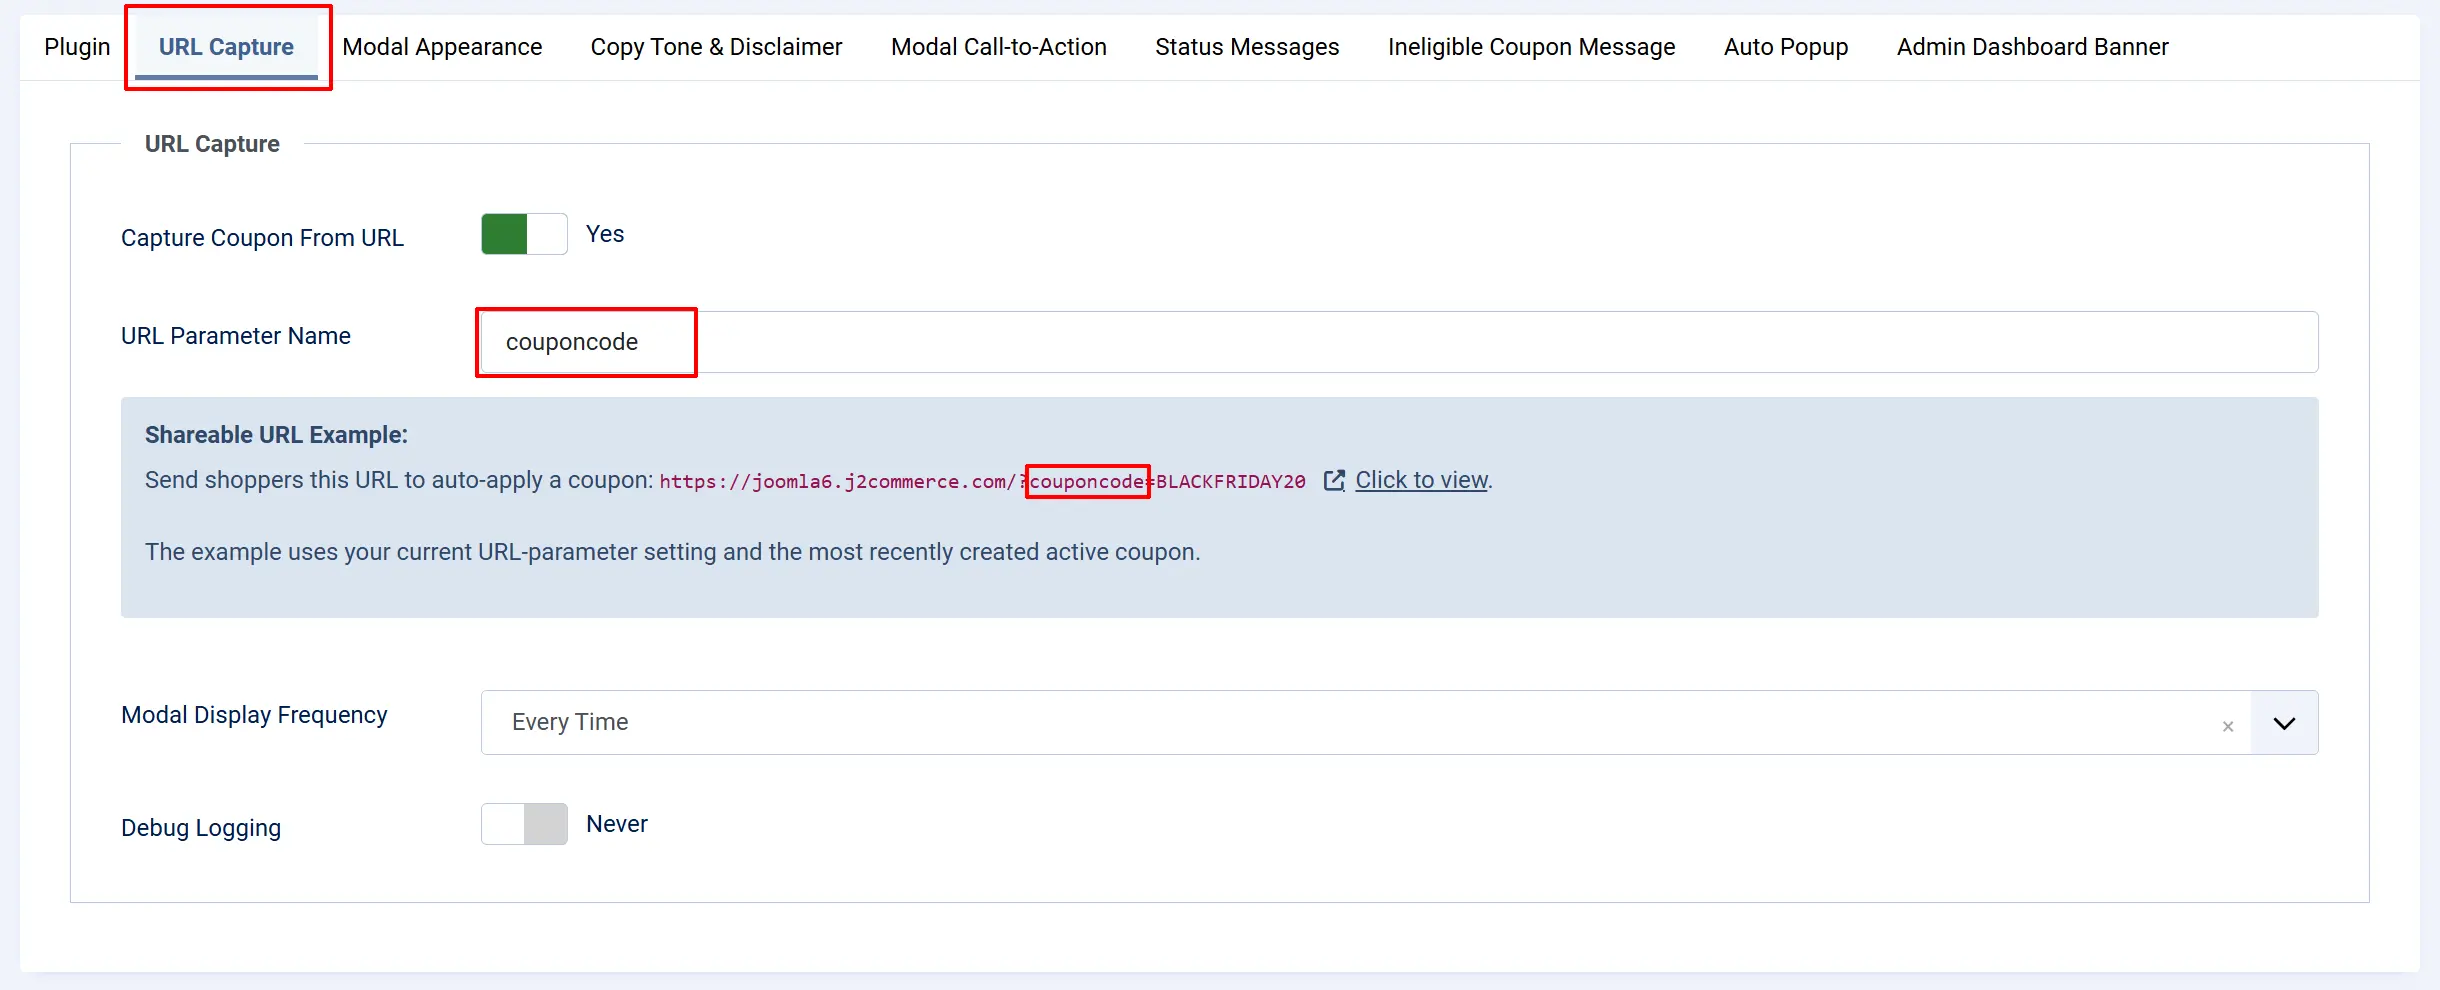
Note: the = BLACKFRIDAY20 in the example is pulling your most recent coupon you have created. You can change the coupon choice in the dropdown but it won't change in the example link. Once you choose the appropriate coupon, you will be able to copy and place your new URL in any email / marketing campaign. https://joomla6.j2commerce.com/?couponcode=YOURCOUPON
-
Modal display frequency — Choose Every time to show the modal on every page load while the code is in the URL. Choose Once per session (per coupon code) to show it only once per browser session for the same code — useful for avoiding repeated interruptions when visitors browse multiple pages after clicking a campaign link.
-
Debug logging — Set to Yes during setup or troubleshooting to write detailed entries to
administrator/logs/plg_j2commerce_app_autocoupon.log.php. Turn this off in production.
Shareable URL Example:
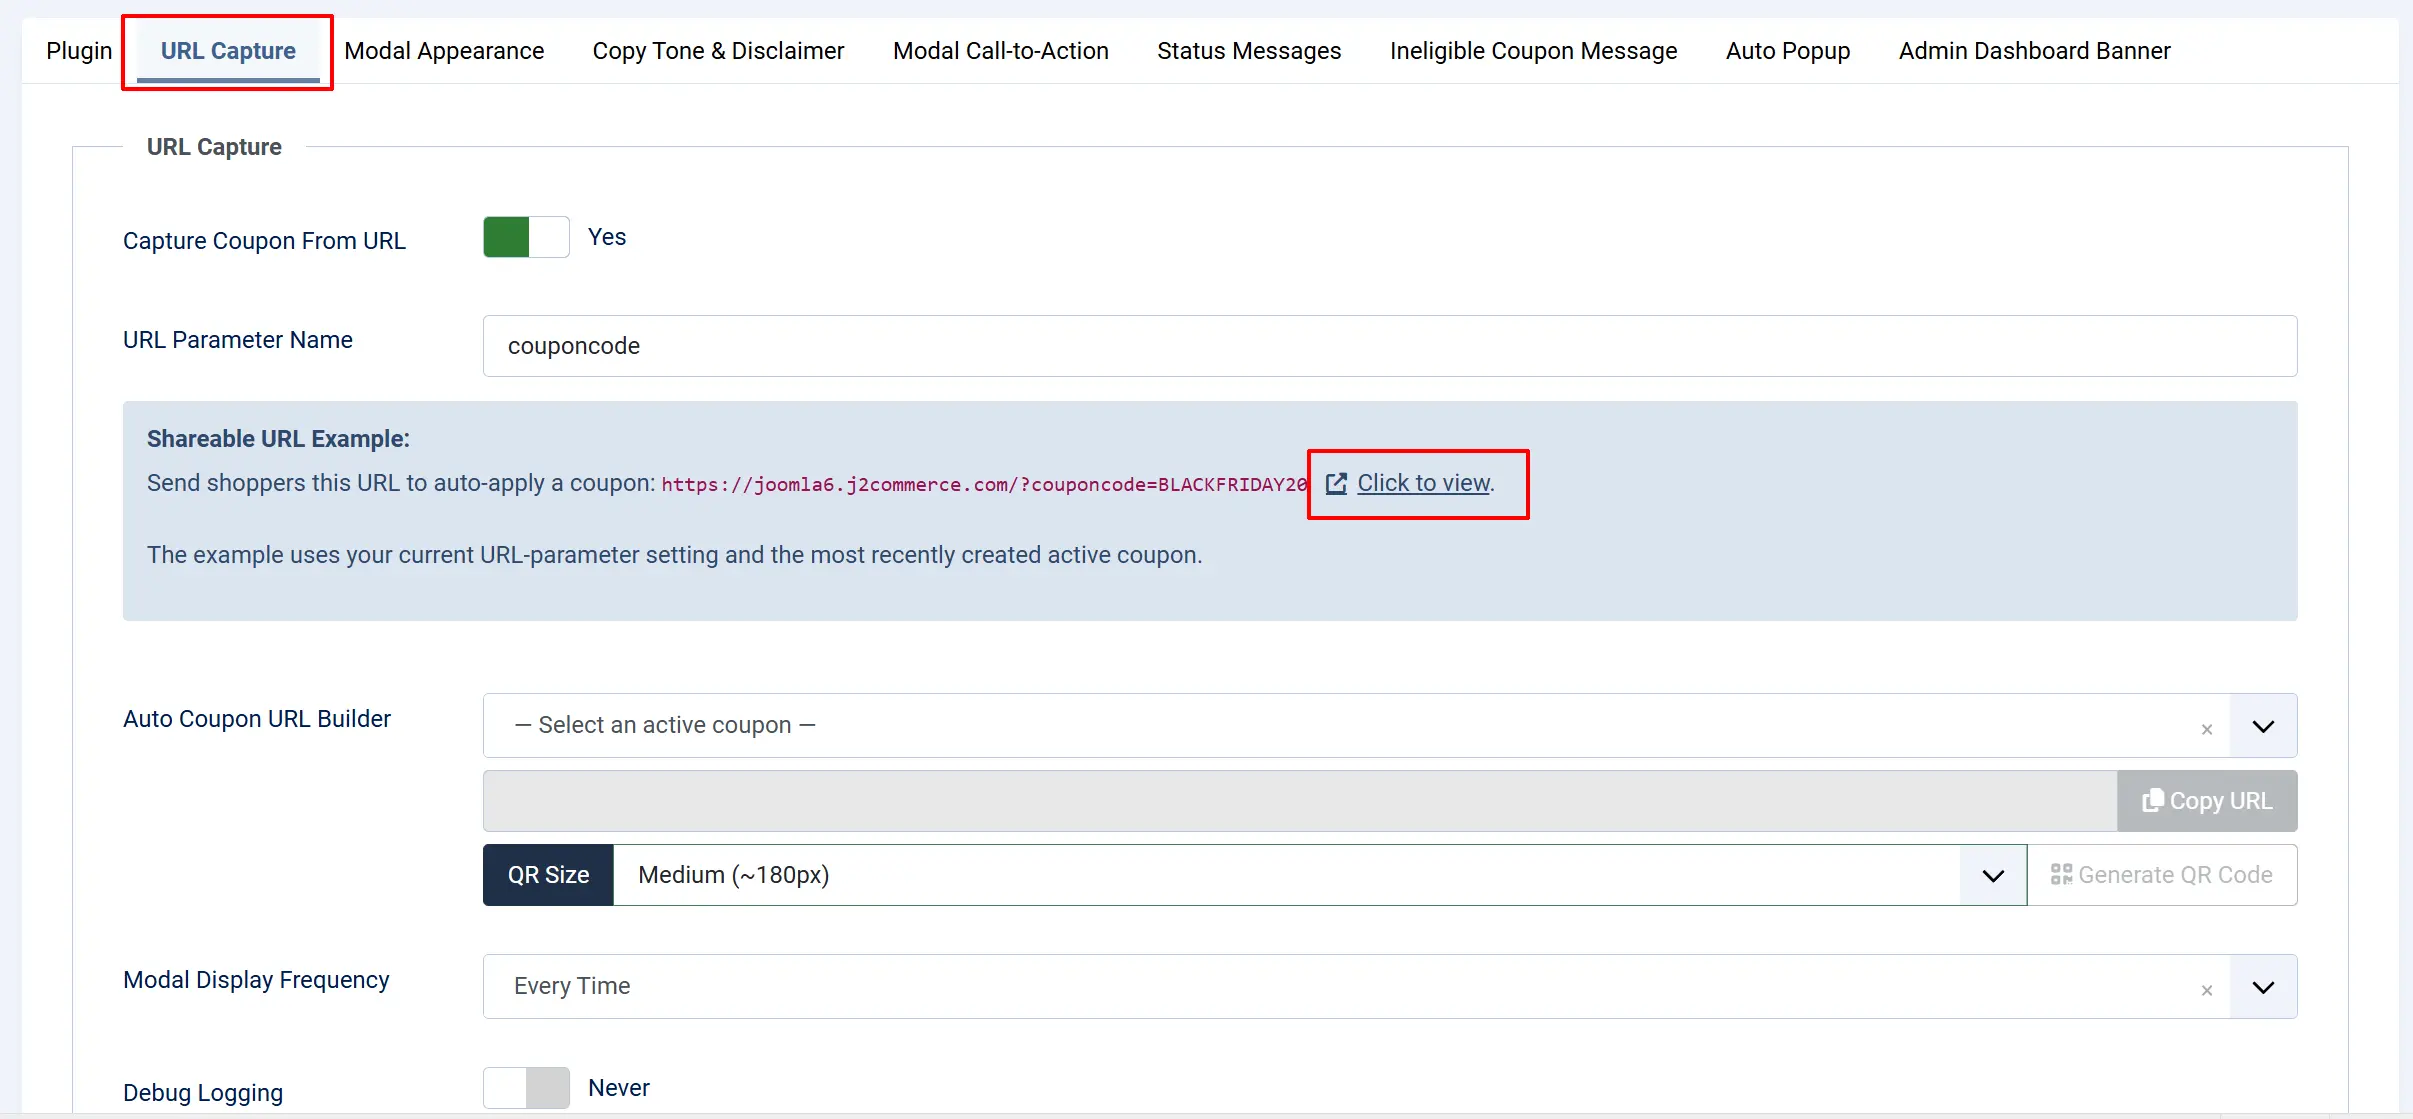
A read-only preview field displayed inside the URL Capture tab. It constructs a live example URL using your current URL parameter name setting and the most recently created active coupon code, with a Click to view link that opens the URL in a new tab. Use this to quickly copy and share your campaign link without leaving the plugin settings.
-
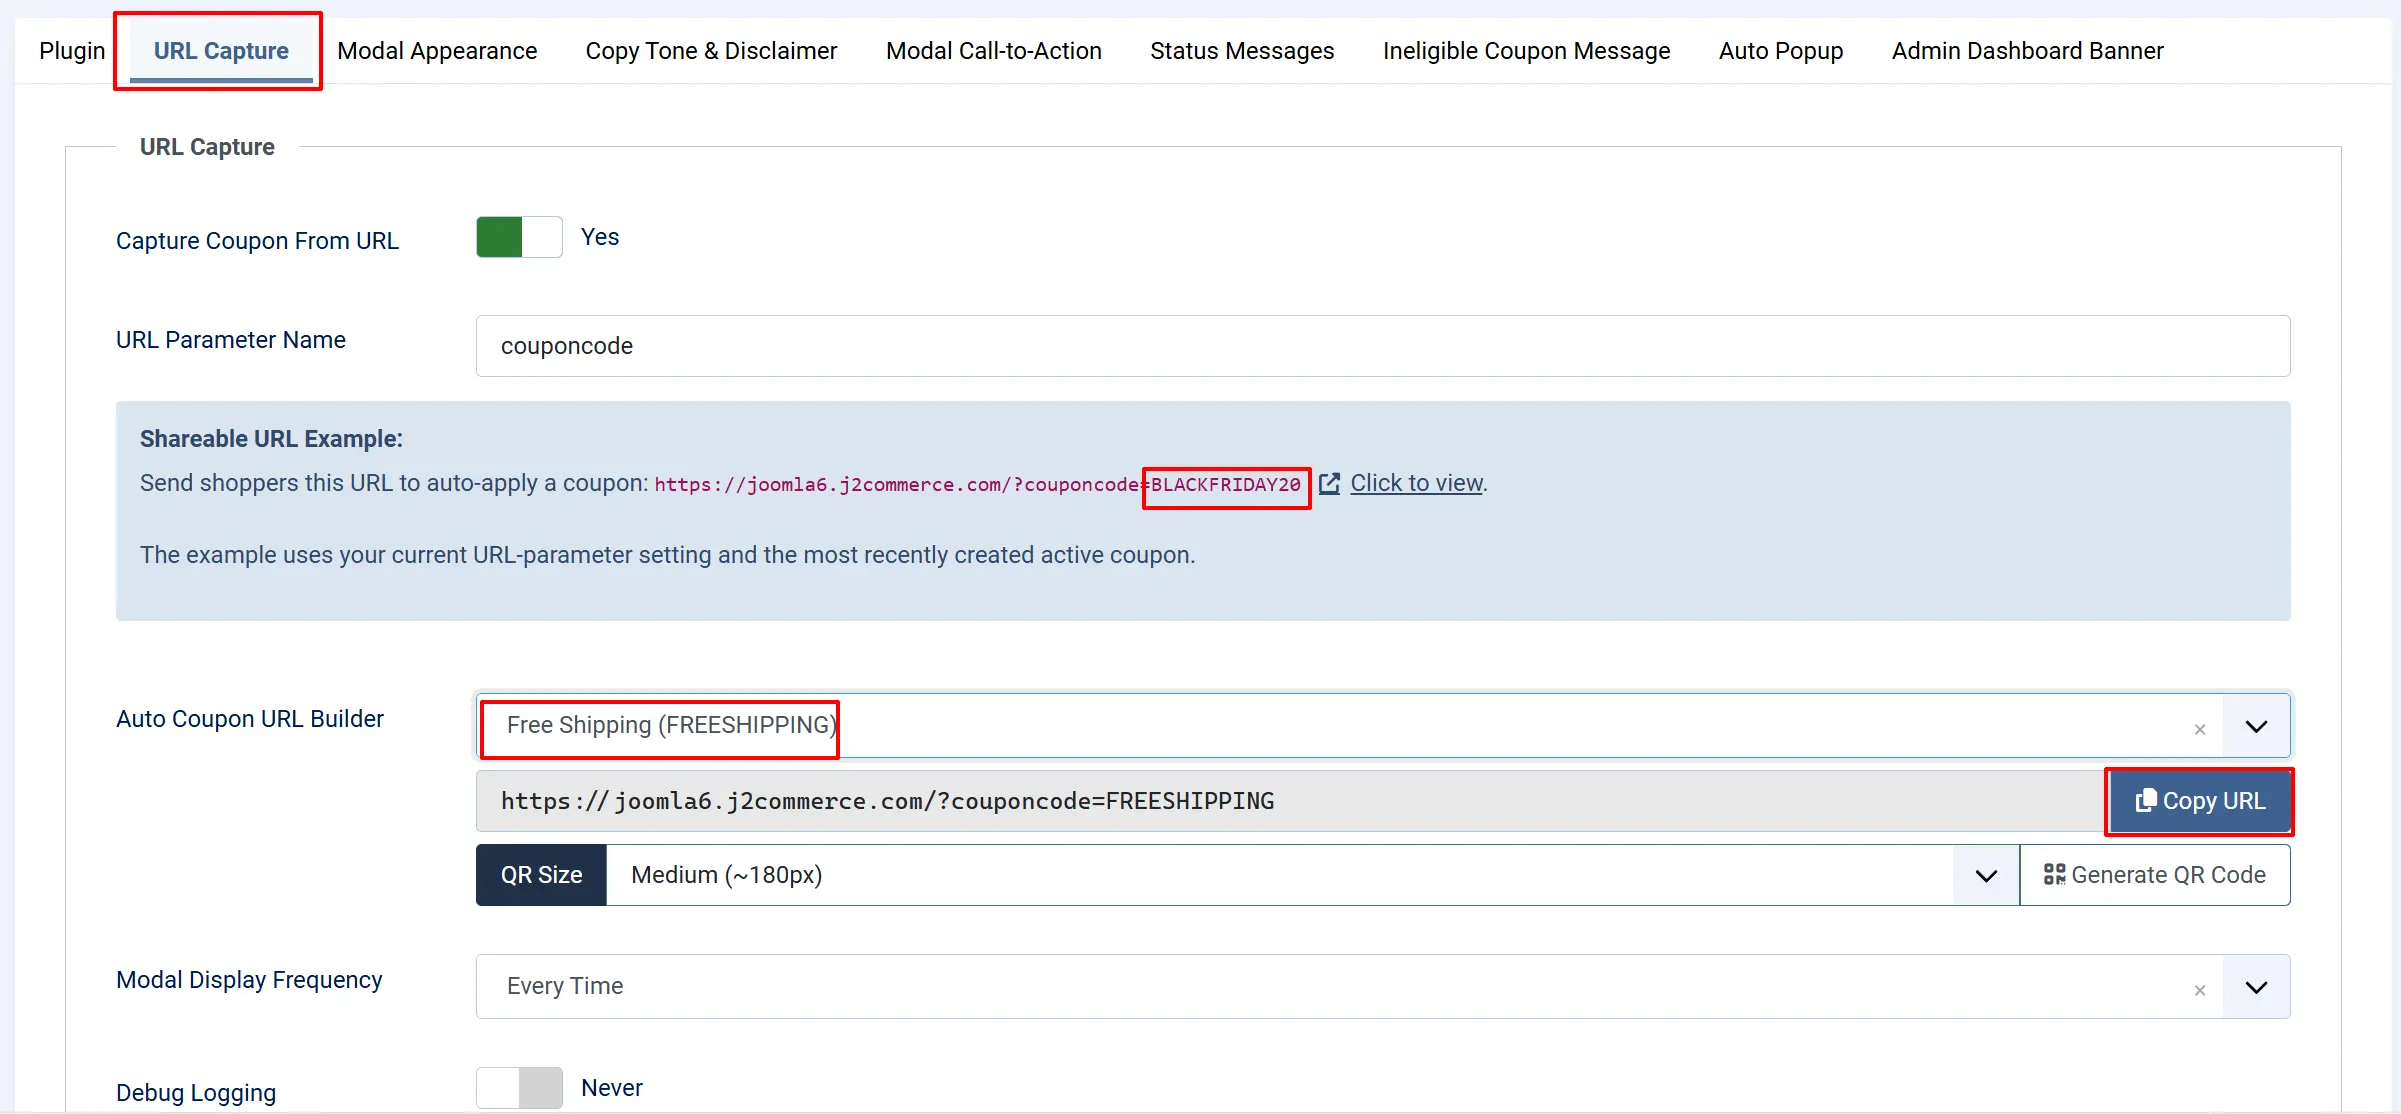
Auto Coupon URL Builder — A multi-row widget added in v6.0.4 that makes it easy to construct, copy, and generate QR codes for your auto-apply campaign URLs without leaving the plugin settings.

-
Coupon dropdown — A searchable fancy-select listing all enabled coupons from J2Commerce -> Sales -> Coupons, formatted as
coupon name (COUPON_CODE)and sorted alphabetically by name. Disabled coupons are filtered out. If no enabled coupons exist, the entire URL Builder hides itself and shows the warning: No active coupons found. Create one in J2Commerce → Coupons first. -
URL preview — A read-only input that shows the auto-apply URL composed from your site's base URL, the current URL parameter name, and the selected coupon's code. The URL recomposes automatically whenever you pick a different coupon or edit the URL parameter name field — no save required.
-
Copy URL button — Copies the previewed URL to your clipboard in one click. A Joomla success toast ("Copied to clipboard") confirms the copy. If the browser denies clipboard access, the toast reads "Copy failed — select and copy manually."
-
QR Size selector — Choose the pixel dimensions of the generated QR code PNG: Small (~120 px), Medium (~180 px, default), Large (~300 px), or X-Large (~480 px). Select X-Large for print materials; Small or Medium for digital embeds.
-
Generate QR Code button — Sends the selected coupon and size to a server-side endpoint, which uses the bundled phpqrcode library to render the auto-apply URL as a PNG. The image downloads immediately to your machine as
coupon-COUPON_CODE.png. No external QR service is called, so this works even on air-gapped staging environments.
-
The URL Builder AJAX endpoint requires a logged-in administrator with core.edit or core.admin permission on com_j2commerce, plus a valid Joomla CSRF token. These are standard framework checks — no additional configuration is needed.
Modal Appearance tab
This tab controls the look and feel of the pop-up modal.
-
Frontend framework — A subtemplate picker that lists the J2Commerce subtemplates installed on your site. The default selection is app_bootstrap5 (the J2Commerce Bootstrap 5 subtemplate). If your storefront uses the UIkit subtemplate, select the UIkit option here — but only if the J2Commerce - UIkit app plugin is also enabled. If UIkit is selected but its plugin is disabled, the modal is silently skipped.
-
Visual treatment — Sets the overall design style of the modal:
- Flat — The cleanest, minimal layout with no background effects. Works well for any brand.
- Gradient — Adds a soft hero glow behind the icon for a polished, modern look.
- Ticket stub — Styles the modal to look like a perforated coupon ticket — fun for discount-focused campaigns.
- Confetti — Adds a subtle celebratory backdrop on the success (Active) state. Ideal for big promotions.
-
Padding density — Controls the inner spacing, icon size, and headline size.
-
Compact fits tight layouts,
-
Regular is the balanced default
-
Comfy adds breathing room for spacious designs.
-
-
Accent palette — Curated color presets applied to the icon, status pill, code pill, and primary button.
- Options: Green (default), Blue, Amber, Coral, Violet, Espresso, or Custom hex. Choose the one that best matches your store's brand color.
-
Custom accent color — Visible only when Accent palette is set to Custom hex. Enter any valid hex color (e.g.
#15803d) to use your exact brand color across the modal's accents. -
Confetti backdrop on success — Visible only when Visual treatment is set to Confetti. Toggle this on to render the animated confetti behind the modal when a coupon is successfully applied.
-
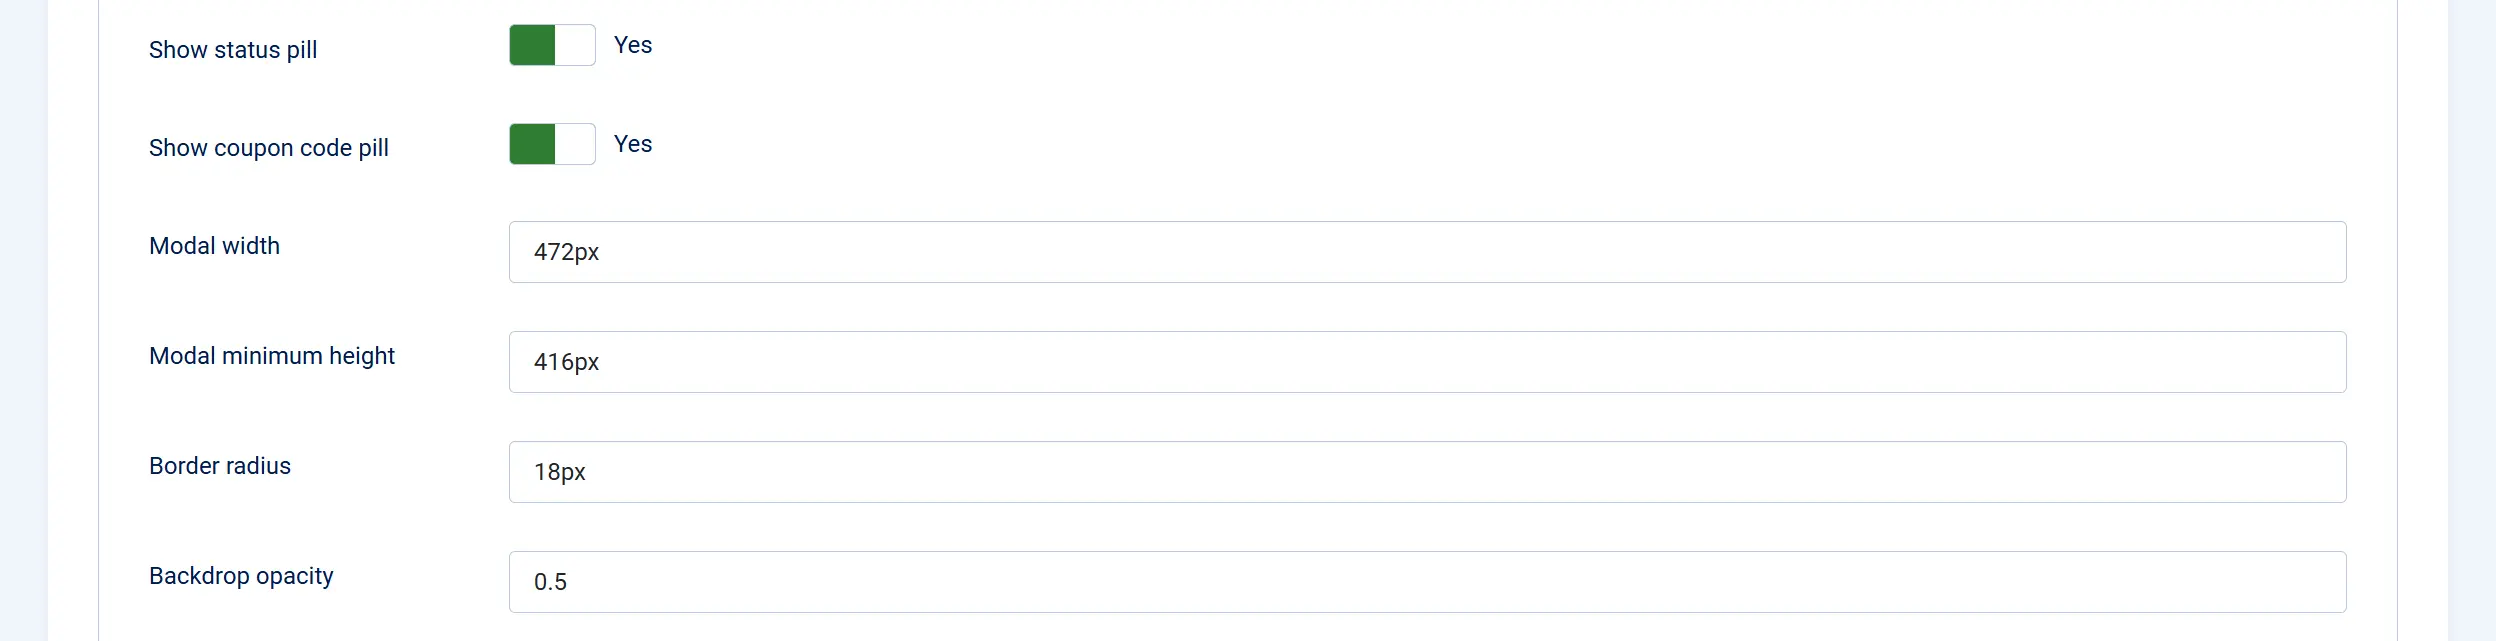
Show status pill — Displays a small uppercase label above the icon (e.g. APPLIED, EXPIRED) that summarizes the coupon state at a glance.
-
Show coupon code pill — Renders the coupon code itself in a monospace pill below the headline. On the Active status this pill becomes a savings row showing the discount value.
-
Modal width — Any valid CSS length (e.g.
472px,32rem,90vw). Applied at viewports 576 px and wider. The modal is full-width on mobile. -
Modal minimum height — Any valid CSS length. Applied at viewports 576 px and wider.
-
Border radius — Corner rounding of the modal panel (e.g.
18px). Set to0for sharp corners. -
Backdrop opacity — How dark the page behind the modal appears.
0is fully transparent,1is fully opaque. The default0.5dims the page without hiding it.

-
Headline font family — CSS font-family stack for the modal title. Defaults to a serif stack (
"Instrument Serif", Georgia). Enter any font stack your theme loads. -
Body font family — CSS font-family stack for the message text, buttons, and pills. Defaults to a system sans-serif stack.
-
Coupon code font family — Monospace stack used inside the coupon code pill and savings row. Defaults to
"JetBrains Mono",ui-monospace. -
Extra title CSS classes — Optional additional CSS classes appended to the headline element. Leave empty to use the design defaults.
-
Extra body CSS classes — Optional additional CSS classes appended to the message paragraph. Leave empty to use the design defaults.
Copy Tone & Disclaimer tab
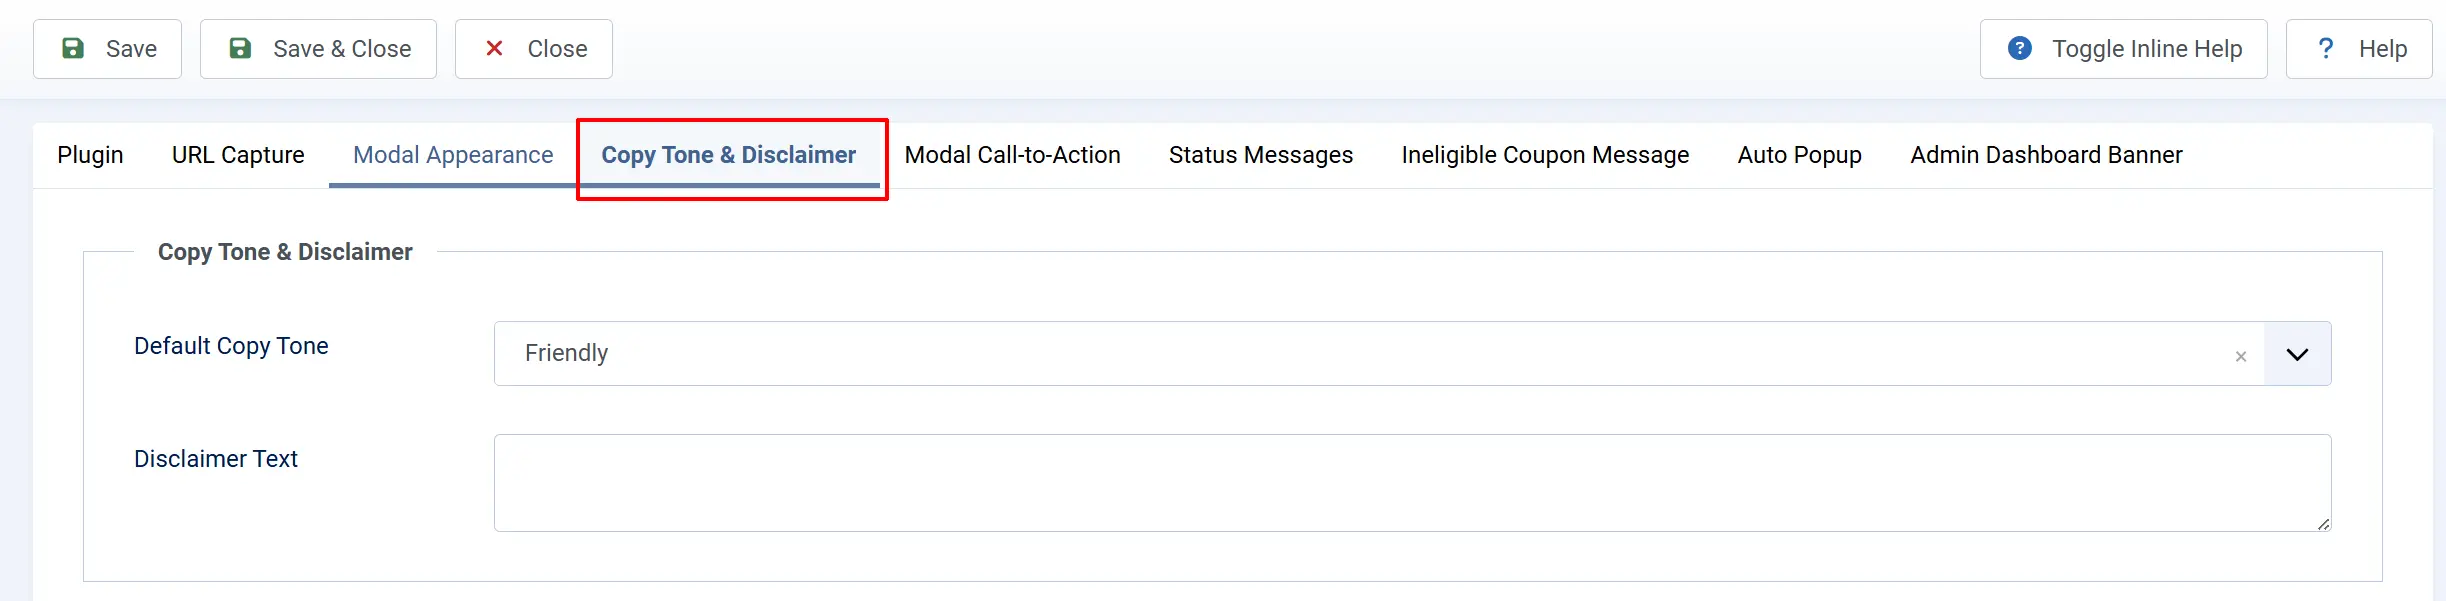
This tab sets the voice of the built-in default messages and an optional fine-print line.
-
Default copy tone — Selects the writing style used for the canned default status messages when you haven't entered custom text in the Status Messages tab:
- Friendly — Warm and personable, e.g. "You're in! Savings Applied."
- Professional — Concise and neutral, e.g. "Discount Applied."
- Witty — Playful with a bit of personality, e.g. "Discount: Deployed and Locked In."
You can override any individual message in the Status Messages tab for per-status customization.
-
Disclaimer text — Optional fine print rendered beneath the call-to-action buttons, such as a link to your terms and conditions. Leave empty to hide this area entirely.
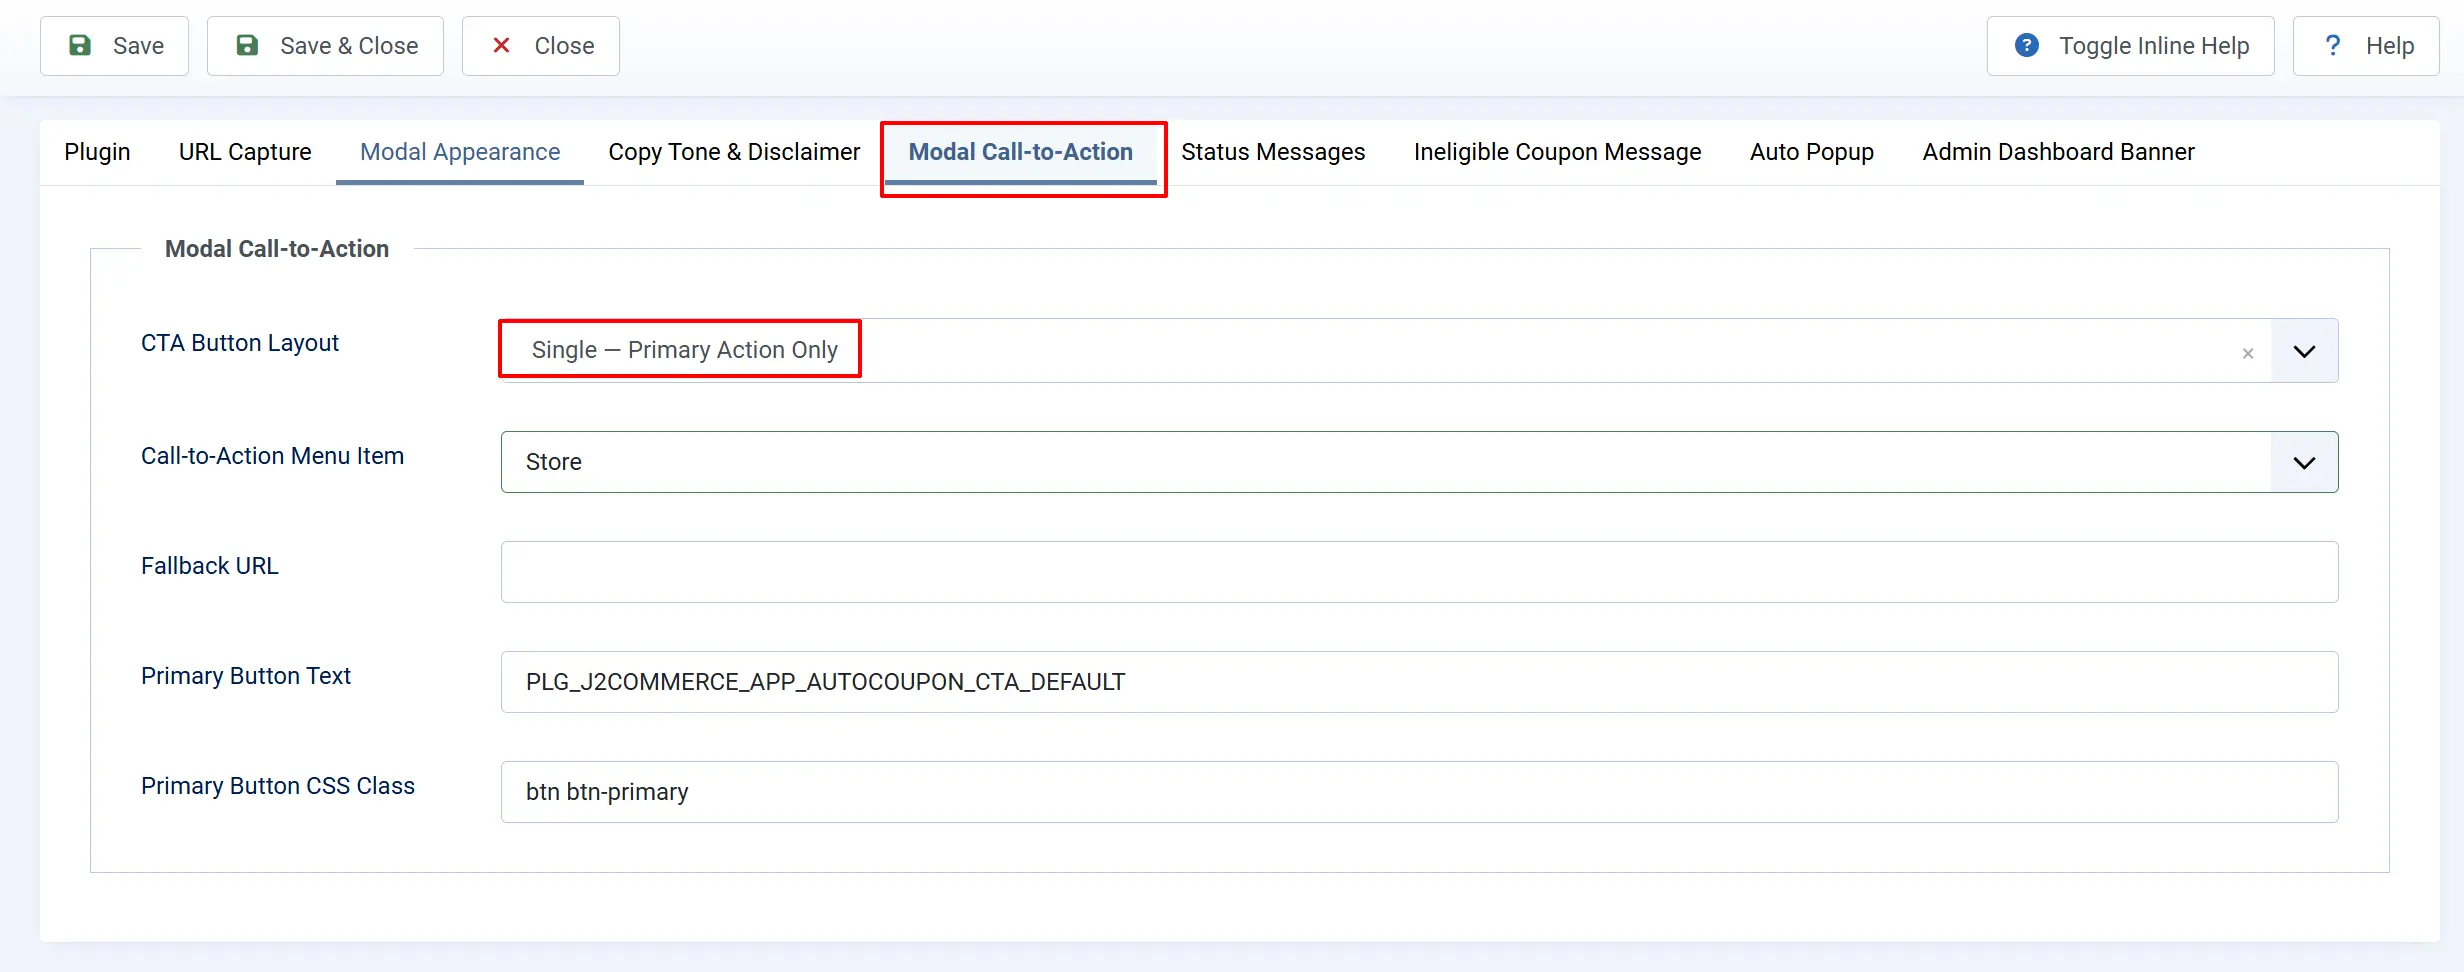
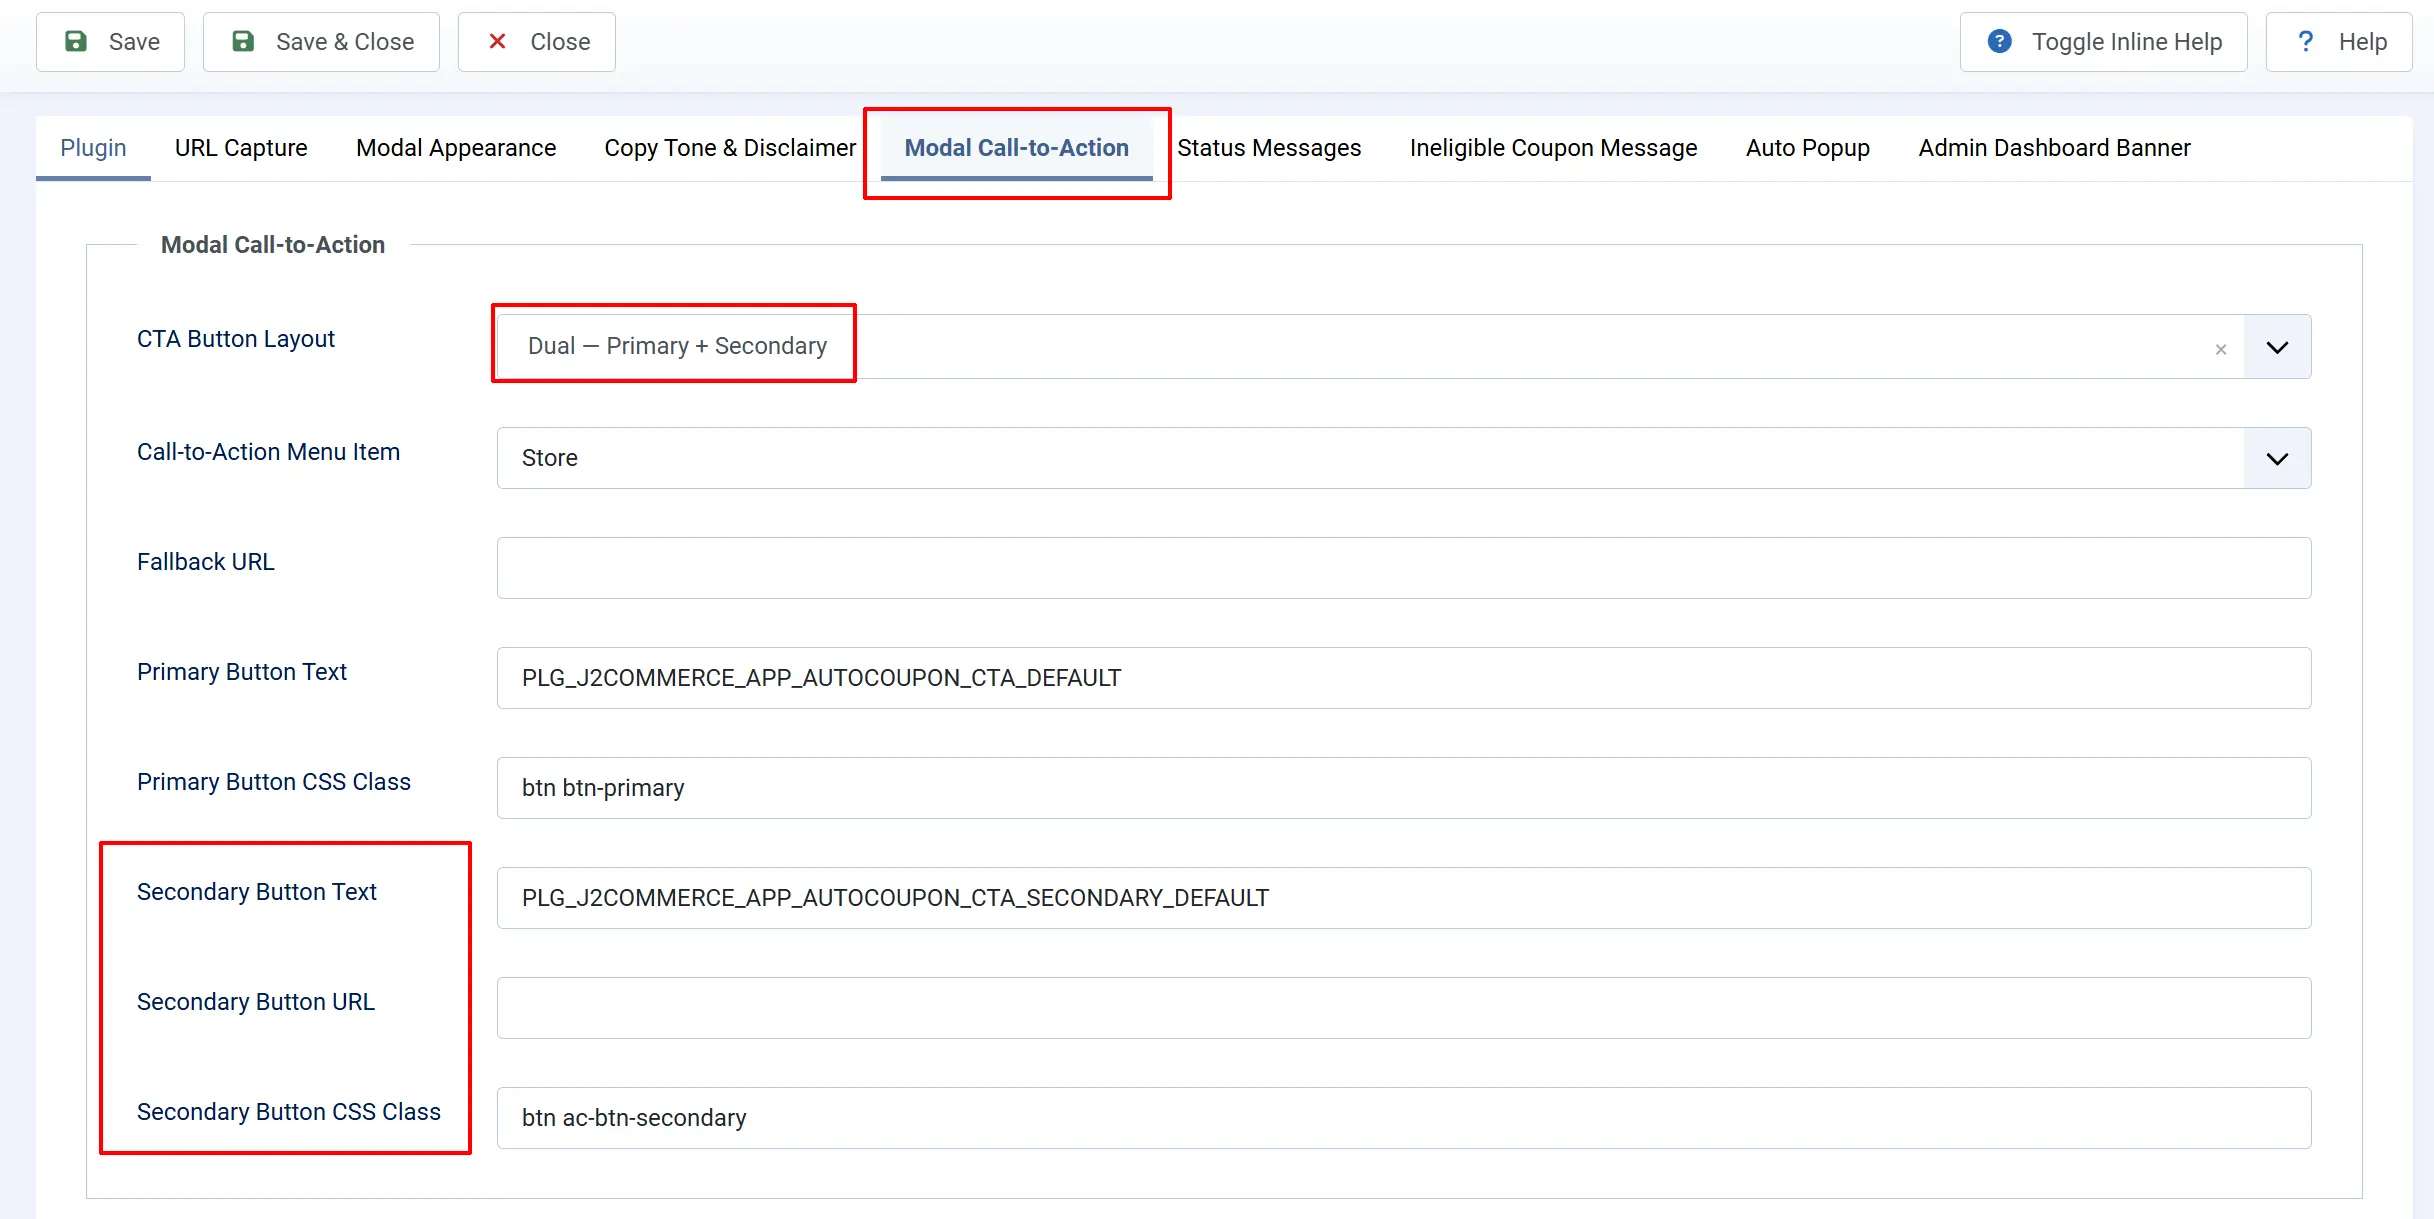
Modal Call-to-Action tab
This tab configures the button or buttons that appear at the bottom of the modal.
-
CTA button layout:
-
Single: to show one primary action button
-
Dual: to stack a primary and a secondary button side by side (e.g. "Shop Now" plus "Continue shopping").
-
-
Call-to-action menu item: Select a Joomla menu item the primary button redirects visitors to when they click the Shop Now button. Typically your product listing or sale page. This is the preferred option since it generates a proper SEF URL automatically.
See the image below
-
Fallback URL: A direct URL used only when no menu item is selected above. Enter an absolute or relative URL.
-
Primary button text: The label shown on the main action button. Defaults to "Shop Now". You can enter literal text or a translation key.
-
Primary button CSS class: CSS classes for the primary button. Defaults to
btn btn-primary. Adjust to match your theme.
-
Secondary button text: Visible only when CTA button layout is set to Dual. Label for the secondary action, defaulting to "Continue shopping".
-
Secondary button URL: Visible only when CTA button layout is set to Dual. Where the secondary button sends the visitor. Leave empty to close the modal without navigating.
-
Secondary button CSS class: Visible only when CTA button layout is set to Dual. CSS classes for the secondary button, defaulting to
btn ac-btn-secondary(a subtle, underlined style).
Status Messages tab

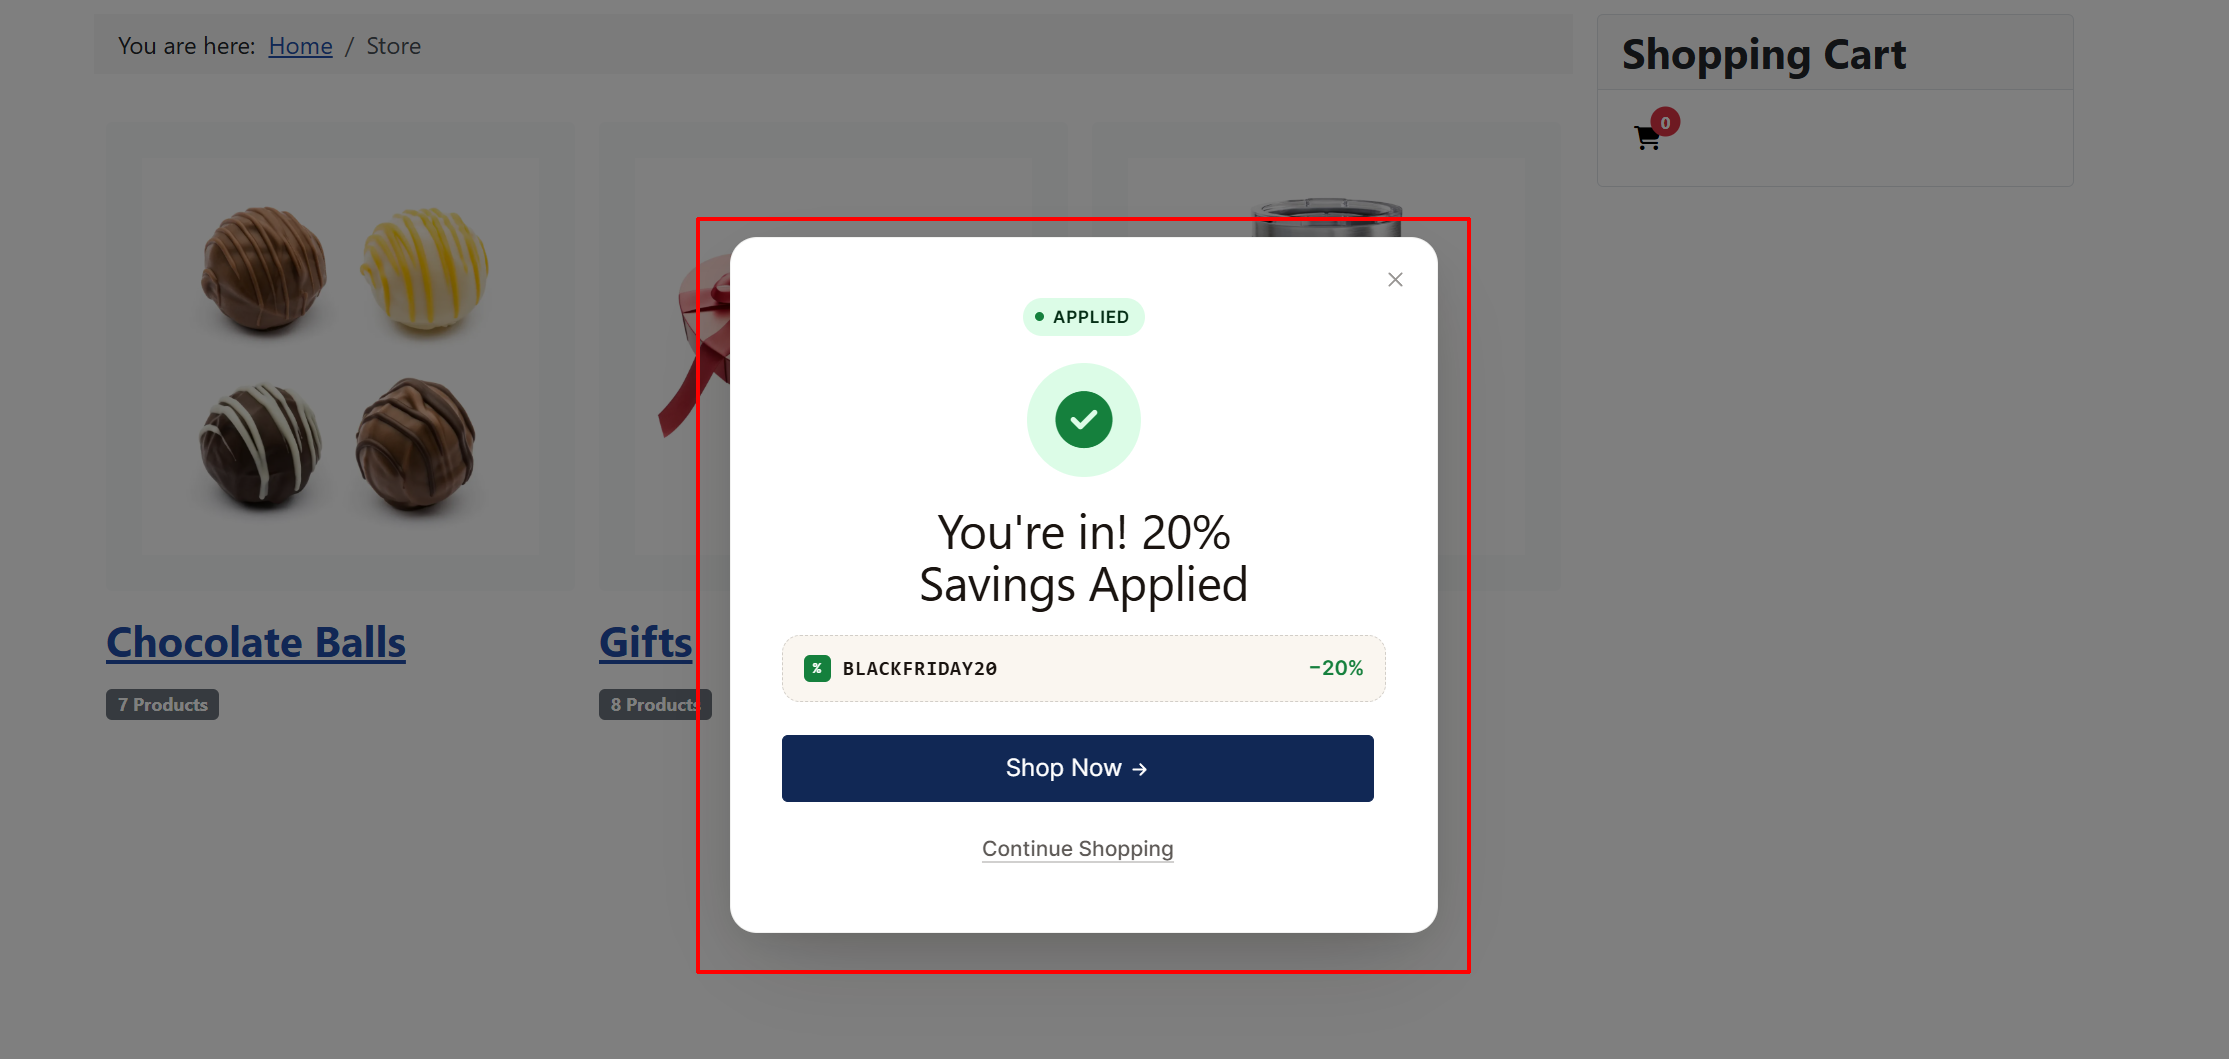
This tab lets you customize the headline and body text shown for each coupon state. There are four states, each with a title field and a body field.
-
Title coupon not found: and Body coupon not found: Shown when the coupon code does not exist in the system at all. Use a gentle message that encourages the visitor to double-check the code.
-
Title coupon expired: and Body coupon expired: Shown when the coupon's end date has passed.
-
Title coupon not active yet: and Body coupon not active yet: Shown when the coupon's start date is still in the future. Useful for pre-launch campaigns where you want visitors to know the deal is coming soon.
-
Title coupon applied: and Body coupon applied: Shown when the coupon was found and successfully applied to the cart. In the title and body fields,
%sis replaced with the discount value (e.g.20%or$10.00) and the coupon code, in that order. Both values are automatically escaped before substitution, so you do not need to worry about special characters.
Leave any field at its default to use the built-in tone-based copy controlled by the Default copy tone setting in the Copy Tone tab.
Ineligible Coupon Message tab
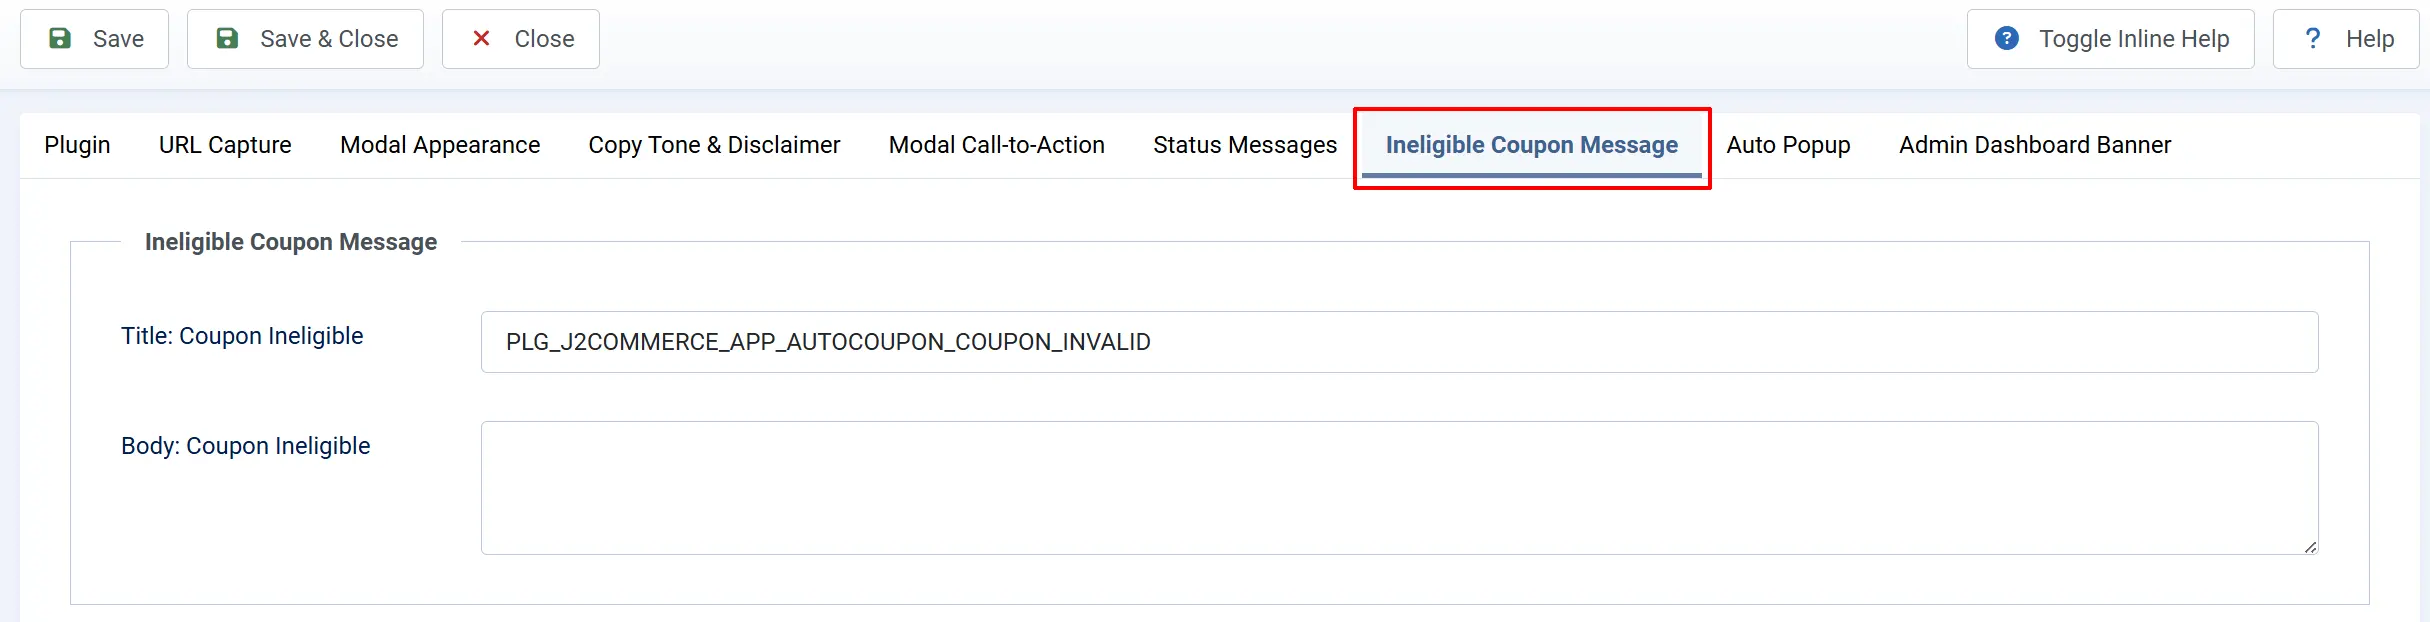
This tab handles the case where the coupon code exists and is in date, but cannot be applied to the visitor's current cart.
-
Title coupon ineligible: Shown when the coupon is valid but the cart doesn't meet its requirements. Common reasons include the order subtotal being below the minimum, the visitor's user group not being permitted, restricted product categories, or the usage cap being reached.
-
Body coupon ineligible: Supporting message shown below the title. You can use
%splaceholders for the discount value and coupon code, both auto-escaped.
Note: In version 1 the plugin does not reveal which specific condition blocked the coupon — all ineligibility reasons share the same message. Write one friendly, generic message and consider linking to your terms-and-conditions page for details.
The Default copy tone setting in the Copy Tone & Disclaimer tab applies here too. When you leave both fields at their defaults, the plugin selects tone-appropriate ineligibility copy automatically: Friendly ("So close — this coupon doesn't fit your basket yet"), Professional ("This coupon's conditions aren't met by your current order"), or Witty ("Your cart needs a little more love before this one applies").
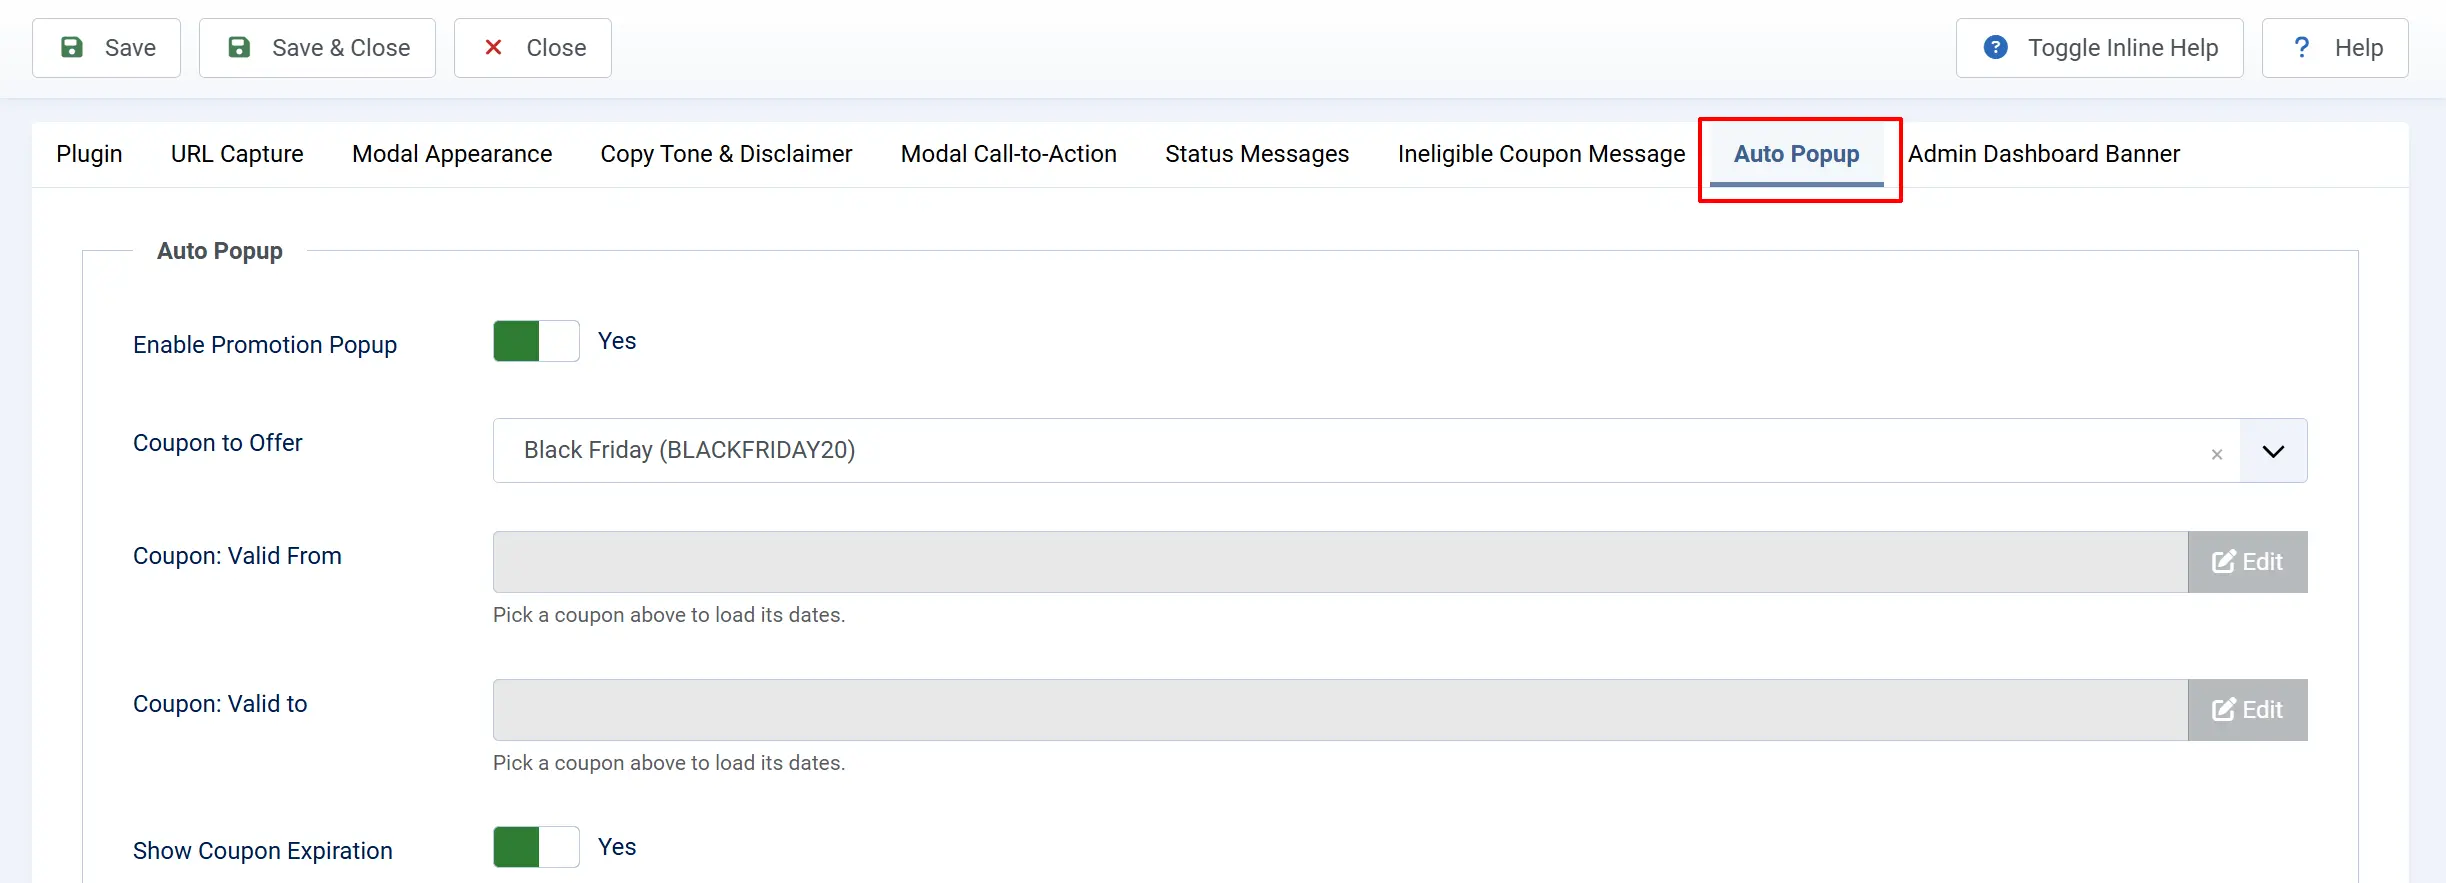
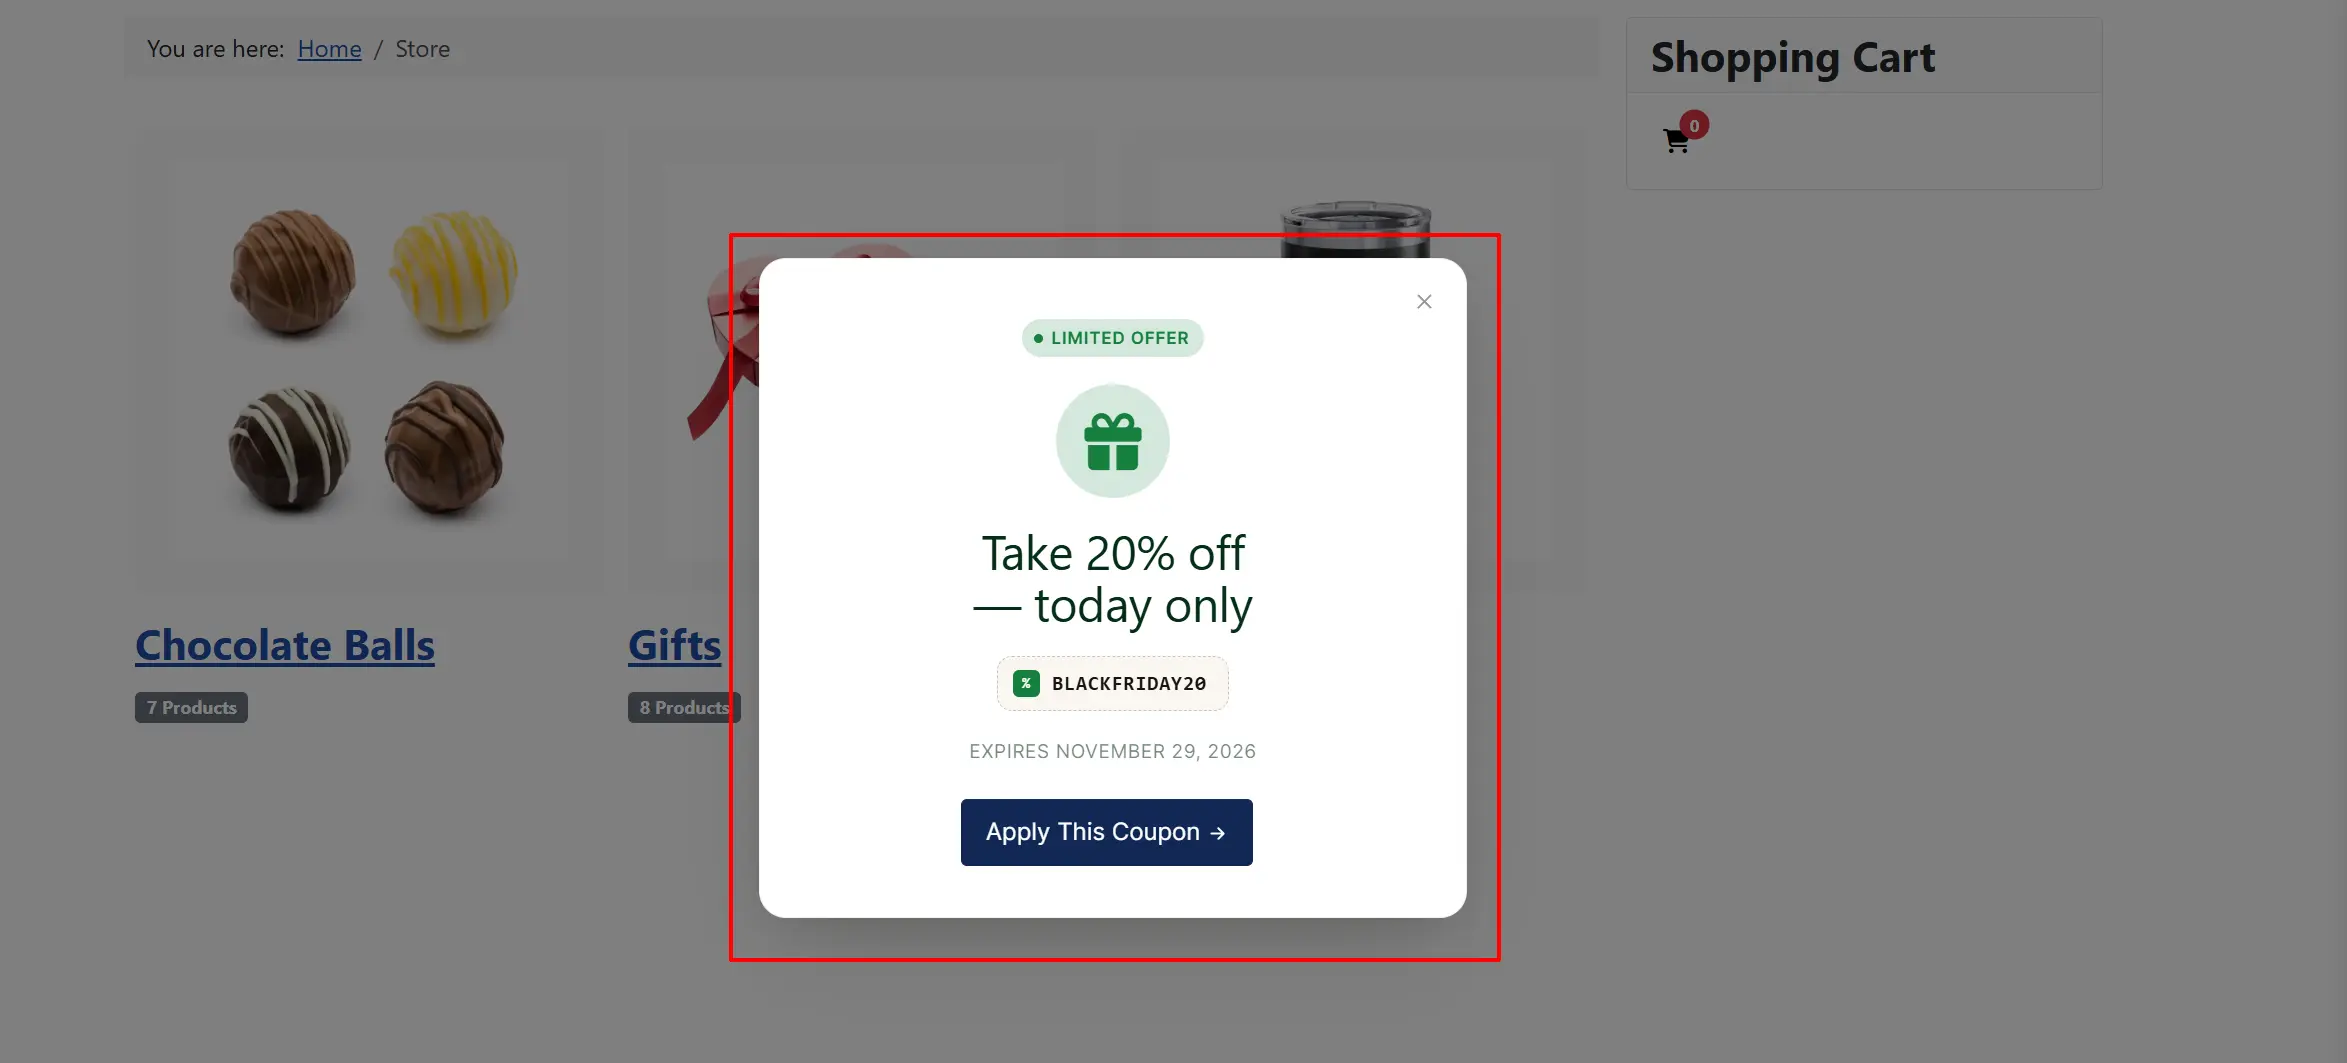
Auto Popup tab
This tab is where you configure the promotion popup — an independent modal that appears automatically on pages that do not contain the URL parameter. Use it to announce a sale and apply a coupon in one click, even when visitors arrive through organic search or direct links rather than a campaign URL.
The promotion popup is independent of the URL-driven flow. You can enable both at the same time. When the URL parameter is present on the page, the URL-capture flow takes priority and the promo popup is suppressed for that page load.
-
Enable Promotion Popup — Toggle Yes to activate the promo popup. When on, the modal fires on any frontend page that does not include the URL capture parameter. Toggle No to disable without affecting the URL-capture modal.
-
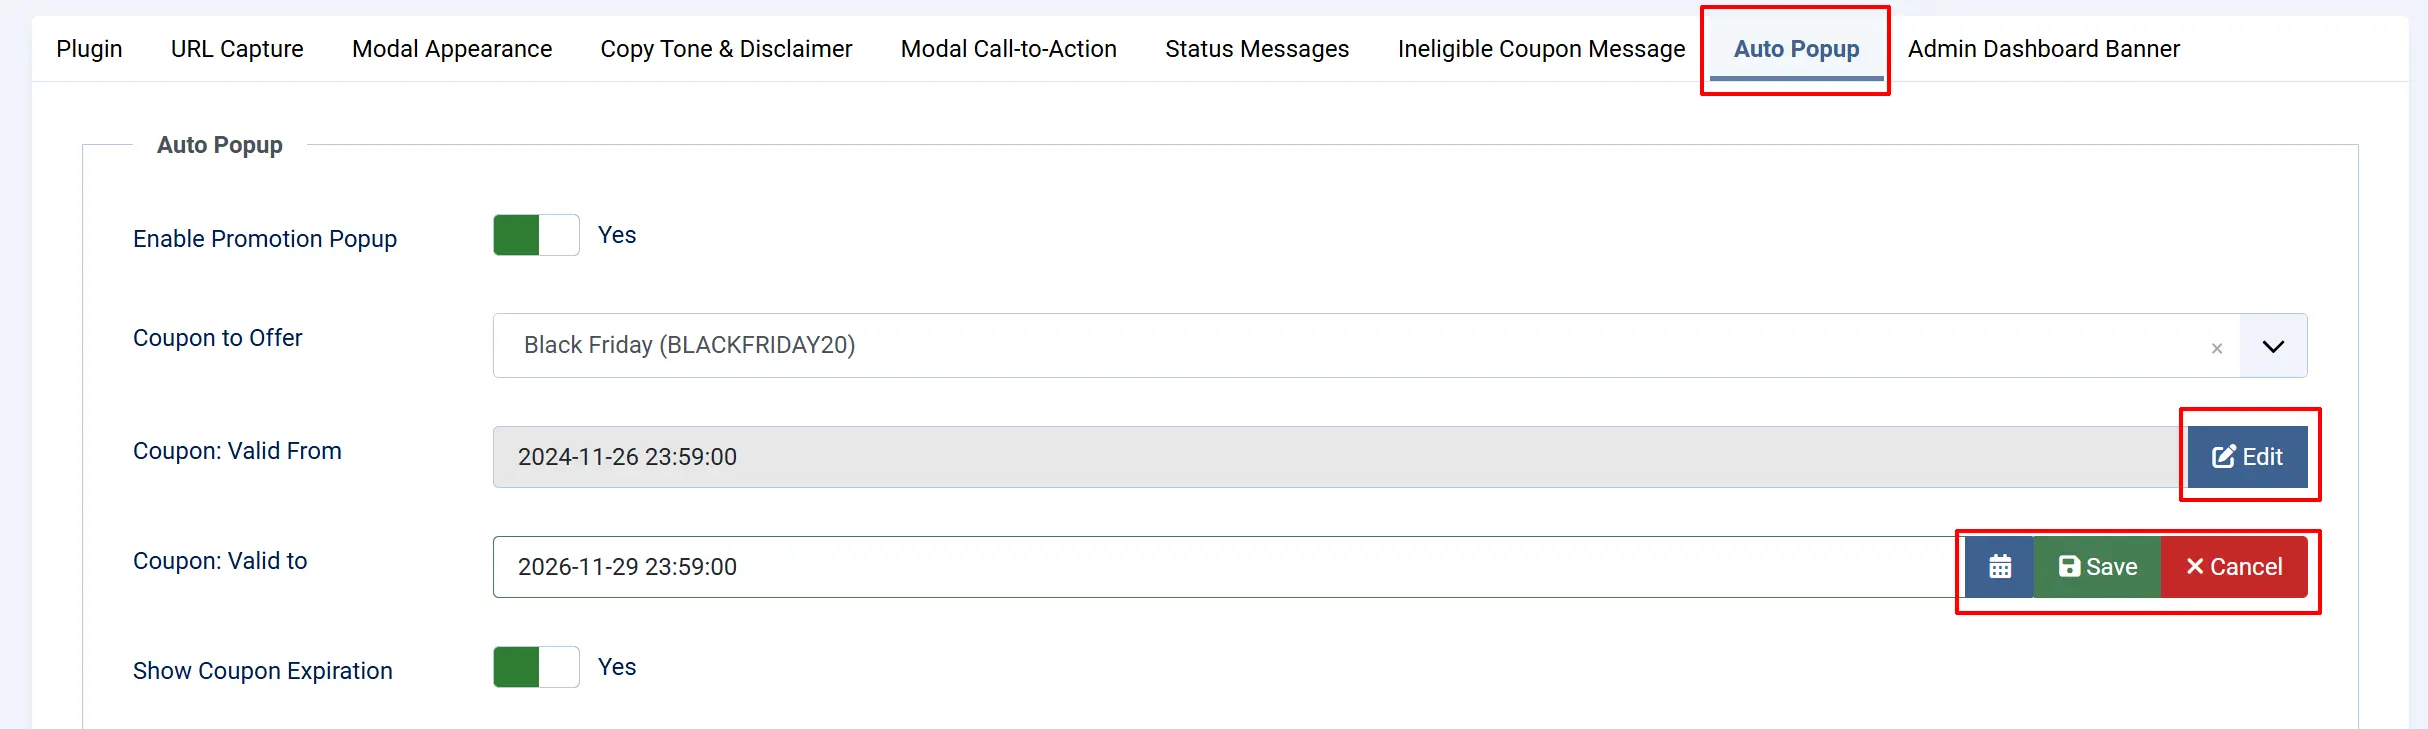
Coupon to Offer — A searchable dropdown listing all enabled coupons you have already created from J2Commerce -> Sales -> Coupons. Only published (enabled) coupons appear. Select the coupon whose discount you want to promote. Leave this empty and the popup will not display even if Enable Promotion Popup is on. If you want to created a new coupon for it to show up here, then go to J2Commerce -> Sales -> Coupons and create a new one.
You must click SAVE after choosing the coupon from the dropdown in order to activate the activation dates below. You can now control the coupon active dates from here instead of having to go to the physical coupon section.
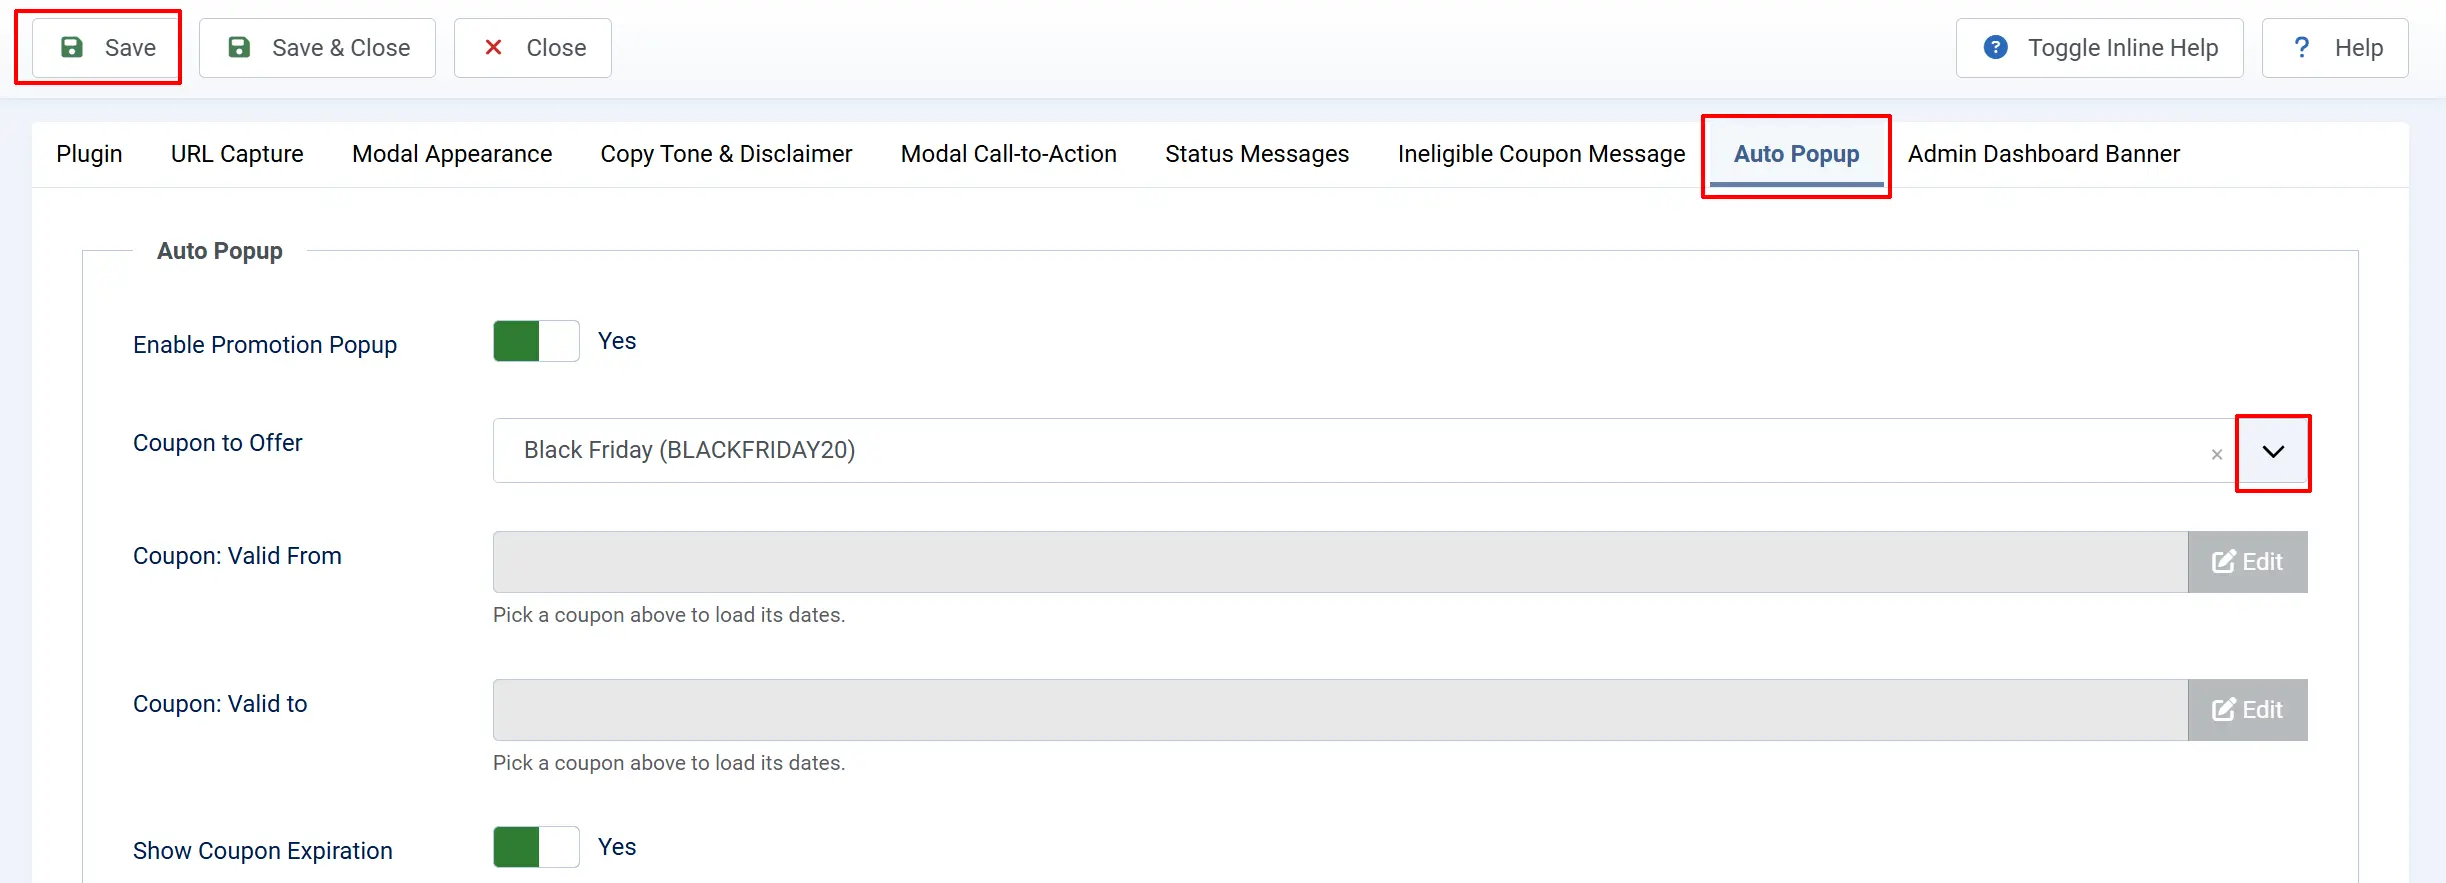
-
Coupon: Valid From — A read-only display that mirrors the selected coupon's own valid_from date (stored as UTC). No data is duplicated — this field reads directly from the coupon row. Click the Edit button inline to jump to the coupon record and update the start date there.
-
Coupon: Valid To — A read-only display that mirrors the selected coupon's own valid_to date (UTC). Click Edit to update the coupon's expiry date directly in the coupon record. The promo popup automatically respects these dates at runtime — if the current date falls outside the valid window, the popup will not show.
- Show Coupon Expiration — When set to Yes, the coupon's valid_to date is displayed inside the popup (for example, "Expires May 31, 2026"). This creates a sense of urgency that encourages visitors to act quickly.
-
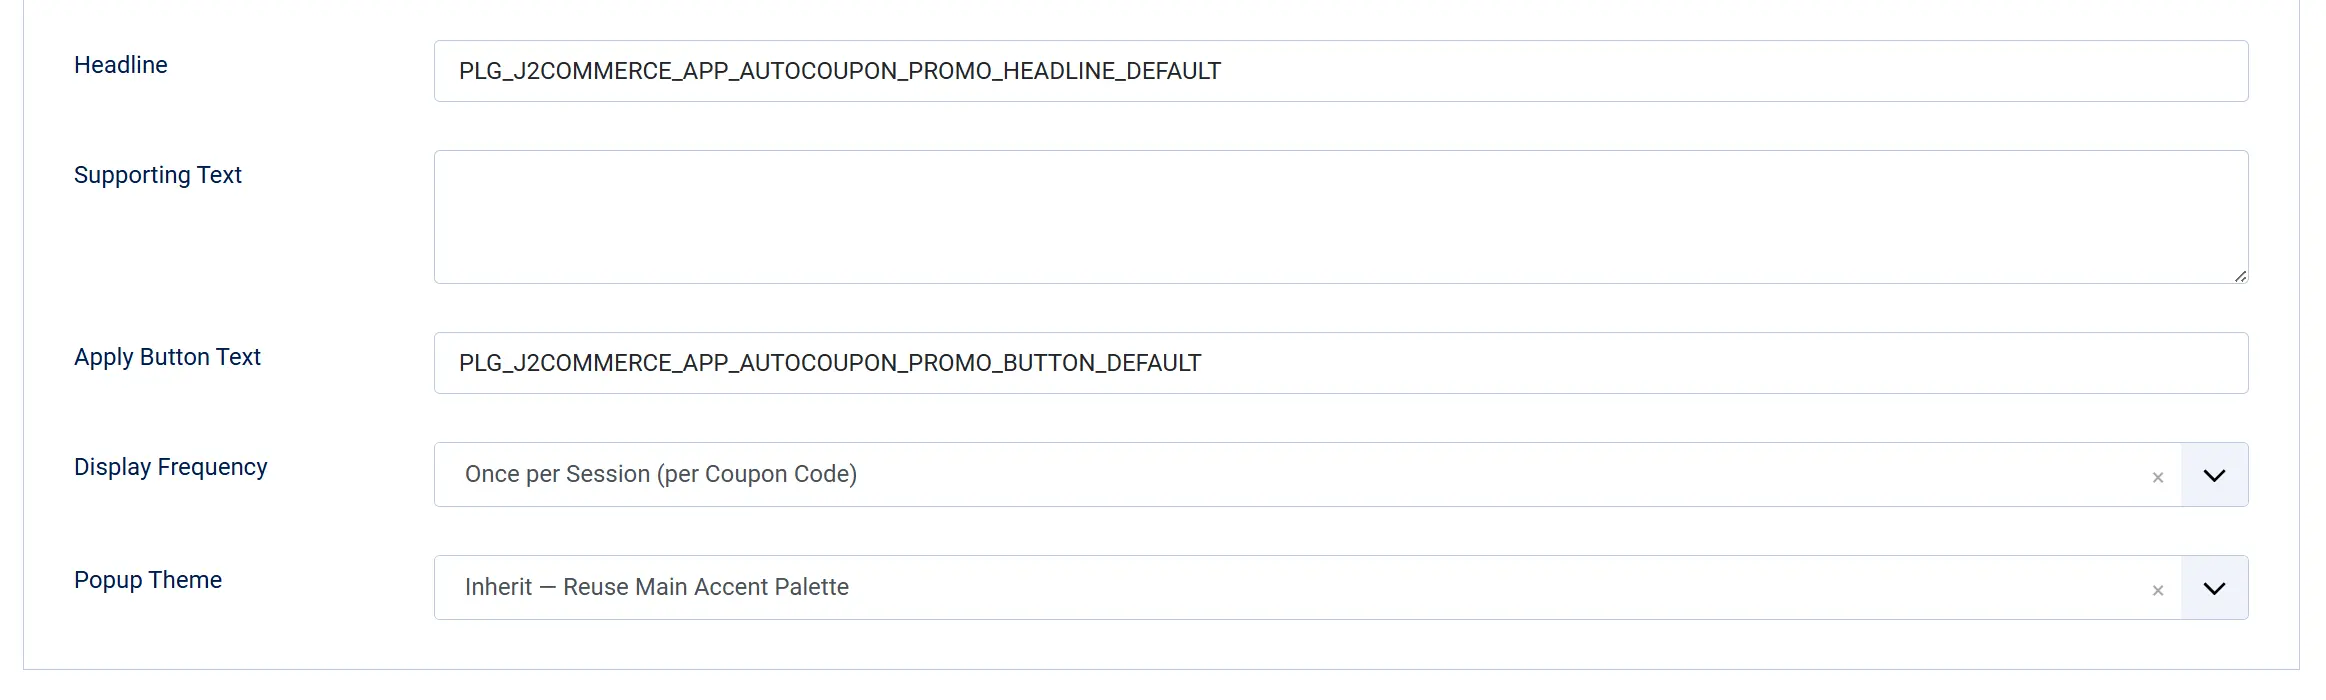
Headline — The large text at the top of the promo popup. You can use two
%splaceholders: the first is replaced with the discount amount (for example,20%or$10.00), and the second with the coupon code. Both values are automatically escaped before substitution. The default constant translates to: Take %s off — today only. -
Supporting Text — Optional secondary copy shown below the headline. HTML is allowed. Use the same
%splaceholders for discount and coupon code. Leave this empty to show the headline and button only. -
Apply Button Text — The label on the button shoppers click to apply the coupon. Leave the default to use the translated value ("Apply This Coupon"), or enter your own copy.
-
Display Frequency — Controls how often the promo popup appears to a single visitor:
- Every Time — The popup fires on every qualifying page load until the session ends or the Stop After limit is reached.
- Once per Session (per Coupon Code) — The popup appears only once per browser session for the configured coupon. Useful when visitors browse multiple pages and you do not want to interrupt them repeatedly.
-
Stop After — Visible only when Display Frequency is set to Every Time. Sets a hard cap on how many times the popup displays within a single browser session. Once the limit is reached the popup stops showing for the rest of that session.
- Never — No cap; the popup fires on every qualifying page load (default).
- 2 / 3 / 4 / 5 / 6 Times — Stop showing after the chosen number of displays.
-
Popup Theme — The color scheme applied to the promo popup panel. This is separate from the main modal's Accent Palette and Visual Treatment settings.

- Inherit — Reuses the main modal's accent palette. The promo popup matches the URL-capture modal's colors automatically.
- Spotlight — Clean White — A bright, minimal white panel with strong contrast.
- Midnight — Dark High-Contrast — A near-black background with high-contrast text for dramatic impact.
- Sunrise — Warm Amber — A warm amber color scheme suited to seasonal or food-related stores.
- Custom Hex — Opens three color pickers for full manual control (see below).
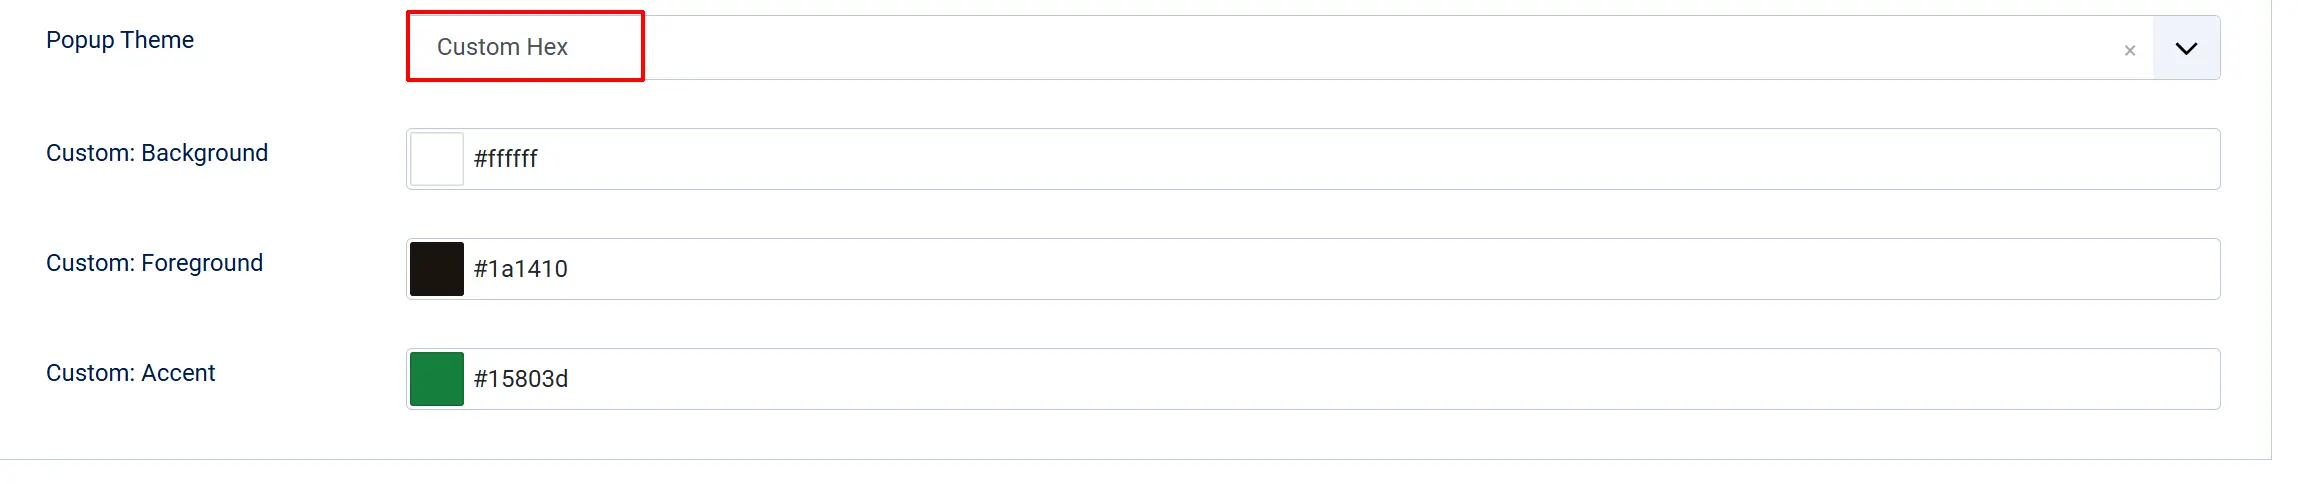
-
Custom: Background — Visible only when Popup Theme is set to Custom Hex. The hex color for the modal panel background (default
#ffffff). -
Custom: Foreground — Visible only when Popup Theme is set to Custom Hex. The hex color for headline and body text (default
#1a1410). -
Custom: Accent — Visible only when Popup Theme is set to Custom Hex. The hex color applied to the coupon code pill, icon halo, and the apply button (default
#15803d).
Admin Dashboard Banner tab
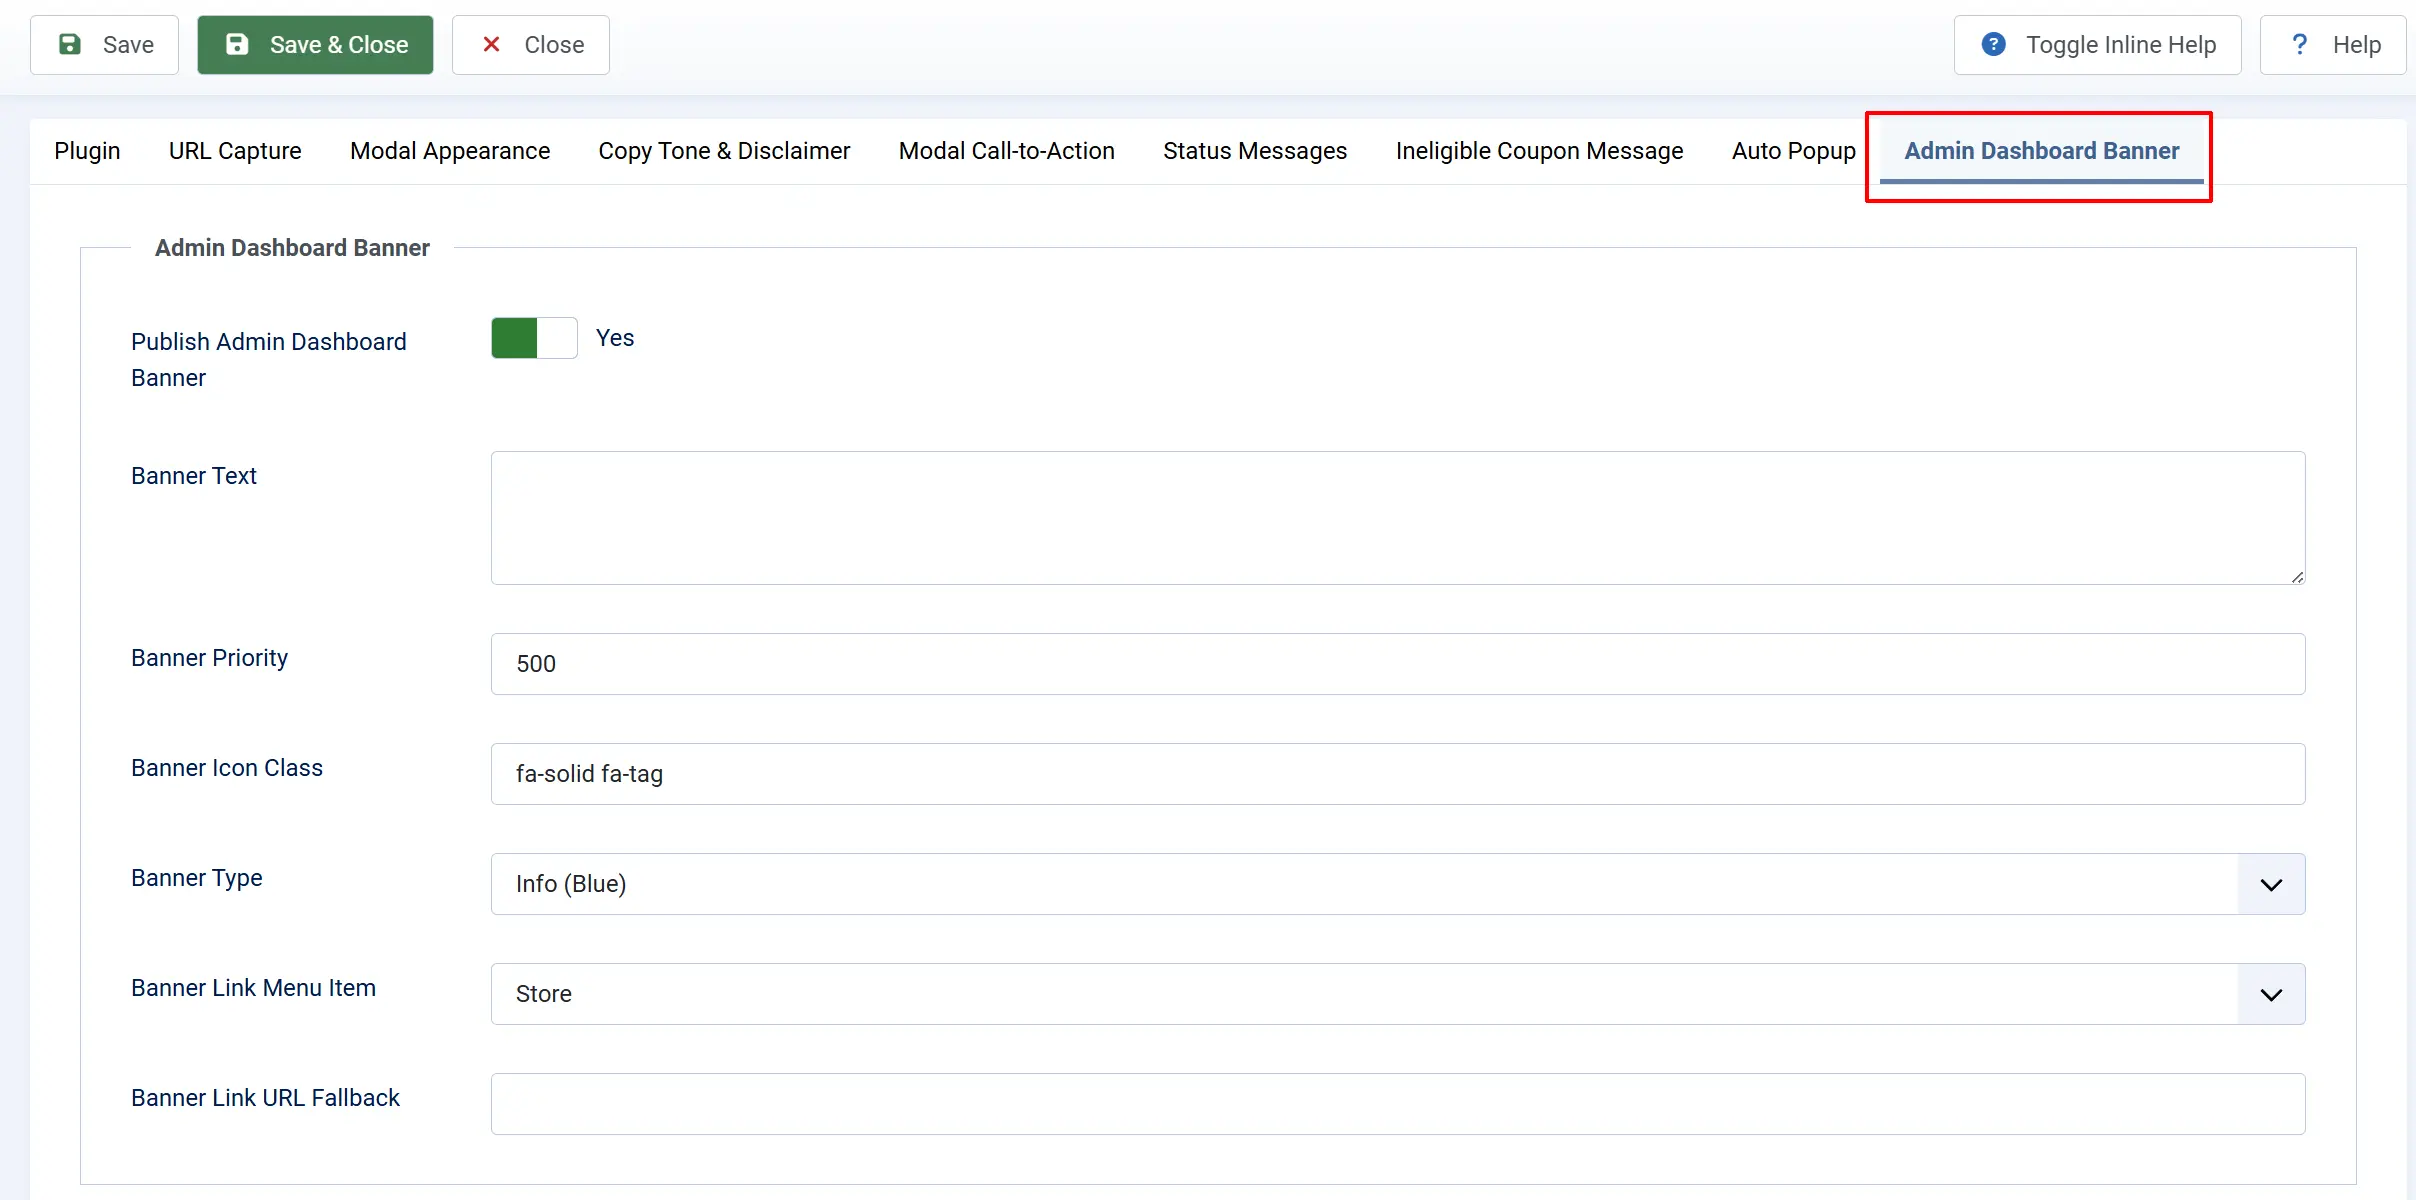
This tab controls an optional announcement banner that appears in the J2Commerce admin dashboard message slider, visible only to administrators.
-
Publish admin dashboard banner: Toggle on to add a banner to the J2Commerce dashboard. Toggle off to hide it.
-
Banner text: Plain-text message displayed in the slider, such as a reminder of your current active campaign URL. Visible only when the banner is published.
-
Banner priority: A number controlling sort order in the slider. Lower numbers appear first. Default is
500. Visible only when the banner is published. -
Banner icon class: Font Awesome class for the icon displayed next to the banner text (default
fa-solid fa-tag). Visible only when the banner is published. -
Banner type: Visual style of the banner: Info (blue), Success (green), or Warning (amber). Visible only when the banner is published.
-
Banner link menu item: Optional Joomla menu item. If set, clicking the banner routes admins to that page. Visible only when the banner is published.
-
Banner link URL fallback: Used only when no menu item is selected above. Enter a direct URL. Visible only when the banner is published.
Generating Marketing QR Codes
The URL Builder makes it straightforward to produce print-ready QR codes for any campaign coupon. Pick the coupon from the dropdown, select X-Large (~480 px) for high-resolution output, then click Generate QR Code. The PNG downloads to your machine instantly — drop it straight into Canva, InDesign, or any design tool and place it on a postcard, poster, trade-show backdrop, or product insert.
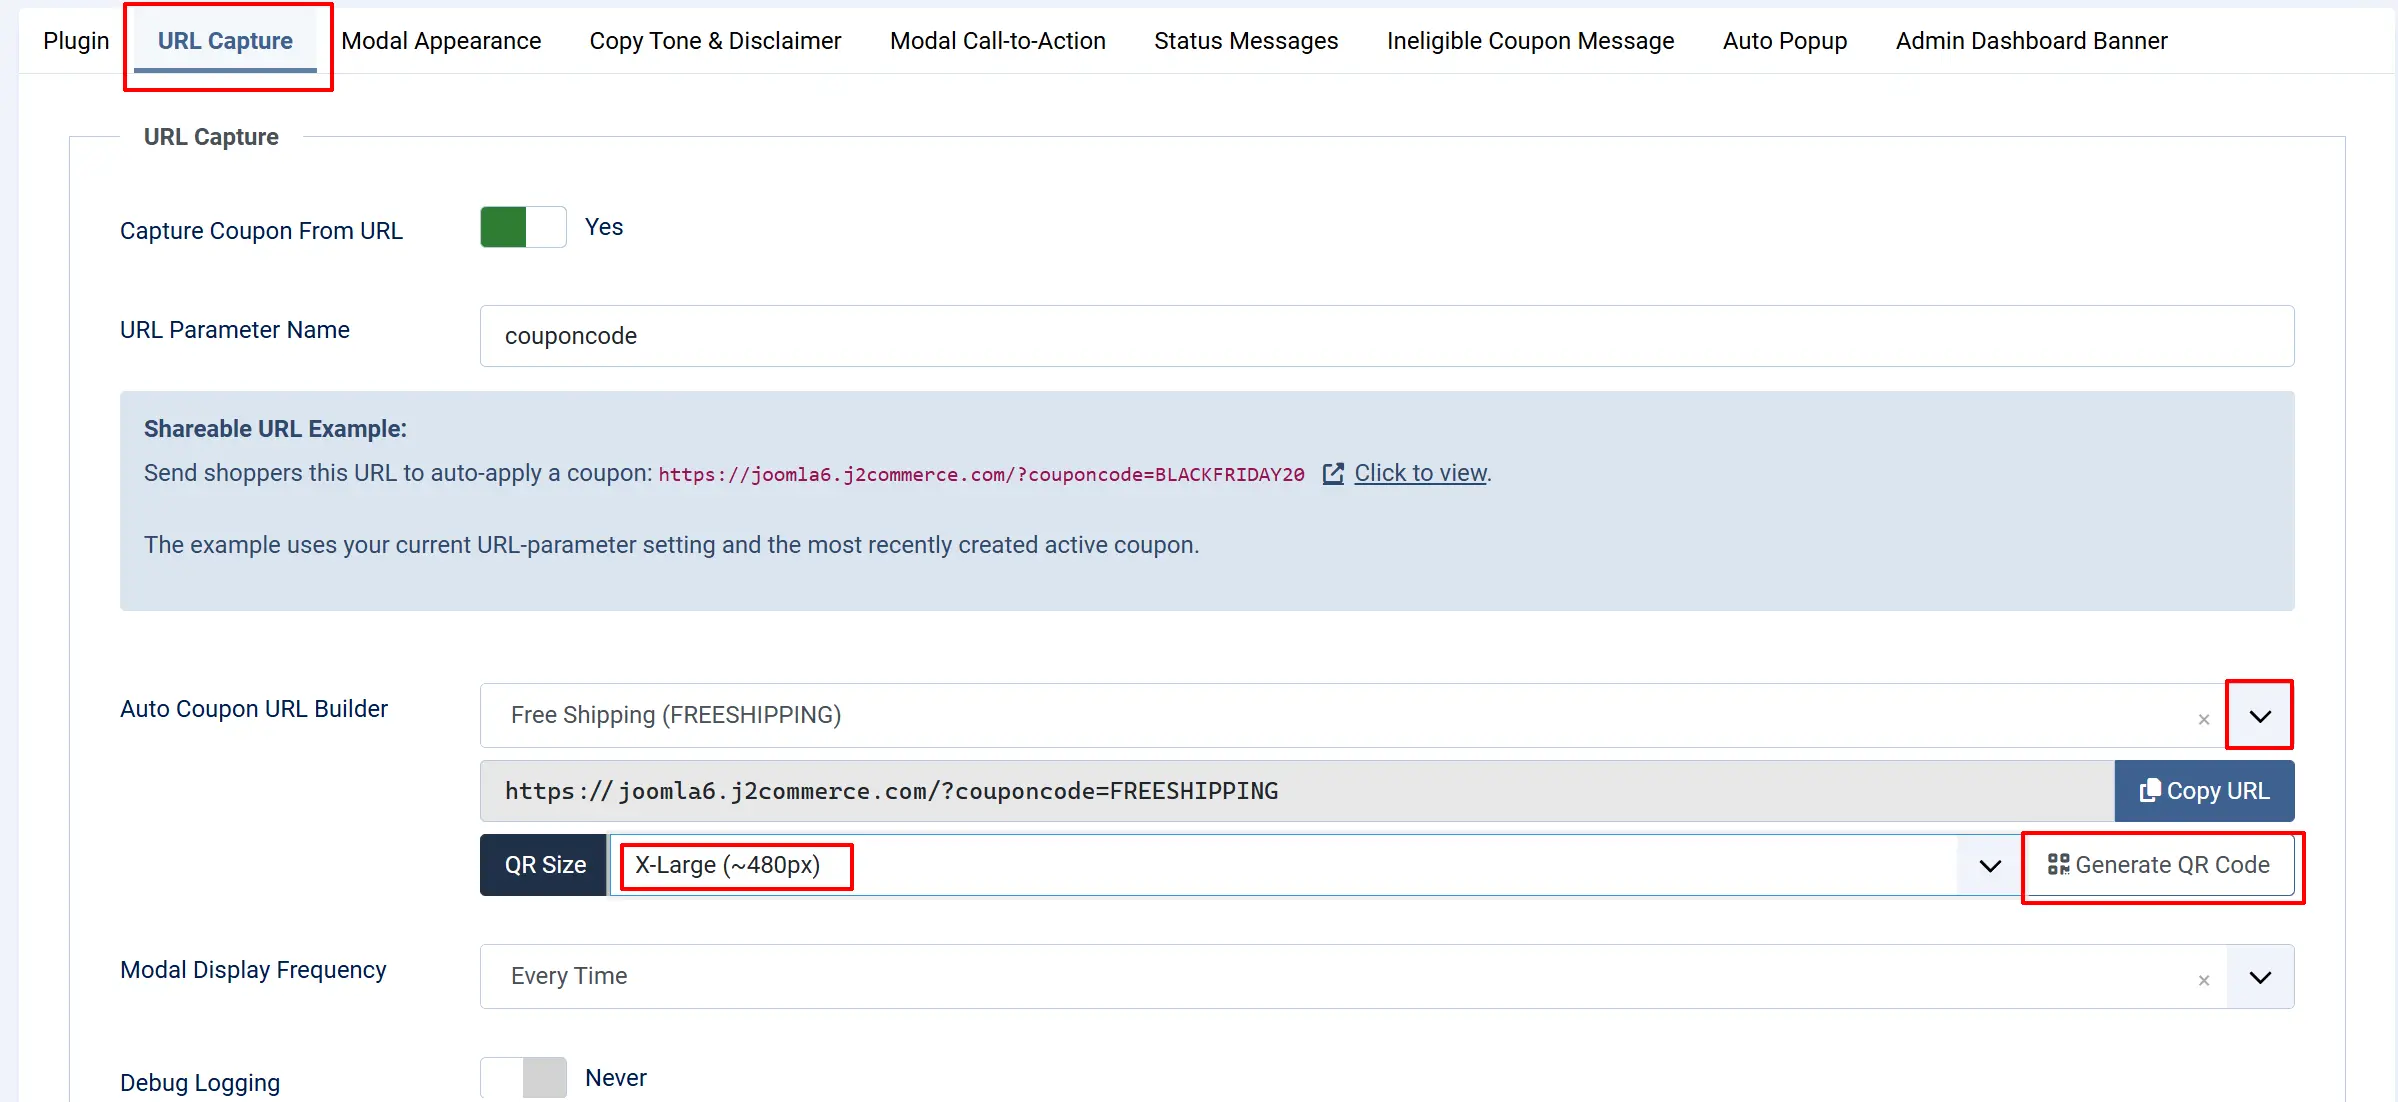
The QR code is generated at error-correction level Q, which means roughly 25% of the code can be obscured or damaged — by smudging, folding, or partial cropping — and still scan reliably. That tolerance makes it a solid choice for printed materials where perfect reproduction isn't guaranteed.
For email newsletters or PDF brochures, Small (~120 px) or Medium (~180 px) keeps file size down without sacrificing scannability on-screen. Reserve X-Large for anything destined for physical print.
How It Works
URL-capture flow:
- A visitor lands on any frontend page with
?couponcode=XYZ(or your custom parameter name) in the URL. - Auto-Coupon reads the code from the URL and attempts to apply it to the visitor's cart.
- The plugin classifies the result as one of five states: Active (applied), Empty (not found), Expired, Pending (not yet active), or Ineligible (exists but cart doesn't qualify).
- A modal appears with the headline and body text matching that state, plus the configured call-to-action button.
- The visitor clicks the CTA to continue shopping or closes the modal manually.
Promotion Popup flow (v6.0.3+):
- A visitor lands on any frontend page that does not contain the URL capture parameter.
- If Enable Promotion Popup is on, the configured coupon is enabled, and the current date falls within the coupon's valid_from / valid_to window, the promo popup fires.
- The popup displays the configured Headline (with the discount amount substituted), optional Supporting Text, and an optional Coupon expiration date.
- The visitor clicks Apply This Coupon (or your custom apply button text). The coupon is applied to the cart and the modal switches to the Active (success) state.
- The visitor then clicks the call-to-action to continue shopping or closes the modal manually.
Display Conditions
URL-capture modal — appears when all of these conditions are true:
- The Auto-Coupon Pop Up plugin is enabled under J2Commerce -> Apps.
- The page URL contains the configured query parameter (default
couponcode). - The parameter has a non-empty value.
The Once per session frequency option suppresses repeat showings for the same coupon code within the same browser session. Opening a new browser tab, using a private/incognito window, or using a different coupon code will trigger a fresh modal.
Promotion Popup — fires when all of these conditions are true:
- The Auto-Coupon Pop Up plugin is enabled.
- Enable Promotion Popup is set to Yes in the Auto Popup tab.
- A coupon is selected in the Coupon to Offer field and that coupon is enabled.
- The current date is within the selected coupon's valid_from / valid_to window (or those dates are not set).
- The page URL does not contain the URL capture parameter (if it does, the URL-capture flow takes priority).
- The popup's own Display Frequency and Stop After limits have not been reached for this browser session.
Frontend Modal View
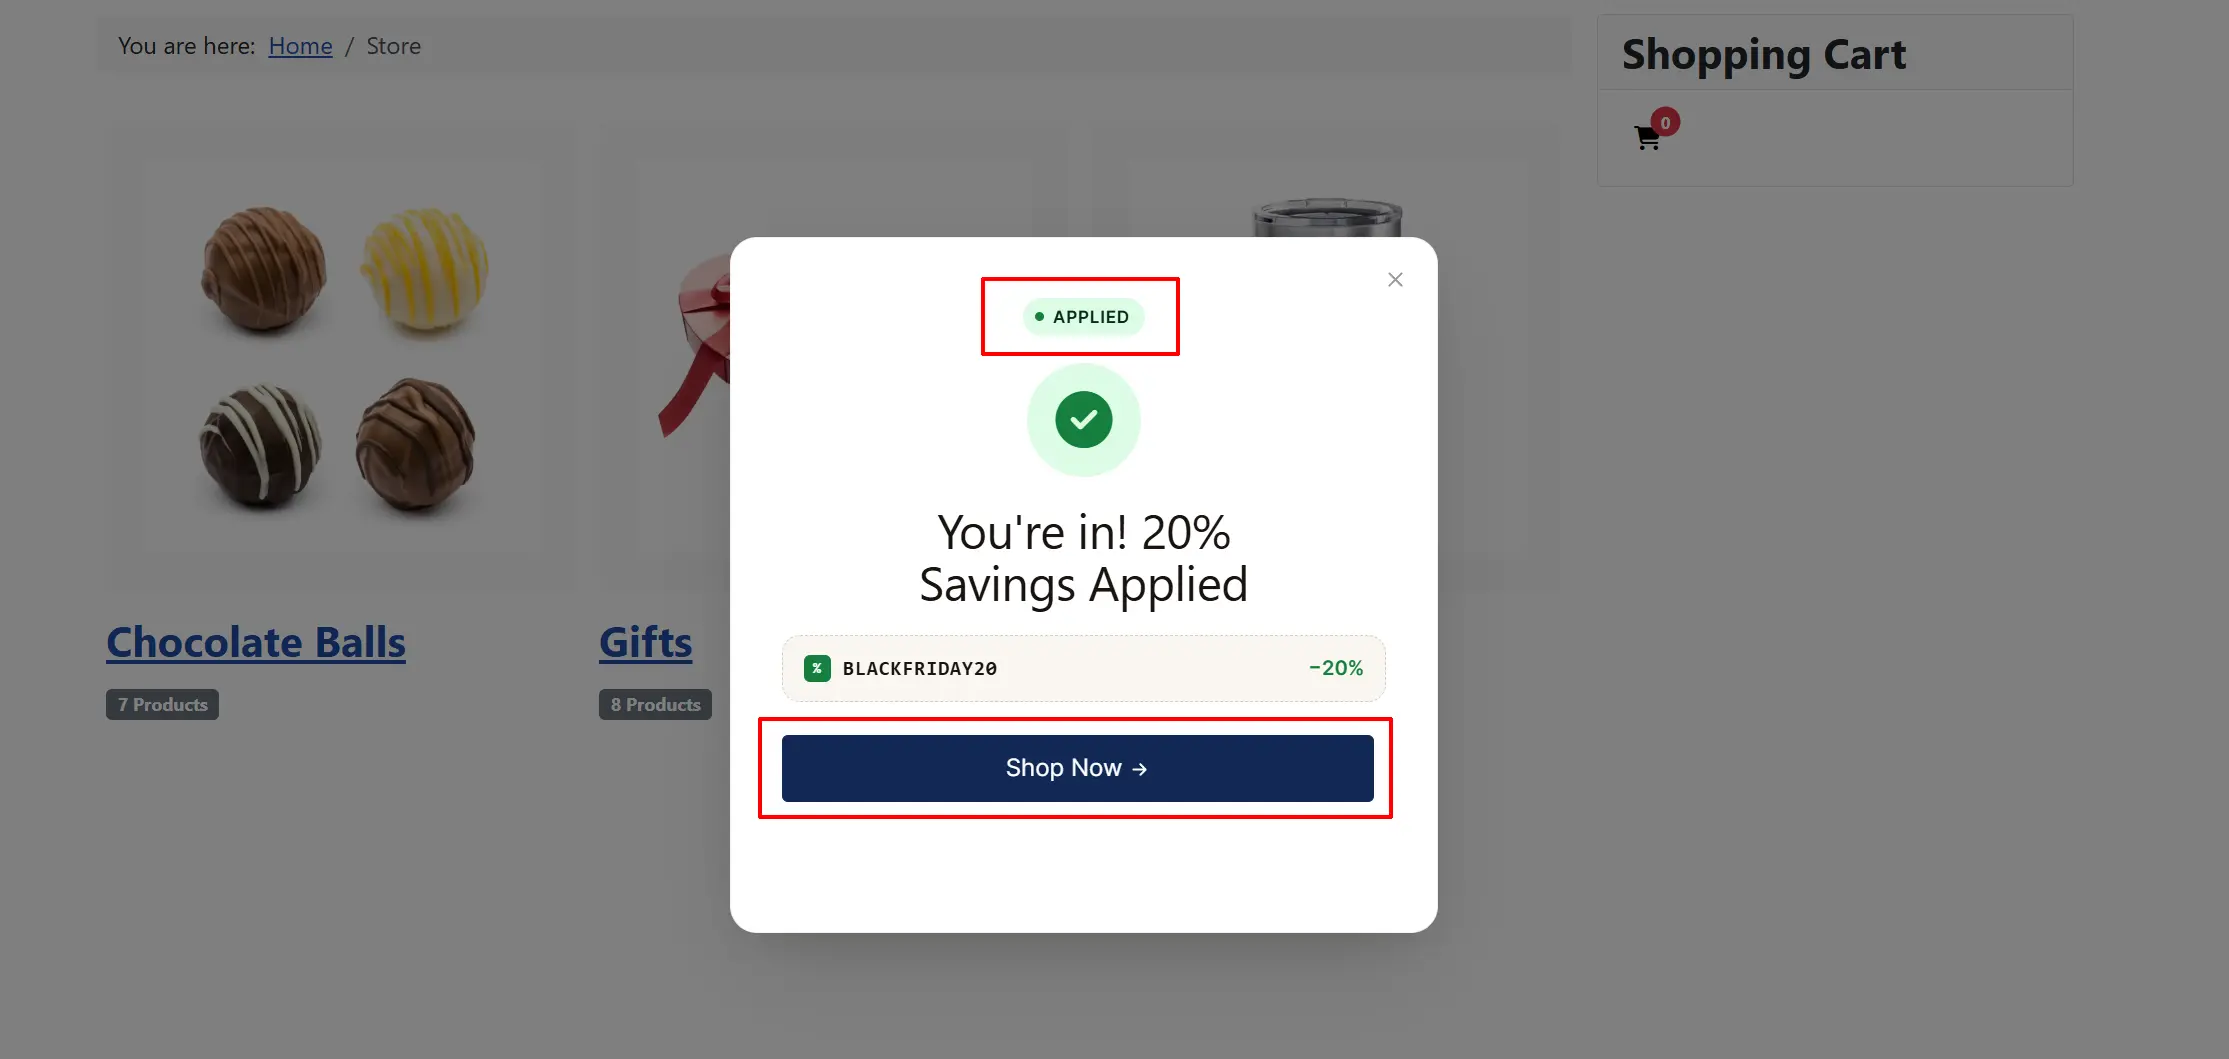
When the customer goes to the coupon URL that has been set, they will see the limited offer popup.
If the customer chooses to apply this coupon, then another popup modal will appear showing it has been Applied to their cart and they can continue to shop
Tips
- Share promotional URLs with the coupon parameter in newsletters and social posts — for example,
https://yoursite.com/sale?couponcode=SUMMER20. - Test each state (Active, Empty, Expired, Pending, Ineligible) at least once before going live to confirm your custom messages and CTA destination look correct.
- Use the Friendly tone for general retail stores and the Professional tone for B2B stores where a neutral voice is expected.
- Match the Accent palette to your storefront brand color — or select Custom hex to enter your exact brand color value.
- Keep status titles short — long titles wrap on mobile screens and may push the CTA button out of view.
- Generate a QR code at X-Large for print materials (postcards, posters, trade-show backdrops). Use Small or Medium for digital embeds in emails and PDFs.
Troubleshooting
Modal Does Not Appear
Cause: The plugin is disabled, the URL parameter name doesn't match, or the URL is missing the parameter entirely.
Solution:
- Go to J2Commerce -> Apps and verify Auto-Coupon Pop Up shows a green checkmark.
- Check the URL you are testing. It must include the exact parameter name configured under URL parameter name (default
couponcode), for example?couponcode=TEST. - Confirm Capture coupon from URL is set to Yes in the URL Capture tab.
- If you selected the UIkit frontend framework, verify the J2Commerce - UIkit app plugin is also enabled.
Coupon Always Shows "Ineligible"
Cause: The coupon exists and is in date, but the cart does not meet the coupon's conditions.
Solution:
- Go to J2Commerce -> Sales -> Coupons and open the coupon.
- Check the Minimum order value — add enough items to the cart to meet it.
- Check User group restrictions — the test visitor may not belong to the required group.
- Check Category restrictions — the coupon may apply only to specific product categories.
- Check the Usage limit — the coupon may have reached its maximum number of uses.
UIkit Modal Not Rendering
Cause: Frontend framework is set to UIkit but the J2Commerce UIkit app plugin is not enabled.
Solution:
- Go to J2Commerce -> Apps and verify J2Commerce - UIkit shows a green checkmark.
- If the UIkit plugin is not installed, switch Frontend framework back to Bootstrap 5 in the Modal Appearance tab and save.
Once Per Session Setting Not Suppressing Repeat Modals
Cause: The browser session was reset, the visitor is using a private/incognito tab, or a different coupon code is in the URL.
Solution:
- Confirm Modal display frequency is set to Once per session (per coupon code) in the URL Capture tab.
- Note that incognito/private windows start a fresh session — the modal will appear once per incognito session by design.
- If the URL contains a different code than the one previously shown, the modal appears again — this is expected behavior.
Promotion Popup Does Not Appear
Cause: One or more required conditions for the promo popup are not met.
Solution:
- Go to J2Commerce -> Apps and verify Auto-Coupon Pop Up shows a green checkmark.
- Open the plugin and click the Auto Popup tab. Confirm Enable Promotion Popup is set to Yes.
- Check that a coupon is selected in Coupon to Offer. If the field is empty, the popup will not fire.
- Open the selected coupon under J2Commerce -> Sales -> Coupons and verify it is enabled and that today's date falls within the Valid From and Valid To dates (or that those dates are blank).
- Check the Stop After setting. If you are testing in the same browser session and the popup already displayed the configured number of times, it will not appear again until you start a fresh session. Open a private/incognito window to reset the session counter.
- Check the URL of the page you are testing. If it contains the configured URL capture parameter (default
couponcode), the URL-capture flow takes priority and the promo popup is suppressed for that page load. Remove the parameter from the URL to trigger the promo popup instead.
Dashboard Banner Not Showing
Cause: The banner toggle is off, or the admin has not refreshed the J2Commerce dashboard.
Solution:
- Go to J2Commerce -> Apps and open Auto-Coupon Pop Up.
- Click the Admin Dashboard Banner tab and verify Publish admin dashboard banner is set to Yes.
- Navigate to the J2Commerce dashboard and refresh the page.
- If the banner still does not appear, check Banner priority — a very high number may push it off the visible area of the slider if other banners with lower numbers are present.
QR Code Generation Fails
Cause: PHP's GD extension is not loaded on the server, or the phpqrcode vendor file was not uploaded when the plugin was installed.
Solution:
- Verify GD is available by running
php -m | grep gdin your server's terminal. If there is no output, ask your host to enable thegdPHP extension. - Re-install the Auto-Coupon Pop Up plugin ZIP from your My Downloads page on the J2Commerce website. A clean install restores the bundled phpqrcode vendor file if it was missing or corrupted.
- Enable Debug logging in the URL Capture tab, attempt to generate a QR code, then check
administrator/logs/plg_j2commerce_app_autocoupon.log.phpfor lines tagged[QR-DEBUG]. These entries identify whether the failure is a missing library, a GD error, or a permissions problem with the download output. - If the log shows a phpqrcode load failure after a clean re-install, contact J2Commerce support with the full
[QR-DEBUG]entries.