Brevo Integration
The Brevo Integration app connects your J2Commerce store to Brevo (formerly Sendinblue) so your email, SMS, and WhatsApp marketing always has real purchase data behind it. When a shopper adds a product to the cart, starts checkout, or completes an order, J2Commerce sends those events to Brevo in real time. A checkout consent checkbox lets customers opt in to your marketing list at the moment they buy, and a product catalog sync keeps Brevo's eCommerce dashboard and product-abandonment flows up to date automatically.
Requirements
- PHP 8.3.0 or later
- Joomla 6.x
- J2Commerce 6.x
- An active Brevo account
Understand the Two Brevo Keys
Brevo uses two different keys, and this app needs both. It is easy to mix them up, so it helps to know what each one does before you start.
| Key | Where it comes from | What it does |
|---|---|---|
| API Key | SMTP & API -> API Keys | A secret key that authenticates every server-side call to Brevo (syncing orders, contacts, and products). Starts with xkeysib-. Keep it private. |
| Marketing Automation (Tracker) Key | Automation -> Settings | A separate, non-secret key used by the on-page Brevo Tracker to record cart and checkout activity. It is safe for this one to appear in your website's pages. |
These are not the same key. The API Key never appears on your website; the Tracker Key does. You must copy both into the plugin settings.
Find Your Brevo API Key
- Log in to your Brevo account.
- Click your account name in the top-right corner, then choose SMTP & API from the menu.
- Open the API Keys tab.
- Click Generate a new API key, give it a name (for example, "J2Commerce"), and click Generate.
- Copy the key that appears. It begins with
xkeysib-.
Copy the API Key to a safe place before closing the dialog. Brevo shows the full key only once, at creation time.
Find Your Marketing Automation (Tracker) Key
- In your Brevo account, open the Automation section from the top navigation.
- Click Settings (sometimes shown as Tracking & scripts or Your DMA / Tracking code).
- Locate your Marketing Automation key (also called the client key or ma-key). It is a long string of letters and numbers.
- Copy this key.
If you do not see an Automation section, your Brevo plan may need the Automation feature enabled. The Tracker Key only powers cart and checkout abandonment — you can connect the rest of the app with just the API Key and add the Tracker Key later.
Purchase and Download
The Brevo Integration is a separate add-on available from the J2Commerce Extensions Store. It is not included with the core J2Commerce 6 component.
Step 1: Go to the J2Commerce website -> Apps.
Step 2: Locate the Brevo Integration app -> click View Details -> Add to cart -> Checkout.
Step 3: Go to My Downloads under your profile button at the top-right corner and search for the app. Click Available Versions -> View Files -> Download Now.
Install the App
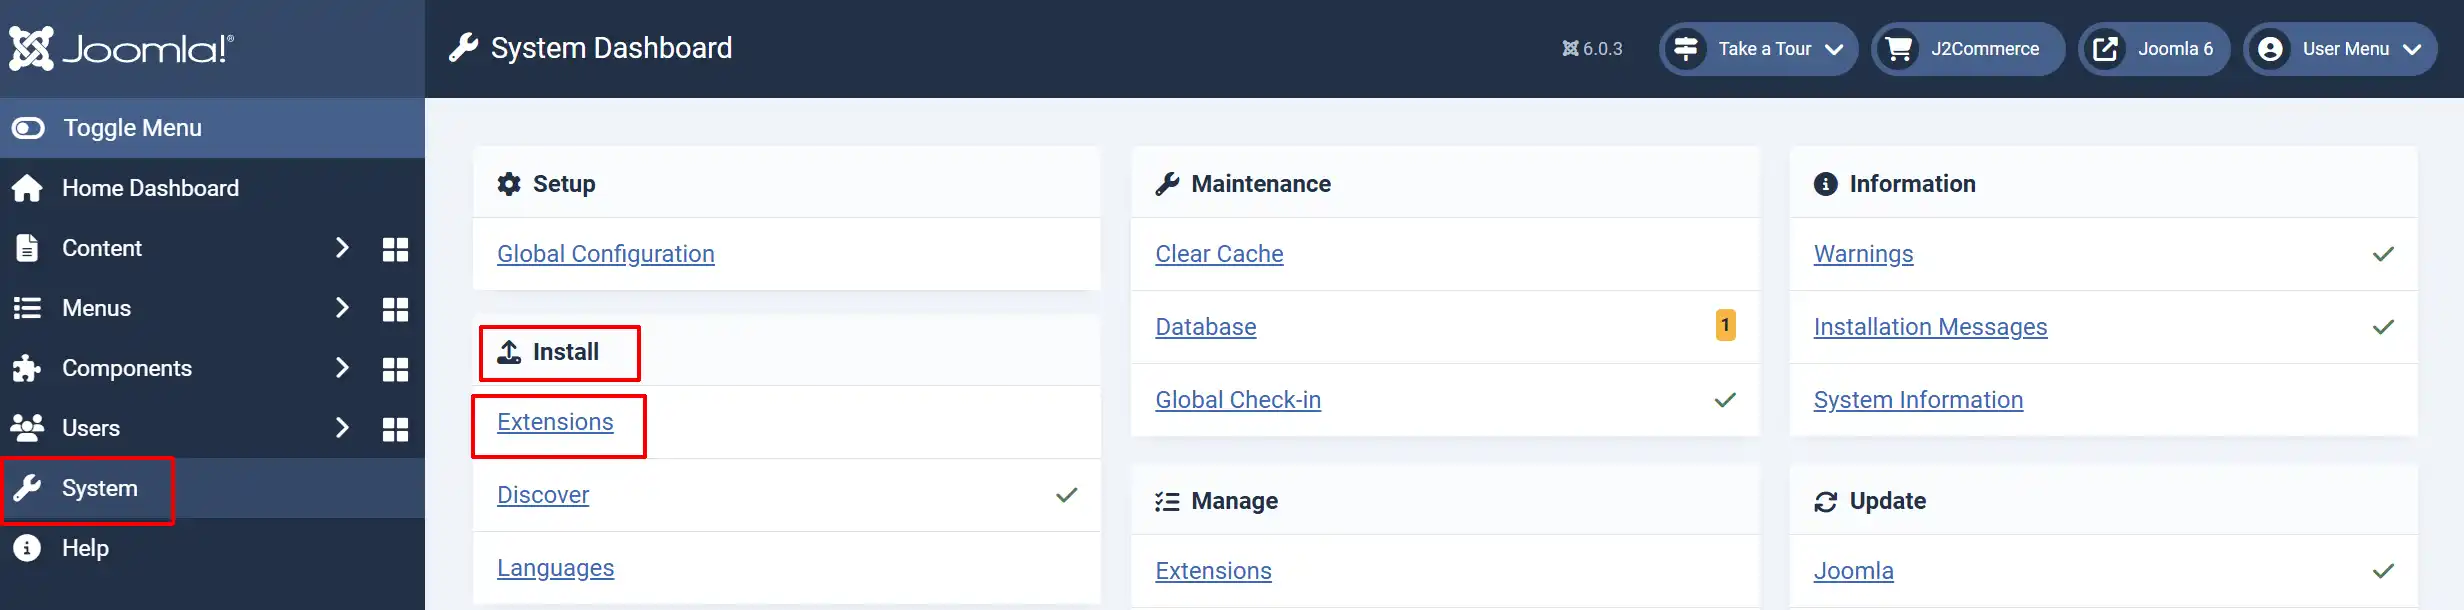
You can install this app using the Joomla installer.
In the Joomla admin, go to System -> Install -> Extensions.
Upload the plg_j2commerce_app_brevo.zip file, or use the Install from URL option.
Enable the App
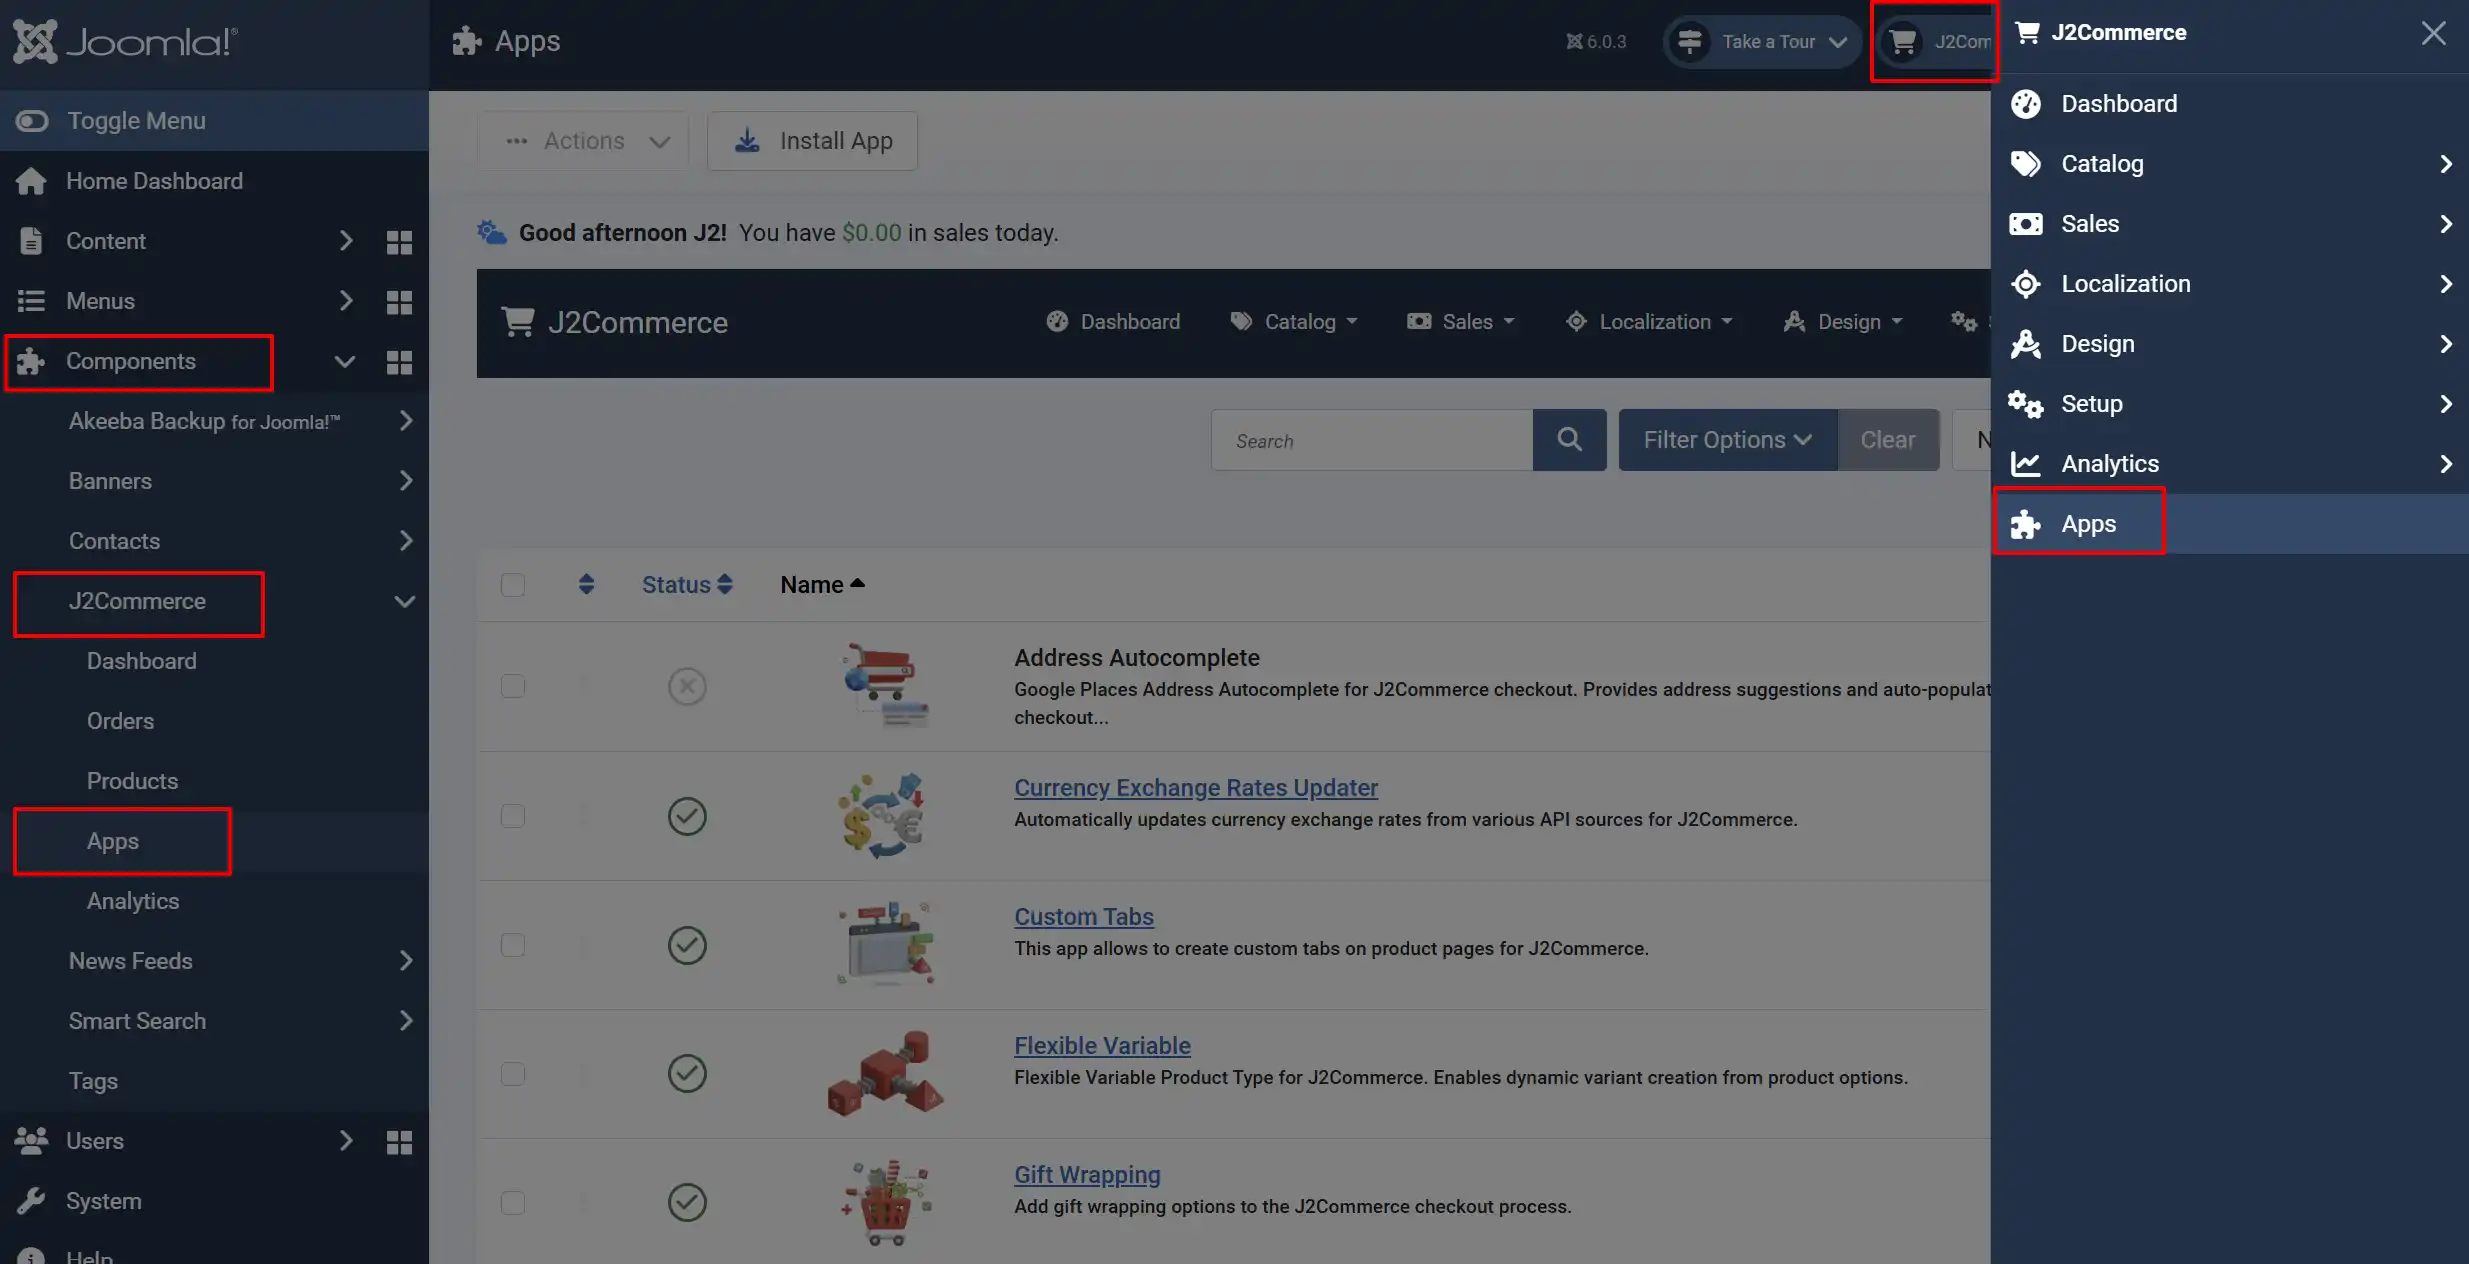
Once installed, you need to enable the app. There are two ways to reach it.
Option A: Click the J2Commerce icon at the top-right corner -> Apps.
Option B: Go to Components on the left sidebar -> J2Commerce -> Apps.
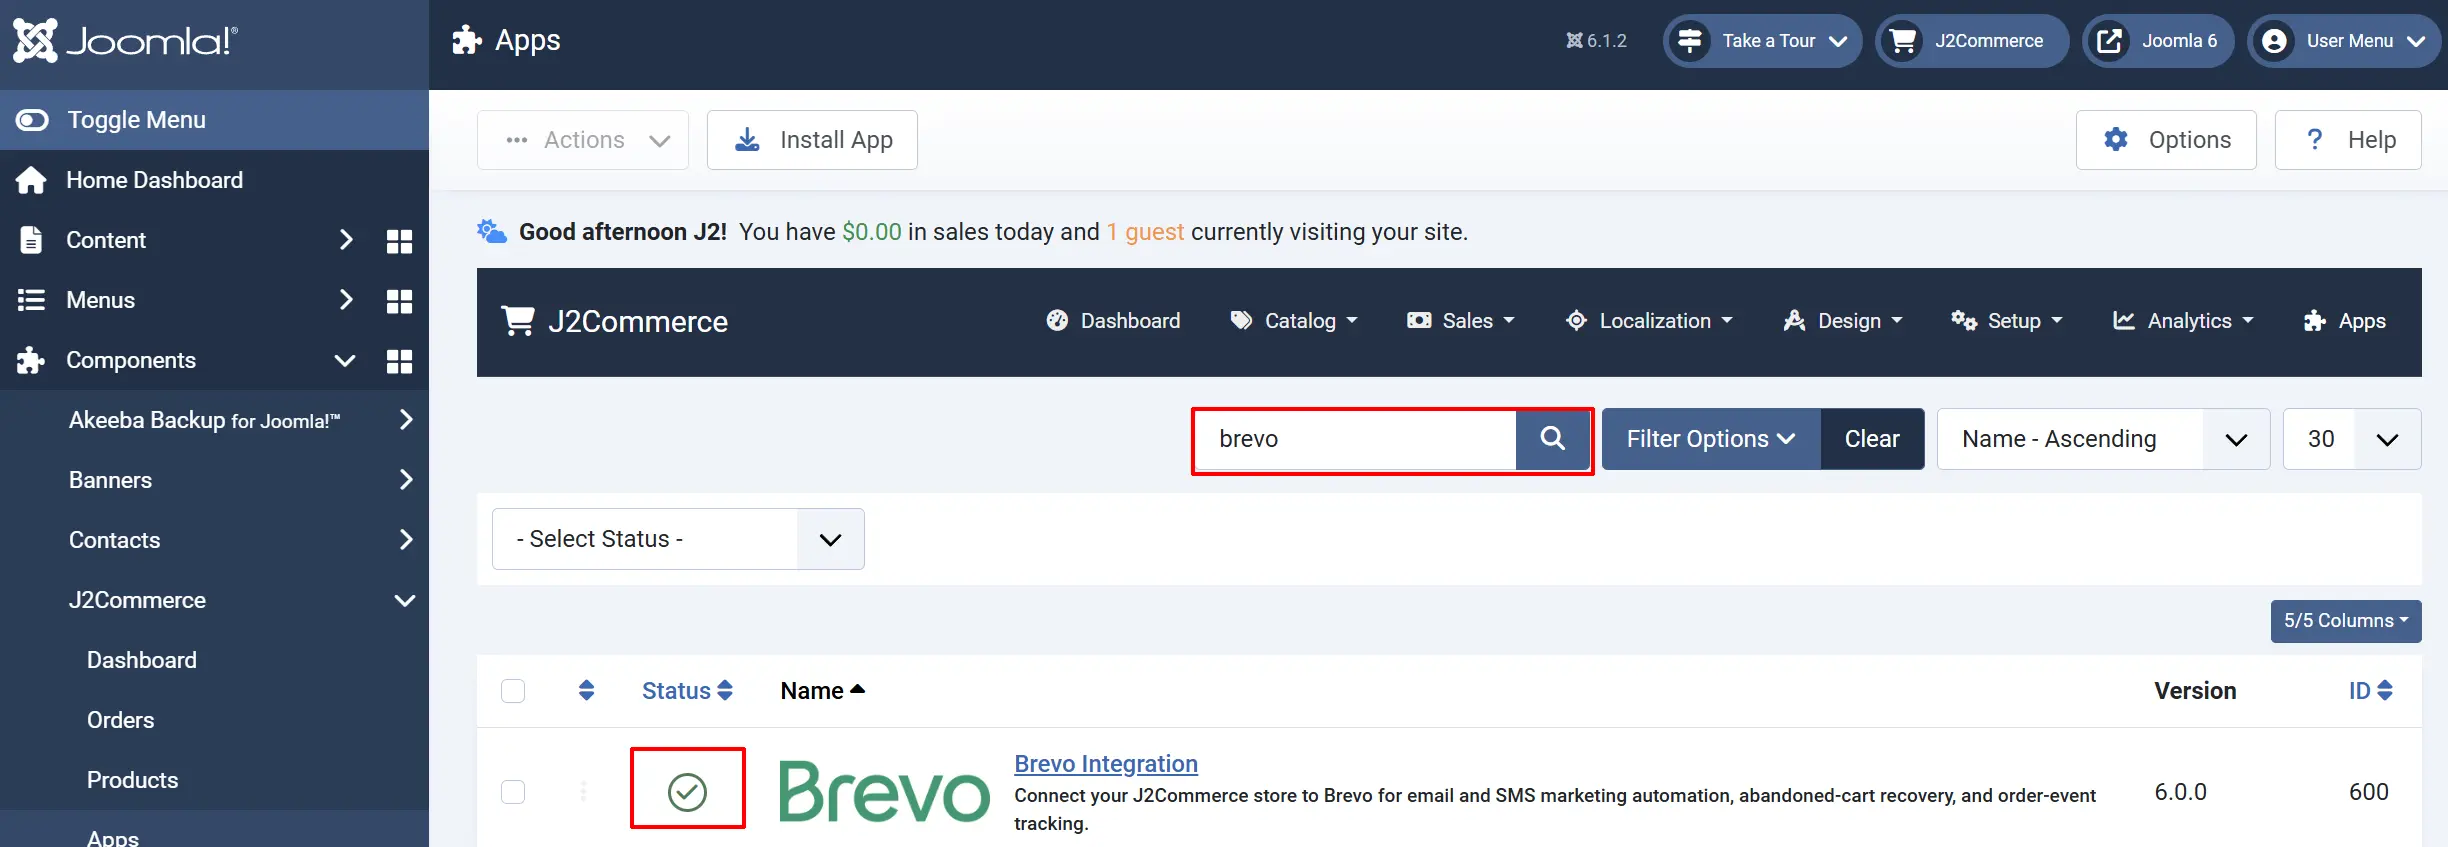
Look for Brevo Integration, click the red X, and it turns into a green checkmark. The app is now enabled and ready for setup.
Configure the App
Click the Brevo Integration title next to the green checkmark to open its settings.
Click the Toggle Inline Help button in the toolbar and the app shows a description below each field as you configure it.
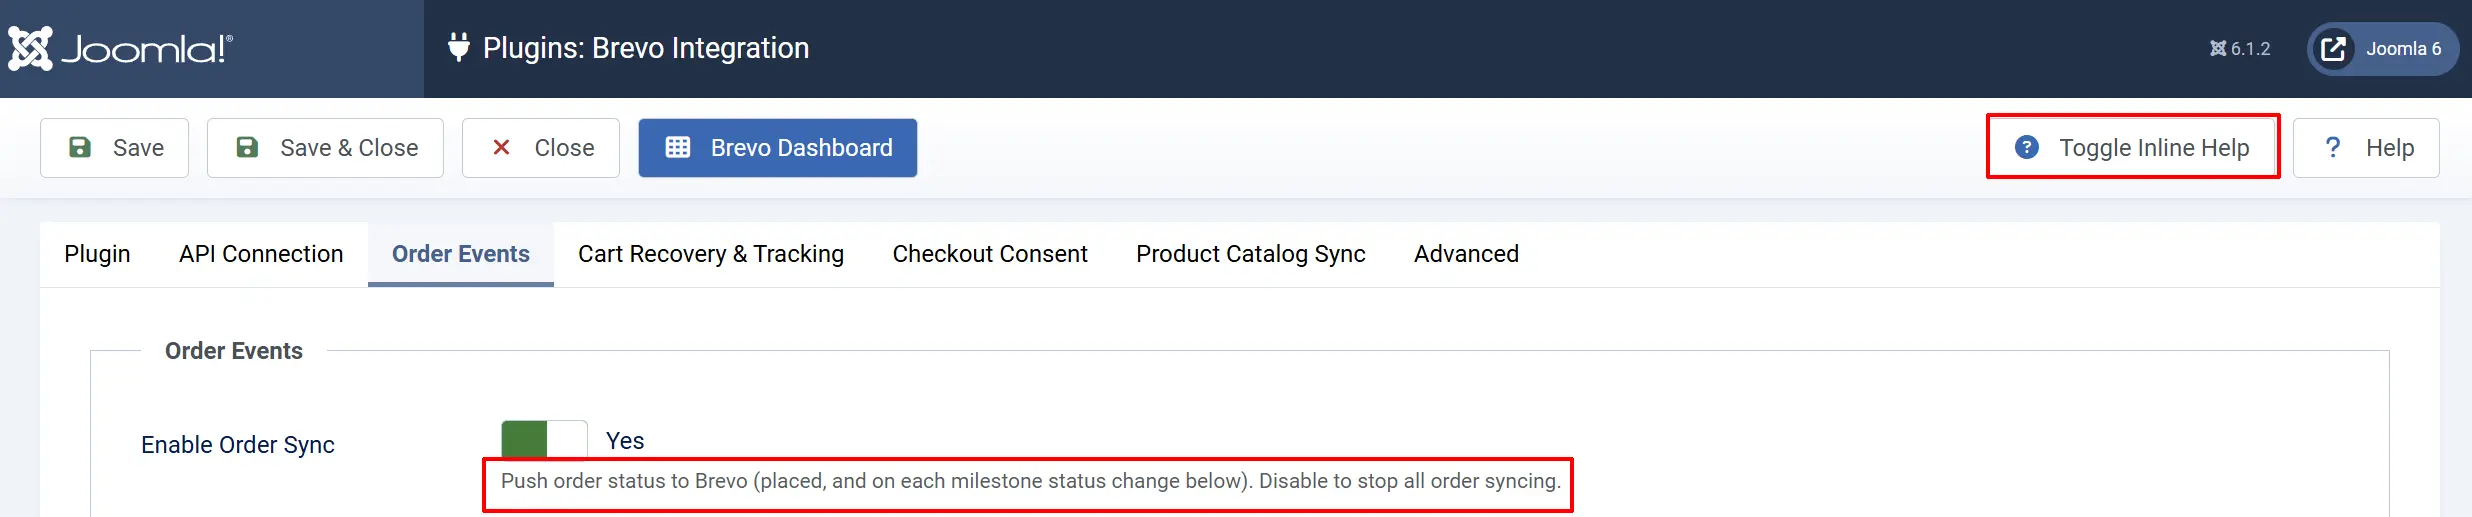
The settings are grouped into tabs. The two most important are API Connection (where your keys go) and Order Events.
API Connection tab
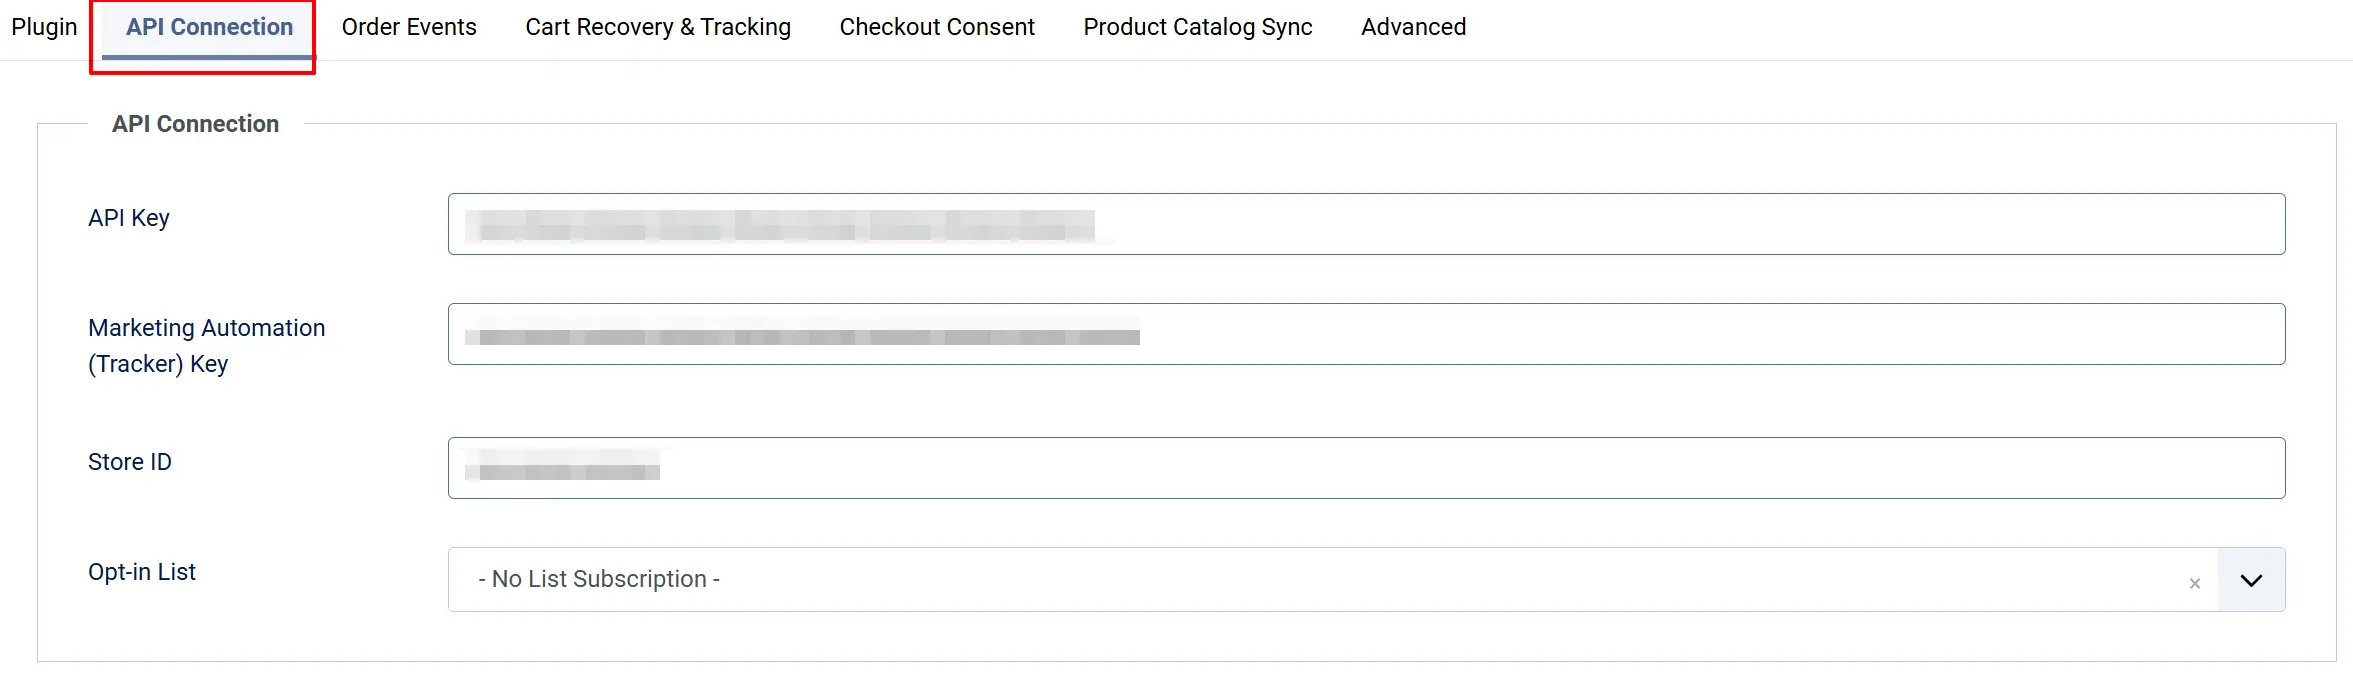
API Key: Paste the API Key you copied from SMTP & API -> API Keys (starts with xkeysib-). Required for order, contact, and product syncing.
Marketing Automation (Tracker) Key: Paste the key you copied from Automation -> Settings. Required for cart and checkout abandonment tracking.
Store ID: Optional. A short identifier for this store, attached to every order sent to Brevo. Leave blank if you run only one store on this Brevo account.
Opt-in List: The Brevo contact list that customers are added to when they tick the marketing-consent checkbox at checkout.
The Opt-in List dropdown is empty until you save a valid API Key. Enter your API Key, click Save, then reopen this tab — your Brevo lists load automatically.
Order Events tab
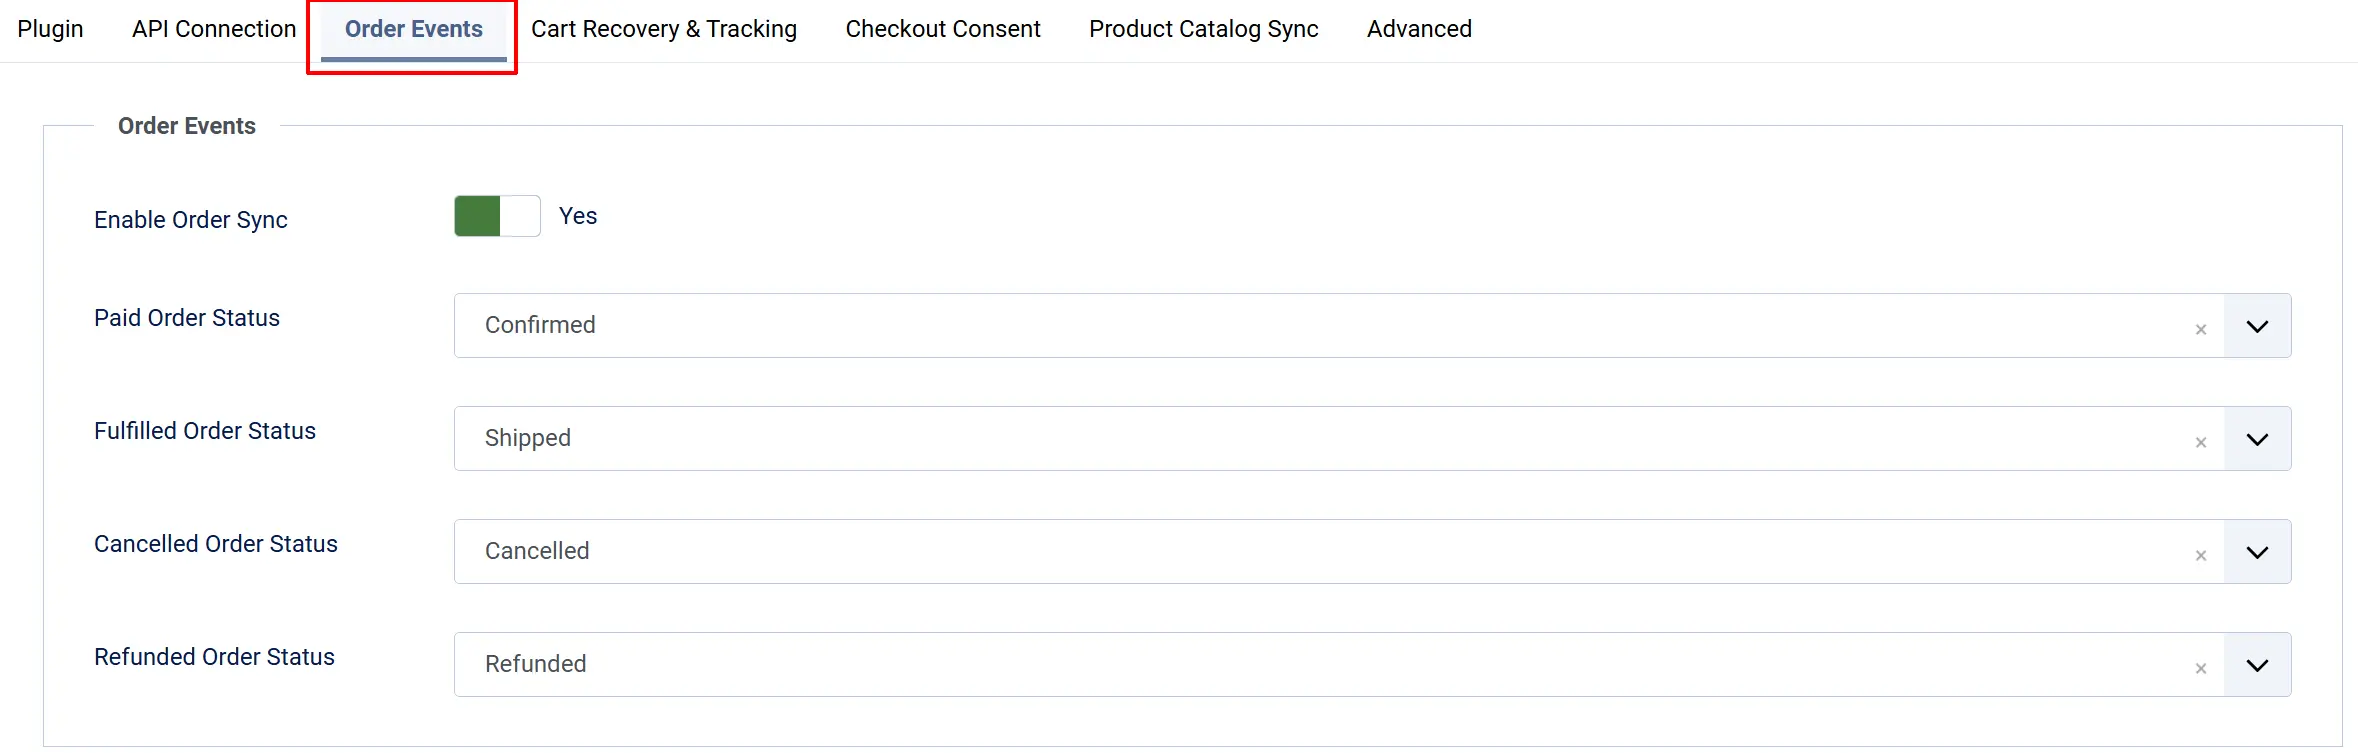
Control which order milestones are pushed to Brevo. Each status field uses your own J2Commerce order statuses, so you can match them to your store's workflow.
Enable Order Sync: Master switch for order syncing. When on, a new order is sent to Brevo when placed, and again on each milestone below.
Paid Order Status: The status that reports an order as paid to Brevo. Usually your Confirmed / Paid status.
Fulfilled Order Status: The status that reports an order as fulfilled. Usually your Shipped status.
Cancelled Order Status: The status that reports an order as cancelled.
Refunded Order Status: The status that reports an order as refunded. Leave empty to skip refund tracking.
NOTE: If the status you want isn't listed in the dropdown menu, you can create a new one by going to J2Commerce -> Setup -> Order Statuses
Cart Recovery & Tracking tab

These options power abandoned-cart and abandoned-checkout automations. They rely on the Marketing Automation (Tracker) Key from the API Connection tab.
Enable Brevo Tracker Snippet: Loads the Brevo Tracker on every page. Required for cart/checkout abandonment and contact identification. Only the Tracker Key is placed in the page — the secret API Key is never exposed.
Enable Cart & Checkout Abandonment: Sends a cart_updated event when a product is added to the cart and a started_checkout event when a shopper reaches checkout. Requires the Tracker snippet above.
Checkout Consent tab
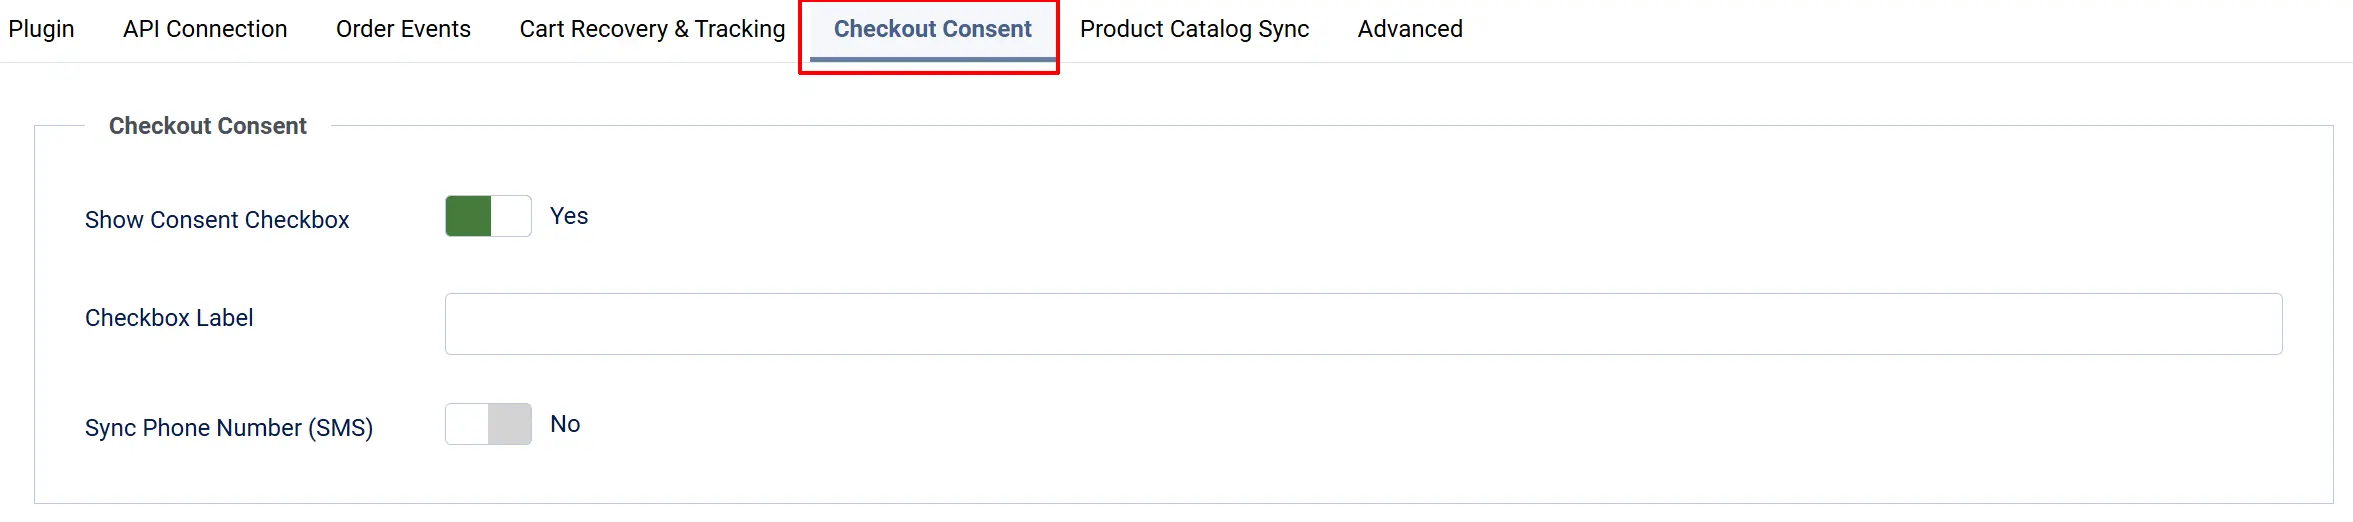
Add a marketing opt-in checkbox to your checkout so customers can join your list as they buy.
Show Consent Checkbox: Displays a marketing-consent checkbox on the checkout step. Ticking it adds the customer to your configured Opt-in List.
Checkbox Label: The wording next to the checkbox. Leave blank to use the default ("Email me news and exclusive offers"). Plain text only.
Sync Phone Number (SMS): Sends the customer's billing phone number to Brevo as the SMS contact attribute, so Brevo can hold it for SMS messaging.
Product Catalog Sync tab

Enable Product Catalog Sync: Automatically syncs products to the Brevo eCommerce catalog whenever they are saved or deleted. Requires the Brevo eCommerce app to be activated (see the dashboard).
Advanced tab

Webhook Bearer Token: Secures the plugin's webhook endpoint. Brevo webhooks are not signed, so the app protects the endpoint with a token you create. See Set Up the Webhook below.
Debug Logging: Writes verbose logs to the Joomla log file for troubleshooting. Turn off in production.
Click Save when you have entered your keys and chosen your options.
Connect and Activate
After saving your keys, open the Brevo Dashboard to verify the connection and switch on eCommerce features.

- Click Test Connection in the toolbar. On success, the dashboard shows Connected along with your Brevo company name and account email.
- Click Activate eCommerce App. This turns on Brevo's eCommerce features, which are required before order and product syncing will work. It is safe to click more than once.
- (Optional) Click Sync All Products to queue an initial full catalog sync. After this, individual products sync automatically when saved.
- (Optional) Click Sync Historic Orders to import past orders.
Before importing historic orders, pause all Brevo order automations. Otherwise Brevo may send automated emails to customers whose orders are already complete.
Set Up the Webhook (Optional)
A webhook lets Brevo notify your store about email events (opens, clicks, unsubscribes). Because Brevo does not sign its webhooks, the app protects its endpoint with a bearer token that you create.
- In the plugin's Advanced tab, enter a long, random string in the Webhook Bearer Token field (for example, a 32-character mix of letters and numbers). Click Save.
- In your Brevo account, go to Webhooks -> Create a webhook.
- Set the webhook URL to your store's Brevo webhook endpoint.
- Under Bearer token authorization, paste the same token value you saved in step 1.
- Choose the events you want Brevo to send, and save the webhook.
The token in Brevo must match the token in the plugin exactly. If they differ, the plugin rejects the incoming webhook.
How It Works
- Contacts: When a customer places an order or opts in at checkout, their details are sent to Brevo as a contact, optionally with their phone number for SMS.
- Orders: New orders are pushed to Brevo immediately. As an order moves through your paid, fulfilled, cancelled, and refunded statuses, Brevo receives a matching status update.
- Cart & checkout activity: The on-page Brevo Tracker records cart updates and checkout starts, feeding Brevo's abandonment automations.
- Products: Saving or deleting a product updates the Brevo eCommerce catalog automatically, so your product-based segments and flows stay current.
Tips
- Enter the API Key first, then reload the tab so your Brevo lists appear in the Opt-in List dropdown.
- Keep both keys straight — the
xkeysib-API Key goes in the API Key field; the Automation key goes in the Tracker Key field. - Pause automations before a historic import to avoid emailing past customers.
- Leave Debug Logging off in production — it only exists to help diagnose problems.
- Activate the eCommerce app once before expecting product or order data to appear in Brevo.
Troubleshooting
"Connected" Never Appears After Test Connection
Cause: The API Key is missing or incorrect.
Solution:
- Open J2Commerce -> Apps -> Brevo Integration -> API Connection tab.
- Confirm the API Key is pasted correctly and begins with
xkeysib-. - Click Save, return to the Brevo Dashboard, and click Test Connection again.
Orders or Products Do Not Appear in Brevo
Cause: The Brevo eCommerce app has not been activated.
Solution:
- Open the Brevo Dashboard.
- Click Activate eCommerce App in the toolbar (safe to click more than once).
- Wait a few minutes, then check your Brevo eCommerce dashboard again.
The Opt-in List Dropdown Is Empty
Cause: Lists load from Brevo only after a valid API Key is saved.
Solution:
- Enter your API Key in the API Connection tab and click Save.
- Reopen the tab — your Brevo lists now appear in the Opt-in List dropdown.
Cart or Checkout Abandonment Not Tracking
Cause: The Tracker snippet is disabled or the Marketing Automation (Tracker) Key is missing.
Solution:
- In the API Connection tab, confirm the Marketing Automation (Tracker) Key is filled in.
- In the Cart Recovery & Tracking tab, set Enable Brevo Tracker Snippet and Enable Cart & Checkout Abandonment to Yes.
- Click Save and clear your Joomla cache.
Webhook Requests Are Rejected
Cause: The bearer token in Brevo does not match the token in the plugin.
Solution:
- Copy the token from the plugin's Advanced -> Webhook Bearer Token field.
- In Brevo, edit the webhook and paste the exact same value under Bearer token authorization.
- Save both, then resend a test event from Brevo.