J2Commerce 4 Migrator Adapter
The J2Commerce 4 Migrator Adapter is the source connector for the J2Commerce Migrator. It reads your existing J2Store v4 store — products, orders, customers, tax setup, and configuration — and moves that data into J2Commerce 6. Without this adapter installed and enabled, the Migrator has no source to read from.
Requirements
- PHP 8.3 or later
- Joomla 6.0 or later
- J2Commerce 6 installed and enabled
- J2Commerce Migrator component installed — the adapter cannot work without it
- An existing J2Store v4 installation (version 4.1.x or 4.2.x), either on the same Joomla site or accessible via a separate MySQL server or SSH tunnel
Get the Adapter
The J2Commerce 4 Migrator Adapter is a separate add-on available from the J2Commerce website. It is not included with J2Commerce 6 or with the Migrator component — you purchase and download it separately.
Step 1: Log in to your account at j2commerce.com and open your customer downloads area.
Step 2: Search for J2Commerce 4 Migrator Adapter and download the plg_j2commercemigrator_j2commerce4_*.zip file.
Install the Adapter
Step 1: In your Joomla admin, go to System -> Install -> Extensions.
Step 2: Drag and drop the plg_j2commercemigrator_j2commerce4_*.zip file into the upload area, or click Browse for file and select it.

The installer checks that both J2Commerce 6 and the J2Commerce Migrator component are already installed. If either is missing, installation will be refused. Install J2Commerce and the Migrator first, then install the adapter.
Enable the Adapter
Step 1: Go to System -> Manage -> Plugins.
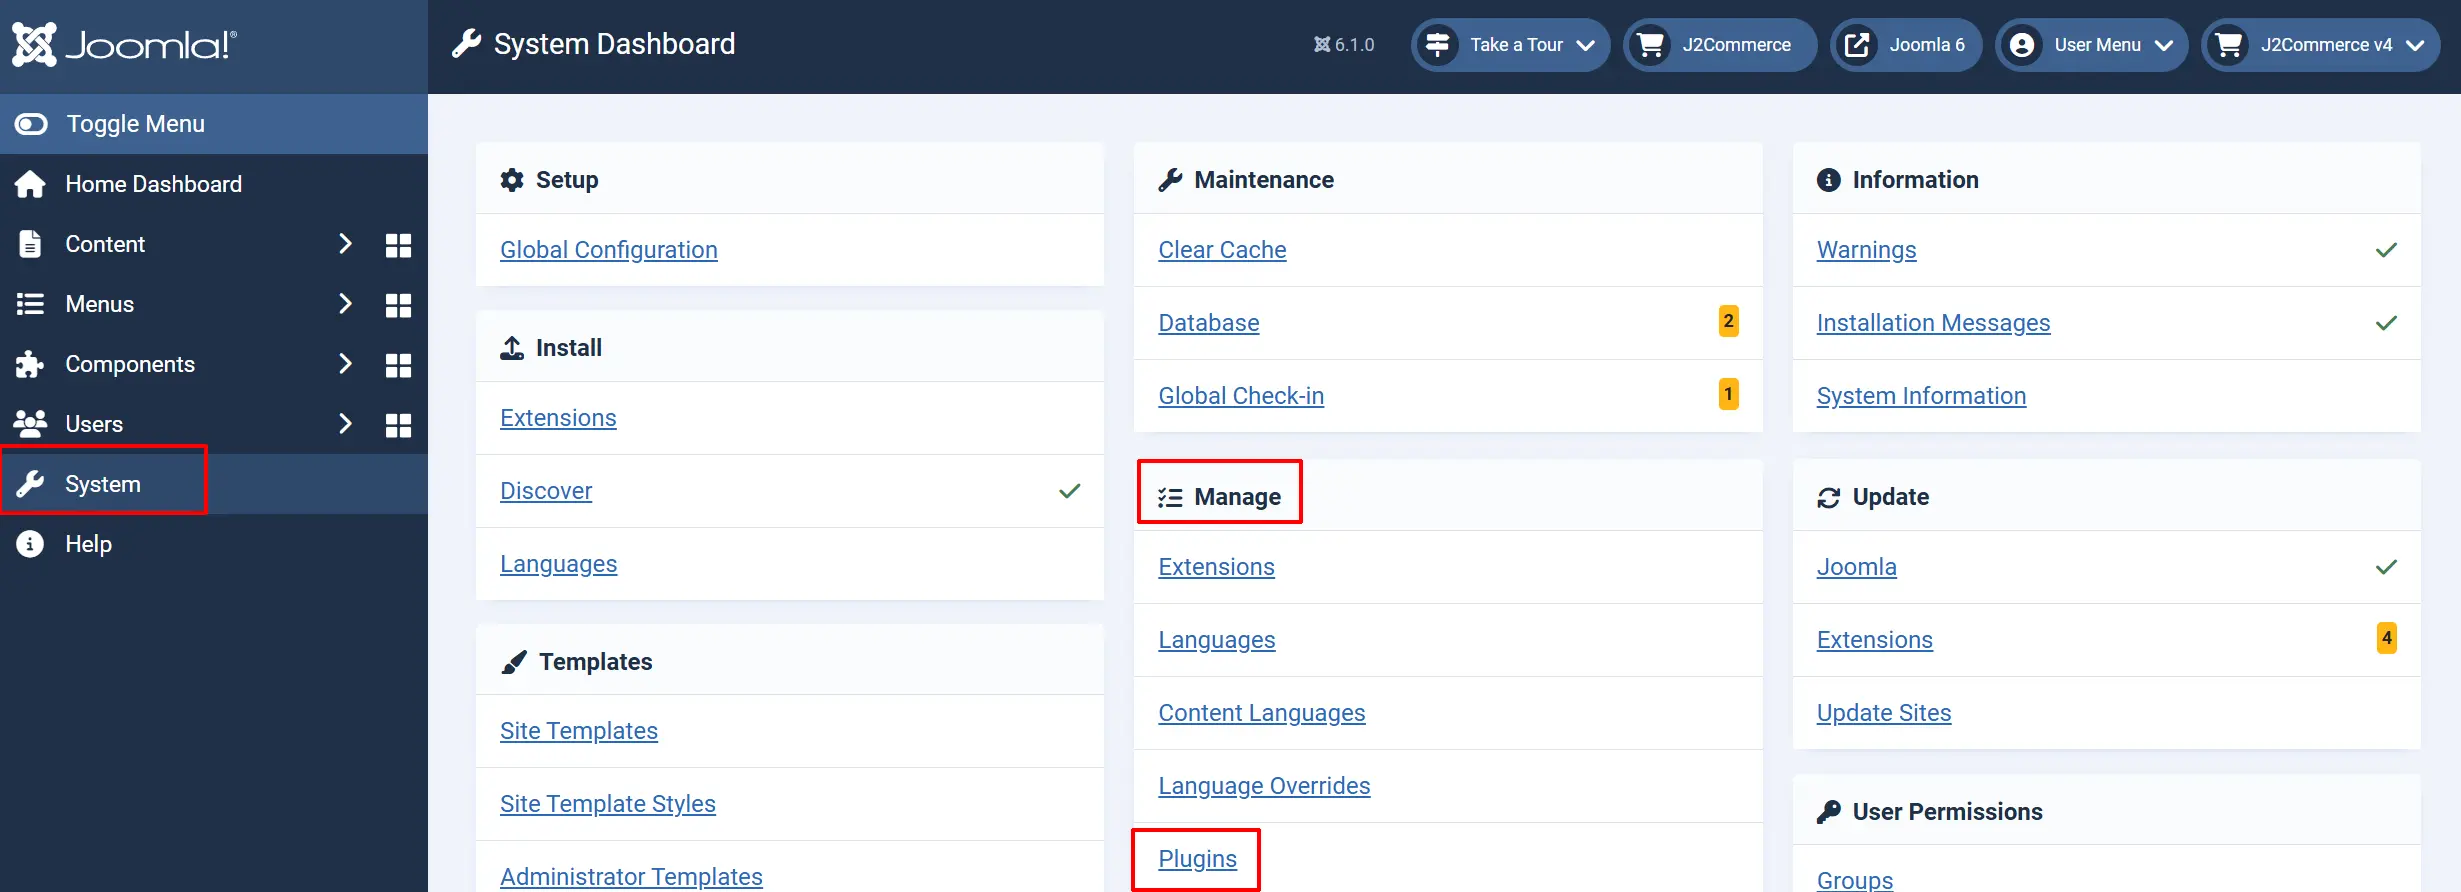
Step 2: In the Filter Options -> Select Type dropdown -> choose j2commercemigrator.
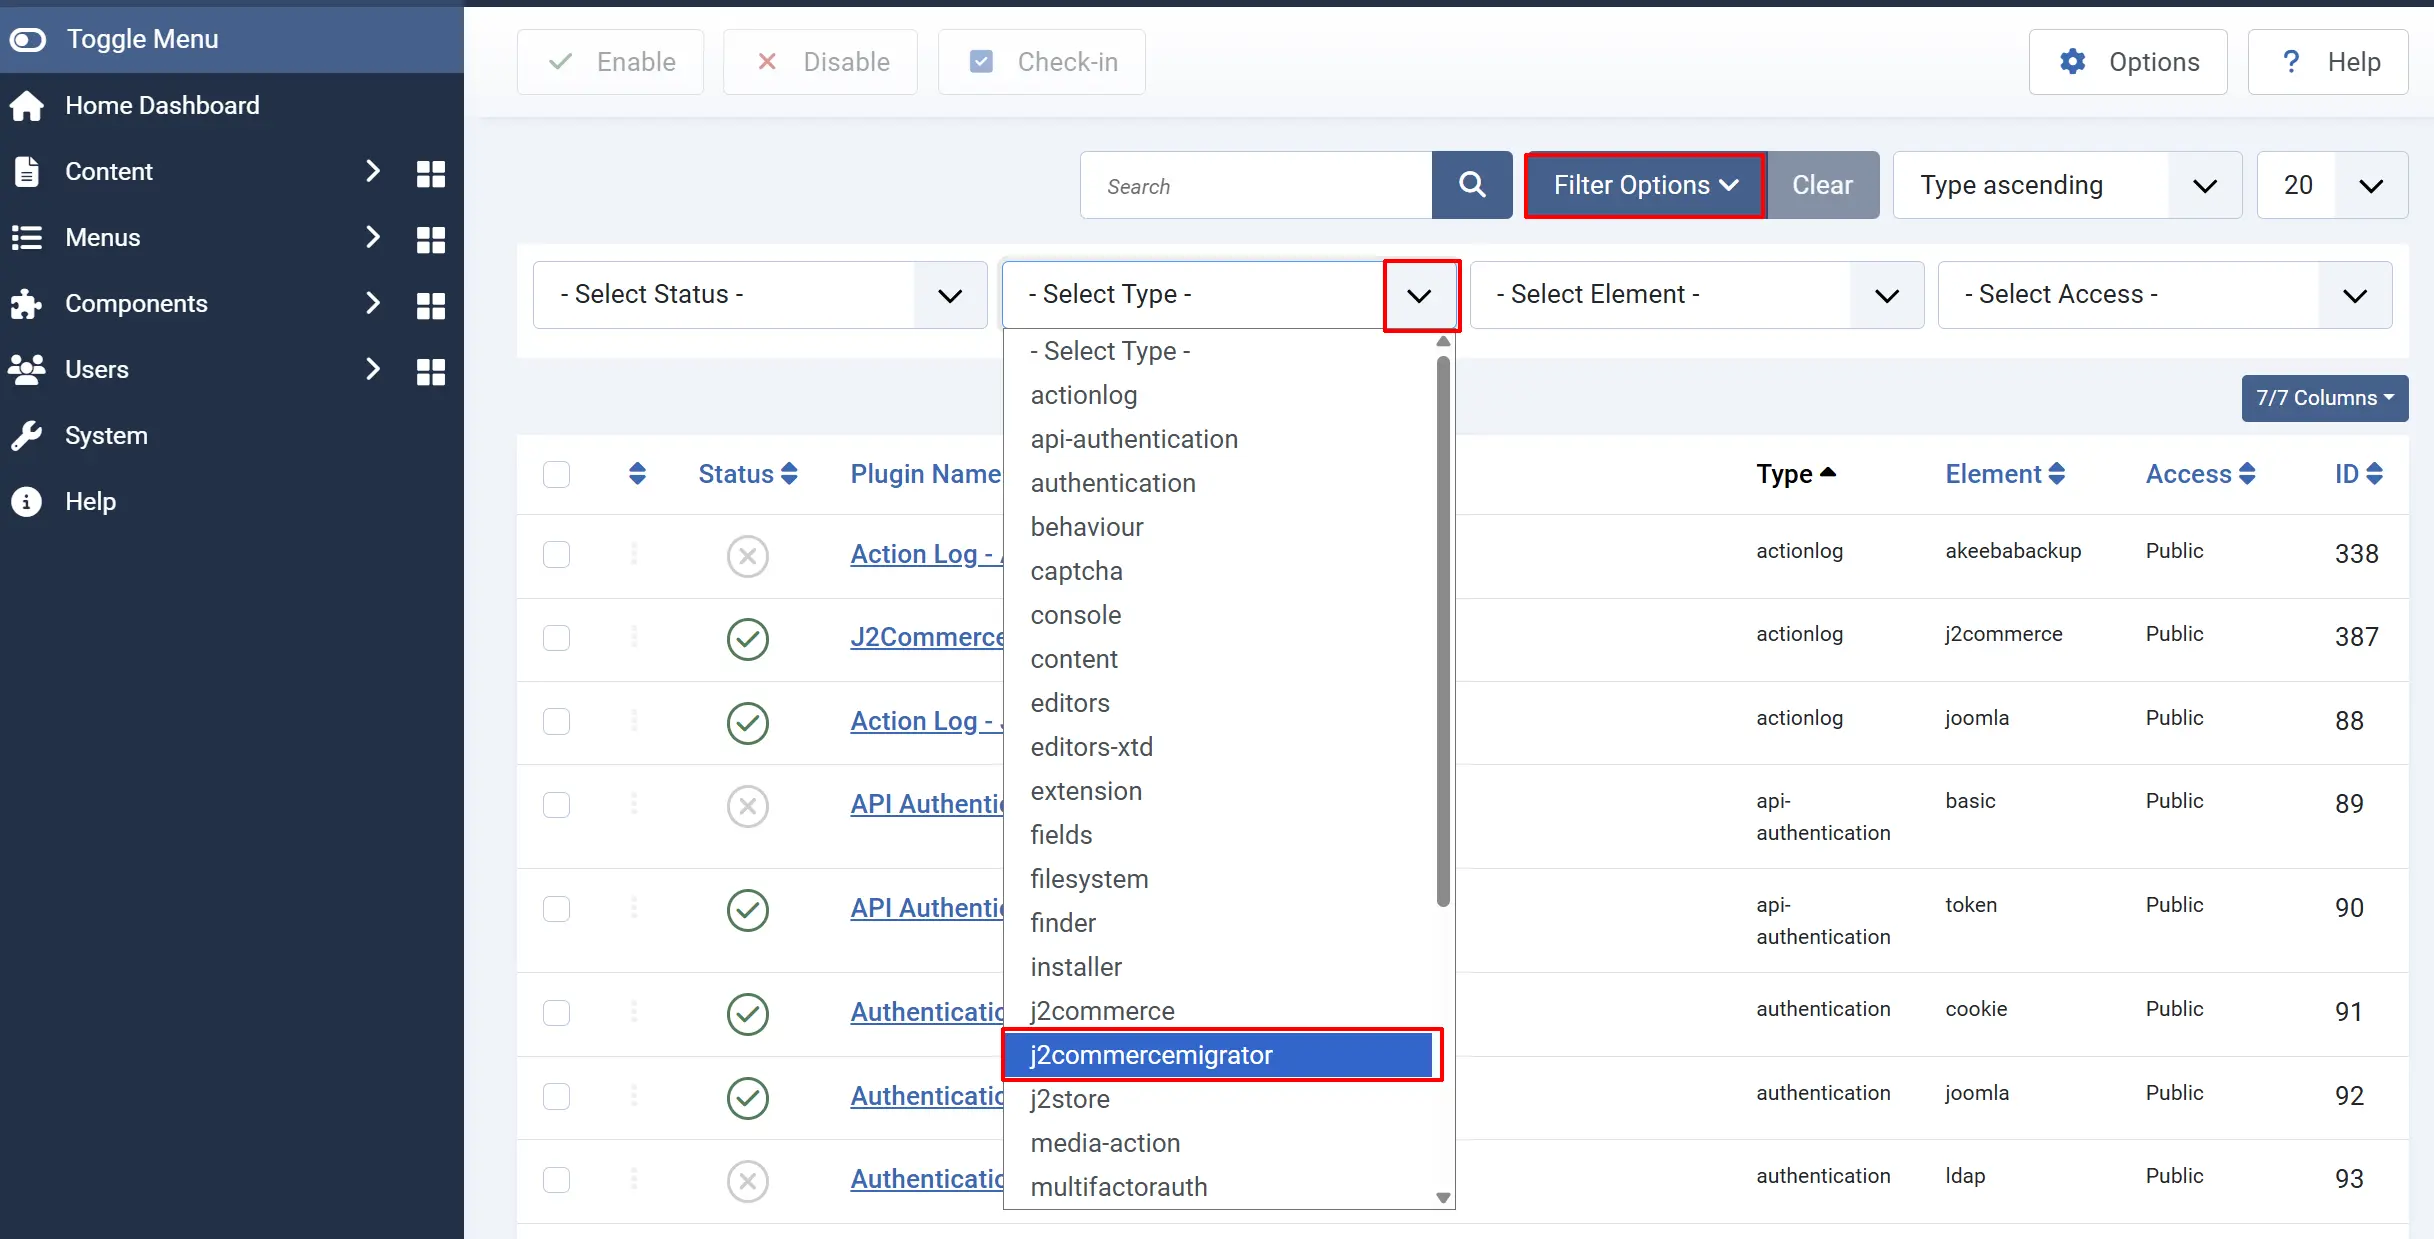
Step 3: Locate the plugin matching your source platform and click the status toggle to enable it.
If the adapter does not appear in the search results at all, the installation may not have completed successfully. Try reinstalling from System -> Install -> Extensions.
Verify the Adapter Is Working
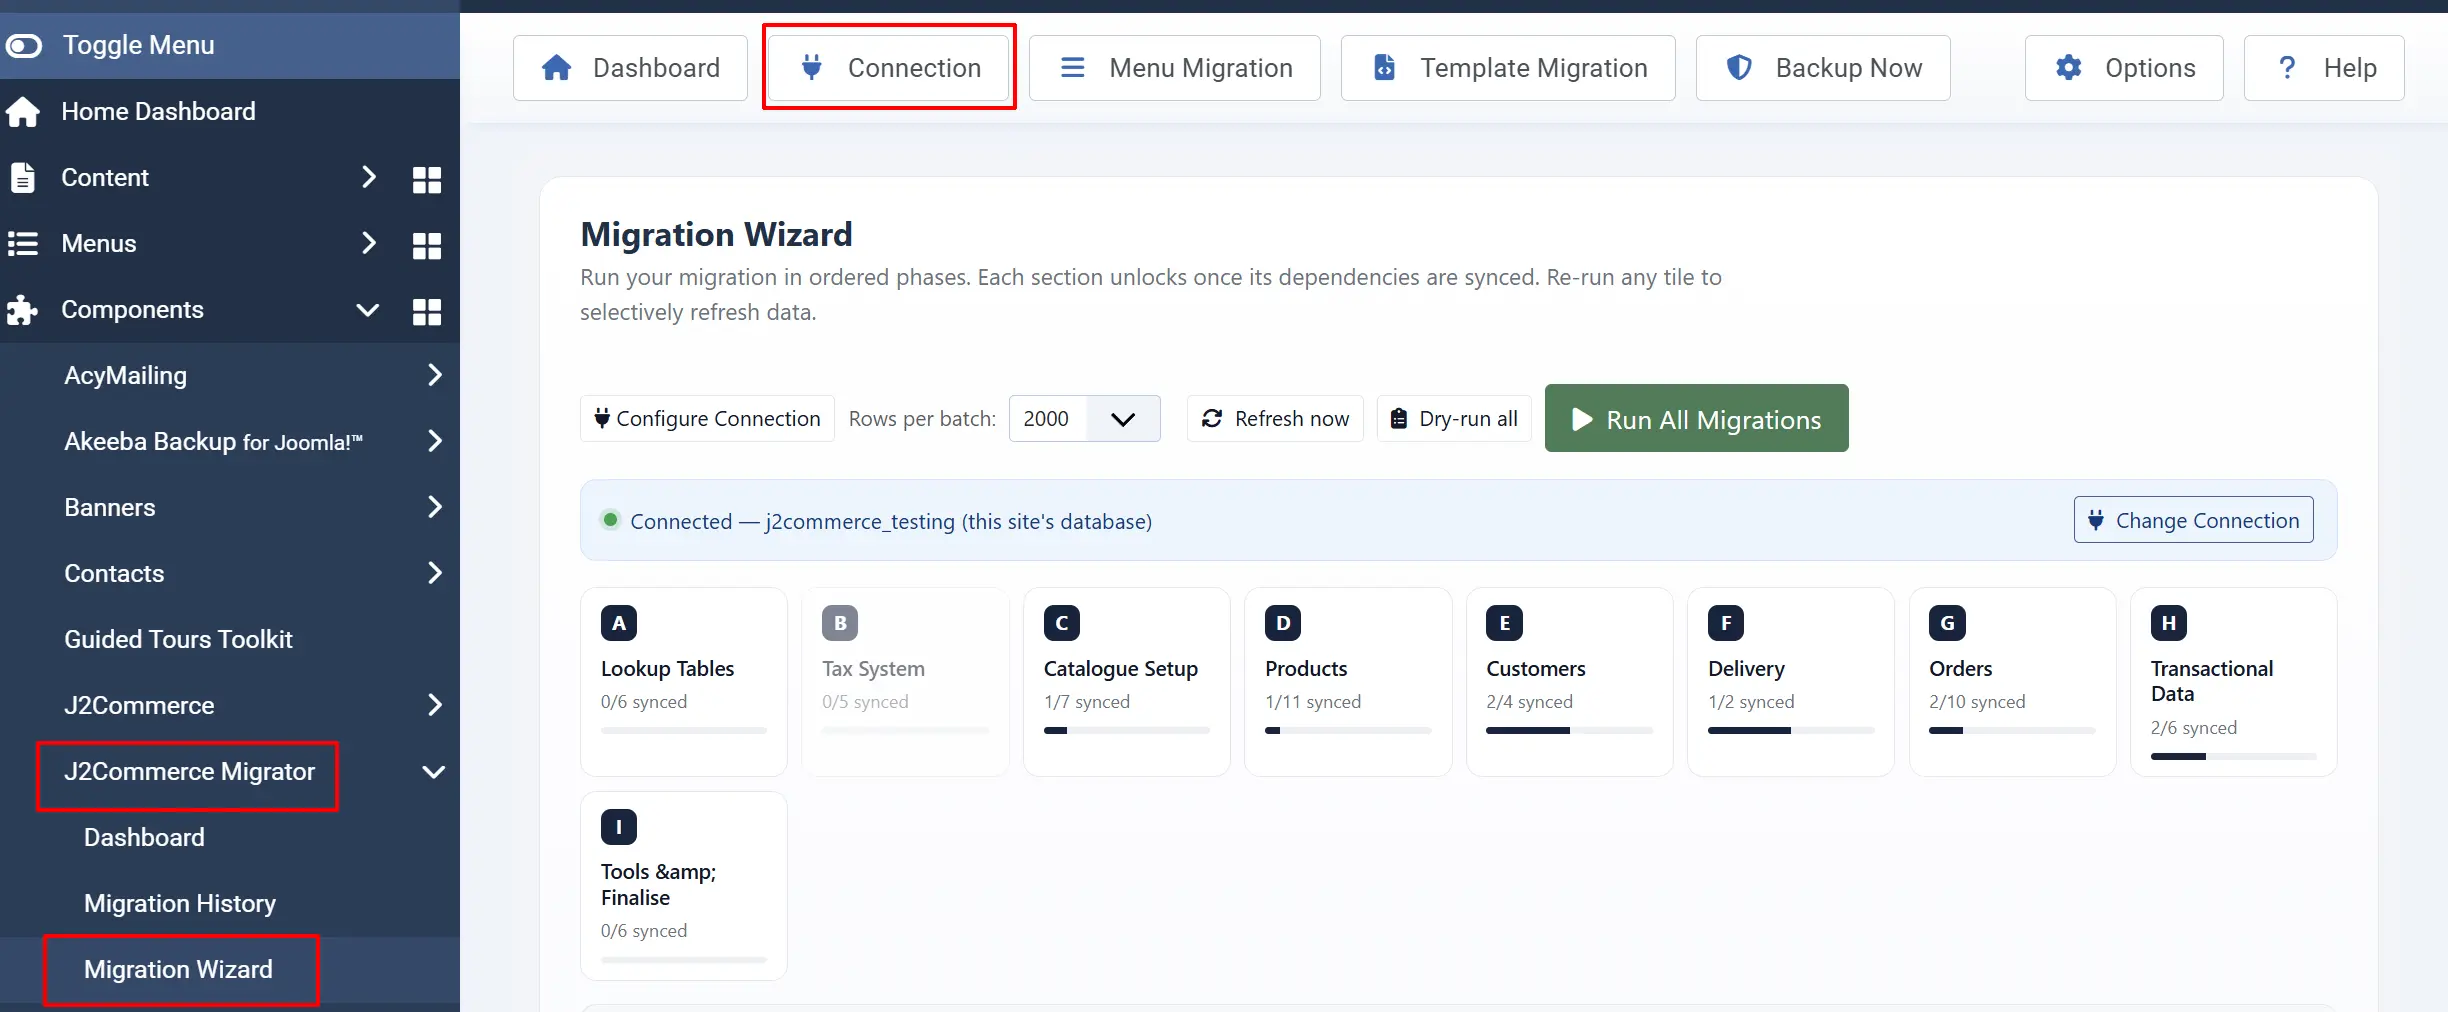
Step 1: Go to Components -> J2Commerce Migrator in the admin menu.
Step 2: The Migrator Dashboard loads. Look for a J2Store card. Its status line tells you whether the adapter can see your J2Store installation:
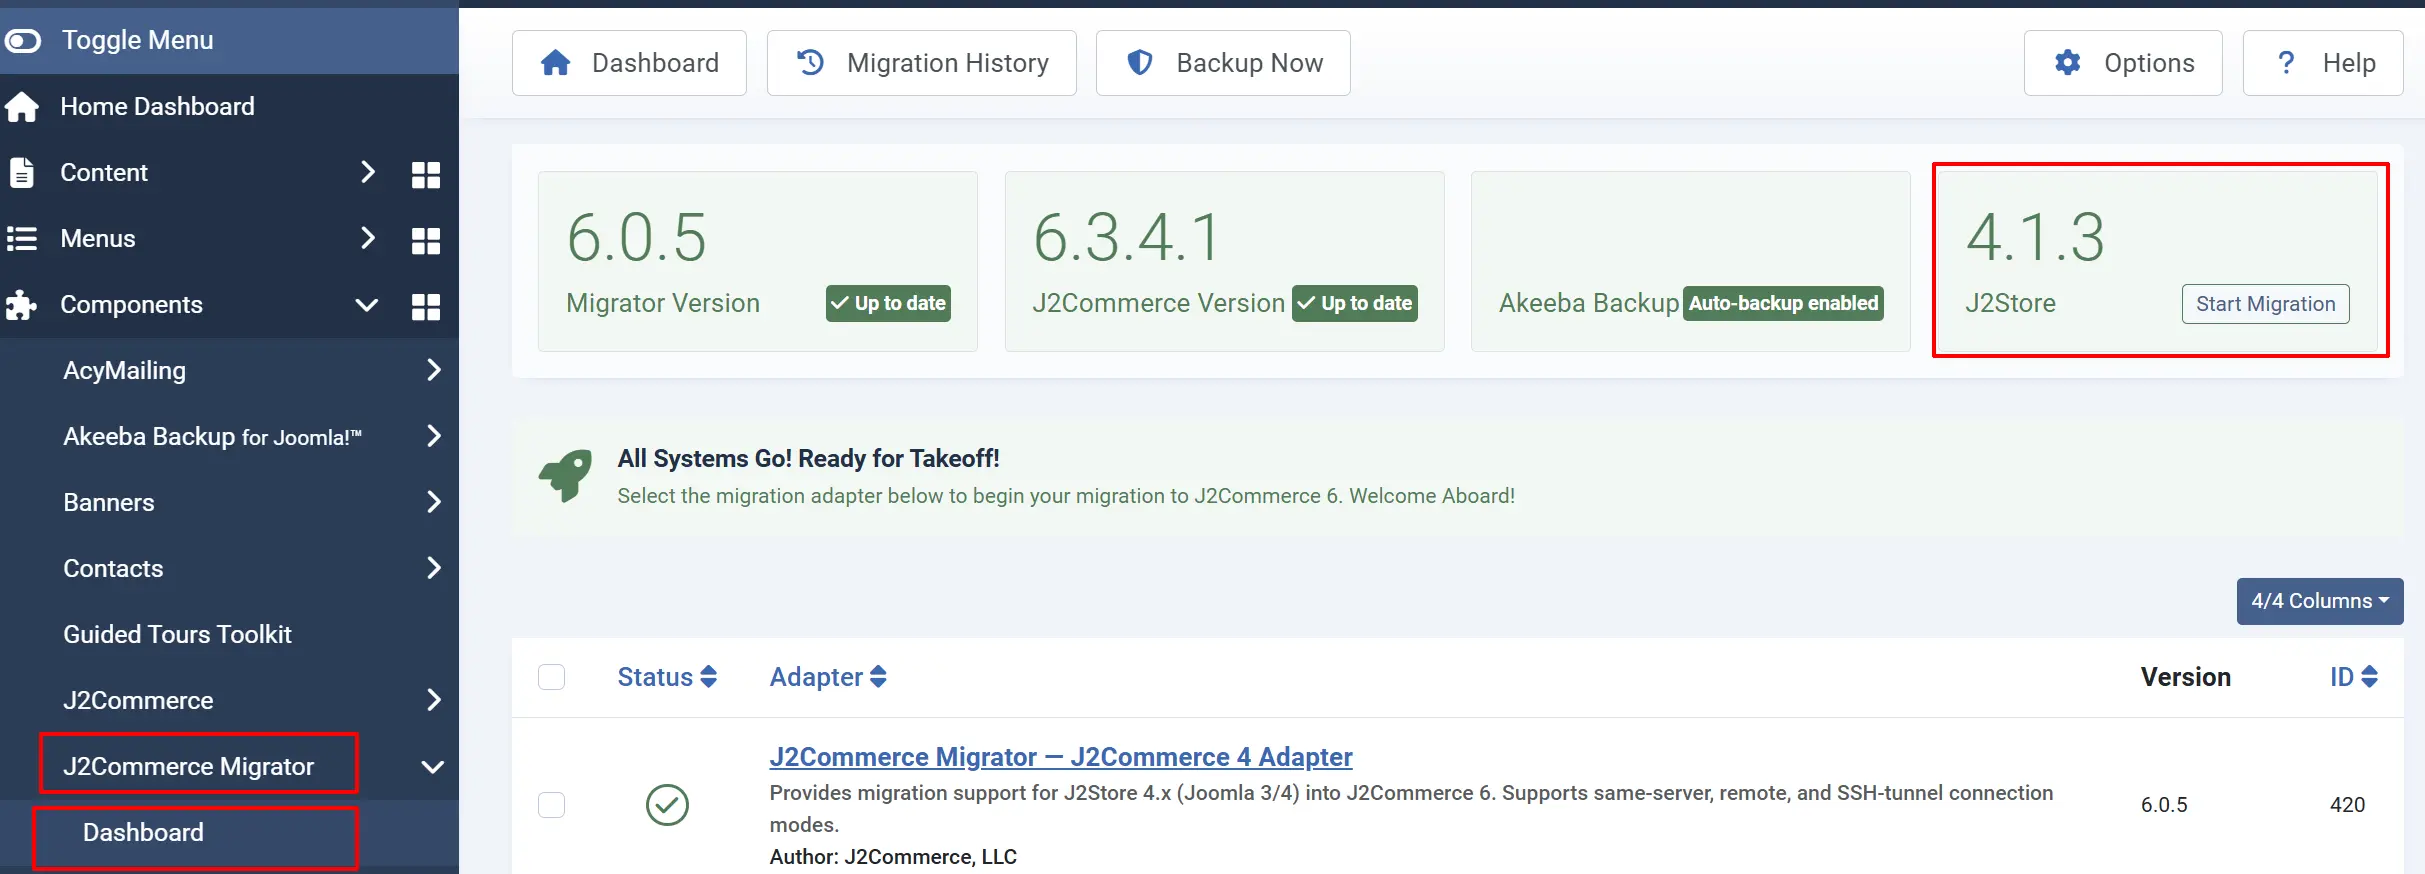
| Status shown | What it means |
|---|---|
| Ready to migrate | J2Store 4 is installed and enabled — you can proceed |
| Installed but disabled | J2Store is installed but disabled in your Extensions list |
| Not installed | J2Store 4 was not found on this Joomla site — check that it exists, or switch to a remote database connection |
Configure the Connection
There is nothing to configure in the adapter plugin itself. All connection settings are entered through the J2Commerce Migrator's Tools view.
Step 1: On the Migrator Dashboard, click Start Migration on the J2Store card. This takes you to the Tools view for this adapter.

Step 2: Go to Migration Wizard on the left side panel. At the top of the Tools view, look for the Connection panel. Choose the mode that matches your setup:
- Mode A — Same site: Your J2Store data is in the same database as your current Joomla site. No extra credentials needed — this is the fastest and simplest option.
- Mode B — Remote database: Your J2Store data lives on a different MySQL or MariaDB server. Enter the host, port, database name, username, and password.
- Mode C — SSH tunnel: Your source database is only reachable through an SSH connection. Enable SSH tunnel support in J2Commerce Migrator -> Options first; Mode C will then appear on the Connection screen.
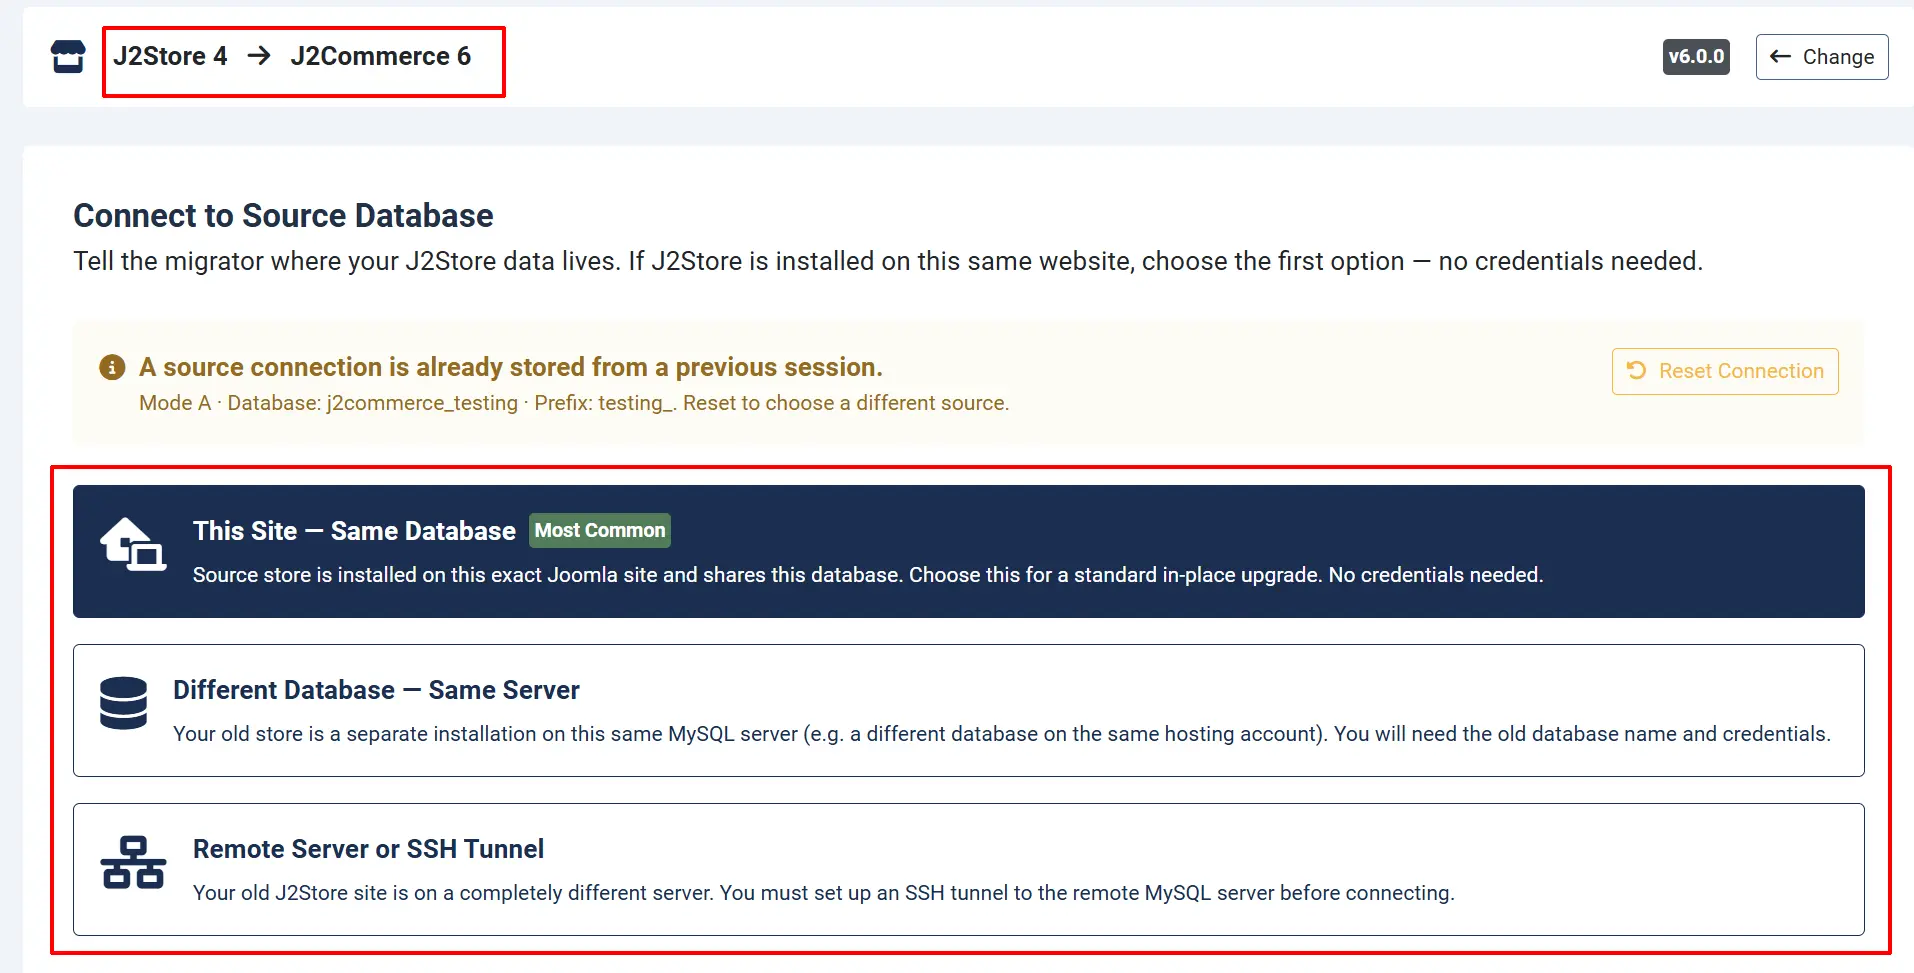
Step 3: Click Test Connection to confirm the adapter can reach your J2Store data. A green success message confirms you are ready to start syncing.
The Tools View — How to Read the Screen
Once you are connected, the main area shows a kanban-style board organized into sections (A through I). Each section contains one or more tiles, and each tile represents one type of data — for example, "Currencies" or "Products."
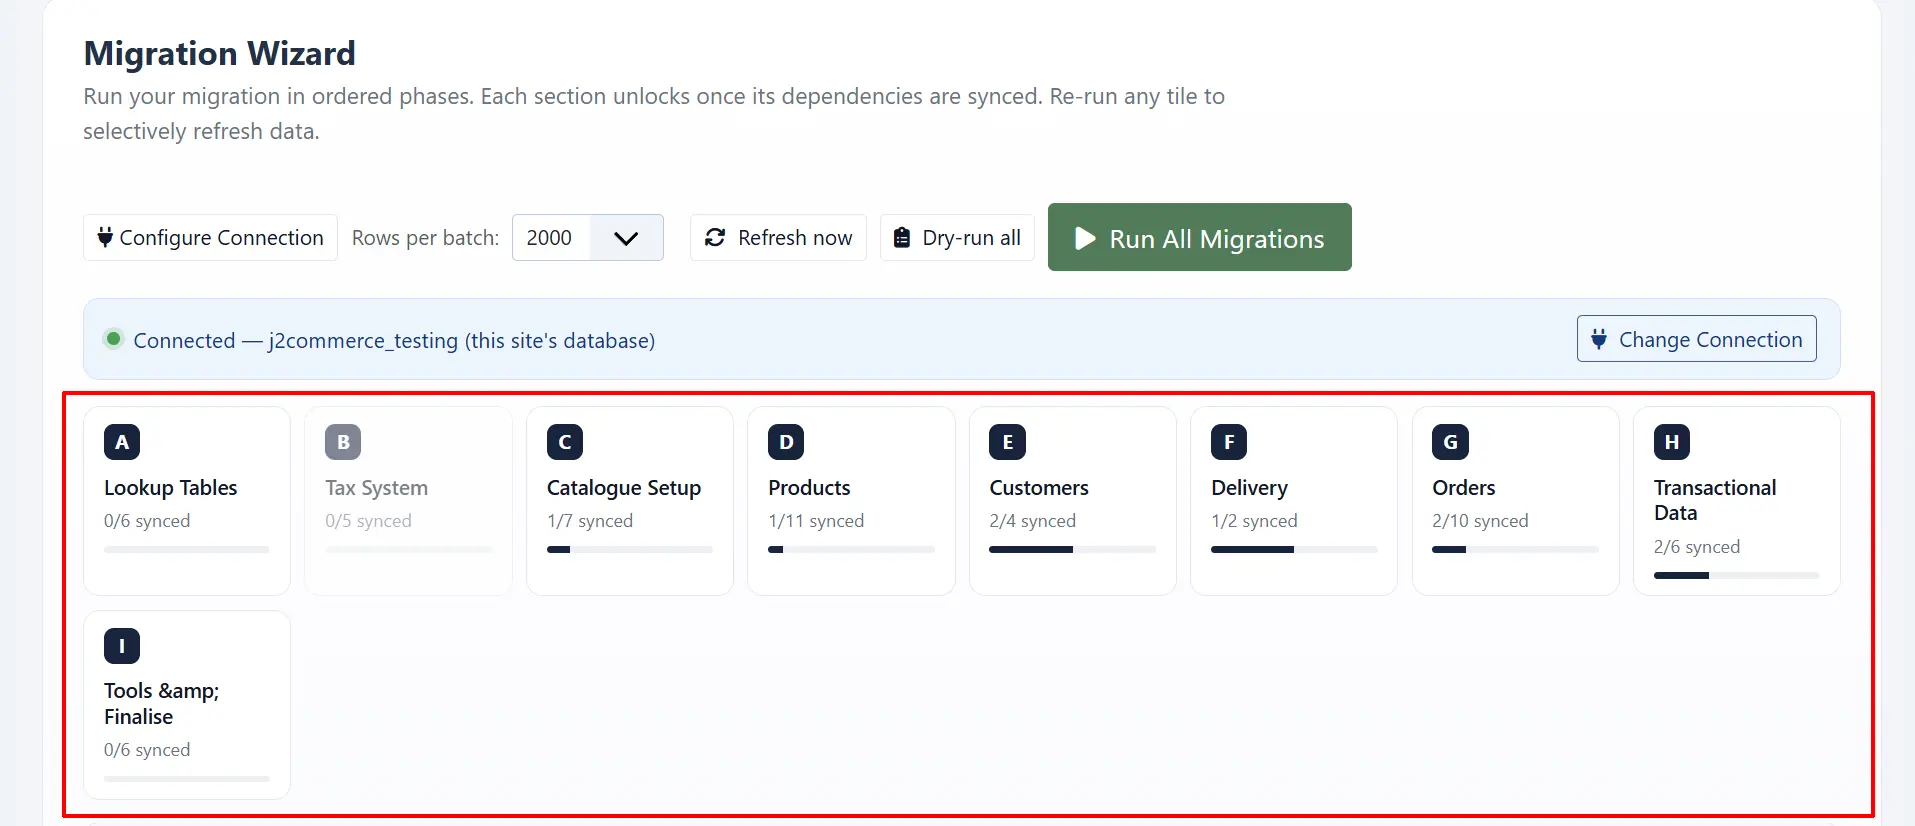
What a tile shows
Every tile displays four things at a glance:
- Name — what type of data this tile handles (for example, "Orders" or "Variants")
- Source table — the J2Store database table being read, shown in small text below the name
- Row count — how many rows were found in the source table
- Status badge — the current state of this tile (see below)
Tile status badges
| Badge | What it means |
|---|---|
| Pending | Not started yet. Click Sync to begin. |
| Syncing… | Migration is running right now. The tile shows a live progress percentage. |
| Synced | All rows from this tile have been copied to J2Commerce. |
| Re-sync | The tile ran before, but new rows have been added to the source since then. Click to pick up the new records. |
| Empty Source | The source table has zero rows — there is nothing to migrate here. The tile is automatically marked done and the button is disabled. |
| Error | Something went wrong. Check the message below the badge for details, then click Retry. |
| Retry | A previous attempt failed and the tile is waiting for you to try again. |
| Resume | A previous run stopped partway through. Click to continue from where it left off. |
While a tile is running, the Syncing… badge shows a live percentage, for example Syncing… (45%). You can watch the whole board update in real time without refreshing the page.
Progress summary bar

At the bottom of the board you will see a summary row showing tiles synced, total rows migrated, and error count. Use this to track overall progress without scrolling through every section.
Sections A through H — Data Migration
Work through sections A to H from left to right, top to bottom. Each section depends on the ones before it — you cannot migrate orders (Section G) before migrating order statuses (Section A) and products (Section D).
Section A — Lookup Tables

The first section you run. Every later tile depends on these records existing first.
| Tile | What it migrates |
|---|---|
| Currencies | Currency definitions — code, name, symbol, exchange rate, decimal places |
| Countries | Country records — names, two-letter codes, enabled/disabled flags |
| Zones | State and province records linked to their countries |
| Order Statuses | Order status labels — Pending, Confirmed, Shipped, and any custom statuses you created |
| Lengths | Length unit definitions (cm, in, mm, and so on) |
| Weights | Weight unit definitions (kg, lb, oz, and so on) |
Section B — Tax System

Tax records must exist before products can be assigned a tax profile.
| Tile | What it migrates |
|---|---|
| Tax Profiles | Tax profile definitions that products are assigned to |
| Tax Rates | The actual tax percentage rows attached to geographic zones |
| Tax Rules | Rules controlling how rates apply to specific products and customers |
| Geo Zones | Geographic tax and delivery zone definitions |
| Geo Zone Rules | Country and zone inclusion rules attached to each geo zone |
Section C — Catalogue Setup

Option groups, filter groups, manufacturers, and custom checkout fields. Products in Section D are built on top of these.
| Tile | What it migrates |
|---|---|
| Options | Option group definitions (Color, Size, and so on) |
| Option Values | The individual values within each option group (Red, Blue, Small, Large, and so on) |
| Manufacturers | Manufacturer and brand records |
| Custom Fields | Checkout custom field definitions |
| Filter Groups | Product filter group definitions |
| Filters | Individual product filter values within each filter group |
| Product–Filter Links | The assignments connecting products to their filters |
Section D — Products

The largest section. Migrate tiles from top to bottom — products first, then everything that hangs off them.
| Tile | What it migrates |
|---|---|
| Products | Core product records, including the extension link from com_j2store to com_content so your Joomla articles display correctly |
| Variants | Variant records — SKU, stock, weight, and dimensions per variant |
| Product Images | Image metadata (file paths, alt text, ordering). After the row sync finishes, images are automatically converted to WebP and resized |
| Product Files | Downloadable file records for digital products |
| Product Prices | Per-user-group tiered price rules |
| Product Options | Assignments linking products to their option groups |
| Product Option Values | The selected option values per product |
| Variant Option Values | The mapping rows connecting variants to specific option values |
| Product Quantities | Per-variant inventory quantity records |
| Price Index | The denormalized price index used for sorting and filtering in the catalog |
| Meta Fields | Plugin metadata stored in the J2Store key-value table |
The Product Images tile shows a link to Open Image Processing settings below its description. Click this link to configure the target directory and image quality settings before running this tile.
Section E — Customers

Customer records depend on countries and zones (Section A) already being migrated.
| Tile | What it migrates |
|---|---|
| Addresses | Saved billing and delivery addresses linked to Joomla user accounts |
| Coupons | Coupon codes, discount rules, and usage counts |
| Vouchers | Gift voucher records and balances |
| Vendors | Multi-vendor seller accounts |
Section F — Delivery

Delivery method configuration. Geo zones (Section B) must exist first.
| Tile | What it migrates |
|---|---|
| Delivery Methods | Delivery method plugin configurations |
| Delivery Rates | Flat-rate and table-rate delivery rule rows |
Section G — Orders

Orders depend on products, customers, currencies, and order statuses all being migrated first. Run Sections A through F before starting here.
| Tile | What it migrates |
|---|---|
| Orders | Order header records |
| Order Info | Billing and delivery address snapshots captured at order time |
| Order Items | Line items — product, quantity, unit price |
| Order Item Attributes | Option and attribute selections per line item |
| Order Histories | Status change history and customer notification logs |
| Order Fees | Handling fees and surcharge rows per order |
| Order Taxes | Tax breakdown rows per order |
| Order Discounts | Coupon and discount application records per order |
| Order Deliveries | Delivery method and rate records per order |
| Order Downloads | Downloadable product purchase and download-tracking records |
Section H — Transactional Data
Optional data. Baskets, email queues, and templates. These tiles are marked optional — you can skip them if they are not relevant to your store.

| Tile | What it migrates |
|---|---|
| Baskets | Abandoned and active shopping basket sessions |
| Basket Items | Individual line items within basket sessions |
| Email Queues | Queued outbound email records |
| Uploads | Customer-uploaded file records attached to orders |
| Email Templates | Customized transactional email templates |
| Invoice Templates | Customized PDF invoice templates |
Section I — Tools and Finalize

Section I contains finishing tools that you run after your data migration is complete. Unlike Sections A through H, these tiles do not copy database rows — they help you clean up, convert your templates, and remove J2Store once you have confirmed everything looks good in J2Commerce.
Run the tools in Section I only after you have verified your migrated data in J2Commerce. The last three tiles — Reset Migration ID Map, Uninstall J2Store, and Drop J2Store Database Tables — are destructive or difficult to reverse. Back up your database before using them.
Migrate Store Settings
Reads your J2Store configuration rows and converts them into J2Commerce component settings. Run this once after your data migration is complete.
Detect / Migrate J2Store CSS Overrides
Scans your installed Joomla templates for j2store.css override files. If found, you can copy them into the J2Commerce media folder so your storefront styling is preserved.
Step 1: Click Detect to scan for override files.
Step 2: If overrides are found, click Migrate to copy the selected file to J2Commerce.
Detect J2Store Menu Items
Lists all Joomla menu items that currently point to J2Store views (for example, your "Shop" menu item linking to the J2Store product list). From the results table you can choose to remap each menu item in-place to the equivalent J2Commerce view, or duplicate it as a new item while leaving the original in place.
Step 1: Click List to retrieve all J2Store menu items.
Step 2: For each item, choose the target J2Commerce view from the dropdown.
Step 3: Click Apply Menu Migrations to save your choices.
Custom J2Store Tables
If you have third-party plugins that created their own j2store_* database tables, this tool finds and copies them across to j2commerce_* tables so those plugins can keep working after J2Store is removed.
This tool only works when connected via Mode A (same-site database). It cannot scan a remote or SSH-tunnel database.
Step 1: Click Detect to scan for non-core J2Store tables.
Step 2: For each table found, choose Import Table (create a new copy) or Update Table (re-sync rows into an existing copy) or Do Not Import.
Step 3: Click Run Selected to execute your choices.
Template Overrides
If your Joomla template has a html/com_j2store/ override folder, this tool finds those files and rewrites them for J2Commerce — updating class names, helper calls, and path references so the overrides work with J2Commerce 6 layouts.
Step 1: Click Detect to find templates with J2Store overrides.
Step 2: Click Analyse on a template to preview what changes will be made before committing.
Step 3: Type MIGRATE TEMPLATES into the confirmation box and click Migrate to apply the changes.
You can also use Discover File Overrides to see a flat list of every override file, and Migrate Selected Overrides to process only specific files rather than the entire template.
If the automated rewriter cannot handle a pattern in your file, use Apply Manual Replacement to do a targeted find-and-replace on that file. Use Re-Migrate From Plugin to re-apply the transformer using the latest plugin source as input.
Transform Template Code
A code transformer you can point at a single file or paste a code snippet into. It applies an eleven-category rewrite — converting FOF2 and Joomla 3 PHP patterns to their Joomla 6 equivalents. Useful for any custom override files the Template Overrides tool did not cover.
Plugin List
Generates a list of the J2Store payment plugins that were detected on your site. Each entry describes which J2Commerce payment plugin to install and configure as the replacement. This tile makes no database changes — it produces guidance only.
Reset Migration ID Map
Deletes all internal tracking rows that the Migrator uses to remember which source rows have already been copied. Use this only if you want to start the entire migration over from scratch.
Type RESET J2COMMERCE4 to confirm before this tool runs. This action cannot be undone.
Uninstall J2Store
Removes the J2Store component and all of its associated plugins from this Joomla installation. Run this only after you have fully verified your migrated data in J2Commerce.
Type UNINSTALL J2STORE to confirm. Verify all orders, products, and customers are correct in J2Commerce before using this tile.
Drop J2Store Database Tables
Permanently deletes all j2store_* tables from the database. This tile is only shown after J2Store has been uninstalled — dropping tables while J2Store is still installed would break Joomla's built-in uninstaller.
Type DELETE J2STORE TABLES to confirm. This action cannot be undone. Take a full database backup before proceeding.
How the Sync Button Works
Every tile in Sections A through H has a Sync button. Here is what happens when you click it:
- The Migrator reads rows from the J2Store source table in batches.
- Each row is translated — table names change from
j2store_*toj2commerce_*, primary key column names are updated to match (for example,j2store_order_idbecomesj2commerce_order_id), and any JSON data stored in columns is updated internally so plugin keys and references use J2Commerce naming. - Translated rows are inserted into the corresponding J2Commerce table. Rows that already exist are skipped — they are never inserted twice.
- The tile updates live as work progresses. When complete, the badge changes to Synced and shows the final row count.
If a tile shows Re-sync, new rows have appeared in the source since the last run. Clicking Re-sync picks up only the new rows and does not re-process records that were already copied.
The Export Log Button
At the bottom of the Tools view there is an Export Log button. Clicking it downloads a plain-text .log file that captures the current state of every tile — names, status badges, row counts, and any notes or error messages visible on the screen. Share this file with J2Commerce support if you need help troubleshooting a problem.

Tips
-
Back up before every run. Take a full Joomla database and files backup before starting. Your J2Store tables are never modified by the Migrator, but a backup gives you a safe rollback point.
-
Use same-site mode when possible. If your J2Store data is in the same database as your current Joomla site, choose Mode A on the Connection screen. It is faster and requires no extra credentials.
-
Run on a staging copy first. Set up a staging clone of your site, run the full migration there, and verify everything looks correct in J2Commerce before touching your live site.
-
Follow the section order. Always run Section A first, then B, C, D, E, F, G, H, and lastly I. The dependency arrows in the tools view show you when a tile is waiting for another to finish.
-
Empty Source tiles are fine. If a tile shows Empty Source, the source table had no rows — there is nothing to migrate and you can move on. For example, if you never used vouchers in J2Store, the Vouchers tile will automatically show Empty Source.
-
Leave J2Store installed until you have verified everything. Do not uninstall J2Store until you have confirmed that all your products, orders, and customers appear correctly in J2Commerce.
-
Clear caches after migration. Once the run is complete and you have verified the data, go to Home Dashboard -> System -> Clear Cache to remove any stale cached data.
Troubleshooting
The J2Store card on the Migrator Dashboard shows "Not installed"
Cause: The Migrator cannot find a J2Store 4 component installed on this Joomla site.
Solution:
- Go to System -> Manage -> Extensions and search for
j2store. Confirm J2Store is listed. - If J2Store is listed but disabled, click its status to enable it — the card should update to "Installed but disabled" and then "Ready to migrate."
- If you are migrating from a J2Store installation on a different server, you do not need J2Store installed locally. Use Mode B or Mode C on the Connection screen to point the Migrator at the remote database instead.
A tile shows Error and will not retry cleanly
Cause: A row in the source data could not be translated — common causes include corrupt JSON in a product params column, a zero date value, or a missing foreign-key record.
Solution:
- Click the Export Log button to download the current state log.
- Check the server log at
administrator/logs/com_j2commercemigrator.logfor the specific error message. - Fix the source data if possible (for example, correct a malformed product params field in J2Store).
- Click Retry on the tile to continue.
- If the error persists on a single row, contact J2Commerce support with the log file.
The Custom Tables tool says "This tool only runs in Mode A"
Cause: You are connected to a remote or SSH-tunnel database. The Custom Tables scanner can only see tables in the local Joomla database.
Solution: If you need to copy custom J2Store tables from a remote source, export them manually using a database tool (such as phpMyAdmin) and import them into your Joomla database before running the Custom Tables tool in Mode A.
A tile is stuck on "Syncing…" and does not complete
Cause: A very large table may take several minutes to process. If the browser window is closed mid-run, the tile may get stuck in a partial state.
Solution:
- Refresh the Tools view page. The tile should show Resume if the run was interrupted.
- Click Resume to continue from where the sync stopped.
- If the tile shows Error instead, click Retry to restart that batch.