J2Commerce Migrator
The J2Commerce Migrator is your command center for moving an existing online store into J2Commerce 6. Whether your shop was built on J2Store 4, J2Commerce 4, eShop, or HikaShop, this component reads your old store data — products, categories, customers, orders, coupons, taxes, addresses, and more — and writes it cleanly into J2Commerce, one phase at a time. Every data type migrates as an independent tile, so you can retry, re-sync, or skip any individual piece without affecting the rest. Progress is tracked live, and your original source data is never touched.
Requirements
- PHP 8.3 or later
- Joomla! 6.x
- J2Commerce 6.x installed and active
- The source-platform migrator plugin that matches your old store (see Enable the Source Adapter Plugin below)
Purchase and Download
The J2Commerce Migrator is a separate add-on available from the J2Commerce Extensions Store. It is not included with the core J2Commerce 6 component.
Step 1: Go to our J2Commerce website -> Apps
Step 2: Locate the J2Commerce Migrator -> click View Details -> Add to cart -> Checkout.
Step 3: Go to your My Downloads under your profile button at the top right corner and search for the app. Click Available Versions -> View Files -> Download Now
Install the Migrator
In the Joomla Administrator, go to System -> Install -> Extensions.
Upload the pkg_j2commercemigrator_*.zip file or use the Install from URL option.

Joomla installs the J2Commerce Migrator component along with the four adapter plugins: J2Store 4, J2Commerce 4, eShop, and HikaShop.
The Migrator Package installs all four adapter plugins, but each one is disabled by default. You will enable only the plugin that matches your source store in the next step.
Enable the Source Adapter Plugin
After installing, you must activate the plugin that corresponds to your old store platform. Only one adapter should be active at a time.
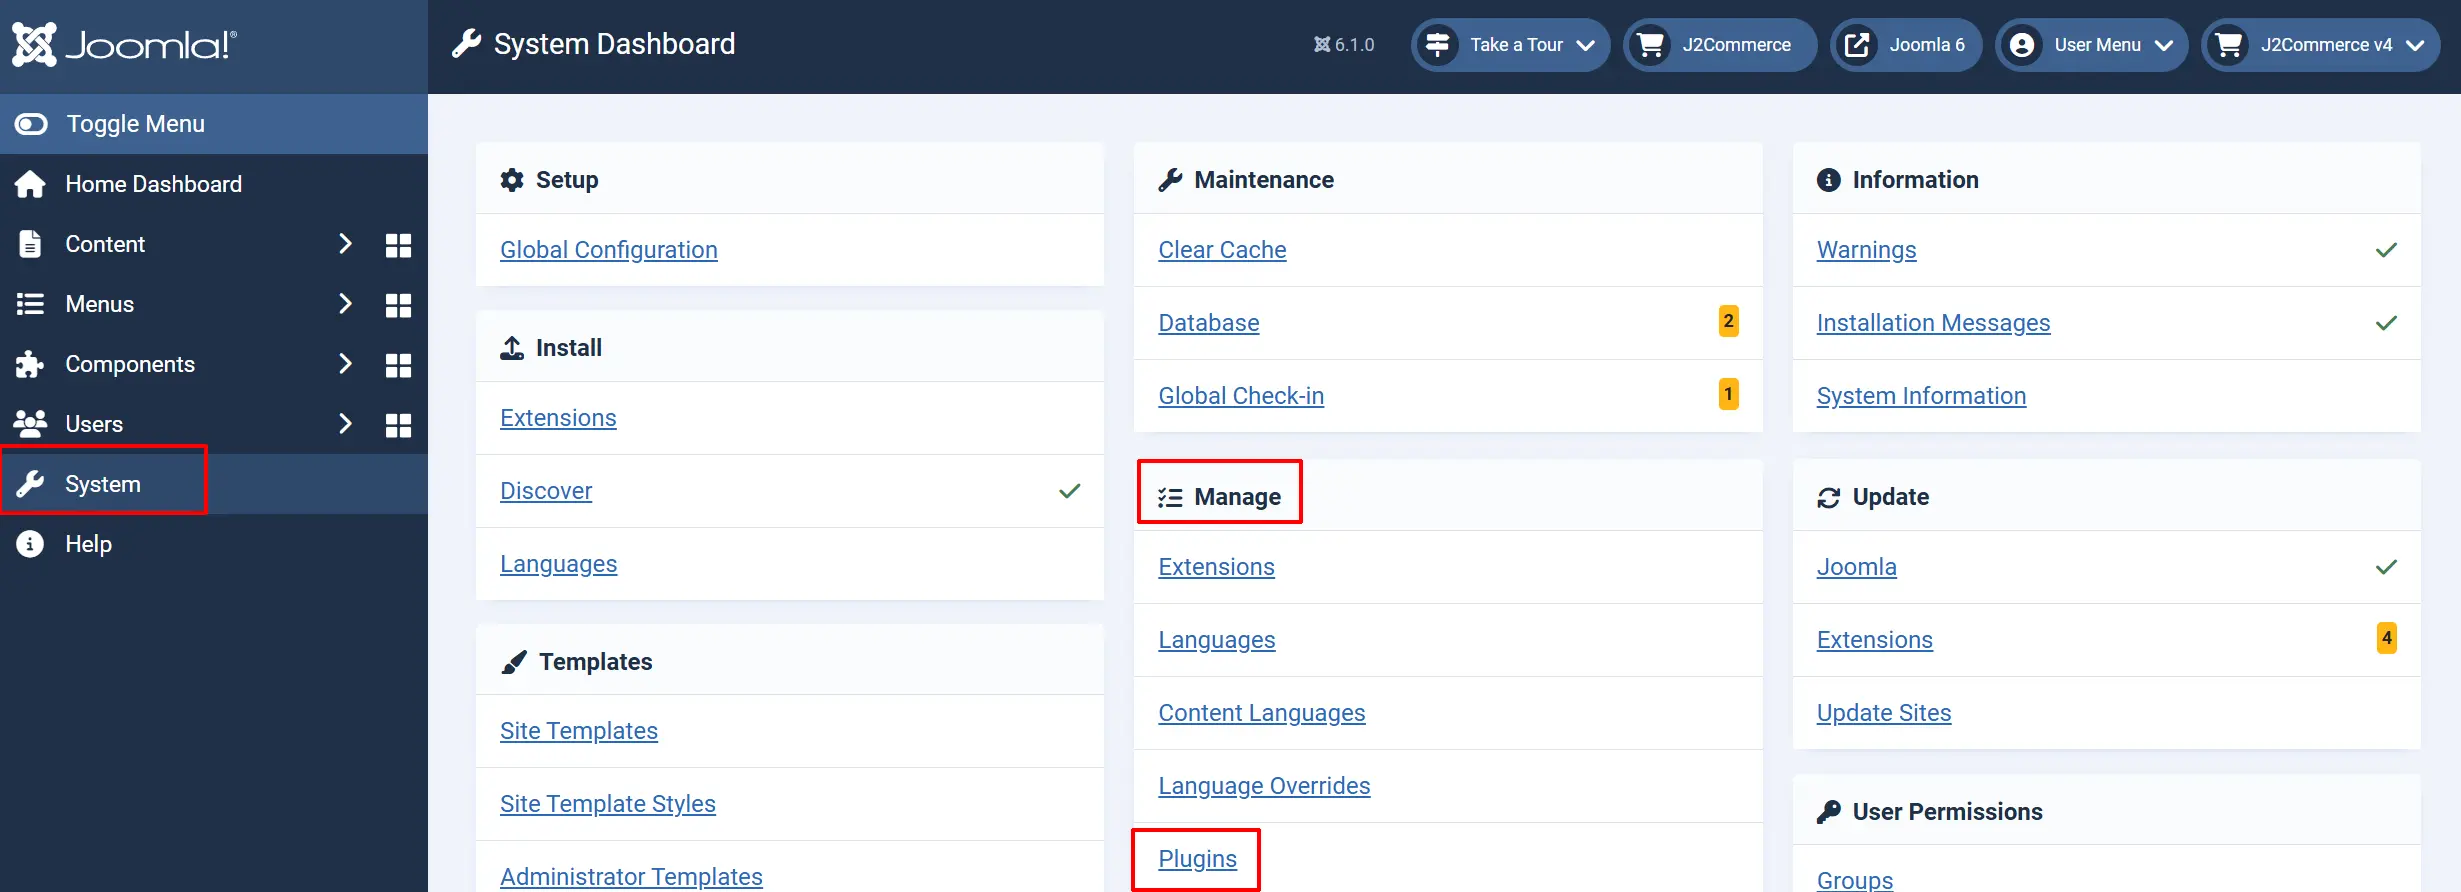
Step 1: Go to System -> Manage -> Plugins.
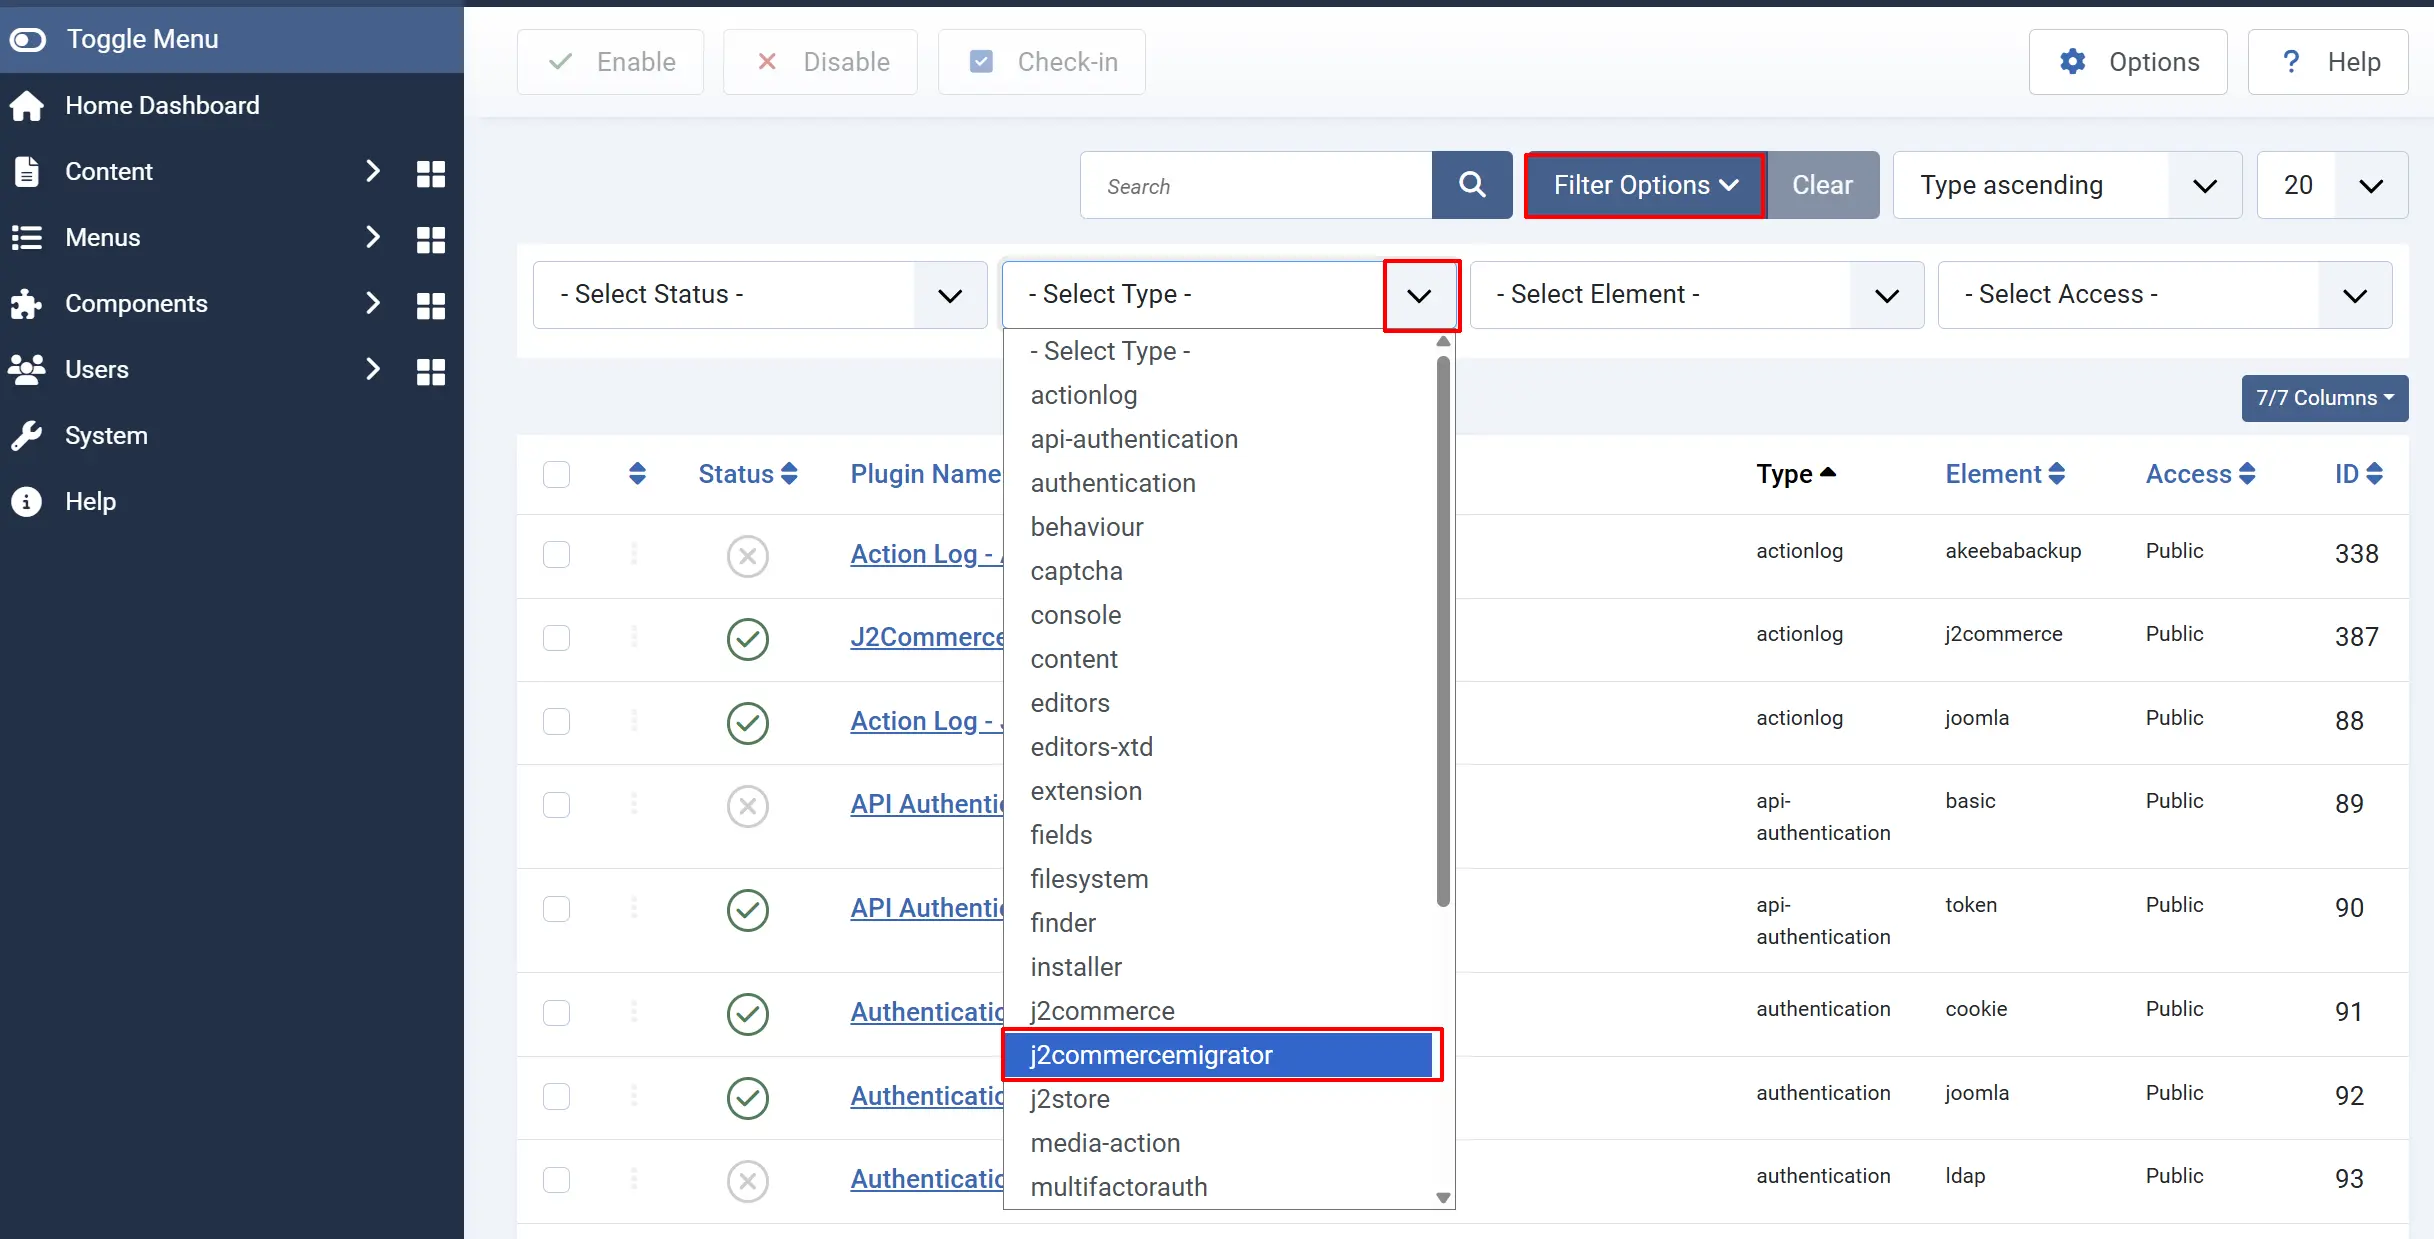
Step 2: In the Filter Options -> Select Type dropdown -> choose j2commercemigrator.
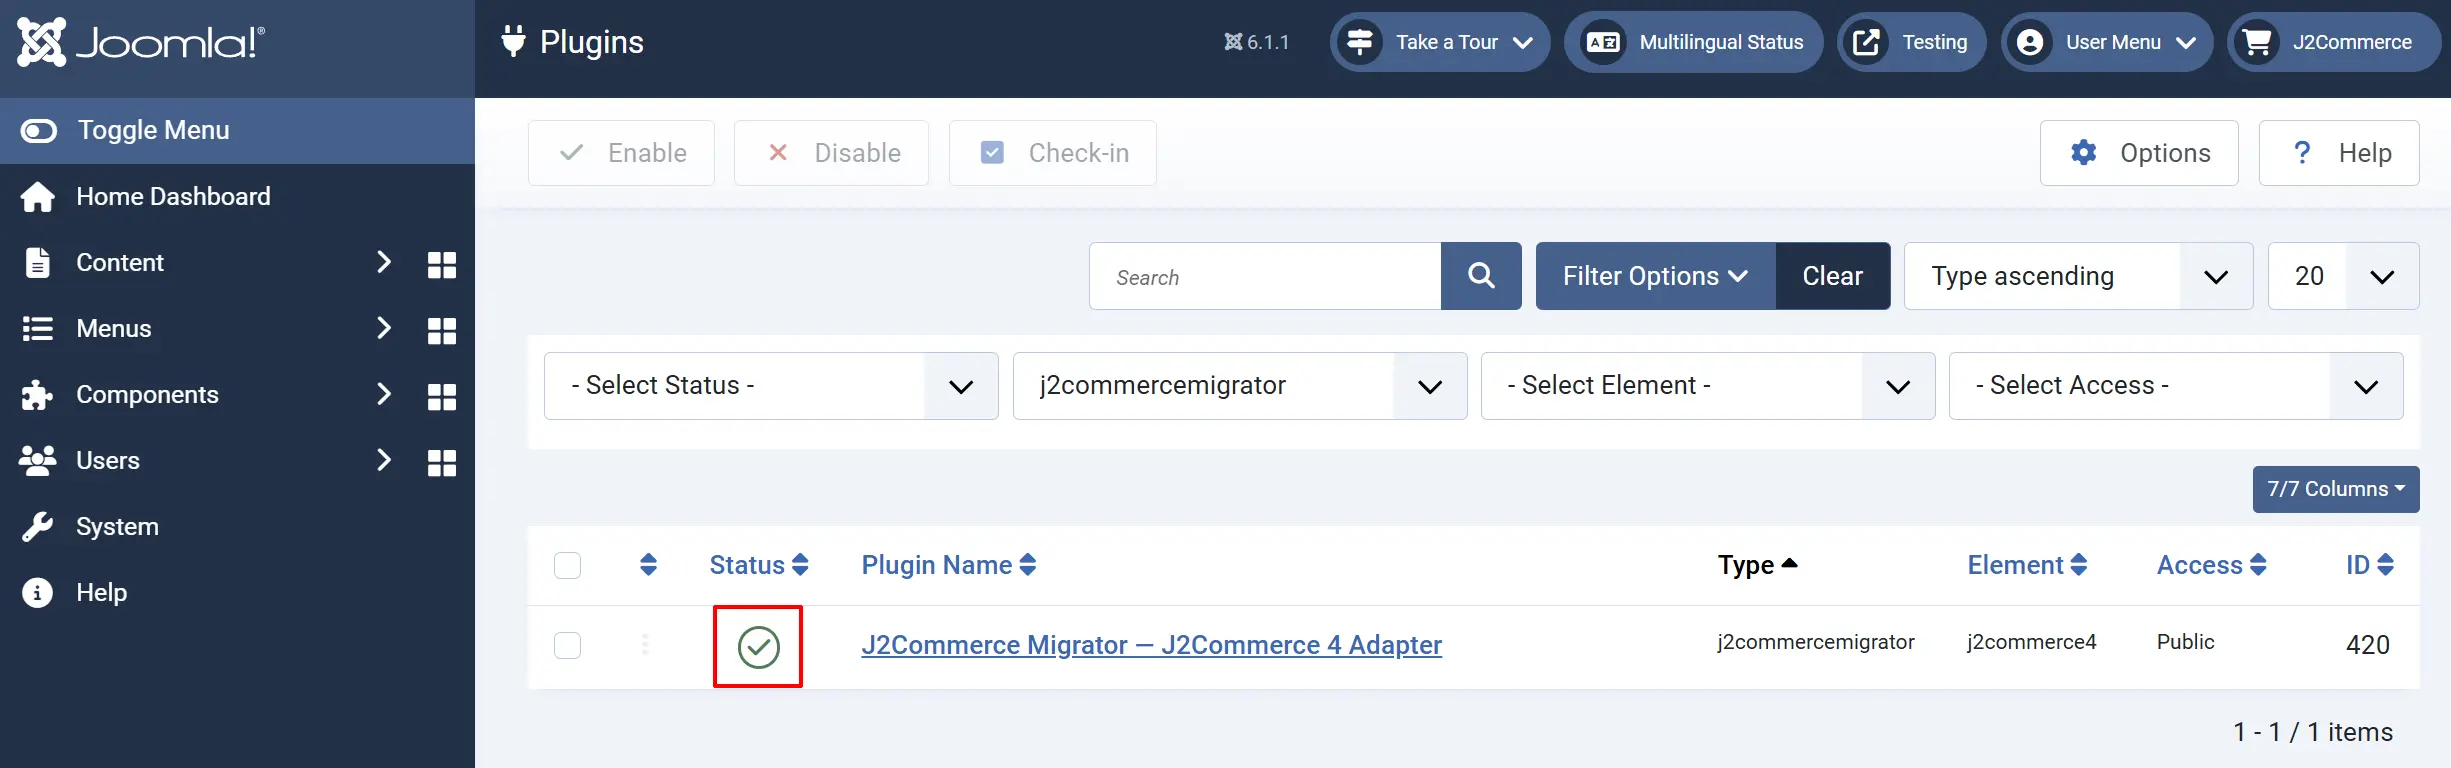
Step 3: Locate the plugin matching your source platform and click the status toggle to enable it.
Additional adaptor plugins can be found at https://www.j2commerce.com/extensions/integrations
If you enable more than one adapter at the same time, the Dashboard will display only the most recently enabled source. Enable only the adapter that matches your old store.
Access the Migrator
Once the adapter plugin is enabled, open the Migrator from either location:
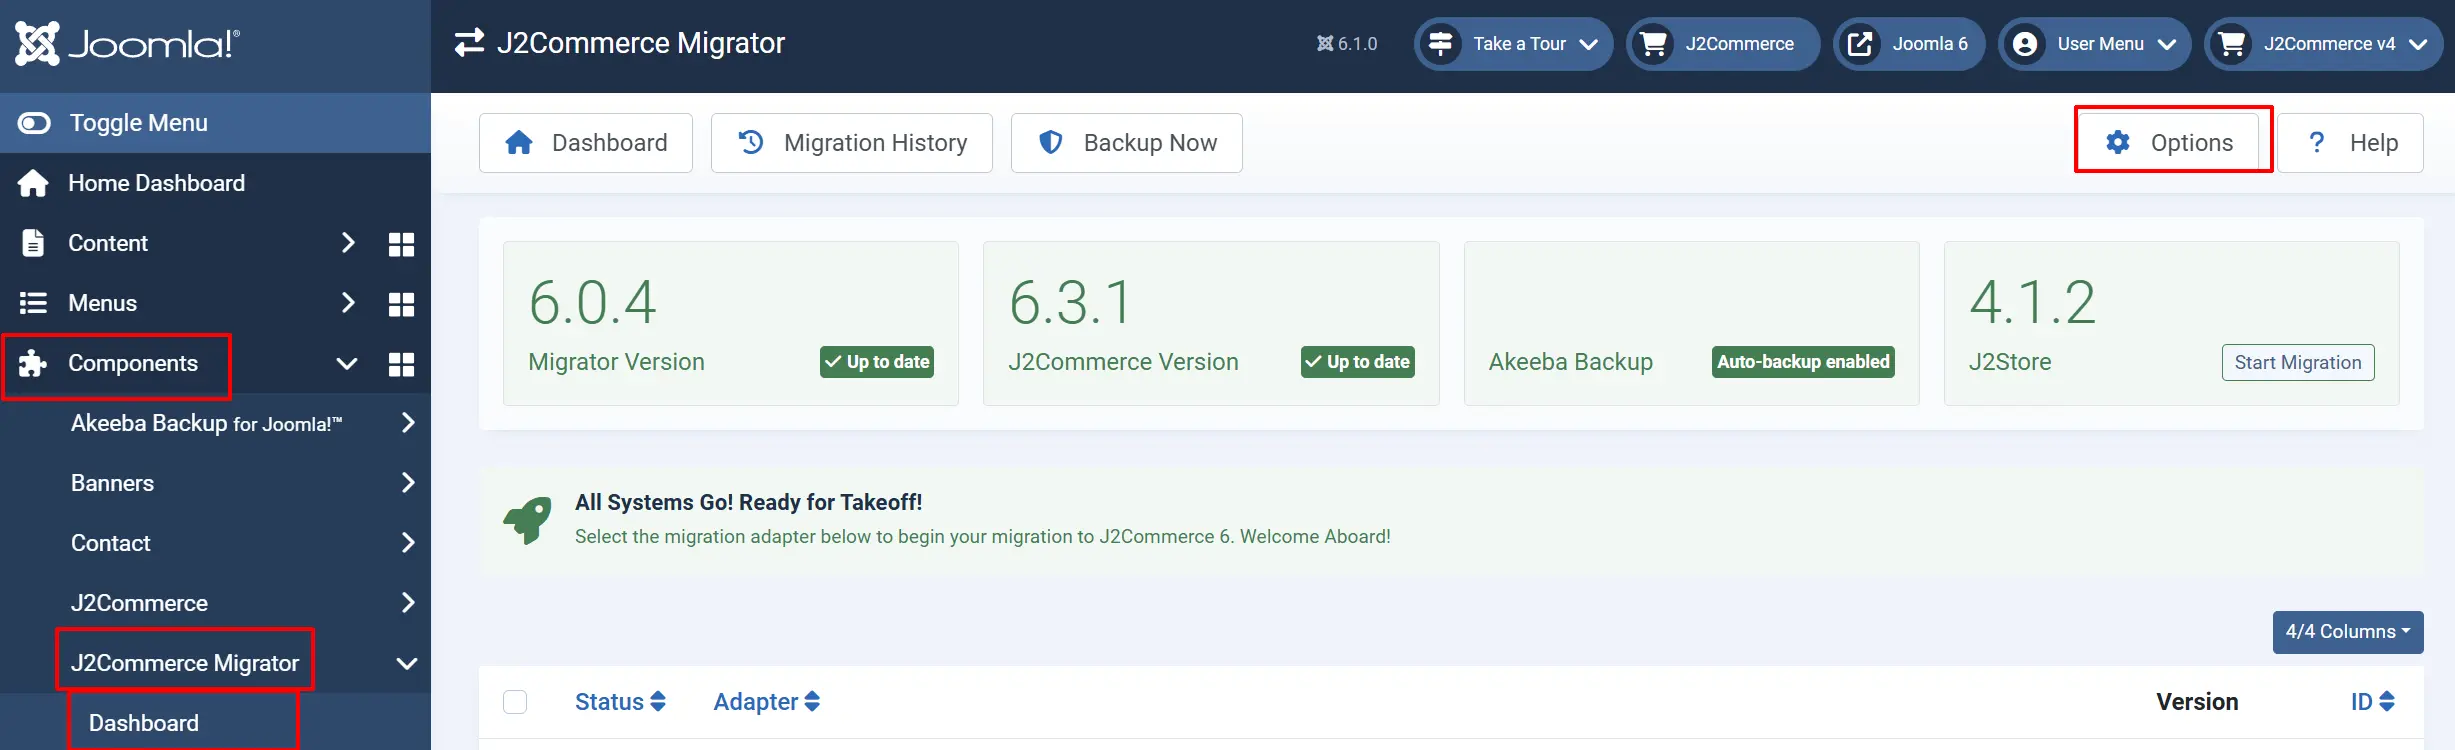
Option A: Go to Components on the left sidebar -> J2Commerce Migrator
Option B: Open the J2Commerce admin navigation and click the J2Commerce Migrator Tool shortcut (if enabled in Options — see Configure the Component below).
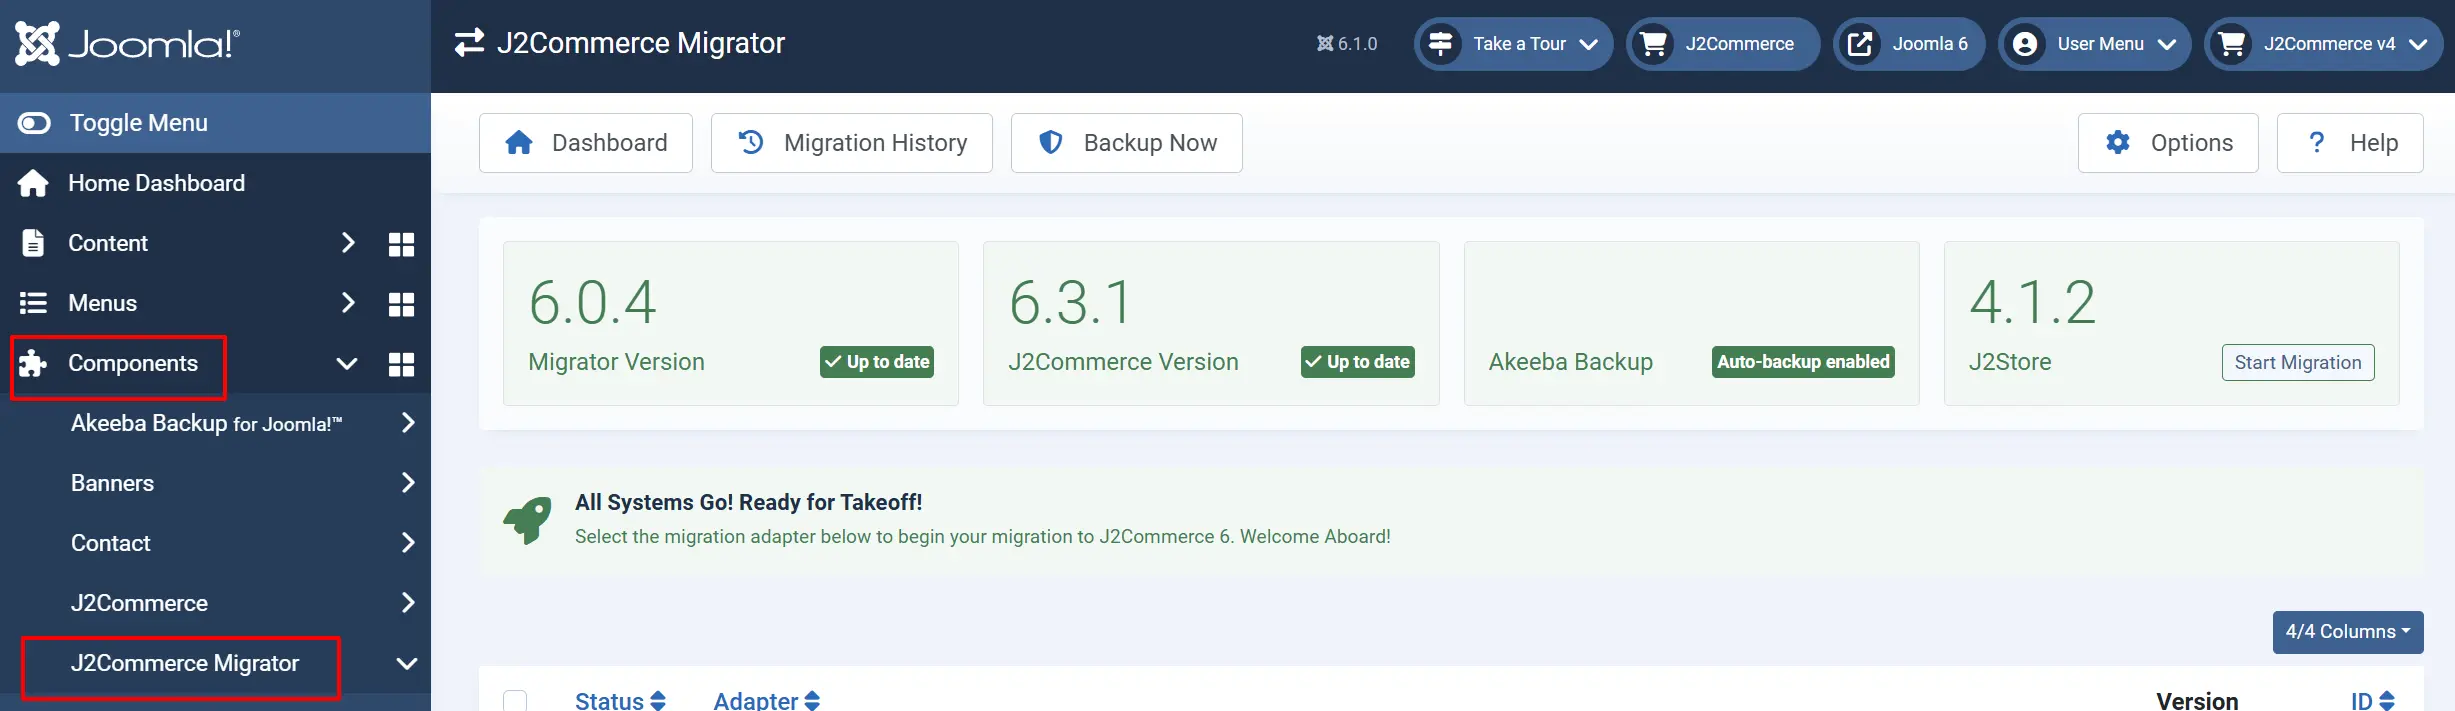
The Dashboard
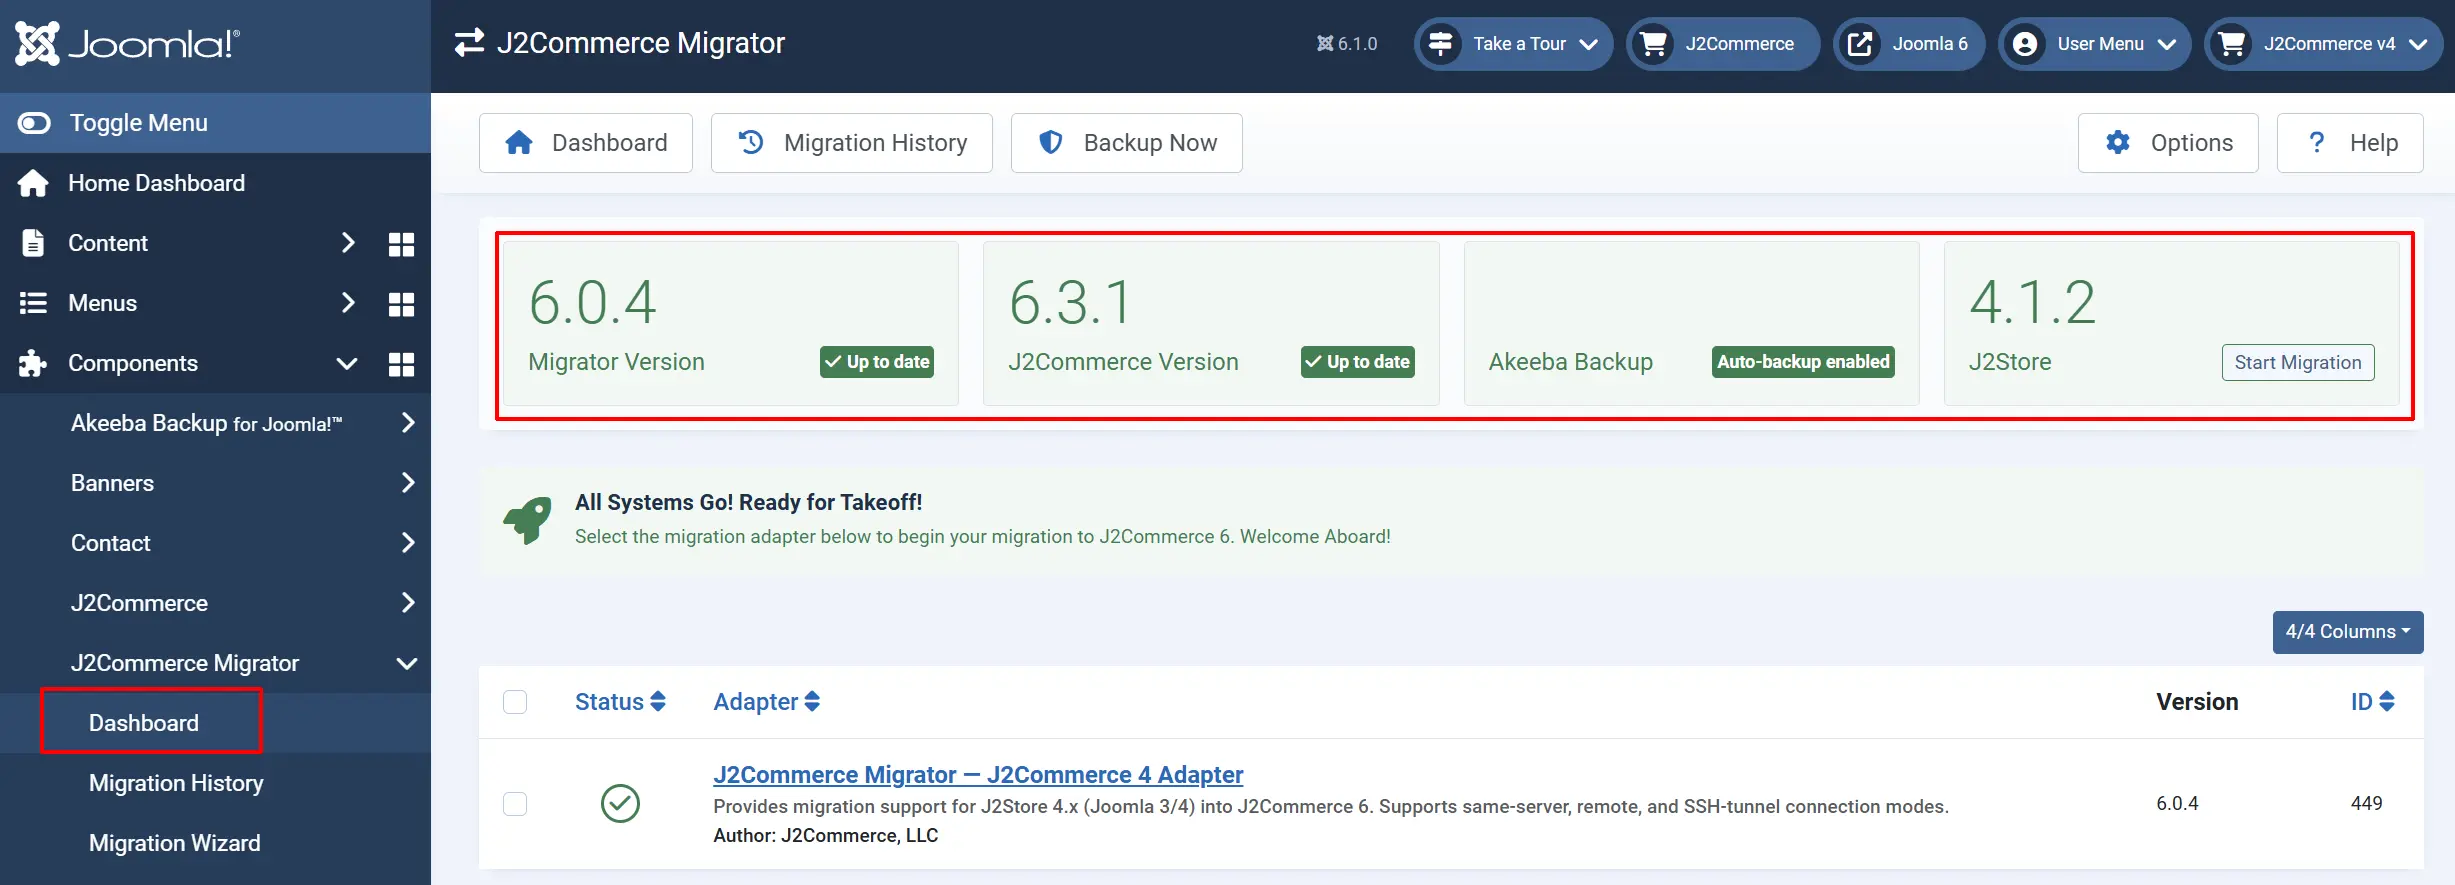
The Dashboard is the landing screen. It shows:
- A Migration Adapters card listing your installed and enabled source-platform plugins
- A Recent Migration Runs panel showing the history of past migration sessions with row counts and status
- Version cards for the Migrator and J2Commerce, with an alert if an update is available
- An Akeeba Backup status card showing whether pre-migration backups are configured
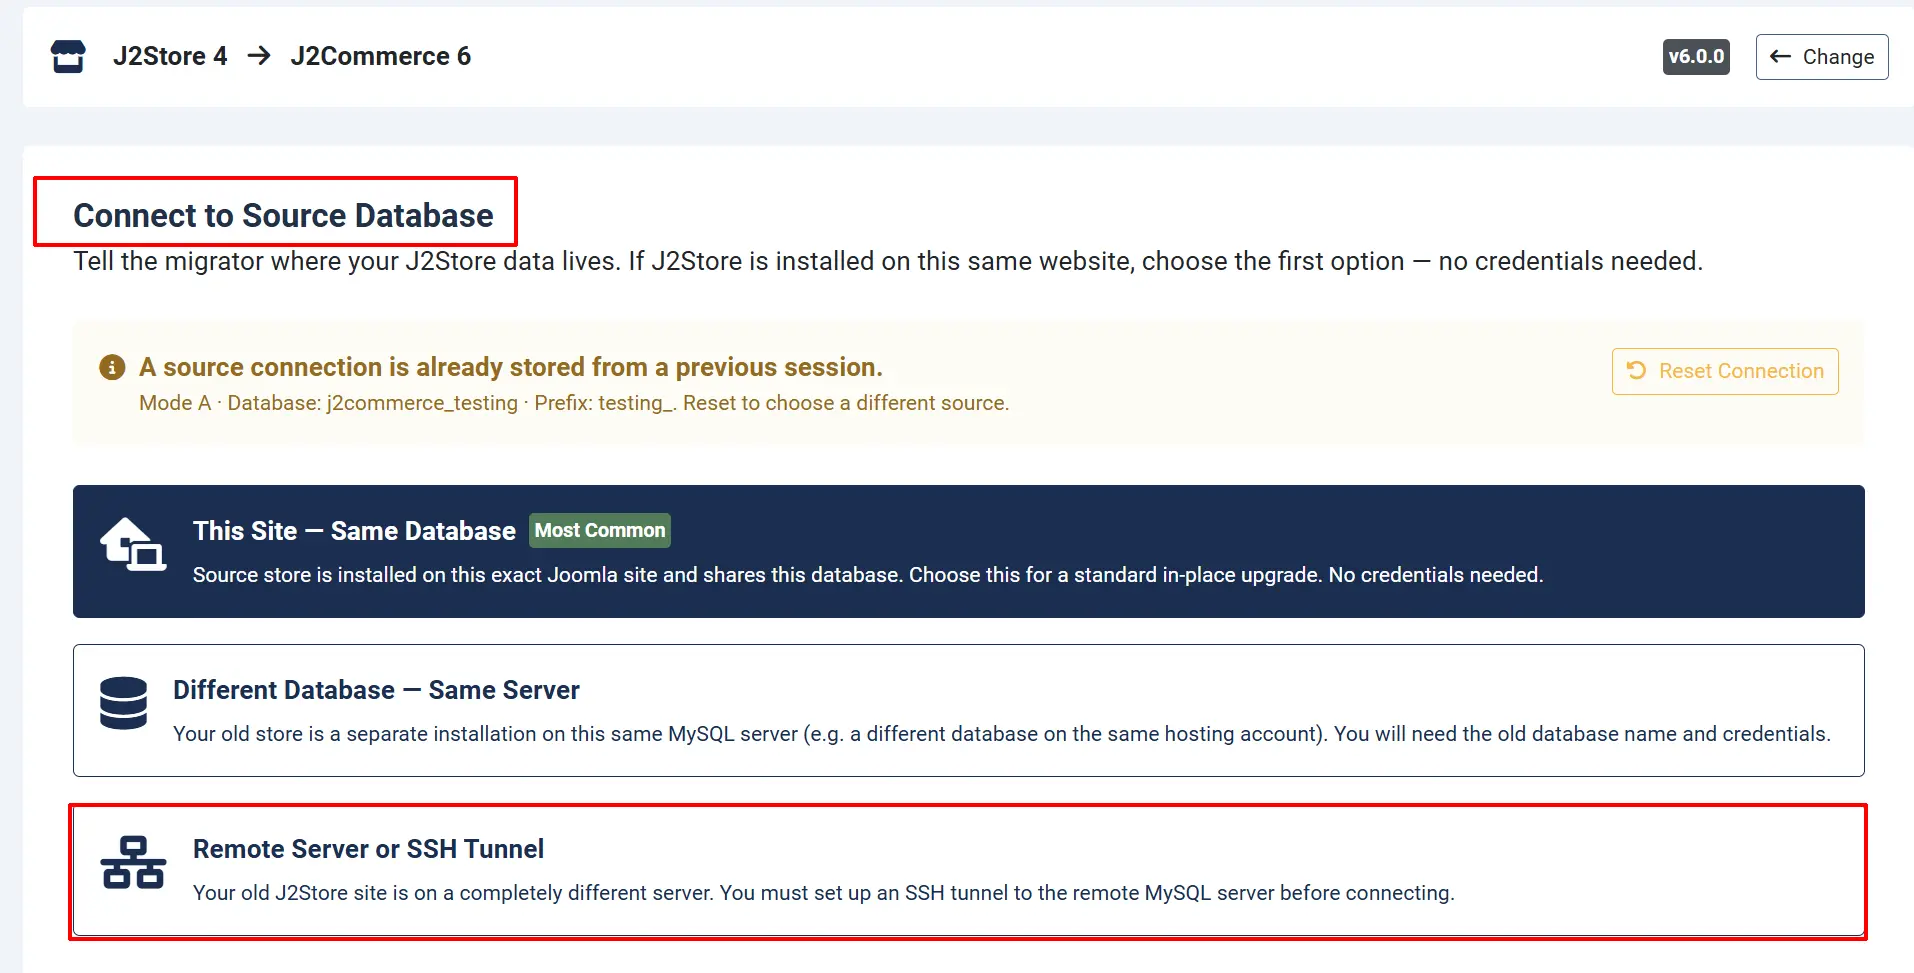
Click Start Migration from the Dashboard to open the Migration Wizard, which walks you through connecting to your source database step by step (Connect -> Discover -> Preflight -> Plan -> Run -> Verify -> Finalize).
Dashboard Submenu

The submenu at the top gives you direct access to all sections:
- Dashboard — this landing screen
- Migration History — full log of every migration run with per-table row counts
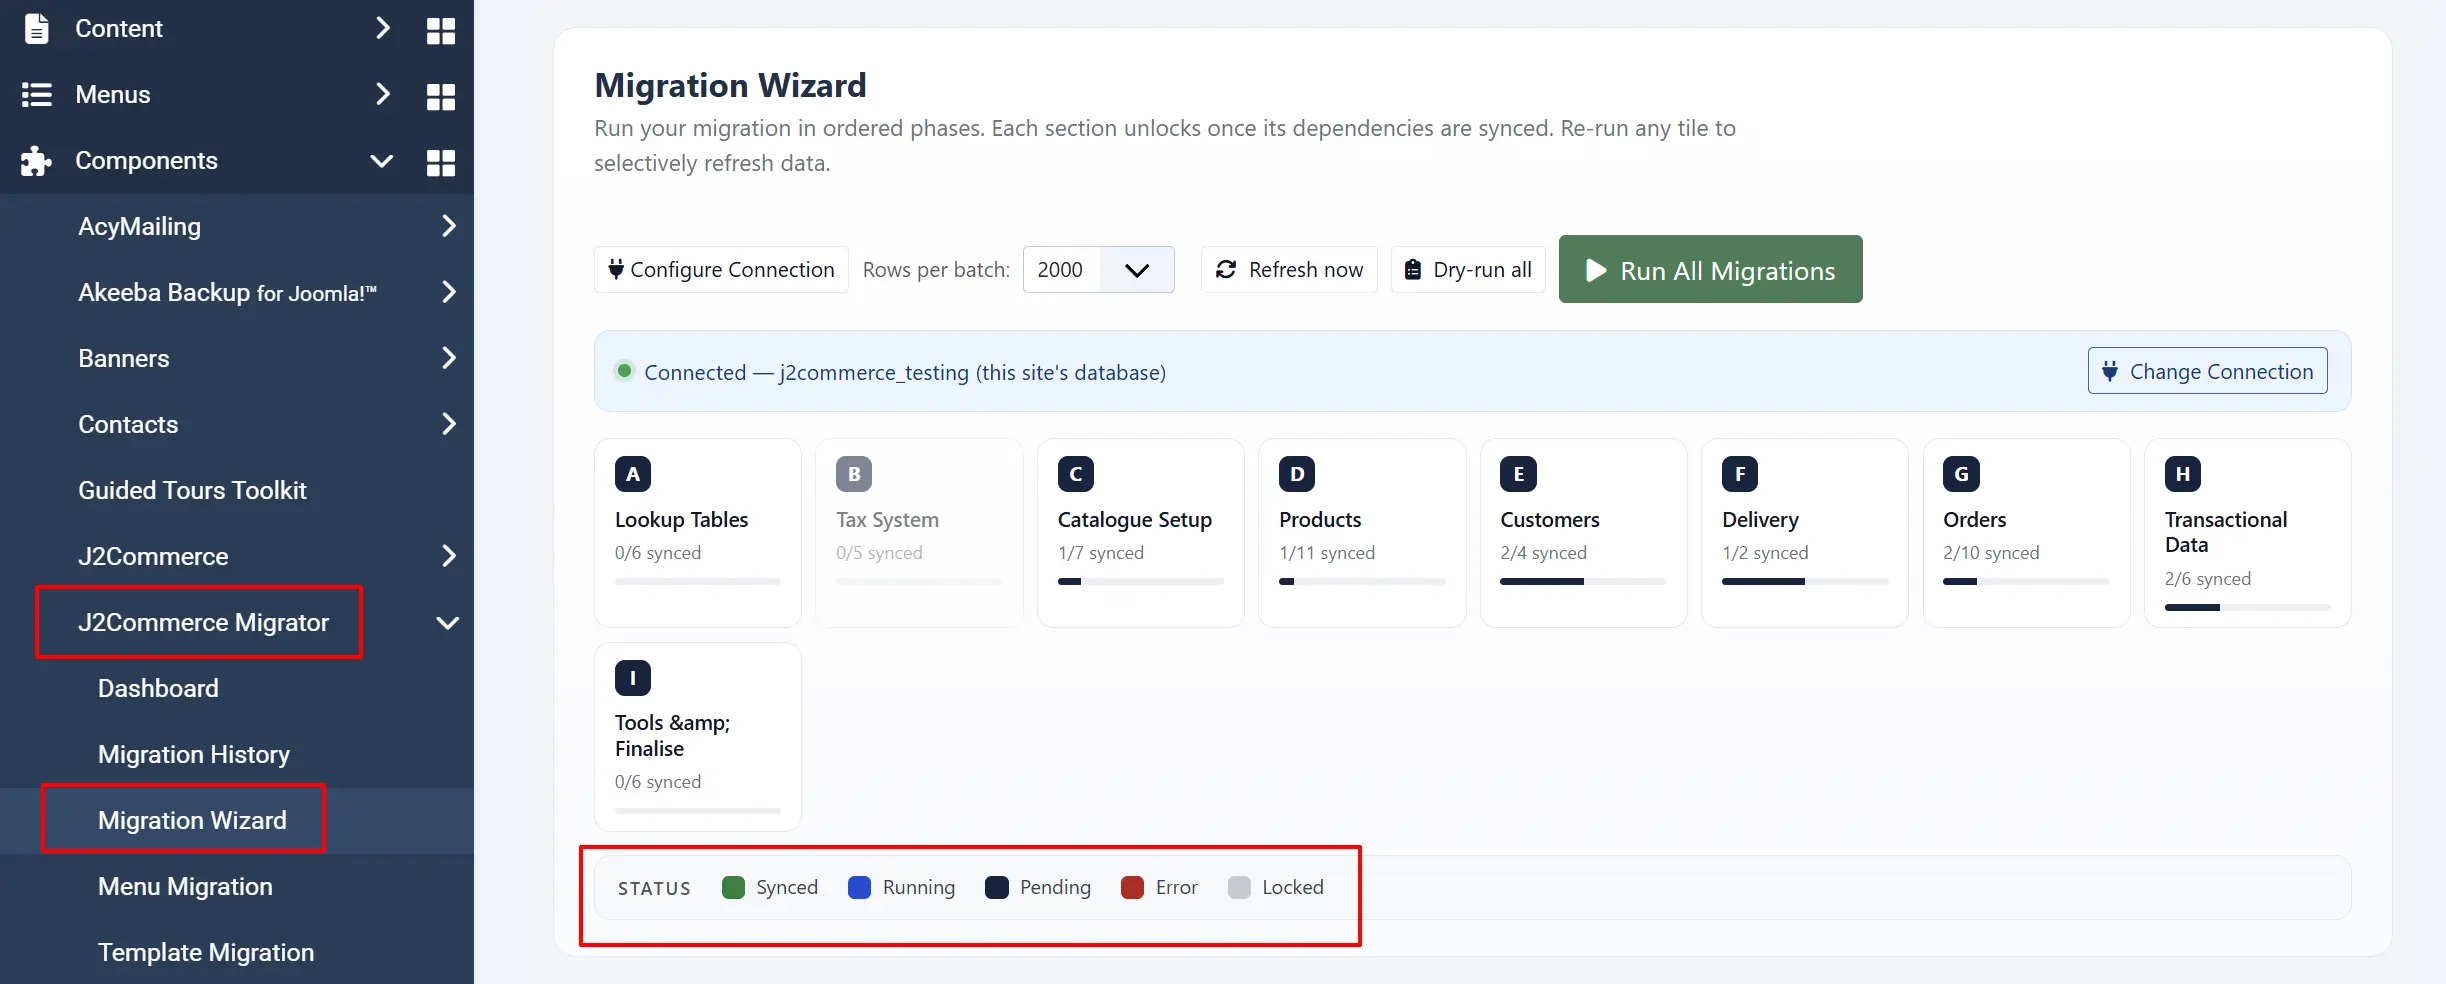
- Migration Wizard — Run your migration in ordered phases. Each section unlocks once its dependencies are synced. Re-run any tile to selectively refresh data.
- Menu Migration — migrate J2Store menu items to J2Commerce routes
- Template Migration — convert J2Store template overrides to J2Commerce layout format
Configure the Component
Go to Components -> J2Commerce Migrator -> click Options in the toolbar to open the component settings.
General Settings tab
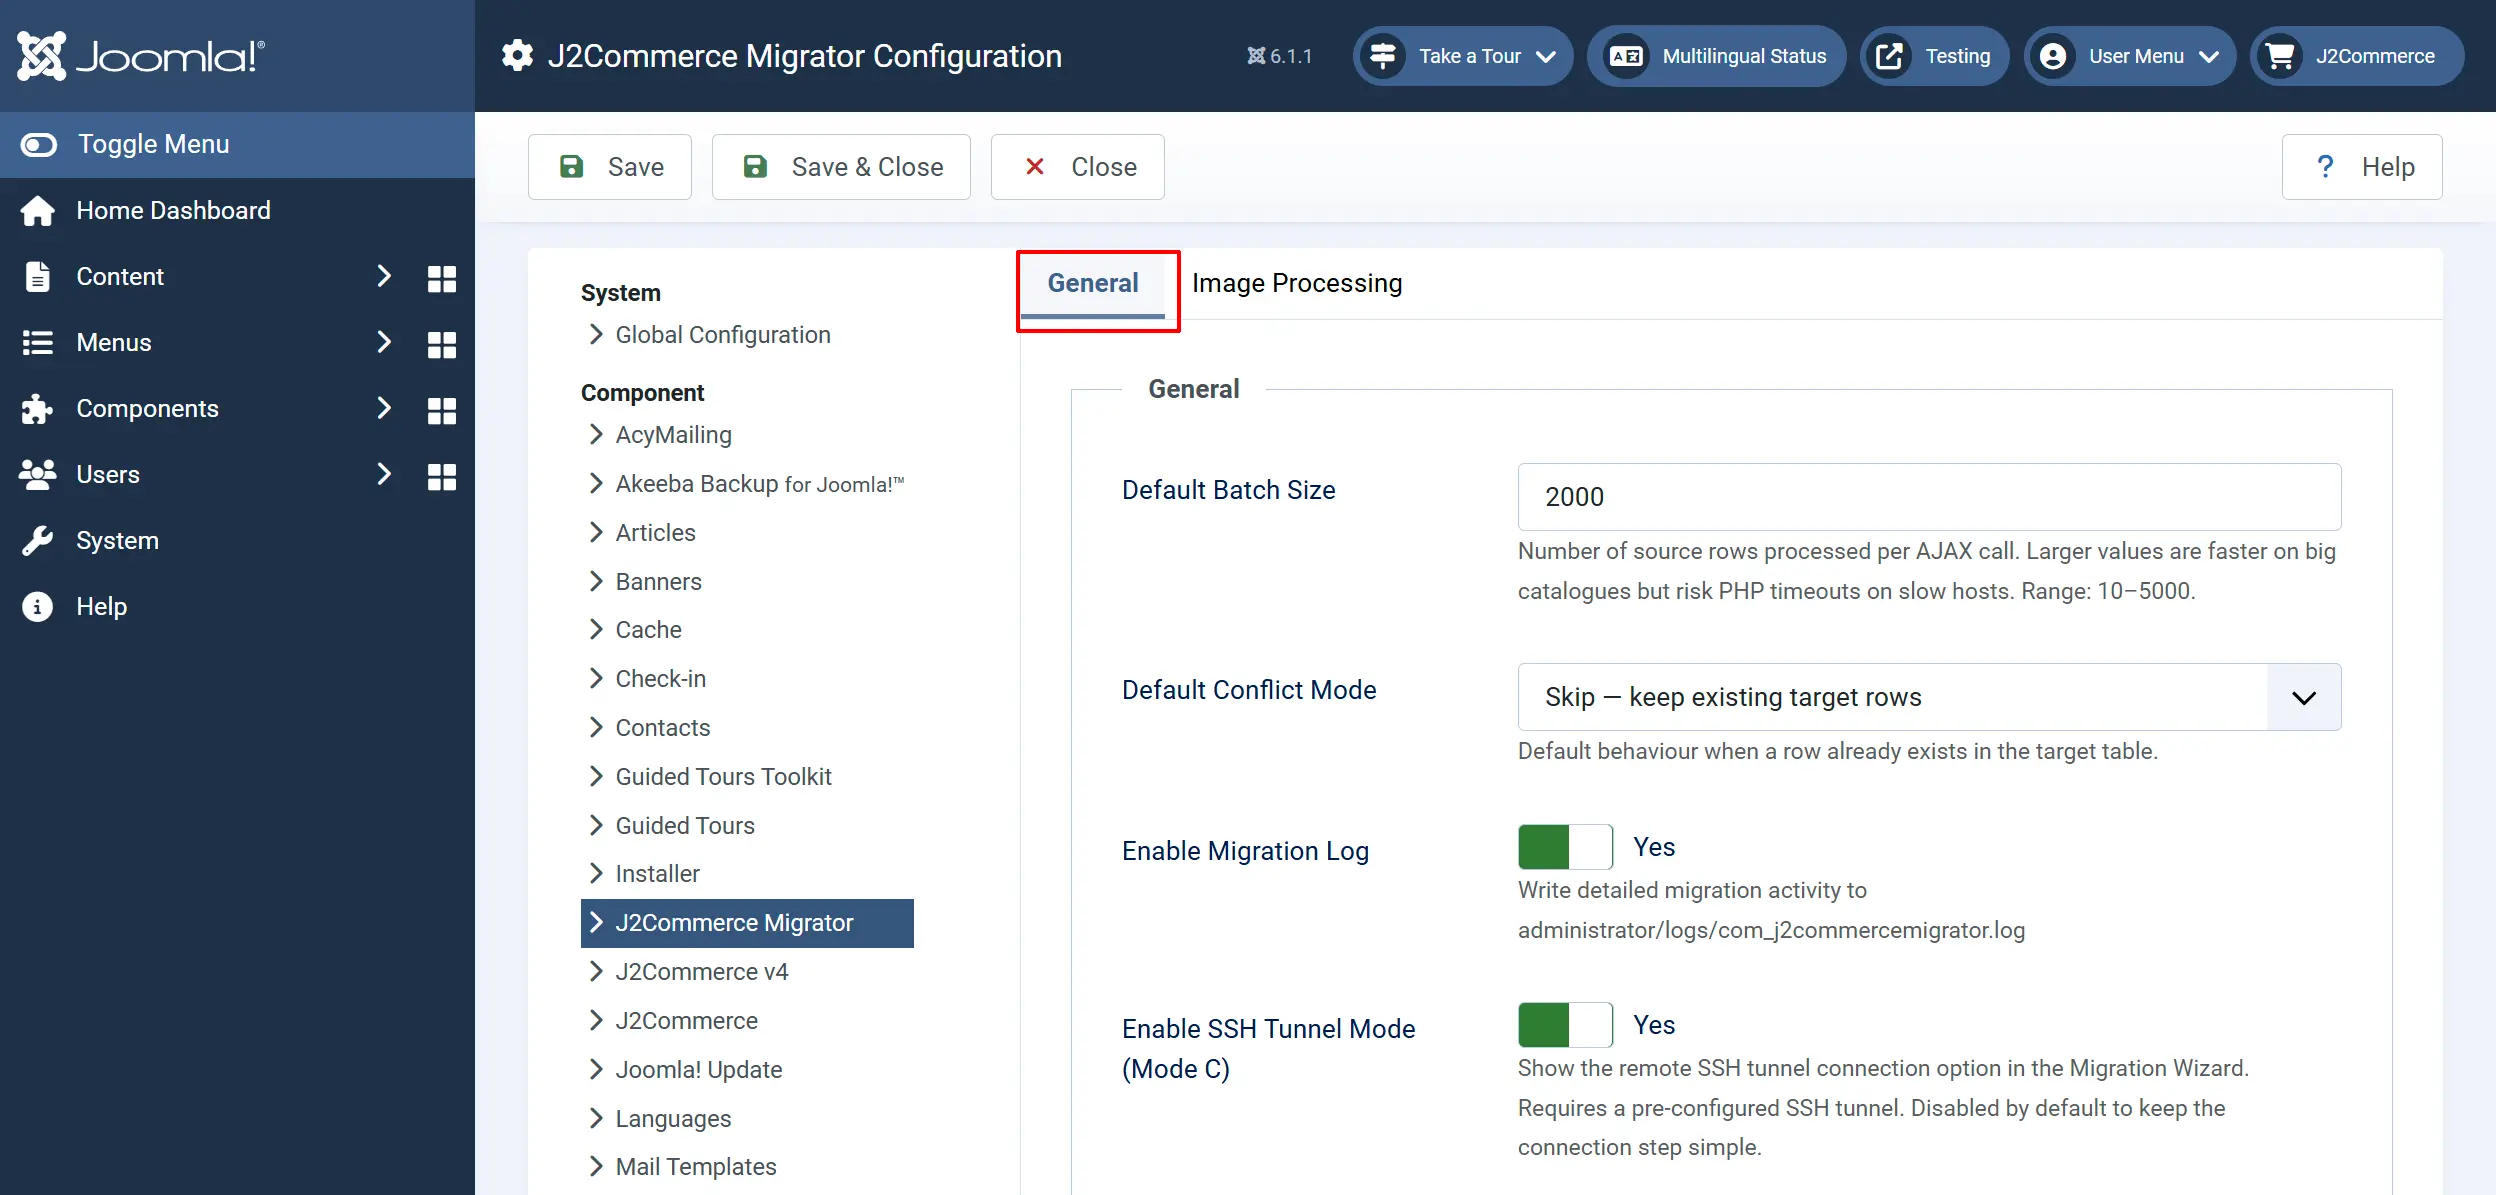
Default Batch Size: Number of source rows processed per AJAX call. Larger values are faster on big catalogs but risk PHP timeouts on slow servers. Range: 10–5000.
Default Conflict Mode: How to handle a row that already exists in the target database.
-
Skip — keep existing target rows
-
Overwrite — replace target rows with source data
-
Merge — fill empty target fields from source
-
Report only — do not write, just report conflicts.
Enable Migration Log: Write detailed migration activity to administrator/logs/com_j2commercemigrator.log.
Enable SSH Tunnel Mode (Mode C): This is used when your old site is on a different server. Show the remote SSH tunnel connection option in the Migration Wizard. Requires a pre-configured SSH tunnel on the server. Disable to keep the connection step simple.
If it is enabled, it will now appear in the connection tab of the Migration Wizard. See below.
Backup
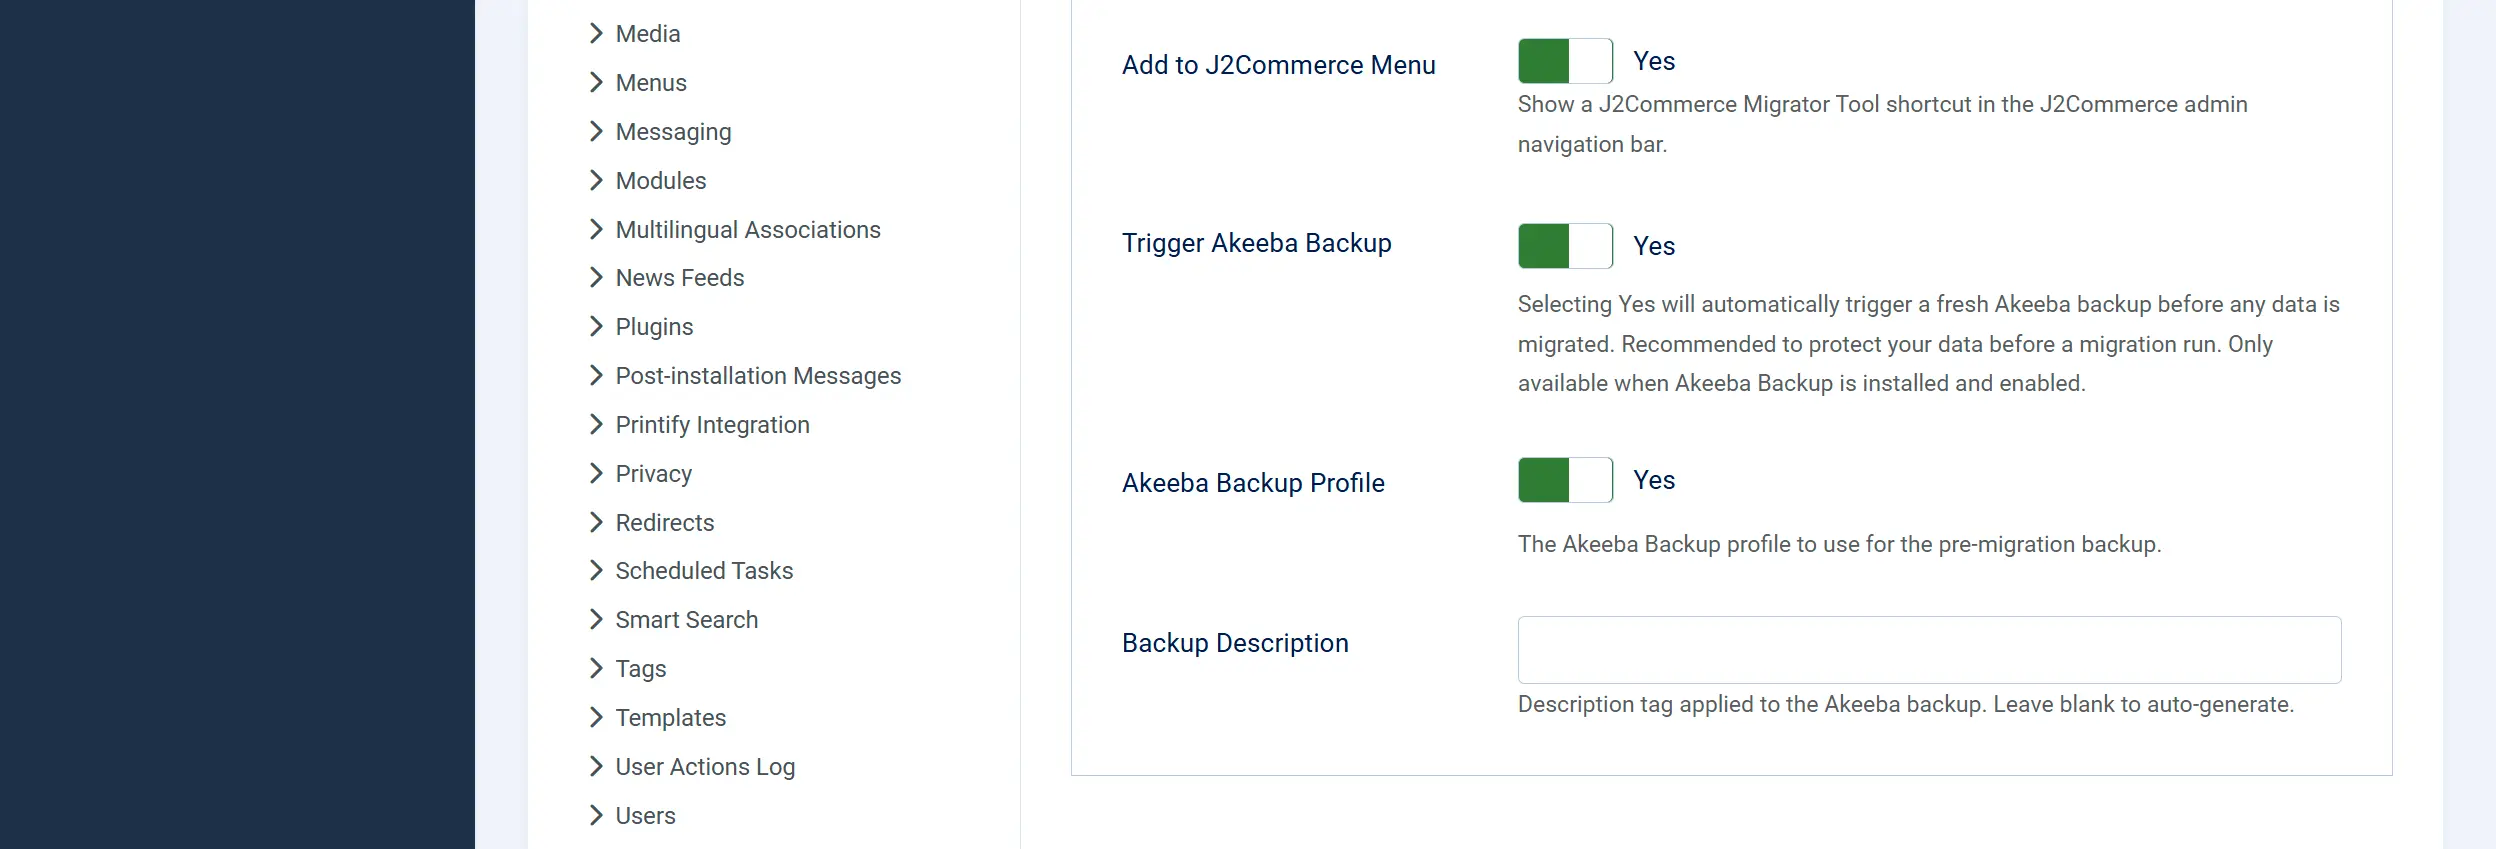
Add to J2Commerce Menu: Show a J2Commerce Migrator Tool shortcut in the J2Commerce admin navigation bar.
Trigger Akeeba Backup: Automatically trigger a fresh Akeeba backup before any migration run. Only available when Akeeba Backup is installed and enabled.
Akeeba Backup Profile: Which Akeeba Backup profile to use for the pre-migration backup. Shown only when Akeeba backup is enabled.
Backup Description: Description tag applied to the Akeeba backup. Leave blank to auto-generate.
Leave Default Conflict Mode set to Skip on your first migration. This protects any data you have already set up manually in J2Commerce. Switch to Overwrite only if you want a clean re-import.
Migration Wizard
Go to Components -> J2Commerce Migrator -> Migration Wizard
This is where the actual data migration happens. The screen is divided into ordered lanes — each lane depends on the one above it being complete before its tiles unlock.

Toolbar Controls

At the top of the screen you will find:
- Rows per batch — A dropdown to set how many rows to process per AJAX call (500 / 1000 / 2000 / 5000). Adjust this if you see timeouts on a slow host.
- Refresh now — Re-reads all tile statuses from the server without running any migration.
- Dry-run all — Runs through all tiles in report mode without writing data. Use this to get a preview of what will be migrated.
- Run All Migration — Starts every pending tile in sequence, working through all sections automatically.
A connection banner below the toolbar shows your current source database connection mode (Mode A — same server, Mode B — remote database, or Mode C — SSH tunnel) and the last full sync timestamp.
At the bottom of the screen a summary footer shows: tiles synced / rows migrated / errors / elapsed time, plus the Export log and a second Run All Migration button.
Migration Lanes

The tiles are organized into the following lanes, displayed in dependency order:
Section Groups: The wizard breaks the store into the following migration sections:
-
Lookup Tables — Core reference data including currencies, countries, order statuses, tax classes, and unit types. These should be migrated first as other tables depend on them.
-
Tax System — Tax rates, zones, and rules.
-
Catalogue Setup — Product categories, manufacturers, custom fields, and filter groups.
-
Products — Product records, images, pricing, custom field values, product files, and related items.
-
Customers — Customer accounts, addresses, and shopper groups.
-
Payment — Payment methods and configuration.
-
Orders — Order records, order items, billing/shipping details, order history, and coupon usage.
-
Transactional Data — Store-specific transactional tables including coupons, gift vouchers, and email templates.
-
Tools / Database Handler — Migration utilities including backup triggers, base migration files, migration log, new migration setup, and store migration files.
Within each lane, individual tiles represent a single data type. The section header shows how many tiles are synced out of the total for that lane.
Tile Status Pills
Each tile displays a colored status pill:
Synced: Green: Migration completed successfully. All source rows have been written.
Running: Blue / animated: Migration is actively running. The pill may show a percentage, for example Running (42%).
Pending: Gray: Not yet run. The tile is ready to sync.
Error: Red: The last run ended in an error. Click Retry to try again.
Locked: Gray / padlock: This tile's dependencies have not been synced yet. Complete the required lane first.
A tile with zero rows in the source (nothing to migrate) is automatically marked Synced and its button shows Empty Source (disabled). You do not need to click anything for these.
Per-Tile Action Buttons
The button on each tile changes depending on the tile's current status:
| Button | When it appears | What it does |
|---|---|---|
| Sync | Tile is Pending | Starts the migration for this tile |
| Re-sync | Tile is Synced | Re-runs the migration to pick up new rows from the source |
| Retry | Tile is Error | Attempts the migration again from where it left off |
| Resume | Tile was interrupted mid-run | Continues from the last completed batch |
| Syncing… | Tile is actively Running | In-progress indicator — click Cancel to stop |
Some tiles show additional badges such as Audit, Optional, Conditional, or Parallel-safe to indicate special behavior.
Section Controls
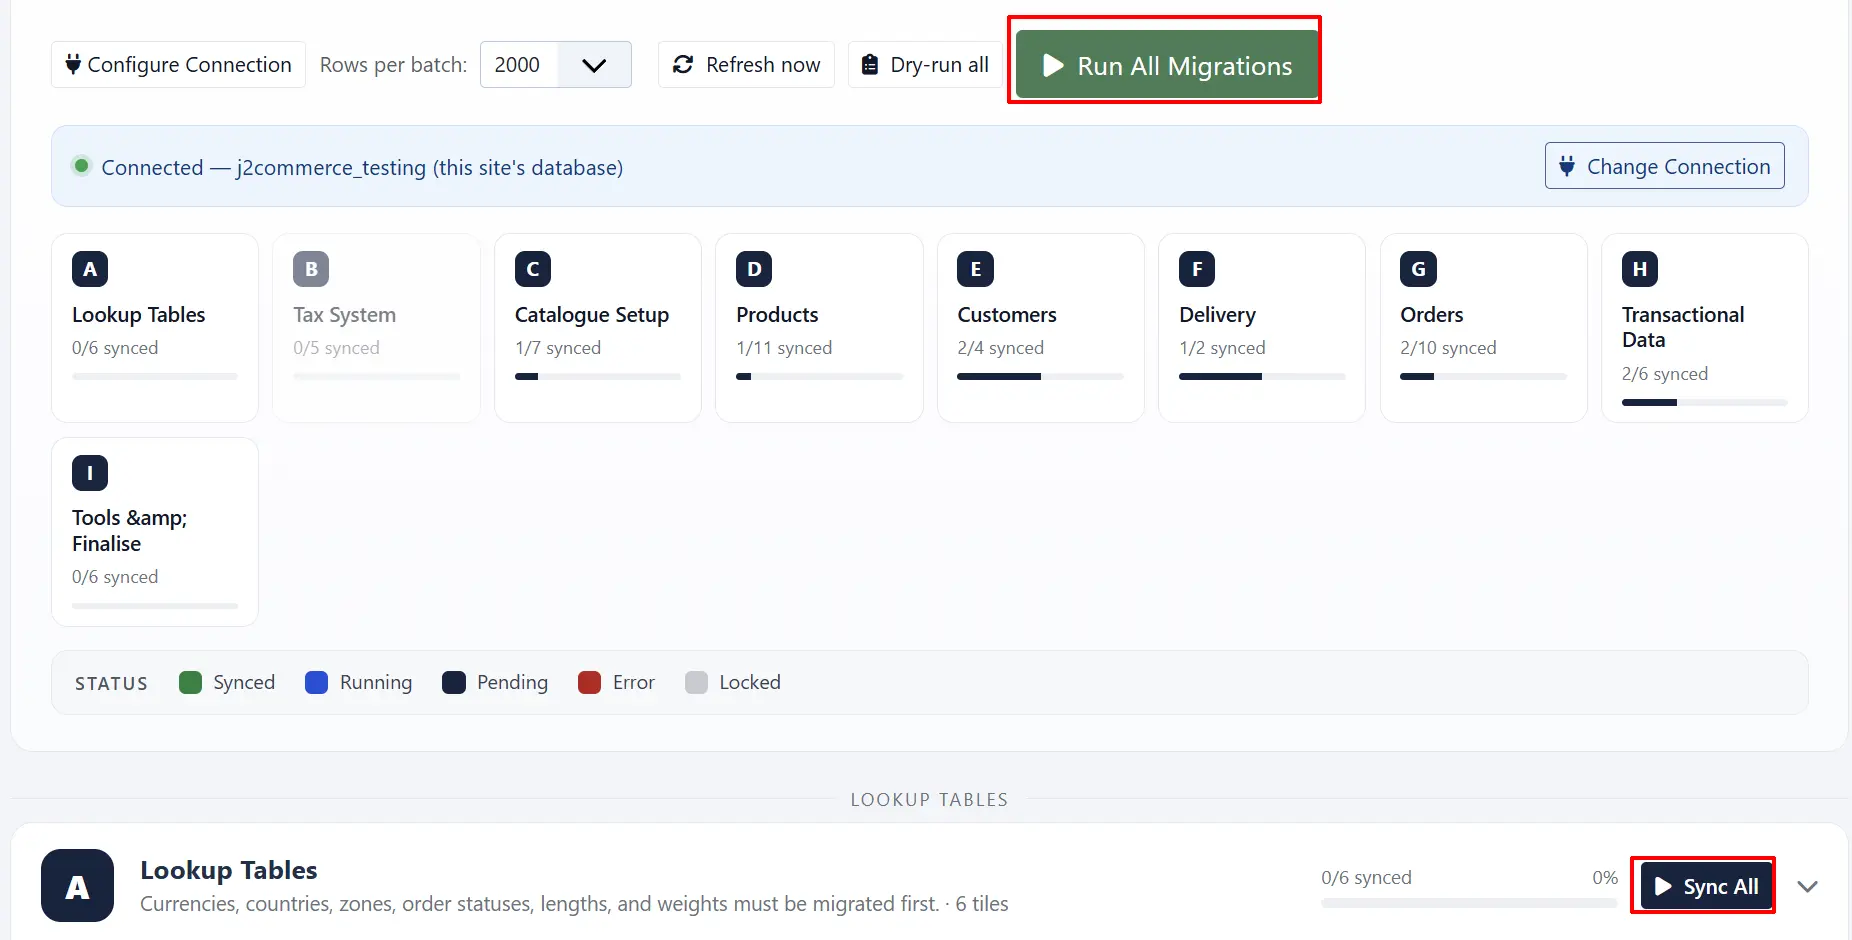
Each lane section has its own Sync All button that queues all pending tiles in that section. A section-level Run All is also available from the top and bottom toolbar.
Use the Export log button at any time to download a plain-text log of all tile activity in the current session. For detailed server-side logs, check administrator/logs/com_j2commercemigrator.log.
Recommended Migration Order
Follow the lanes top to bottom. Do not skip a lane.
- Complete all tiles in Foundations first. Every subsequent lane depends on currencies, countries, and tax data being present.
- Run Catalog Setup next (manufacturers, categories, options).
- Run Products (including variants, prices, and images).
- Run Promotions & Logistics (coupons, shipping methods).
- Run Customers — this can be done in parallel with catalog lanes since it is independent.
- Run Orders only after Customers and Foundations are both fully synced.
- Run Customer Activity (carts, reviews) if you need this data — it is optional.
- Run Finalize last to apply configuration patches and flatten multilingual data.
Customers and the catalog lanes (Foundations through Promotions) are independent of each other. You can run the Customers lane at any point alongside the catalog lanes to save time on large stores.
Re-syncing, Retrying, and Resuming
Re-sync appears on a green Synced tile. It re-runs the migration for that tile, which picks up any new rows added to the source since the first run and applies your current Conflict Mode setting to rows that already exist in the target. Use Re-sync any time your source store receives new data after the initial migration.
Retry appears on a red Error tile. It restarts the migration for that tile from the beginning of the current page offset. Check the Export log or the Joomla error log if Retry does not resolve the issue — the underlying error message is recorded there.
Resume appears when a tile was interrupted mid-run, for example by a browser reload or a PHP timeout. It continues from the last successfully committed batch rather than starting over, so no rows are duplicated.
Syncing… is shown while a tile is actively processing. You can click Cancel to stop it. The tile reverts to its previous state and any batches already committed are kept.
Source Platform Specifics
Each adapter handles the field-by-field mapping, schema differences, and any quirks of its source platform. This guide covers only the shared Migrator workflow. For per-platform details, see the companion adapter documentation:
- J2Commerce 4: See
plg_j2commercemigrator_j2commerce4.md - eShop: See eshop.md
- HikaShop: See
plg_j2commercemigrator_hikashop.md
How It Works
When you click Sync on a tile, the source adapter reads a batch of rows from your old store database. The migration engine transforms each row into the J2Commerce data format and writes it into the appropriate #__j2commerce_* table. After each successful write, an identity map record is created that pairs the original source row ID with the new target row ID. This identity map is what makes re-runs safe: on subsequent syncs, the engine looks up the map first and skips any row that has already been migrated (or overwrites it, depending on your Conflict Mode setting). The process repeats in batches until all rows are done, and the tile pill flips to Synced.
Tips
- Back up before you start. Run an Akeeba Backup (or equivalent) before the first migration run. Enable the automatic pre-migration backup in Options for ongoing protection.
- Use a staging copy. Run the migration on a staging duplicate of your live site first. Verify the results before repeating on production.
- Keep the source platform installed. Do not uninstall J2Store, HikaShop, or eShop until you have verified that all data migrated correctly. The Migrator never modifies the source tables, so you can always re-run.
- Run Foundations before Catalog. The tile dependency system enforces this, but understanding the reason helps: currencies, countries, and tax data must exist before products and orders can reference them.
- Export the log after each big section. Click Export log after completing the Products or Orders lane. This gives you a snapshot to refer back to if any issues surface later.
- Reduce batch size on slow hosts. If you see PHP timeout errors, open the Rows per batch dropdown and switch from 2000 to 500. The migration takes more steps but each one completes before the server times out.
Troubleshooting
The Migration Wizard screen is empty or shows "Database Connection Required"
Cause: No source adapter plugin is enabled, or the Migration Wizard has not been run yet.
Solution:
- Go to System -> Manage -> Plugins and filter by type j2commercemigrator.
- Enable the plugin that matches your source platform. Only one should be active.
- If the message says Database Connection Required, click Go to Migration Wizard and complete the Connect step to establish the source database connection.
A tile is stuck on "Running"
Cause: The migration was interrupted mid-batch — for example, by a browser tab closing or a server timeout.
Solution:
- Reload the Sync Tools screen. The tile should show a Resume button.
- Click Resume to continue from the last completed batch.
- If the tile stays on Running after reload, click Refresh now in the toolbar to force a status re-read from the server.
- If the issue persists, check the Joomla error log at
administrator/logs/joomla_error.php.
A tile shows "Error"
Cause: An error occurred during migration for that data type.
Solution:
- Click Retry on the tile to attempt the migration again.
- If it errors again, click Export log to download the activity log and look for the error message.
- Check
administrator/logs/com_j2commercemigrator.logfor server-side detail. - Common causes: a unique constraint violation in the target table, a missing required field in the source data, or a PHP memory limit reached.
Orders imported but customers are missing
Cause: The Orders lane was run before the Customers lane completed. Order records reference customer (user) records by ID — if those records do not exist yet, the link cannot be established.
Solution:
- Run the Customers lane (Users and Addresses tiles) until all tiles show Synced.
- Then go back to the Orders lane and click Re-sync on each Orders tile. The engine will fill in the customer references on the second pass.
I want to start the migration over from scratch
Cause: You need a clean slate — for example, after testing a migration on a staging site that you now want to redo cleanly.
The tools described below permanently delete migrated data from J2Commerce. Your original source store data is never affected. Make sure you have a backup before proceeding.
The Reset and Drop tables tools are available from the tile action menu within the Finalize section and from dedicated tiles in the tools screen. These are destructive operations that require typed confirmation before they run:
- Reset J2Commerce Data — Truncates all J2Commerce data tables populated by the migration (orders, products, customers, etc.) while preserving your J2Commerce configuration, email templates, and invoice templates.
- Remove Old J2Store Database Tables — Removes
#__j2store_*tables after you have verified the migration and uninstalled J2Store. - Uninstall J2Store v4 — Permanently removes the com_j2store component from this Joomla installation (database tables are not deleted by this action).
After resetting, return to Sync Tools and all tiles will show Pending again so you can run a fresh migration.