
A Variable product lets you sell one product in multiple variations — for example, a T-shirt in different sizes and colors. You define the options (Size, Color), assign which values each option can take, and J2Commerce automatically generates every possible combination as a separate variant. Each variant can have its own price, SKU, stock level, weight, and image.
Variable products are ideal when your product has clearly defined option combinations and you want each combination managed and tracked independently.
How Variable Products Differ from Other Types
Variable: Best for products where every size/color combo is tracked separately
Configurable: Best for complex product families needing full independent catalog entries
Flexivariable: Best for products where combinations are not systematic
With Variable products, the variant generation is automatic — you do not create each combination by hand.
Requirements
- PHP 8.3+
- Joomla! 6.x
- J2Commerce 6.x
Tip
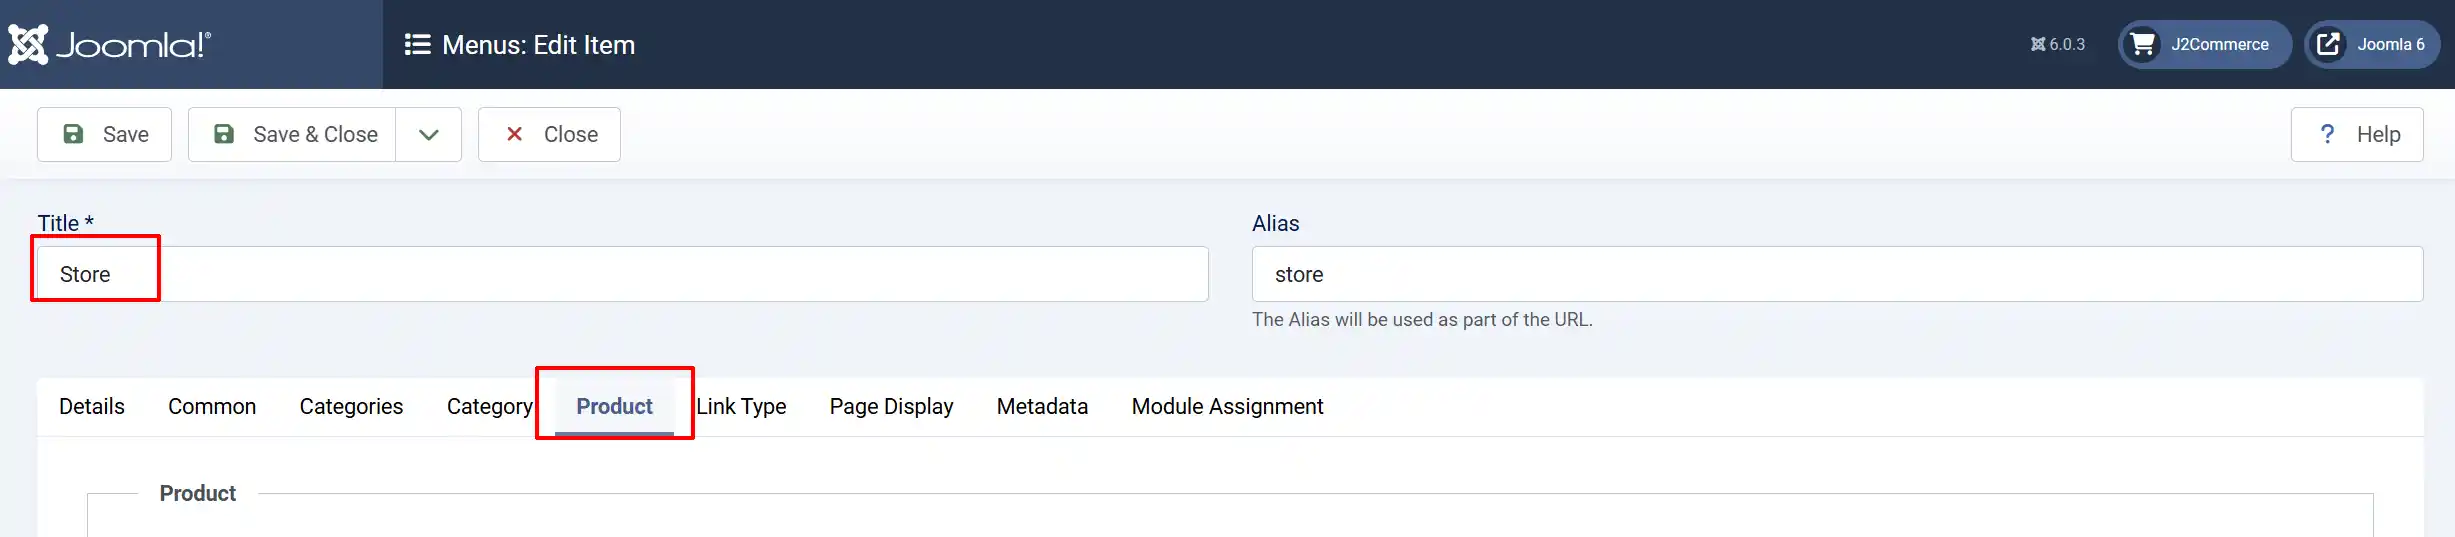
IMPORTANT: Once you have configured the settings for any product, check to see if those specific items are showing up on the frontend. If they are not, (ie: filters, cross-sells, price, title, etc), then go to your store menu and show or hide the items you want to control on the frontend. Go to Menu -> Main Menu -> Store -> Product tab
Info
NOTE: Before you can begin setting up a Variant, you need to create all of the Options that the product will offer.
Setting Up Options (if needed)
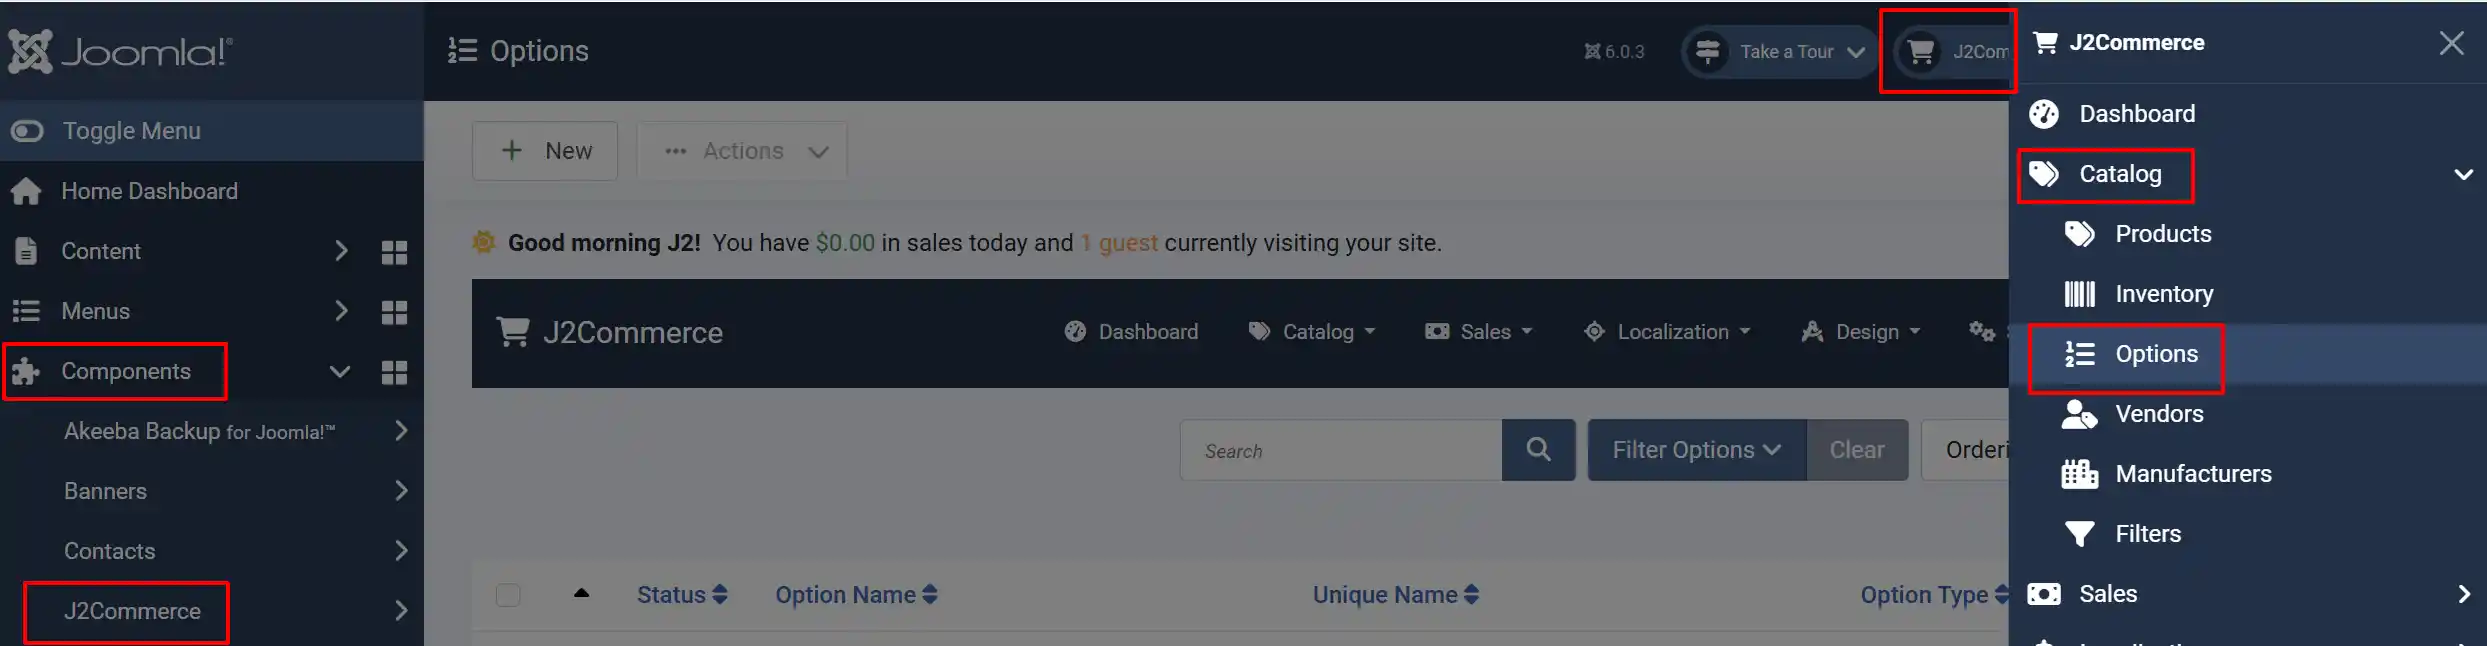
There are two ways you can access Options.
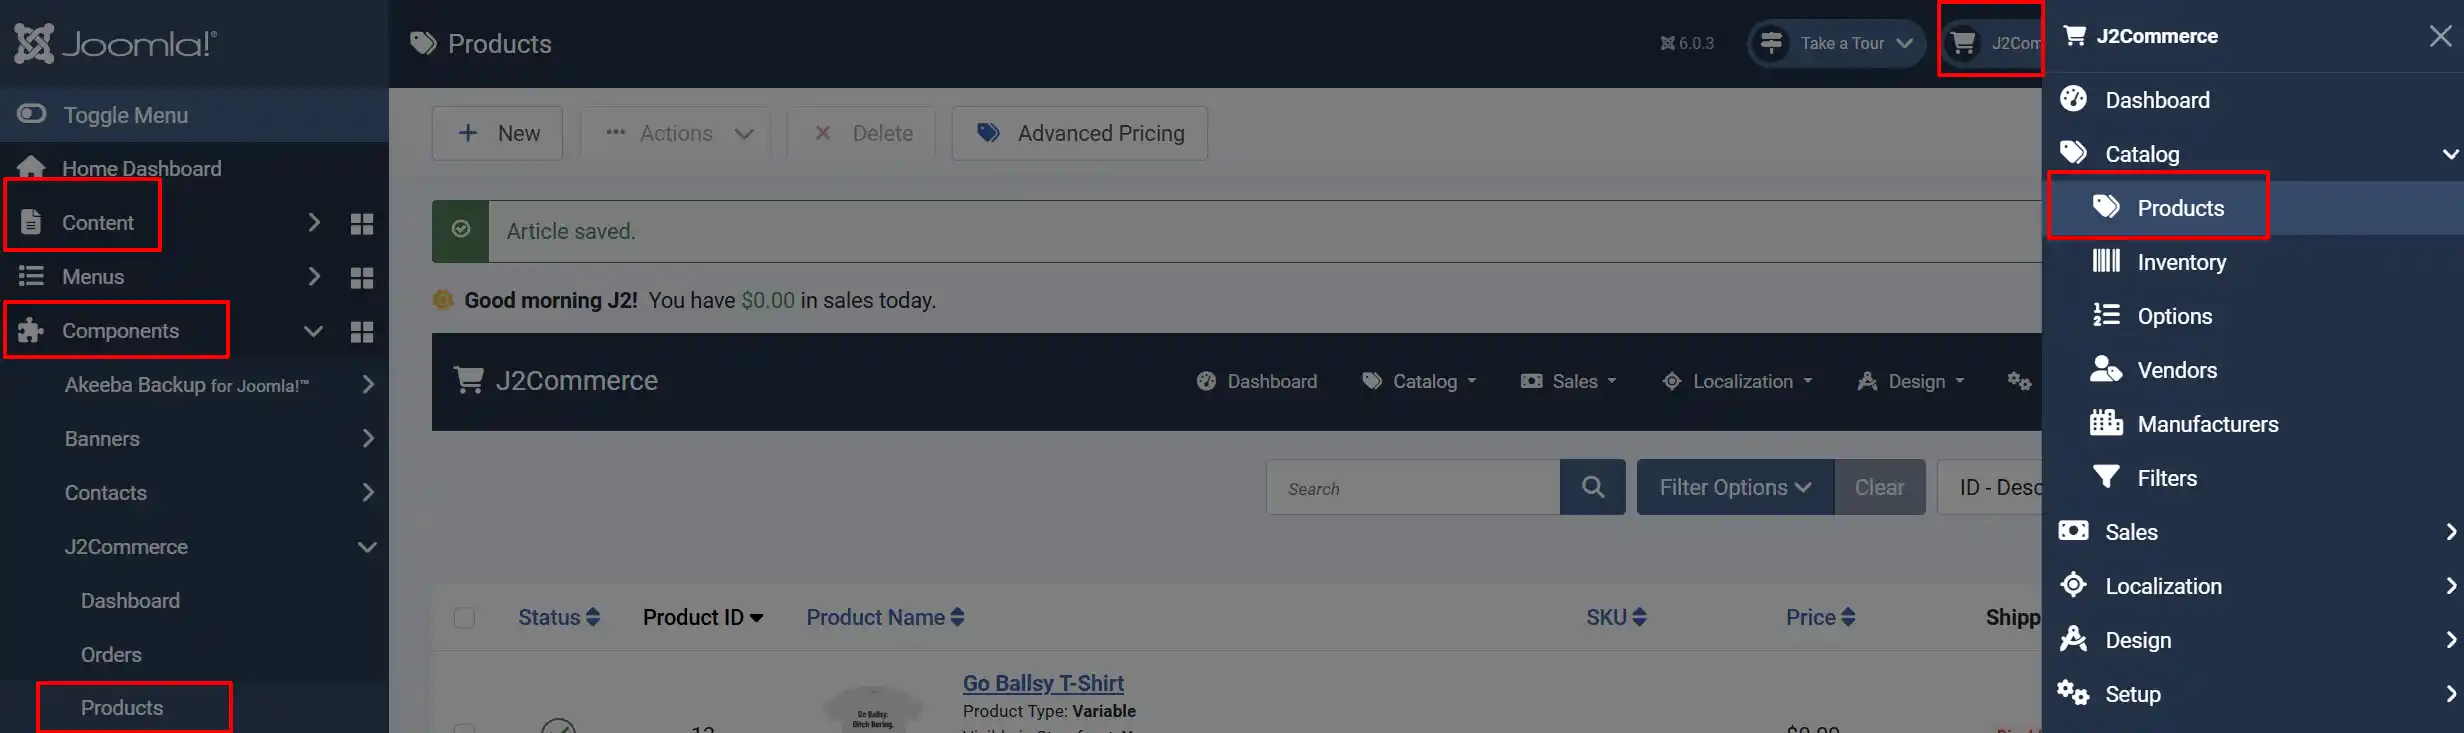
Option A: Go to the J2Commerce icon at the top right corner -> Catalog -> Options
Option B: Go to Components on the left sidebar -> J2Commerce -> Dashboard -> Catalog -> Options
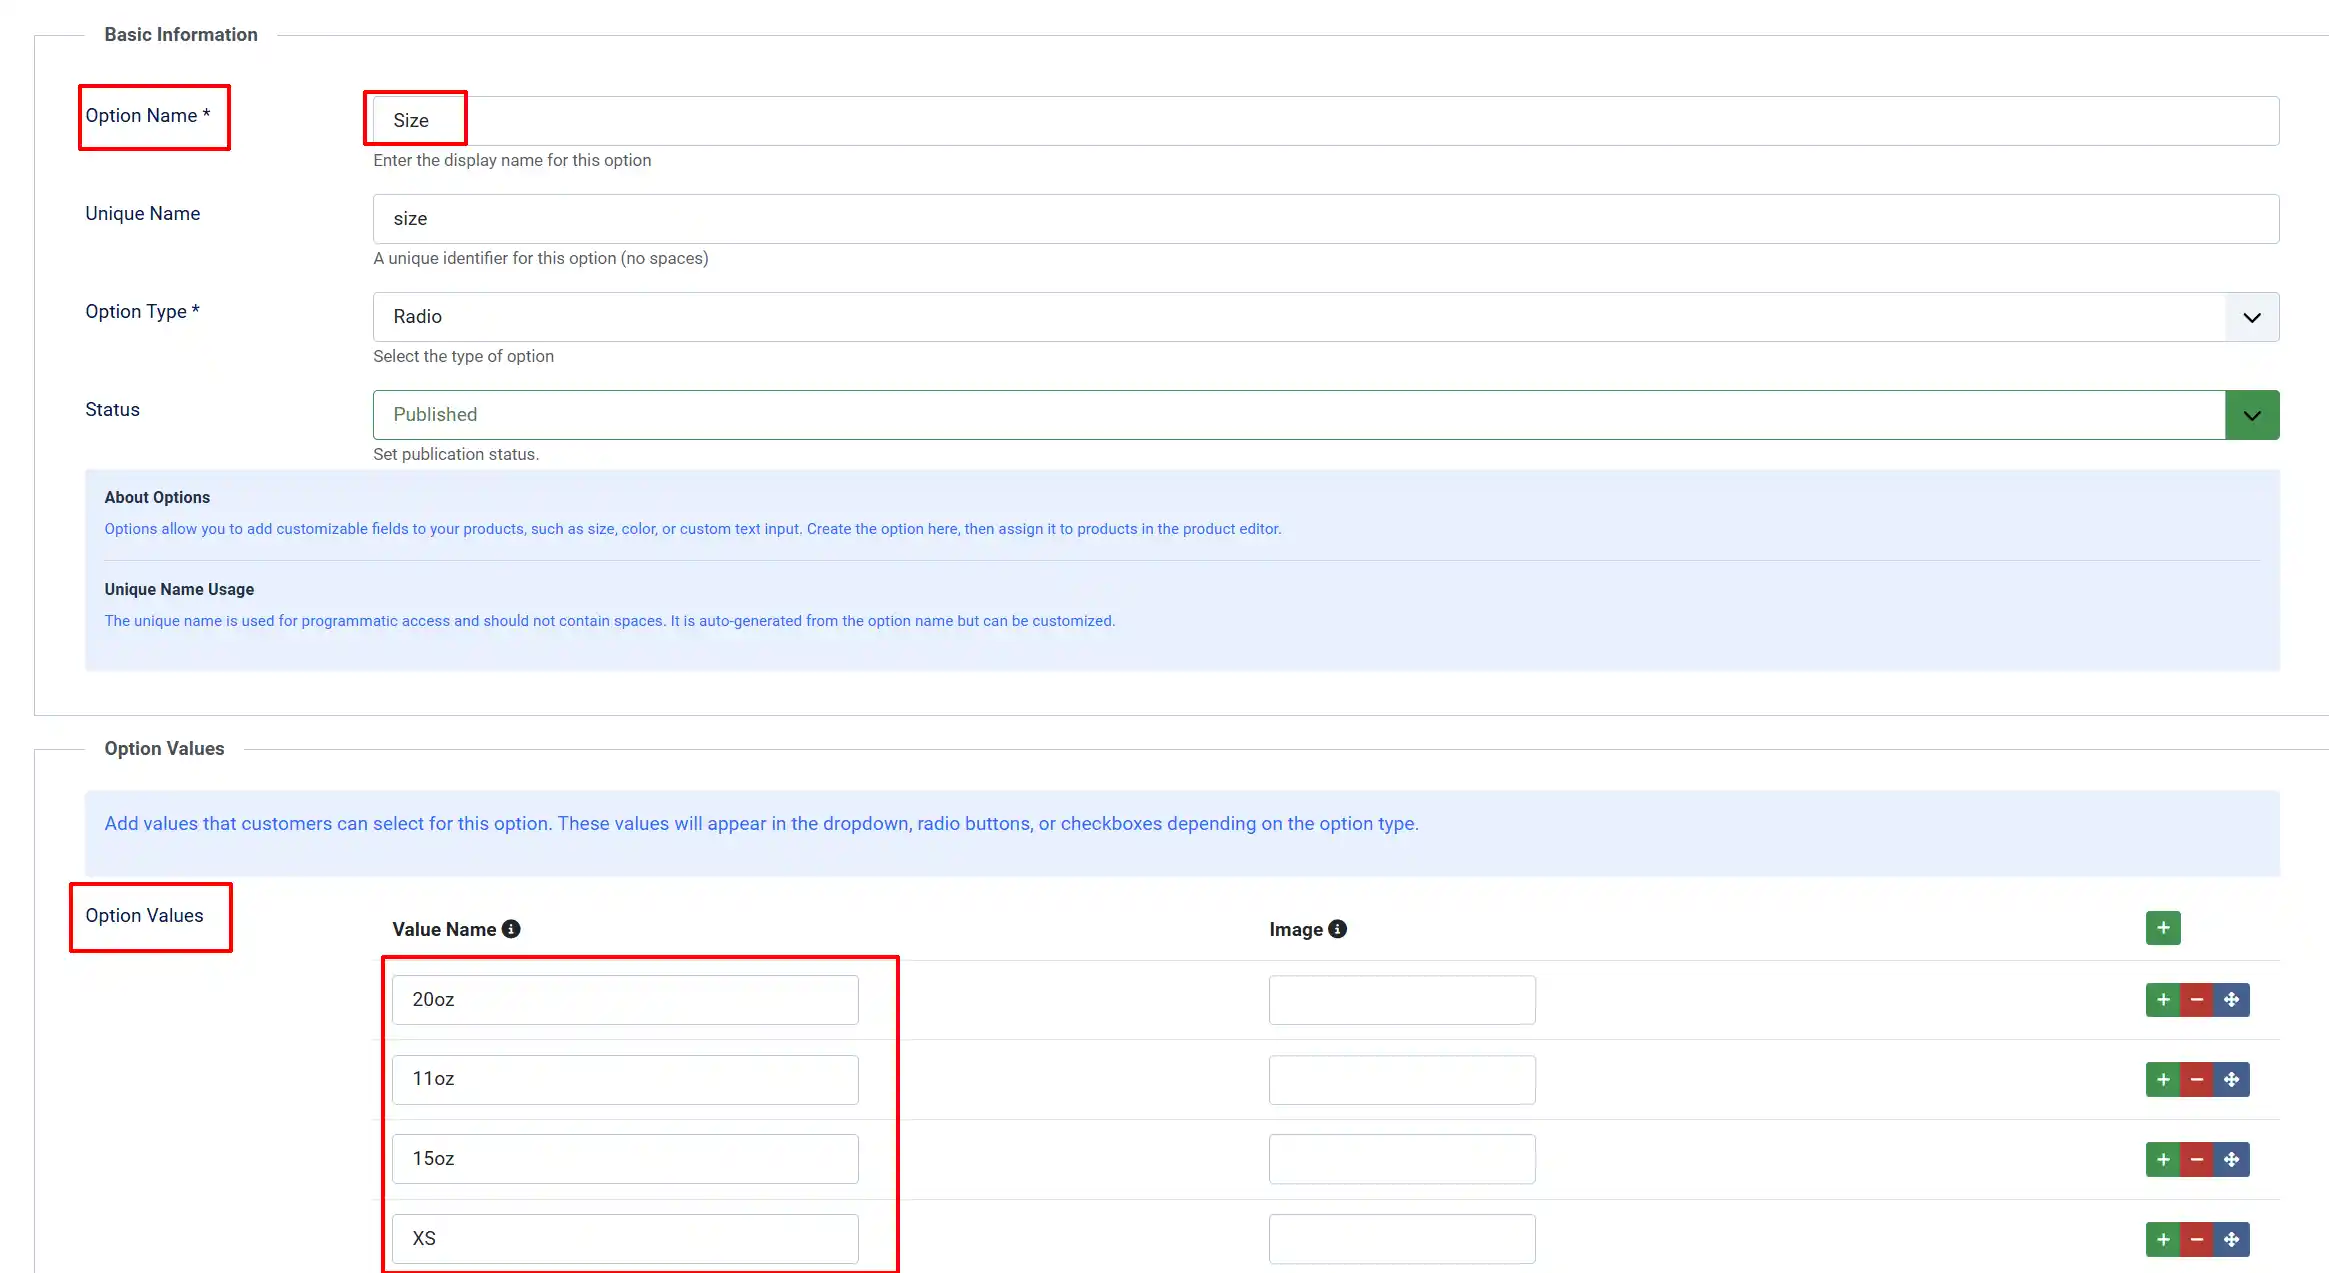
Select New to create a new option. (for example, Name: Size, Type: select).
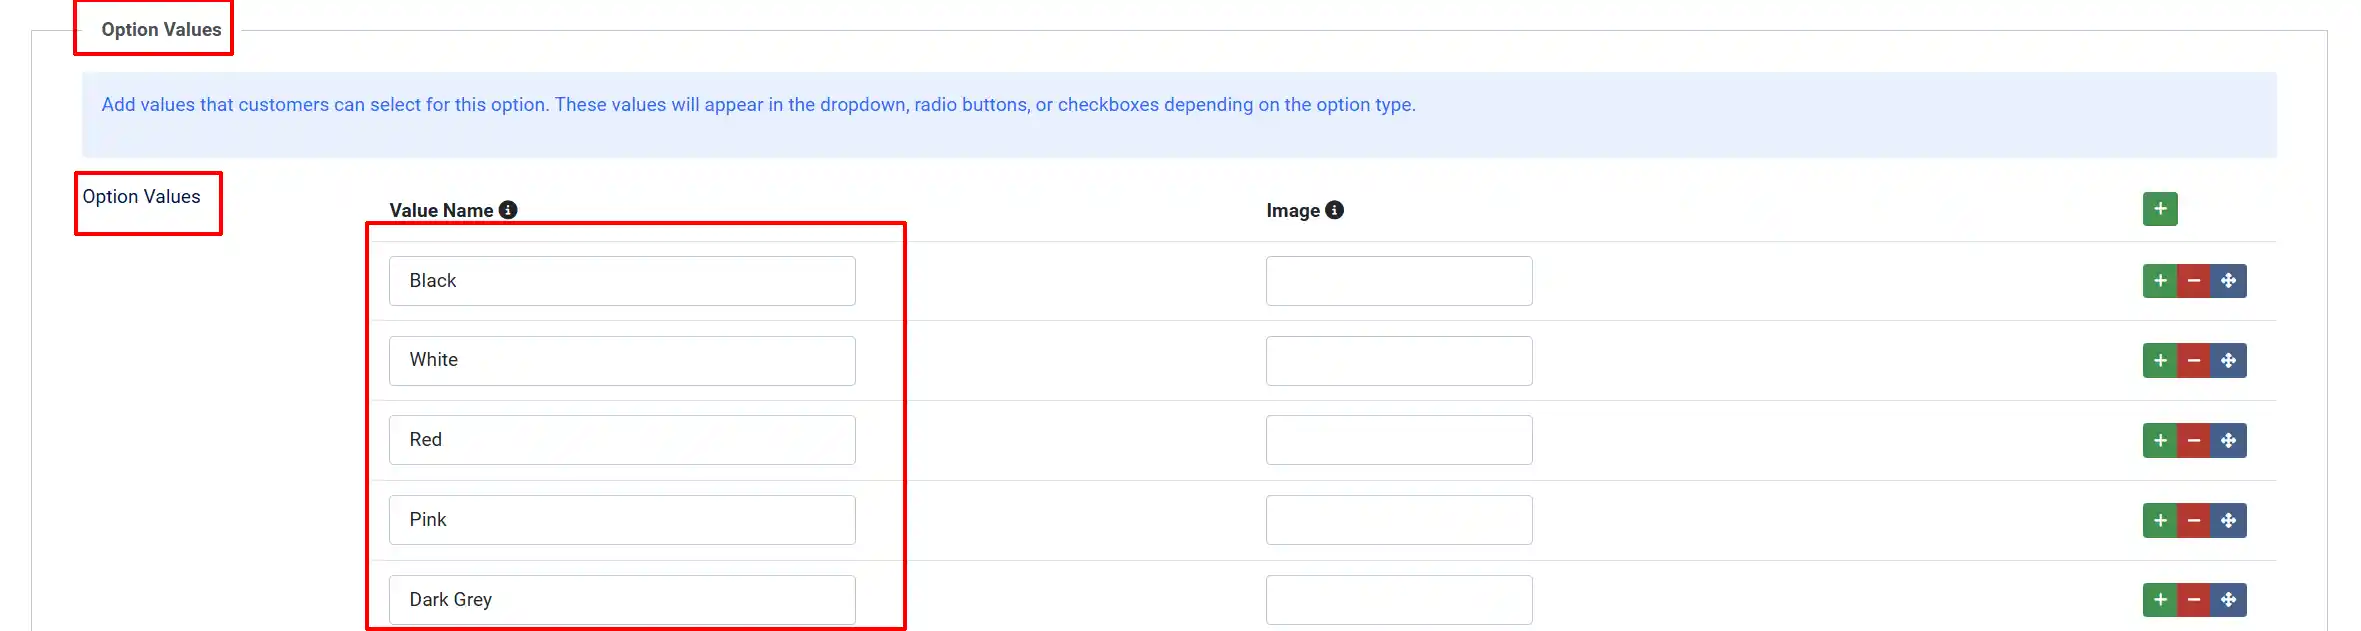
Add the option values (Small, Medium, Large) to the option
Repeat for each option you plan to use (e.g., create a separate "Color" option with values Red, Blue, Green).
You only need to do this once. The same options can be reused across many products.
Option Name: The label customers see on the product page, for example, "Size" or "Color".
Option Unique Name: An internal identifier (no spaces) used to distinguish options with the same display name.
Type: Controls the input style shown to customers. See the table below for all types.
Option Types
Select: A dropdown menu
Radio: Clickable button group
Checkbox: Multiple-choice checkboxes
Color: Color swatch buttons
Text: A single-line text input
Textarea: A multi-line text input
Date / Datetime / Time: A date or time picker
Number: A numeric input field
File / Image: A file upload input
Email / URL: A formatted text input
Tip
IMPORTANT: For Select, Radio, Checkbox, and Color option types, add your option values in the Option Values section that appears below the type field. Each value needs a name, and optionally an image.
Create a New Product Article
Variable products in J2Commerce are attached to Joomla articles.
There are many ways you can access products or articles.
Option A: Go to the J2Commerce icon at the top right corner -> Catalog -> Products -> New
Option B: Go to Components on the left sidebar -> J2Commerce -> Products -> New
Option C: Go to Content -> Articles -> New
Setting up the Product
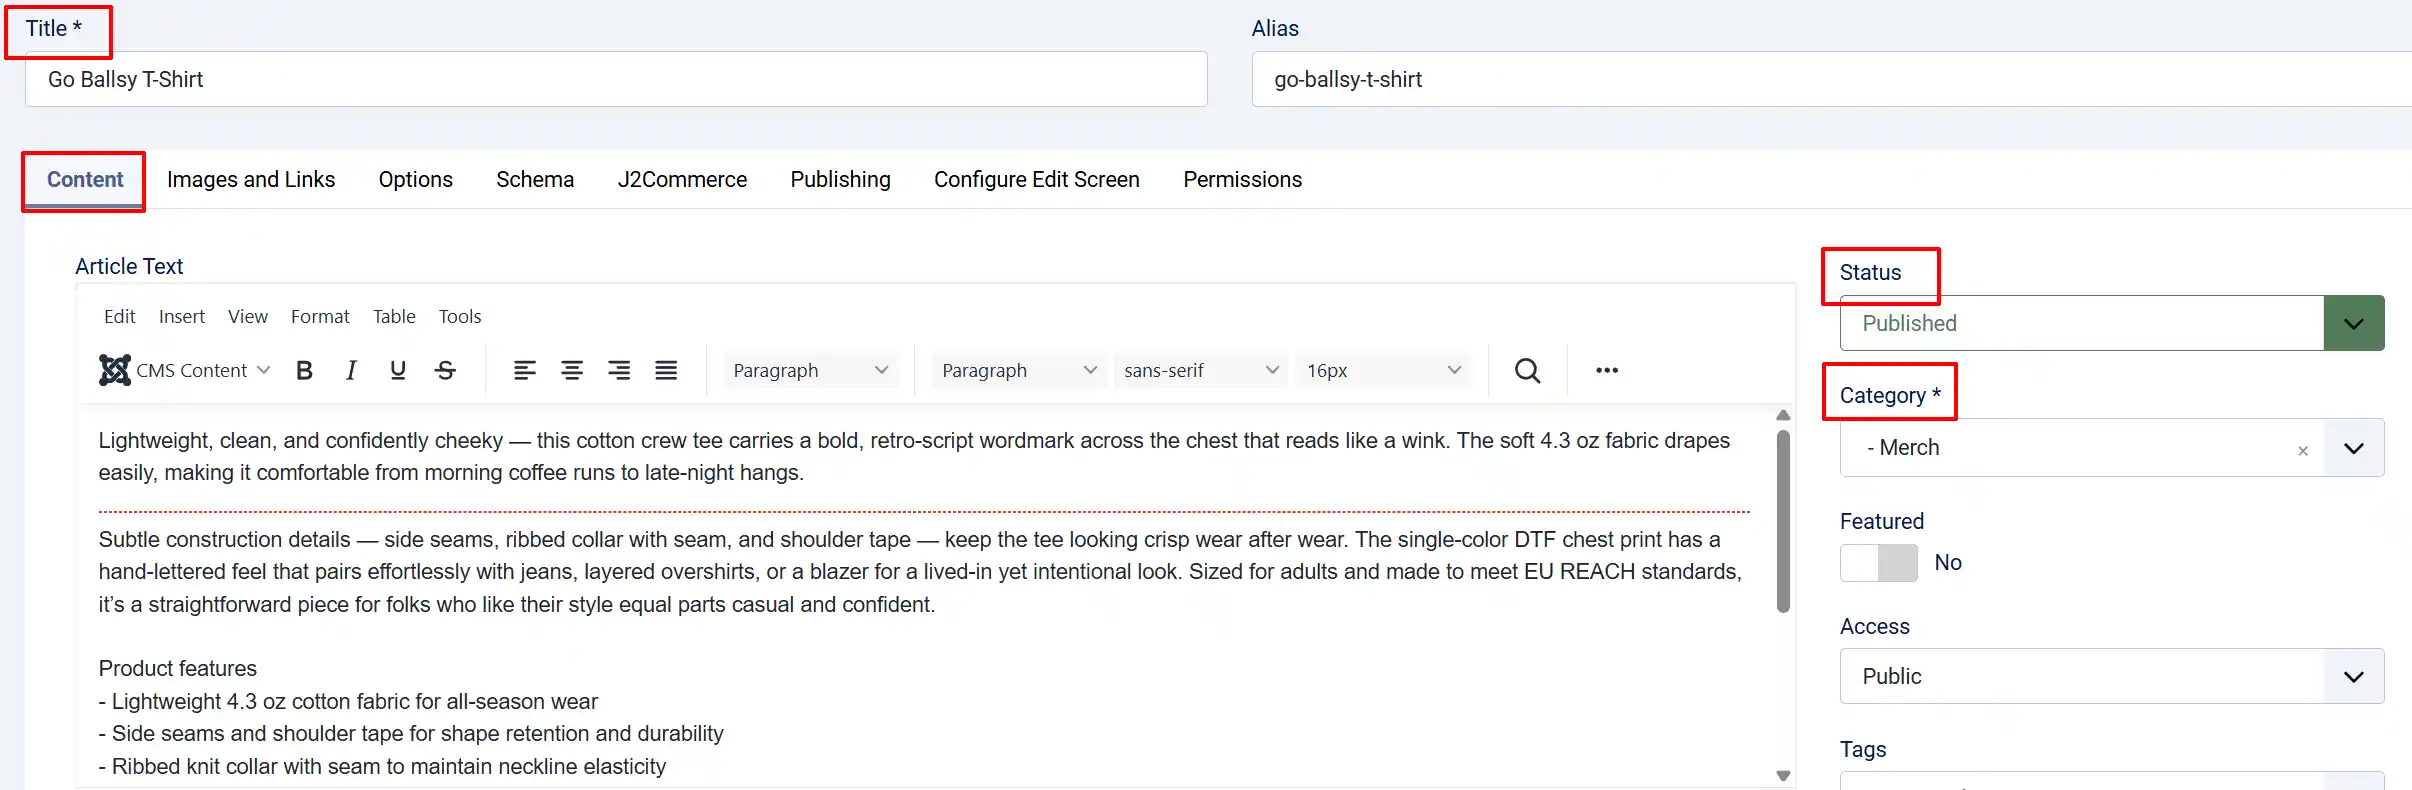
Give the article a title (e.g., "Classic T-Shirt").
Add your product description in the article body.
Info
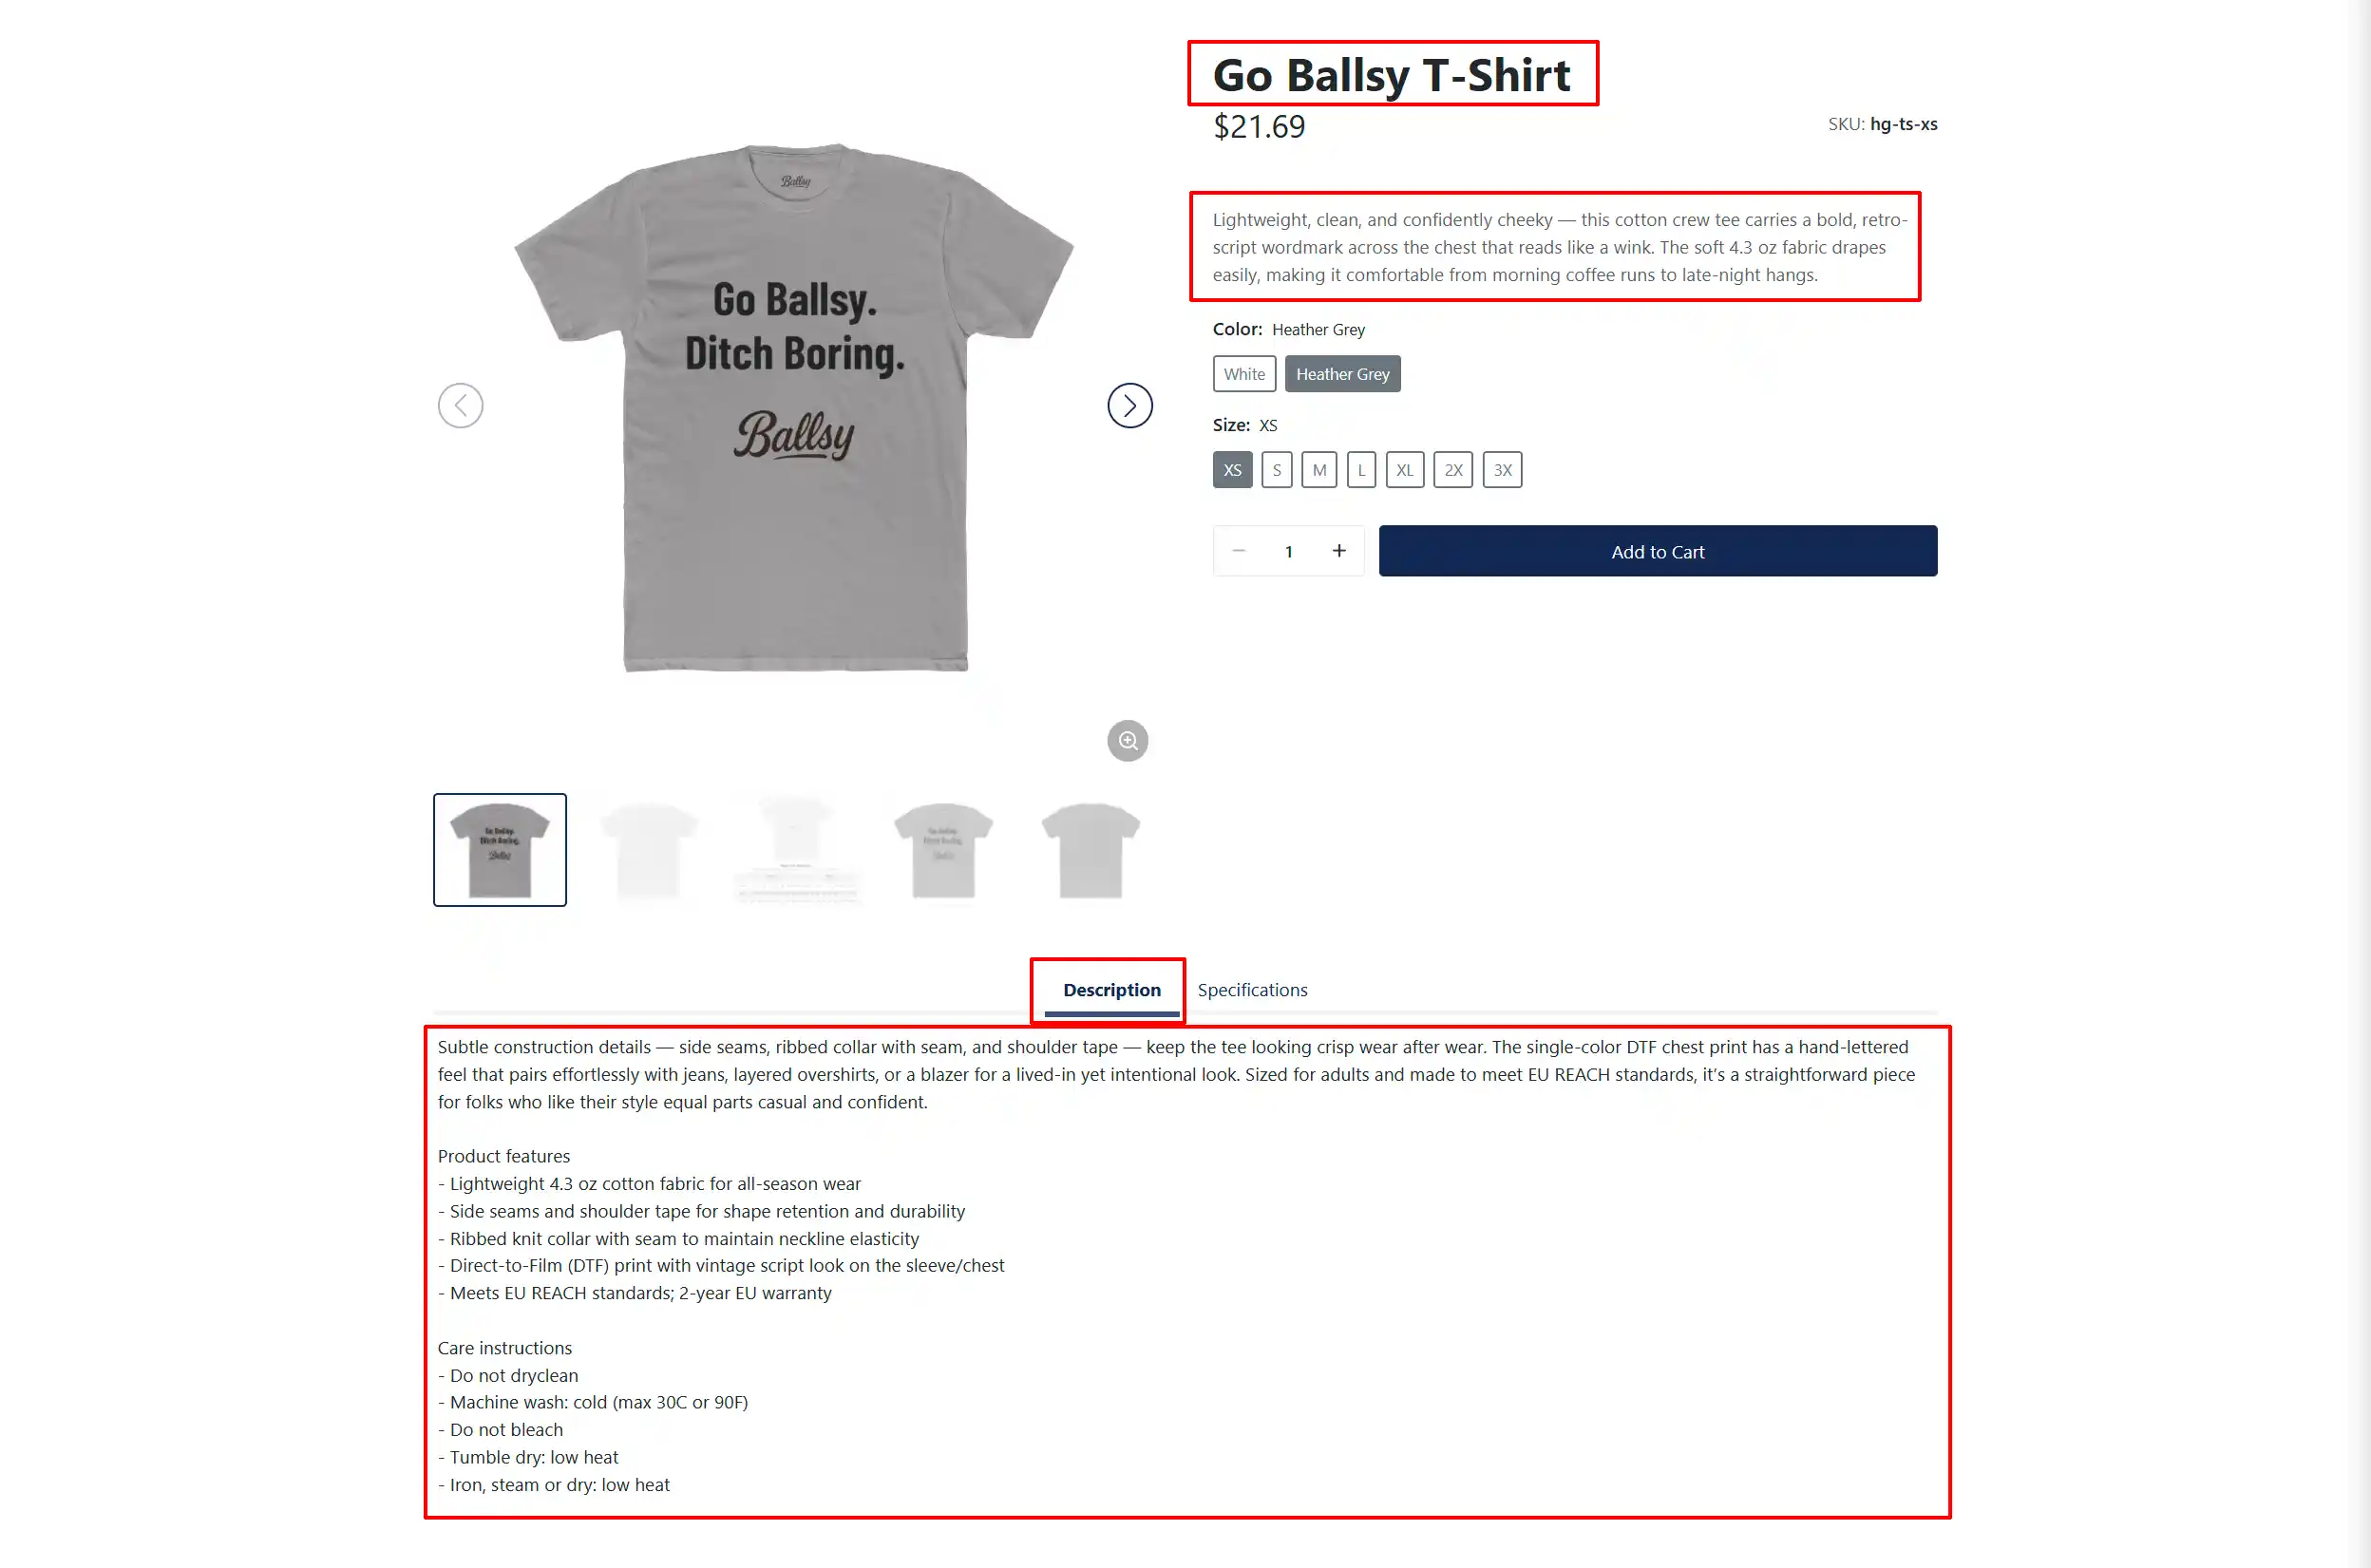
Note: The intro description above the red 'Read More' line will appear under the main title of the product. The main description will appear under the description tab below the product
The intro description above the red 'Read More' line will appear under the main title of the product. The main description will appear under the description tab below the product
Set the article's state to Published.
Assign the article to the appropriate category.
Frontend View
Add J2Commerce Details to the Article
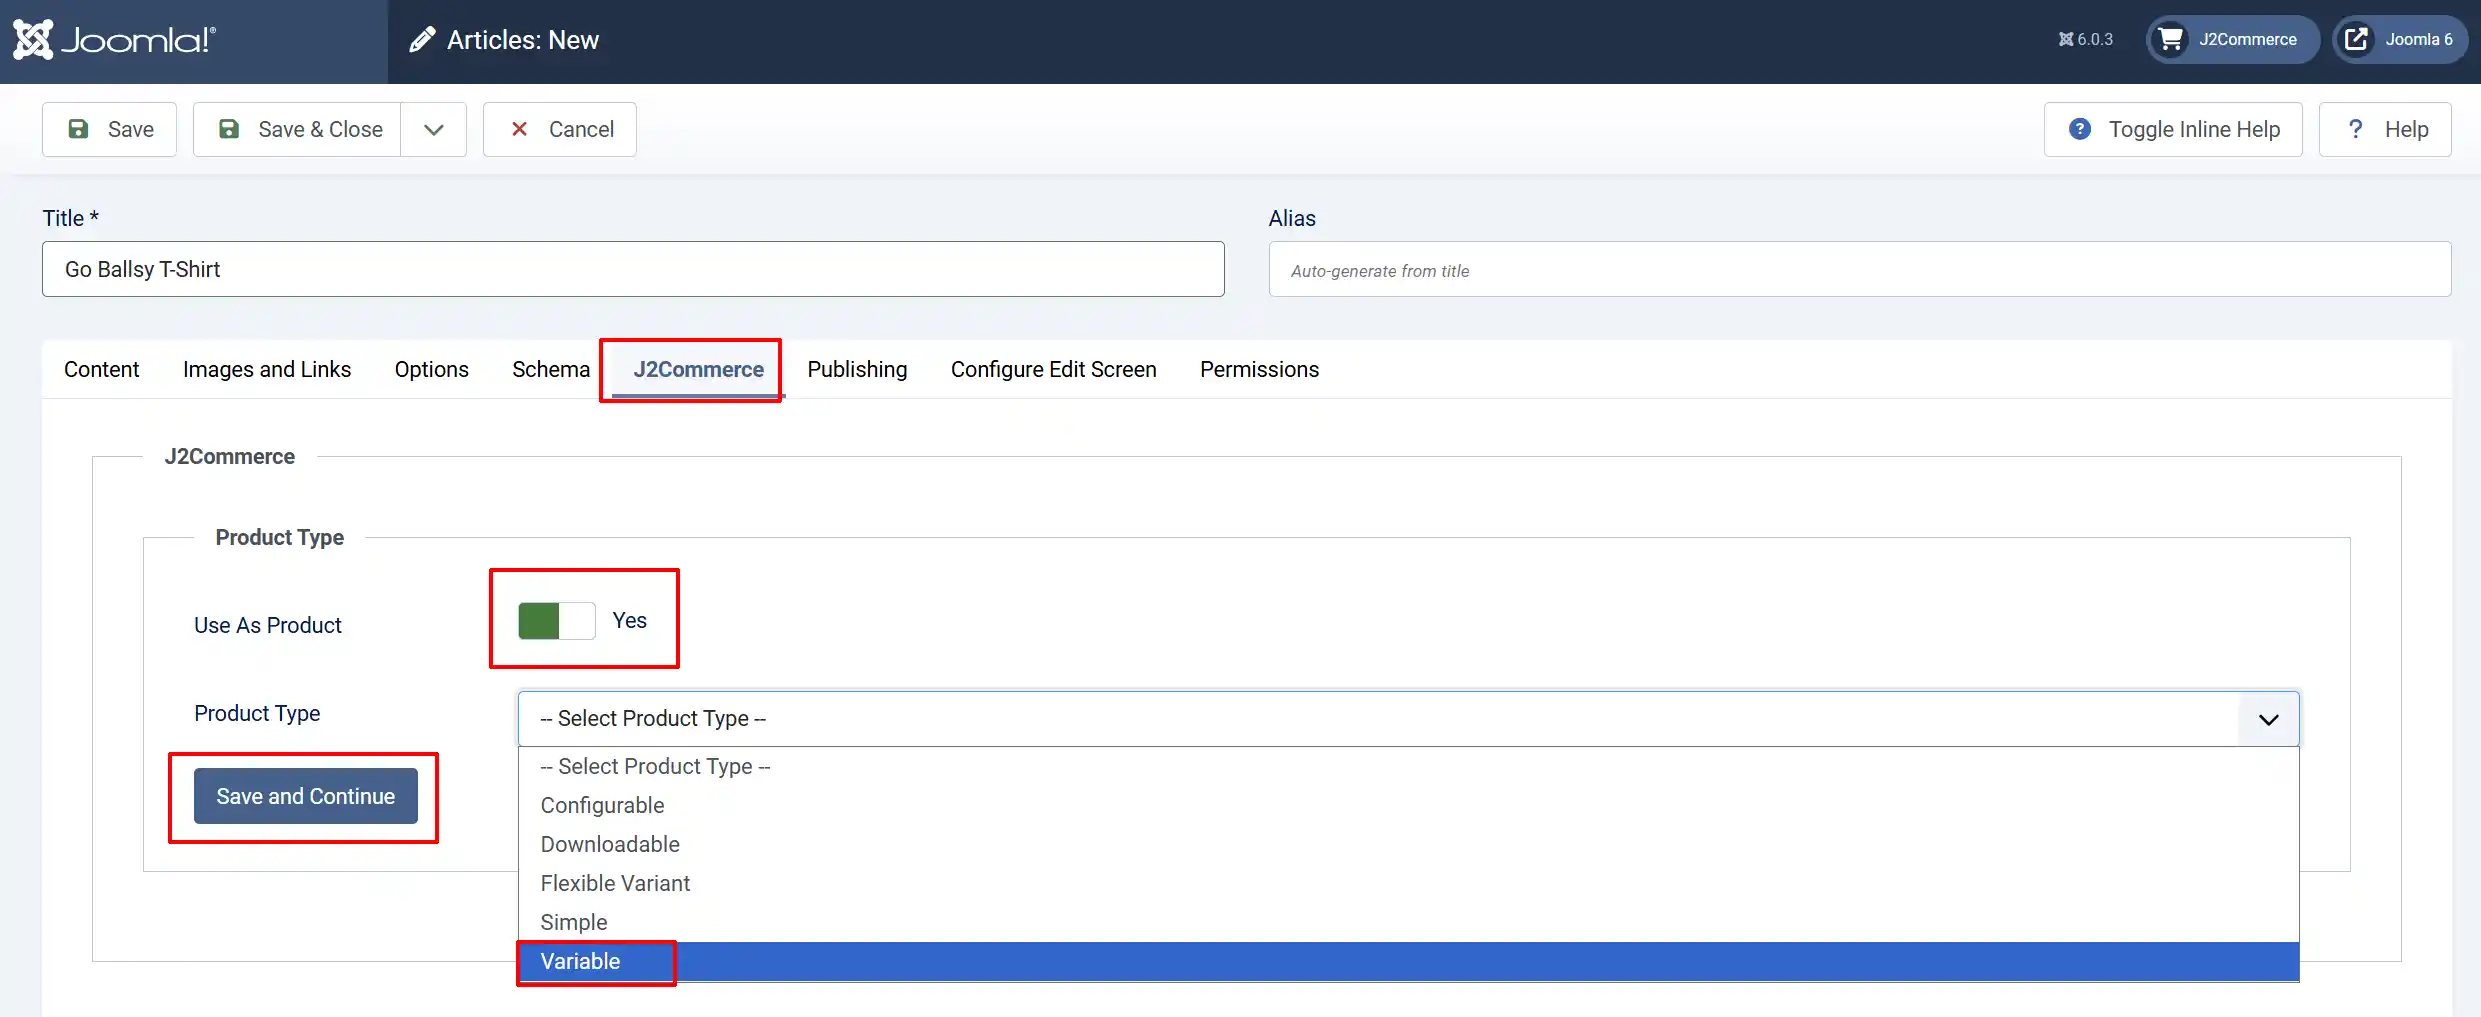
Open the Product Article -> J2Commerce tab
Use as Product: Select 'Yes'
In the Product Type dropdown, select Variable.
Click Save and Continue
General Tab
The General tab sets product-wide settings that apply to the whole product, not individual variants.
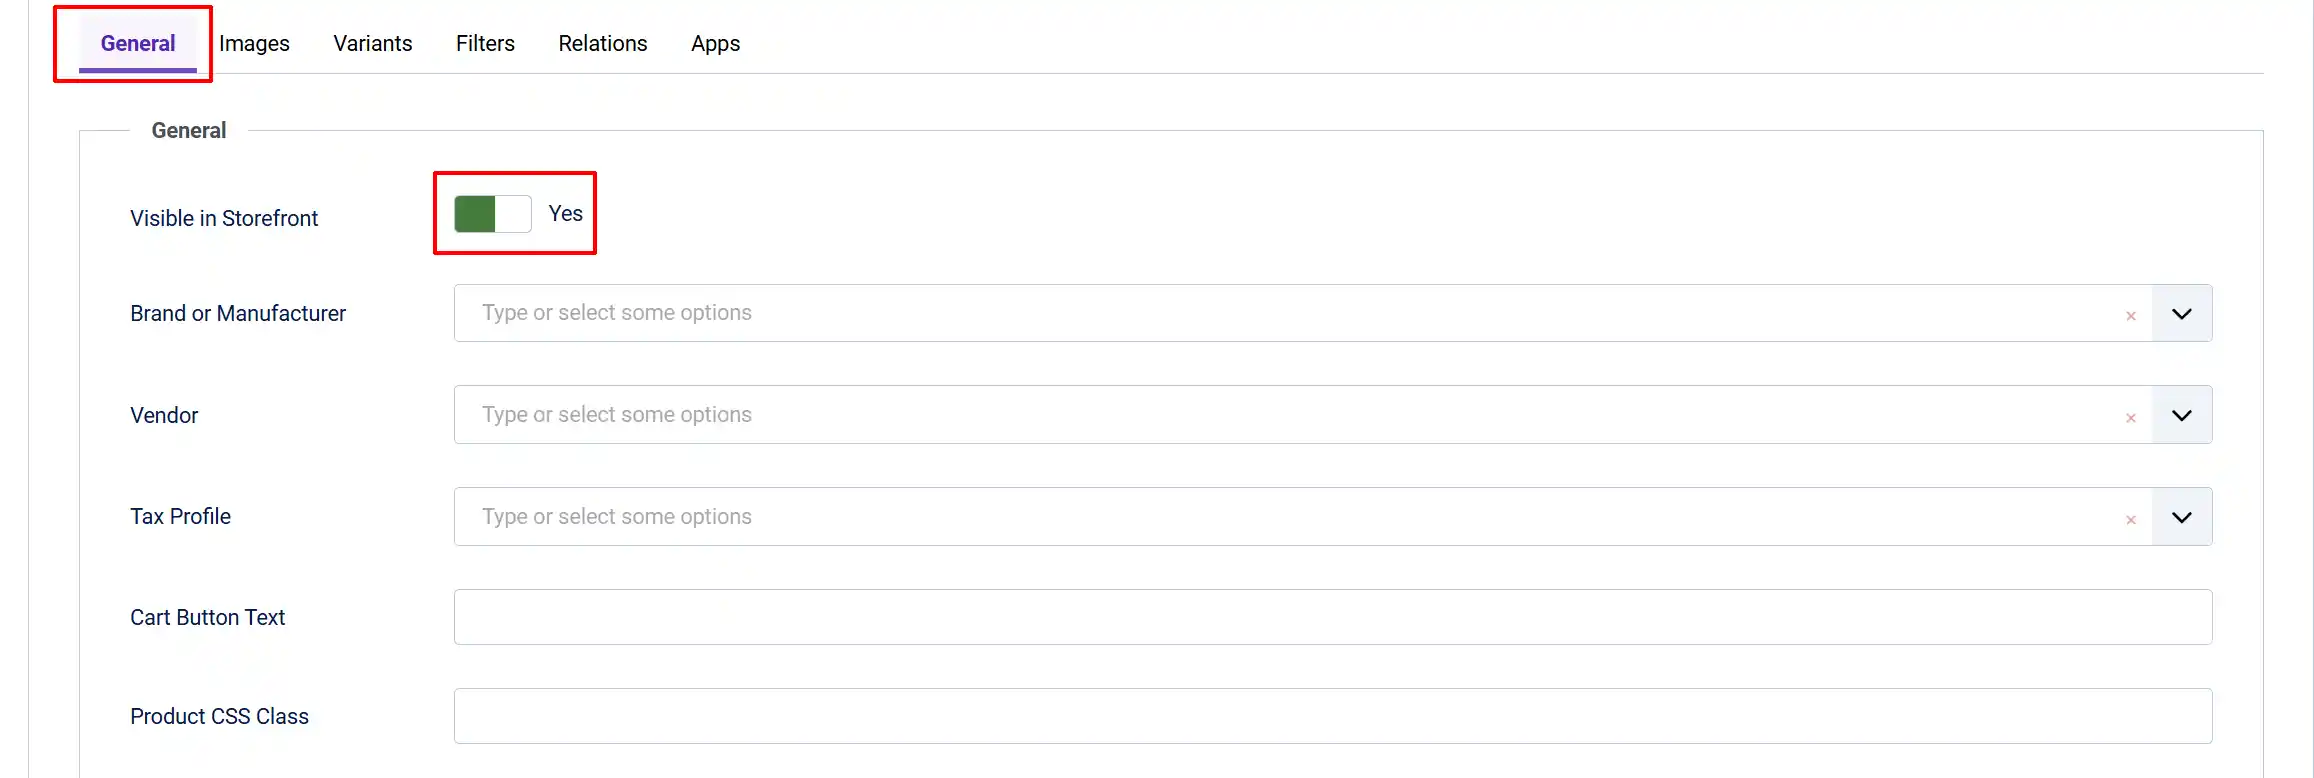
Visible in Storefront: Show or hide the product in storefront listings. Set to 'Yes' to make it visible to shoppers.
Brand or Manufacturer: Links this product to a manufacturer record. Useful for filtering and for the Custom Accordions app's Brand Details feature.
Info
NOTE: You have to set up the Manufacturer details in both an Article and under J2Commerce -> Catalog -> Manufacturer, in order for them to appear in the dropdown menu
Vendor: Assigns the product to a vendor. Relevant for multi-vendor setups. Leave blank if you do not use vendors.
Info
NOTE: You have to set up the Vendor's details in both an Article and under J2Commerce -> Catalog -> Vendors, in order for them to appear in the dropdown menu
Tax Profile: Assigns a tax profile to this product. The tax profile determines which tax rates apply based on the customer's location. Create tax profiles under J2Commerce -> Taxes.
Cart Button Text: Customize your cart button name. This will override the default "Add to Cart" button label for this product only. Leave blank to use your store's global button label.
Product CSS Class: Adds one or more CSS class names to the product's container element. Useful for per-product styling without modifying template files.
Image tab
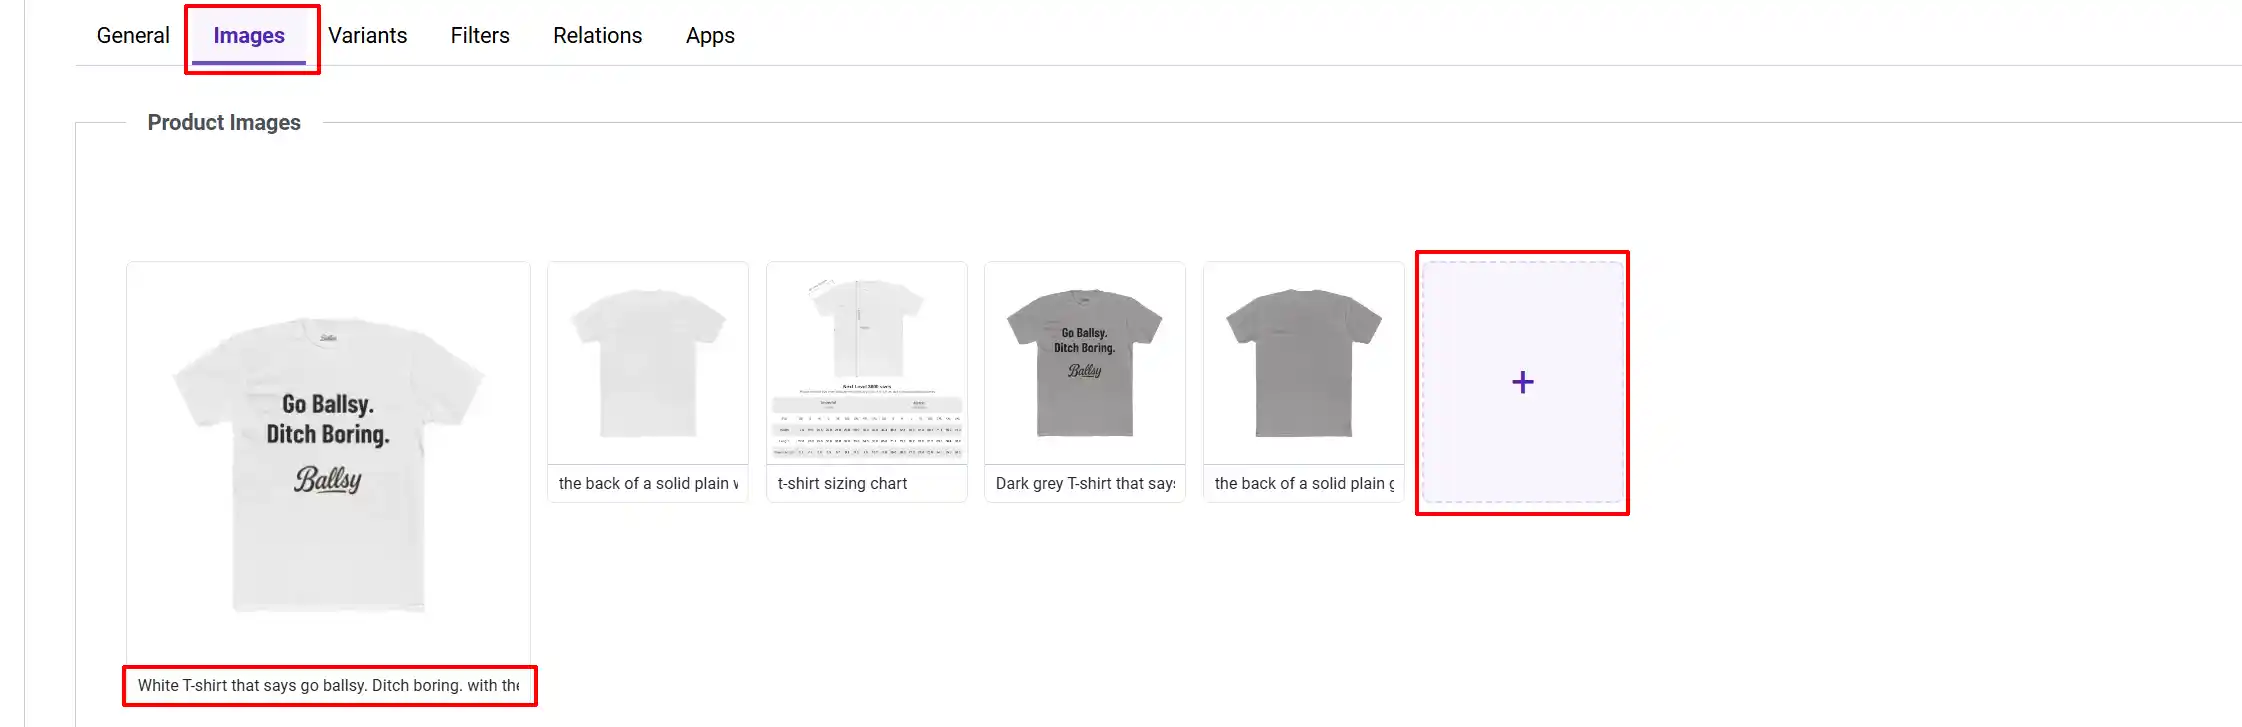
On the Images tab, click Upload Image or drag image files directly into the upload area.
-
Supported formats: JPG, JPEG, PNG, GIF, WebP, AVIF.
-
The main image appears on the product detail page and in category listings.
-
Gallery images appear in the image gallery on the product page.
-
Individual variants can also have their own images — you set those later.
Frontend View
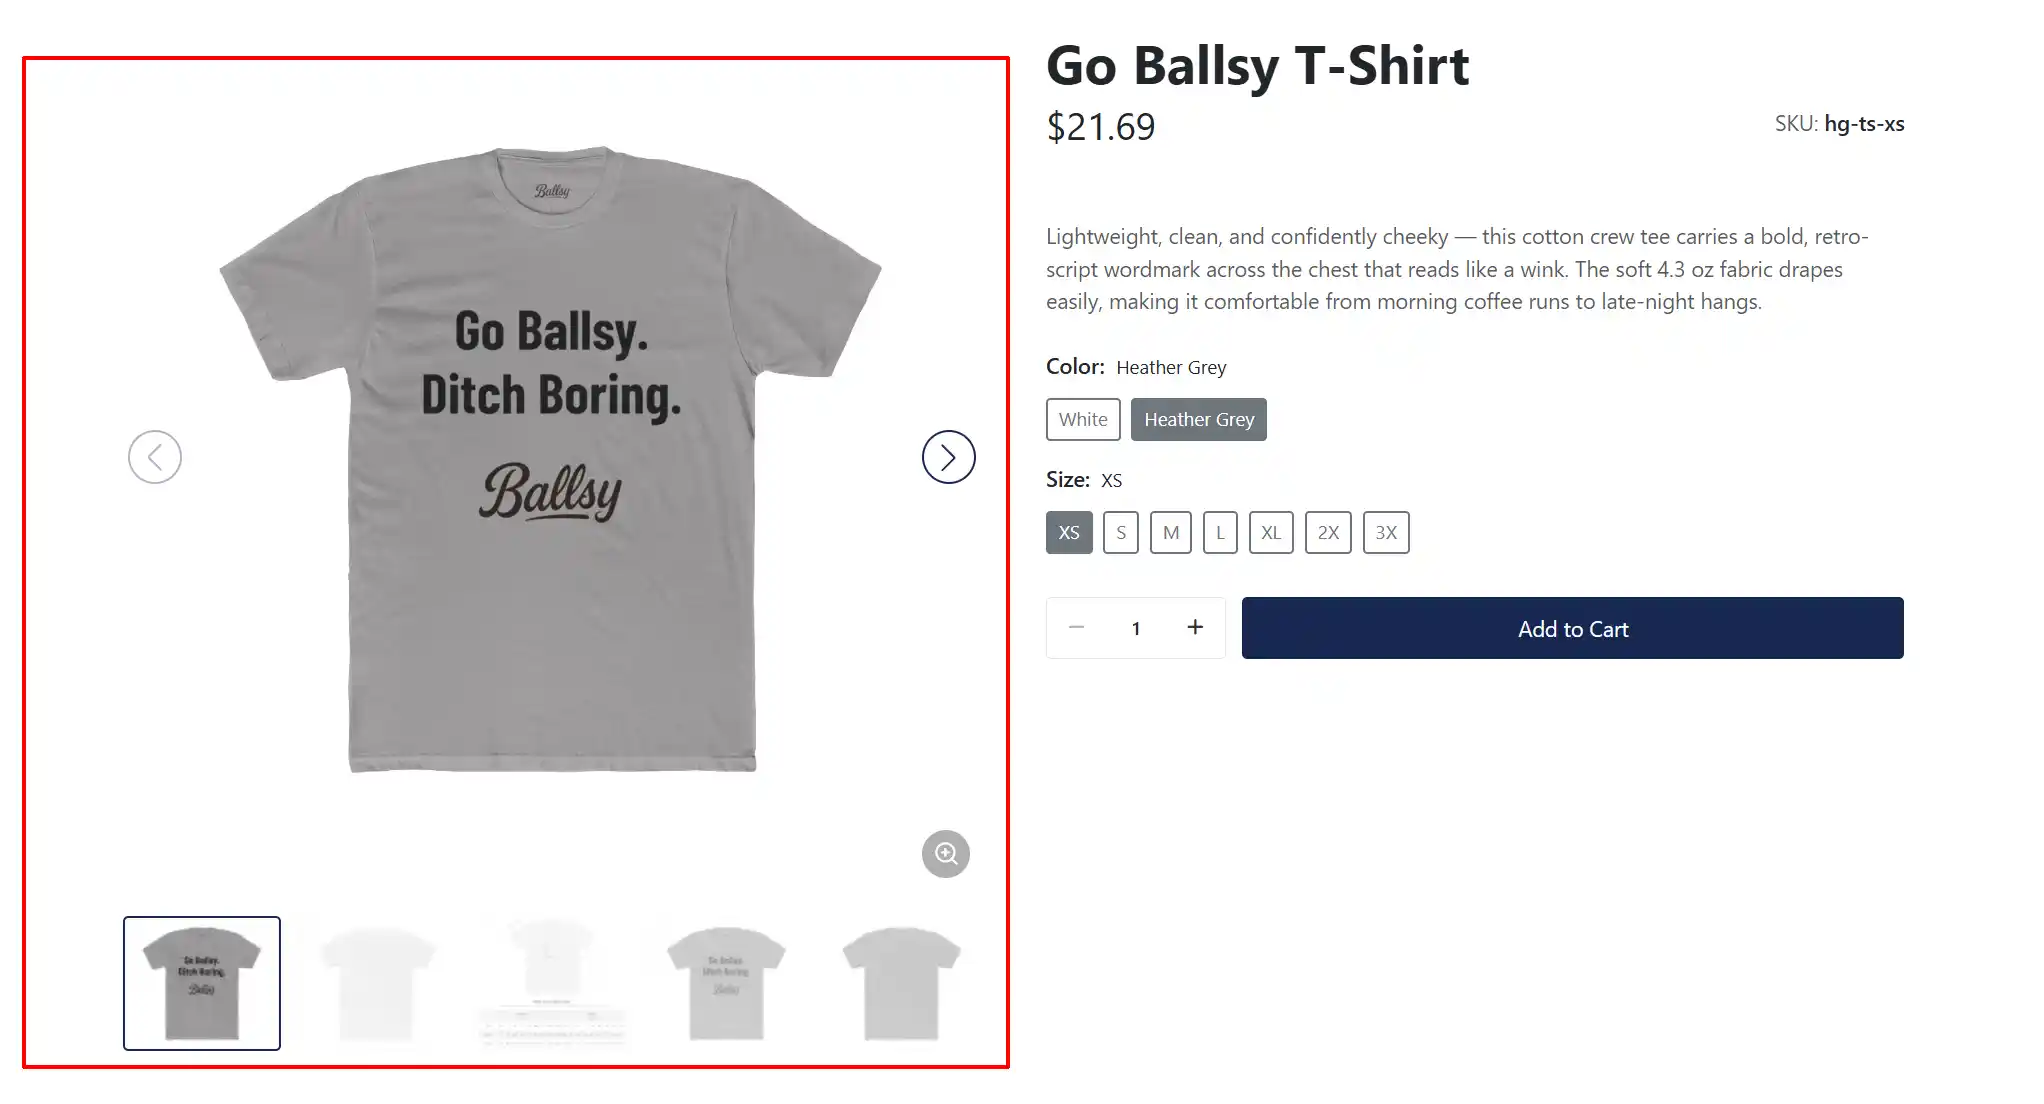
Image Order and the Main Image
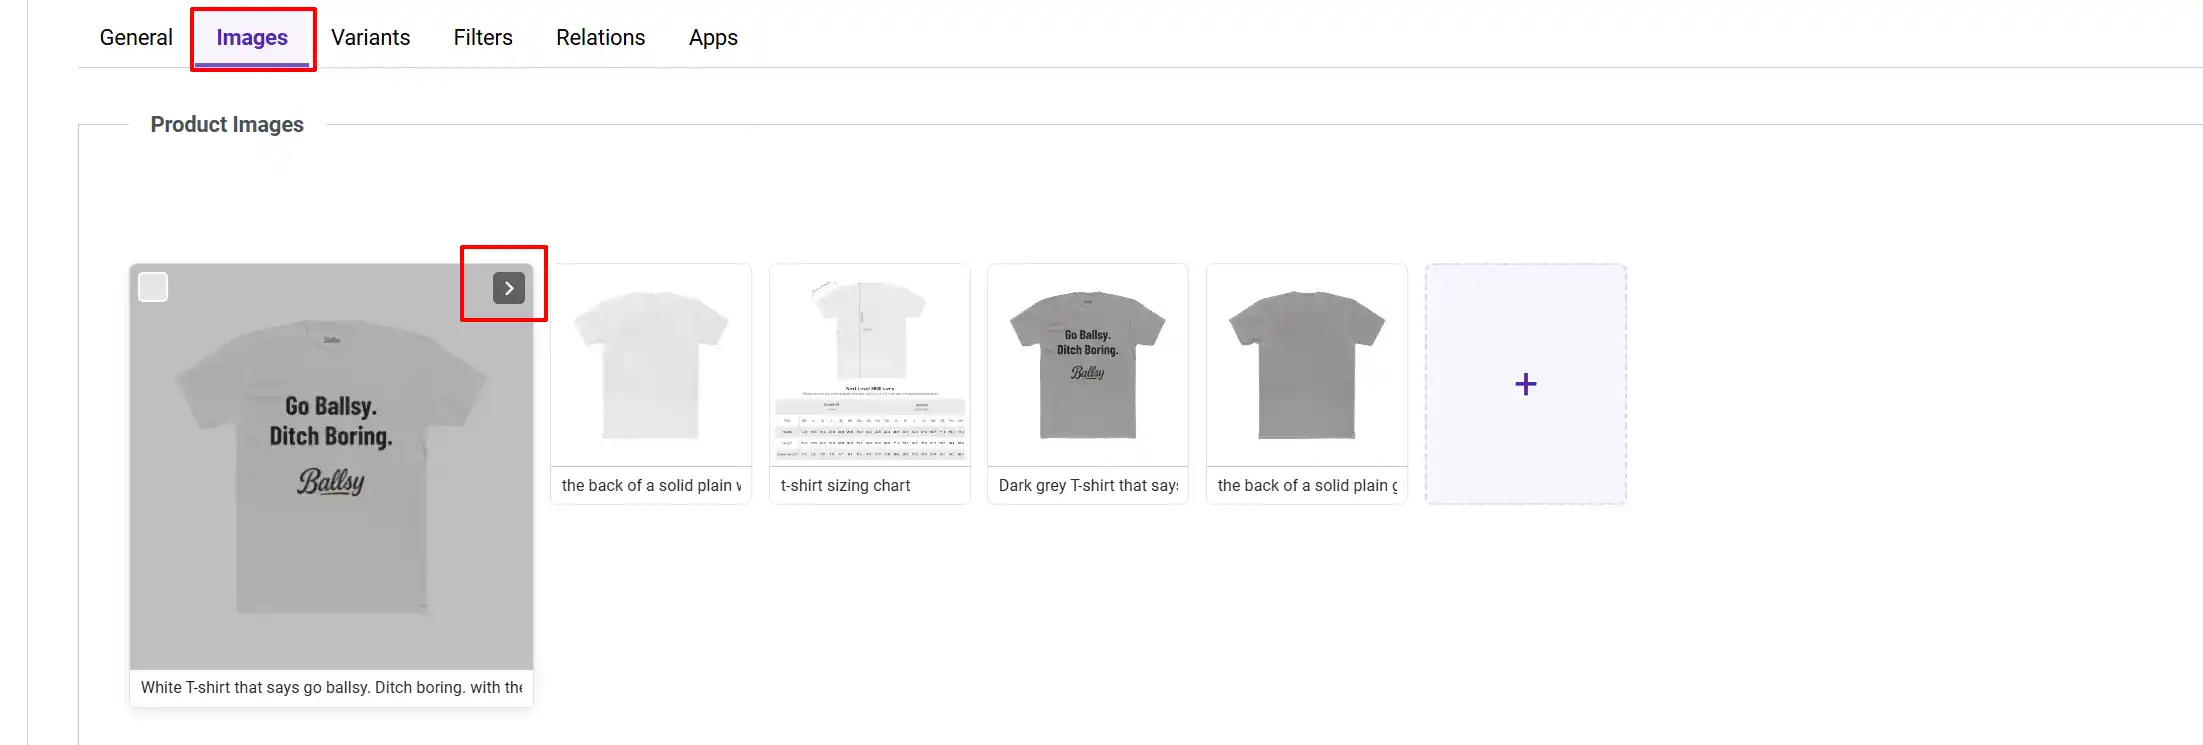
The first image in the uploader is the main product image — the large image shown on the product detail page and used as the thumbnail in listings. To reorder:
- Hover over an image card to reveal the left and right arrows.
- Click the arrows to move the image to a new position.
- Save the product to apply the new order.
Automatic Thumbnails
J2Commerce automatically generates resized thumbnails and tiny versions of each uploaded image. These are used in product listings, the cart, and other compact views. No extra configuration is needed — the sizes are set in your store's image configuration.
Alt Text
Each image card has an Alt Text field. Write a short description such as "Blue ceramic mug, 350ml". Alt text is read by screen readers and used by search engines to understand your images.
Removing Images
Clicking Remove on a card removes the image from this product but does not delete the file from the server. To delete the file permanently, use the file browser icon in the uploader.
Creating Variants
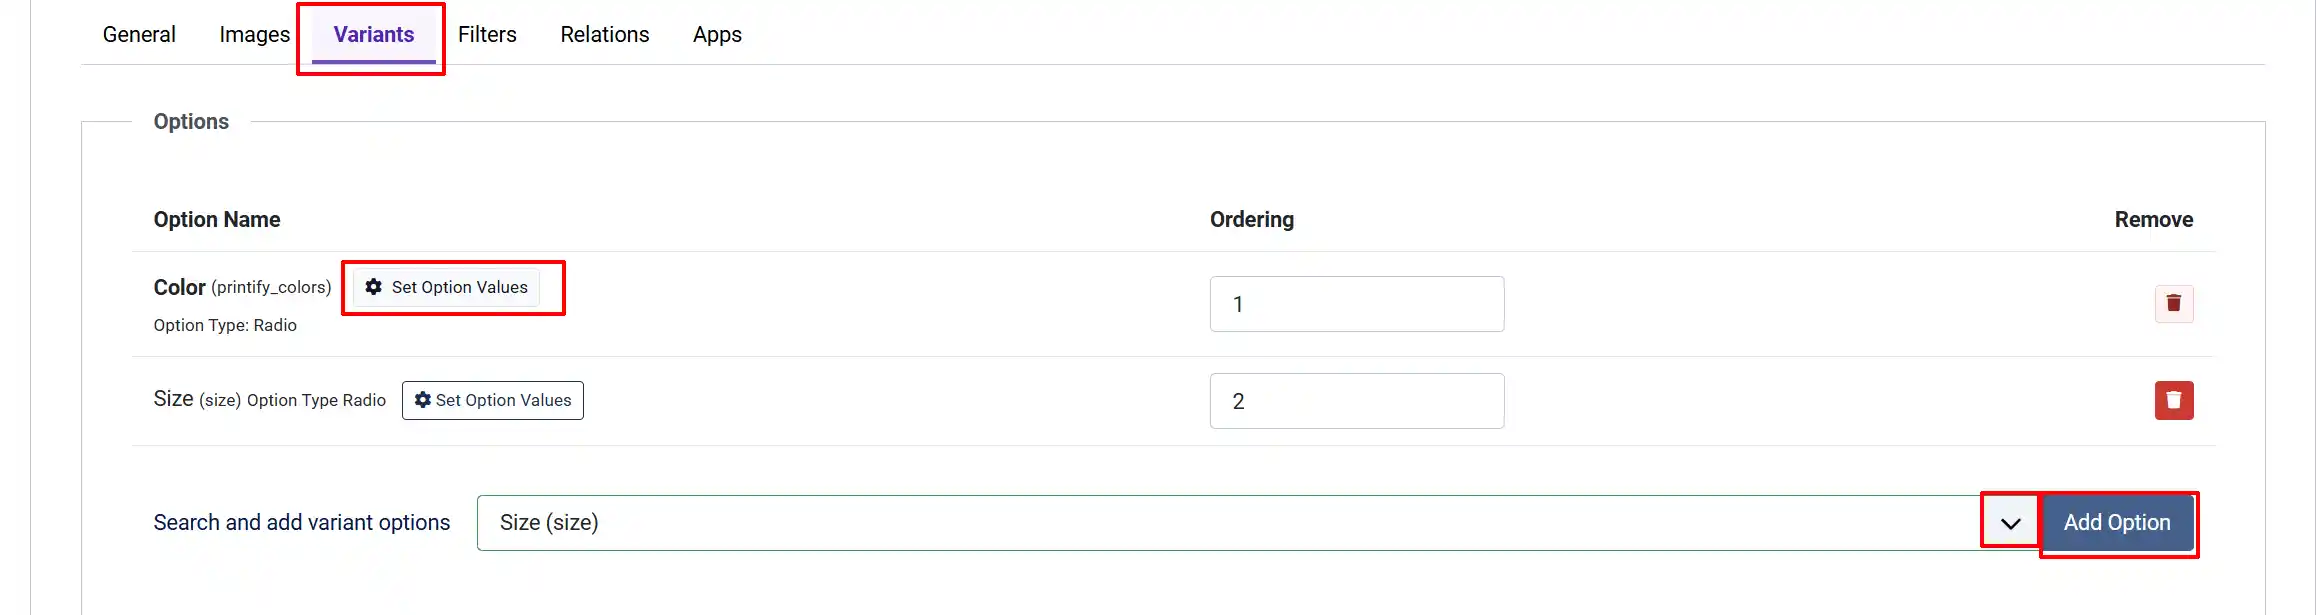
The Variants tab is where the core Variable product workflow happens. It has two sections: Options at the top and Variants below.
Add Options to the Variant
The Options section shows which options define the combinations for this product.

- In the Search and Add Variant Option dropdown, select the first option (e.g., "Size").
- Click Add Option.
- The option appears in the table. Repeat to add more options (e.g., "Color").
You can set an ordering number for each option to control which option the customer sees first.
Info
Note: If no options exist yet, a warning appears with a link to create options. You must first create options under J2Commerce -> Catalog -> Options.
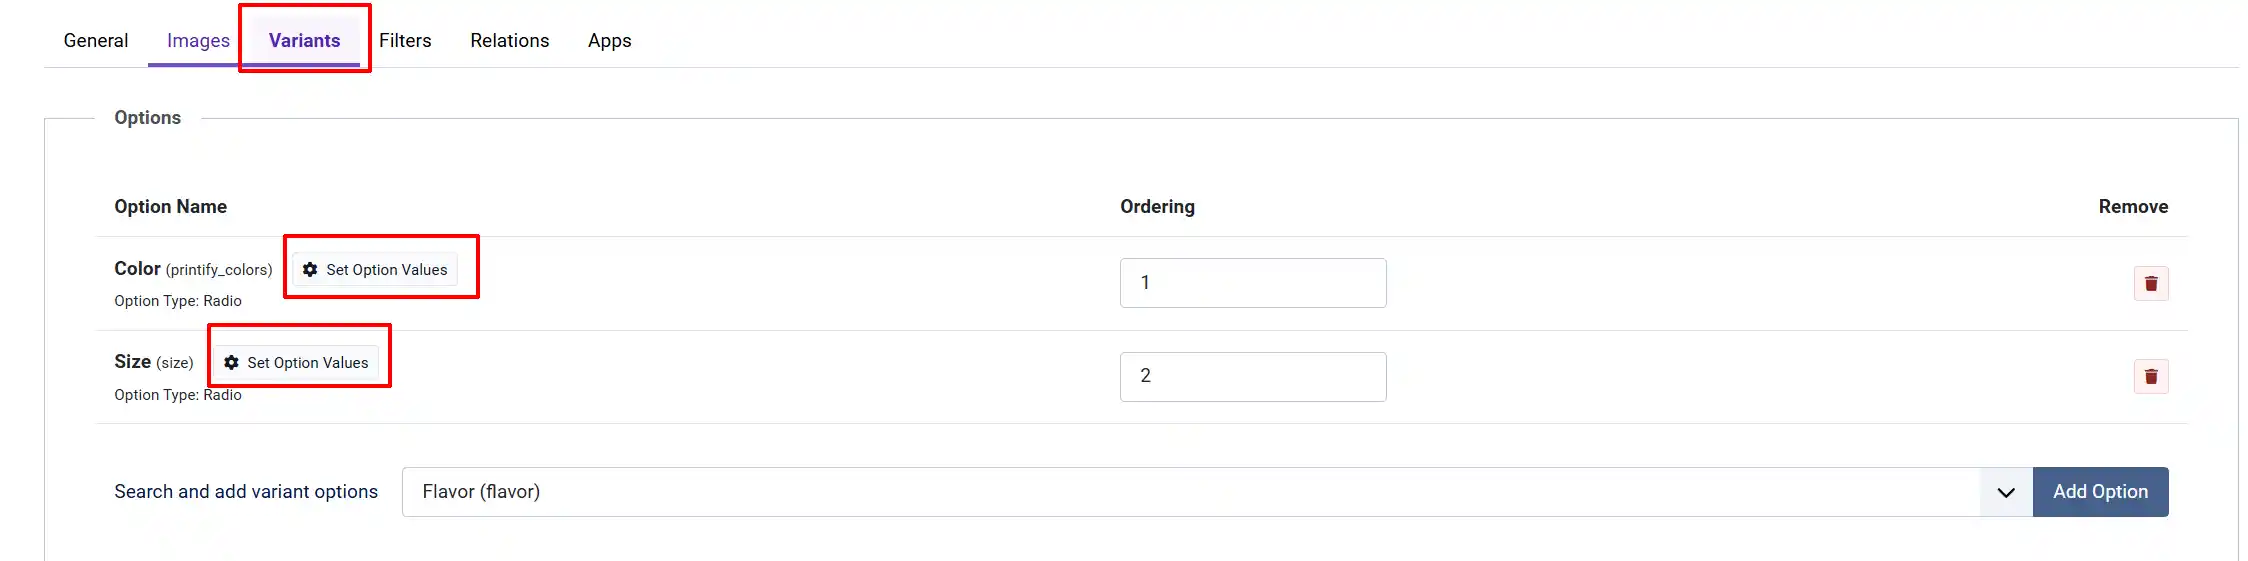
Set Option Values for This Product
After adding an option that uses a dropdown (select), radio, or color type, a Set Option Values button appears next to it.
-
Click Set Option Values next to an option.
-
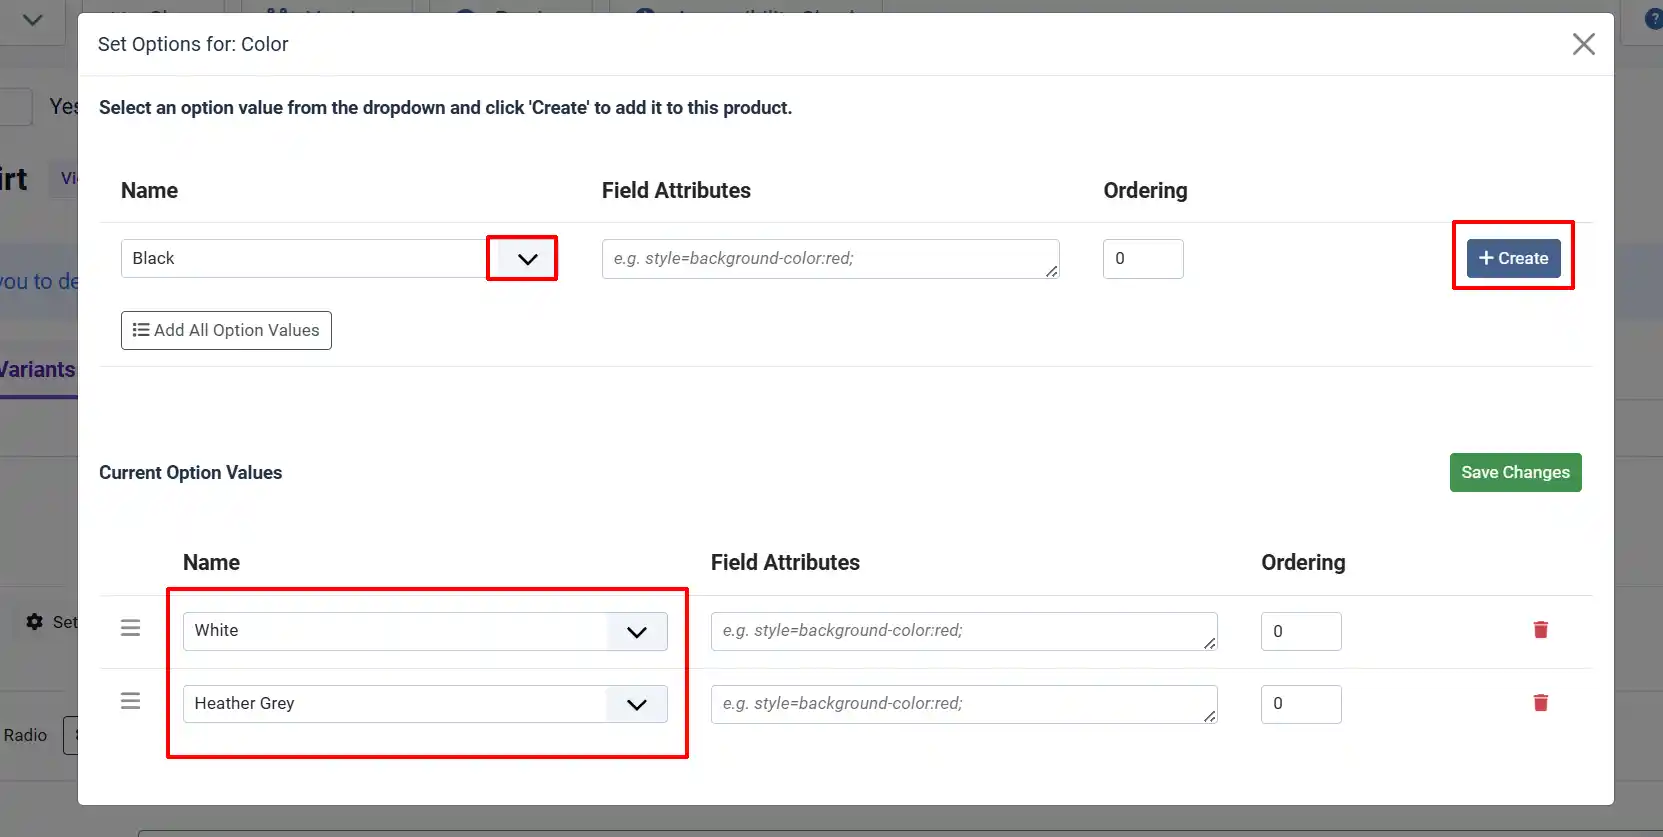
A panel opens showing all available values for that option.
-
Click Add All to include every value, or add values individually.
-
Click Save Changes when done.
-
Repeat for every option on the product.
Generate Variants
Once options and their values are configured, J2Commerce can generate all possible combinations. You can delete the individual ones that won't apply to your product
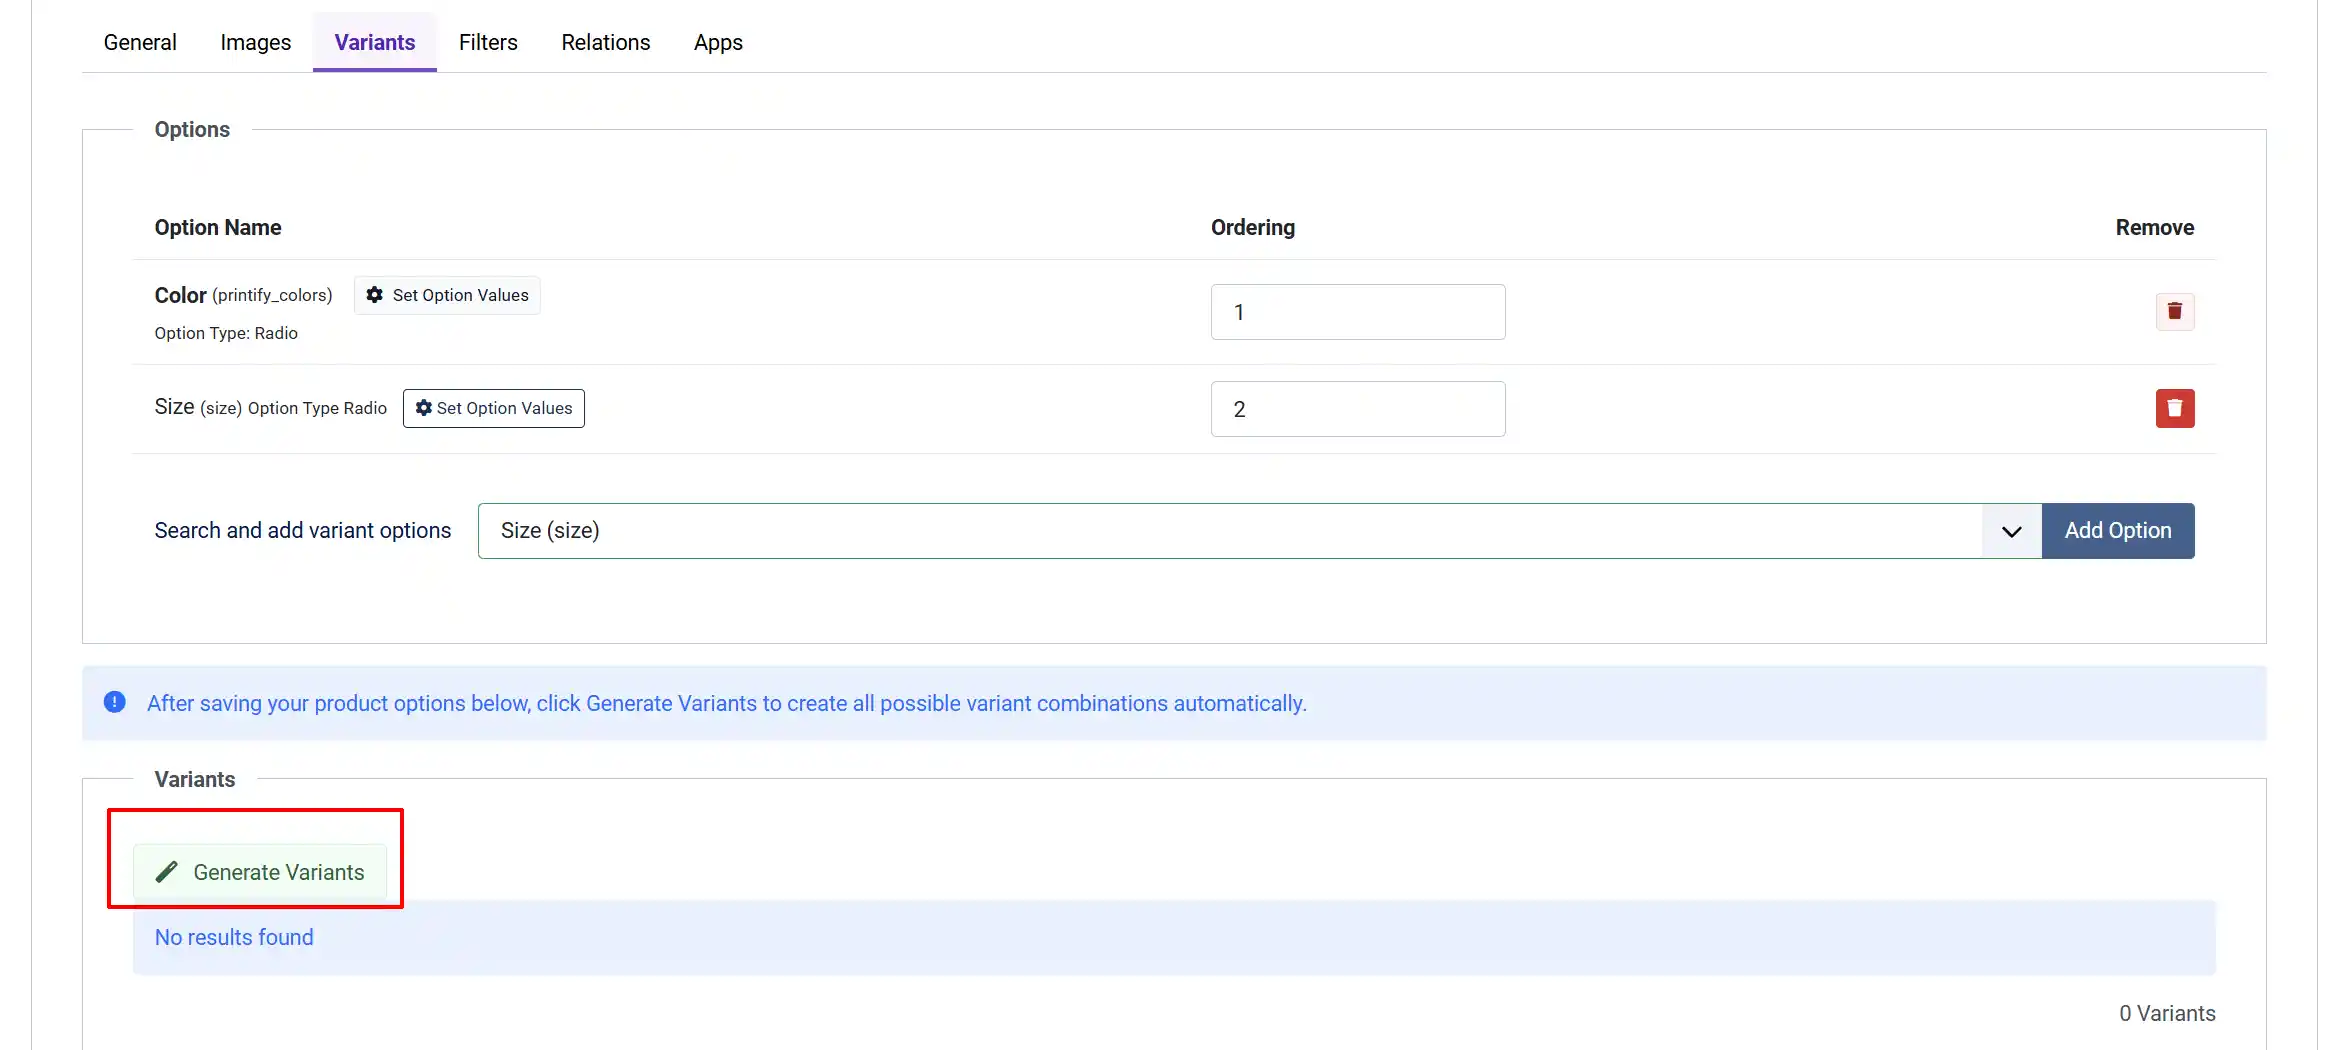
In the Variants section below the Options table, click Generate Variants.
Confirm the prompt
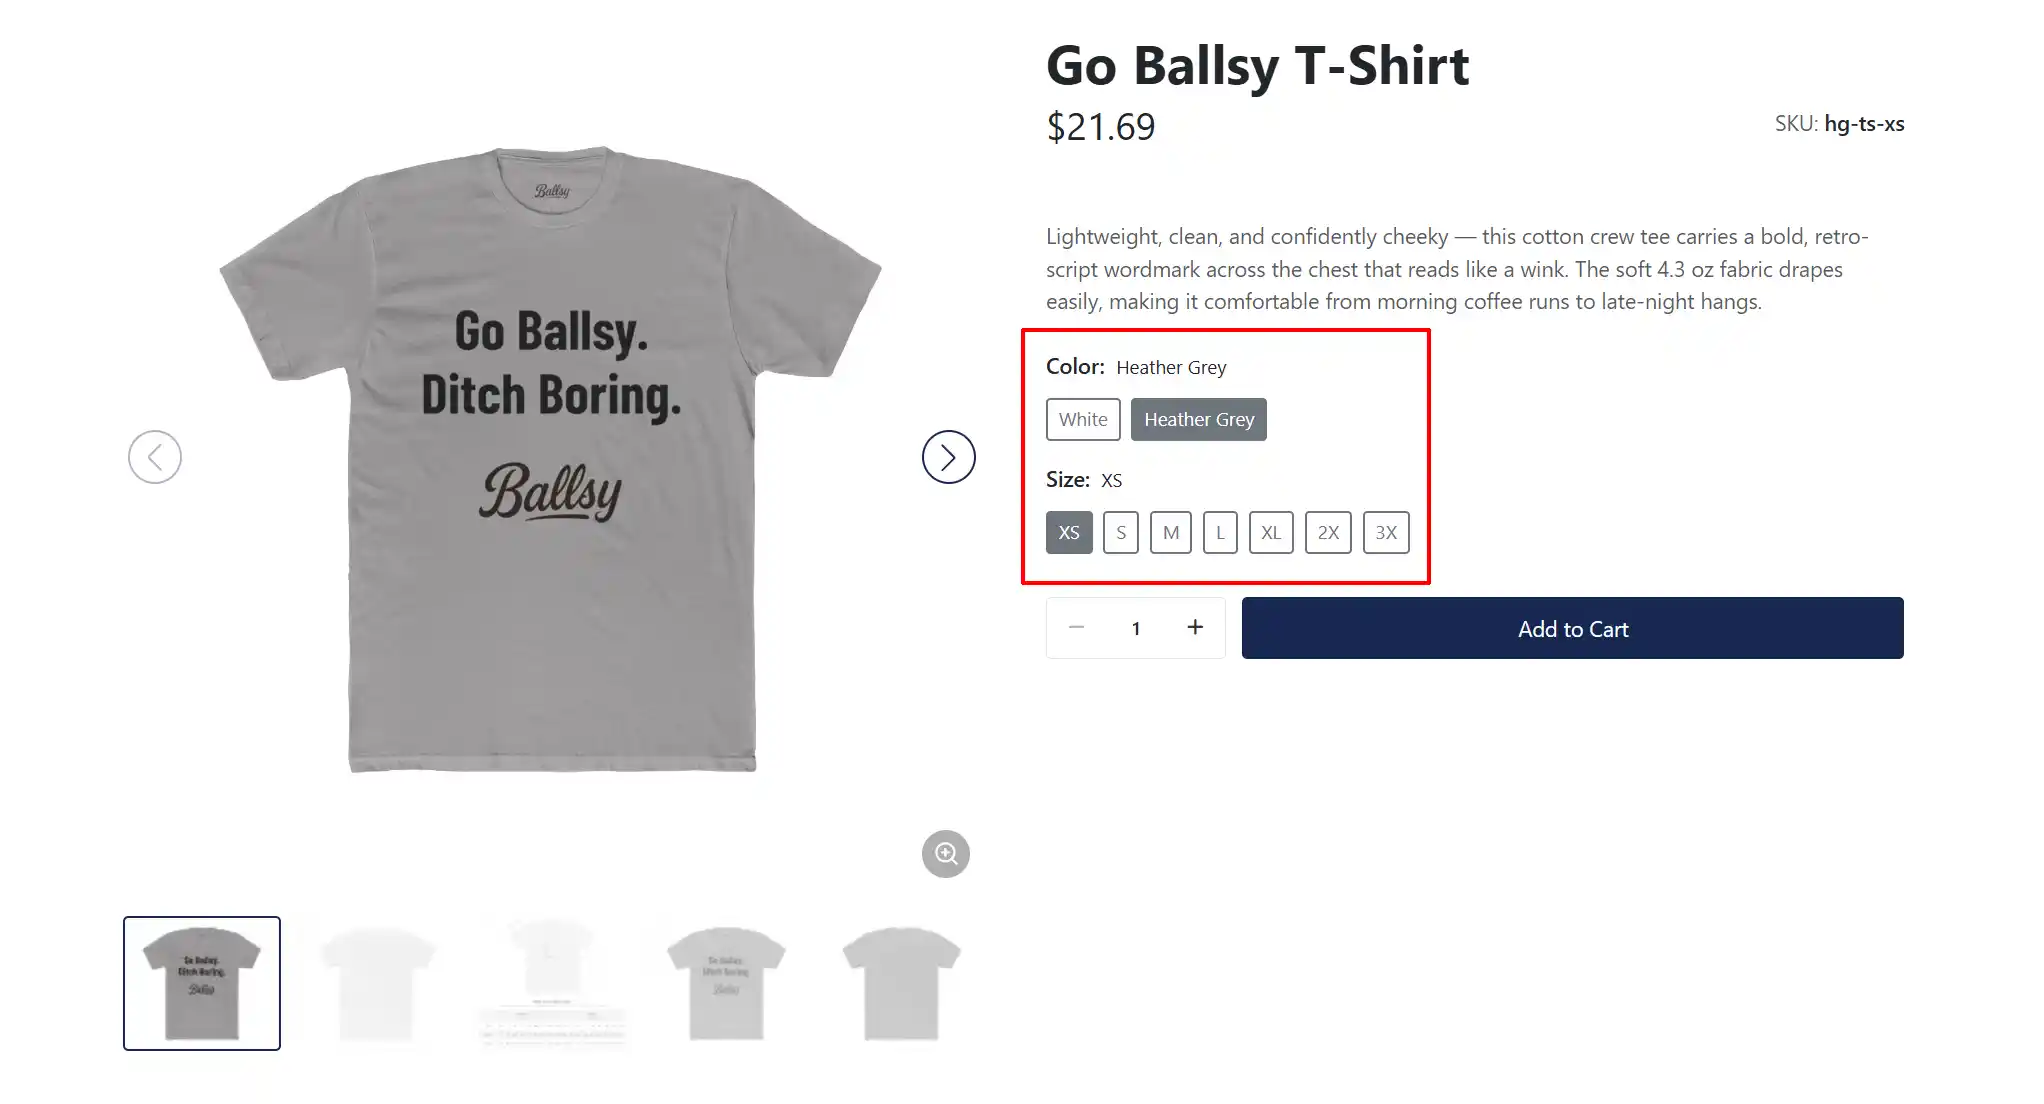
For example, if Size has 3 values (S, M, L) and Color has 2 values (White, Gray), J2Commerce generates 6 variants: S/White, S/Grey, M/White, M/Grey, L/White, L/Grey.
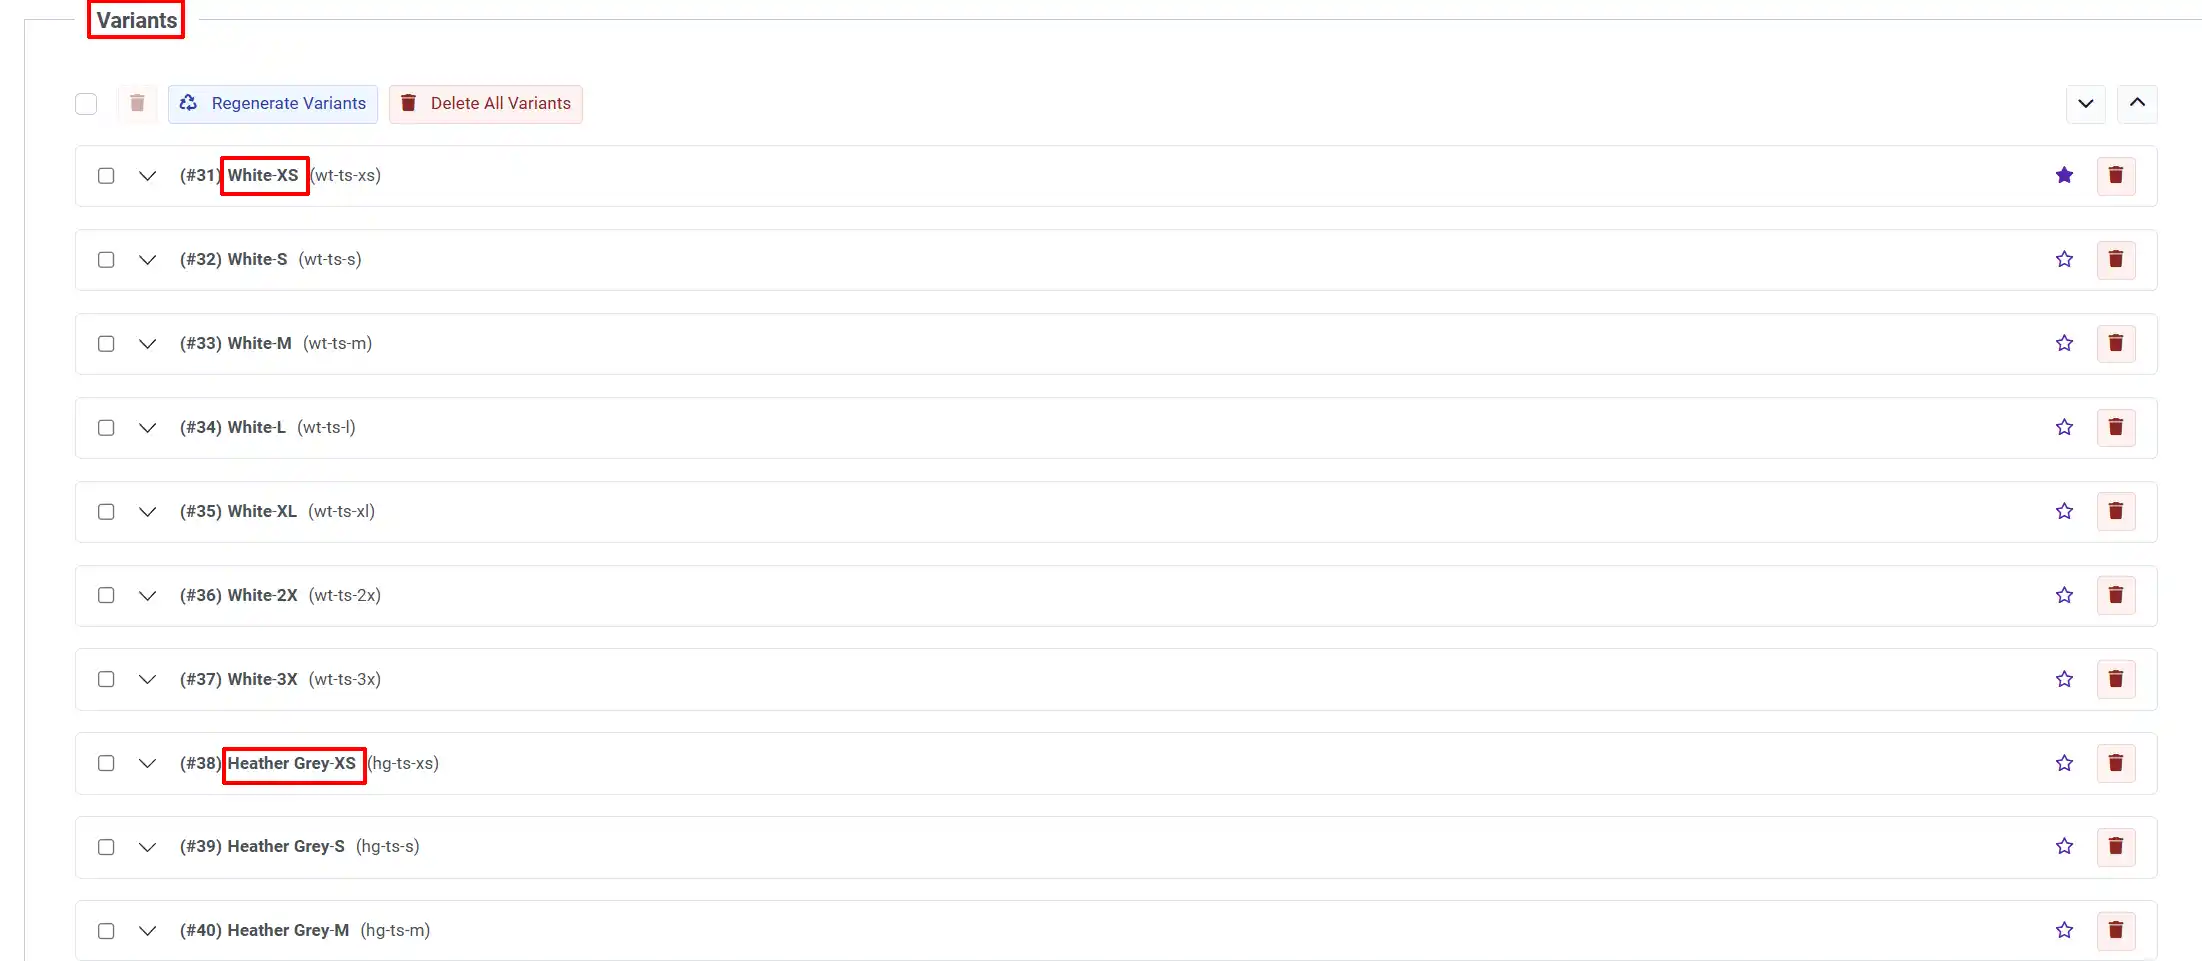
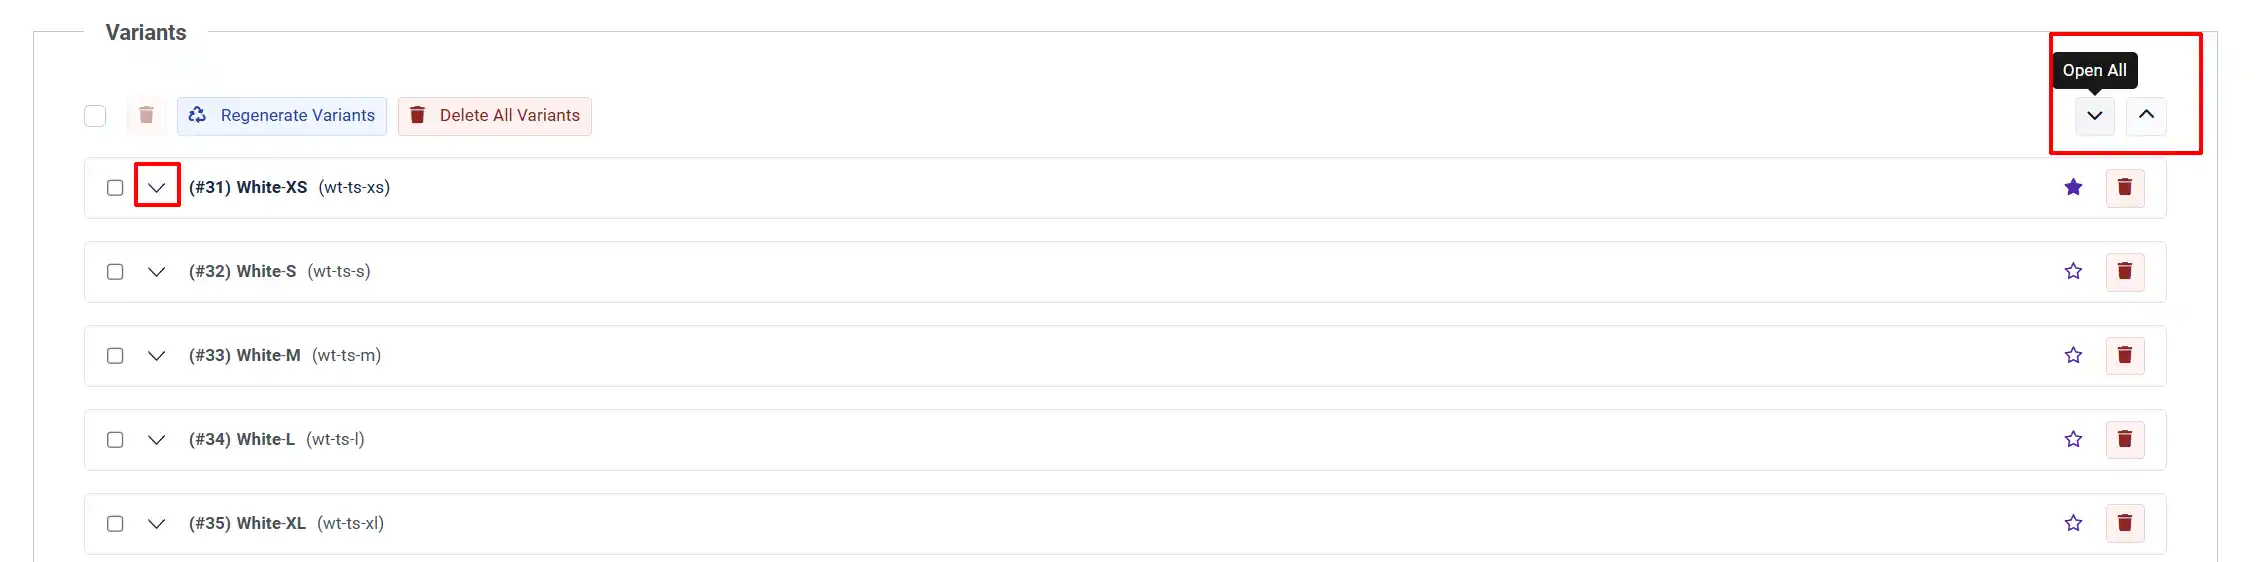
The variants appear as an accordion list. Each variant is collapsible.
Frontend Product View of Options
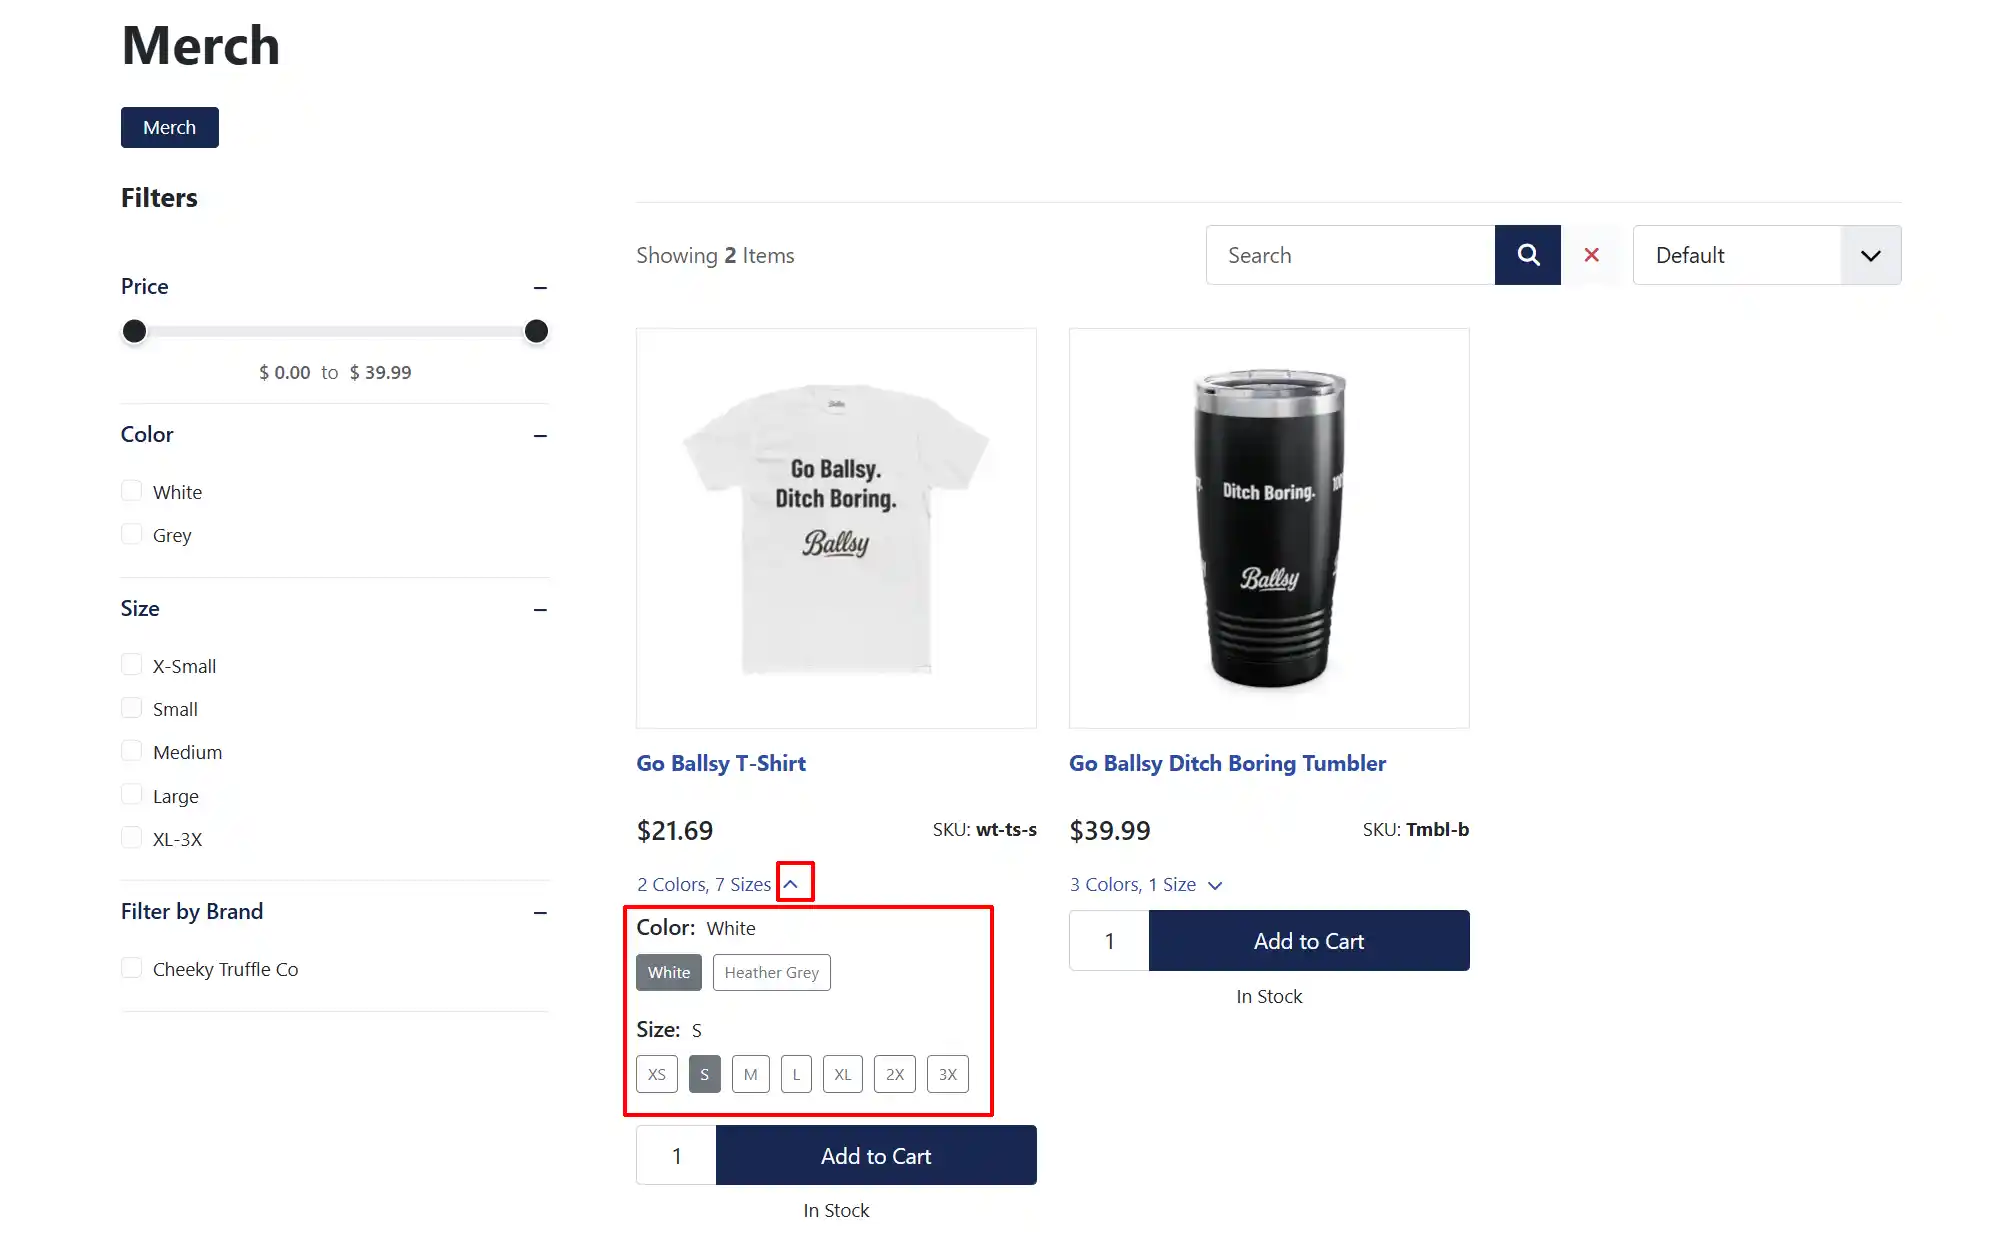
Frontend Category View of Options
Info
Note: Below the category title will appear the variant options with a dropdown arrow, allowing the customer to view all options without leaving the category page
Configure Individual Variants
Every generated variant can be expanded and configured independently.
To open/close them individually, click on the up/down arrow on the left of the titles.
To open/close them all at the same time, click on the up/down arrow in the top right corner.
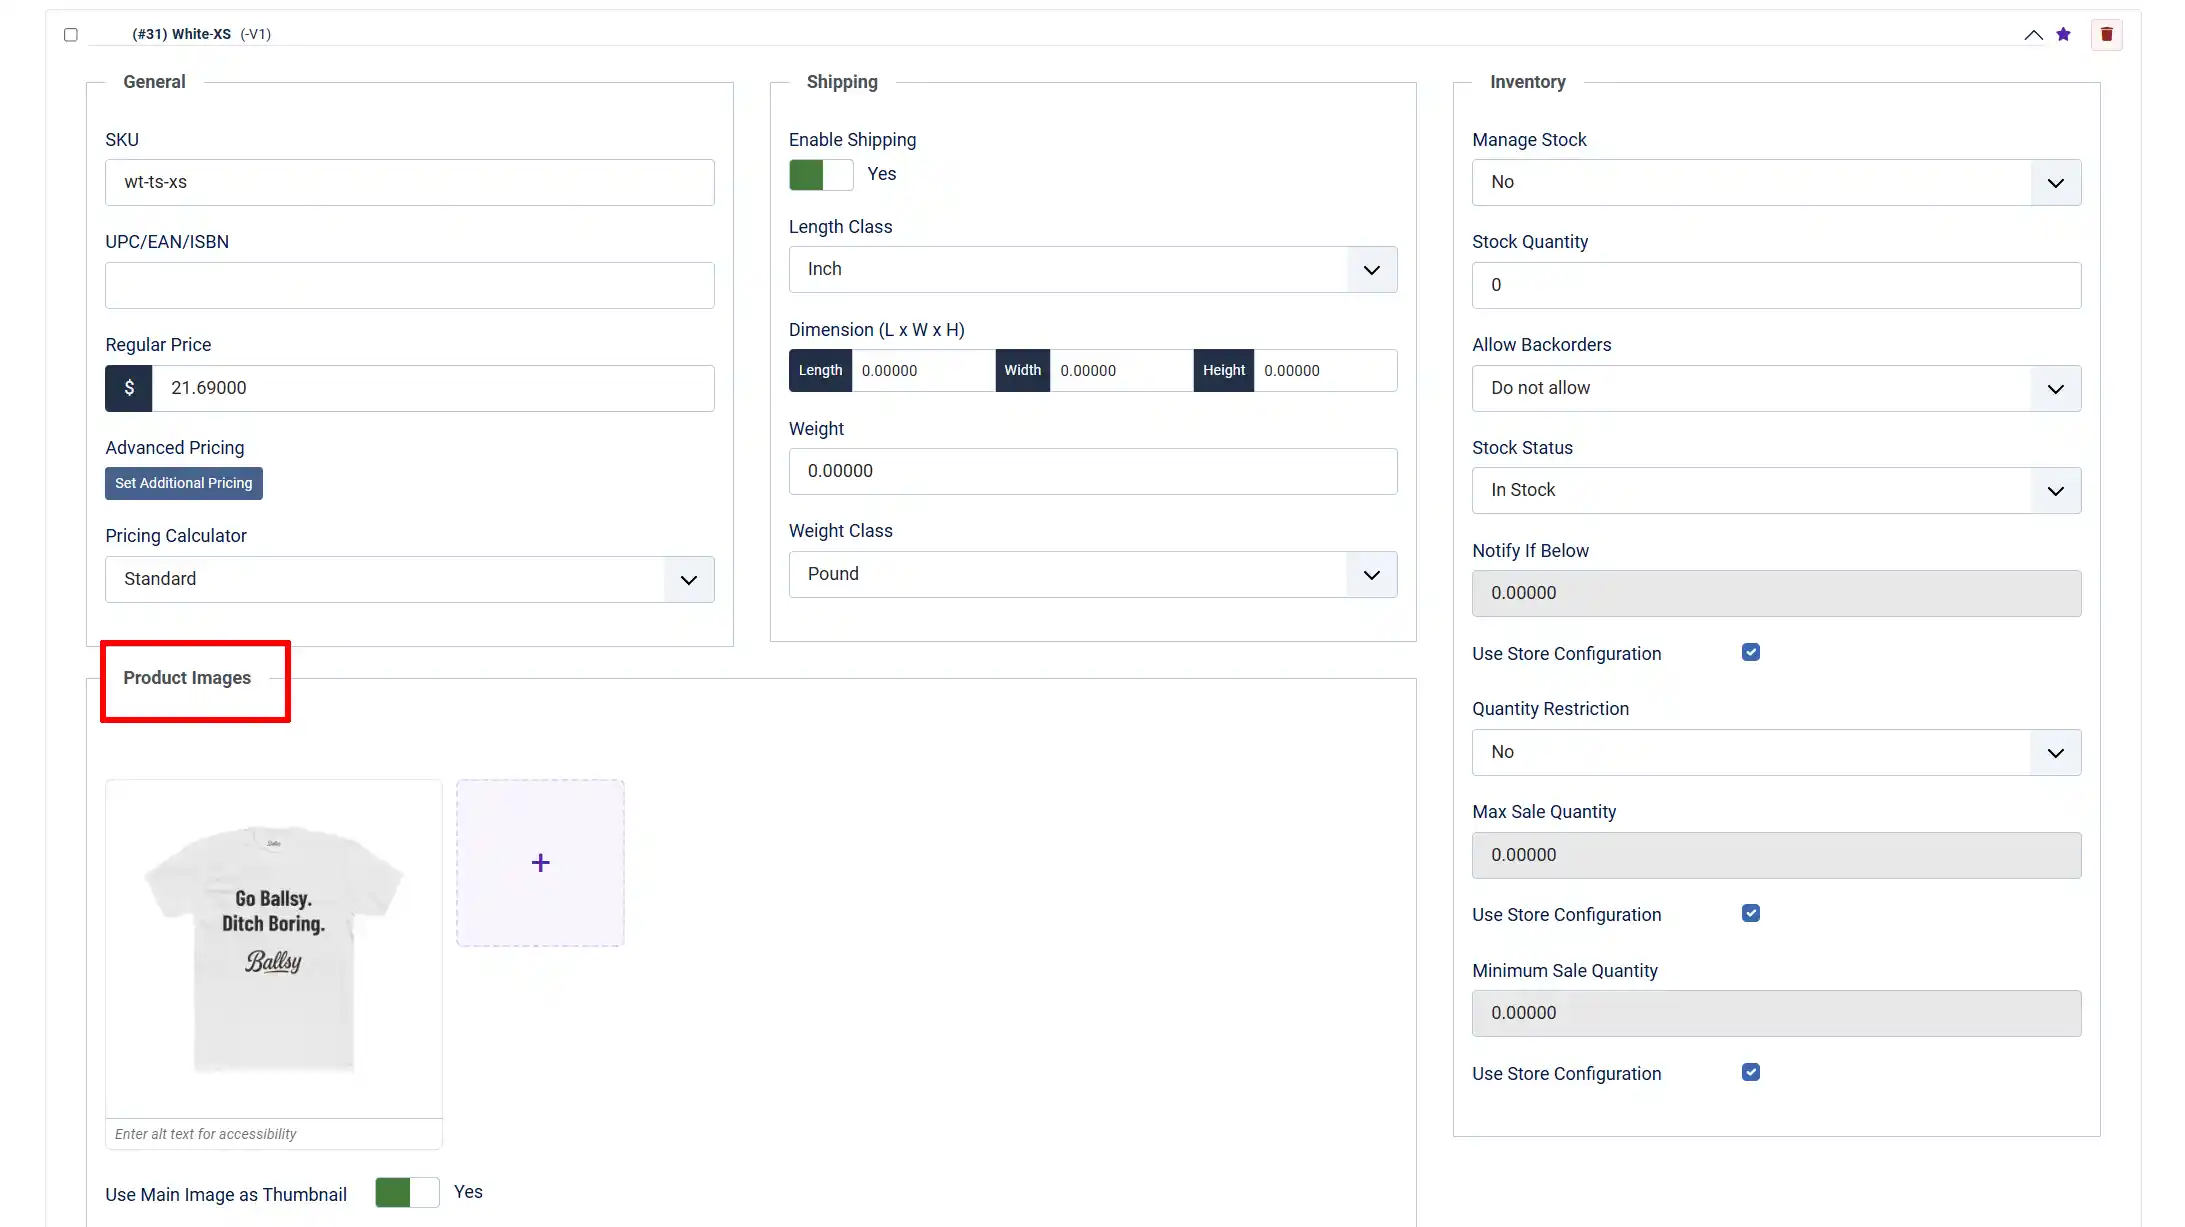
Each variant has four configuration sections:
General Section
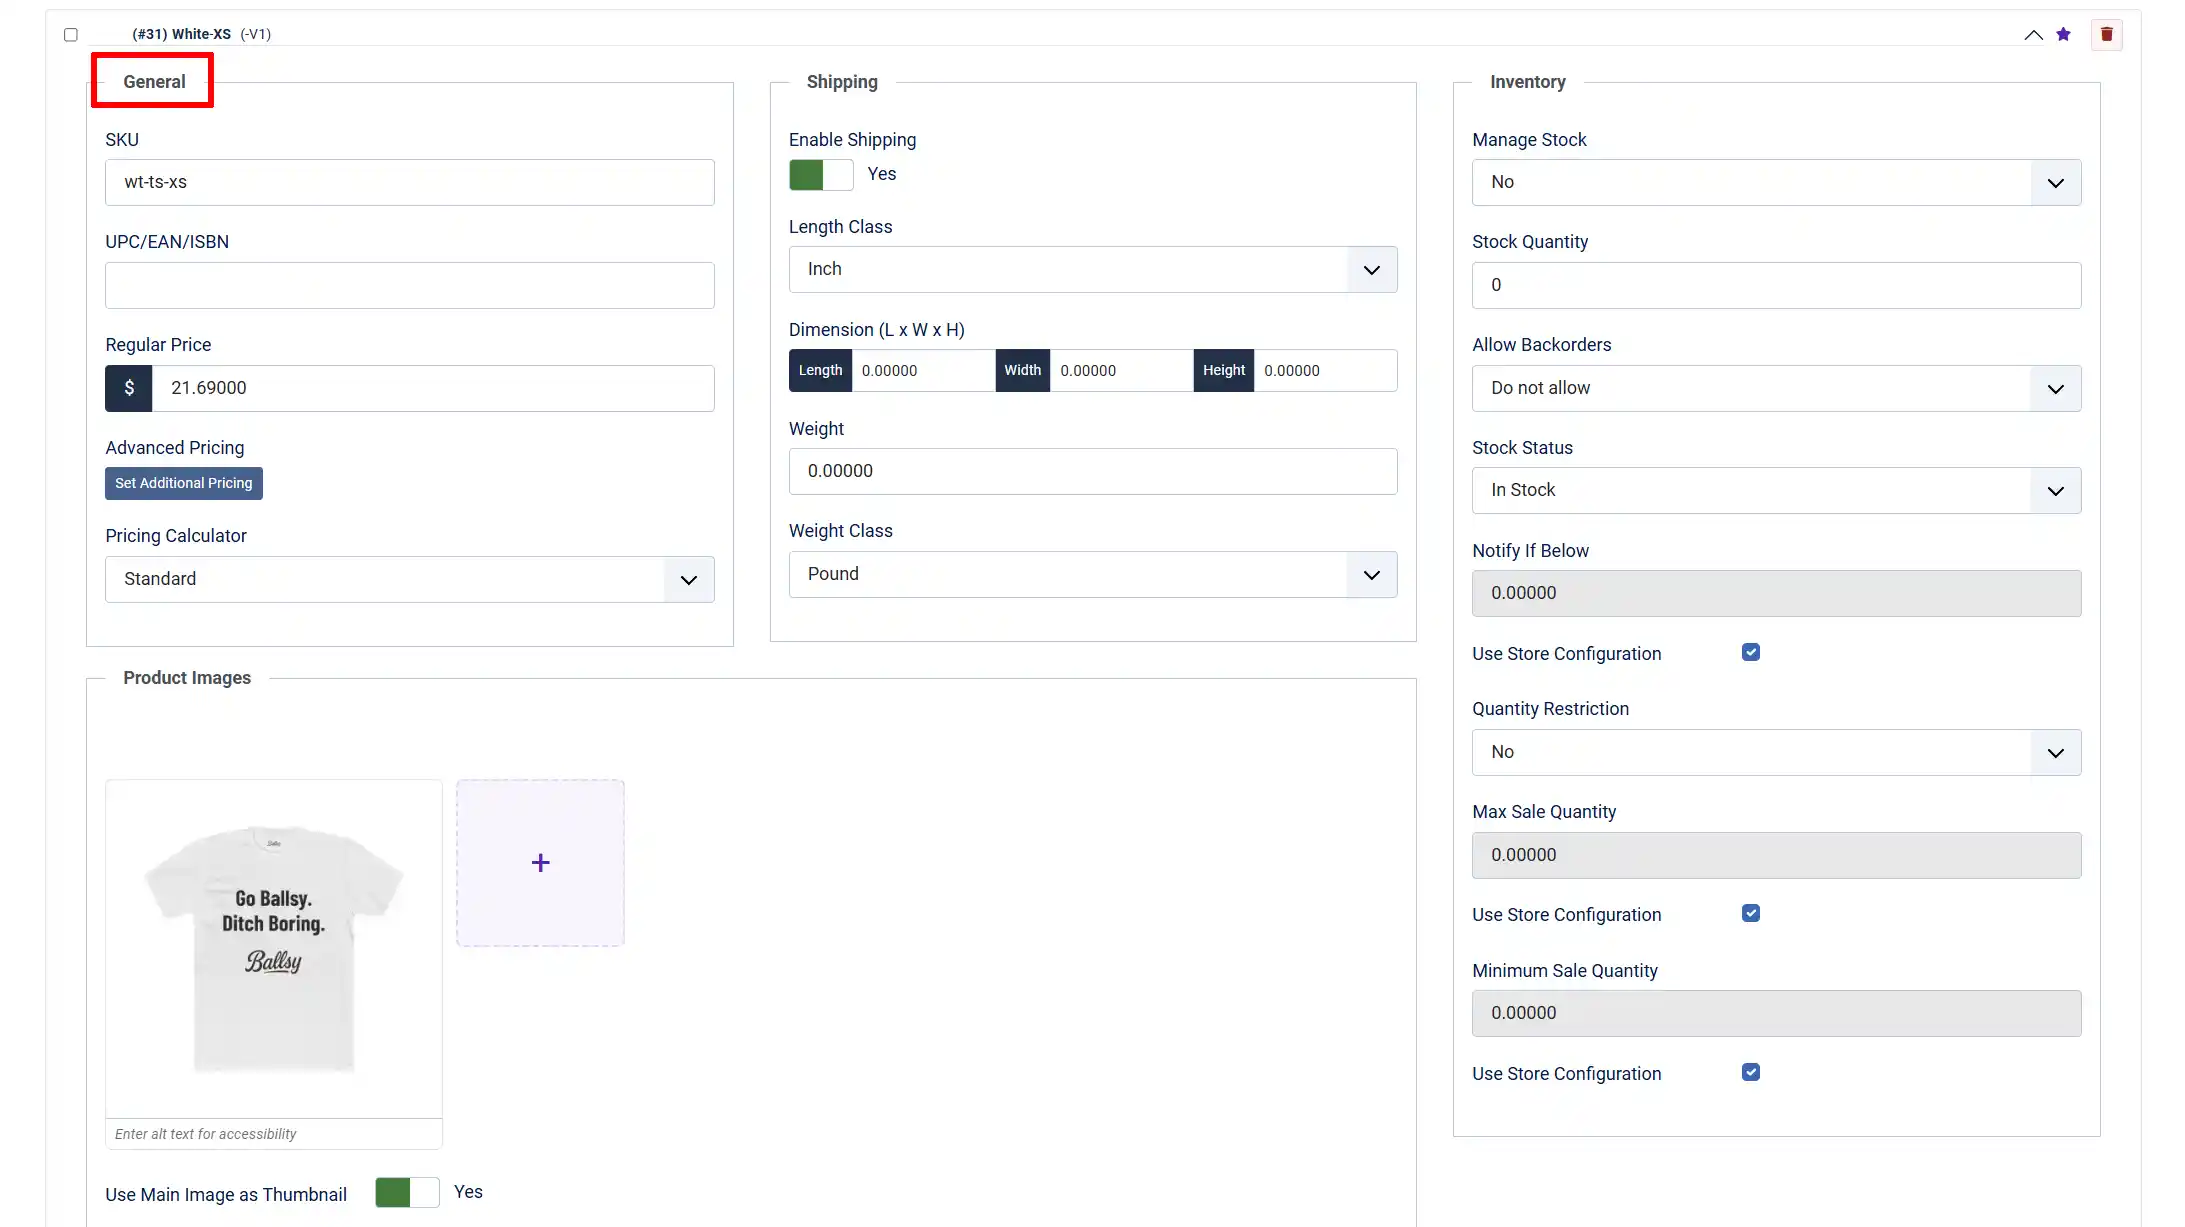
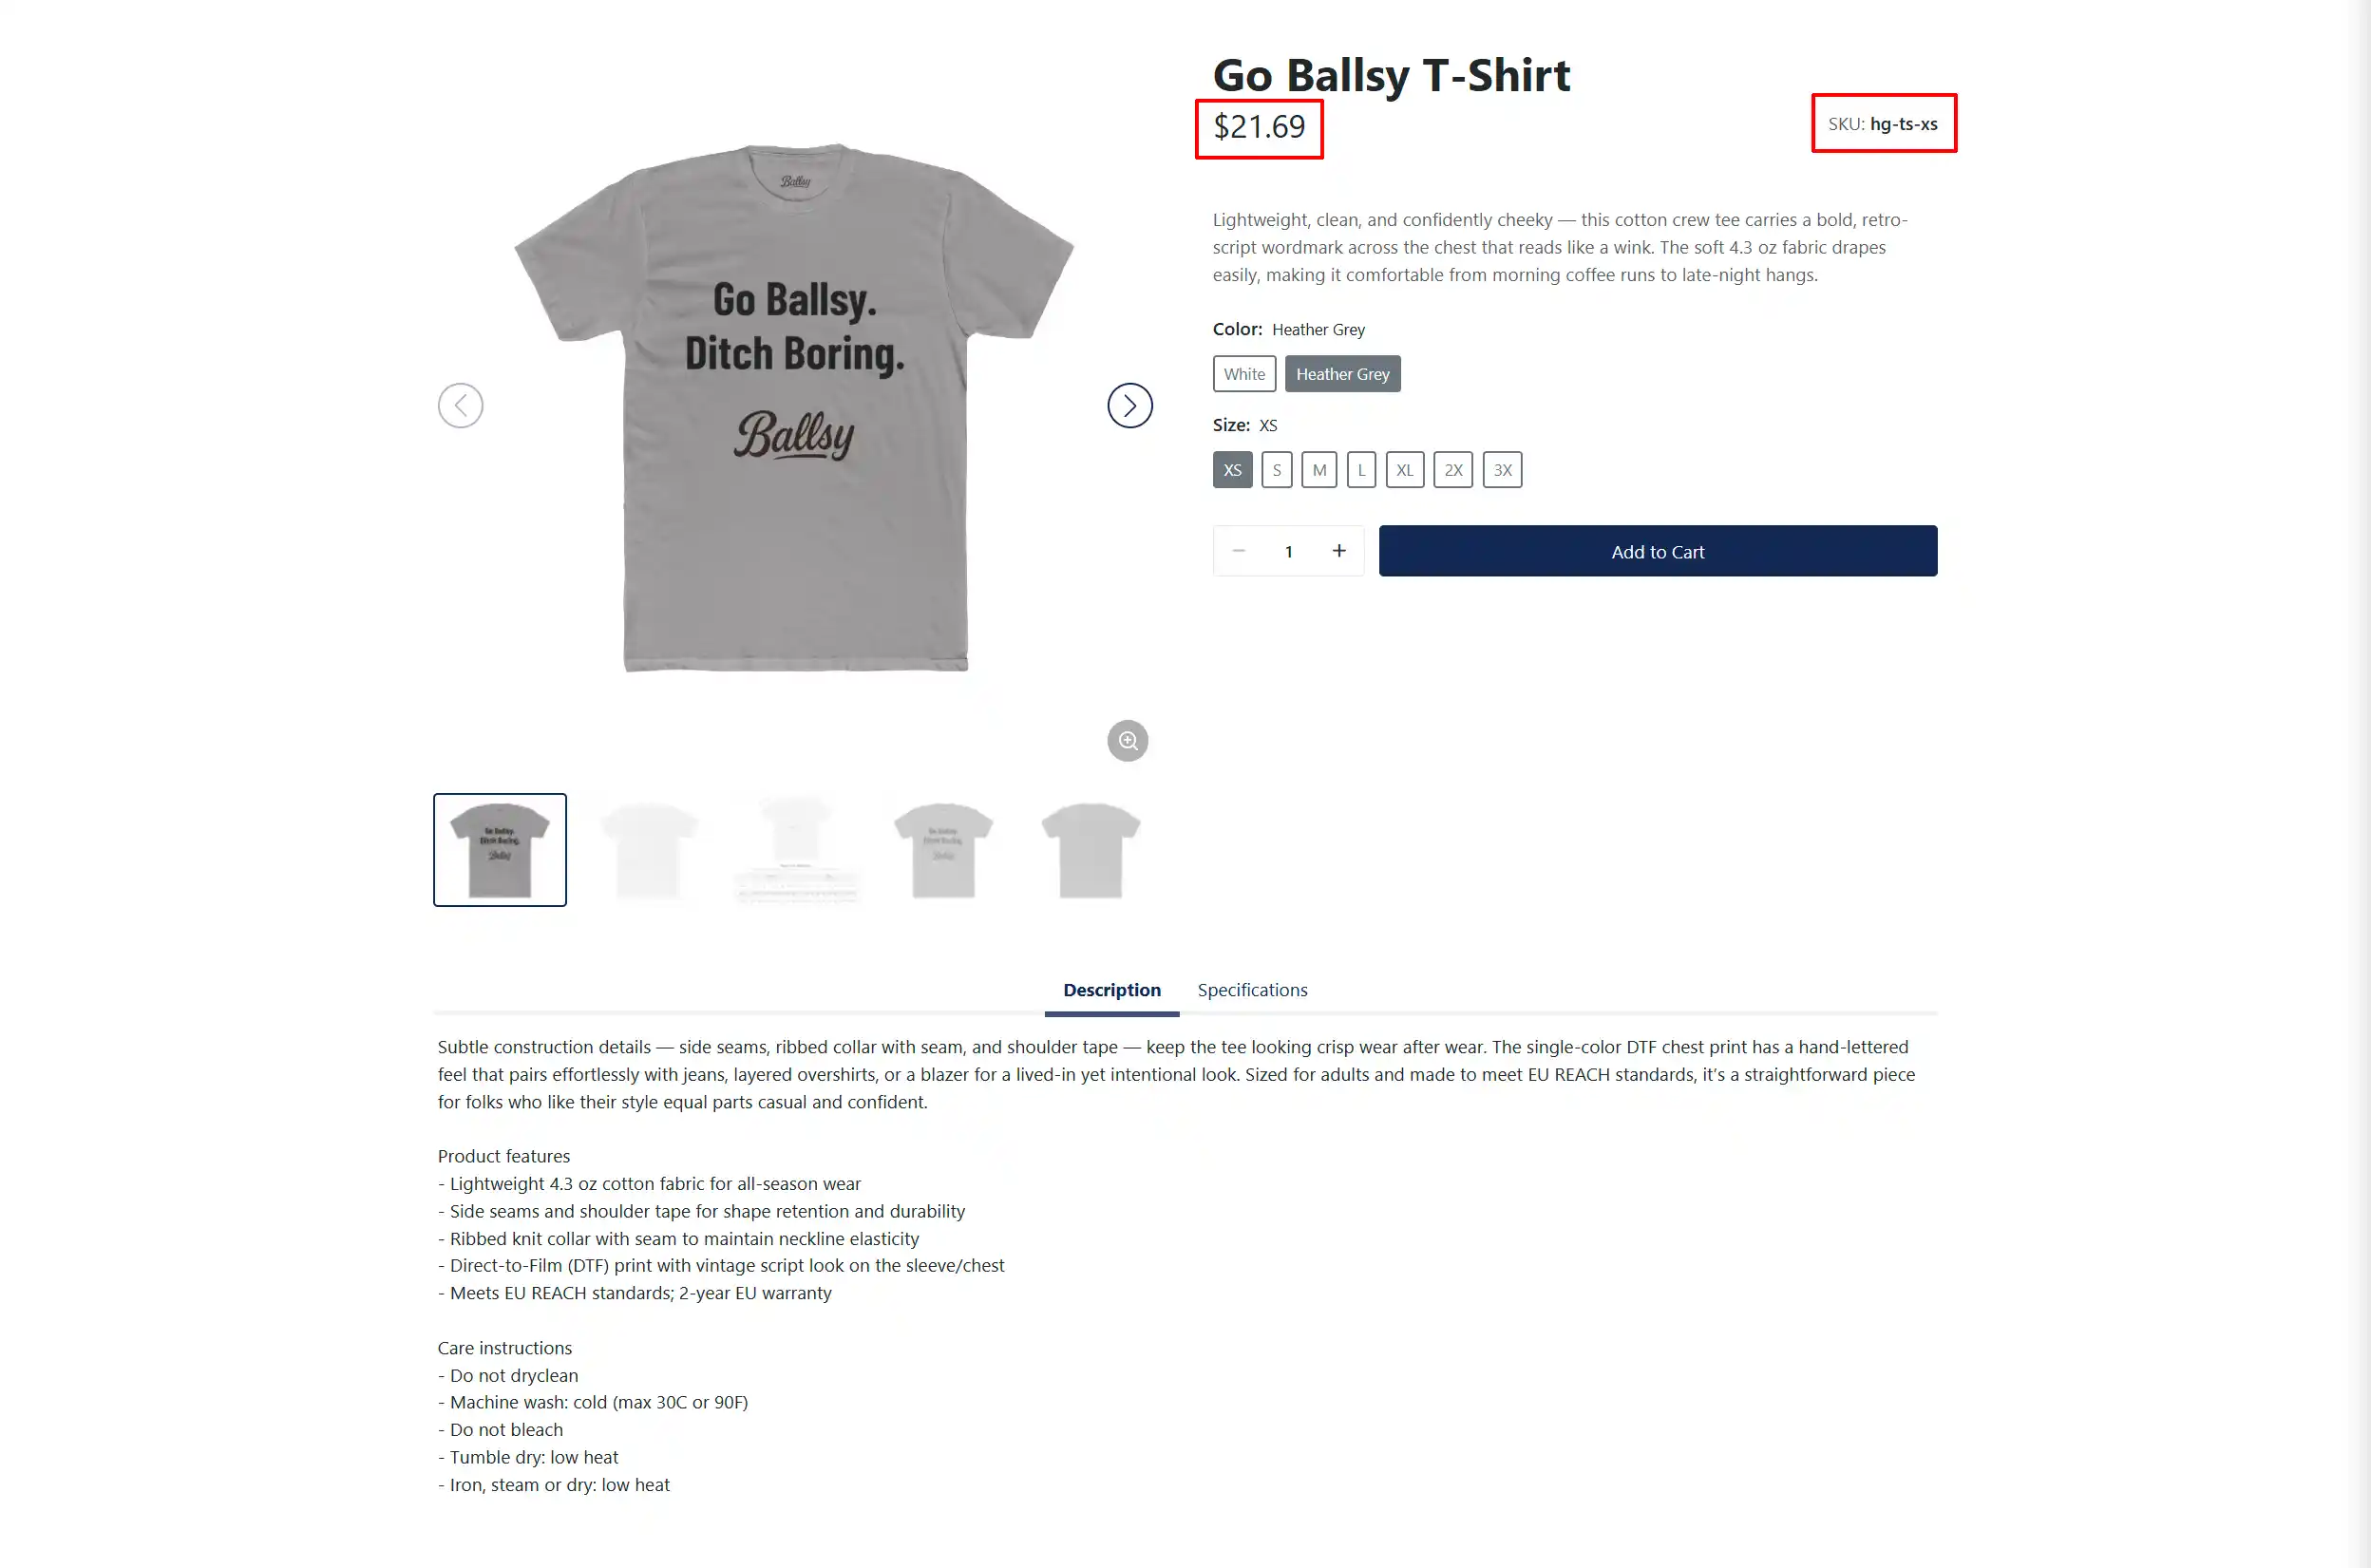
SKU: The unique stock-keeping unit code for this variant. Filled automatically with a default value; update it to match your inventory system.
UPC: Optional barcode or Universal Product Code for this variant.
Regular Price: The selling price for this specific variant. Each variant can have a different price.
Advanced Pricing: Opens a modal to configure sale prices, customer-group pricing, or date-range discounts for this variant.
Pricing Calculator: Controls how the price is calculated at checkout. Leave set to Standard unless you have a custom pricing calculator plugin.
Frontend View - General Section
Shipping Section
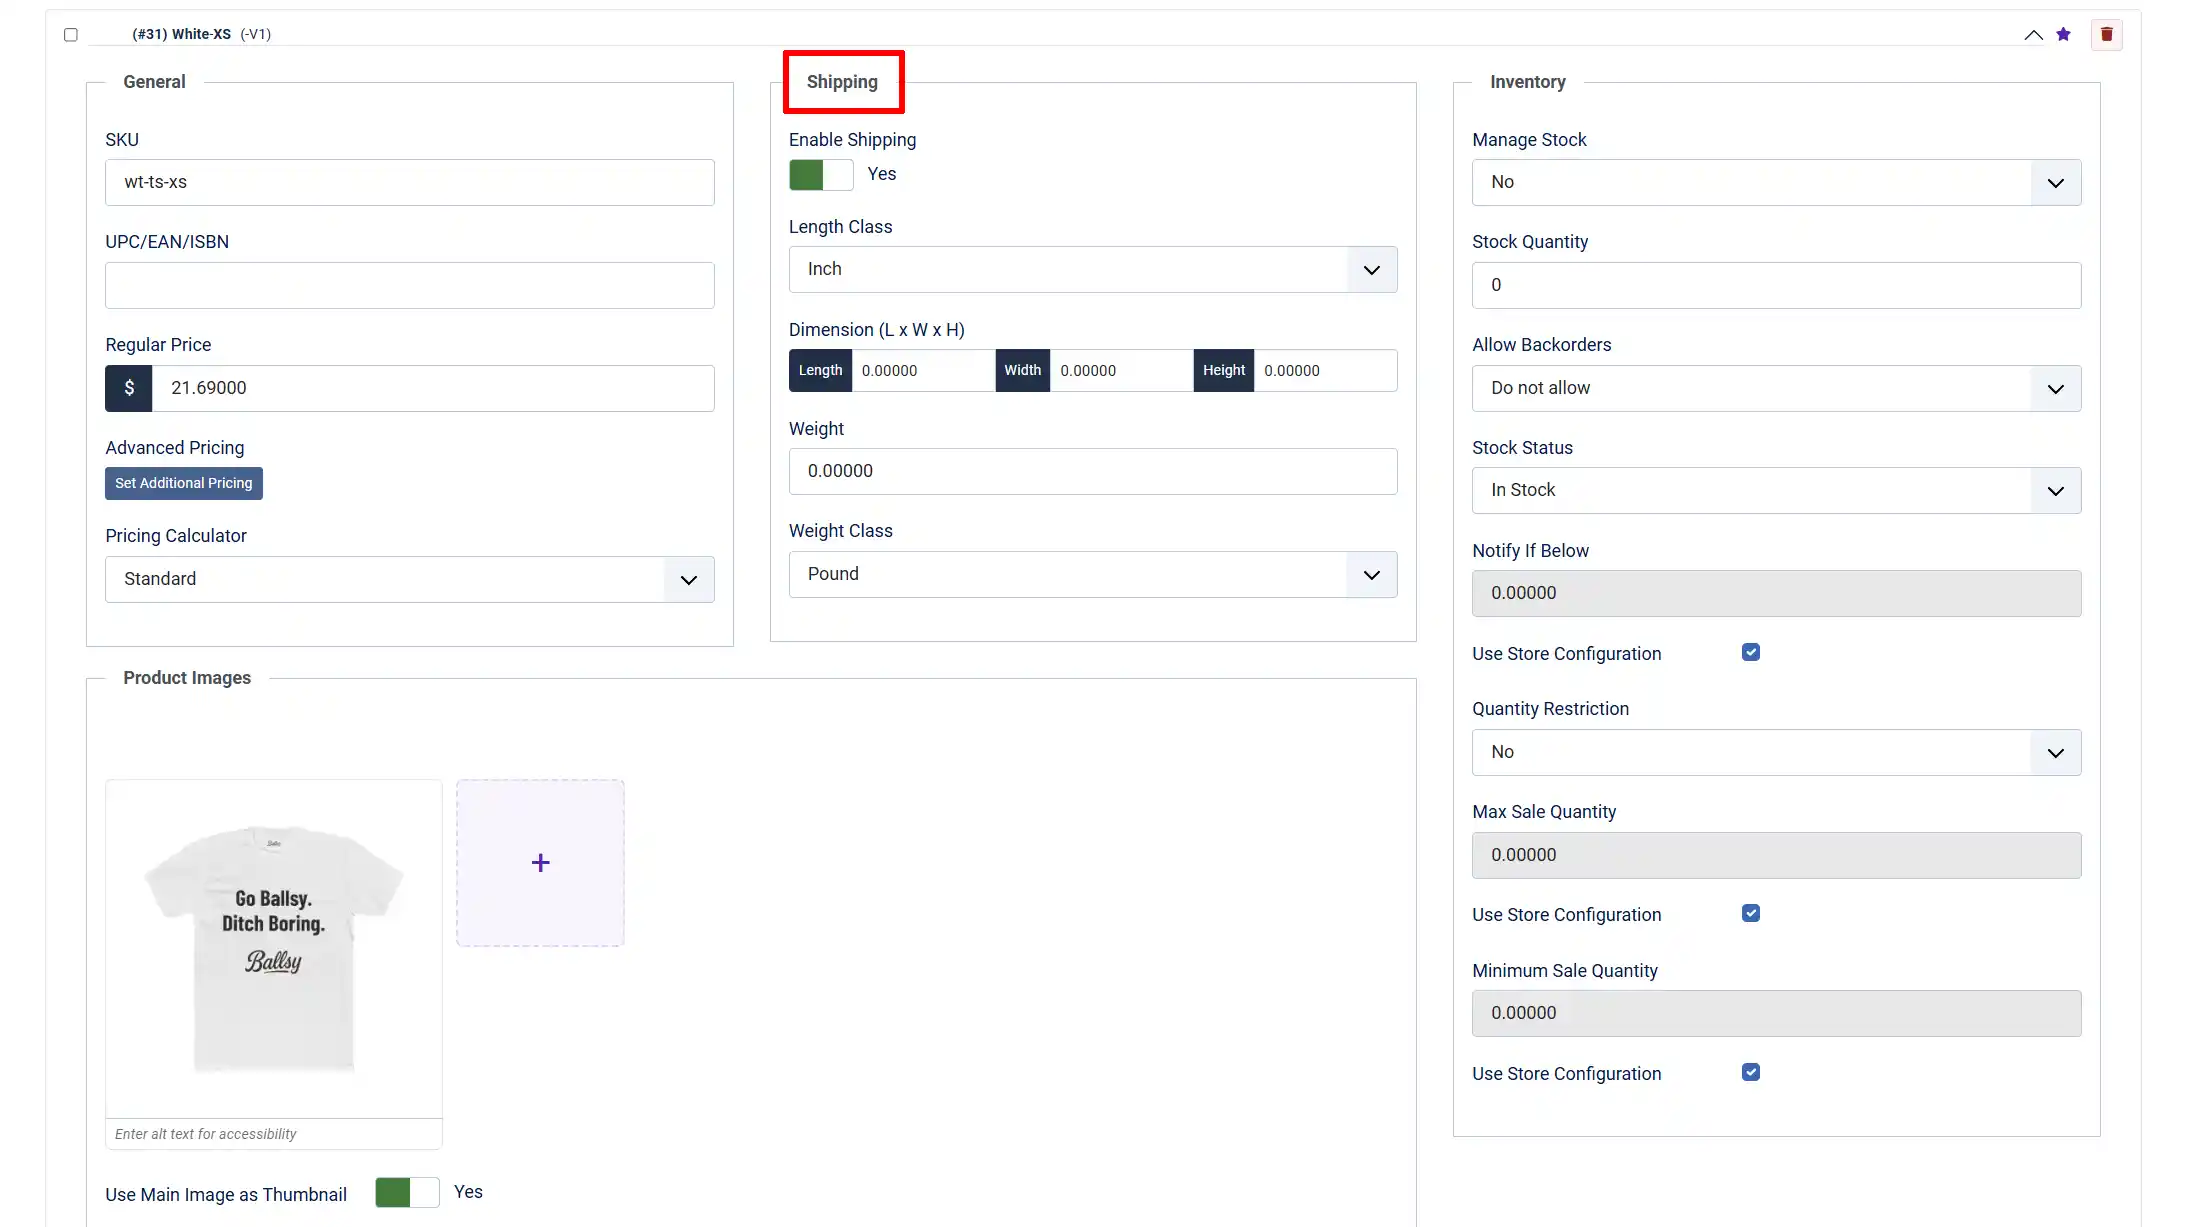
Enable Shipping: Set to Yes if this variant is a physical item that requires shipping. Set to No for digital or service variants.
Length Class: The unit of measurement for dimensions (e.g., centimetre, inch).
Dimensions: The physical dimensions of the variant: length, width, and height. Used by shipping rate calculators.
Weight: The physical weight of this variant.
Weight Class: The unit of measurement for weight (e.g., kilogram, pound).
Inventory Section
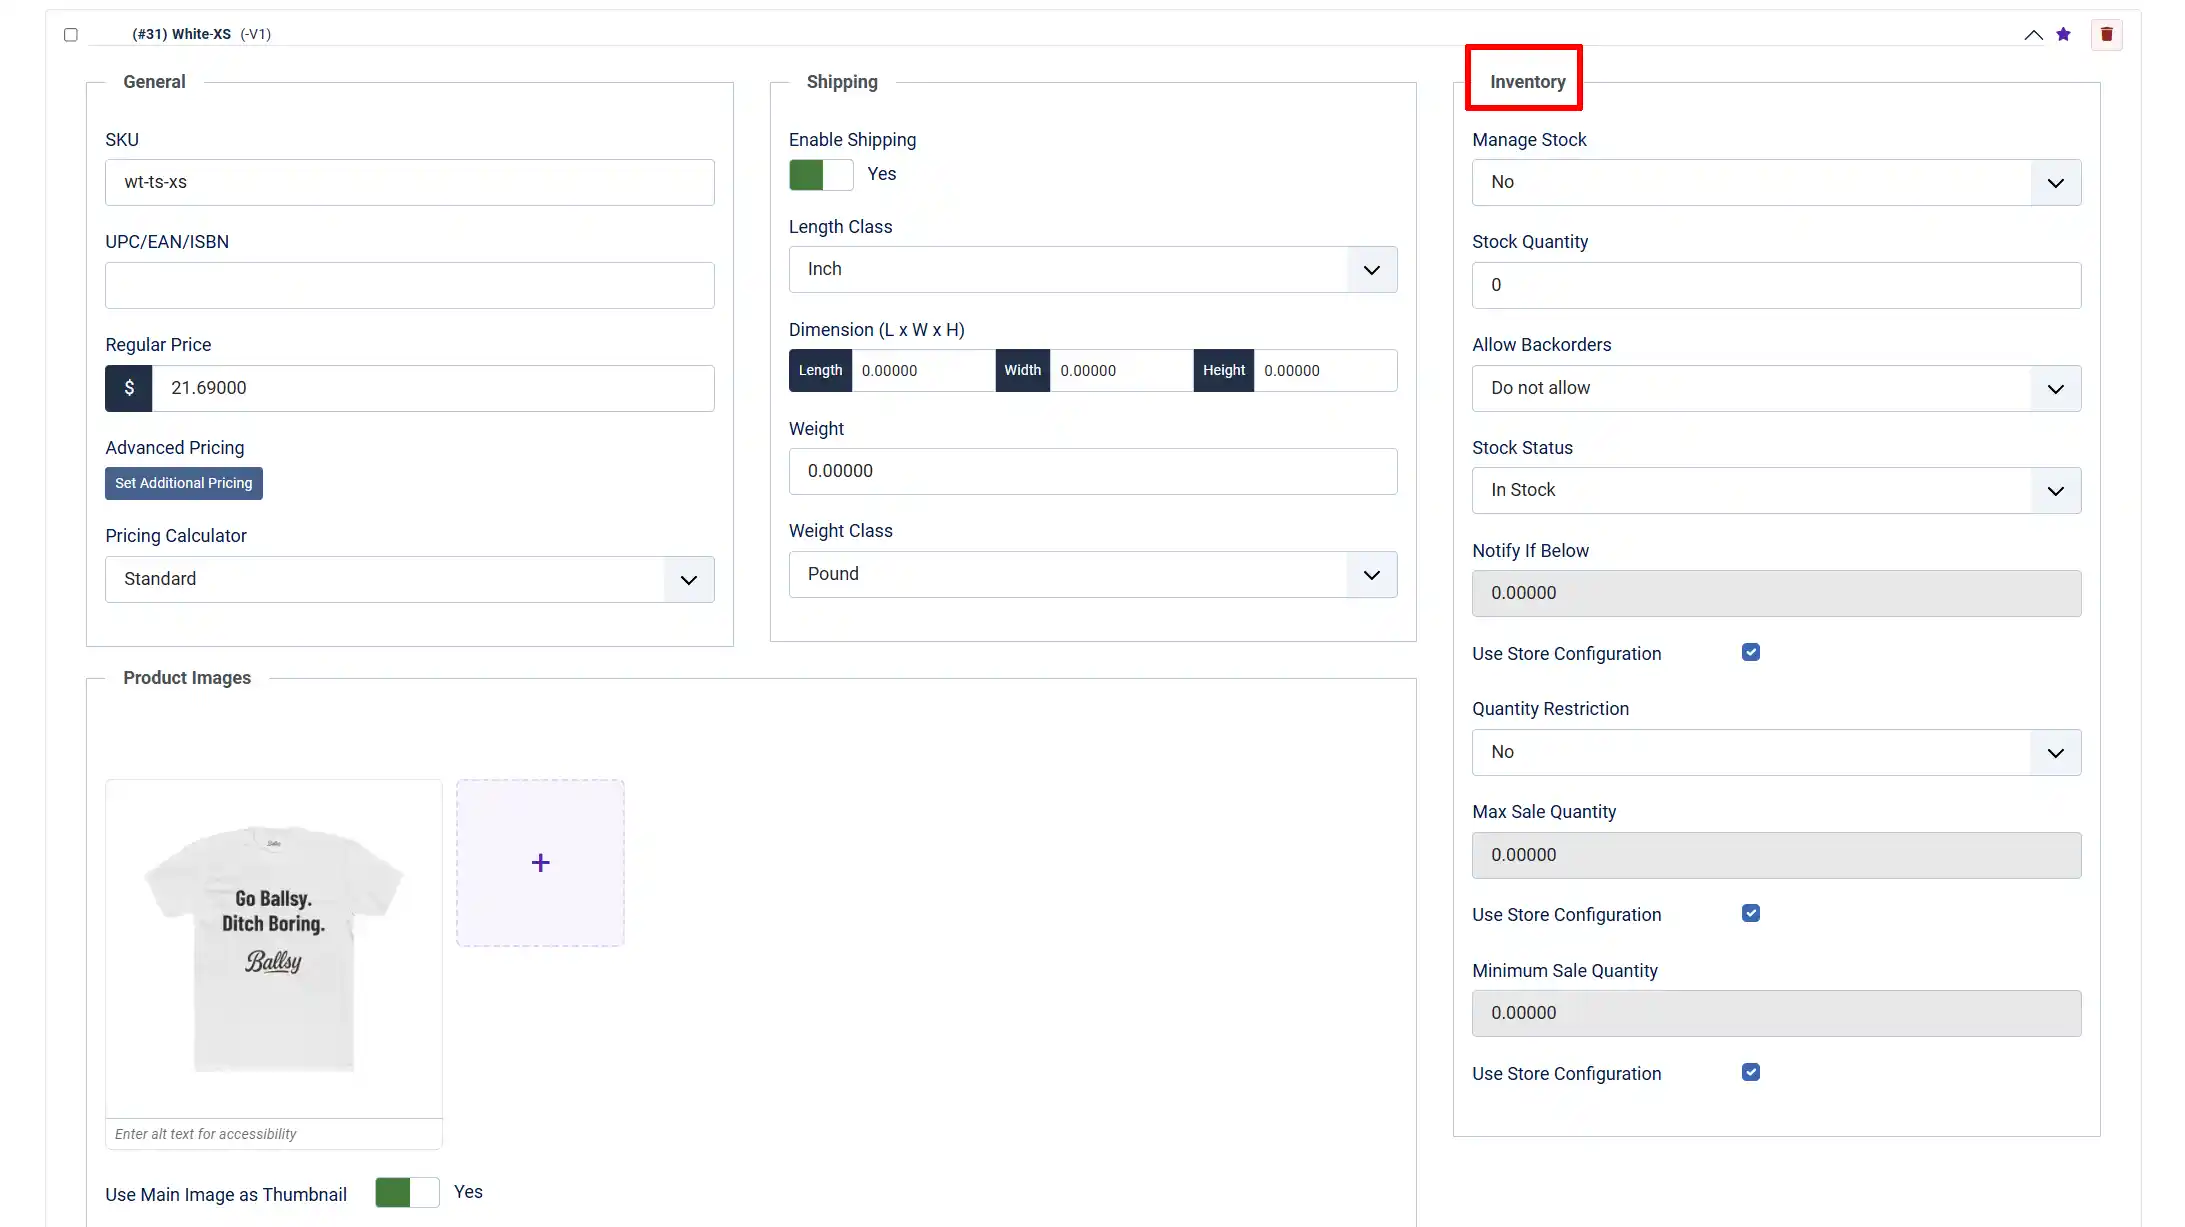
Manage Stock: Select 'Yes' to track stock levels for this variant. If you have an unlimited inventory supply, then you don't need to manage stock quantity
Quantity: Current stock quantity for this variant.
Allow Backorders: Whether customers can order this variant when it is out of stock.
Stock Status: Manual override for whether the variant shows as in-stock or out-of-stock.
Notify Quantity: Send a low-stock notification when the quantity drops to this number.
Quantity Restriction: Limit how many units a customer can purchase in one order.
Max Sale Quantity: Maximum units per order, when Quantity Restriction is enabled.
Min Sale Quantity: Minimum units per order.
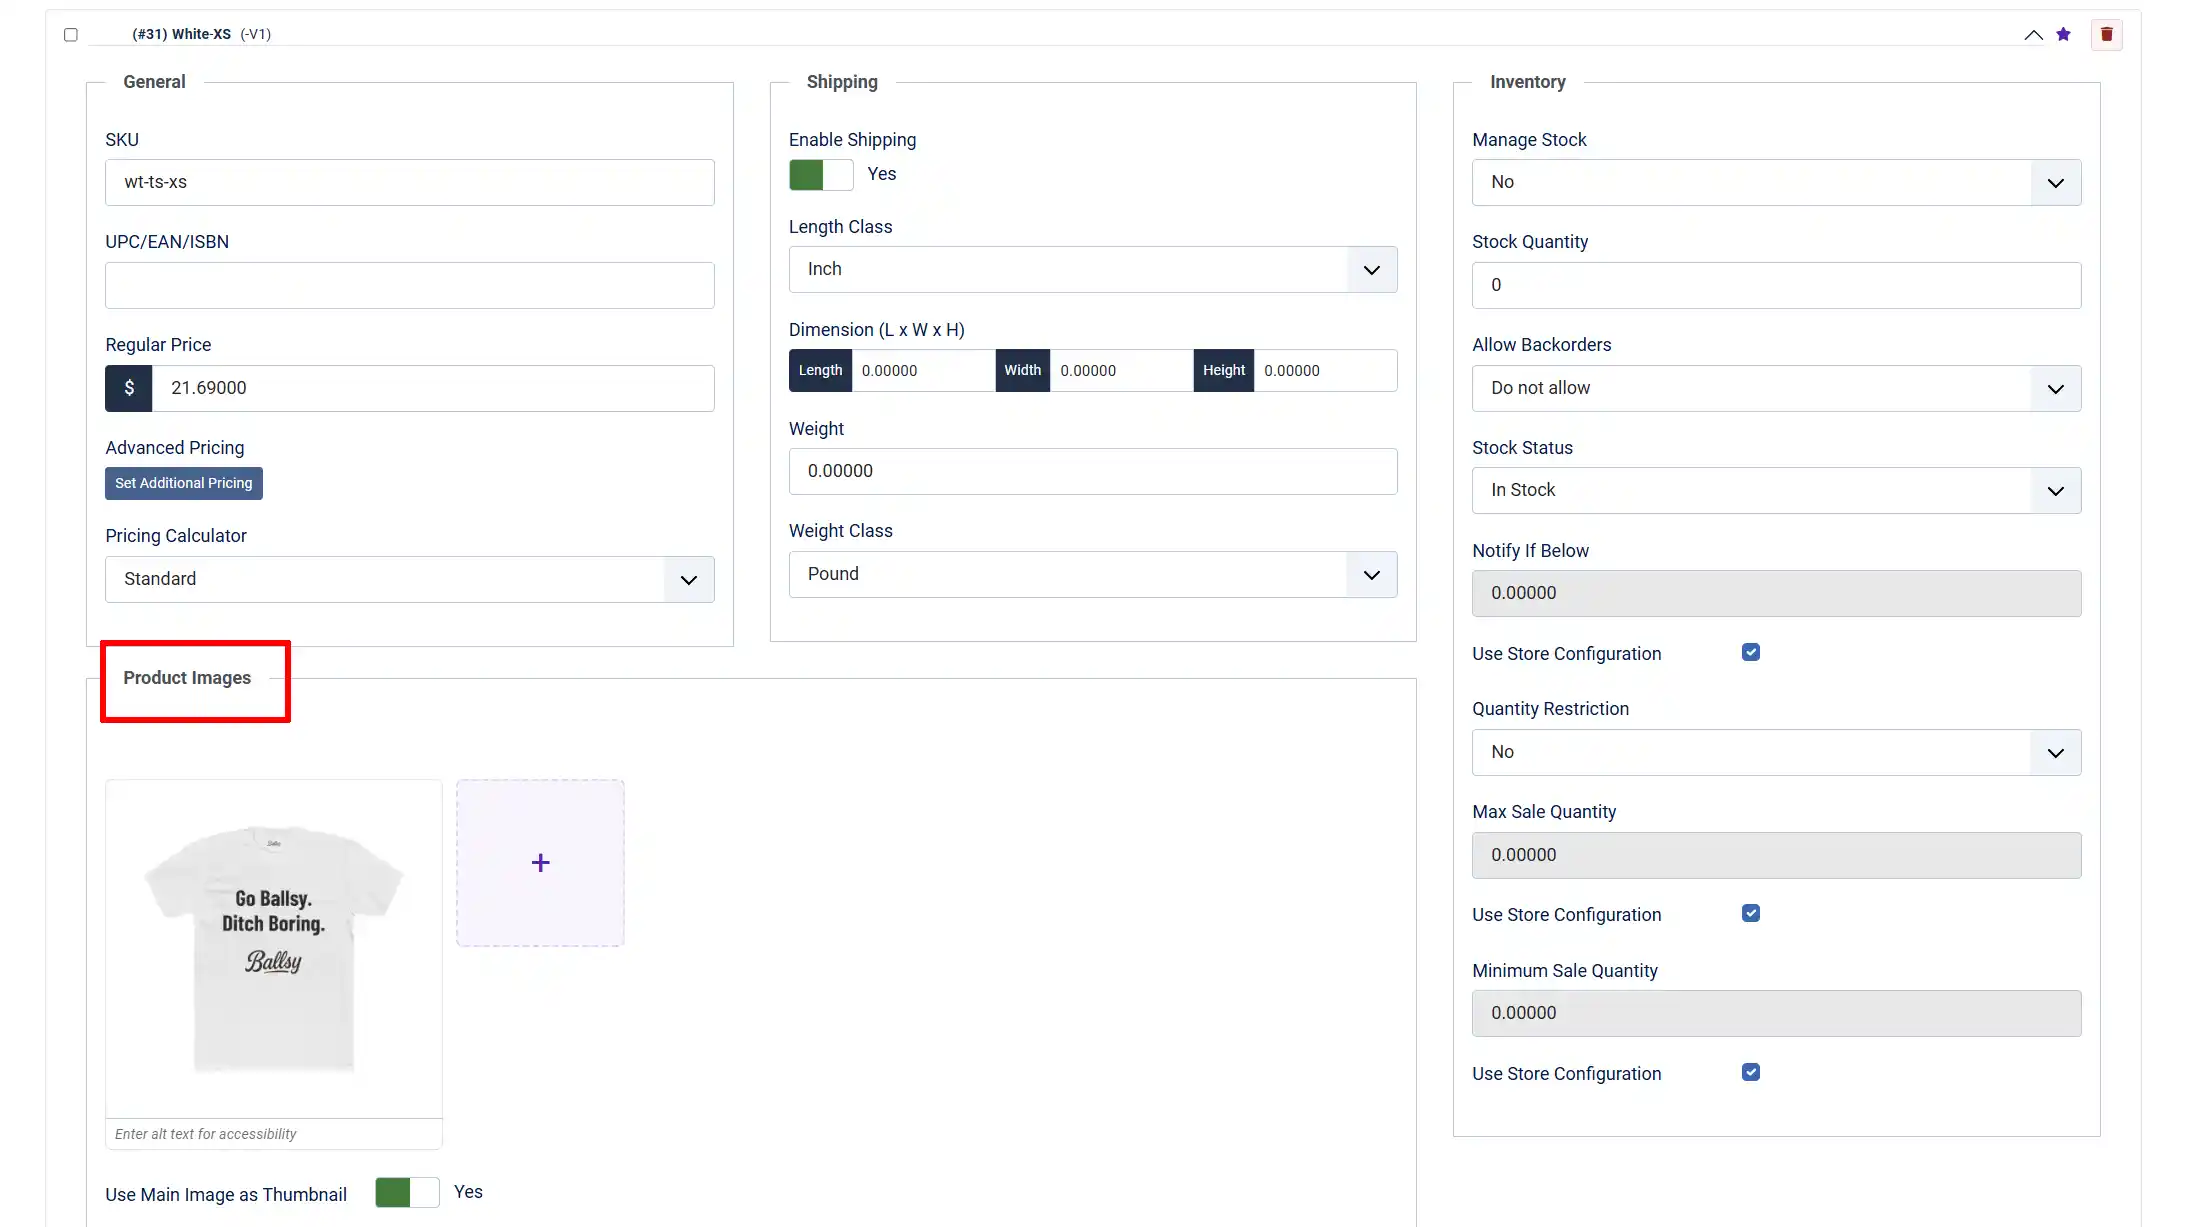
Image
Tip
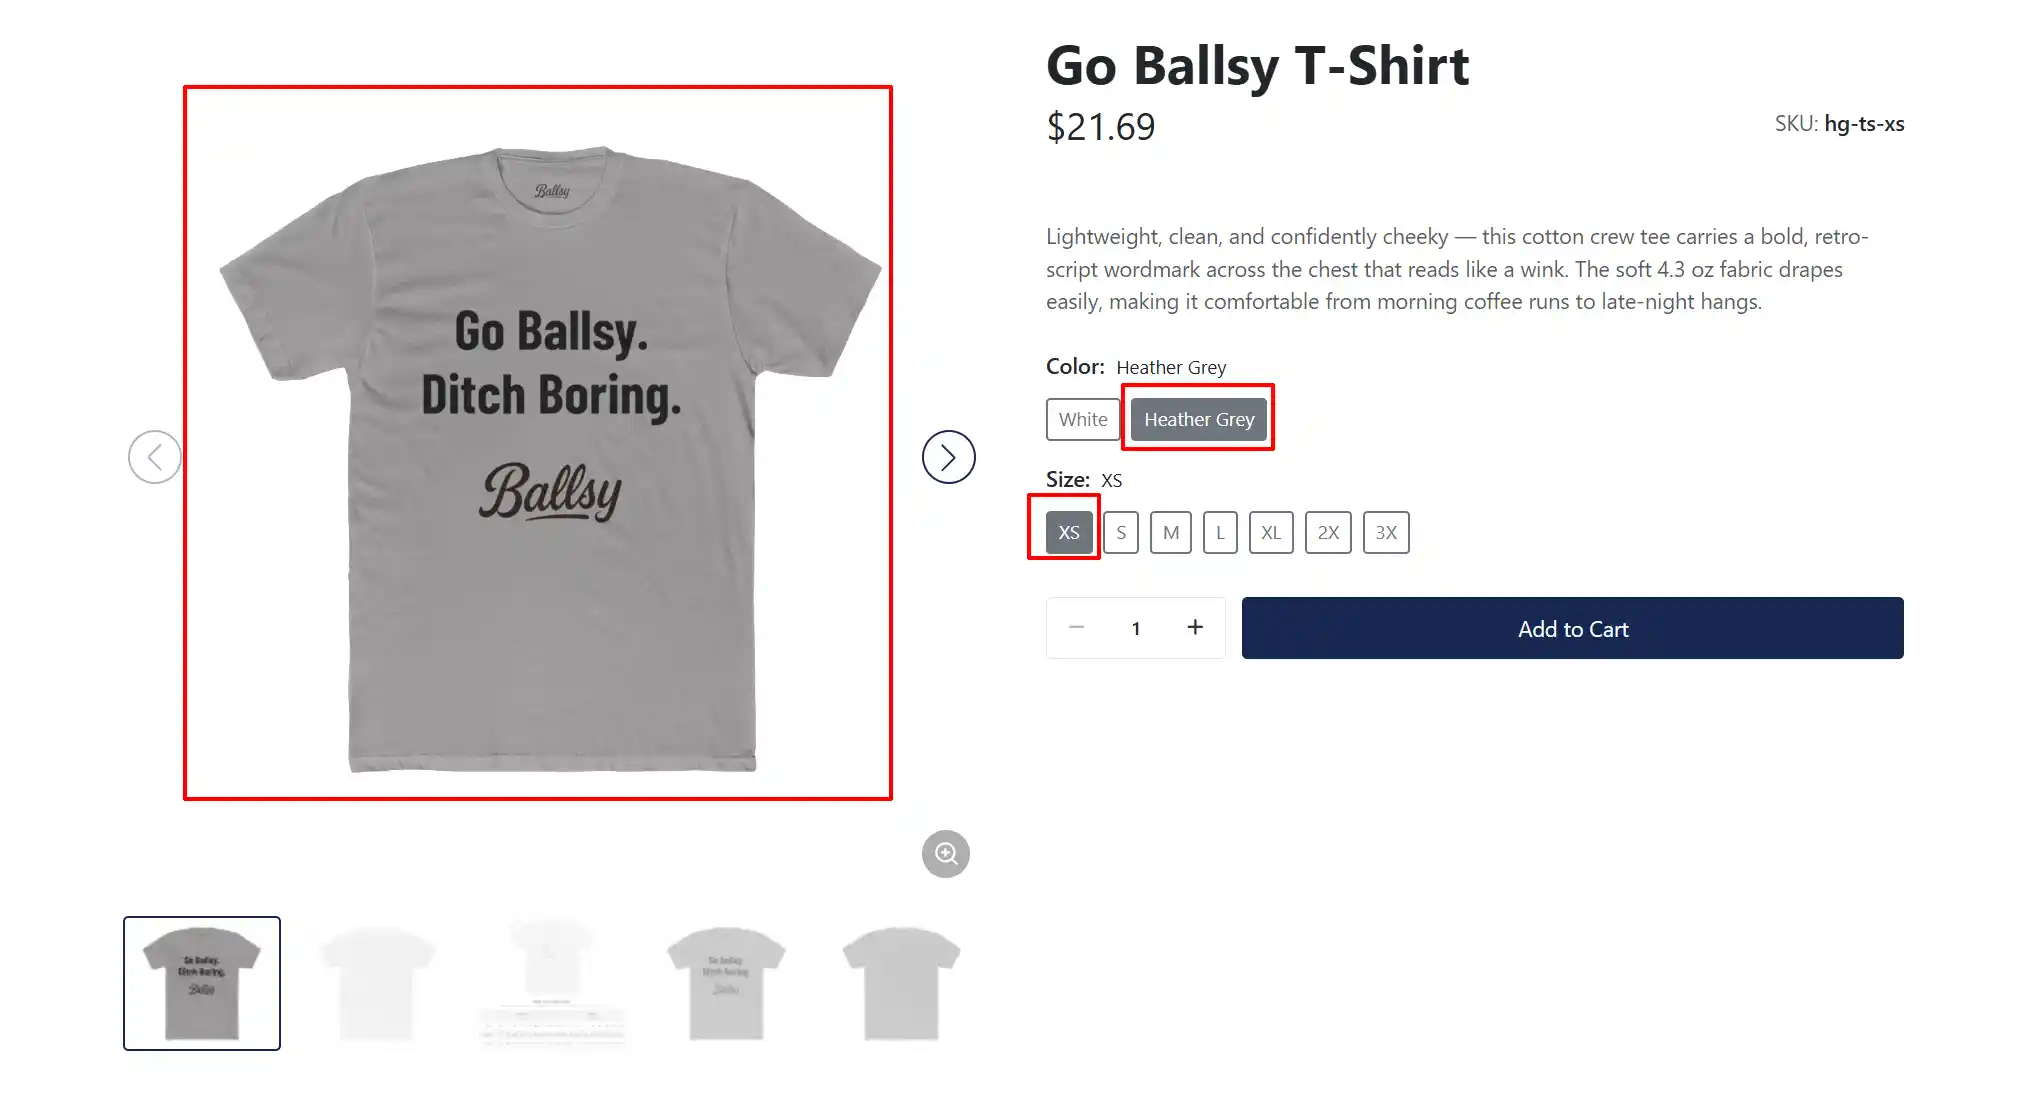
Tip: Each variant can have its own individual images. This is very helpful to the customer to see the differences in the options. ie: color, flavor, size, etc. When the customer selects a specific option on the product page, the corresponding image will appear.
Main Image: The primary image shown when a customer selects this variant combination.
Use Main Image as Thumbnail: When enabled, the product's main image is used as the thumbnail for this variant instead of a variant-specific image.
Each variant can have its own main image and gallery images. This is useful when Red and Blue variants look completely different.
Frontend View of the image changing depending on which option is selected
Set a Default Variant

One variant needs to be marked as the default — this is the combination shown and priced when the product page first loads.
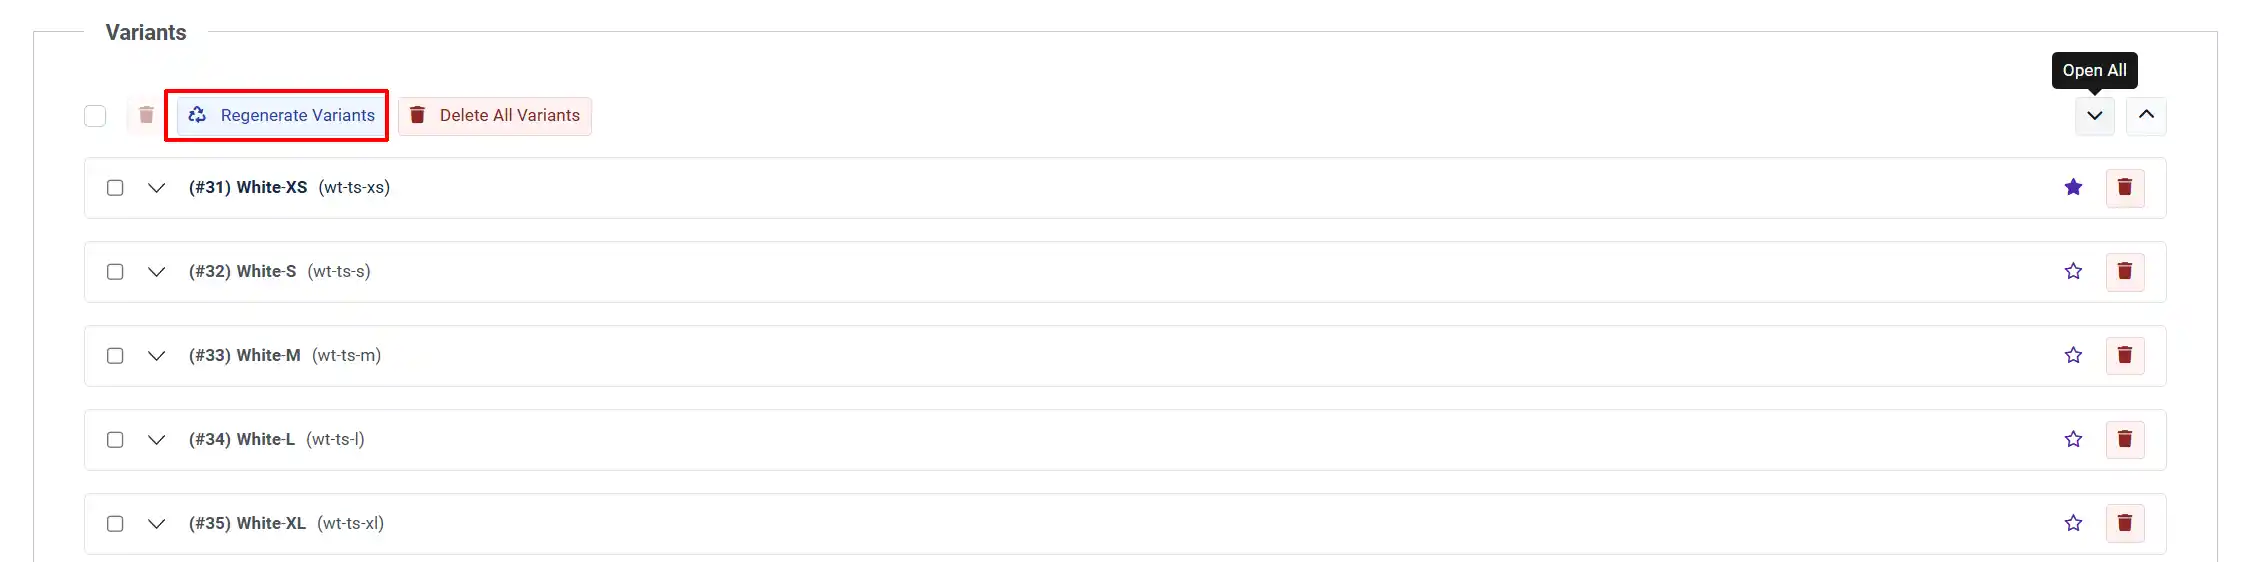
In the variant list, click the star icon on the variant you want as the default. A filled star indicates the default variant. You can change the default item by clicking the star on another variant.
Managing Variants Over Time
As your product line evolves, you may need to update variants.
Regenerating Variants
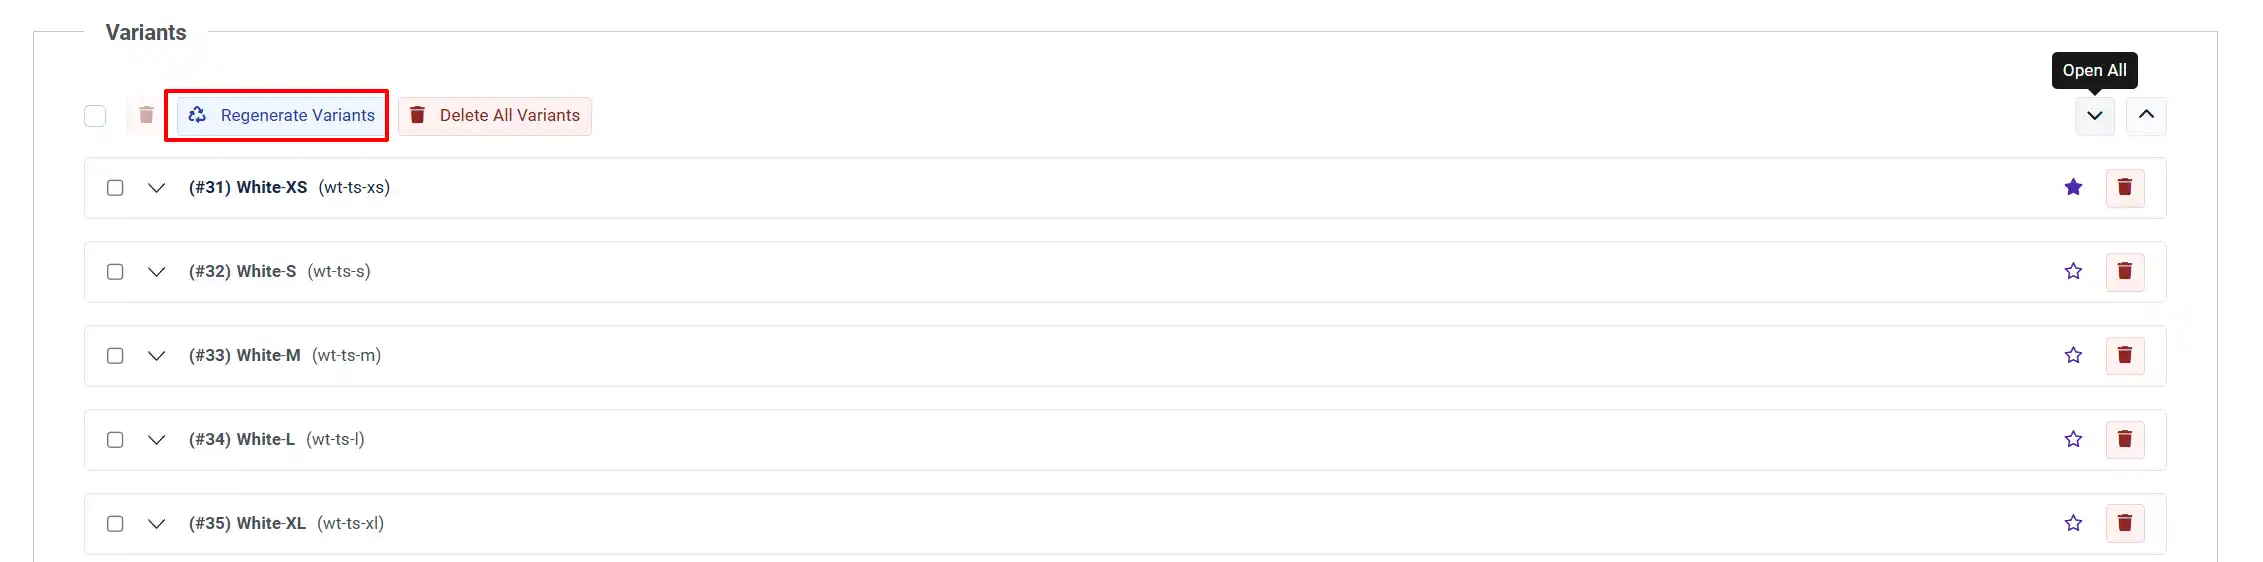
If you add a new option value later (e.g., a new color), click Regenerate Variants in the Variants tab. J2Commerce adds new combinations for the new value while preserving existing variants and their prices, stock, and images.
Deleting Variants
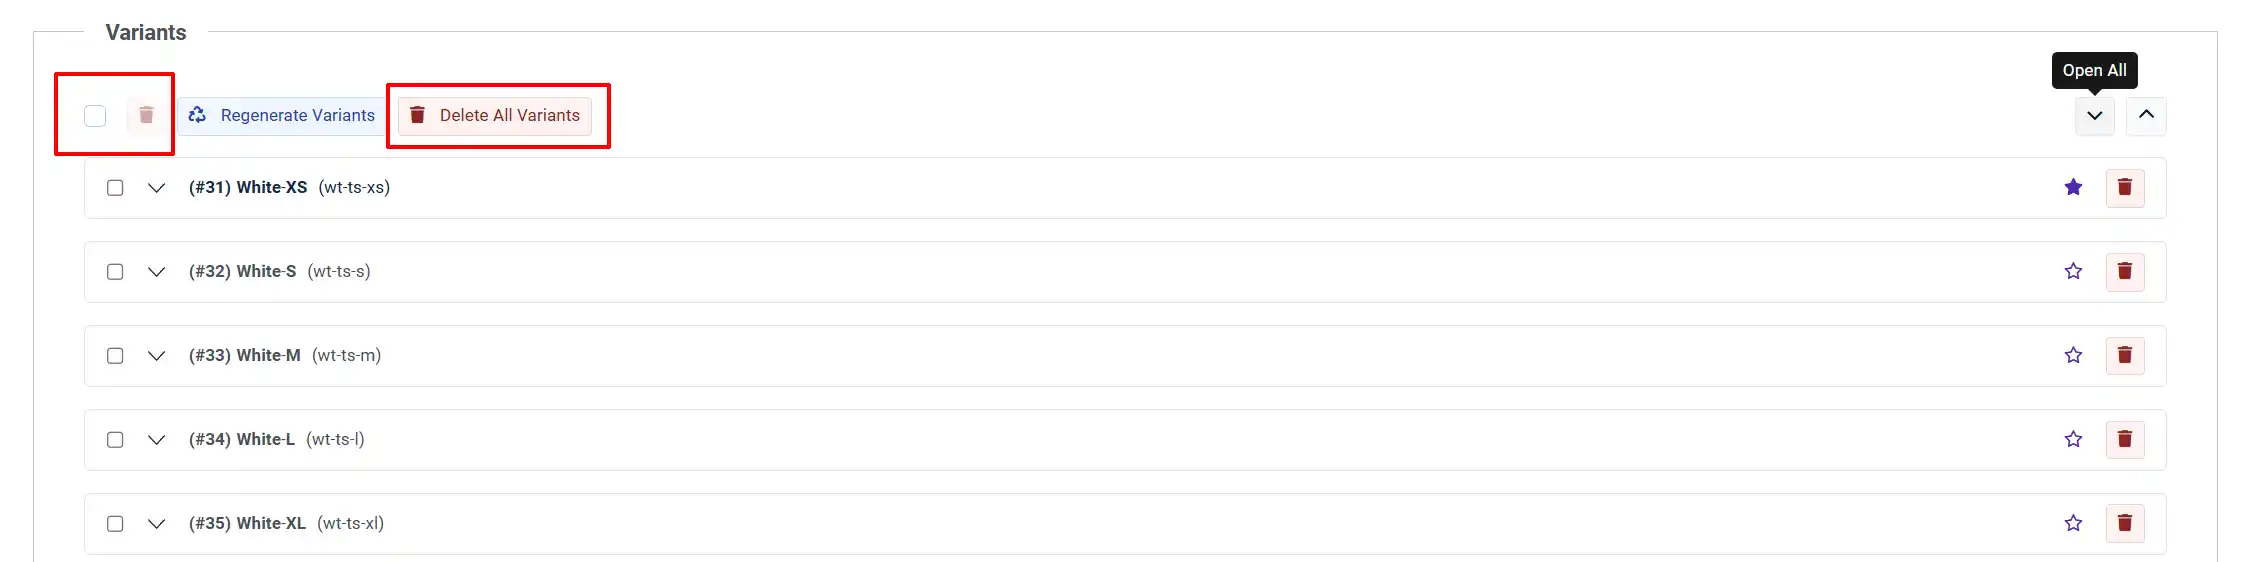
- To delete a single variant: expand it and click the delete button.
- To delete multiple variants: check the checkboxes and click the delete button in the toolbar.
- To delete all variants and start over: click Delete All Variants.
Browsing Many Variants
If a product has many variants, they are paginated. Use the page numbers below the accordion list to navigate between pages.
Filters Tab
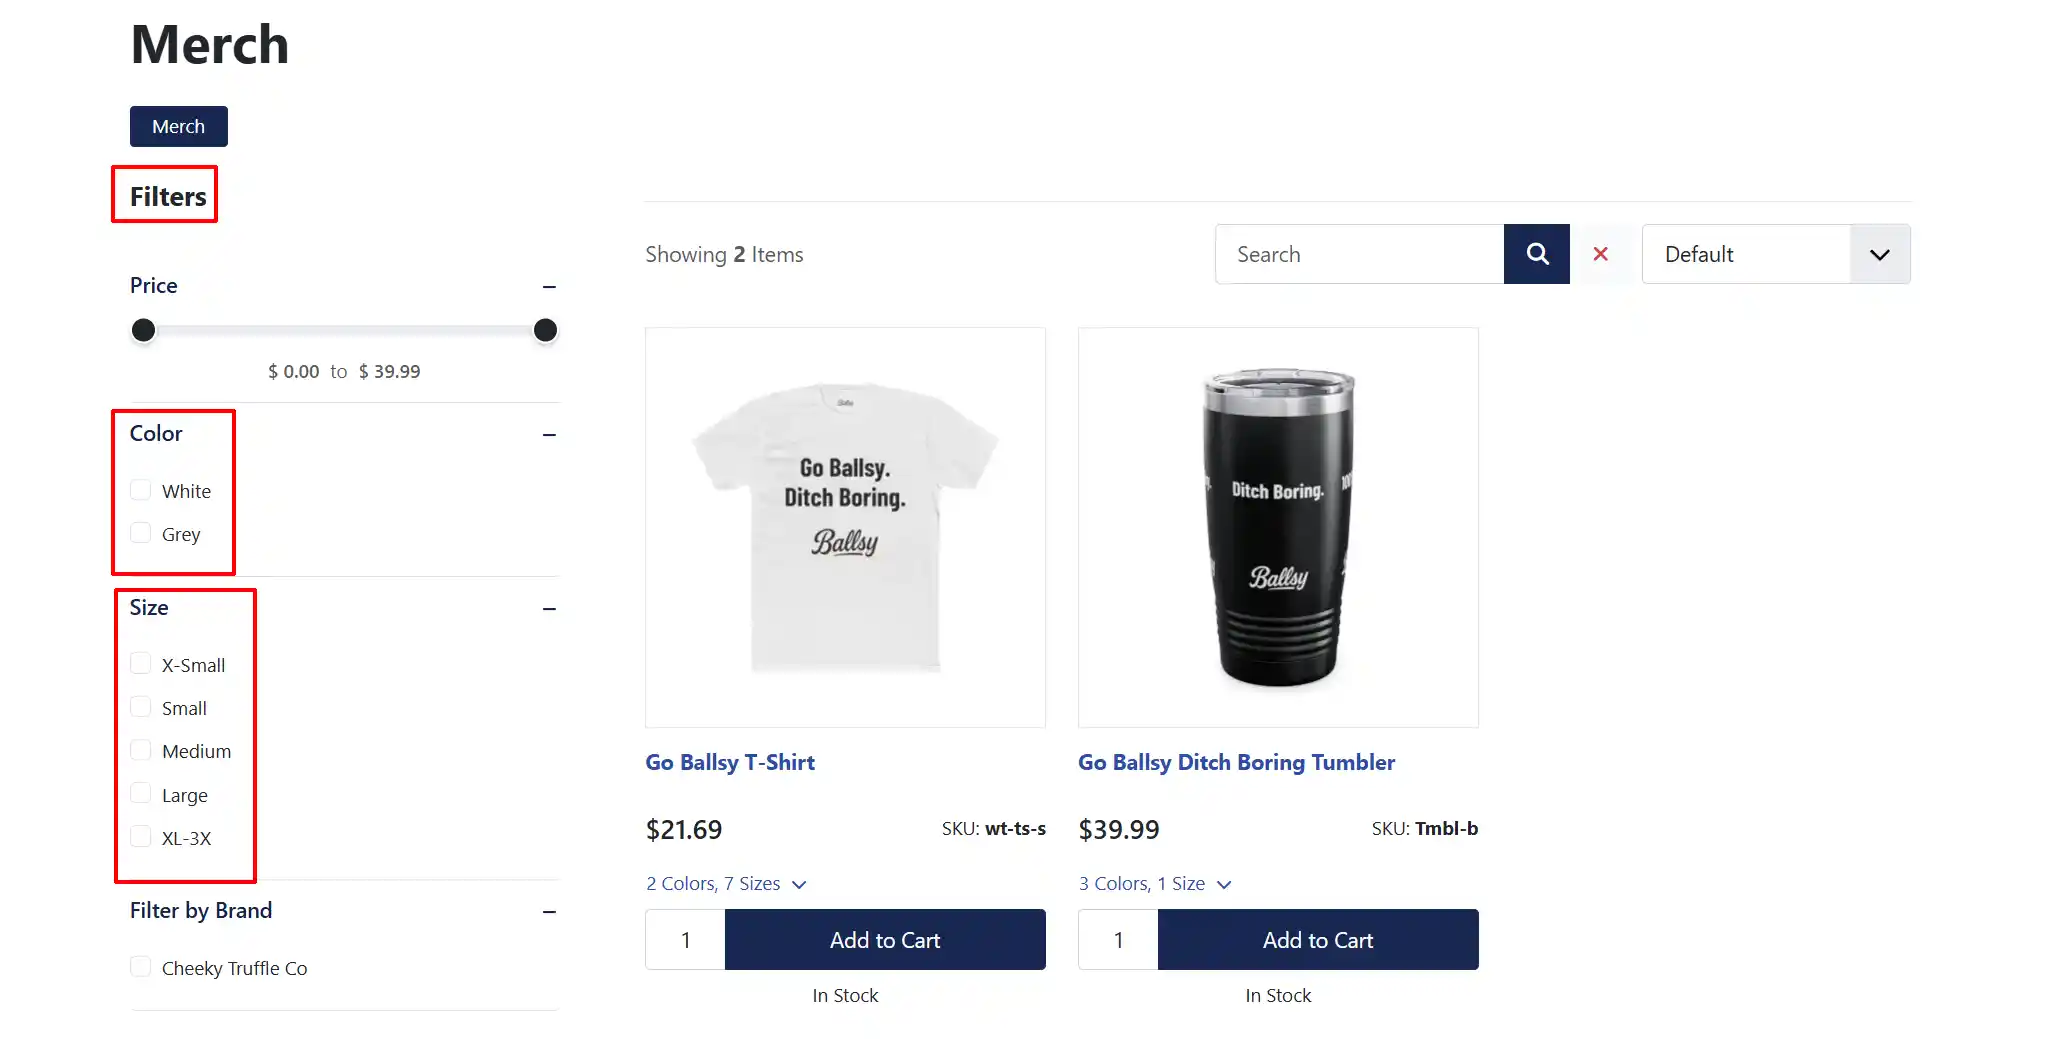
Filters allow shoppers to narrow product listings by attribute — for example, filtering by material, color range, or size range. Assigning filters here makes this product appear in the correct filtered results on category and tag pages.
To assign a filter value:
- Type part of the filter name in the search box. Results appear in a dropdown.
- Click the matching result to add it to the product.
- Repeat for each filter value you want to assign.
- To remove a filter, click the trash icon next to it.
Filters are created and organized under J2Commerce -> Catalog -> Filters.
Frontend View of Filters on Products
They will appear under the Specification tab
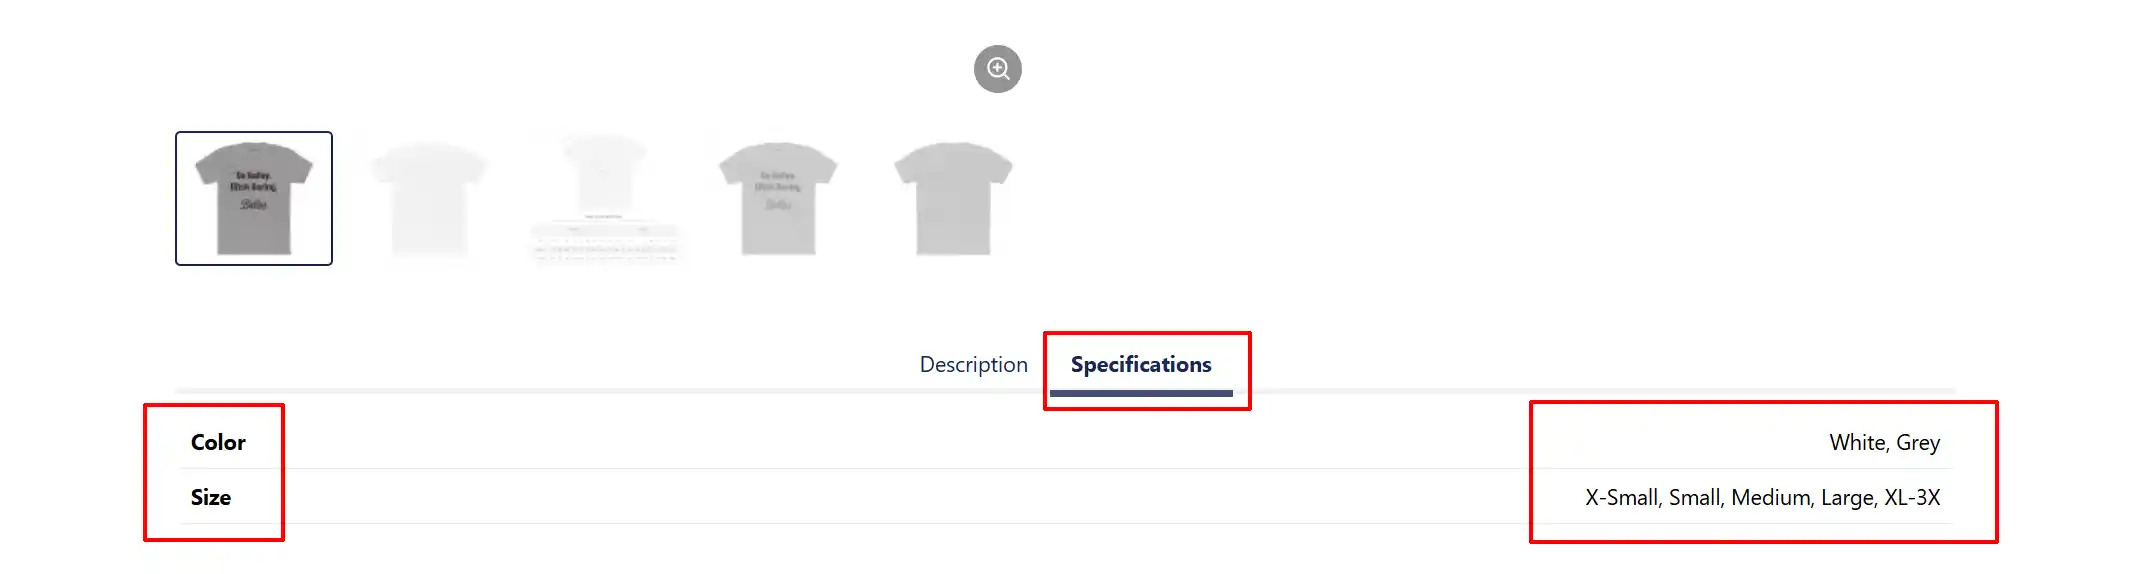
The filters section will always appear on the Categories page but will only show up on the individual product pages if you choose to configure the product that way.
Frontend View of Filters on Categories
Relations Tab
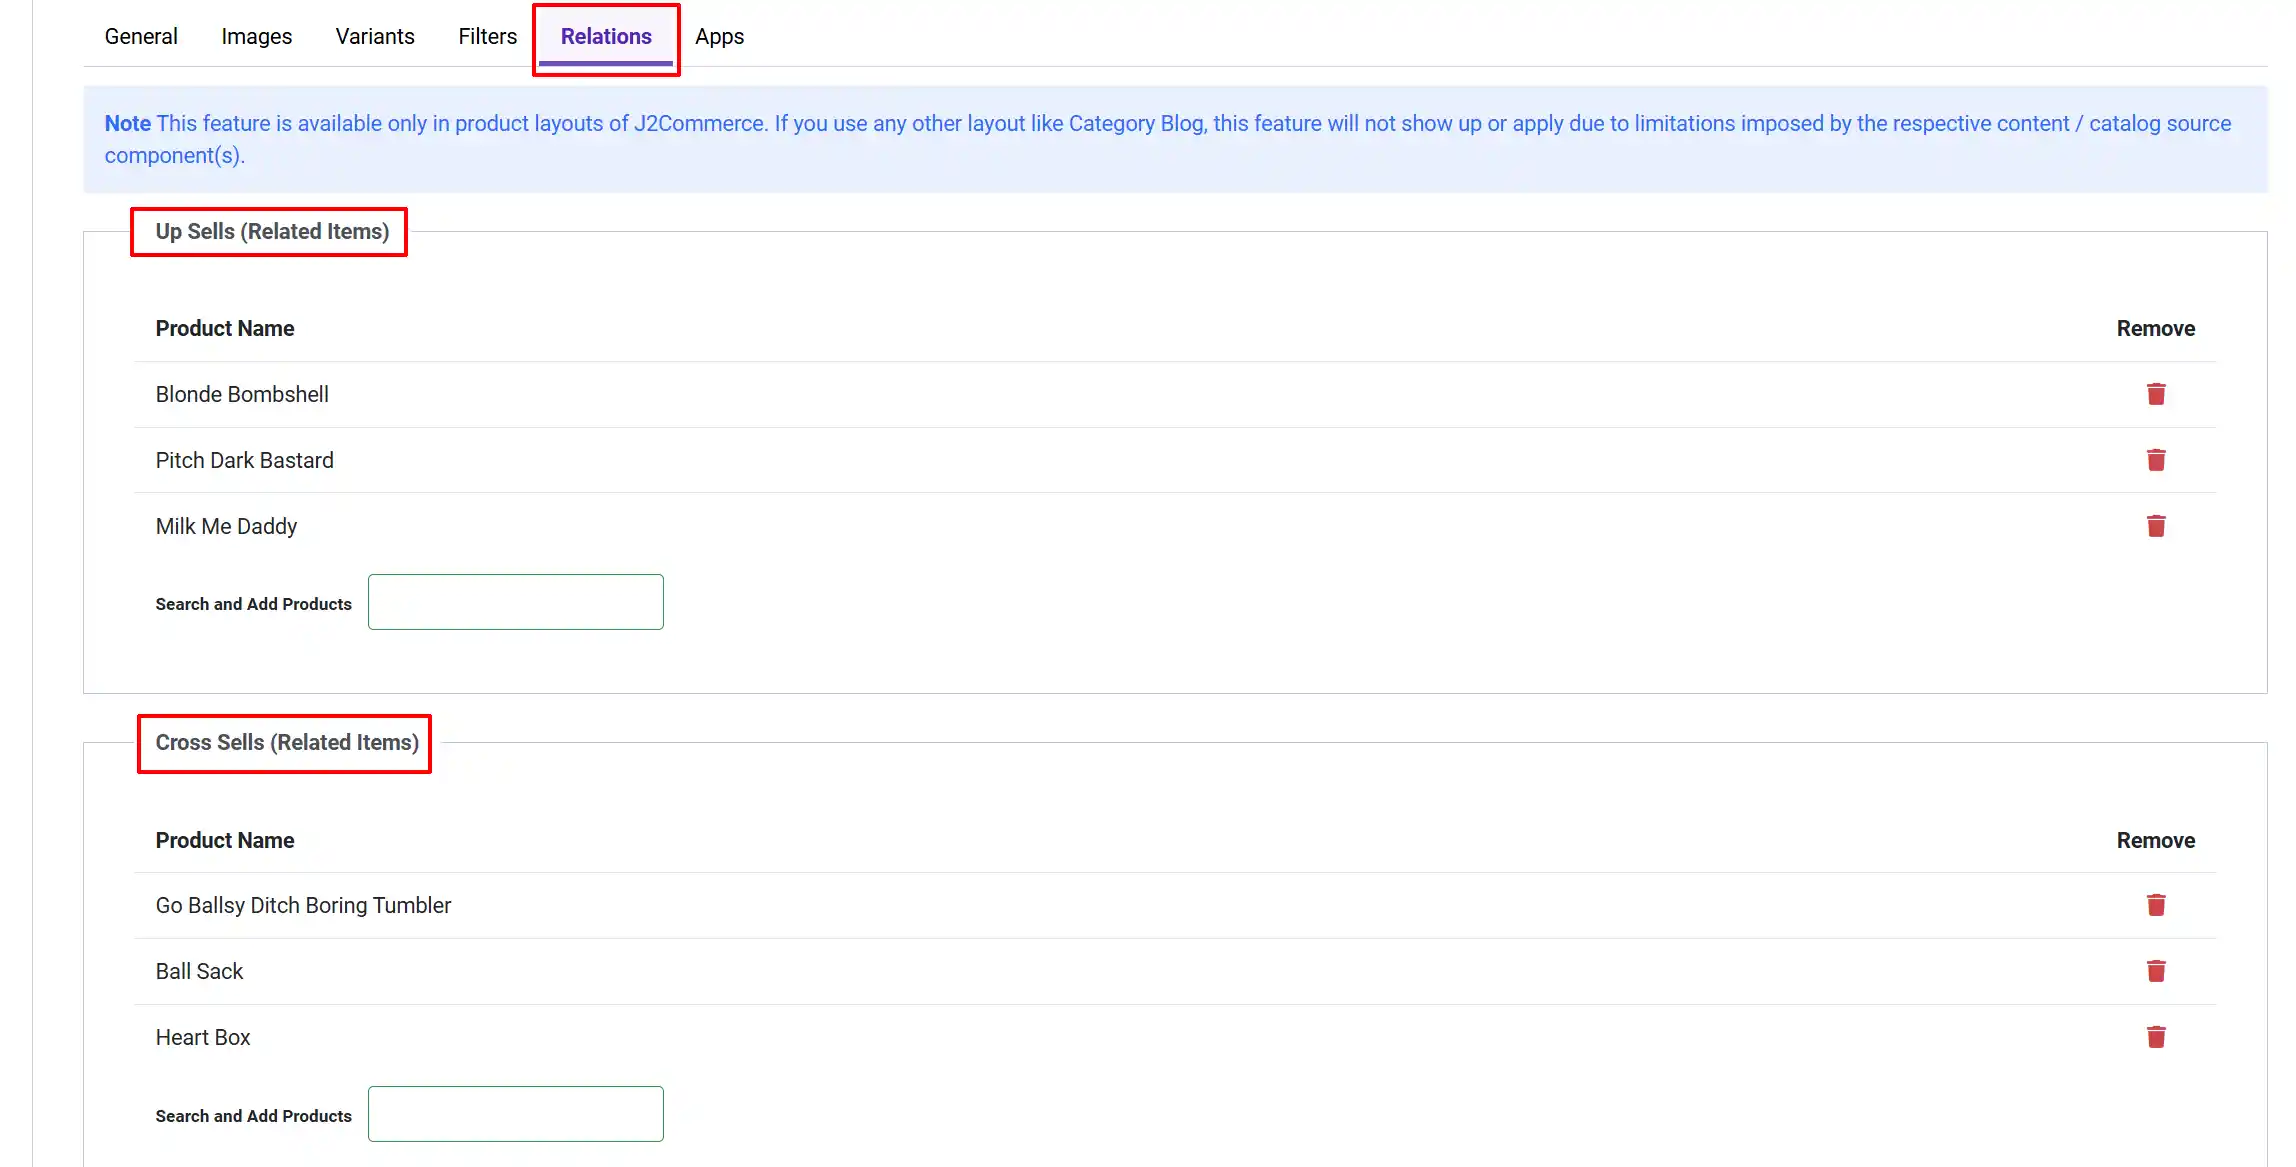
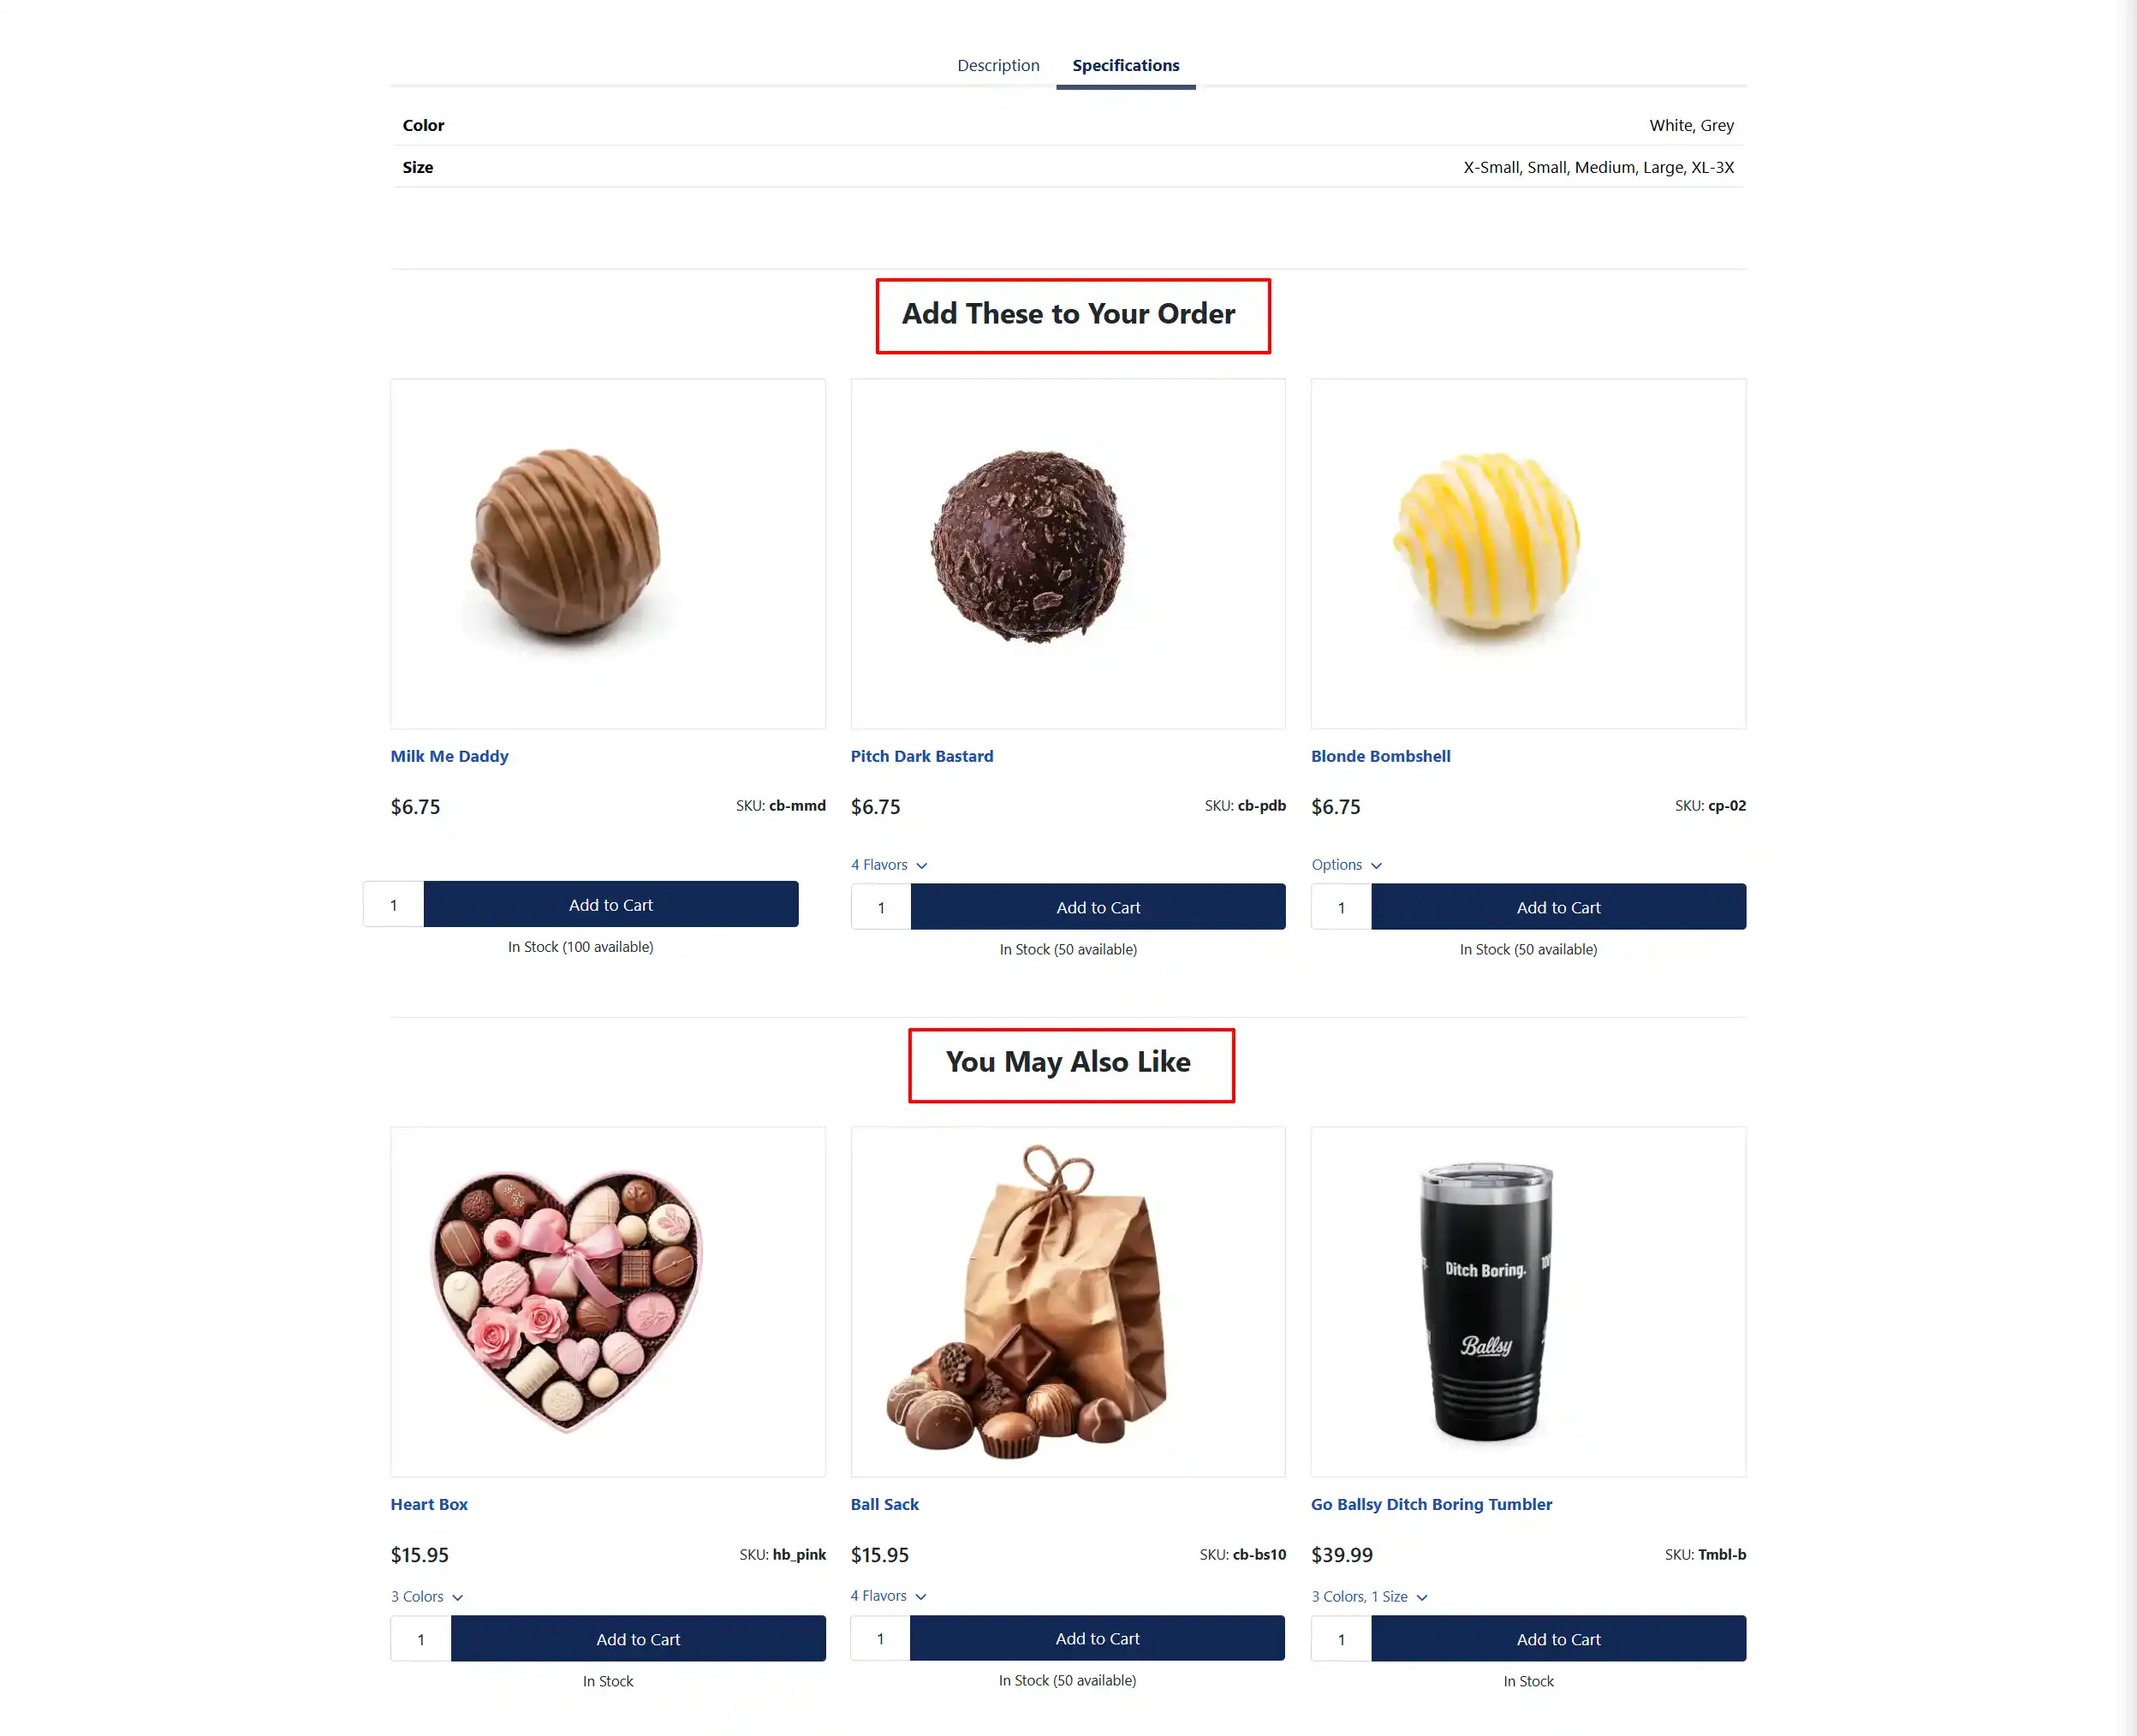
Up-sells: Products to recommend as upgrades on this product's detail page. Typically shown as "Add these to your order" with products that will complement the order. ie: parts for a specific tool, extenders, etc...
Cross-sells: Products to suggest as complementary purchases or are similar. Typically shown as "You might also like" with higher-value alternatives. They can be placed at the bottom of the product page, in the cart sidebar, or at checkout.
To add a related product, start typing its name in the search box. Matching products appear in a dropdown — click one to add it. Remove a related product by clicking the trash icon next to it.
Frontend View of Related Products
Apps Tab

The Apps tab shows product-level configuration panels provided by installed app plugins. For example:
- If you have the Custom Accordions app enabled, you can add accordion sections directly on this tab.
- If you have the Gift Wrapping app enabled, its per-product settings appear here.
Each app is responsible for its own content on this tab. If no apps are installed, the tab shows an information message.
How It Works on the Storefront
When a customer views a Variable product:
- The product page displays option selectors (dropdowns, radio buttons, or color swatches, depending on the option type).
- As the customer makes selections, J2Commerce updates the price, image, and stock status via AJAX — no page reload.
- Once all options are selected, the correct variant is identified and the Add to Cart button becomes active.
- Adding to the cart validates that the selected combination exists and has stock available.
- The cart shows the selected option values alongside the product name.
In category listing views, if your store settings show the cart on the listing page, option selectors also appear there so customers can add directly from the list.
Tips
- Set prices on variants, not the article — the variant price is what customers see and pay. The article itself has no price field for Variable products.
- Use a default variant — always mark one variant as the default so the product page shows a valid starting price.
- Set values before generating — configure option values for each option before clicking Generate Variants. You can regenerate later to add new combinations.
- Enable inventory per variant — if you need to track stock per size and color separately, enable Manage Stock and set Quantity on each variant individually.
- Reuse options — create your Size and Color options once under Options and reuse them across multiple products.
Troubleshooting
Variants Not Generating
Cause: No option values have been assigned to the product options, or the options are of a type that does not support value selection.
Solution:
- Go to the Variants tab and click Set Values next to each option.
- Confirm that at least one value is assigned and saved for each option.
- Click Generate Variants again.
Option Values Not Appearing in the Set Values Panel
Cause: The option's global value list is empty.
Solution:
- Go to J2Commerce -> Catalog -> Options.
- Open the option (e.g., Size) and verify it has values listed.
- Add any missing values and save the option.
- Return to the product and click Set Values again.
Add to Cart Button Stays Disabled
Cause: Not all option selectors have been chosen by the customer, or the selected combination has no matching variant.
Solution (admin):
- Open the product and go to the Variants tab.
- Verify that a variant exists for every possible combination of option values.
- If some combinations are missing, click Regenerate Variants.
Price Does Not Update When Selecting Options
Cause: A default variant is not set, or JavaScript is blocked.
Solution:
- Open the product, go to the Variants tab, and click the star icon on one variant to set it as the default.
- Save the product.
- Verify that JavaScript is enabled and not blocked by browser extensions.

Variant Image Does Not Change on Selection
Cause: No image has been uploaded for that variant.
Solution:
- Expand the variant in the Variants tab.
- Go to the Image section and upload a main image for the variant.
- Set Use as Thumbnail to Yes if you want the listing thumbnail to change, too.
- Save the product.