Modal Bouncer
The Modal Bouncer app displays a blocking popup that visitors must satisfy before they can browse or buy in your store. Use it to enforce an age gate (date-of-birth check), a terms acceptance checkbox, a region confirmation, or any custom question — then remember the answer in a browser cookie so returning visitors are not interrupted again.
The gate can apply to your entire Joomla site or only to J2Commerce store pages. You can stack multiple requirement fields in a single modal and choose whether all of them must pass or whether satisfying any one is enough.
Requirements
- PHP 8.3.0 or later
- Joomla! 6.x
- J2Commerce 6.x
Purchase and Download
Step 1: Go to the J2Commerce website -> Apps
Step 2: Locate Modal Bouncer -> click View Details -> Add to Cart -> Checkout
Step 3: Go to My Downloads under your profile button at the top right and find the app. Click Available Versions -> View Files -> Download Now
Install the App
In the Joomla Administrator, go to System -> Install -> Extensions.
Upload the plugin ZIP file or use the Install from URL option.

Enable the App
The plugin installs and enables itself automatically. No separate enable step is needed. However, it's important to know where to go to enable or disable it in the future .
There are two ways to reach the Apps list.
Option A: Go to the J2Commerce icon at the top right corner -> Apps
Option B: Go to Components on the left sidebar -> J2Commerce -> Apps

To help you narrow down the list, you can do a search for Modal Bouncer, click the X, and it will turn into a green checkmark. It is now enabled and ready for setup.

Configure the App
Click the Modal Bouncer title (next to the green checkmark) to open the settings screen.
Click the Toggle Inline Help button on any app you install to see a description below each field directly in the admin panel.
Basic Settings Tab
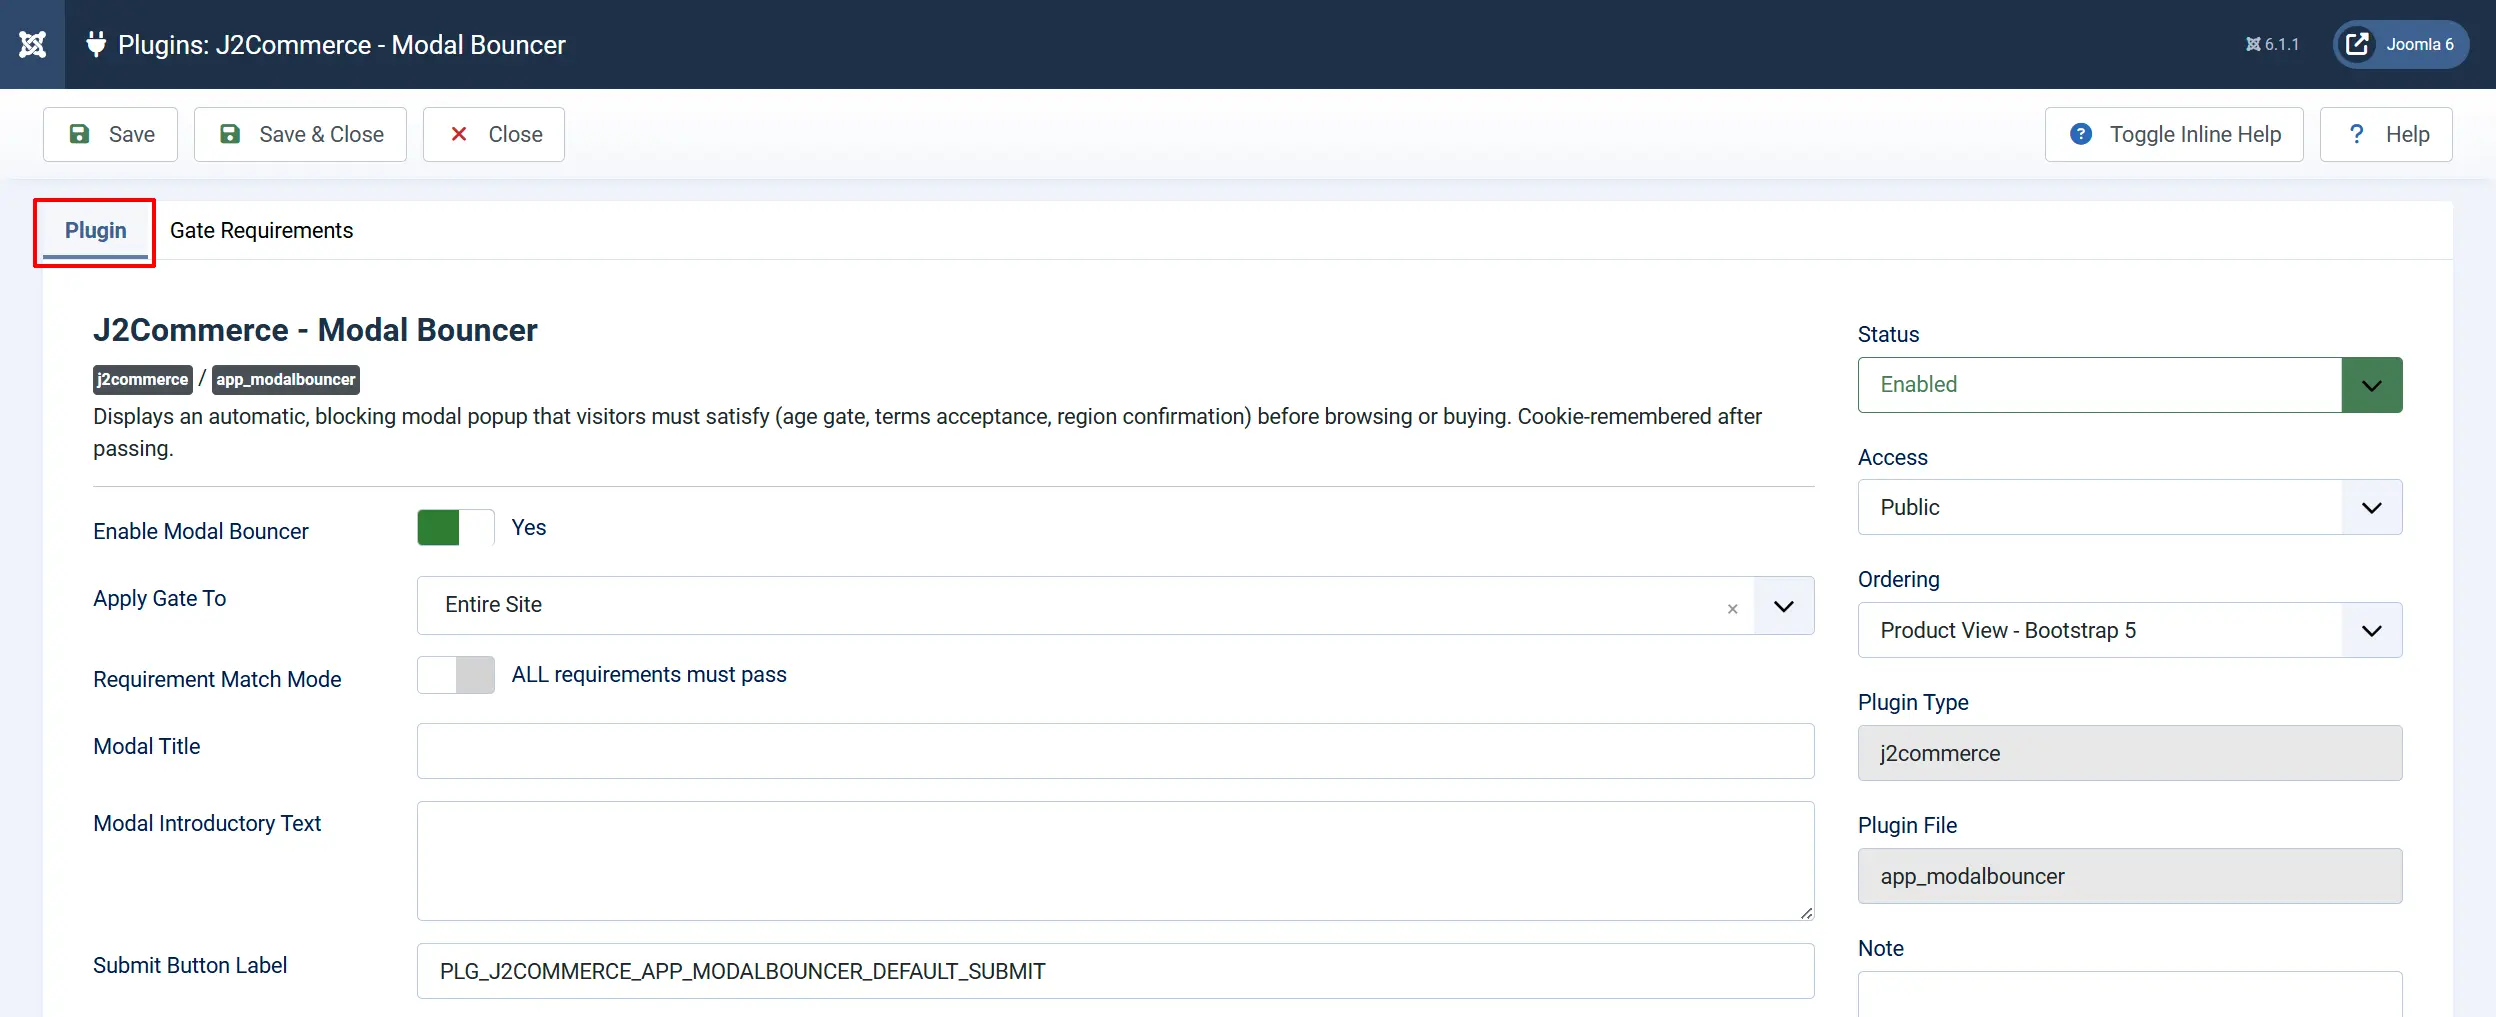
Enable Modal Bouncer: Turns the gate on or off sitewide without requiring you to disable the whole plugin. Set to Yes to show the modal, No to hide it temporarily (for maintenance or seasonal use).
Apply Gate To: Choose where the gate appears:
-
Entire Site: The modal appears on every page of your Joomla site. It is useful for age-restricted or region-restricted stores where even non-store pages need gating. The visitor will only see it on the first page they visit as long as they acknowledge the modal bouncer.
-
J2Commerce Pages Only: The modal appears only on J2Commerce store pages (product lists, product detail, cart, checkout). It is the right choice when your site has a public-facing blog or news section but your store has entry requirements.
Requirement Match Mode: Controls how multiple requirement rows (set up in the Gate Requirements tab) are evaluated:
ALL requirements must pass: Every requirement row must be satisfied. This is the standard choice for a date-of-birth check combined with a terms checkbox.
ANY one requirement is enough: The visitor only needs to satisfy one row. Useful when you offer alternative ways to confirm eligibility.
Modal Title: The heading displayed at the top of the popup. Leave blank to show no title. Examples: "Age Verification", "Welcome", "Please Confirm".
Modal Introductory Text: A short paragraph shown below the title to explain what the visitor must do. Keep it brief and plain — for example: "You must be 18 or older to enter this store" or "Please confirm you have read and accept our terms."
Submit Button Label: The text on the button visitors click to submit their answers. Defaults to Enter. You can change it to "Continue", "I Confirm", "I Am 18+", or any label that fits your use case.
Cookie Settings
These settings control how long the app remembers that a visitor has already passed the gate.

Pass Cookie Name: The internal name stored in the visitor's browser. The default (j2c_modalbouncer_pass) works for most stores. Only change this if you are running multiple gates on the same domain and need to track them separately.
Cookie Lifetime (days): How many days the browser remembers a passed gate before asking again:
0: Session only — the gate reappears every time the browser is closed and reopened.
30 (default): The visitor is not asked again for 30 days.
Up to 365: Up to one year.
Cookie Path: The URL path where the pass cookie is active. The default / covers your entire site. If your J2Commerce store is in a subfolder (for example /shop), you can enter /shop so the cookie does not interfere with other subfolders.
Cookie Strategy:
-
Global (one cookie): One cookie stores the result of all requirements together. This is the simplest setup and the right choice for most stores.
-
Per Requirement: A separate cookie is stored for each individual requirement row. Use this when different requirements need different expiry logic, or when you add or remove requirements frequently (each change invalidates only the affected cookie).
Cookie SameSite Policy: Controls whether the pass cookie travels with cross-site requests:
Lax (default): Recommended for most stores. The cookie is sent on normal navigation but blocked on cross-site requests.
Strict: Maximum restriction. Use only if your store is never accessed via a link from another website.
None: Needed only for storefronts embedded inside an iframe on another domain. Requires HTTPS.

Enable Server-Side Verification: When enabled, the app sends the visitor's answers to the server for a second check before writing the pass cookie. This makes it harder for a technically savvy visitor to bypass the gate by manipulating their browser.
Server-side verification raises the bar, but this is still a soft gate — it is not a substitute for hard authentication. Use it for age gates and entry confirmations, not for security-critical access control.
Template Style: Choose between the Bootstrap 5 template (default) and the UIkit template. Select the one that matches your active Joomla template's front-end framework.
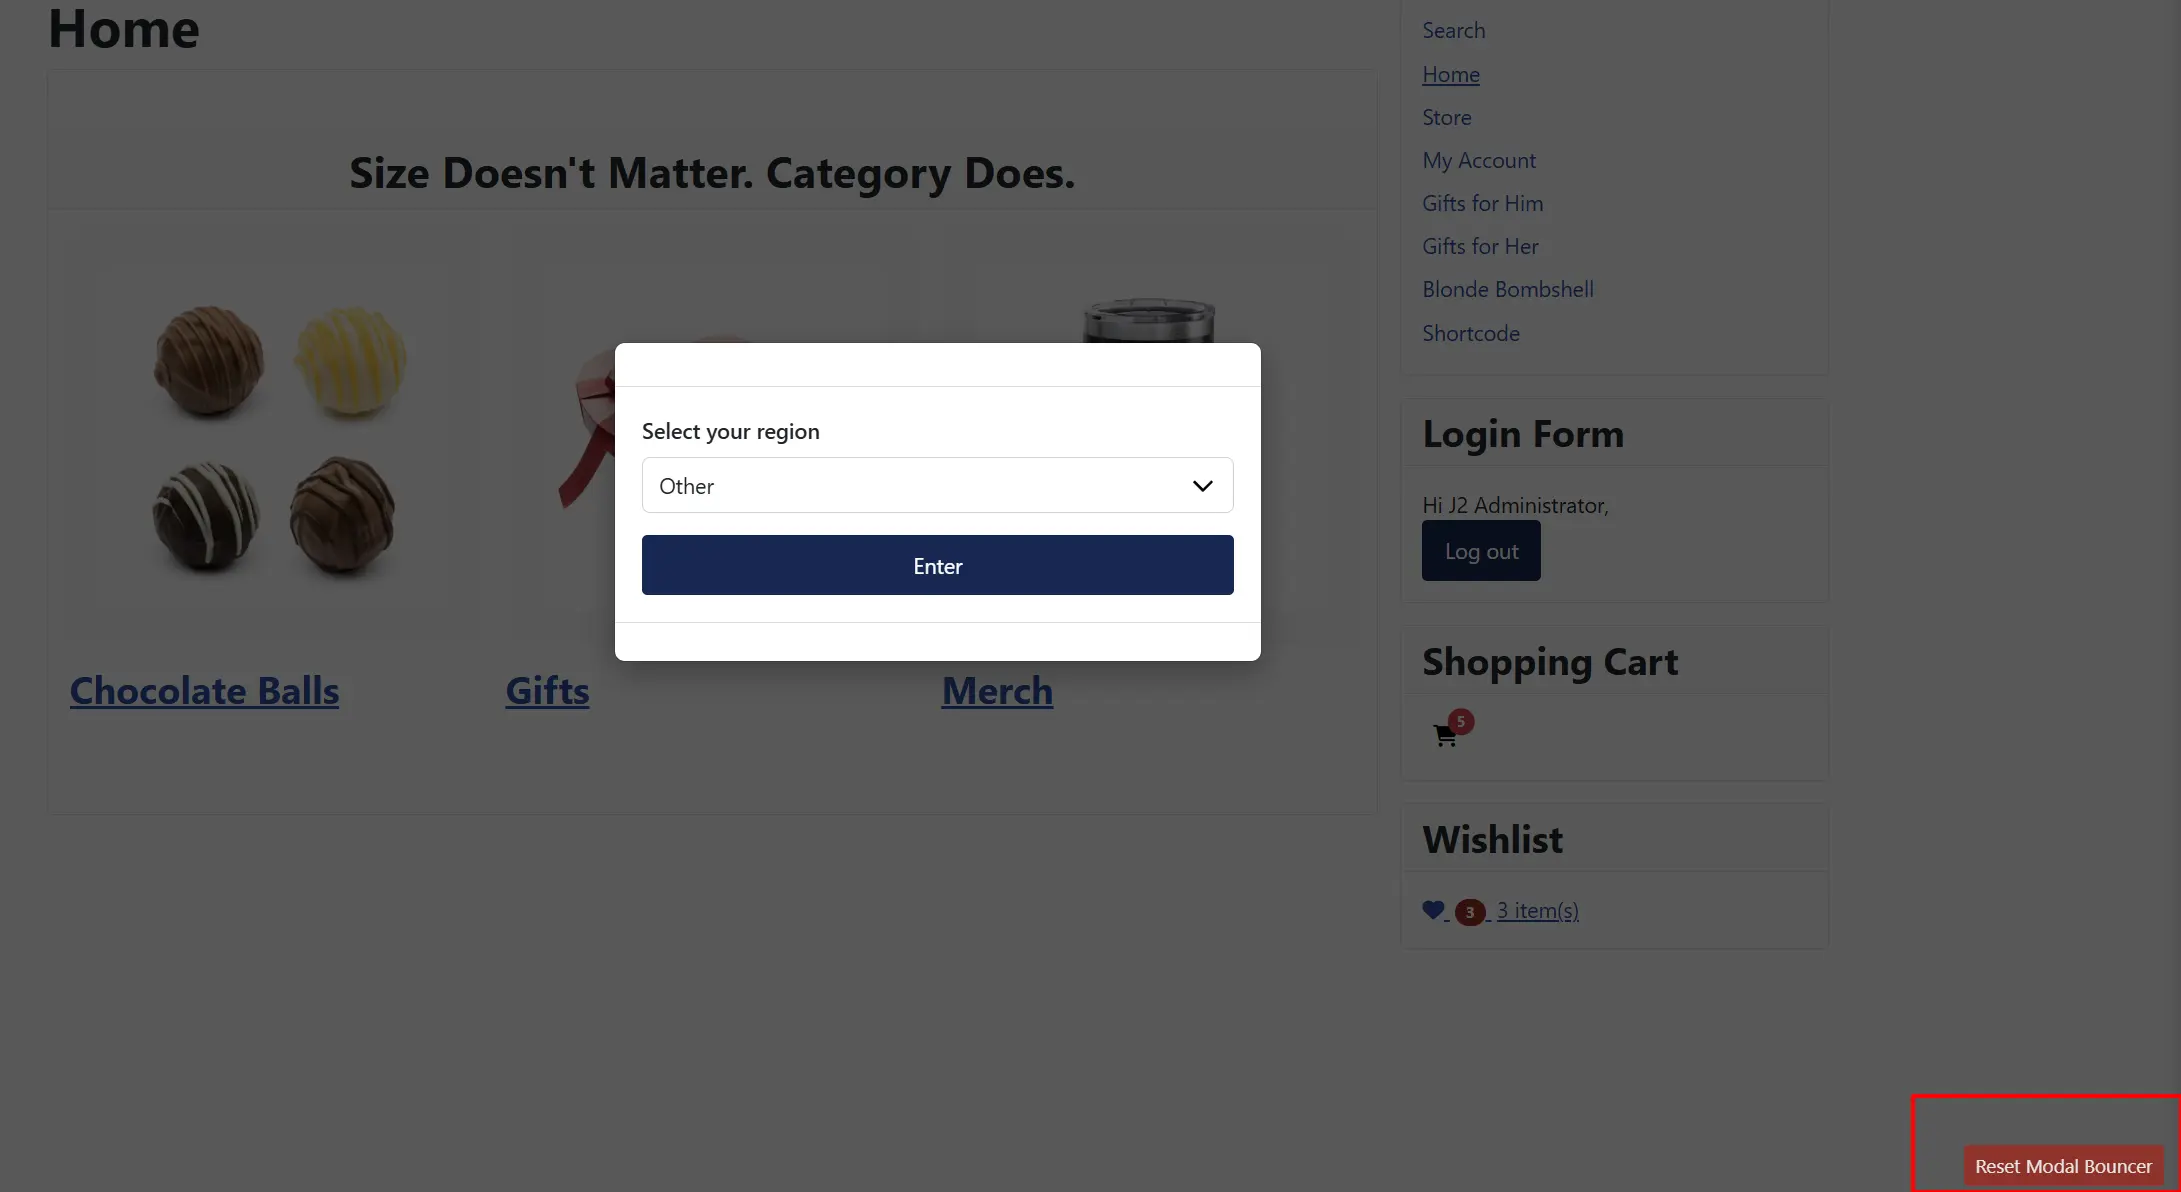
Debug Mode: When enabled, a small Reset Modal Bouncer button appears on the page so you can clear your own pass cookie and see the modal again without clearing all browser cookies. Also logs diagnostic messages to the browser console.
Turn this off on production sites.
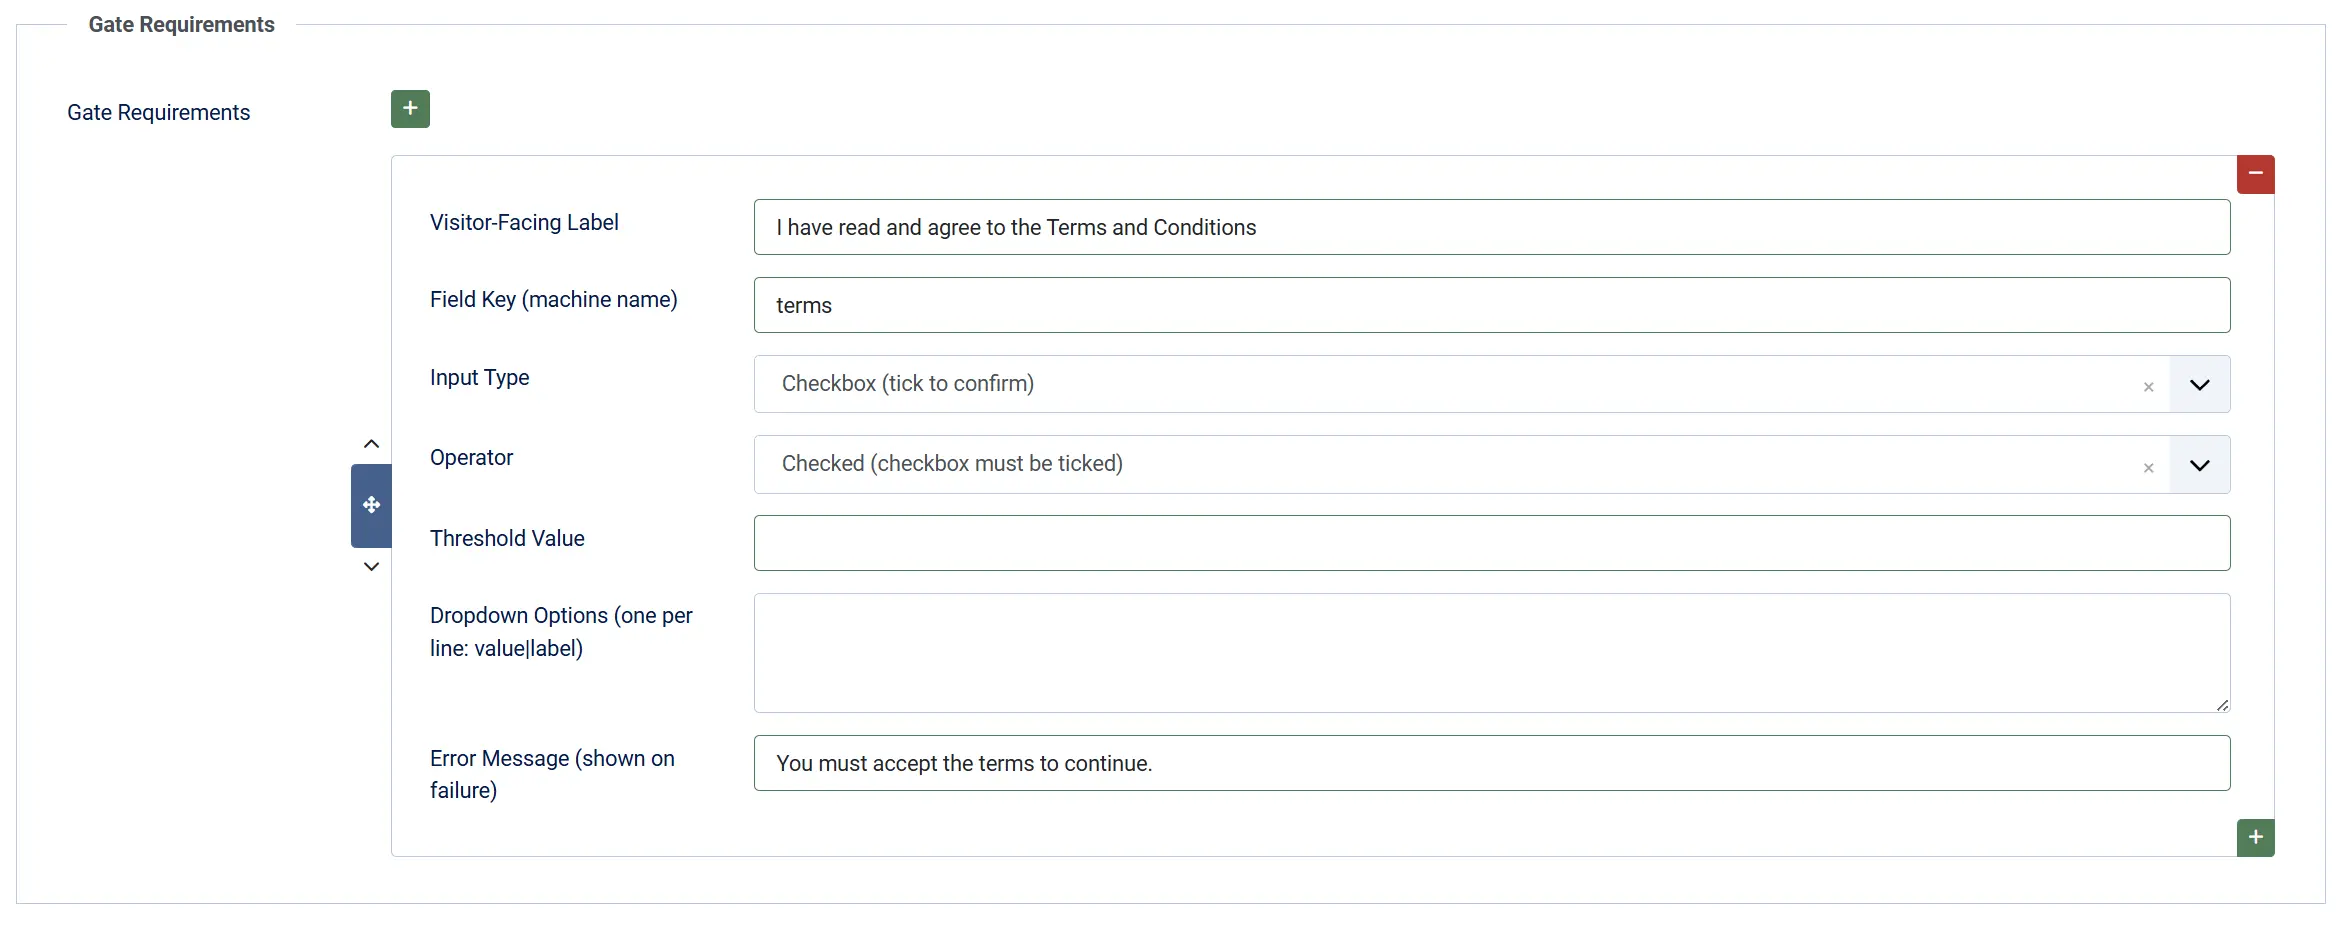
Gate Requirements Tab

This is where you define what the visitor must enter or confirm. Click the green plus sign to Add Item to add a requirement row. You can add as many rows as you need.
Each row has the following fields:
Visitor-Facing Label: The label displayed next to the input field in the modal. Write something clear and descriptive — for example: "Date of Birth", "I agree to the Terms and Conditions", "Select your region".
Field Key (machine name): A short internal identifier for this requirement. Use only letters, numbers, and underscores (no spaces). For example: dob, terms_agreed, region. This key is also used as part of the cookie name when the Per Requirement cookie strategy is selected.
Input Type: The type of field presented to the visitor:
-
Date: A date picker (calendar). Use this for date-of-birth age gates.
-
Number: A numeric input box.
-
Text: A plain text input.
-
Email: An email address input.
-
Checkbox: A checkbox the visitor must tick to confirm. Use this for terms acceptance.
-
Dropdown: A select list with your own options.
Operator: Defines the rule that determines whether the visitor's answer passes:
-
Minimum Age (years from date): The visitor entered a date of birth, and you want to verify they are at least N years old. Set Threshold Value to the minimum age (e.g.,
18). -
Above (value
>): The visitor entered a number that must be strictly greater than the threshold. -
Below (value
<): The visitor entered a number that must be strictly less than the threshold. -
Equals (exact match): The visitor's answer must match the threshold exactly (not case-sensitive). For example, operator Equals, threshold
yeson a text field. -
Checked (checkbox must be ticked): The checkbox field must be ticked. No threshold value is needed.
Threshold Value: The value the visitor's answer is compared against. For Minimum Age, enter the required age in years (e.g., 18, 21). For Equals, enter the exact expected answer. Leave blank for Checked.
Dropdown Options (one per line: value|label): Only used when Input Type is Dropdown. Enter one option per line in value|label format — for example:
us|United States
eu|European Union
other|Other
The left side of the | is the internal value that gets matched against the threshold; the right side is the text the visitor sees in the dropdown.
Error Message (shown on failure): The message displayed inside the modal when the visitor's answer for this row does not pass. Write a clear, helpful message — for example: "You must be 18 or older to enter", "You must accept the terms to continue".
How It Works
When a visitor lands on a gated page:
- J2Commerce checks whether the visitor already has a valid pass cookie. If they do, the page loads normally with no interruption.
- If no valid cookie is found, the modal appears and covers the entire page. The page content behind it is inaccessible until the visitor submits valid answers.
- The visitor fills in the required fields and clicks the submit button.
- The app evaluates the answers against the requirement rules (client-side, and optionally server-side if Enable Server-Side Verification is on).
- If the answers pass, a pass cookie is written and the modal disappears.
- If any answer fails, an inline error message appears next to the relevant field, and the modal stays open.
- On the visitor's next visit, the pass cookie is checked first, so the modal is skipped until the cookie expires.
The modal is a blocking gate — pressing Escape does not close it, and clicking outside the modal does not dismiss it. The only way to proceed is to submit valid answers.
Common Use Cases
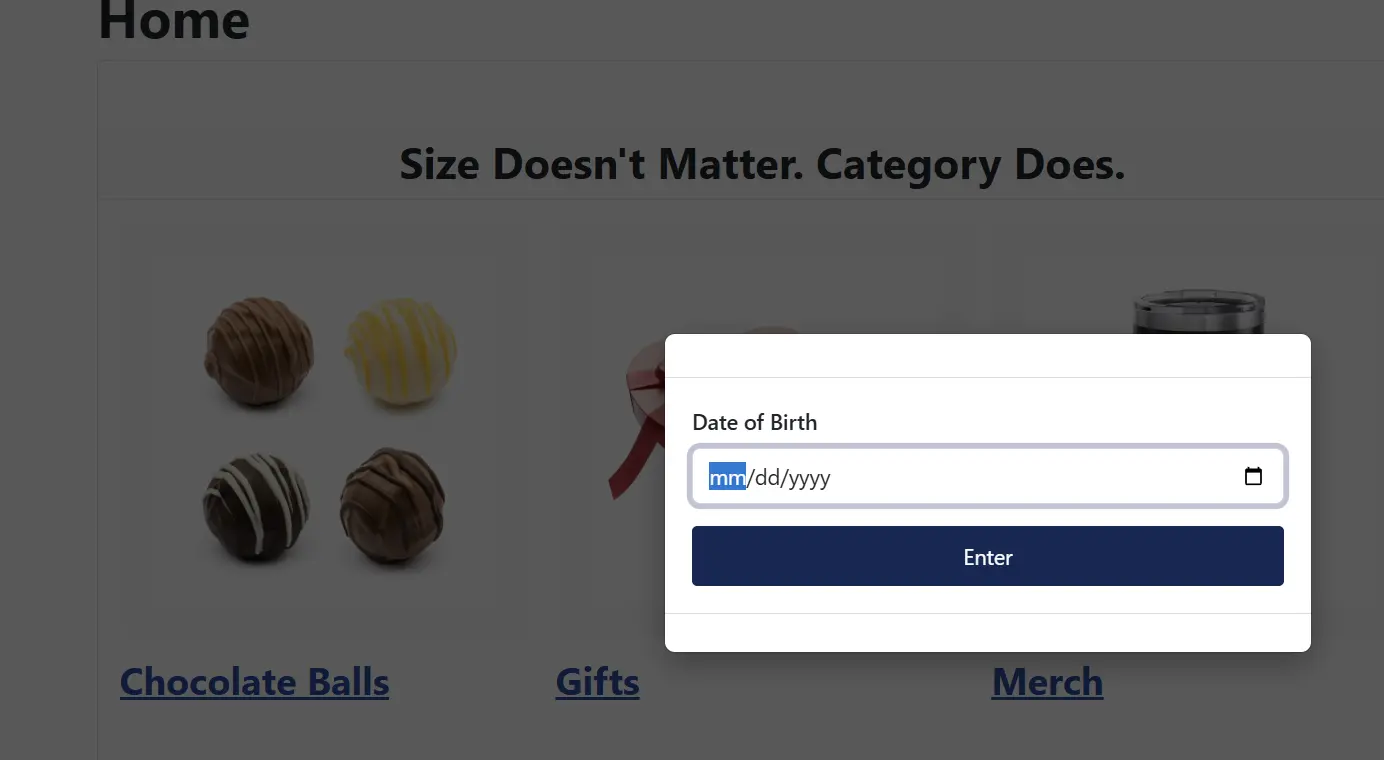
Age Verification (Date of Birth)
A date-of-birth age gate is the most common use of Modal Bouncer. Example setup:
- Visitor-Facing Label: Date of Birth
- Field Key:
dob - Input Type: Date
- Operator: Minimum Age (years from date)
- Threshold Value:
18 - Error Message: You must be 18 or older to enter this store.
The app calculates the visitor's age from the entered date and compares it to the threshold. Leap-day birthdays are handled correctly.
Frontend View - Age Verification
Frontend View - Failed Message

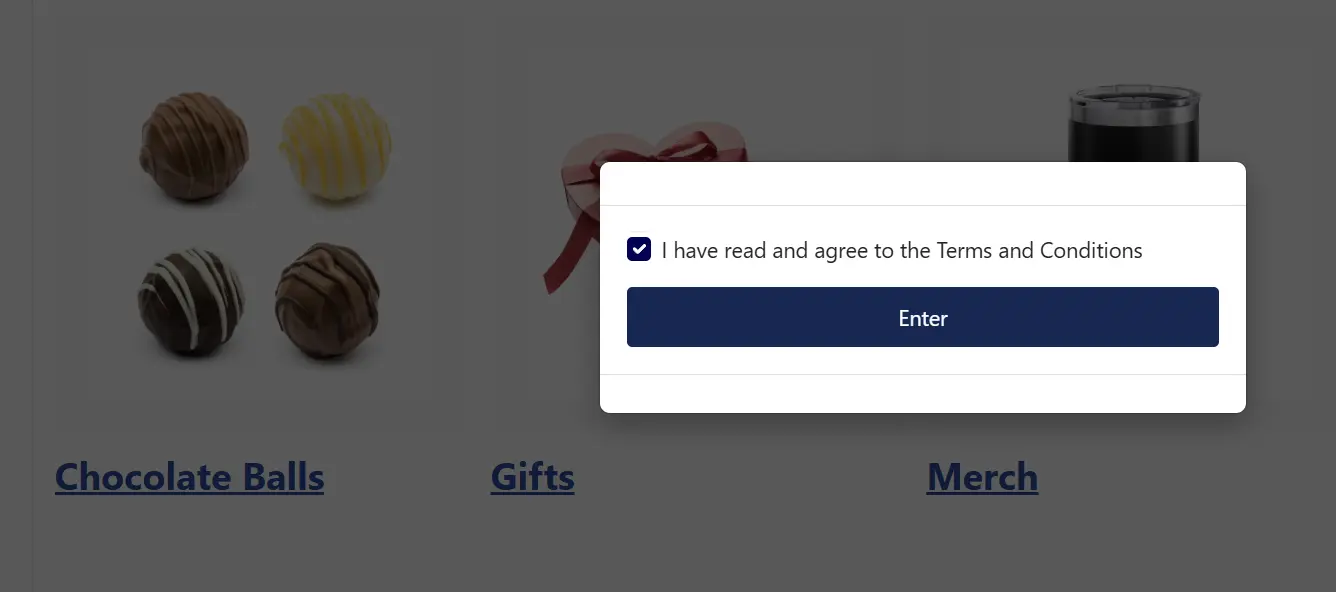
Terms Acceptance Checkbox
- Visitor-Facing Label: I have read and agree to the Terms and Conditions
- Field Key:
terms - Input Type: Checkbox
- Operator: Checked (checkbox must be ticked)
- Error Message: You must accept the terms to continue.
Frontend View - Terms
Frontend View - Failed Message

Region Confirmation (Dropdown)
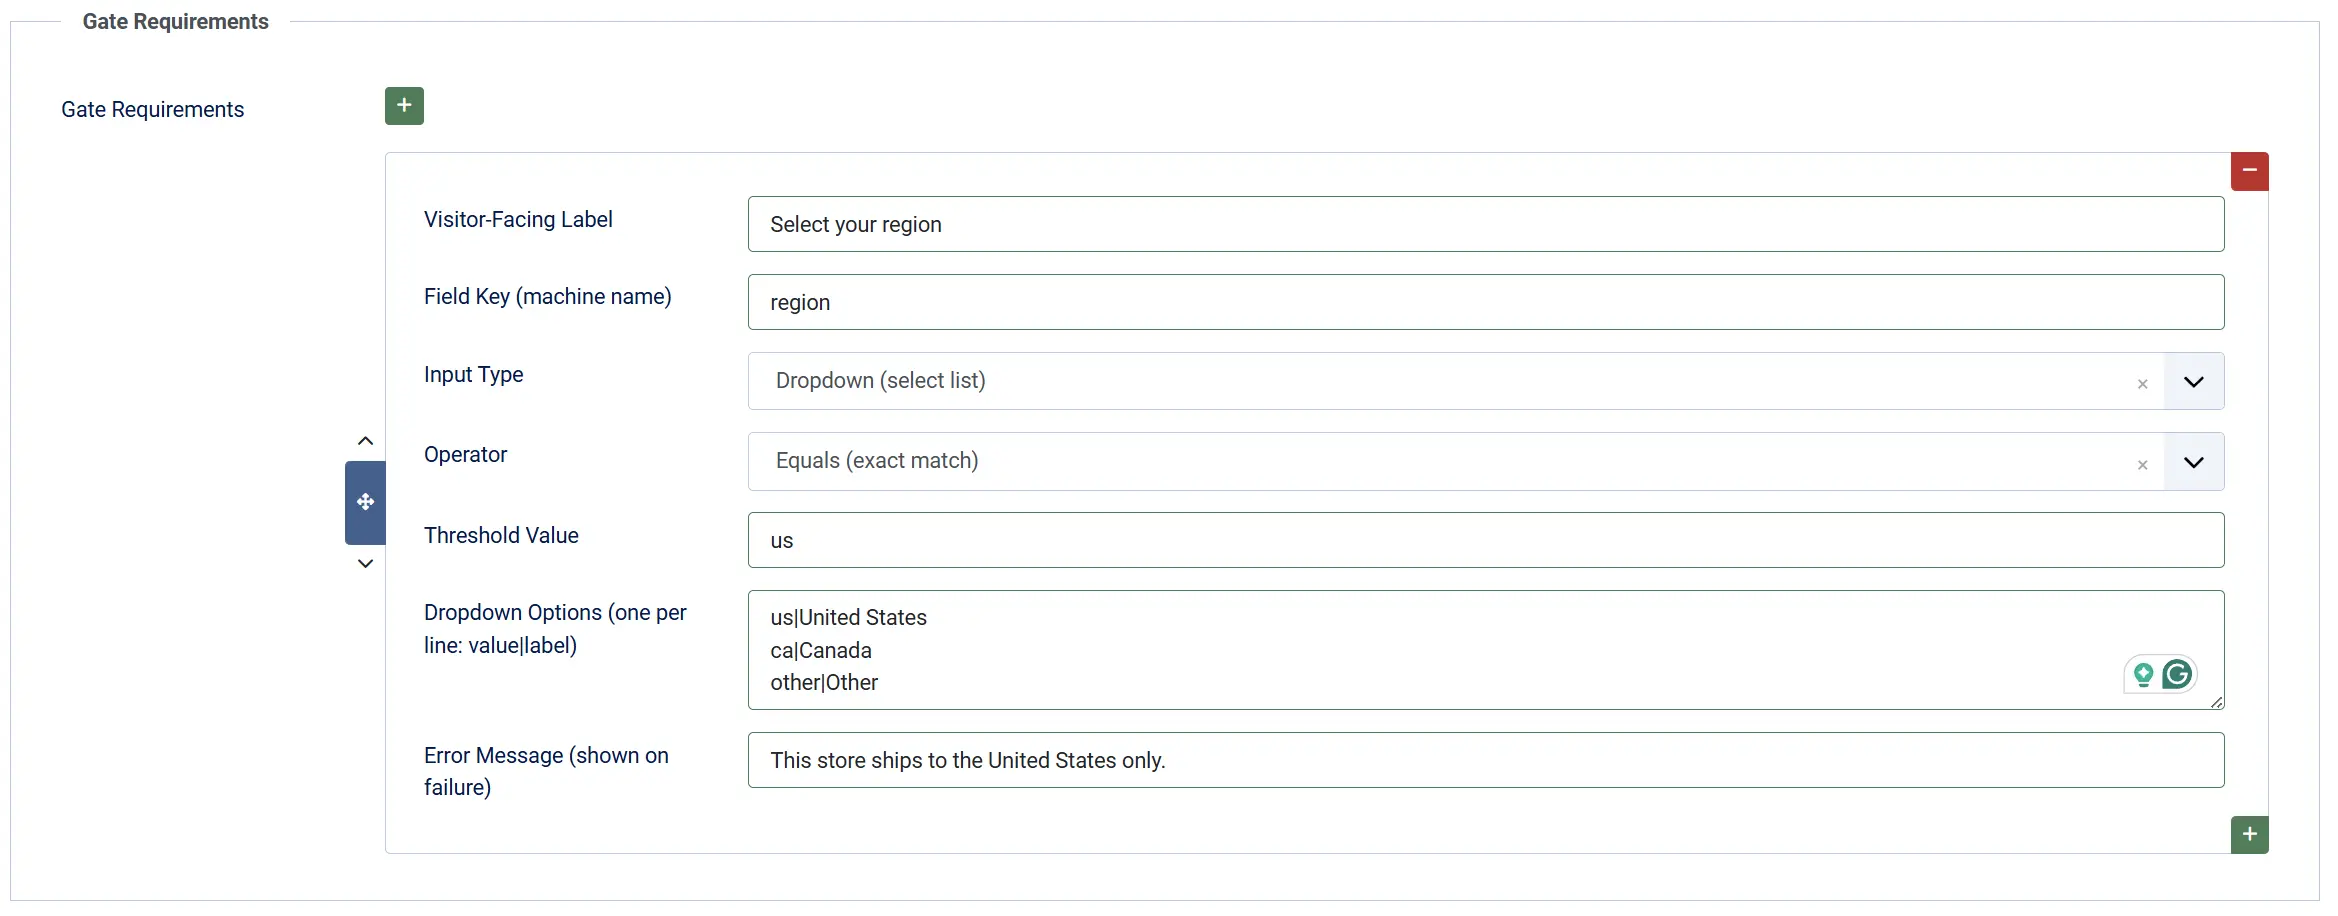
- Visitor-Facing Label: Select your region
- Field Key:
region - Input Type: Dropdown
- Dropdown Options:
us|United States/ca|Canada/other|Other - Operator: Equals
- Threshold Value:
us - Error Message: This store ships to the United States only.
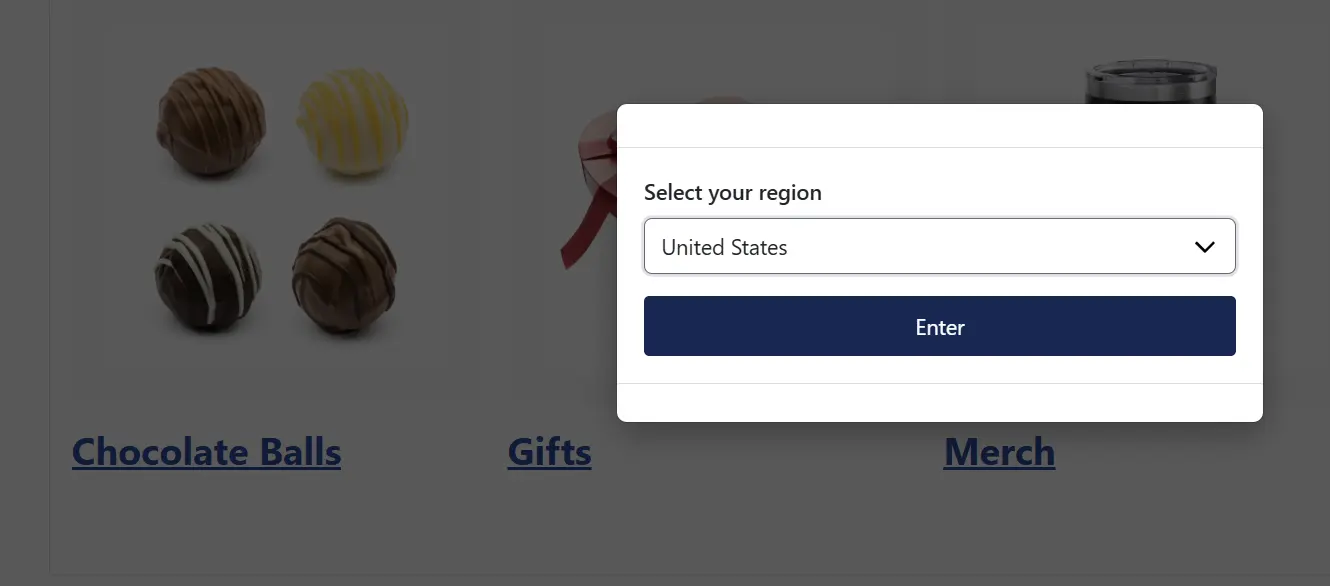
Frontend View - Region
Frontend View - Failed Message

Combined Age Gate and Terms
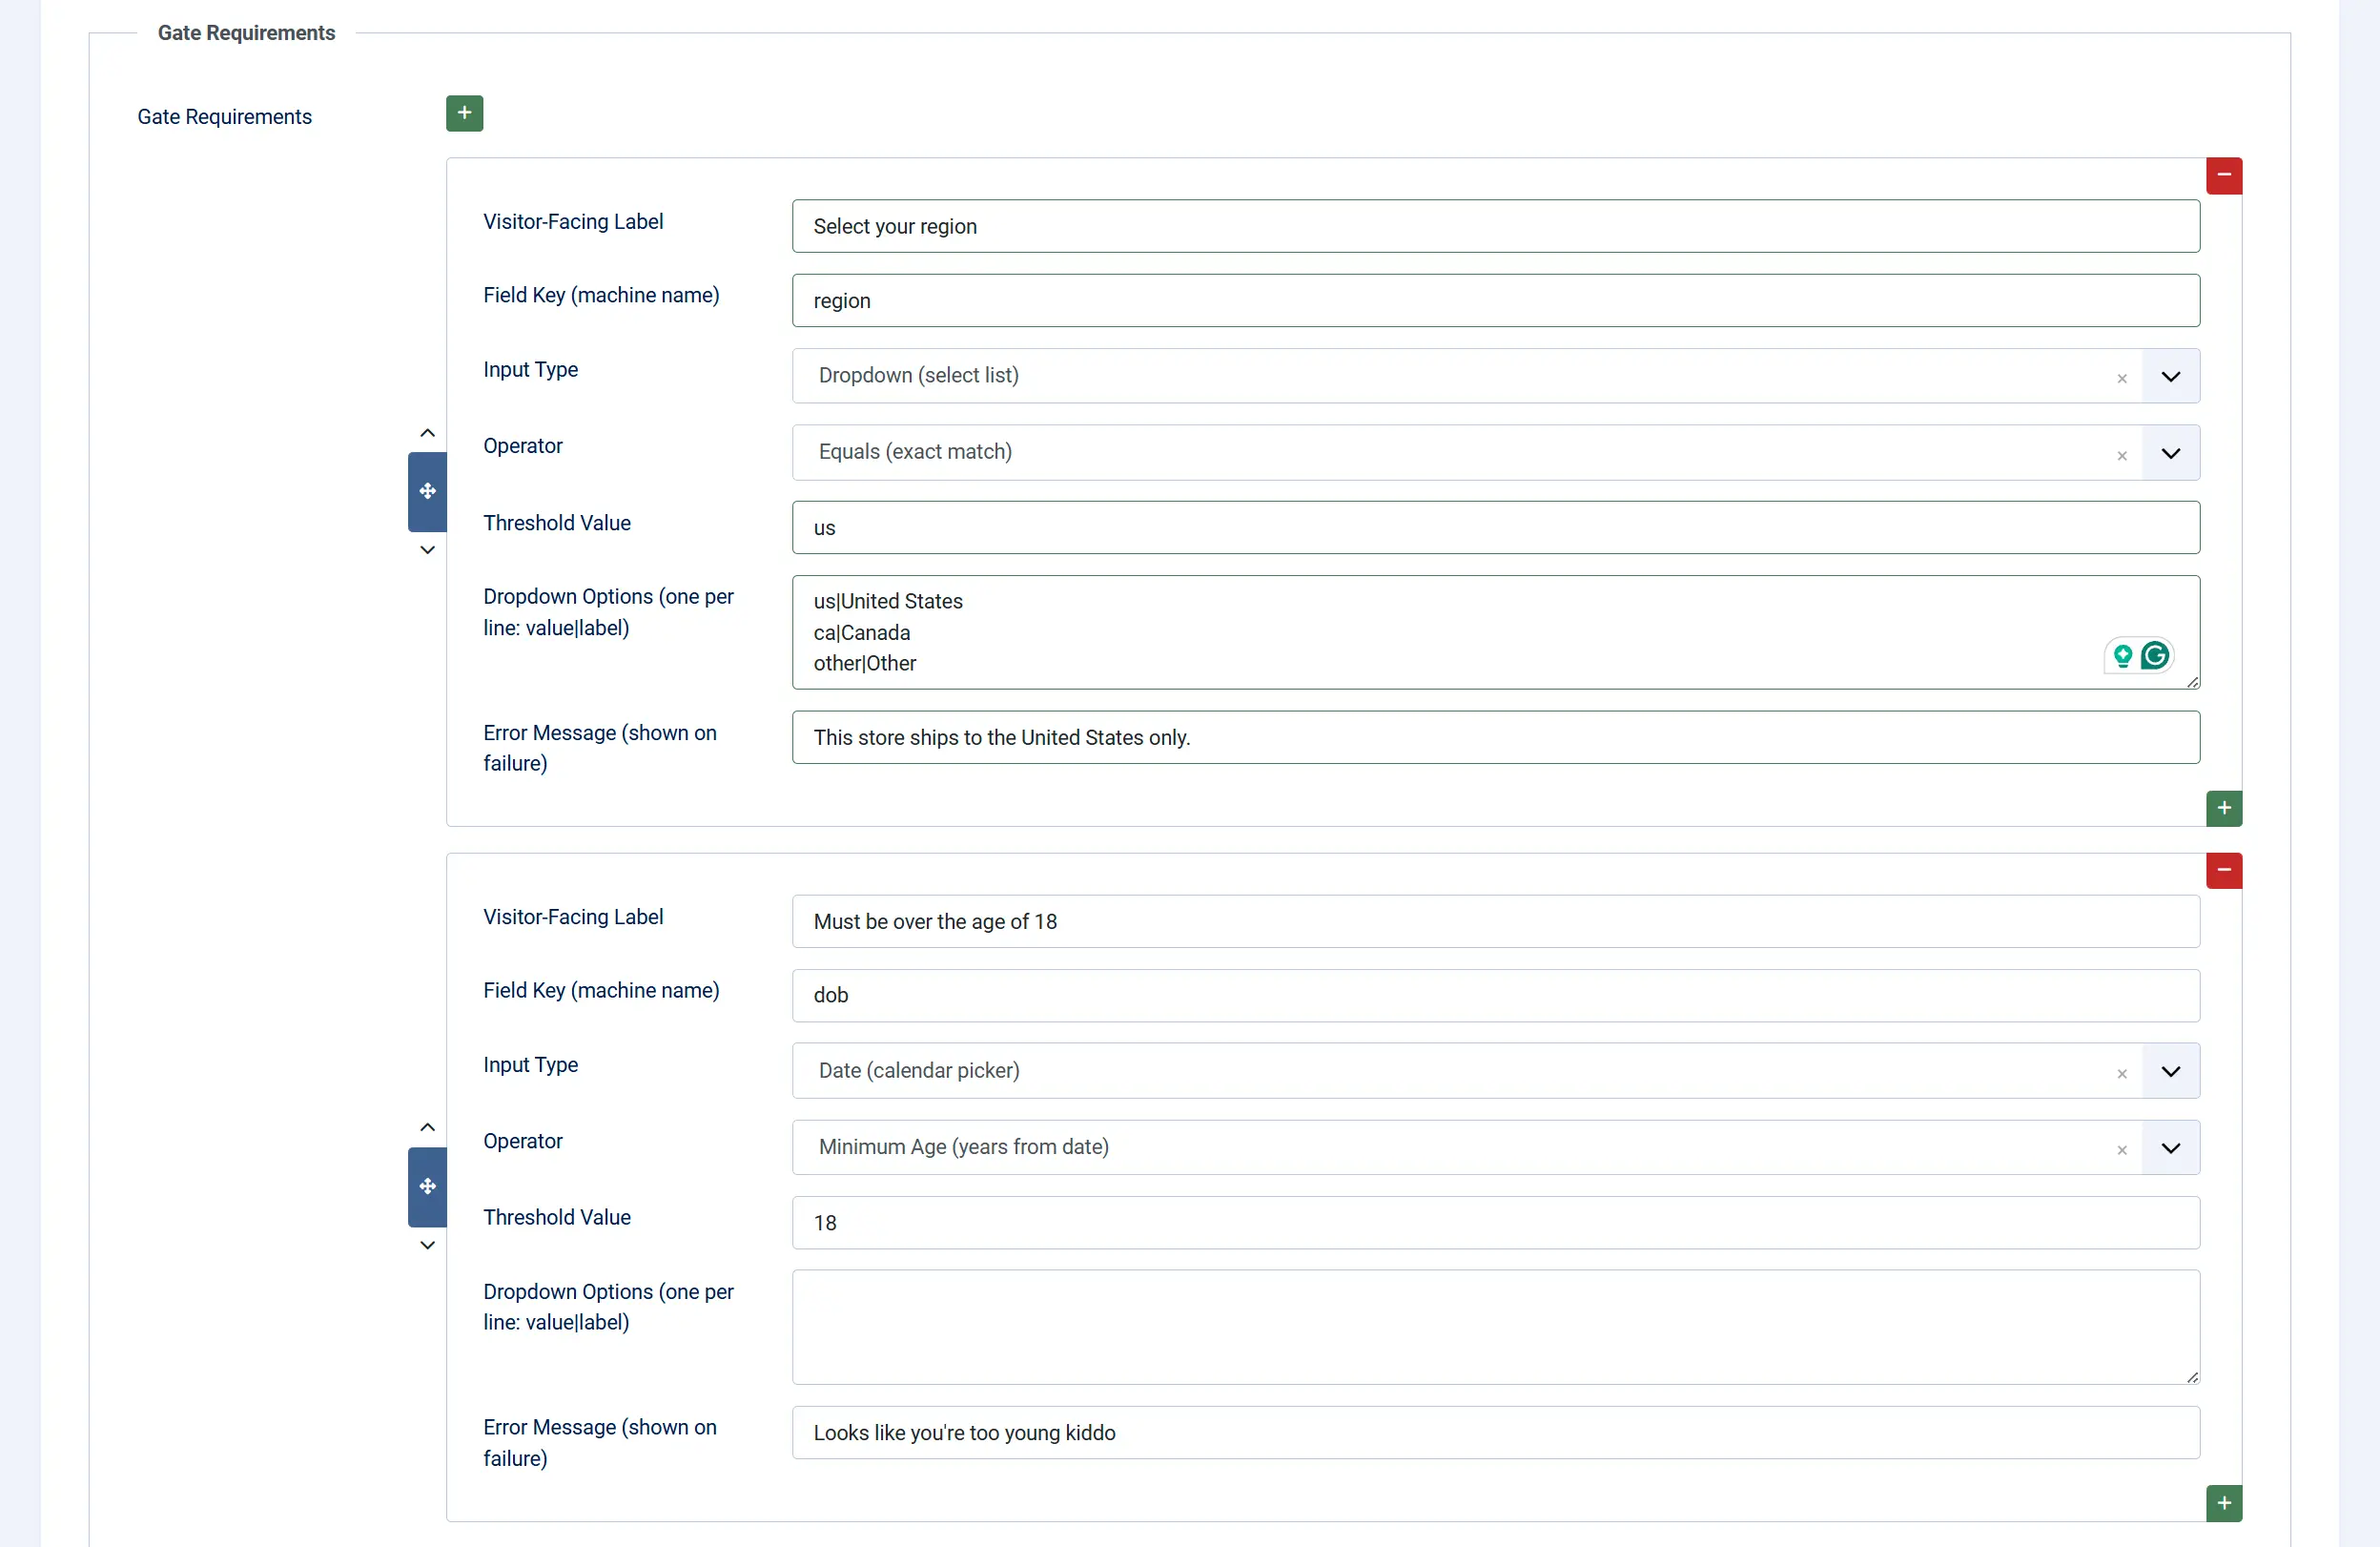
Add two rows to the Gate Requirements tab — one for date of birth (Minimum Age) and one for the terms checkbox (Checked). Set Requirement Match Mode to ALL requirements must pass so both must be satisfied.
Display Conditions
The modal appears when ALL of these conditions are true:
- Enable Modal Bouncer is set to Yes in the app settings.
- At least one requirement row is configured in the Gate Requirements tab.
- The current page matches the Apply Gate To scope setting.
- The visitor does not already have a valid pass cookie.
Tips
- Use plain language in the intro text — visitors are more likely to complete the gate quickly when the reason is clearly stated.
- Set a sensible cookie lifetime — 30 days is a good starting point. For legal compliance (such as EU age verification), check whether your jurisdiction requires the gate to reappear on every session.
- Test with Debug Mode on — enable Debug Mode during setup so you can clear your own cookie and see the modal again without opening a private browser window.
- Keep requirement rows short — asking for more than two or three inputs increases abandonment. Use the minimum needed.
- Apply Gate To: J2Commerce Pages Only when your site has public content areas that should remain freely accessible.
Troubleshooting
Modal Does Not Appear
Cause: The plugin is disabled, no requirement rows are configured, or the scope does not match the current page.
Solution:
- Go to J2Commerce -> Apps.
- Verify Modal Bouncer shows a green checkmark (enabled).
- Click the Modal Bouncer title and confirm that Enable Modal Bouncer is set to Yes.
- Check the Gate Requirements tab and confirm at least one row is present.
- If Apply Gate To is set to J2Commerce Pages Only, navigate to a J2Commerce store page (product list or product detail) — the modal only appears there, not on standard Joomla articles.
Modal Keeps Appearing After Passing
Cause: The pass cookie is not being written, or the browser is blocking cookies.
Solution:
- Confirm your browser is not blocking third-party cookies or running in a strict privacy mode.
- If you recently changed any requirement rows, the app automatically invalidates old cookies because the rules have changed — this is expected behavior. The modal appears once after a configuration change.
- Enable Debug Mode in the app settings. A Reset Modal Bouncer button appears at the bottom of the page — click it to clear all pass cookies and see the modal fresh. If the cookie is written correctly after passing, the button disappears on reload.
Error Message Shown Even With Correct Input
Cause: The Operator or Threshold Value setting does not match the expected format.
Solution:
- For the Minimum Age operator, confirm the Threshold Value is a plain number such as
18, not18 yearsor18+. - For the Equals operator, the comparison is case-insensitive but the value must otherwise be an exact match. Check for extra spaces.
- For a Dropdown field, confirm the Threshold Value matches the
valuepart (left side of|) in your Dropdown Options list.
Gate Appears on Every Visit Despite Cookie Being Set
Cause: Cookie Strategy is set to Per Requirement and a requirement row's key was changed, or you added or removed a requirement since the last visit.
Solution:
The app uses a signature of all requirement keys, operators, and thresholds to validate the pass cookie. Any change to the requirements invalidates existing cookies — this is intentional so the gate re-runs when the rules change. If you want to minimize re-prompting, avoid changing field keys after the initial setup.
Server-Side Verification Always Fails
Cause: The AJAX request is being blocked, or the session has changed between page load and form submission.
Solution:
- Check your browser's network console for errors on the AJAX request.
- Ensure your site is served over HTTPS if Cookie SameSite Policy is set to None.
- If the issue persists, enable Debug Mode and check the Joomla log file (System -> Logs) for entries from
plg_j2commerce_app_modalbouncer. - As a temporary measure, set Enable Server-Side Verification to No to confirm the client-side gate works correctly on its own.