Marketplace
Marketplace turns your J2Commerce store into a multi-seller platform. Independent sellers apply, list their own products, and sell alongside (or instead of) your own catalog. You set the rules — commission rates, product approval, payout schedules, shipping — and Marketplace tracks every sale, splits every order by seller, calculates commissions automatically, and pays sellers out through PayPal, Stripe Connect, or a manual process you control.
Each seller gets their own dashboard to manage products, view orders, track earnings, and request payouts, plus a public storefront page where shoppers can browse everything that seller offers.
Requirements
- PHP 8.3.0 or later
- Joomla 6.x
- J2Commerce 6.x
If you previously installed the legacy Vendor Marketplace plugin (app_vendormarketplace), disable it before enabling Marketplace. Running both at the same time causes duplicate routing and duplicate commissions.
Purchase and Download
The Marketplace is a separate add-on available from the J2Commerce Extensions Store. It is not included with the core J2Commerce 6 component.
Step 1: Go to www.j2commerce.com -> Apps.
Step 2: Locate the Marketplace app, click View Details, then Add to Cart -> Checkout.
Step 3: After purchase, go to My Downloads under your profile menu and find the app. Click Available Versions -> View Files -> Download Now.
Install the App
In the Joomla Administrator, go to System -> Install -> Extensions.
Upload the plugin plg_j2commerce_app_marketplace.zip file or use the Install from URL option.
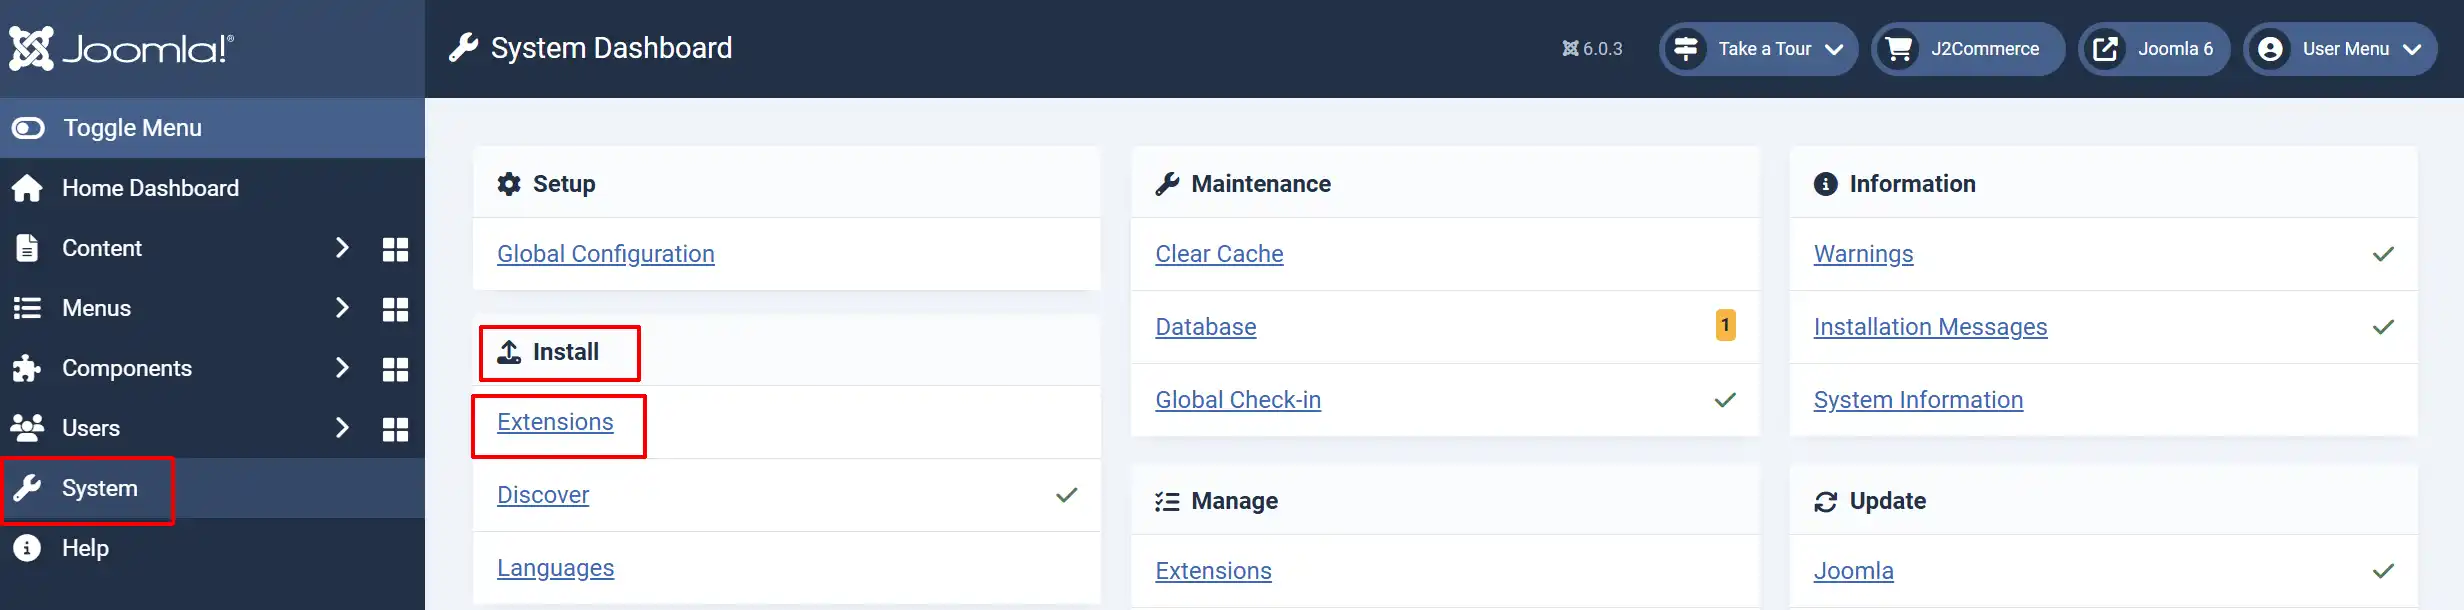
J2Commerce must already be installed and enabled before you install Marketplace. If it is not, the installer stops and shows a warning telling you to install J2Commerce first.
The first time Marketplace installs, it automatically:
- Creates a default global commission rule set at 15%.
- Creates four seller application fields (Store Name, Store Description, Store Logo, Store Slug) that appear on the sign-up form.
- Adds four new frontend page types to the Joomla menu system: Marketplace Dashboard, Marketplace Application, Marketplace Store, and Marketplace - Sellers.
- Adds a Marketplace section to your J2Commerce admin sidebar.
Enable the App
The plugin installs and enables itself automatically. No separate enable step is needed. However, it's important to know where to go to enable or disable it in the future .
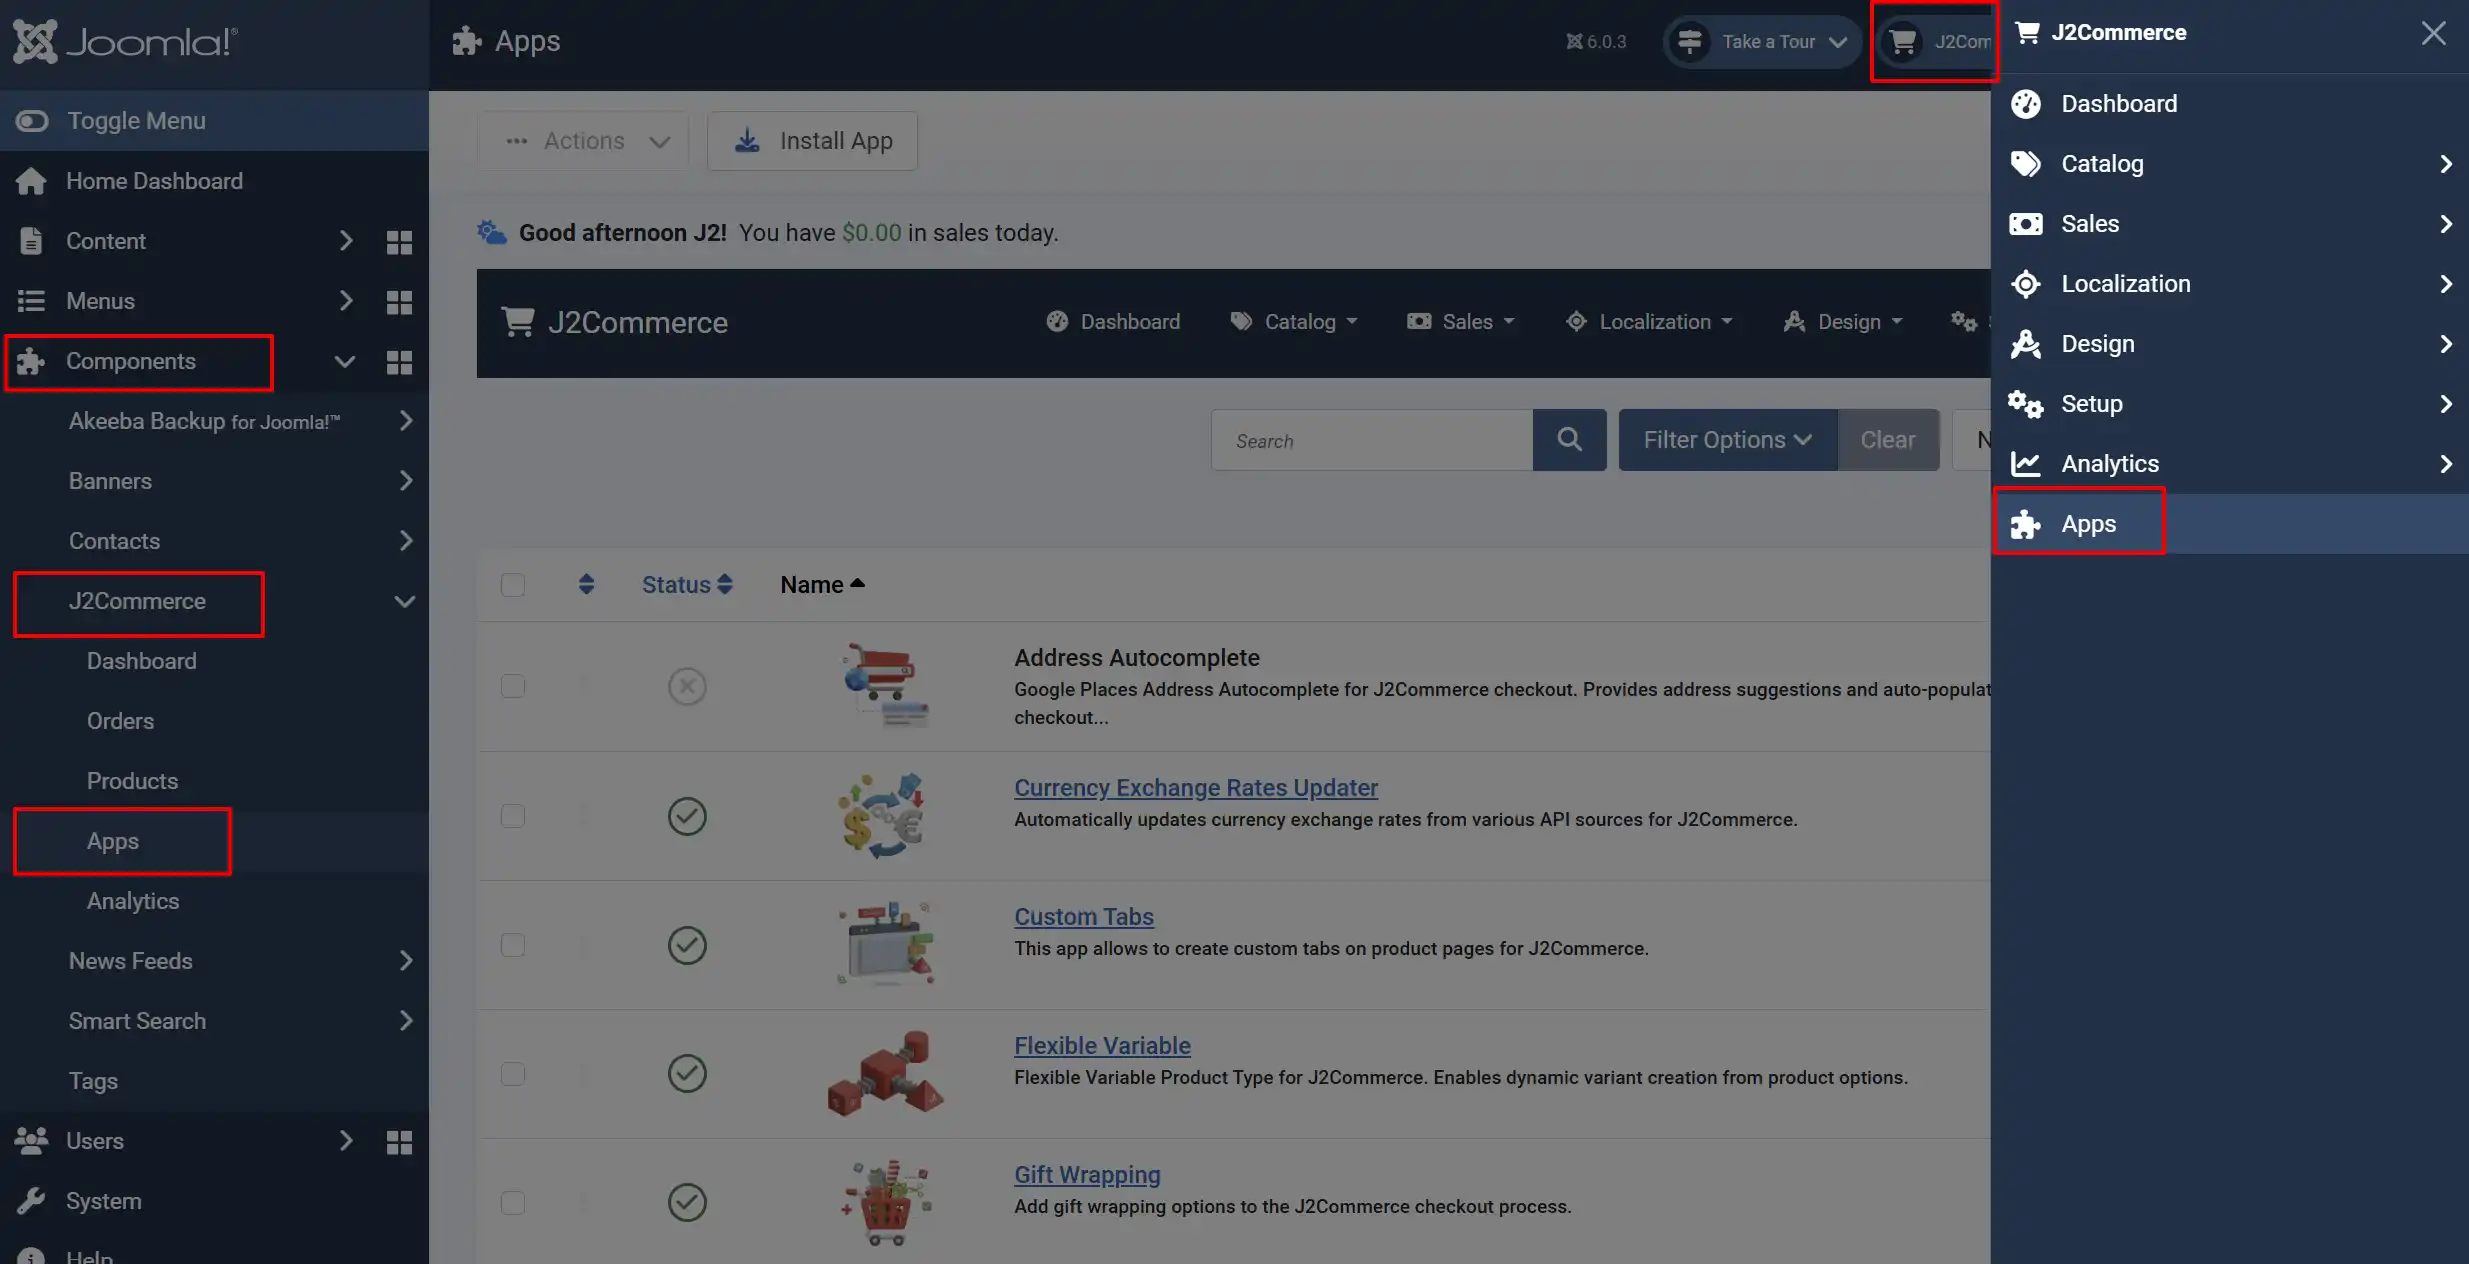
There are two ways to reach the Apps list.
Option A: Go to the J2Commerce icon at the top right corner -> Apps
Option B: Go to Components on the left sidebar -> J2Commerce -> Apps
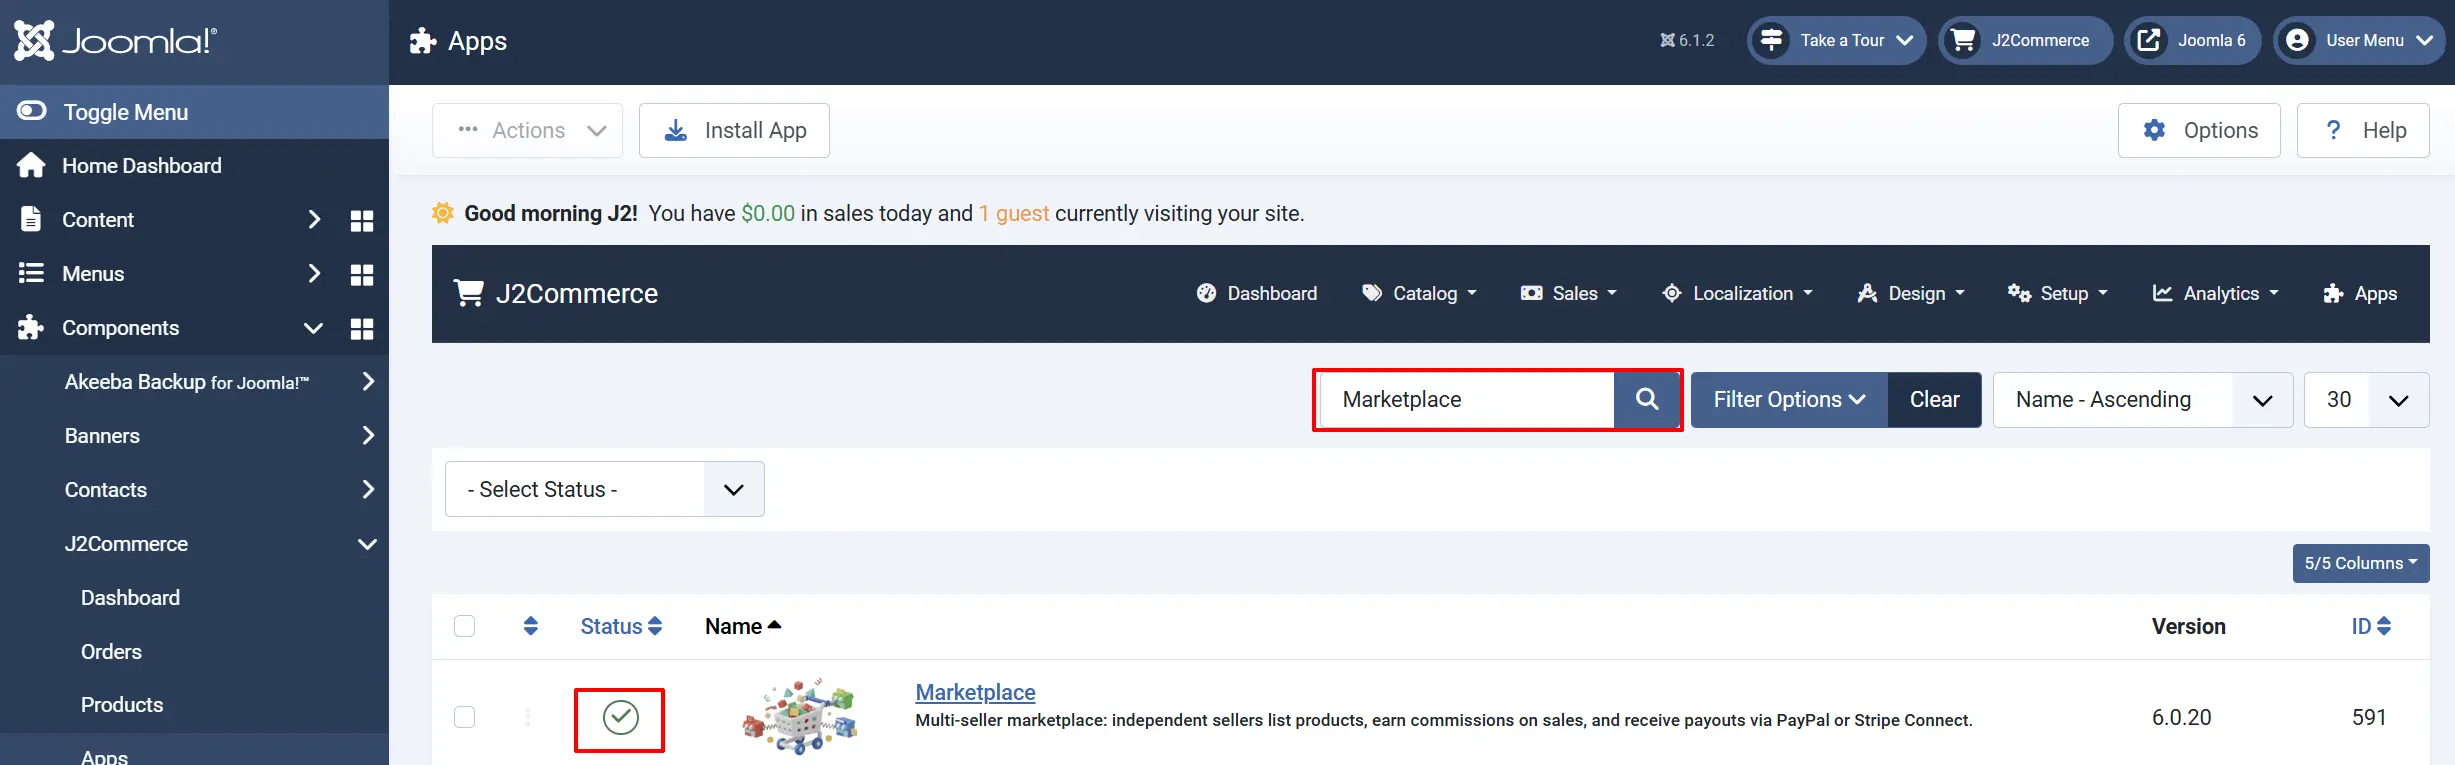
To help you narrow down the list, you can do a search for Marketplace, click the X, and it will turn into a green checkmark. It is now enabled and ready for setup.
Configure the App
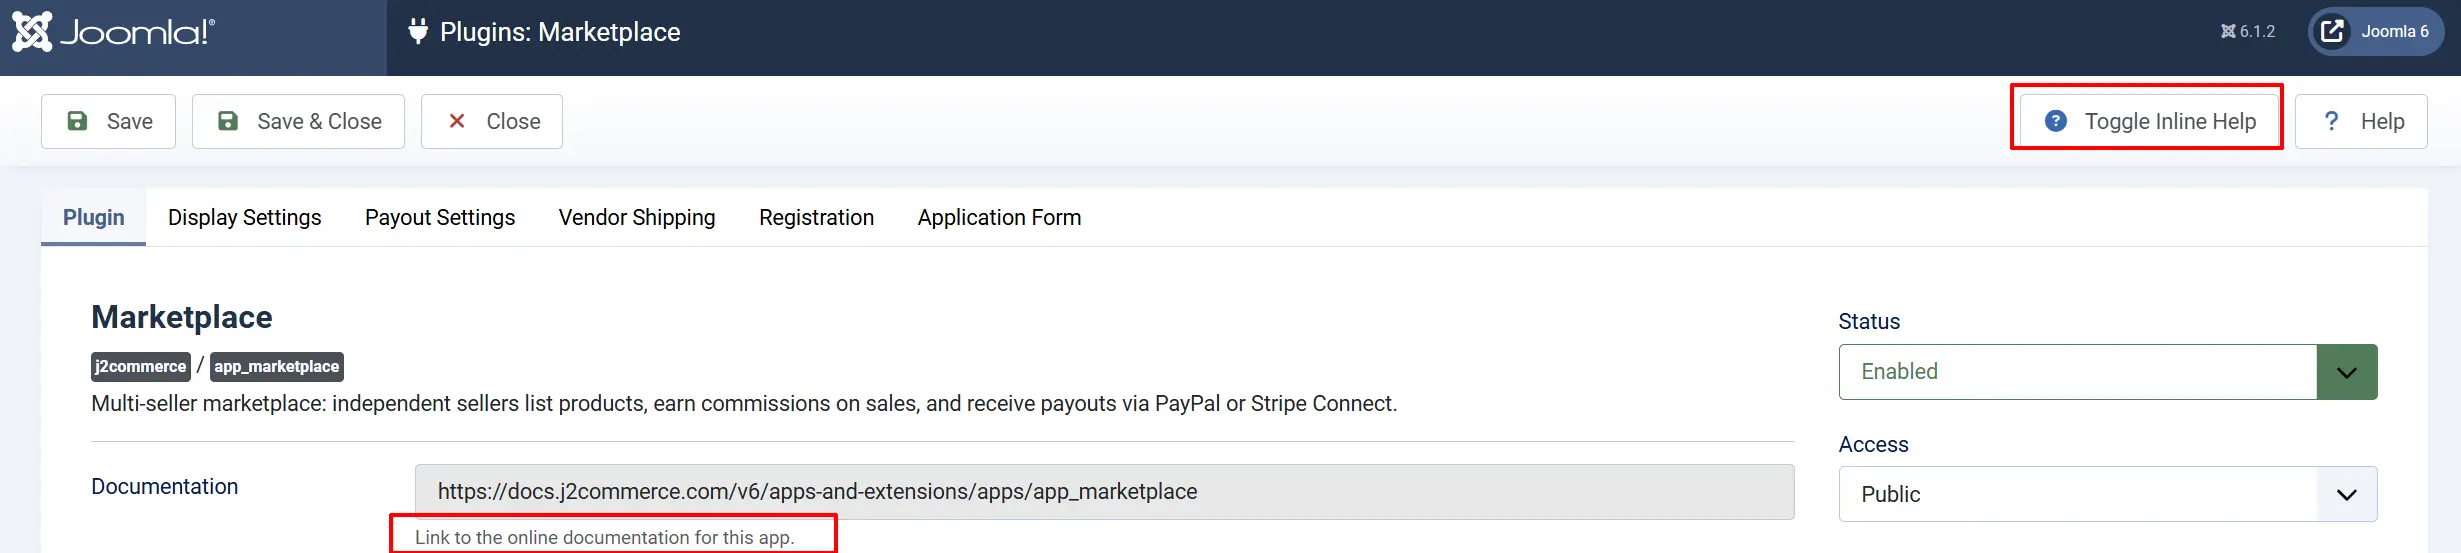
Once you click the Marketplace title next to the green checkmark, you are ready to start setting up the parameters.
Click the Toggle Inline Help button in the toolbar and the app will show a description below each field as you configure it.
General Settings tab
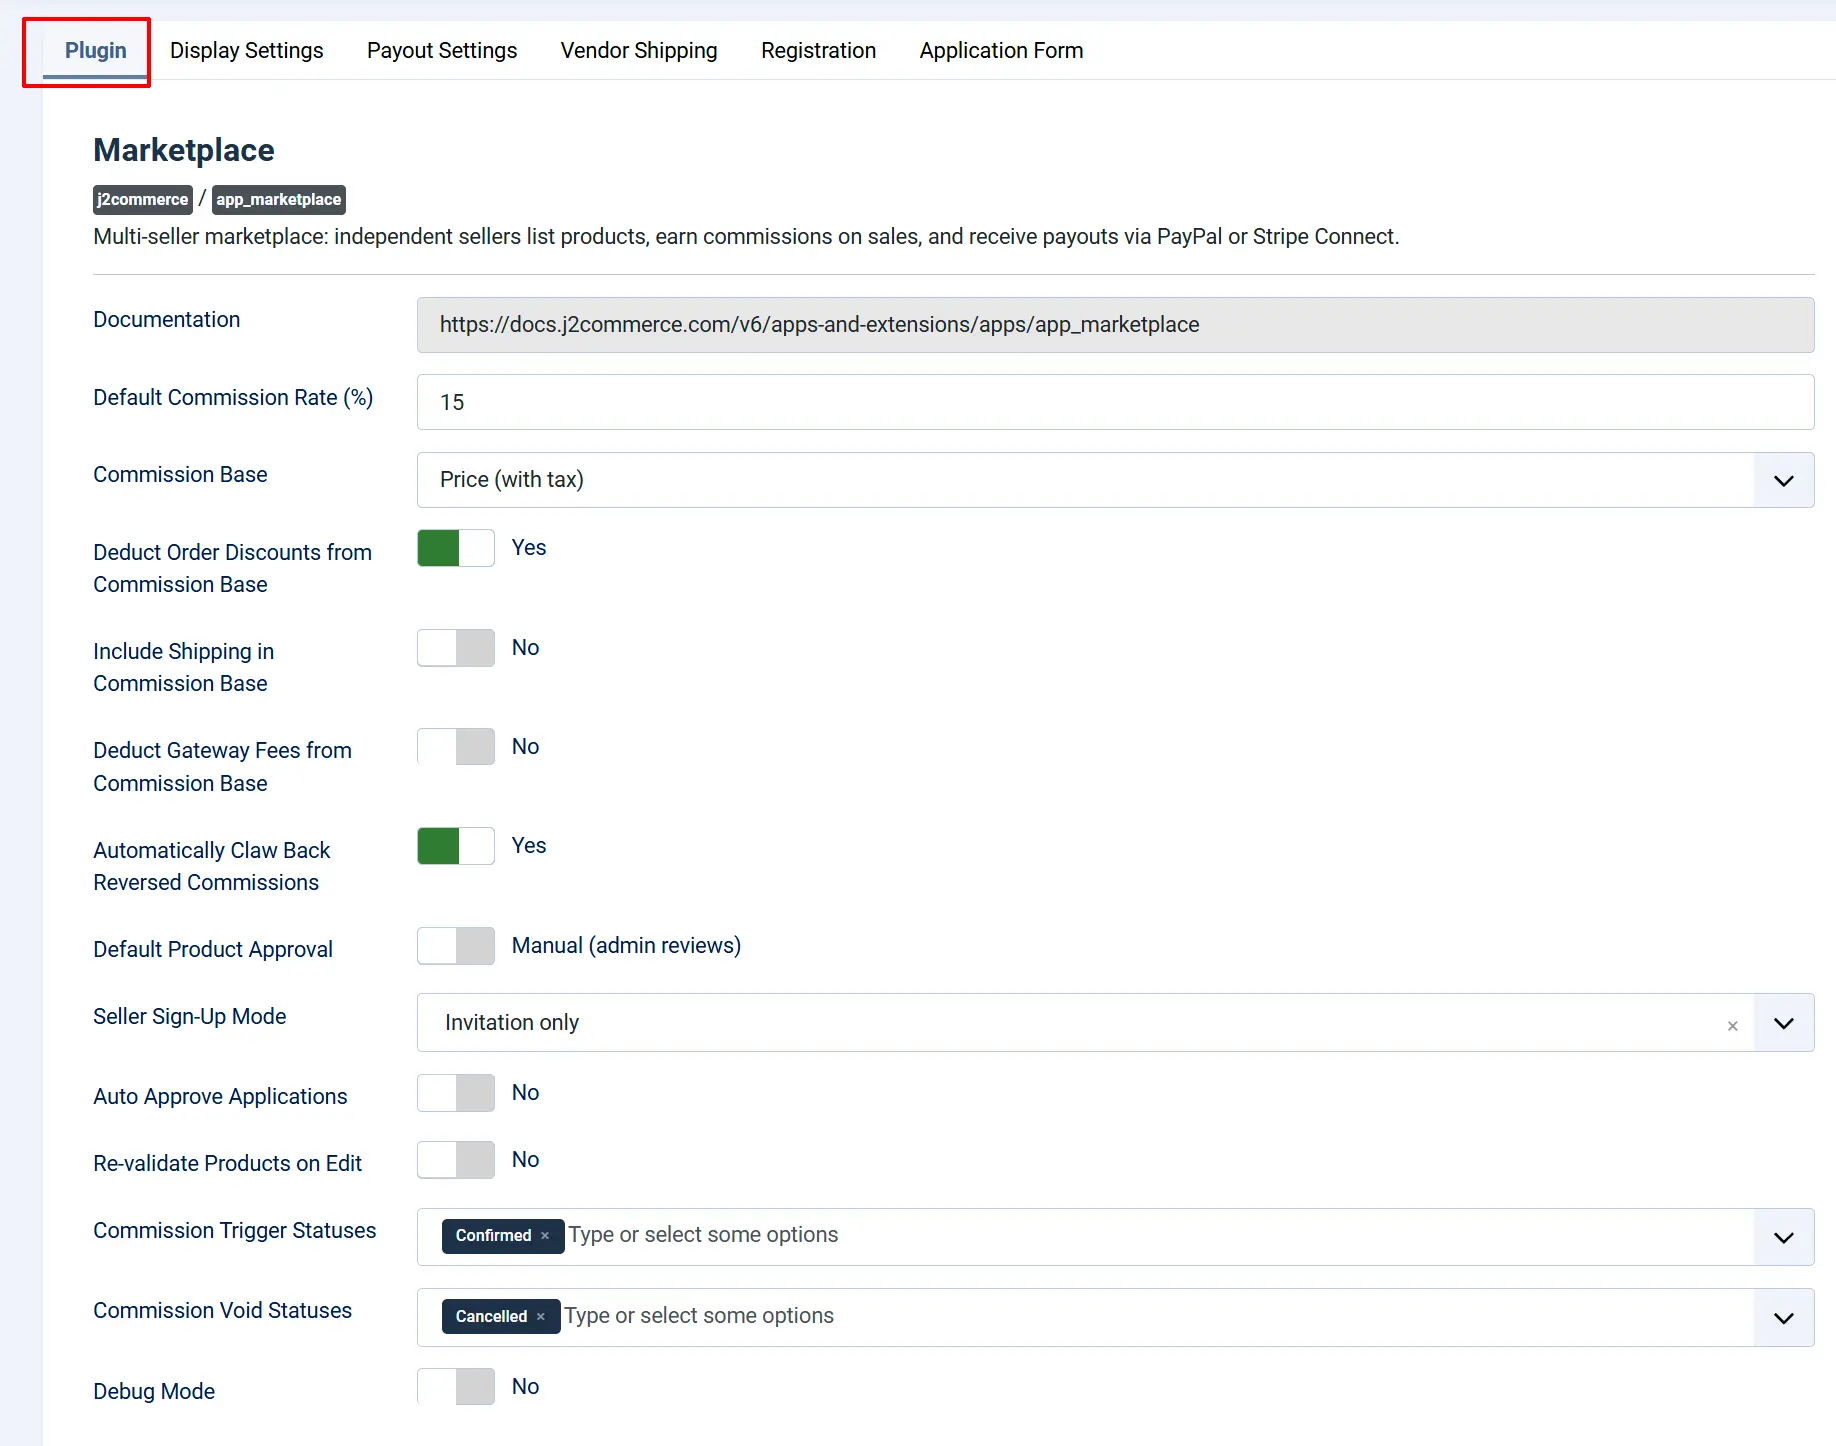
Default Commission Rate (%): The commission rate applied when no seller- or product-specific rule exists.
Commission Base: Whether commission is calculated on the price with tax or without tax.
Deduct Order Discounts from Commission Base: When Yes, coupon and voucher discounts are allocated across sellers and subtracted from the commission base, so commission is calculated on what the customer actually paid. When No, commission is calculated on the full, undiscounted price.
Include Shipping in Commission Base: When Yes, each seller's share of the order's shipping charge is added to their commission base before the rate is applied.
Deduct Gateway Fees from Commission Base: When Yes, each seller's share of the payment gateway fee is subtracted from their commission base.
Automatically Claw Back Reversed Commissions: When Yes, if a paid commission is later reversed by a refund, a negative adjustment is created automatically and nets against the seller's next payout. When No, you must recover the amount manually.
Default Product Approval: Whether products a seller submits need your review before they go live. Applies unless a seller has a personal override.
Seller Sign-Up Mode: Who is allowed to apply: Open (anyone), Invitation only, or Admin creates sellers only (no public form).
Auto Approve Applications: When Yes, new seller applications are approved instantly and the welcome email is sent. When No, applications wait in Seller Applications for your review. Open sign-up mode always auto-approves regardless of this setting.
Re-validate Products on Edit: When Yes, editing a previously approved product resets it to Pending until you re-approve it.
Commission Trigger Statuses: The order status(es) that cause commissions to be calculated. Choose the status that represents a confirmed, paid order.
Commission Void Statuses: The order status(es) that cancel or reverse existing commissions (for example, Cancelled or Refunded).
Commission Trigger Statuses and Commission Void Statuses are loaded from your store's actual order statuses. Review this selection after installing or upgrading, since status IDs and names vary from store to store.
Debug Mode: Writes extra detail to the Joomla log. Leave off in production.
Display Settings tab
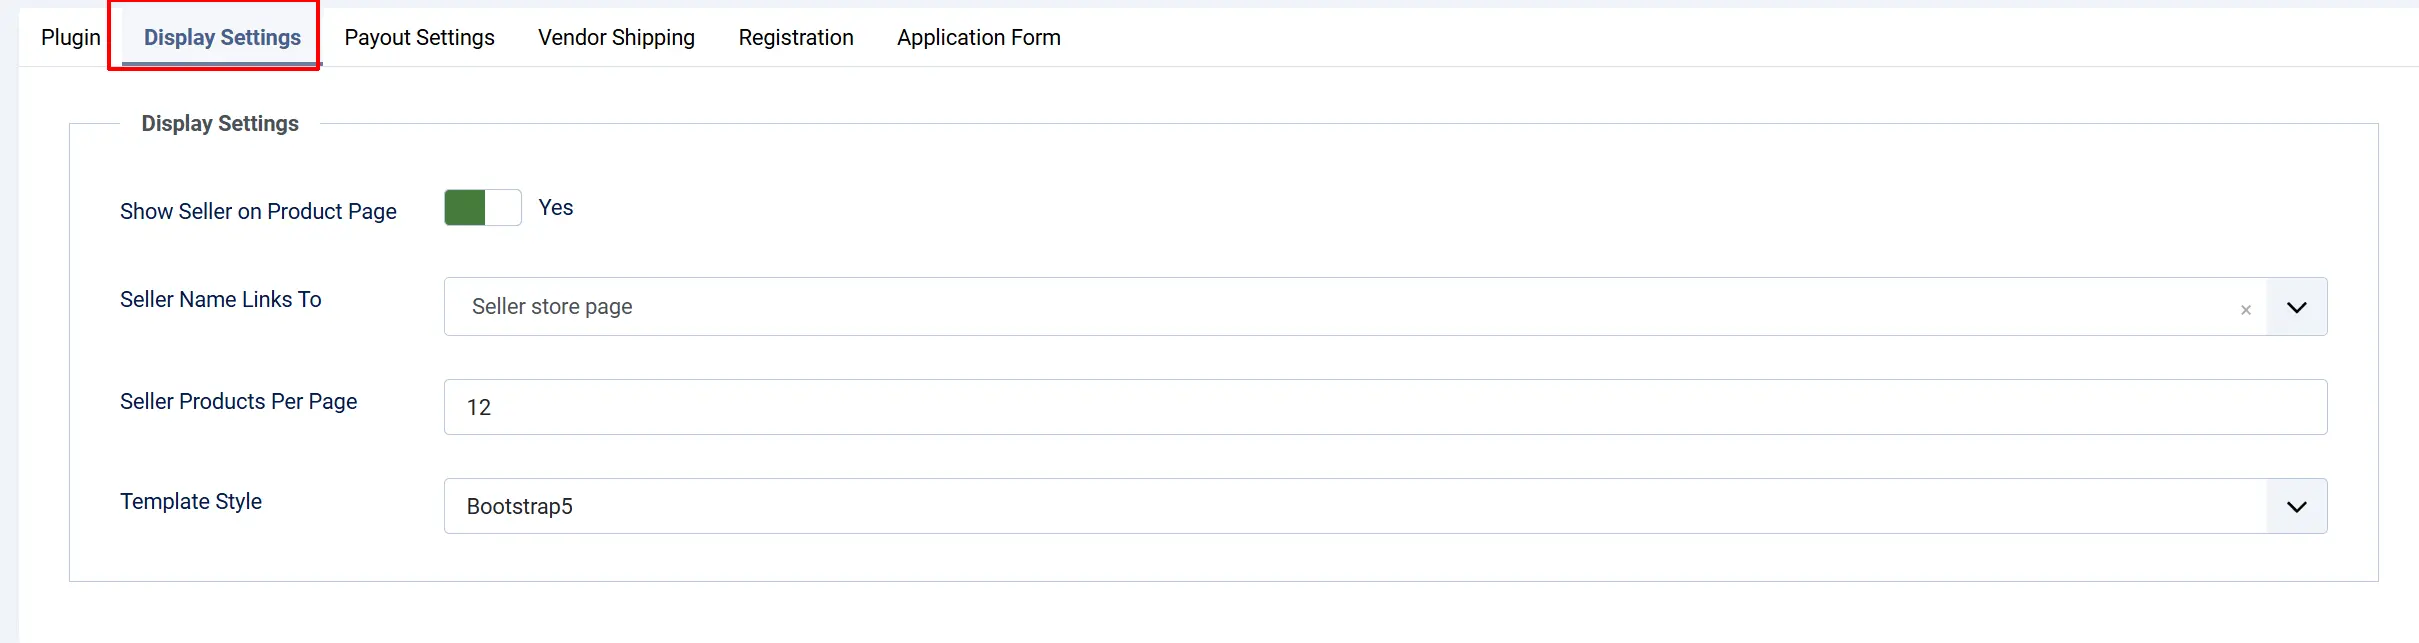
Show Seller on Product Page: Displays a "Sold by [seller]" badge on product pages.
Seller Name Links To: Where clicking the seller's name goes: their store page, or nowhere.
Seller Products Per Page: How many products appear on a seller's public store page before pagination. Pagination is AJAX-based, so it does not reload the page.
Subtemplate: The frontend template family used to render Marketplace pages (Bootstrap 5 or UIkit).
Payouts tab
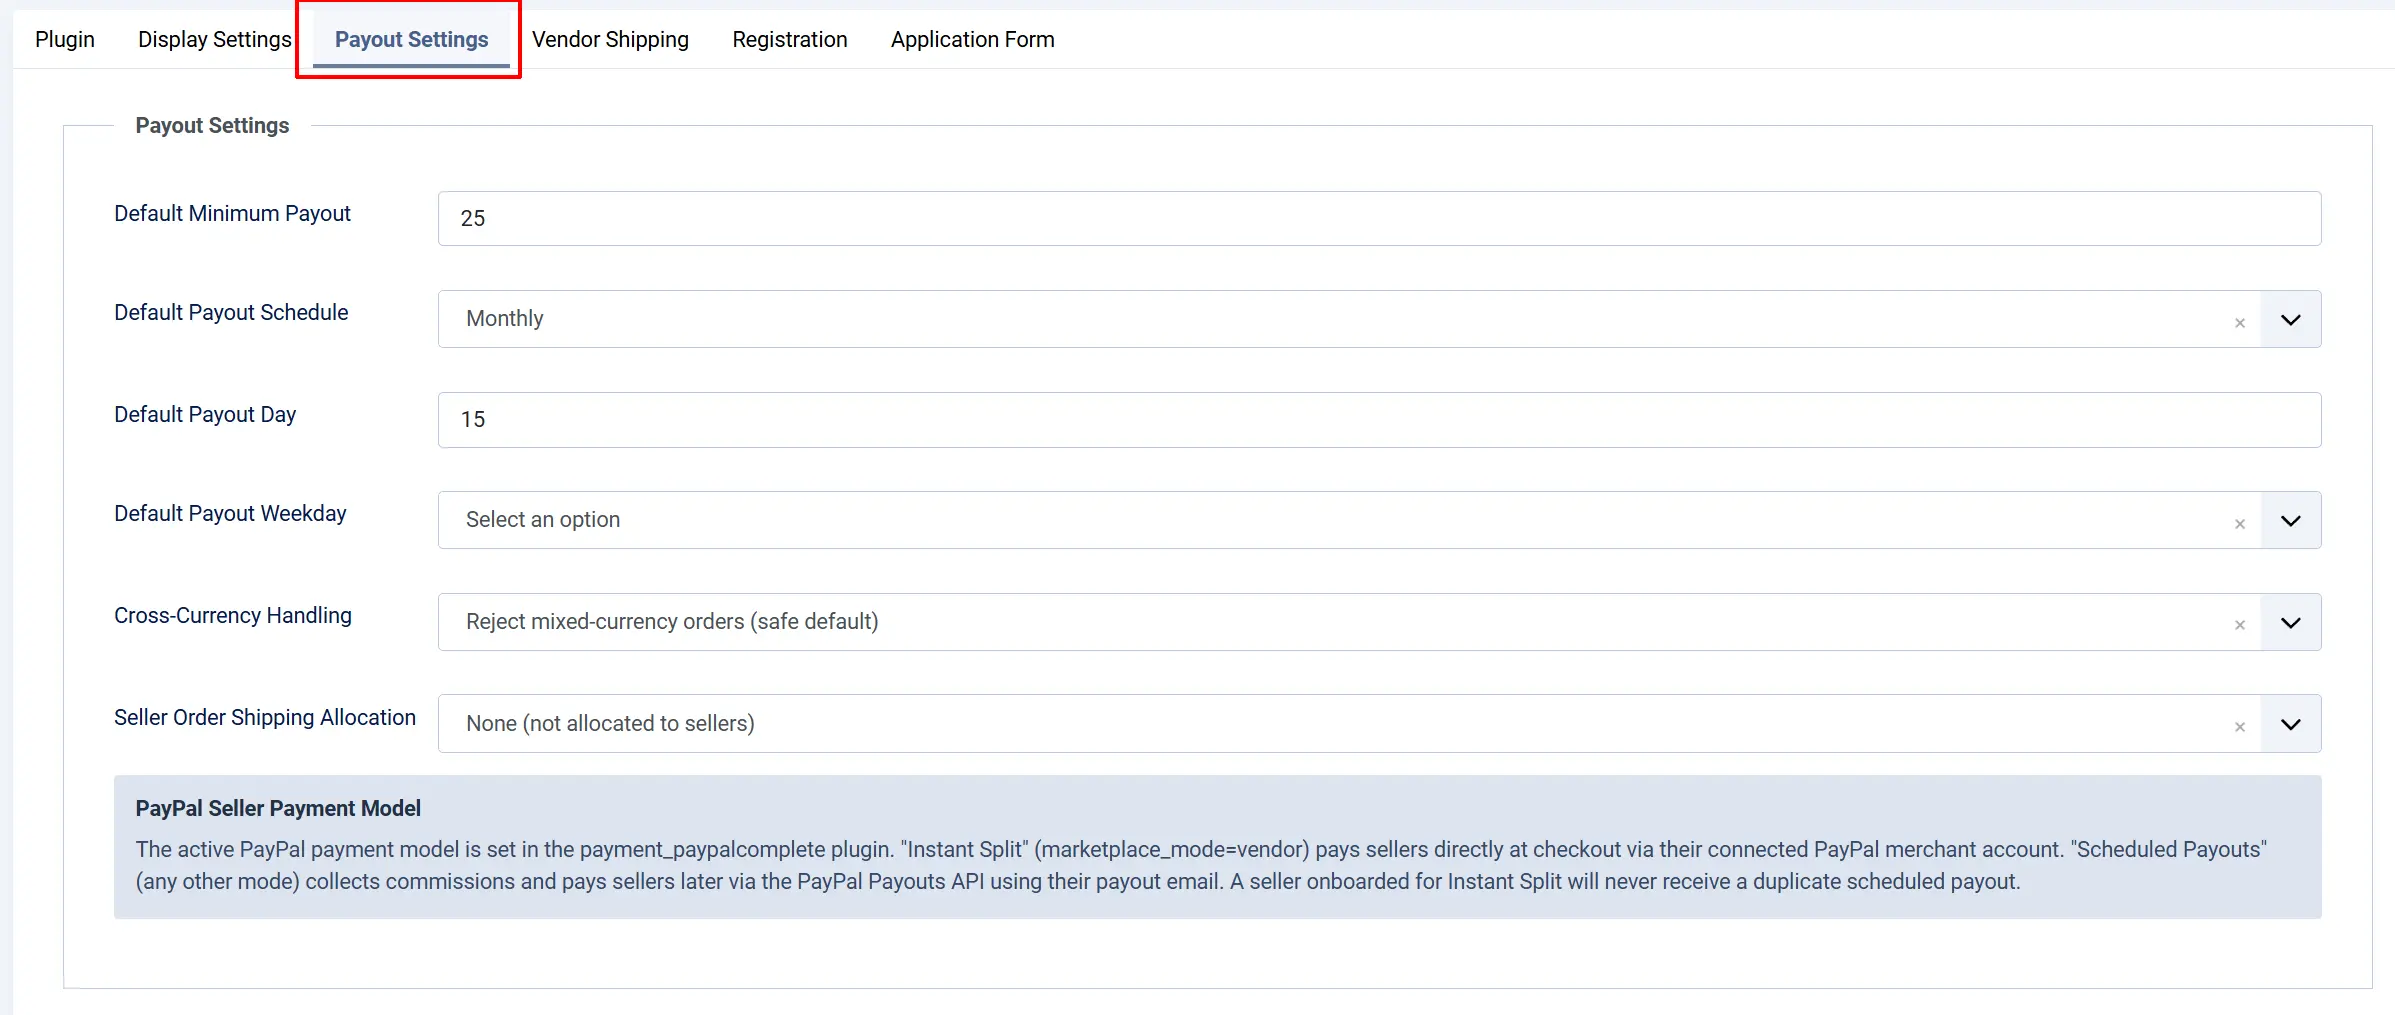
Default Minimum Payout: The minimum balance a seller must have before a scheduled payout fires, unless overridden per seller.
Default Payout Schedule: Manual, Weekly, Monthly, When balance meets threshold, or Schedule AND threshold.
Default Payout Day: Day of month (1–31) used for monthly and combined schedules.
Default Payout Weekday: Day of week used for weekly and combined schedules.
Cross-Currency Handling: What to do when a seller's payable balance spans more than one currency: Reject (safest — holds the payout), Store base currency only (pays that portion, strands the rest), or Pay out per currency (one payout per currency).
Seller Order Shipping Allocation: How the order's shipping charge is split across sellers when an order contains items from more than one seller.
The active PayPal seller payment model — instant split at checkout versus scheduled payouts collected later — is configured separately in the payment_paypalcomplete plugin's marketplace_mode setting. A seller onboarded for instant payouts never receives a duplicate scheduled payout.
Vendor Shipping tab

Enable Vendor Shipping Rules: Lets each seller define their own shipping rates, which combine into a single line item at checkout. Leave off and checkout is untouched by Marketplace shipping logic.
Shipping Line Label: The label shown to shoppers for the combined seller-shipping charge.
Registration tab
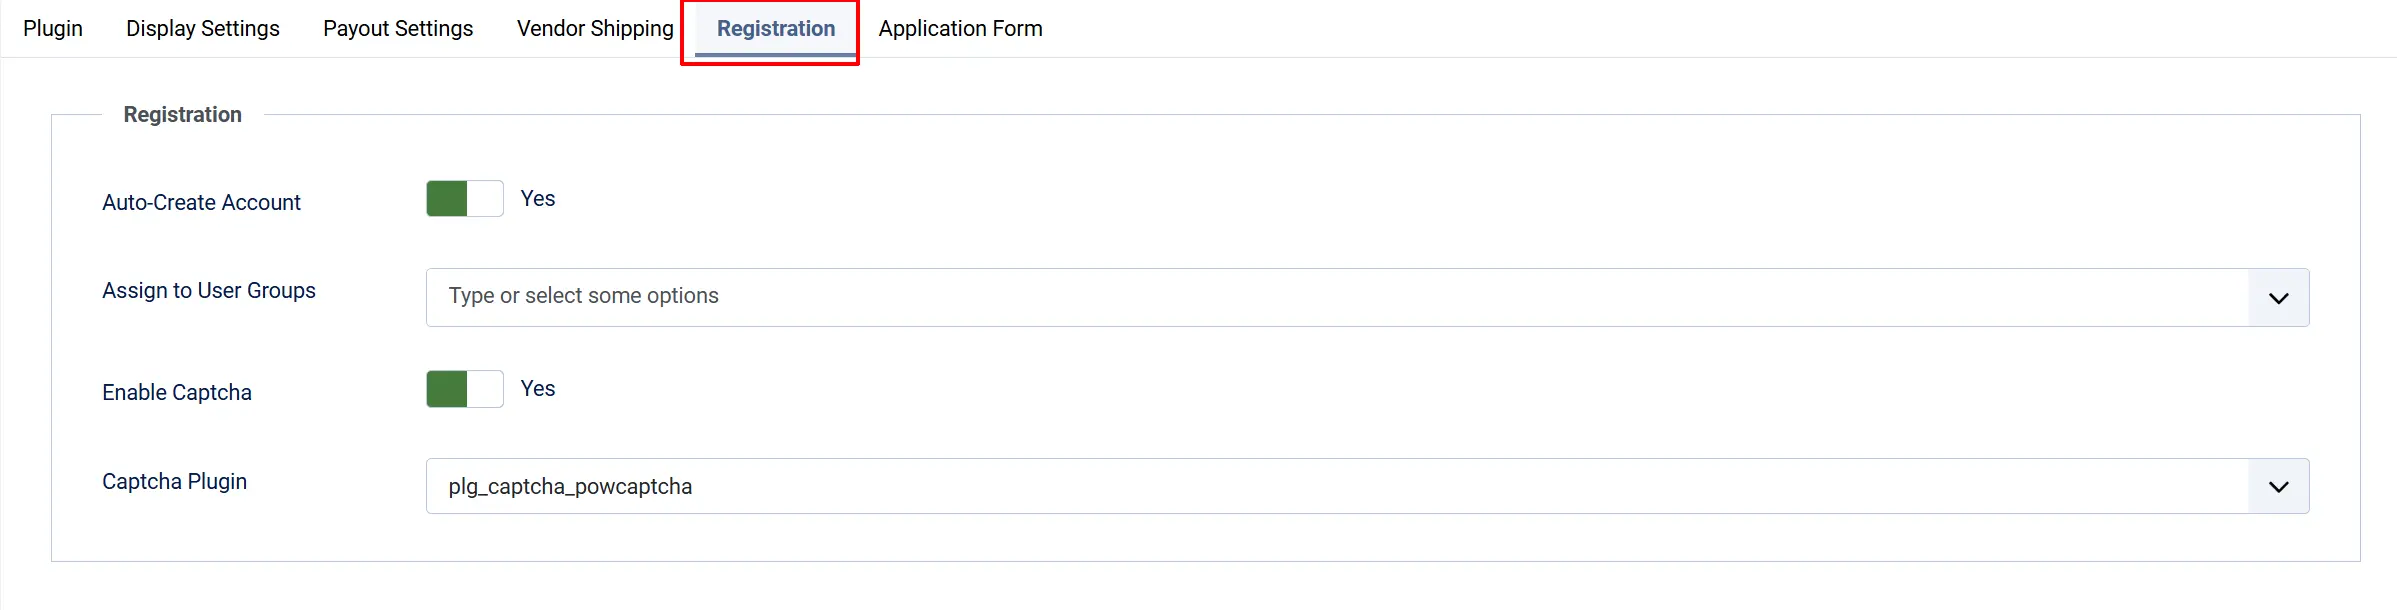
Auto-Create Account: When Yes, a guest filling out the apply form gets a new Joomla account created automatically on submit. When No, guests are redirected to log in first.
Assign to User Groups: User groups assigned to newly created seller accounts. Defaults to Registered if none are chosen.
Enable Captcha: Shows a captcha challenge on the seller application form.
Captcha Plugin: Which enabled Joomla captcha plugin to use. Only shown when Captcha is enabled.
Application Form tab
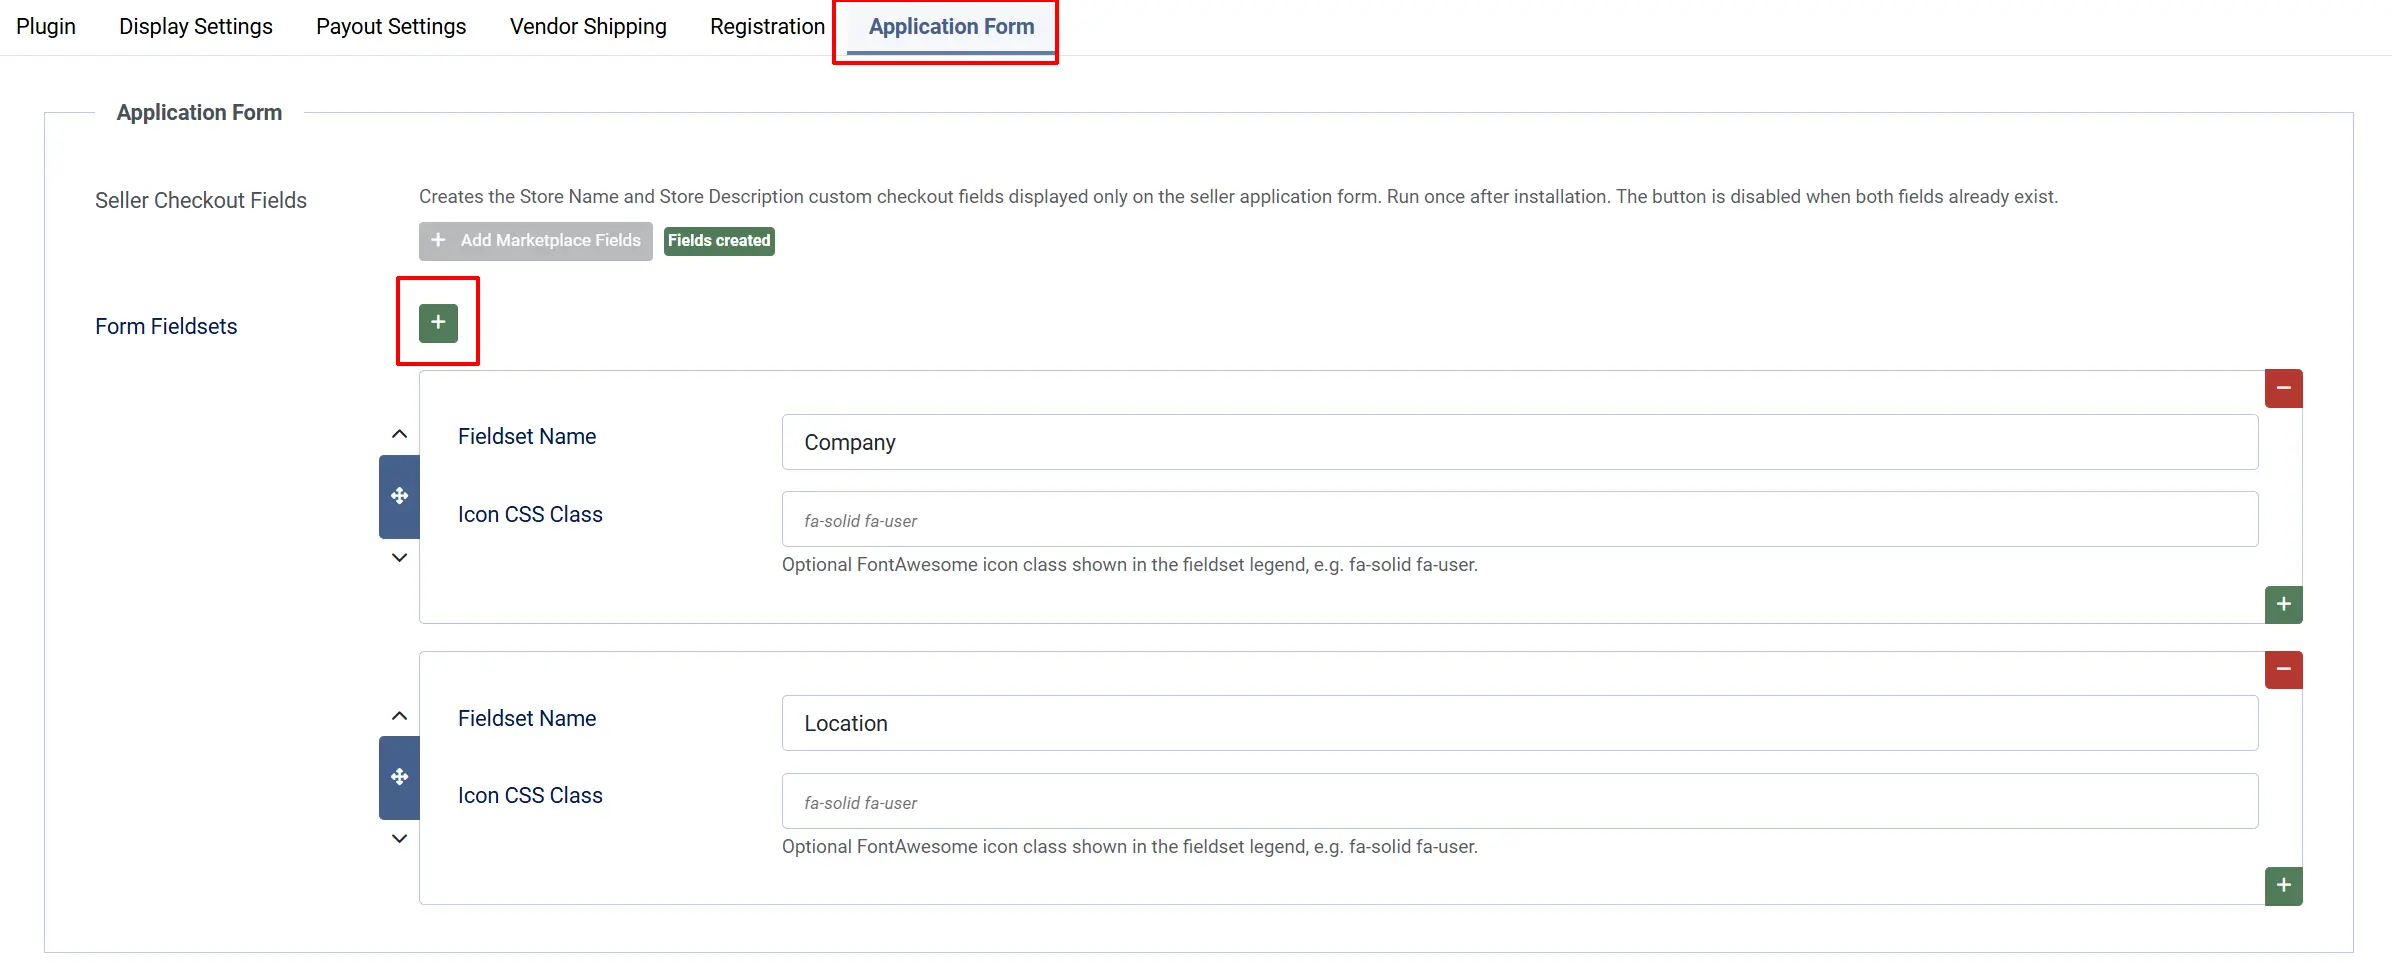
Seller Checkout Fields: Click Add Marketplace Fields to create the Store Name and Store Description custom checkout fields used on the application form. Run once after installation — the button is disabled once both fields already exist.
Form Fieldsets: Add named sections (with an optional FontAwesome icon) to group custom fields on the application form. Assign fields to a fieldset from the Field Management admin screen.
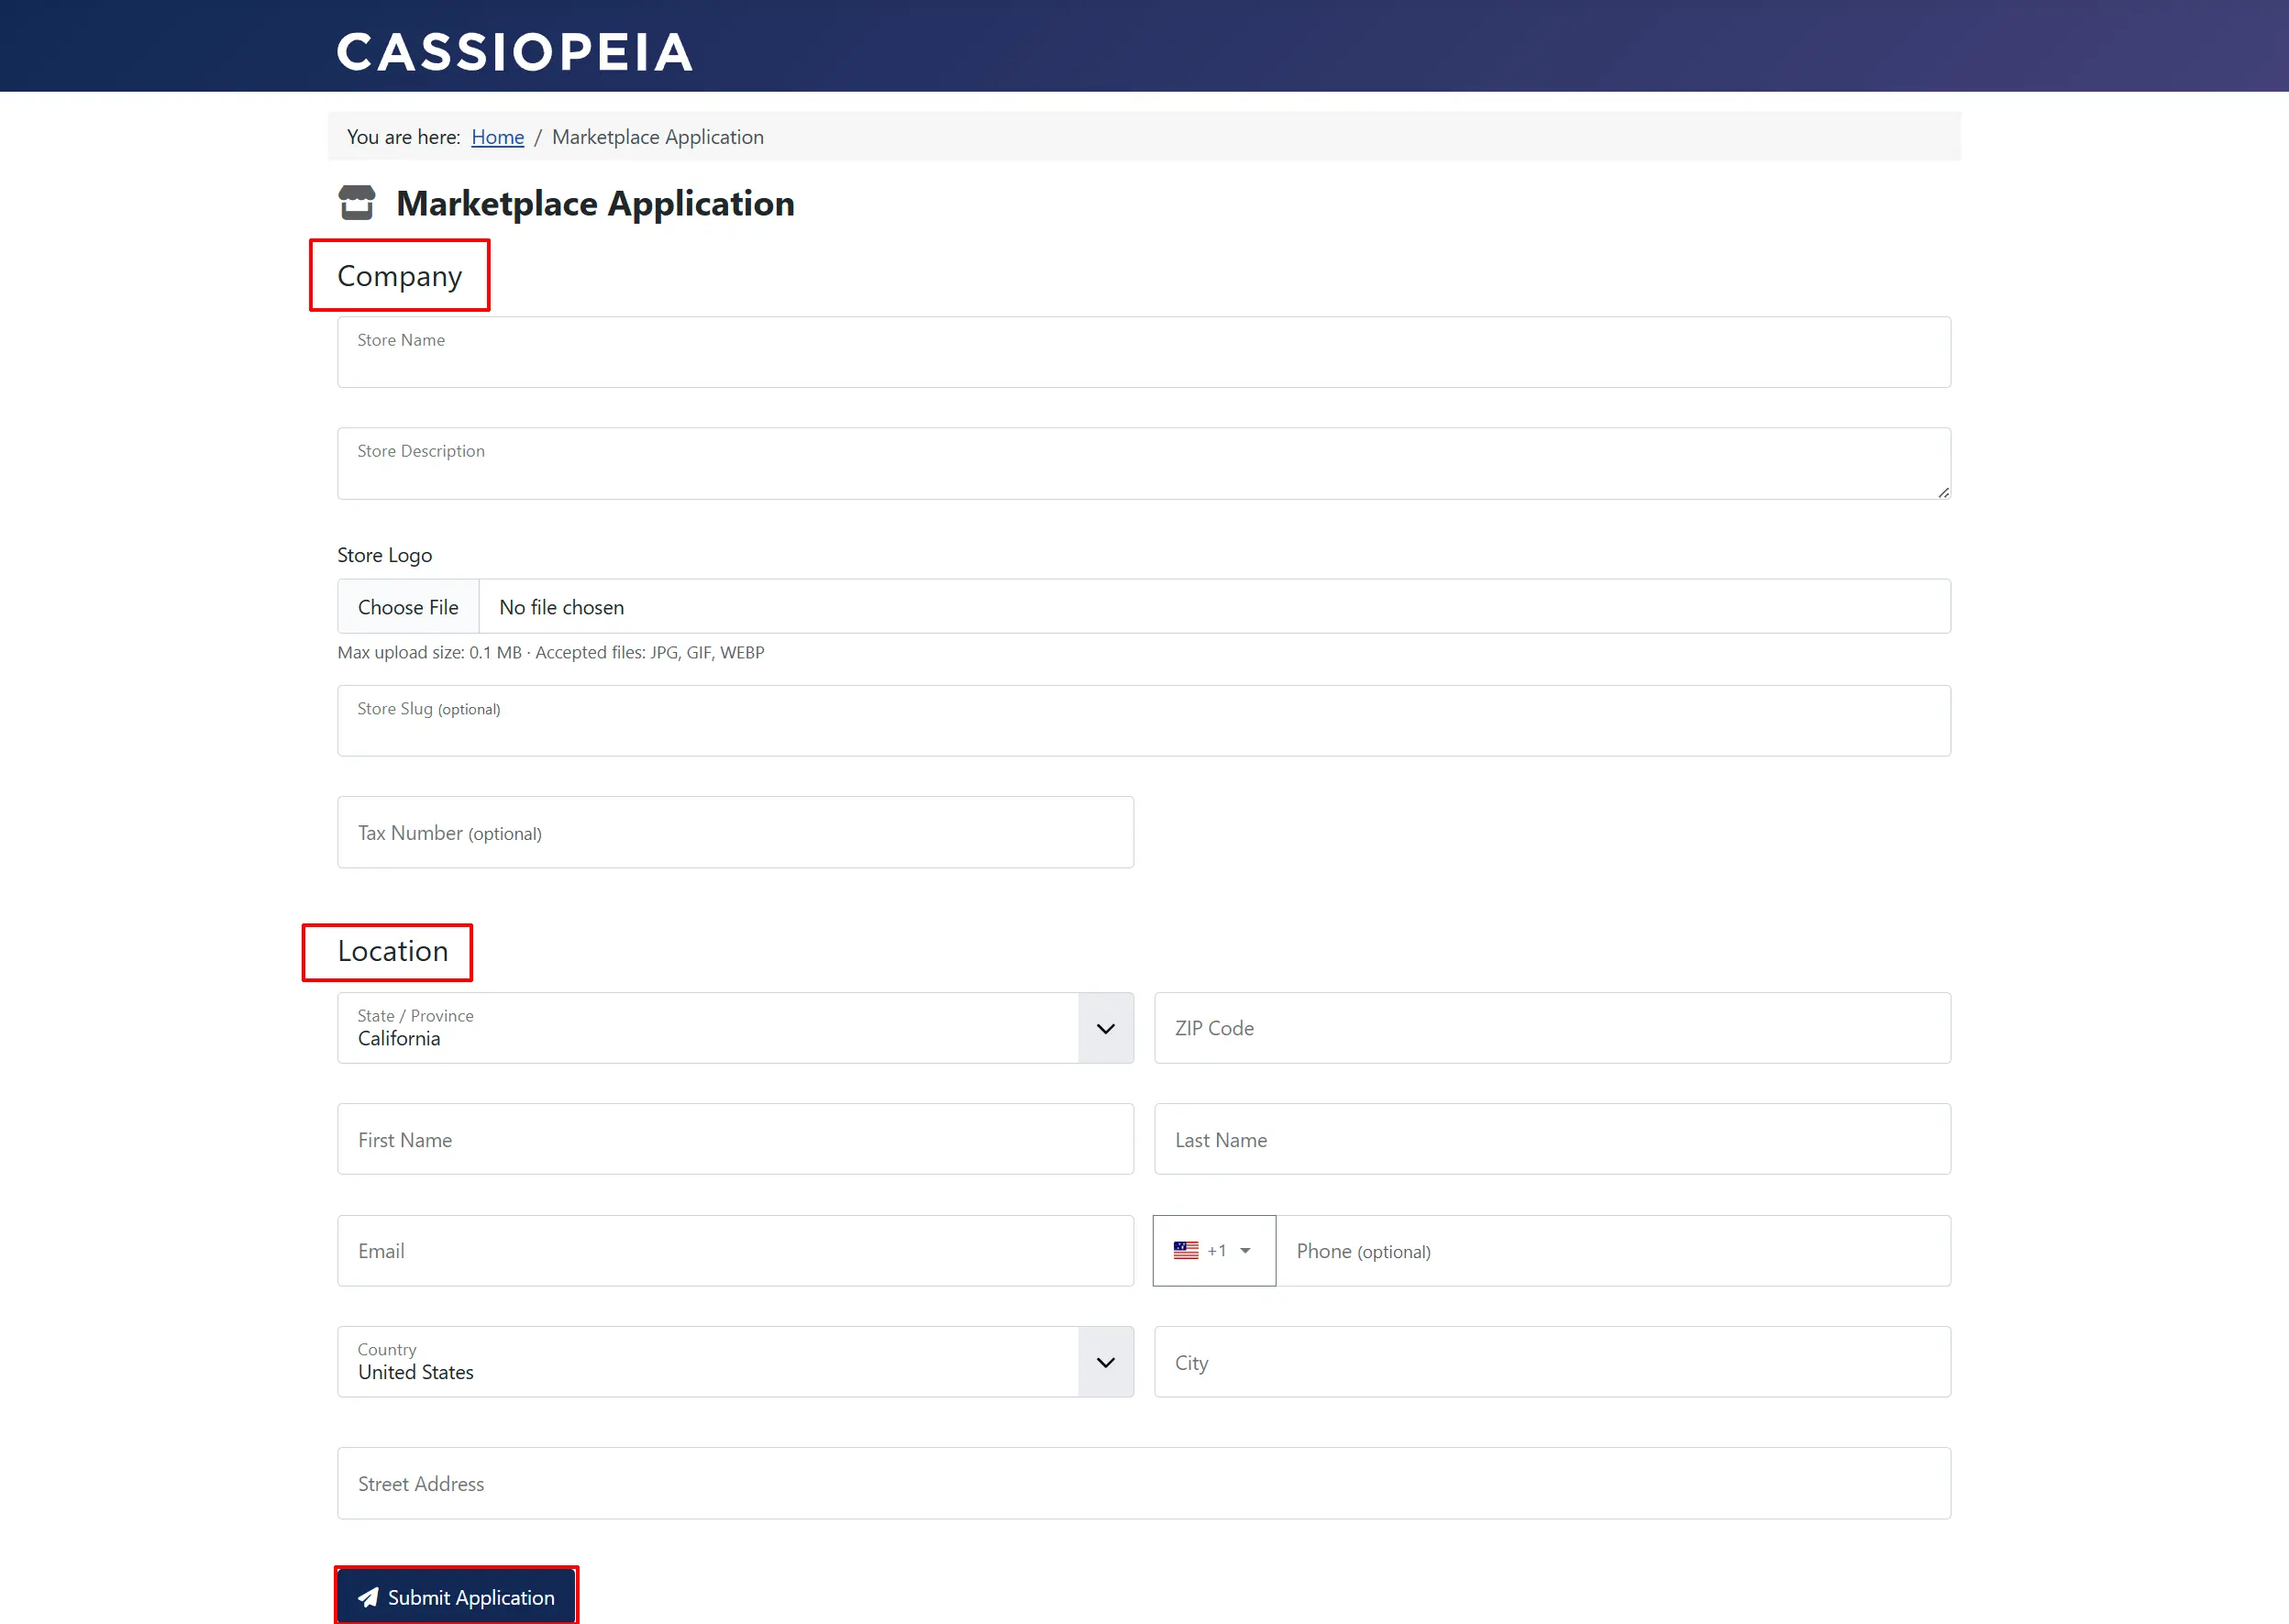
For example: Company can be for all of the company fields to be grouped together and Location can be for the applicant's info grouped together. Whatever titles you put here, will be shown as the category title on the Application
Setting Up Your Marketplace Pages
Marketplace adds four page types to Joomla's menu system so you can place them anywhere in your site navigation.
Go to Menus -> All Menus -> New.
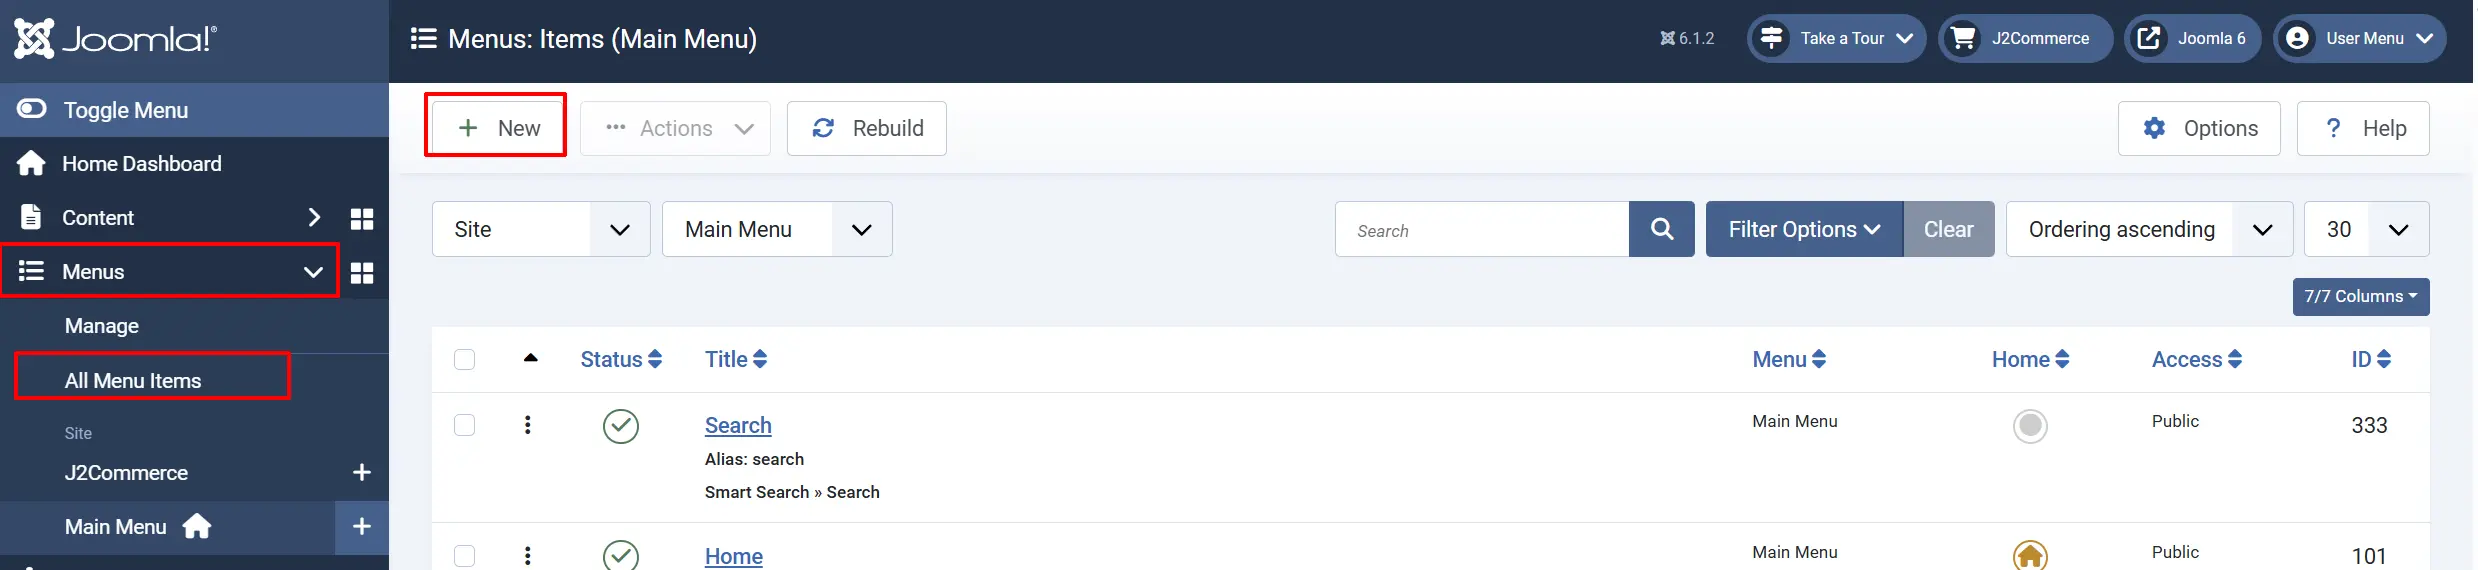
Select Menu Item Type. Under the J2Commerce menu item types, pick one of the following:
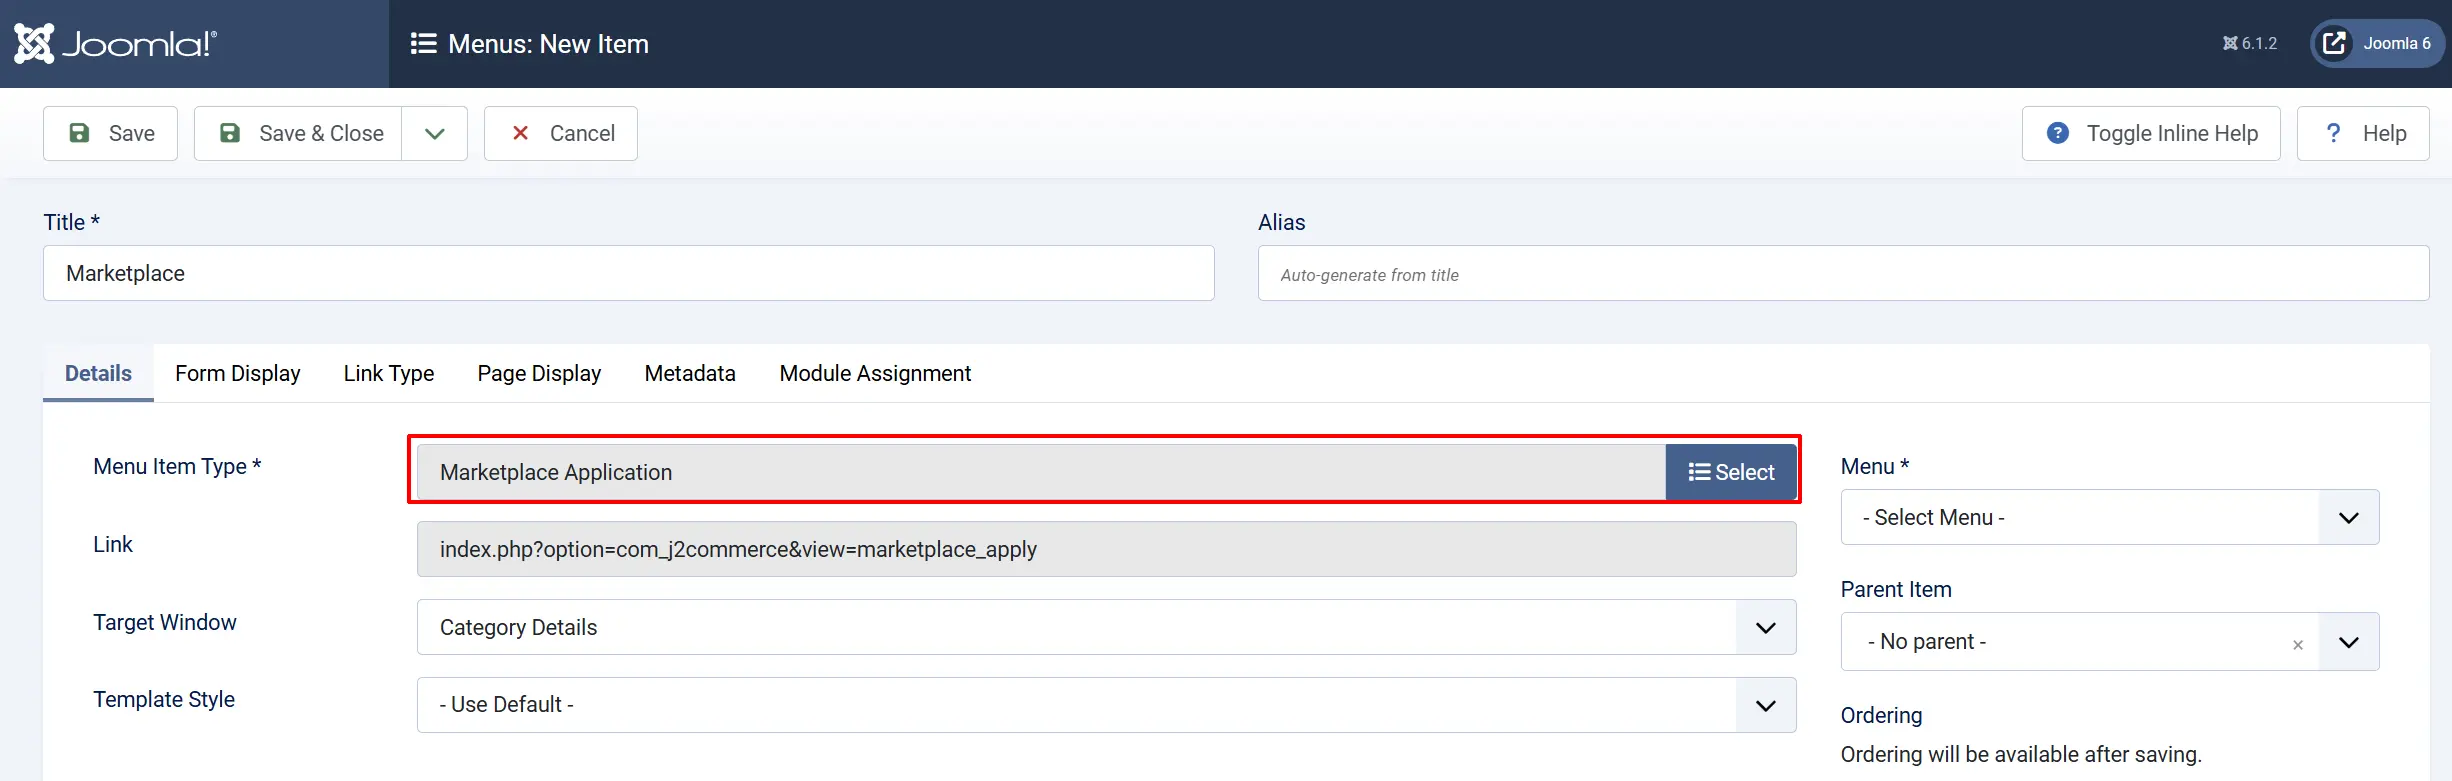
| Menu Item Type | What it shows | Notable options |
|---|---|---|
| Marketplace Application | The public "Apply to Become a Seller" form. | — |
| Marketplace Dashboard | The logged-in seller's private dashboard. Non-sellers are redirected to log in. | Default Tab — which tab opens first (Sales, Commissions, Payouts, or Store Profile). |
| Marketplace Store | A single seller's public storefront. | Seller ID — optional; link to one specific seller, or leave blank to resolve from the URL. |
| Marketplace - Sellers | A landing page that lists every approved seller as browsable cards. | Sellers Per Page, Show Search Bar. |
Creating an Application
The fields to fill out on the application will come from the Checkout Fields you have already created. You can also create new ones.
Go to J2Commerce -> Setup -> Checkout Fields
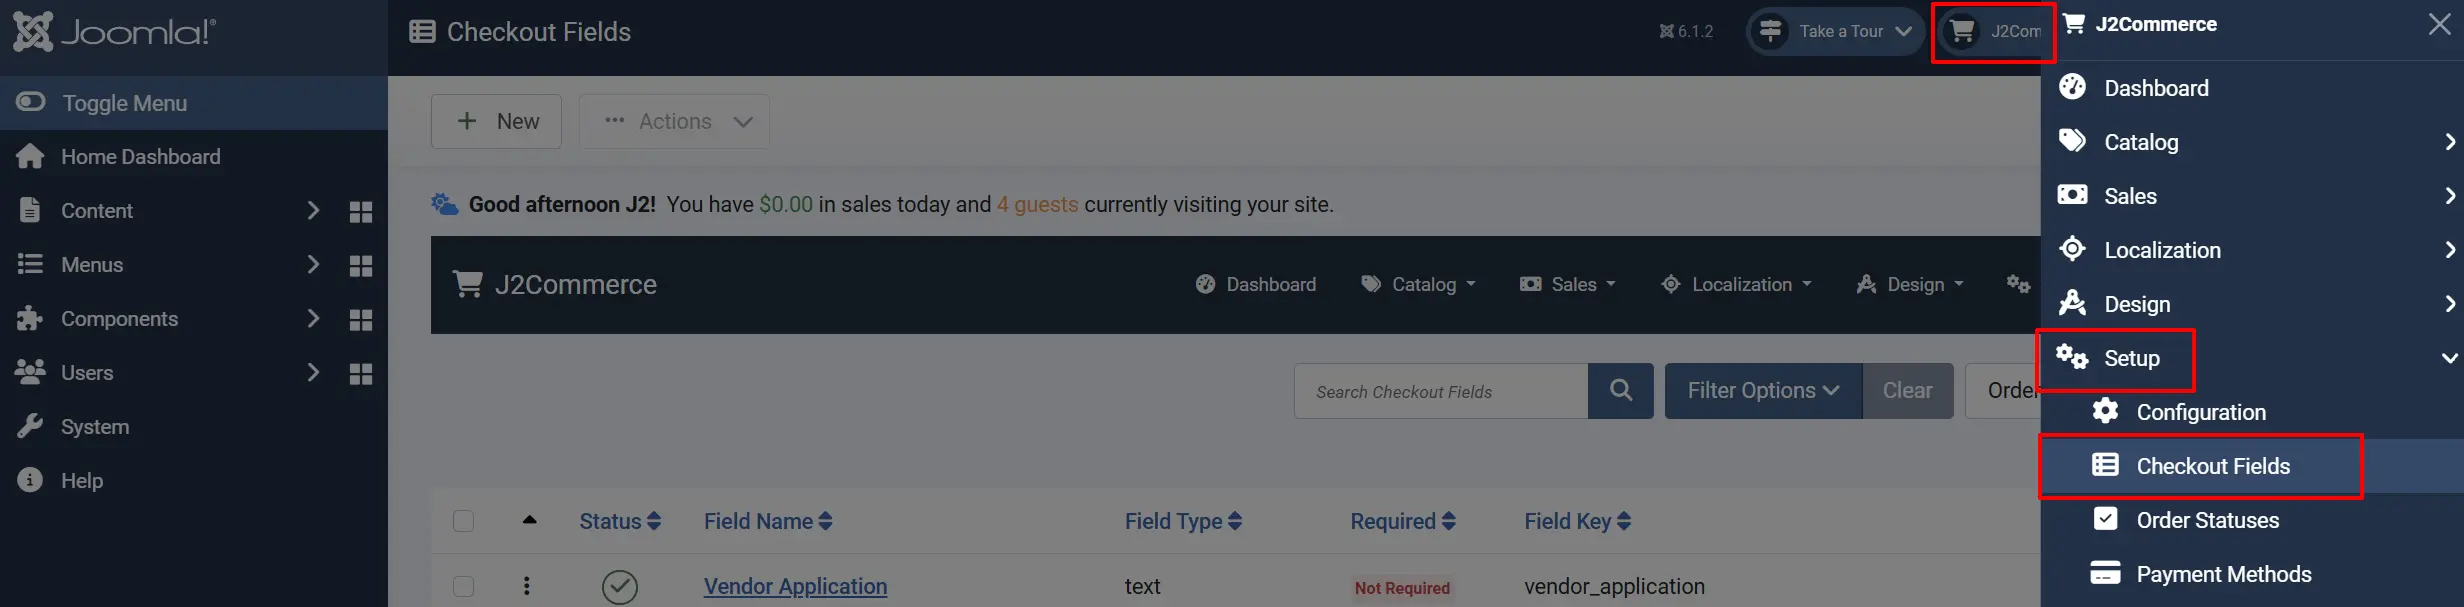
You can assign each checkout field individually to the Marketplace or in batch. Batch is recommended if you are assigning more than one field to Marketplace.
Individual Assignment
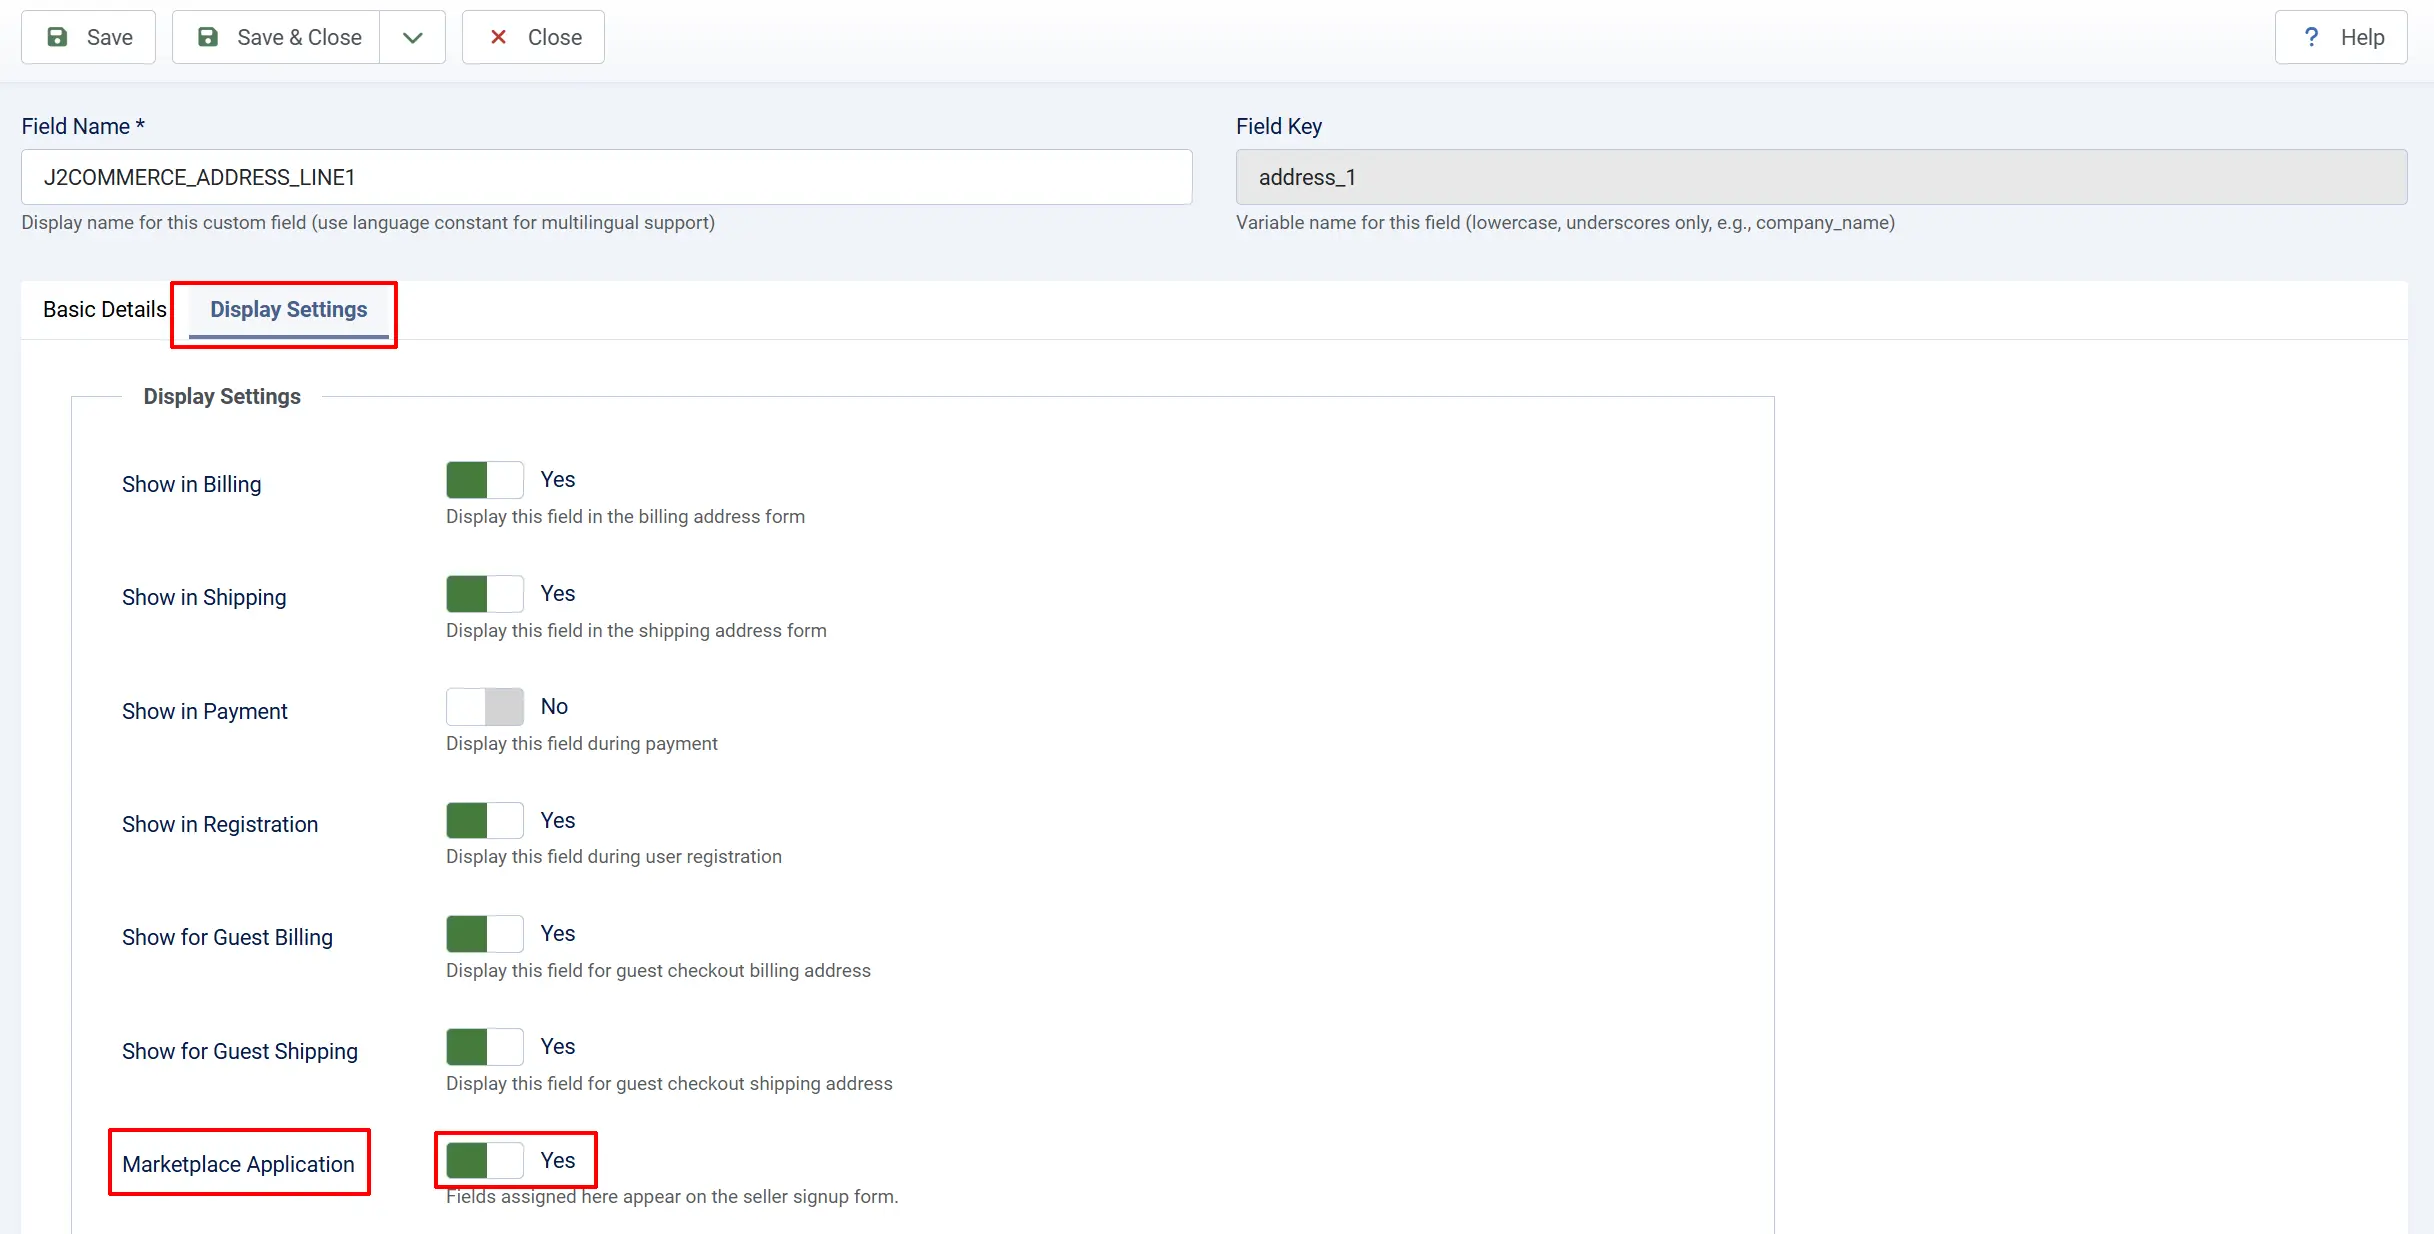
Click on the field and select Yes for Marketplace Application
Batch Assignment
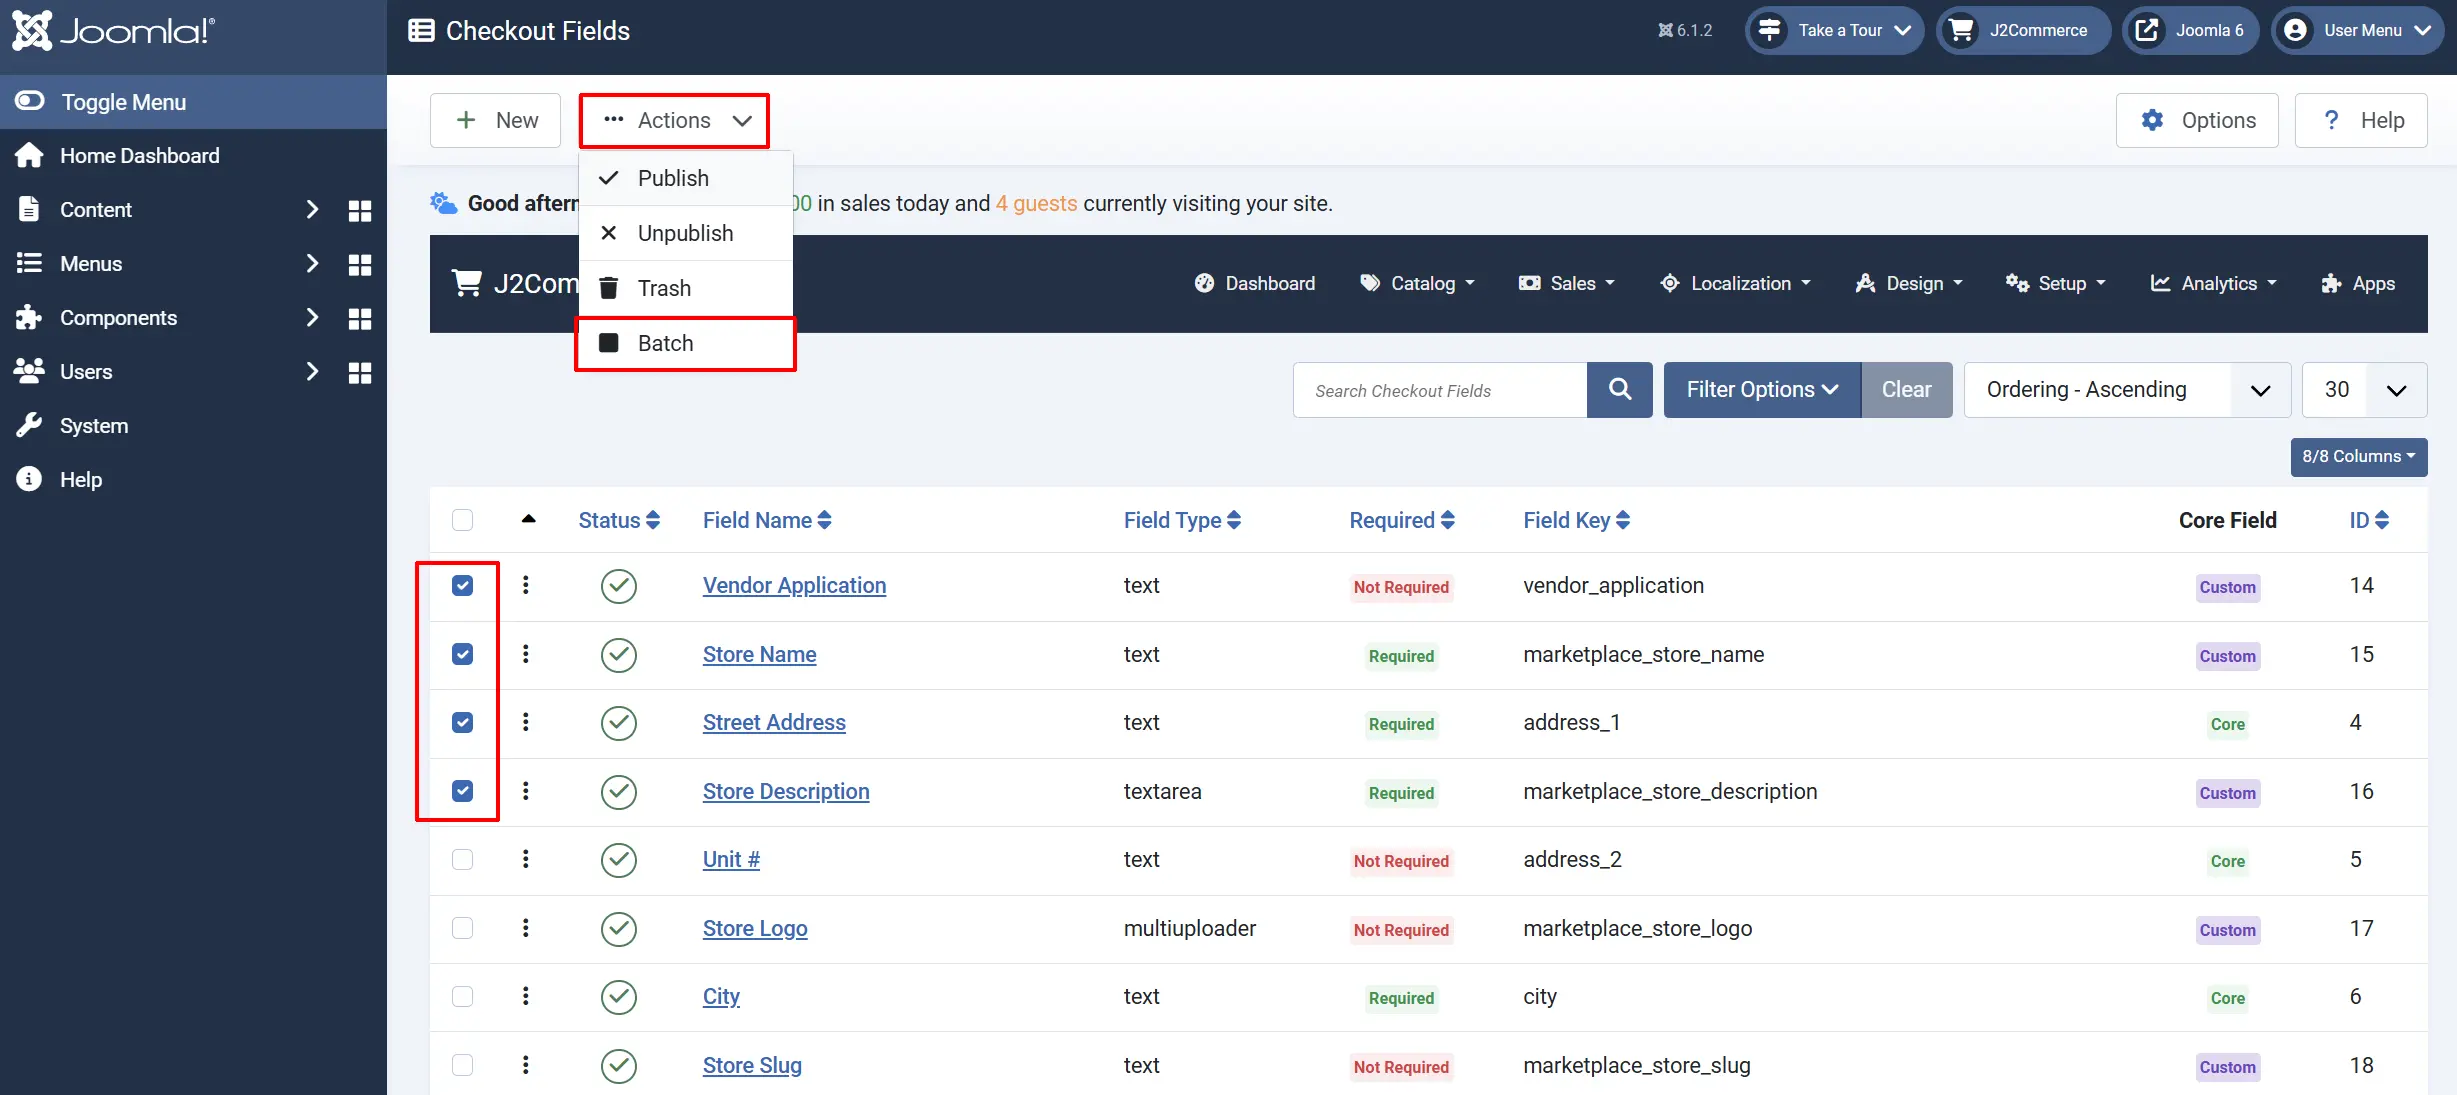
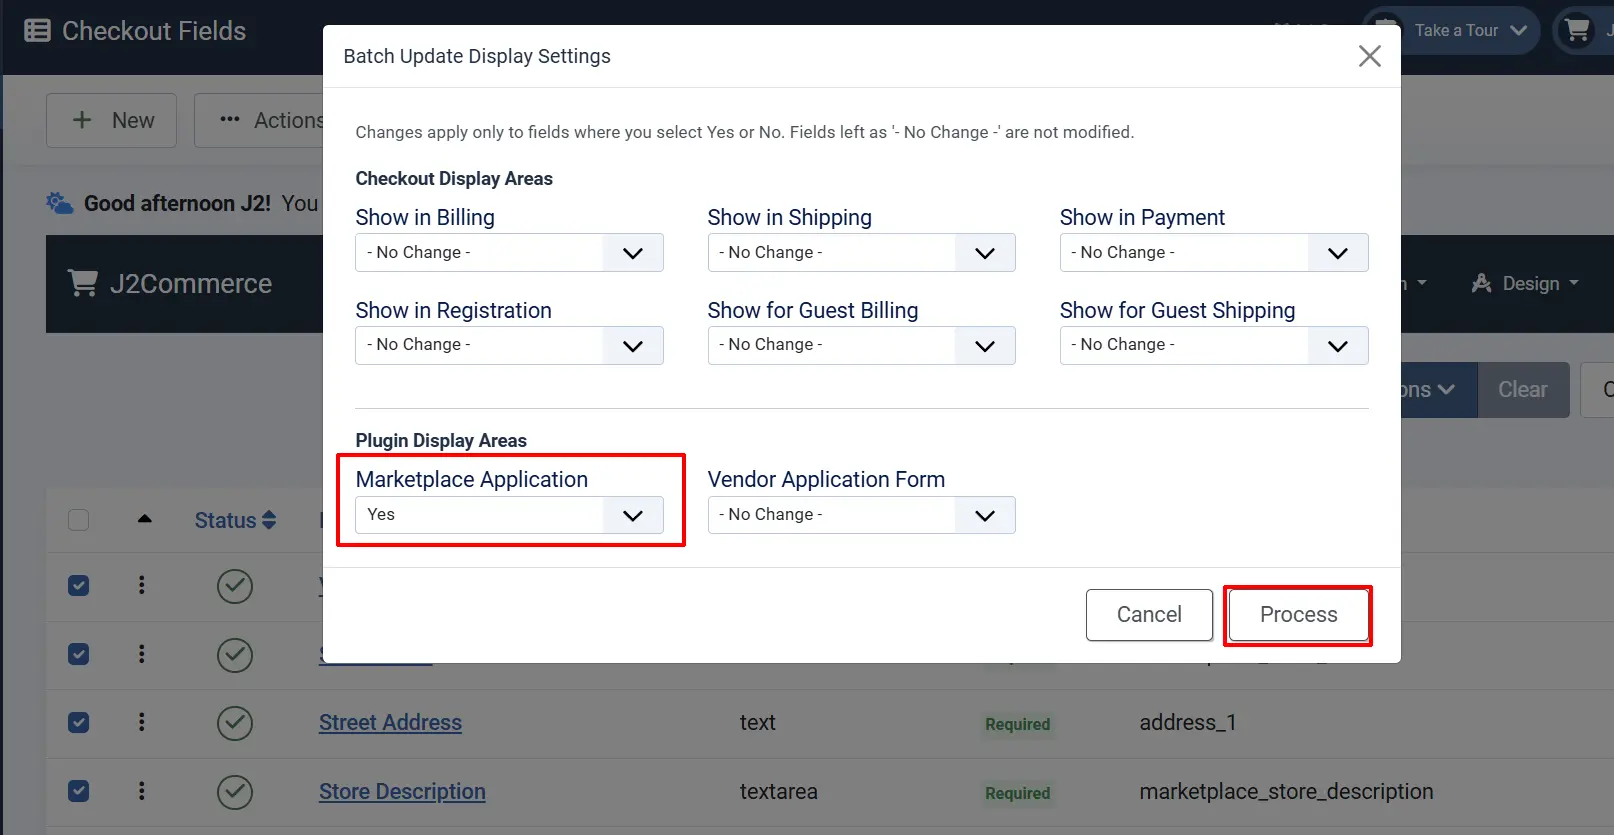
Check multiple fields -> Actions -> Batch -> Select Yes for Marketplace Application -> Process
Application Fields
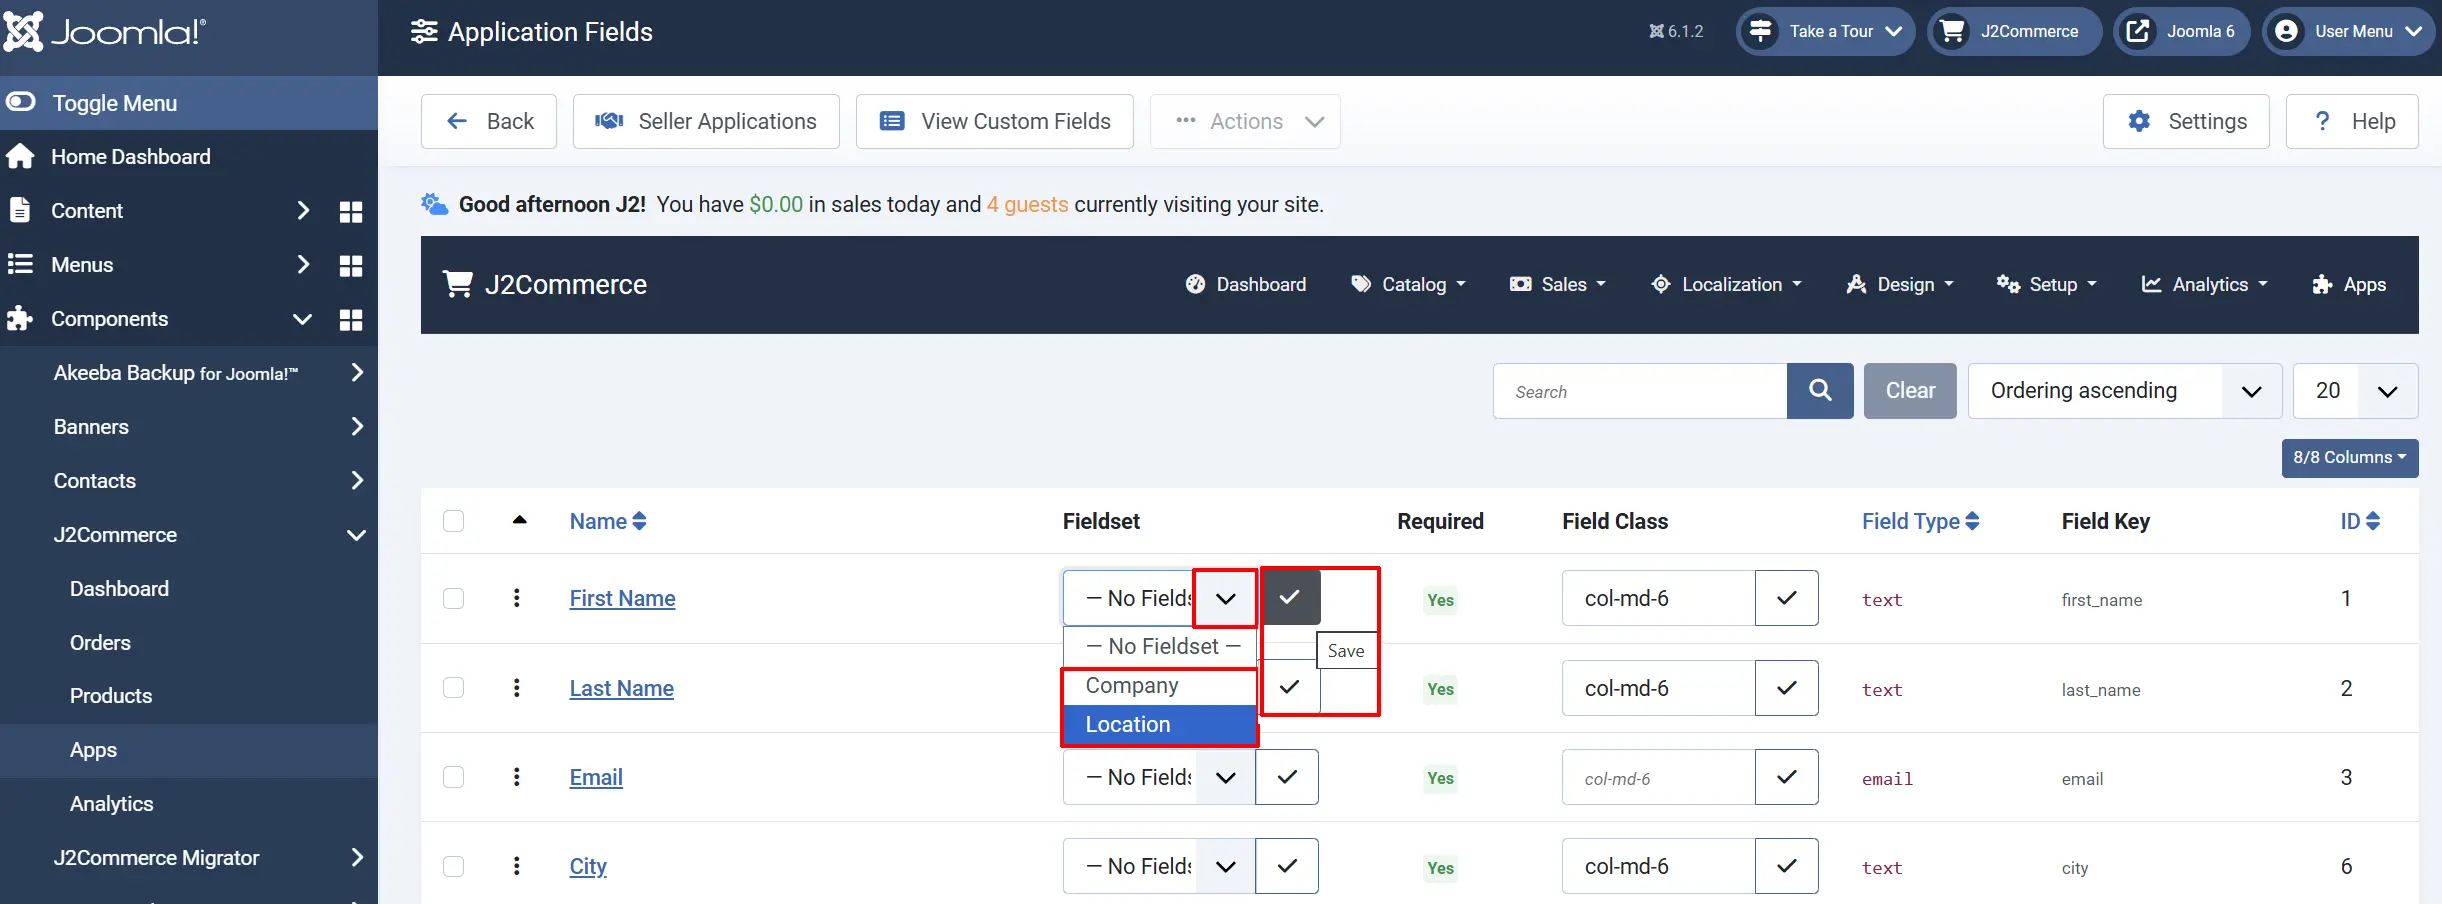
To organize the different checkout fields to their appropriate categories that you created in the App. ie: The examples above we created two categories, Company & Location. Go to J2Commerce -> Catalog -> Marketplace -> Application -> Application Fields

Assigning Fields
Assign the Fieldset to the appropriate category and click the checkmark to Save
Adding Additional Fields
You can add more fields that already exist in Checkout Fields or create a new field without leaving the application fields page. Click on the View Custom Fields tab

Frontend View
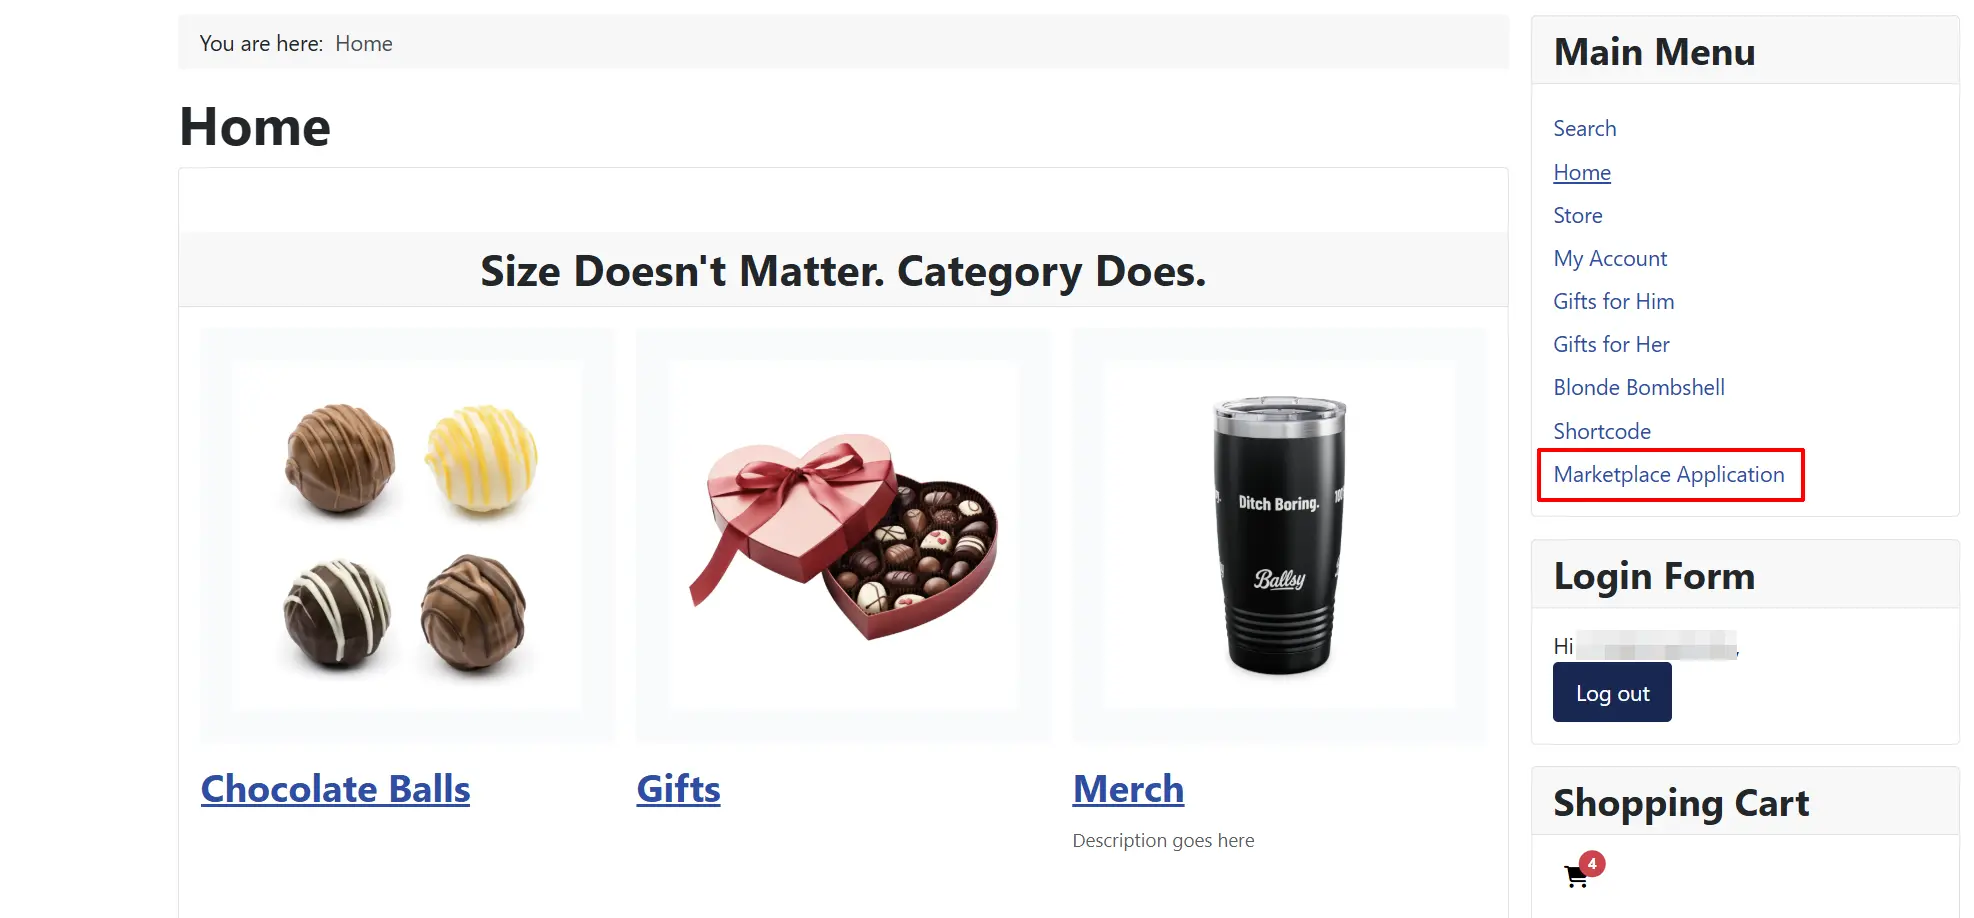
The Marketplace Application Menu tab shows up on the frontend
Application View
Becoming a Seller: The Application Process

How a visitor becomes a seller depends on your Seller Sign-Up Mode setting under the Basic Plugin tab in the Marketplace App:
- Open — Anyone can fill out the application form, and it is always approved immediately.
- Invitation only — The application form is visible, but new applications wait for your approval unless Auto Approve Applications is set to Yes.
- Admin creates sellers only — There is no public application flow. You create sellers directly from Approved Sellers -> New.
The application form always collects Store Name, Store Description, and Store Logo. You can add more fields — see Field Management below.
If Auto-Create Account is enabled, a visitor without a Joomla account can fill out the apply form and one is created for them automatically. Otherwise, they are asked to log in first.
If you request more information from an applicant, they see a banner on their application explaining what you need, and can update and resubmit it.
Reviewing Seller Applications

Go to J2Commerce -> Catalog -> Marketplace -> Seller Applications.
Each pending application shows the store name, applicant, and submission date. For each one you can:
- Approve — Publishes the seller and sends the approval email.
- Reject — Requires a reason, which is included in the rejection email.
- Request Info — Sends the applicant a note asking for more detail; the application stays pending until they update it.
Managing Approved Sellers

Go to J2Commerce -> Catalog -> Marketplace -> Approved Sellers to see every active seller: store name, linked user, commission rate, payout method, and join date.
Click a seller to edit their profile:
| Section | Fields |
|---|---|
| Store Details | Store Name, Store URL Slug, Commission Rate (blank = use the global default), Auto-Approve Products (overrides the global setting for this seller only). |
| Payout Settings | Payout method, schedule, and minimum payout amount, each of which can be left blank to inherit the global default. |
| Seller Info | Read-only: linked vendor, user, email, and join date. |
You can also unpublish (unapprove) a seller from this list, or use Unapprove in the batch actions to disable several at once.
Product Approvals
When a seller adds or edits a product from their dashboard, whether it goes live immediately or waits for you depends on the Default Product Approval setting (or the seller's individual Auto-Approve Products override).
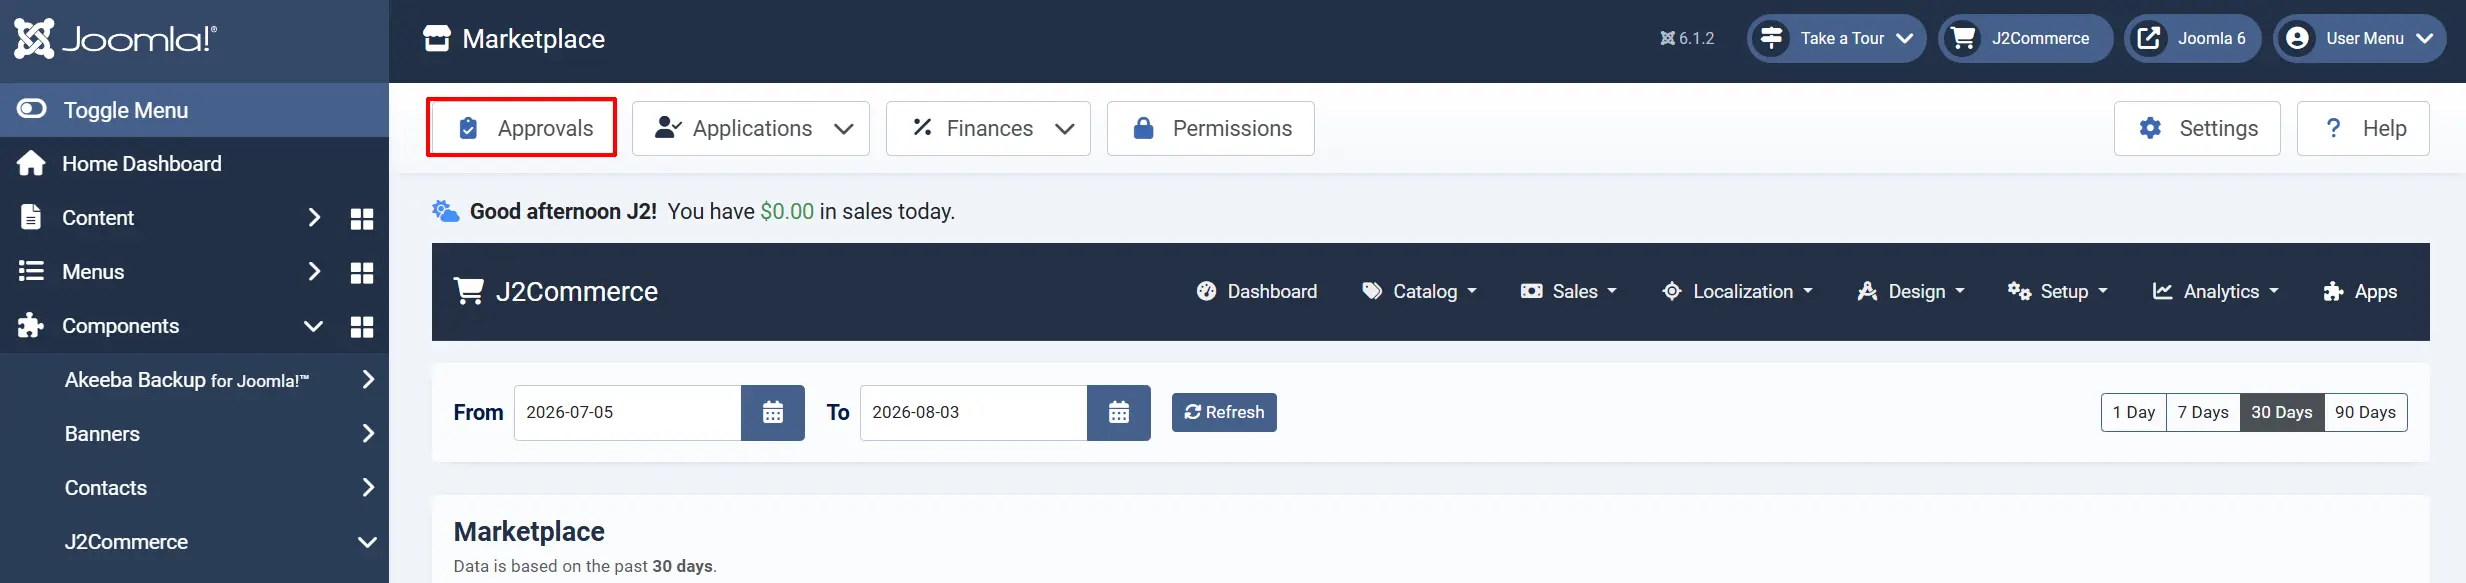
Review pending products at J2Commerce -> Catalog -> Marketplace -> Approvals. For each submission you can:
- Approve — Publishes the product and notifies the seller.
- Reject — Requires a reason, shown to the seller on their product list.
- Request Info — Asks the seller for changes before you decide.
- Revoke Approval — Un-publishes a previously approved product.
If Re-validate Products on Edit is enabled, any edit a seller makes to an already-approved product resets it to Pending, so it disappears from the storefront until you re-approve it.
Commissions
A commission record is created automatically for every seller's share of an order once the order reaches one of your Commission Trigger Statuses. If the order later reaches a Commission Void Status (such as Cancelled or Refunded), the commission is voided.
Commissions move through these statuses:
| Status | Meaning |
|---|---|
| Pending | Created, awaiting review or awaiting payout eligibility. |
| Approved | Cleared and included in the seller's payable balance. |
| Paid | Included in a completed payout. |
| Voided | Cancelled by an order status change. |
| Reversed | Refunded after being paid; may trigger an automatic clawback if enabled. |
Go to J2Commerce -> Catalog -> Marketplace -> Finances -> Commissions to review, filter, batch-approve, or batch-void commission rows, view a Vendor Summary report totalled by seller, or Export CSV.
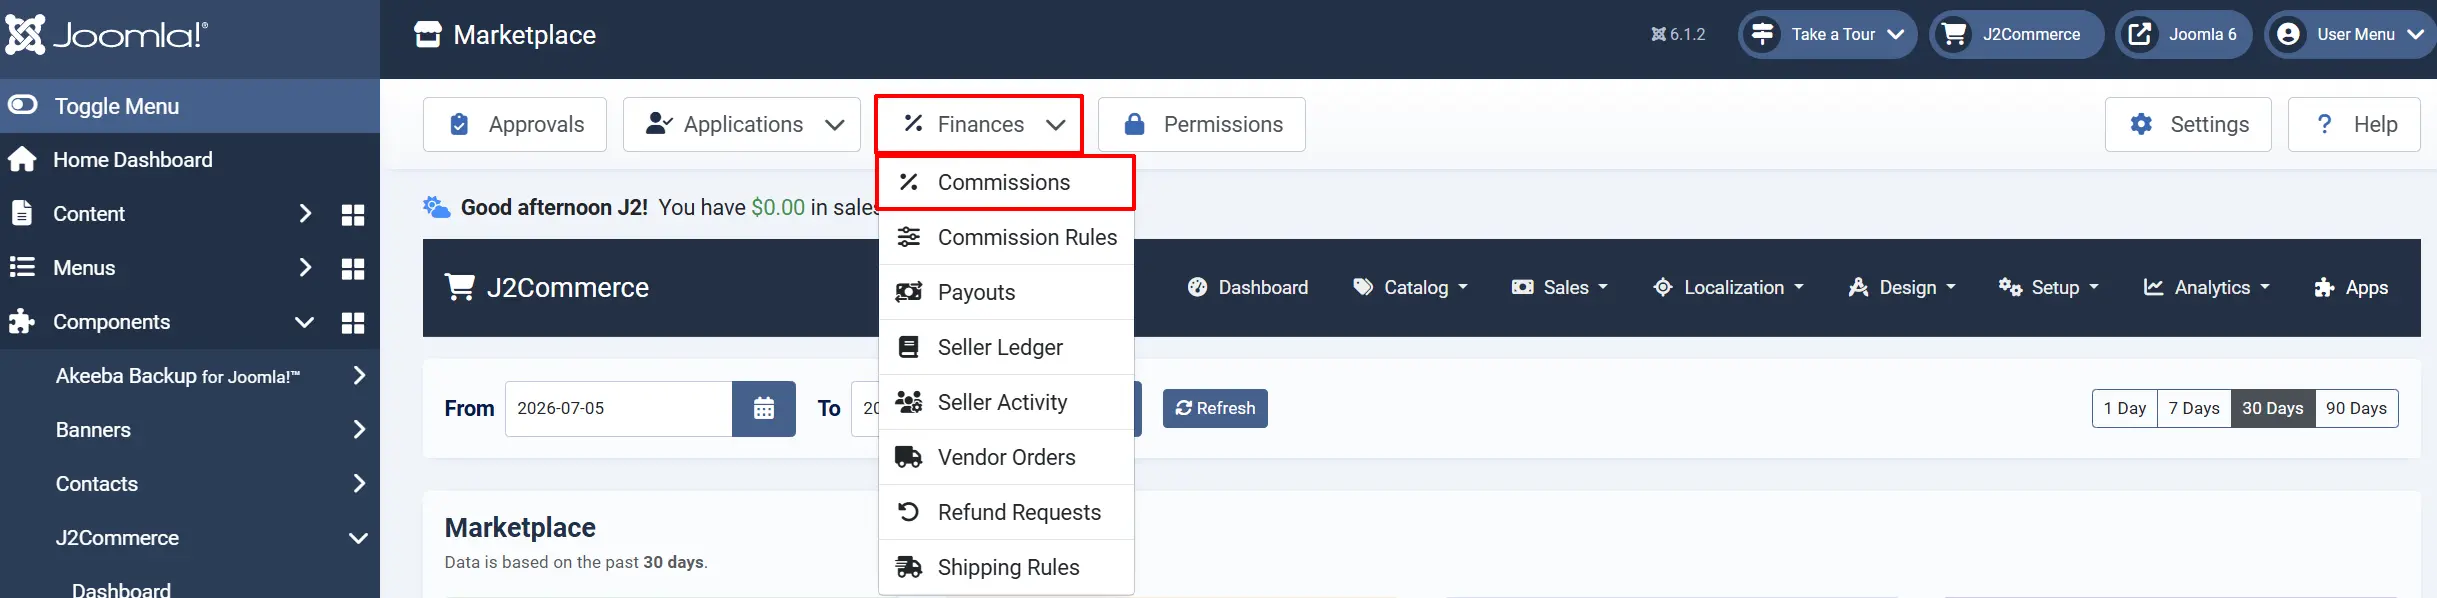
If a commission looks overstated because of a known quantity-pricing issue, use the Audit Amounts button on the Commissions screen to find and automatically correct affected rows. Rows already paid or attached to a payout are flagged for manual review instead of being changed automatically.
Commission Rules
Commission Rules let you override the default rate for a specific seller, product, or category, without editing the global setting.
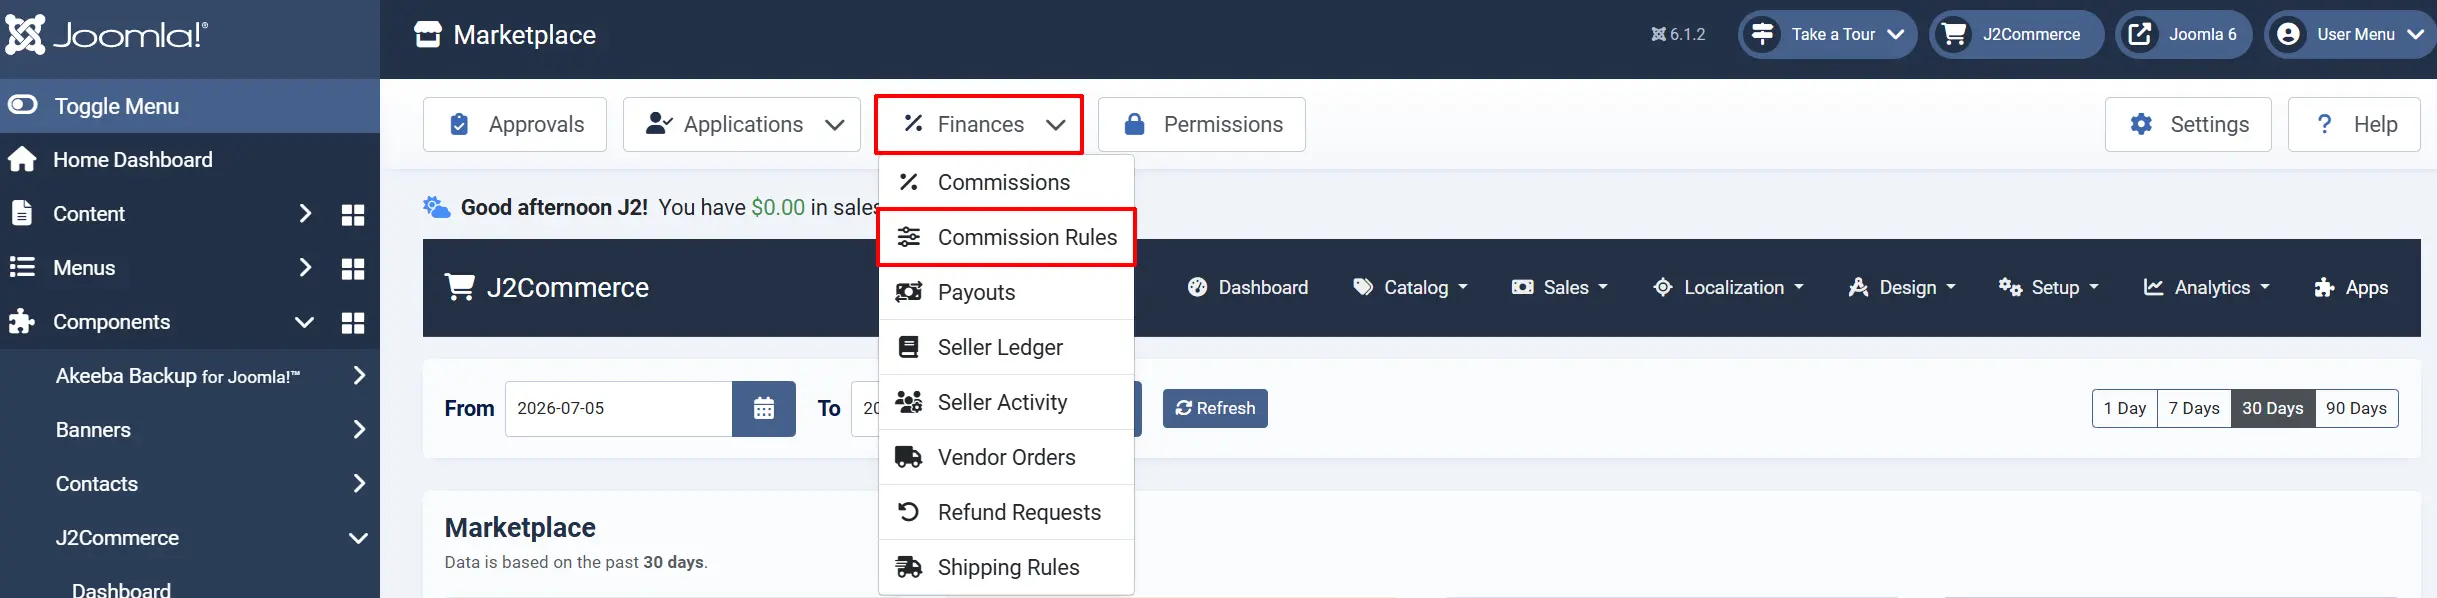
Go to J2Commerce -> Catalog -> Marketplace -> Commission Rules -> Add Rule.
Rule Type: Global (default), Per Seller, Per Product, or Per Category.
Rate Type: Percent, Fixed Amount, or Percent + Fixed Amount. A fixed amount is charged once per order line — never multiplied by quantity.
Commission Rate / Fixed Amount: The percentage and/or flat fee this rule charges.
Priority: Higher numbers win when more than one rule matches an order line.
Payouts
Payout Methods
Go to J2Commerce -> Catalog -> Marketplace -> Payout Methods to see which payout gateways are installed. Manual / Check is always available and requires no setup — you simply record payments yourself. Additional gateways (for example PayPal Payouts, Stripe Connect, or other payout plugins from the J2Commerce Extensions Store) appear here automatically once installed and enabled.
Paying Sellers
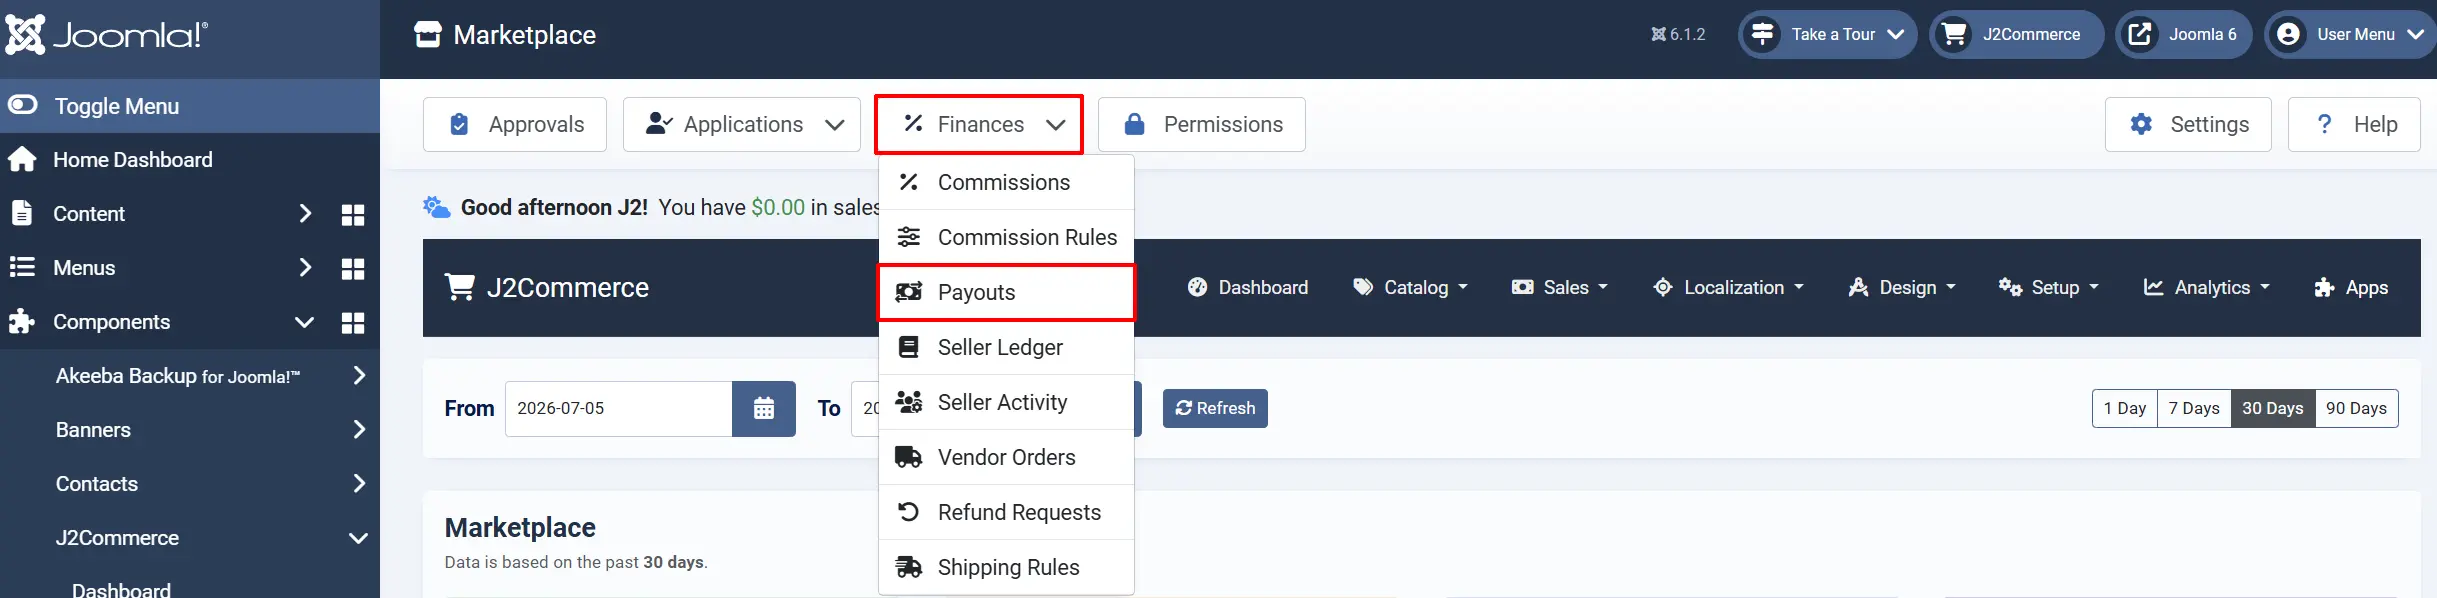
Go to J2Commerce -> Catalog -> Marketplace -> Finances -> Payouts. From here you can:
- Process Pending Payouts — Sends a real payout to every seller with a payable balance on a gateway payout method.
- Mark Paid Manually — Records a manual payment (check, bank transfer) with a reference number and note, for sellers on the Manual / Check method.
- Review Withdrawal Requests — Sellers can request an early payout from their dashboard; approve, reject, or edit the reference/note on any request.
A Payout Gateway Status panel on the Payouts screen shows whether each installed gateway is Ready, Not Ready, or Disabled, so you can see at a glance which sellers can actually be paid electronically.
Vendor Shipping Rules
When Enable Vendor Shipping Rules is turned on in settings, sellers can define their own shipping rates from their dashboard's Shipping tab:
| Rate Type | How it charges |
|---|---|
| Flat Rate | One fixed charge per order. |
| Per Item | A base rate plus a per-item charge. |
| Per Weight | A base rate plus a per-weight-unit charge. |
| Weight Brackets | A different rate depending on the cart's total weight; leave the top bracket's max weight blank for an open-ended range. |
Each rule can also set a free-shipping threshold and restrict itself to specific countries. All applicable sellers' shipping charges are combined into a single line item at checkout, labeled with your configured Shipping Line Label.
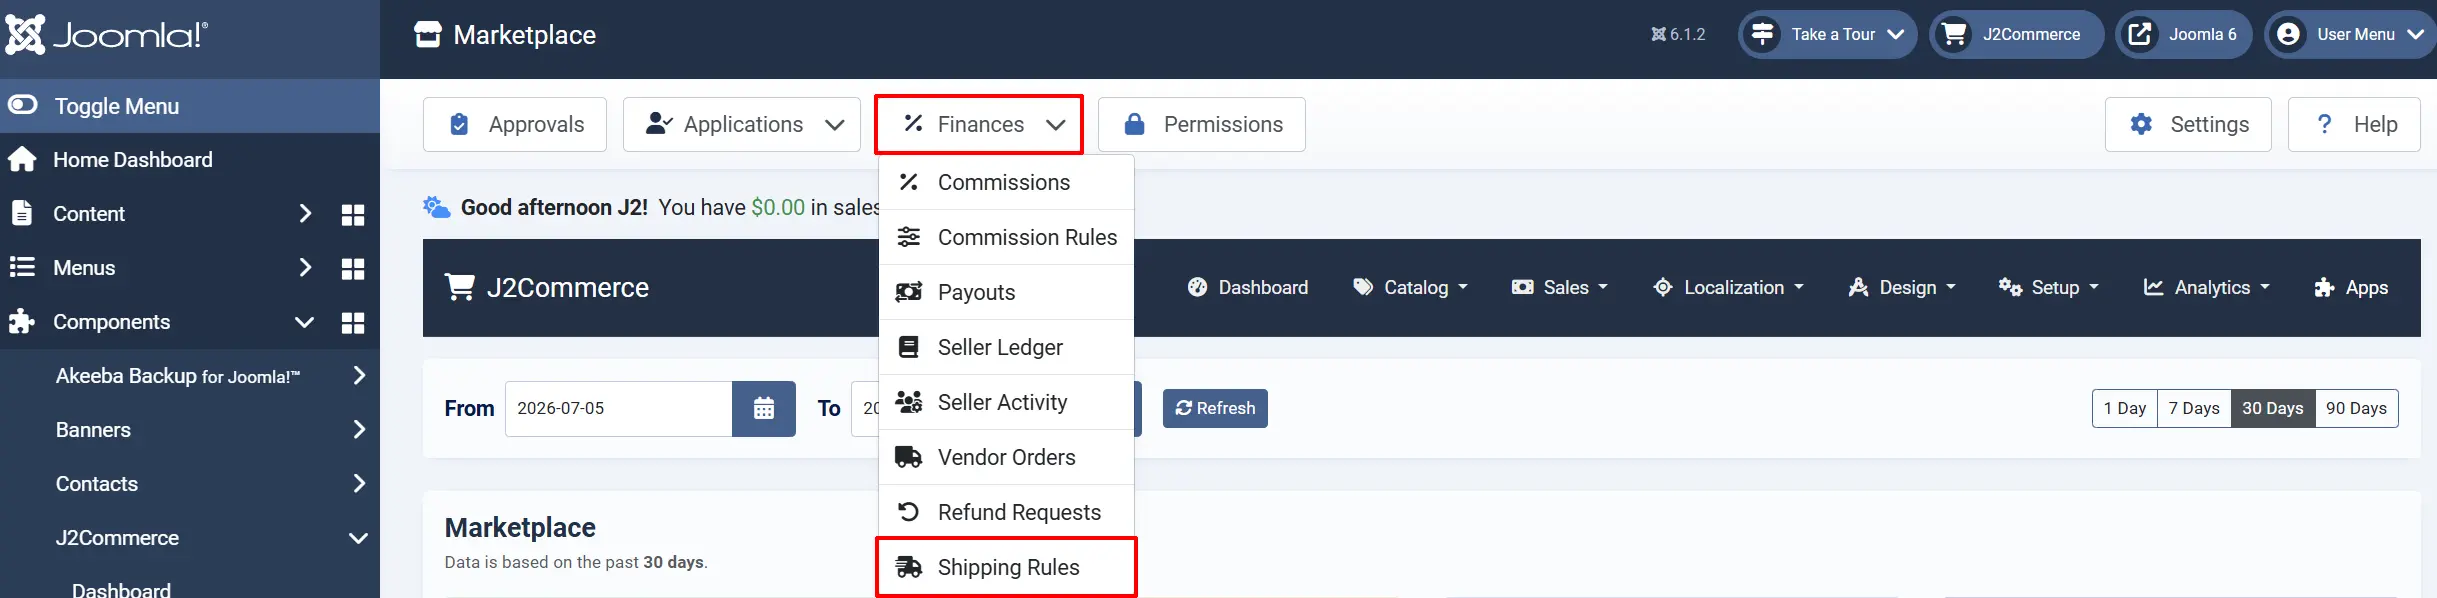
You can review every seller's shipping rules read-only, and bulk enable/disable them, at J2Commerce -> Catalog -> Marketplace -> Finances -> Shipping Rules.
Vendor Orders (Fulfillment)
When a customer's order includes products from more than one seller, Marketplace splits it into per-seller sub-orders. Each seller only sees their own items, shipping address, and totals on their dashboard's Orders tab, where they can:
- Update Fulfillment Status (Shipped, Delivered, Cancelled).
- Enter a Carrier, Tracking Number, and Tracking URL.
- Print a Packing Slip for their portion of the order.
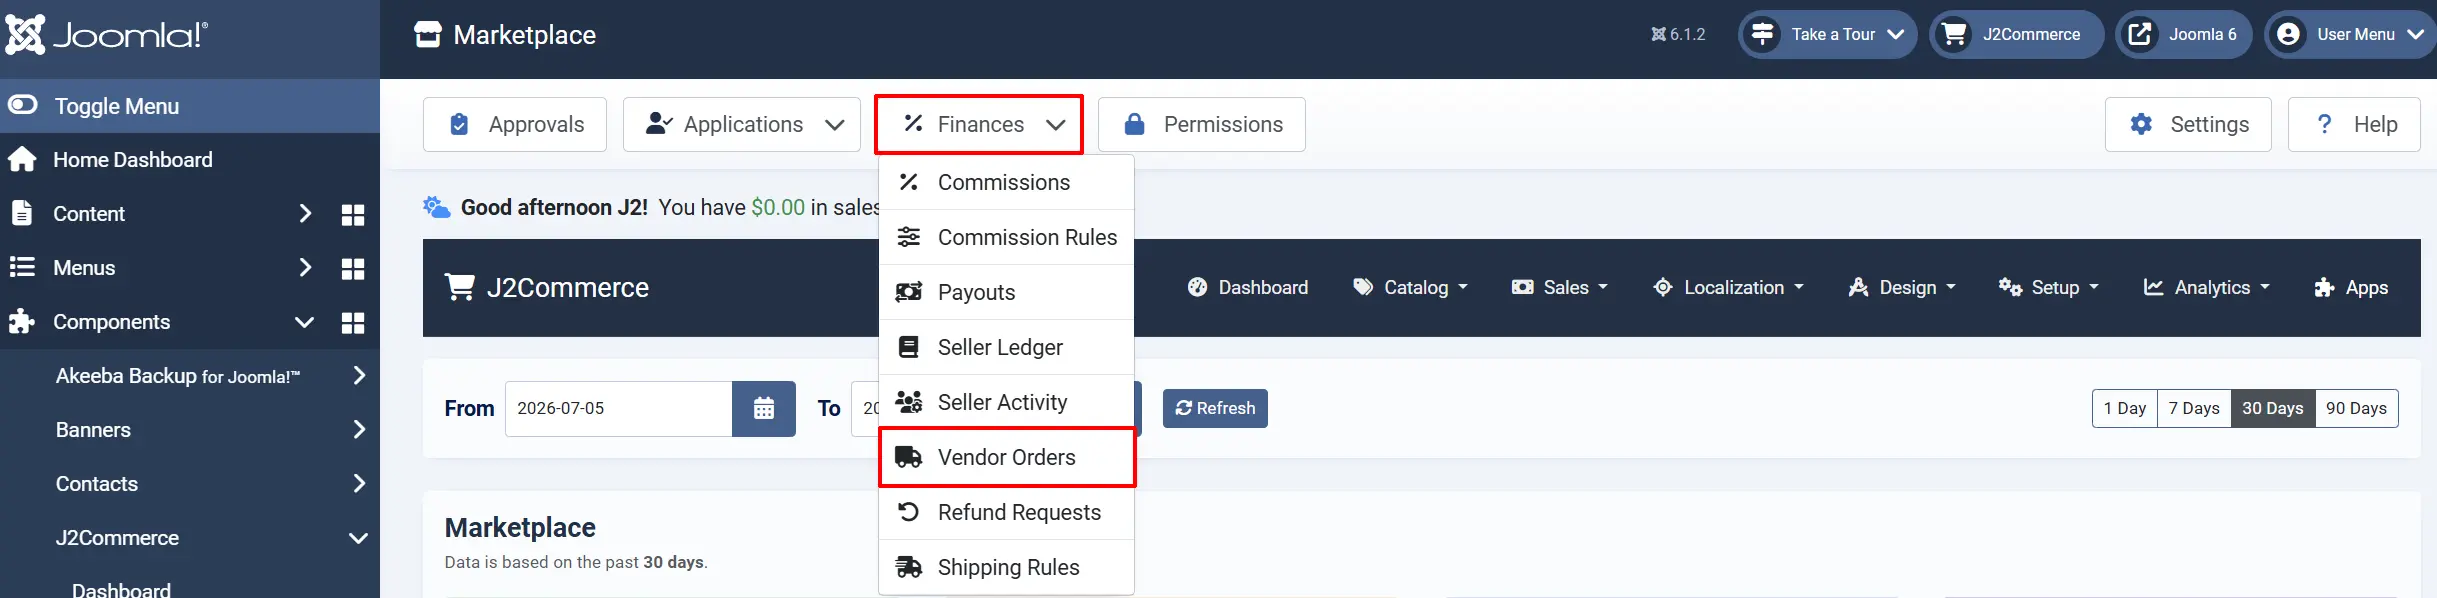
Go to J2Commerce -> Catalog -> Marketplace -> Finances -> Vendor Orders for a cross-seller overview of every sub-order and its fulfillment status.
Refund Requests
Sellers can request a refund on one of their own orders from the Refunds tab of their dashboard, specifying an amount (up to the remaining refundable balance) and a reason.
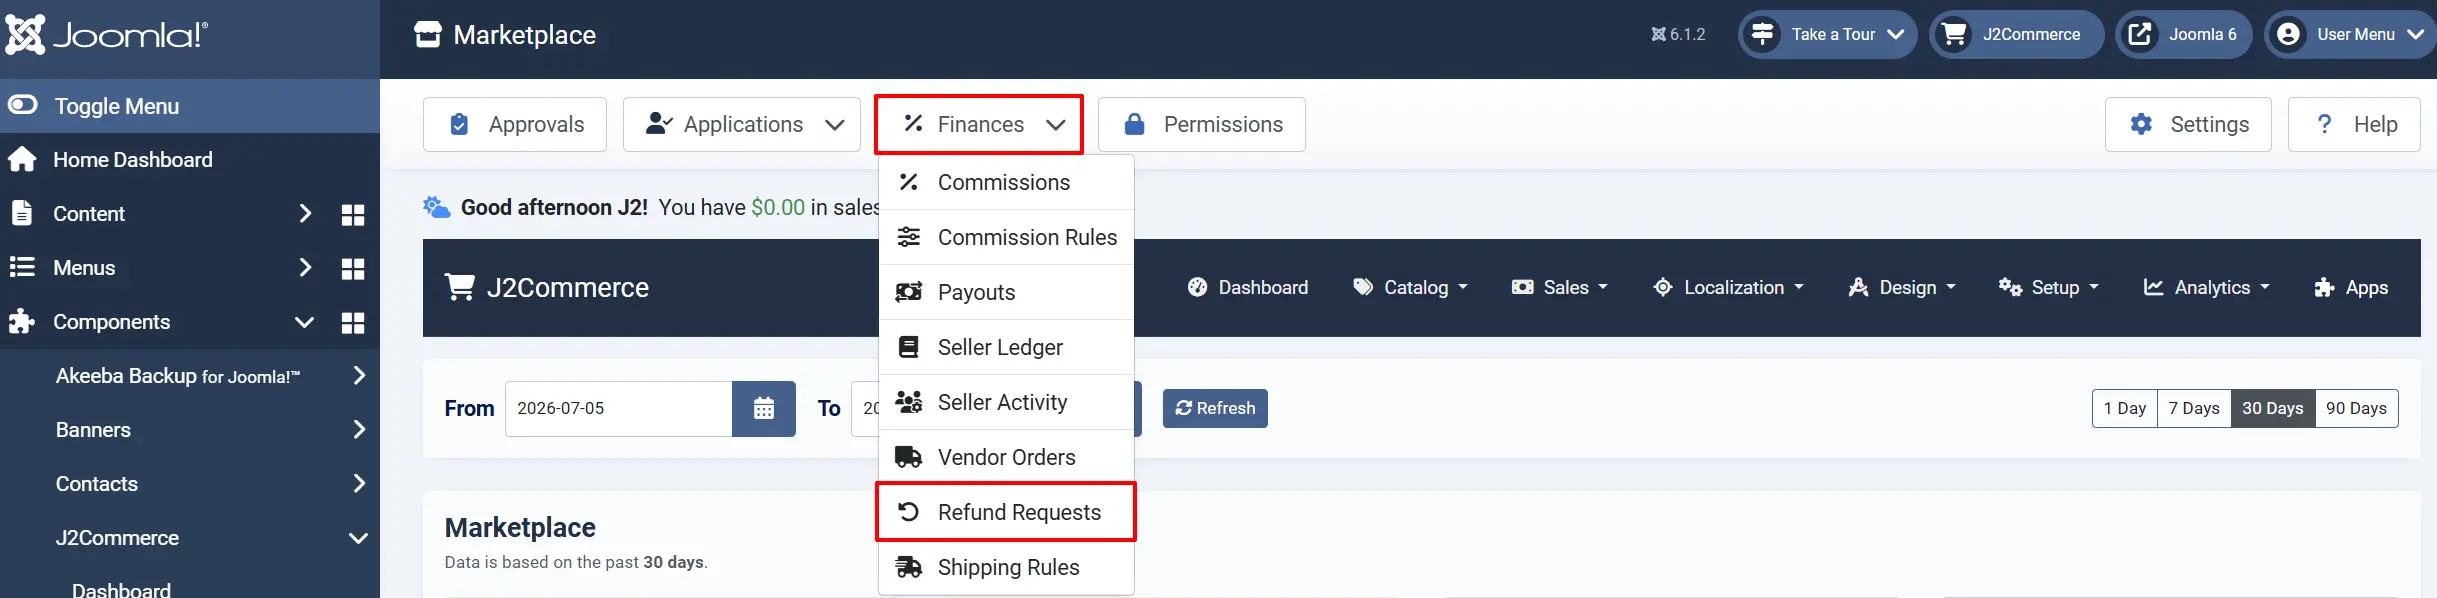
Review requests at J2Commerce -> Catalog -> Marketplace -> Finances -> Refund Requests. Approving a request immediately adjusts the seller's ledger; rejecting it can include an optional note explaining why.
Seller Ledger
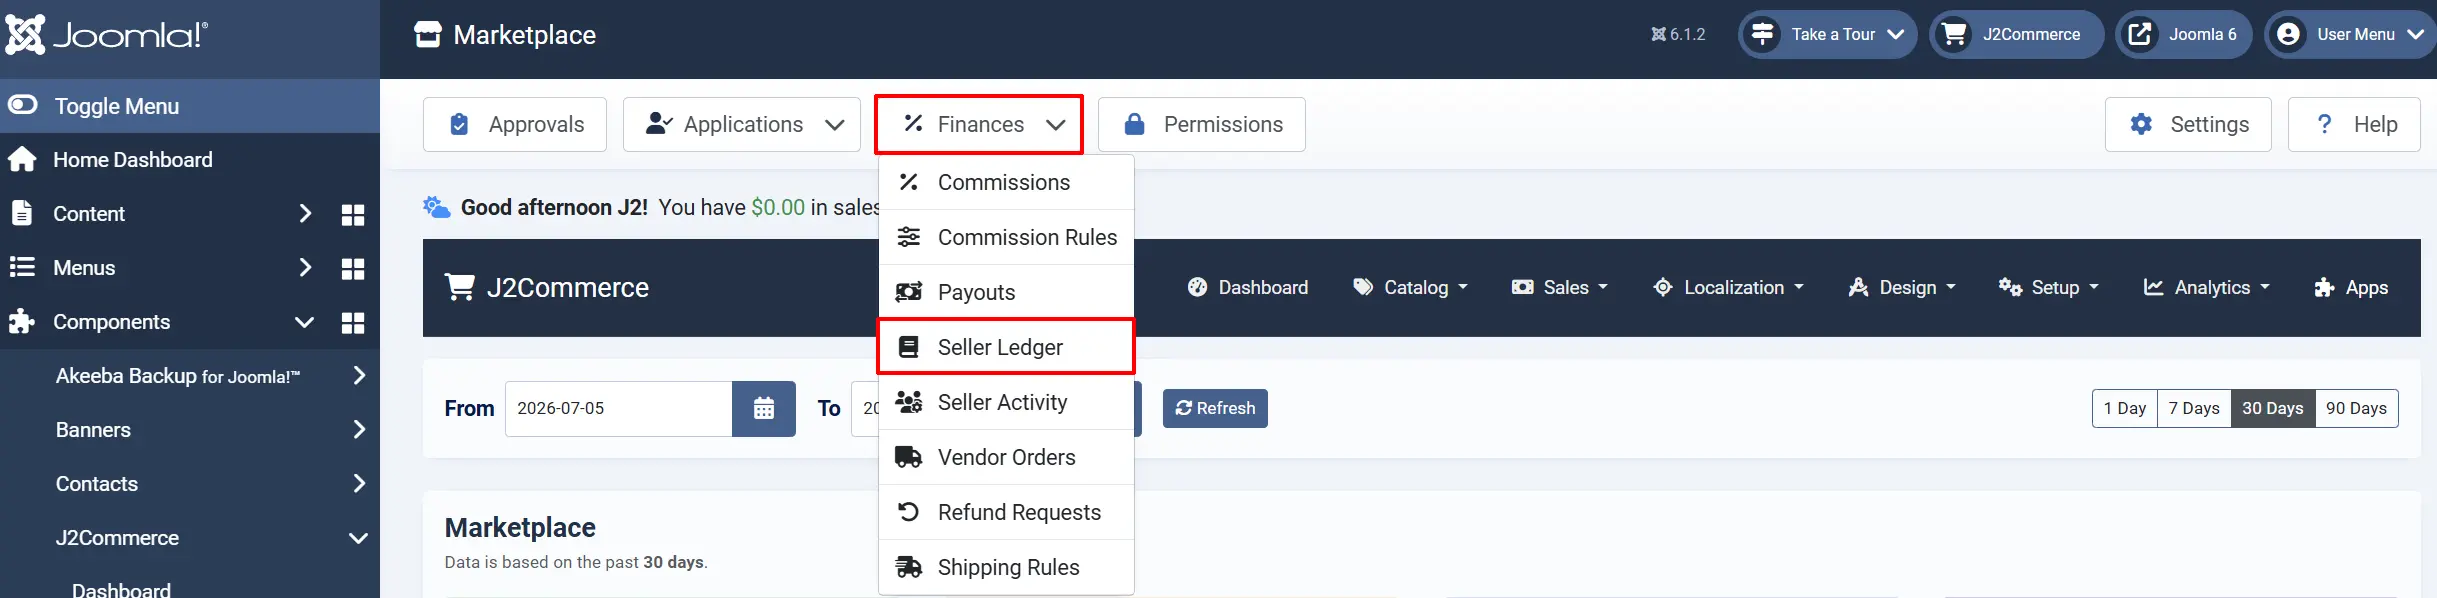
Every seller has a running ledger showing Commission Earned, Shipping Revenue, Voided commissions, Clawback Adjustments, and Payouts, plus a running Current Balance.
Sellers can filter their ledger by month and download a CSV statement from their dashboard's Ledger tab. You can view any seller's ledger — and add a manual credit or debit adjustment with a reason — at J2Commerce -> Catalog -> Marketplace -> Finances -> Seller Ledger.
If a seller's balance goes negative (for example, after a large refund), a warning shows the amount owed. It is deducted automatically from their future earnings rather than requiring an immediate payment.
Seller Activity
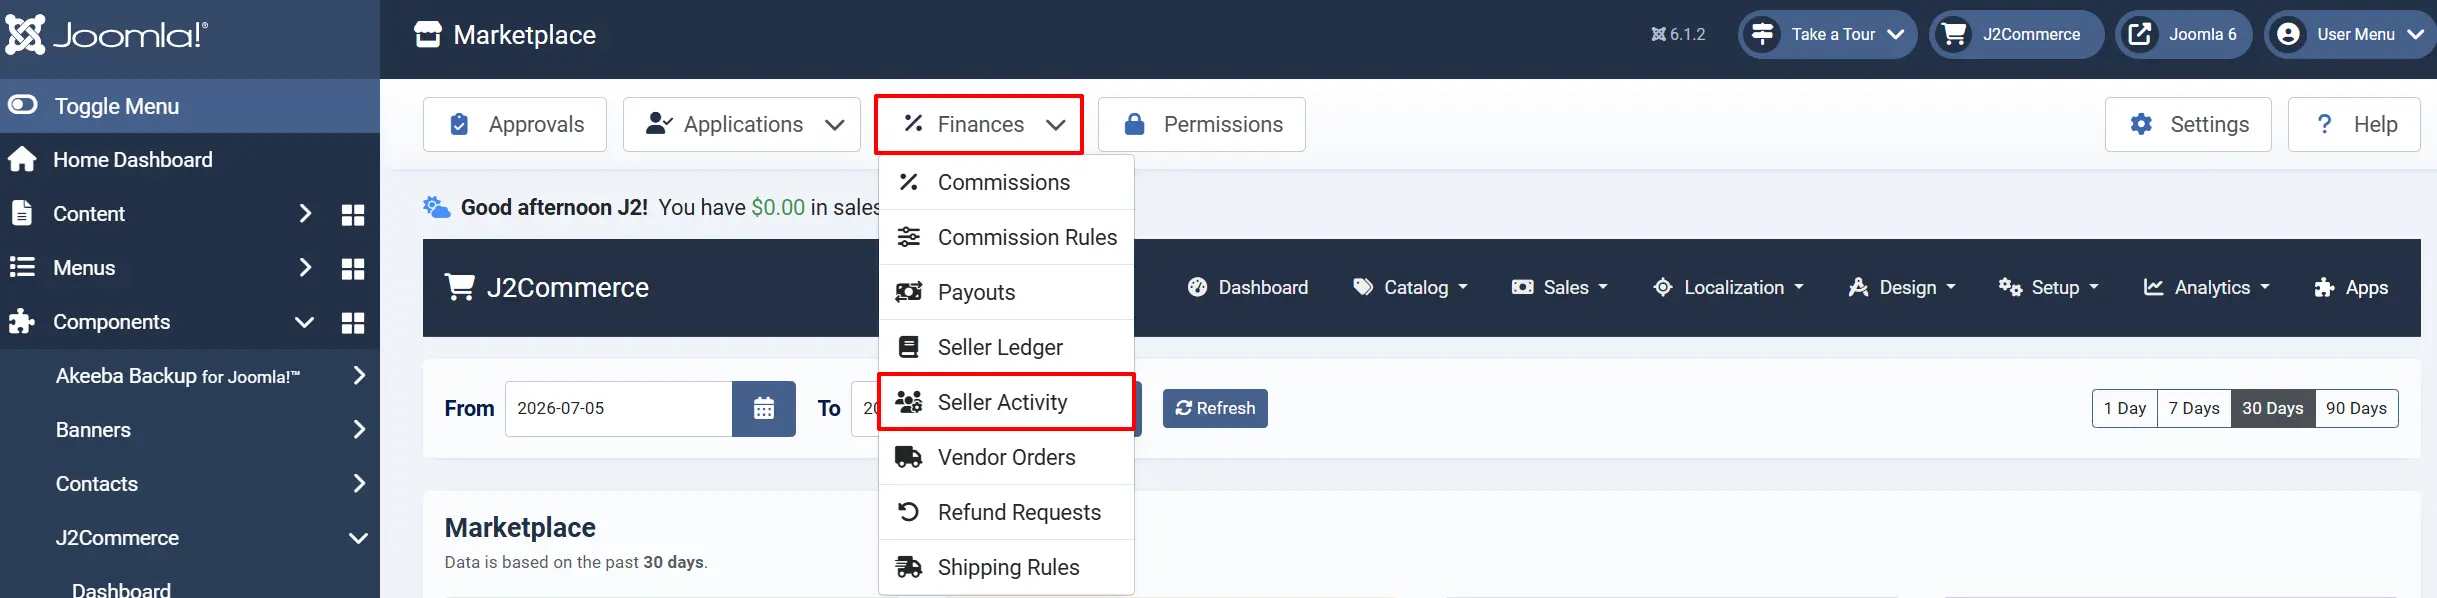
Go to J2Commerce -> Catalog -> Marketplace -> Finances -> Seller Activity for a combined, searchable feed of every commission and payout event across all sellers — useful for a quick oversight scan without opening each seller's ledger individually.
Announcements
Post updates that appear on every seller's dashboard from J2Commerce -> Catalog -> Marketplace -> Applications -> Announcements -> New.

Title / Message: The announcement text. Basic formatting (links, bold, lists) is allowed.
Audience: All Sellers, or a hand-picked list of specific sellers.
Email Sellers: When enabled, also sends the announcement by email to every targeted seller.
Publish Start / End Date: Optional window controlling when the announcement is visible.
Low Stock Alerts and Vacation Mode
Sellers receive an automatic email when one of their products' stock falls to or below its Low Stock Threshold (set per product, or the store default when left at 0).
From their Store Profile tab, sellers can turn on Vacation Mode to hide all of their products from the storefront temporarily. They can set an optional end date to have it turn off automatically, or turn it off manually at any time.
The Seller Dashboard
Once approved, a seller logs in and visits the Marketplace Dashboard menu page you created. The dashboard is organized into tabs:
| Tab | What it does |
|---|---|
| Sales | Key figures (gross sales, items sold, orders, pending commission) and a searchable, date-filterable order list. |
| Products | Add, edit, duplicate, or delete products, with pending/published/rejected/info-requested status badges. Includes bulk CSV import and export. |
| Orders | Fulfill sub-orders: set shipping status, tracking info, and print packing slips. |
| Shipping | Configure the seller's own shipping rules (only shown when Vendor Shipping is enabled). |
| Commissions | View commission history filtered by status and date. |
| Payouts | View payout history and request an early withdrawal against an approved balance. |
| Ledger | Full running ledger with monthly filtering and a downloadable statement. |
| Refunds | Submit and track refund requests on the seller's own orders. |
| Announcements | Read announcements posted by the store administrator. |
| Analytics | Product view counts over time and top-viewed products. |
| Payments | Connect a PayPal account for receiving payouts (see below). |
| Store Profile | Store name, slug, logo, description, about section, shipping/refund/return policies, and Vacation Mode. |
Connecting PayPal
On the Payments tab, a seller can connect a PayPal account for receiving payouts directly:
- Click Connect PayPal Account to open the onboarding window.
- Log in to a PayPal business account (or create one) and grant the requested permissions.
- Once approved, the account status updates on the Payments tab automatically and shows as Active.
The account card shows capability warnings (for example, "Payments not receivable" or "Email unconfirmed") if PayPal reports the account is not fully ready to receive funds.
Public-Facing Pages
Seller Store page — Displays the seller's logo, description, "member since" date, about section, store policies, and a paginated product grid.
Marketplace - Sellers page — Lists every approved seller as a browsable, searchable card grid.
Product page badge — When Show Seller on Product Page is enabled, shoppers see a "Sold by [seller name]" badge that links to the seller's store page.
Permissions
Go to J2Commerce -> Catalog -> Marketplace -> Permissions to control which user groups can perform each Marketplace action: applying to become a seller, managing a store, creating/editing/deleting products, and uploading logos or product images.
By default, the Registered user group is granted all of these actions, so any signed-in visitor can apply and, once approved, manage their store. Adjust the matrix here if you want to restrict any of these actions to a different group.
How It Works
- A visitor applies (or you create a seller directly), and the application is approved automatically or by an admin, depending on your Seller Sign-Up Mode and Auto Approve Applications settings.
- The approved seller adds products from their dashboard, which publish immediately or wait for your review depending on the product approval settings.
- A shopper buys products from one or more sellers in a single checkout; Marketplace splits the order into per-seller sub-orders behind the scenes.
- Once the order reaches a Commission Trigger Status, a commission record is created for each seller's share, using the applicable commission rule.
- Commissions accumulate in each seller's ledger until they are paid out — automatically on a schedule, once a threshold is met, or manually by you.
- Sellers fulfill their sub-orders, track shipments, and manage refunds and their store profile independently from their dashboard.
Tips
- Decide your commission model before you launch. Changing the global rate later is easy, but per-seller and per-product rules are meant for exceptions — set the global default correctly first.
- Start with Invitation Only sign-up while you're testing. Switch to Open once you're comfortable with your approval workflow.
- Turn on Auto-Approve Products for trusted sellers only. New or unknown sellers should go through manual review at least at first.
- Set your Commission Trigger and Void Statuses immediately after install. Commissions will not be recorded correctly with the wrong statuses selected.
- Review the Payout Gateway Status panel before your first payout run so you know exactly who can be paid electronically versus who needs a manual payment.
- Enable Vendor Shipping Rules only if you actually want per-seller shipping. Leaving it off keeps your existing store-wide shipping methods untouched.
Troubleshooting
Commissions Are Not Being Created After a Sale
Cause: The order's status does not match any of the configured Commission Trigger Statuses.
Solution:
- Go to J2Commerce -> Apps -> Marketplace and open the General Settings tab.
- Confirm Commission Trigger Statuses includes the status your paid orders reach (for example, Confirmed).
- Save, then check whether previously placed orders at that status now show commissions on the Commissions screen.
A Seller Cannot Apply / Sees a Permission Error
Cause: Seller Sign-Up Mode is set to Admin creates sellers only, or the applicant's user group is missing the Access Application permission.
Solution:
- Go to J2Commerce -> Apps -> Marketplace and check the Seller Sign-Up Mode setting on the General Settings tab.
- If it should be public, go to J2Commerce -> Catalog -> Marketplace -> Permissions and confirm Access Application is allowed for the applicant's user group (usually Registered).
No Extra Fields Appear on the Application Form
Cause: No custom fields have been assigned to the Marketplace Application display area.
Solution:
- Go to J2Commerce -> Checkout Fields, edit the field you want to show, and enable the Marketplace Application toggle.
- Return to J2Commerce -> Catalog -> Marketplace -> Application Fields to confirm the field now appears and set whether it is required.
Payout Button Is Disabled or No Payout Methods Are Listed
Cause: No payout gateway plugin is installed, so only Manual / Check is available.
Solution:
- Go to J2Commerce -> Catalog -> Marketplace -> Finances -> Payout Methods.
- Install a payout gateway plugin (for example, PayPal Payouts or Stripe Connect) from the J2Commerce Extensions Store, then enable it here.
- Assign a payout method to the seller from Approved Sellers -> [Seller] -> Payout Settings.
Duplicate Commission or Routing Warnings After Install
Cause: The legacy Vendor Marketplace plugin (app_vendormarketplace) is enabled alongside Marketplace.
Solution: Go to System -> Manage -> Plugins, search for the legacy plugin, and disable it. Only one marketplace plugin should be active at a time.
A Seller's Product Stays "Pending" Indefinitely
Cause: Default Product Approval is set to Manual and no admin has reviewed it yet, or Re-validate Products on Edit reset a previously approved product back to Pending.
Solution:
- Go to J2Commerce -> Catalog -> Marketplace -> Approvals and review the pending item.
- If this happens often for a trusted seller, consider enabling Auto-Approve Products for that seller individually on their Approved Sellers profile.