PrintNode for J2Commerce
PrintNode connects your J2Commerce store to a cloud printing service that can send invoice PDFs directly to a physical printer the moment an order reaches a status you choose — no one needs to be sitting at a computer to click Print. The PrintNode client runs quietly in the background on any machine near your printer and picks up jobs automatically.
This plugin is a separate add-on available from the J2Commerce Extensions Store. It is not included with the core J2Commerce 6 component.
Prerequisites
Before installing, confirm you have all of the following in place:
- A PrintNode account (free tier covers most small stores)
- The PrintNode client application installed and running on a computer that has access to your printer
- A physical printer added and visible inside your PrintNode account dashboard
- The Dompdf library installed on your Joomla site (required for PDF generation — see Invoice Settings for a built-in status check)
- J2Commerce 6 installed and working
PrintNode works on all major brands of printers and scales, including:

Creating a PrintNode Account
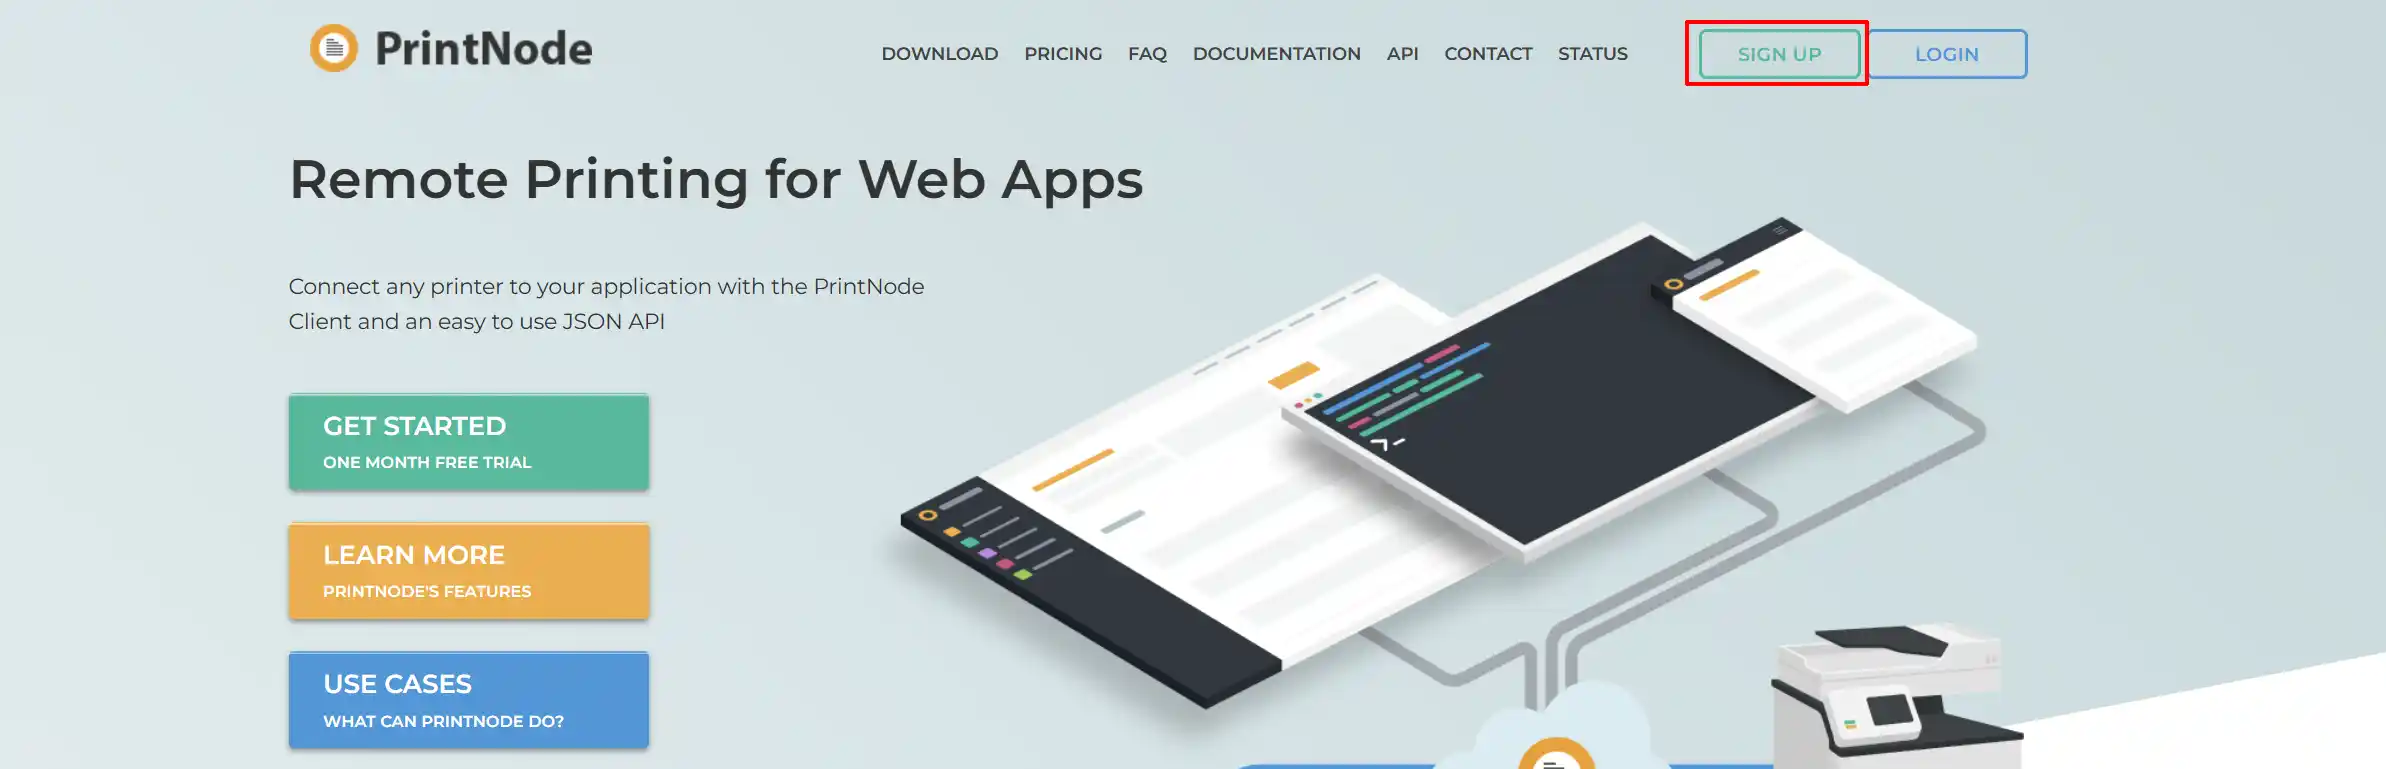
Sign-up tab
Go to Printnode.com and create an account by clicking Sign-up
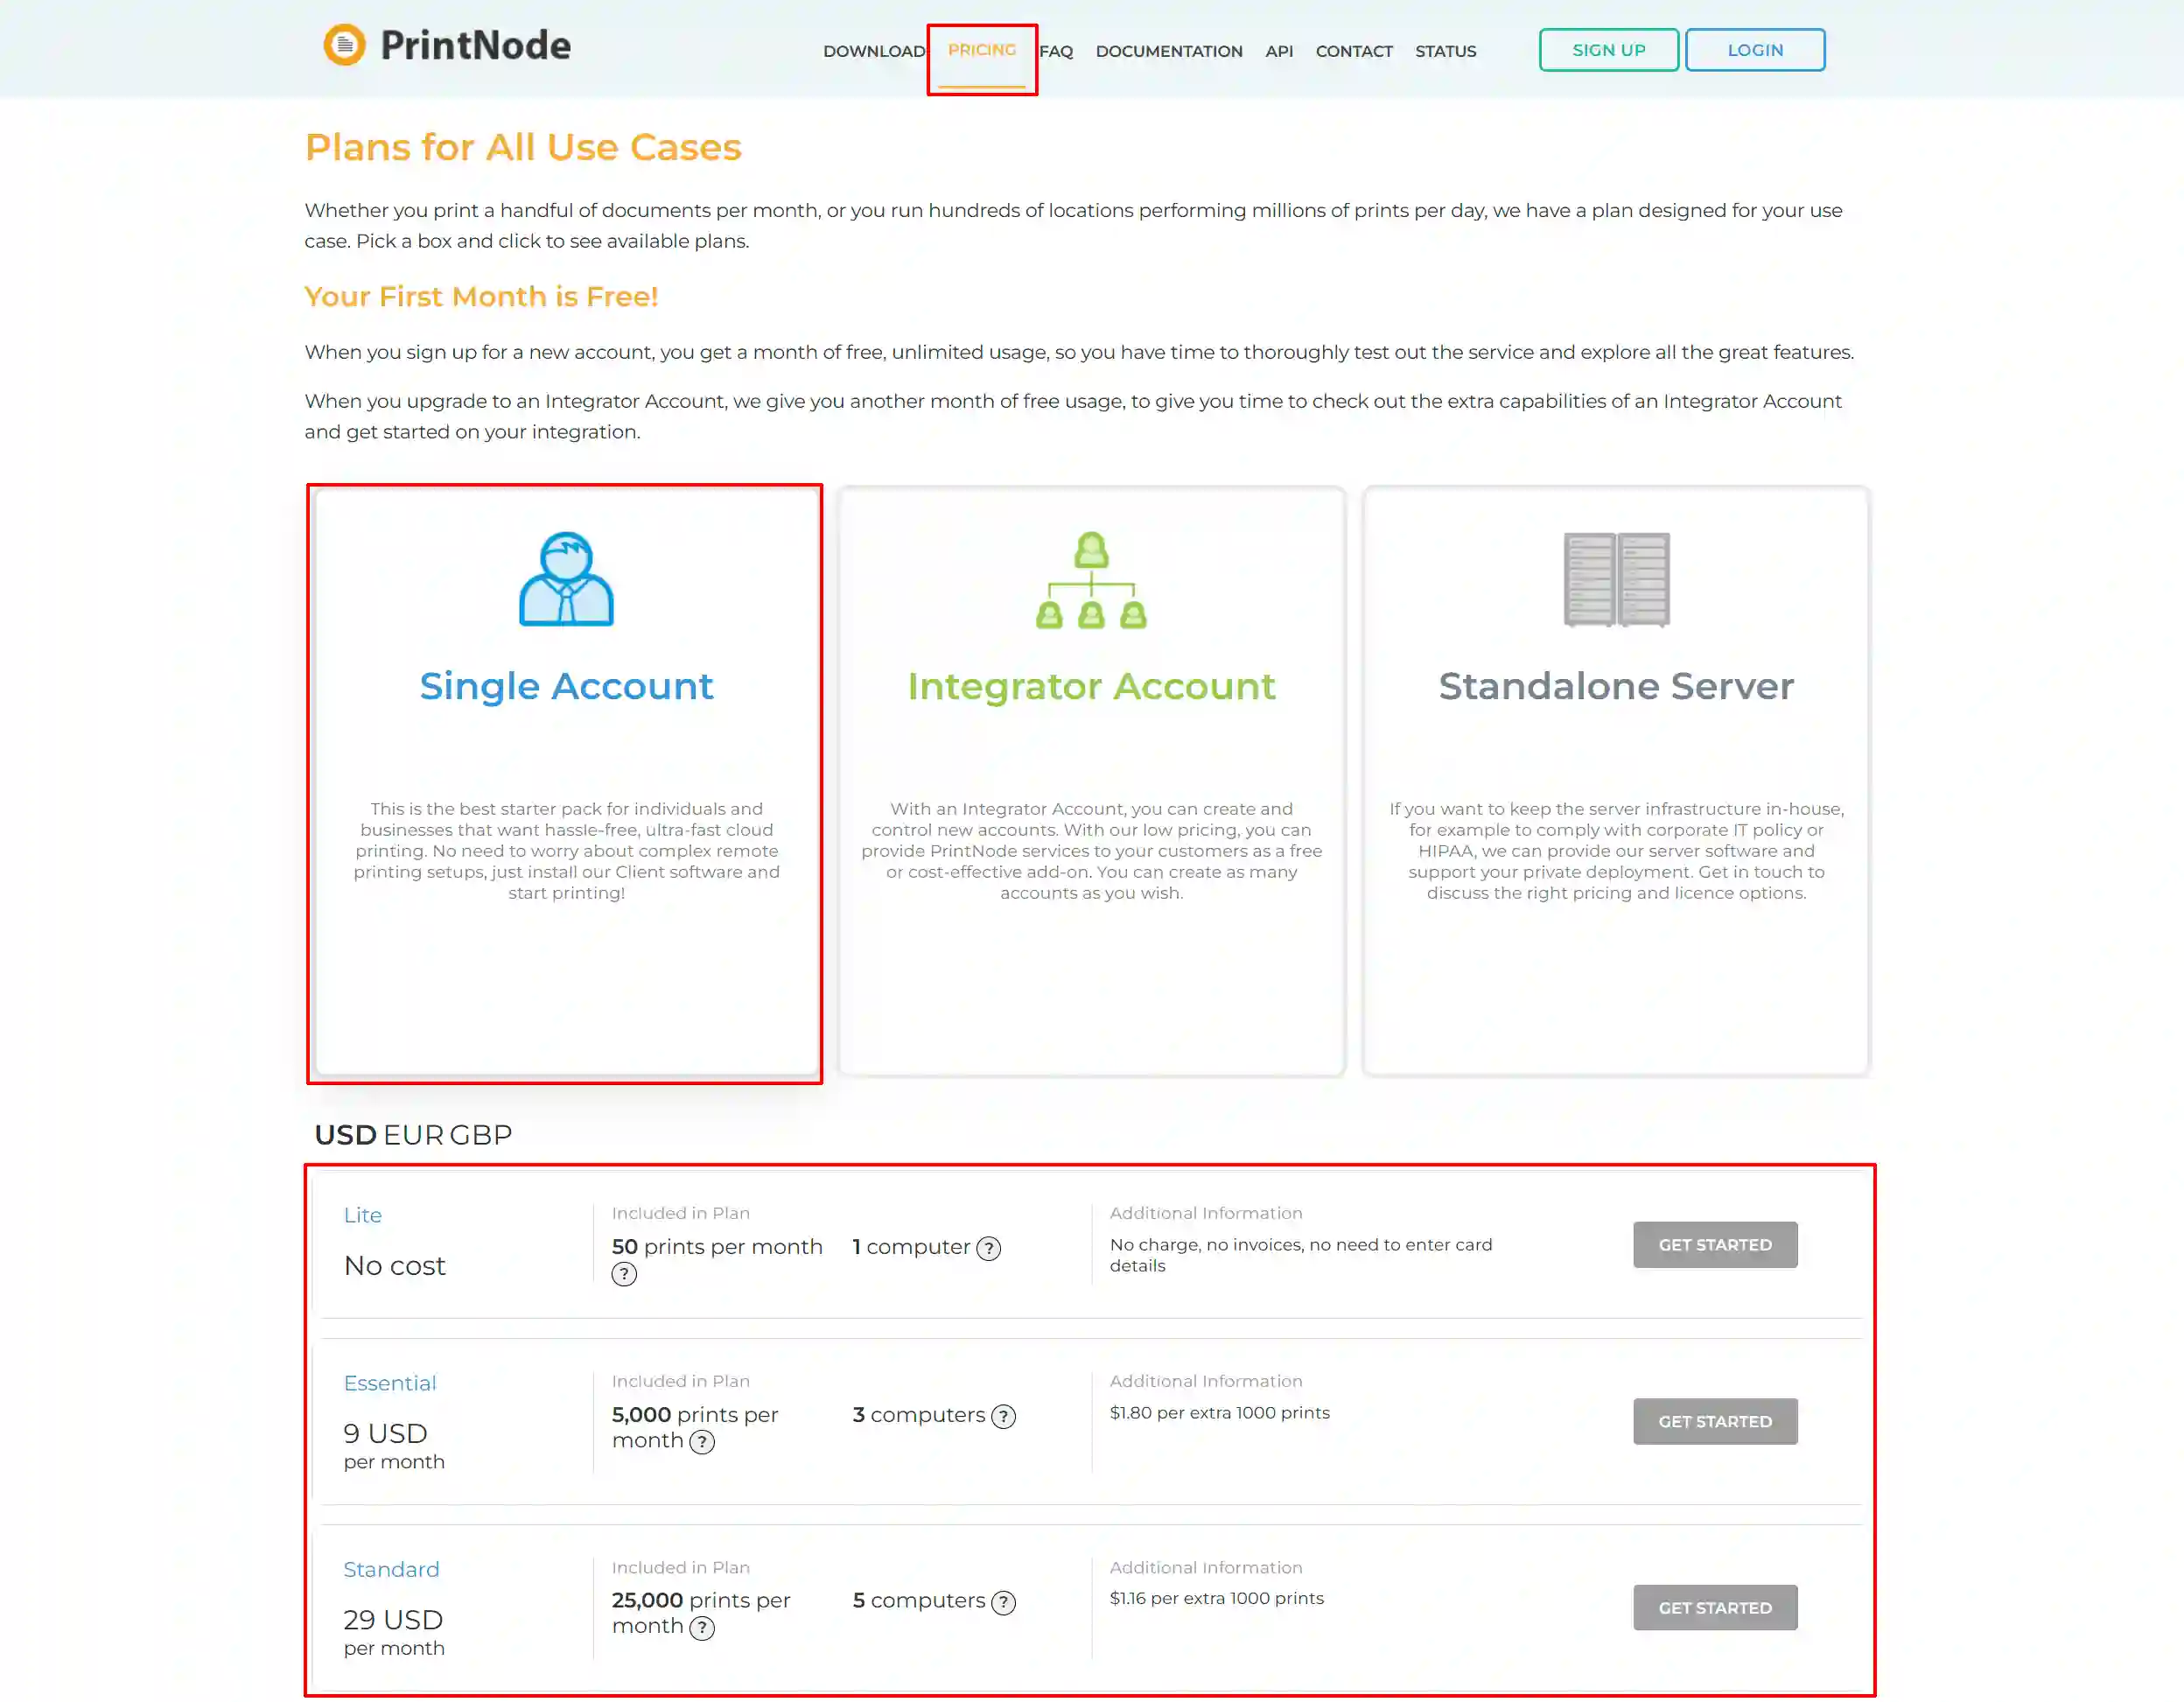
Pricing tab
-
Click on the Pricing tab
-
Choose what type of account you want. ie: Single, Integrator, Standalone
-
Choose the appropriate plan for your business.
Example: If you choose the 5,000 prints and have multiple departments using the same account, the 5,000 prints will be shared between the different computers.
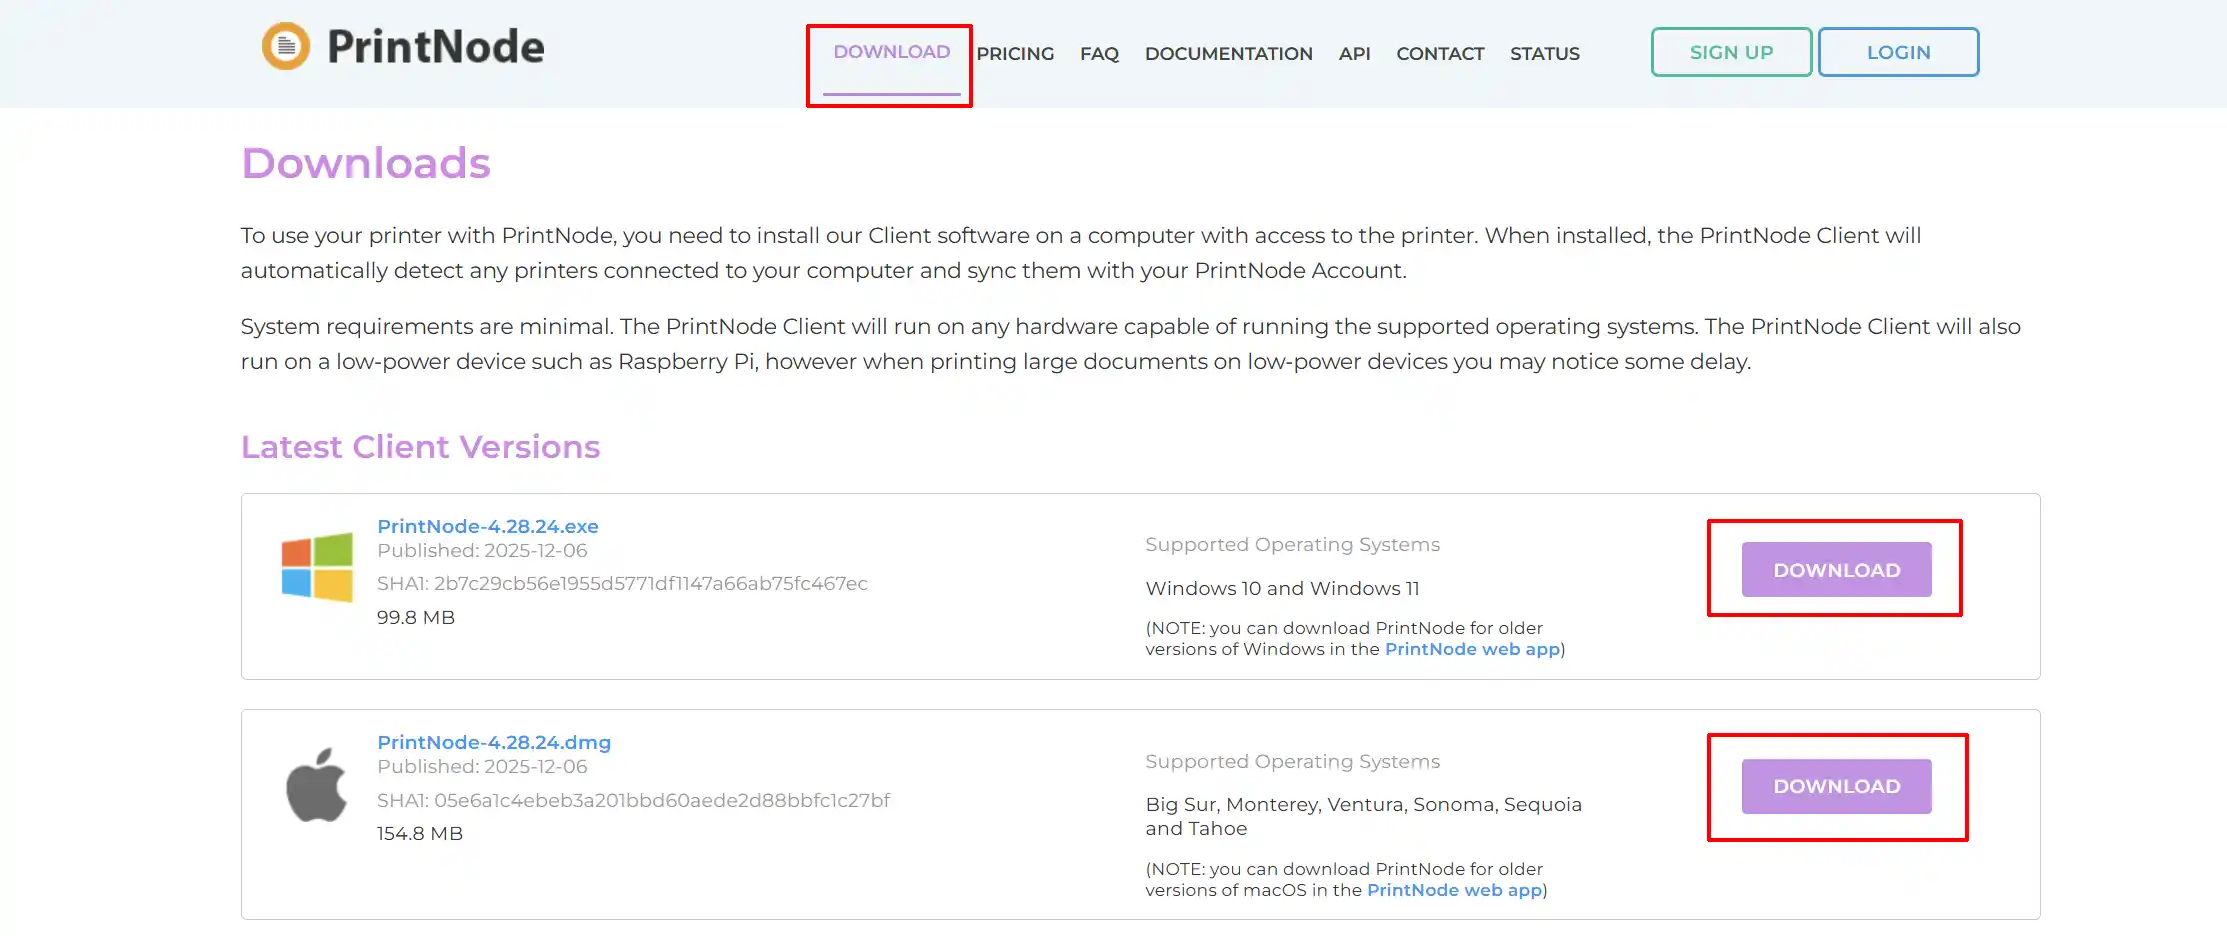
Download tab
Download the printer that will work with the type of computer you have. ie: PC/Mac
Install the Printer
Once you have downloaded the printer, double-click on it to start the installation. When it gets to the page shown below, select Create a desktop Shortcut. This will come in handy if your computer shuts down and you need to easily turn on the printer again.

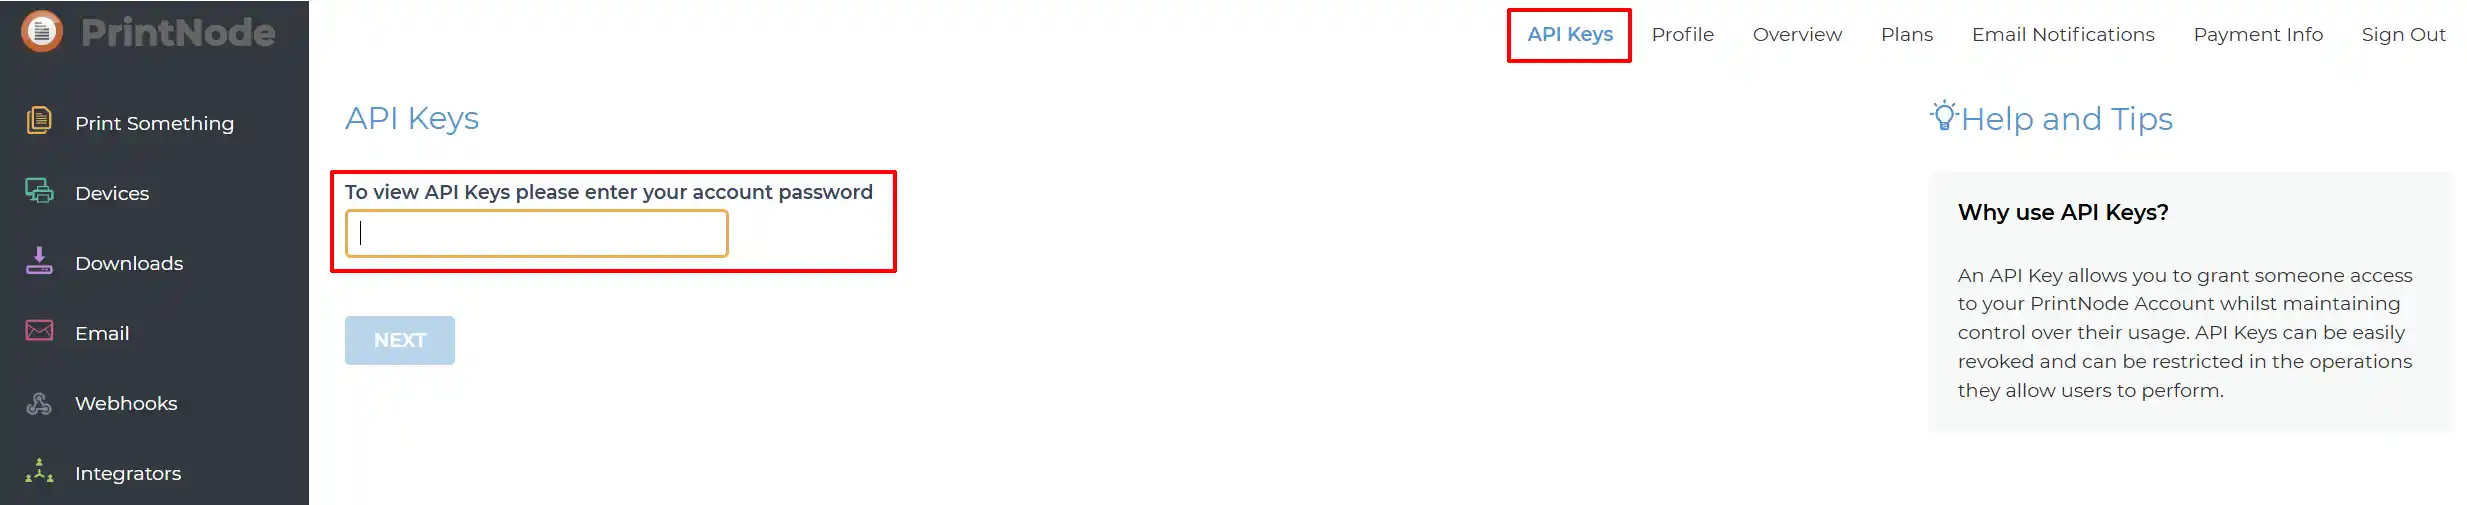
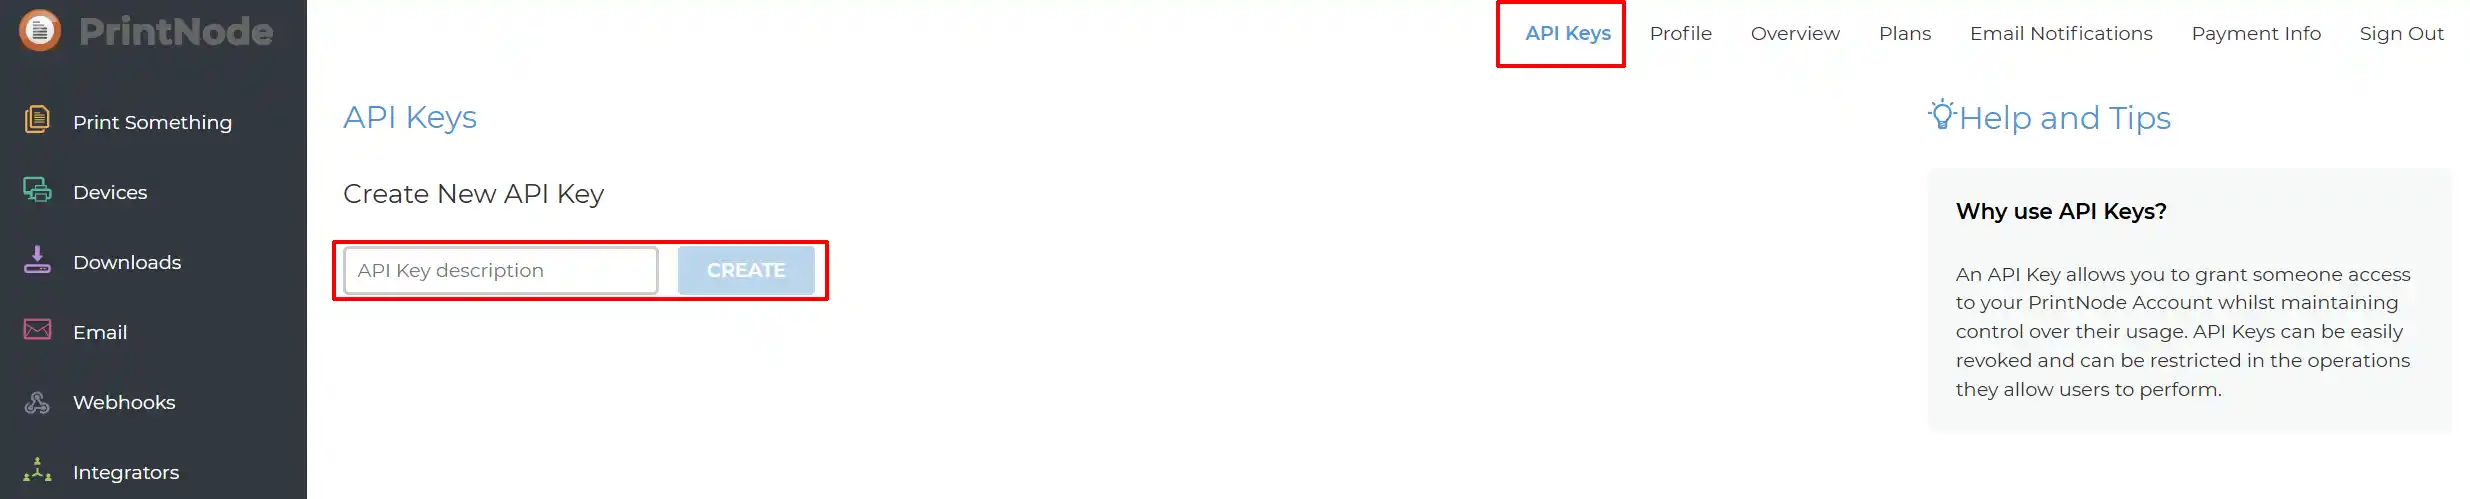
API Key tab
Step 1: Enter your PrintNode Password to open the API Key page
Step 2: Name your 'API Key Description', then select Create
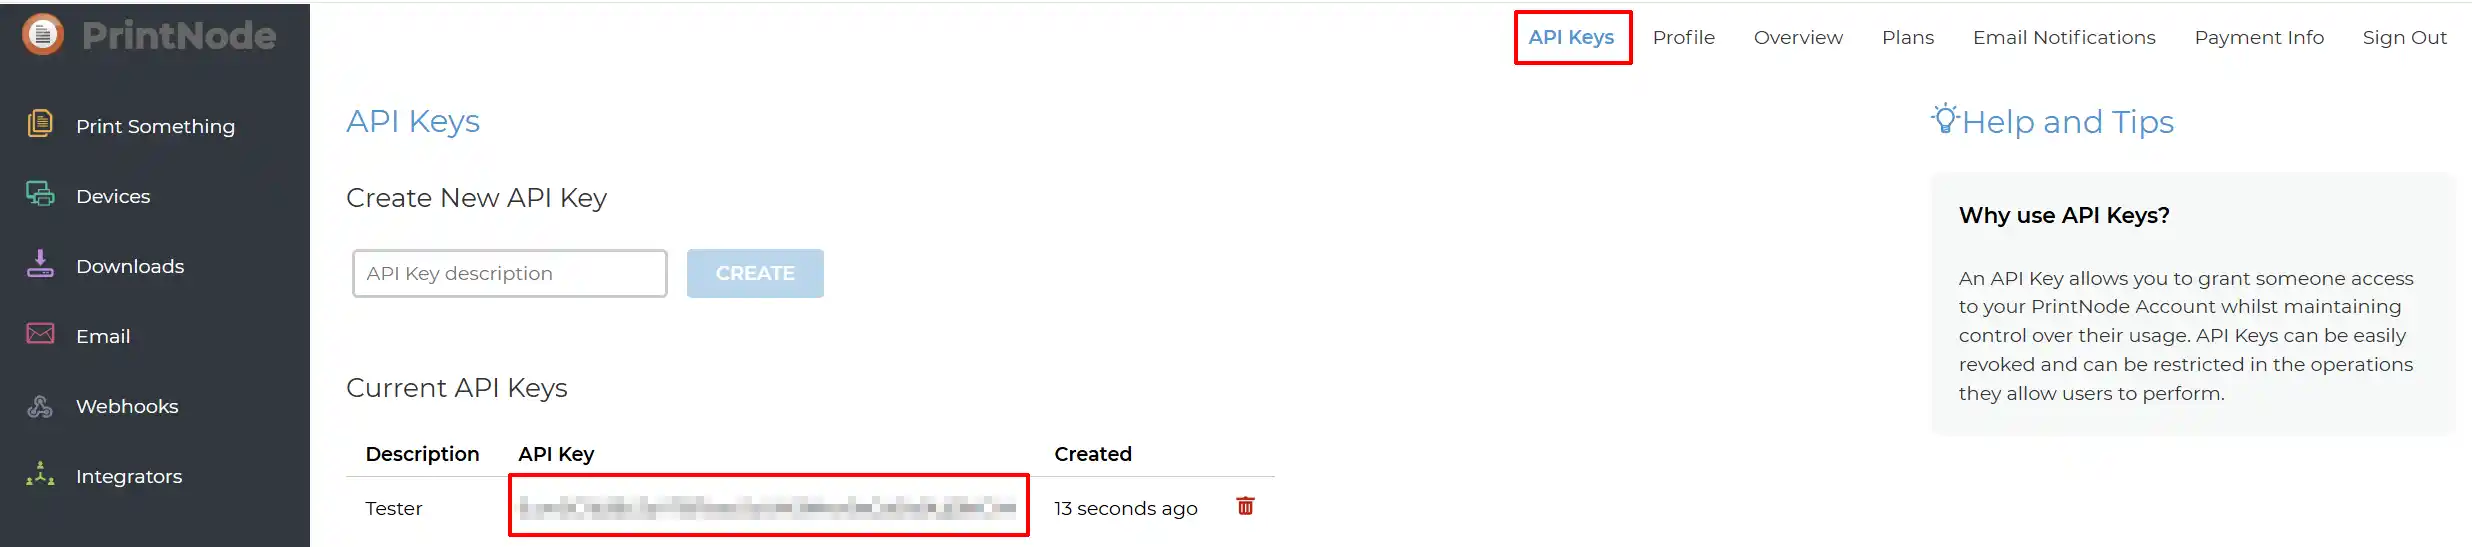
Step 3: Your new API Key will appear below. This is the API Key you will need when setting up the configuration in the App on your website.
Purchase and Download
This plugin is a separate add-on and must be purchased and downloaded from the J2Commerce website.
Step 1: Go to our J2Commerce website -> Apps
Step 2: Locate the Print Node App -> click View Details -> Add to cart -> Checkout.
Step 3: Go to your My Downloads under your profile button at the top right corner and search for the app. Click Available Versions -> View Files -> Download
Install the App
You can install PrintNode using the Joomla installer. The following steps help you with a successful installation.
In the Joomla admin, go to System -> Install -> Extensions
Upload the plugin app_printnode.zip package file or use the Install from URL option.
 (1)-a6689f12b23b8e992f5c2a169737672f.webp)
Enable the App
Once you have installed the App, you will need to enable it. There are two ways you can access the App.
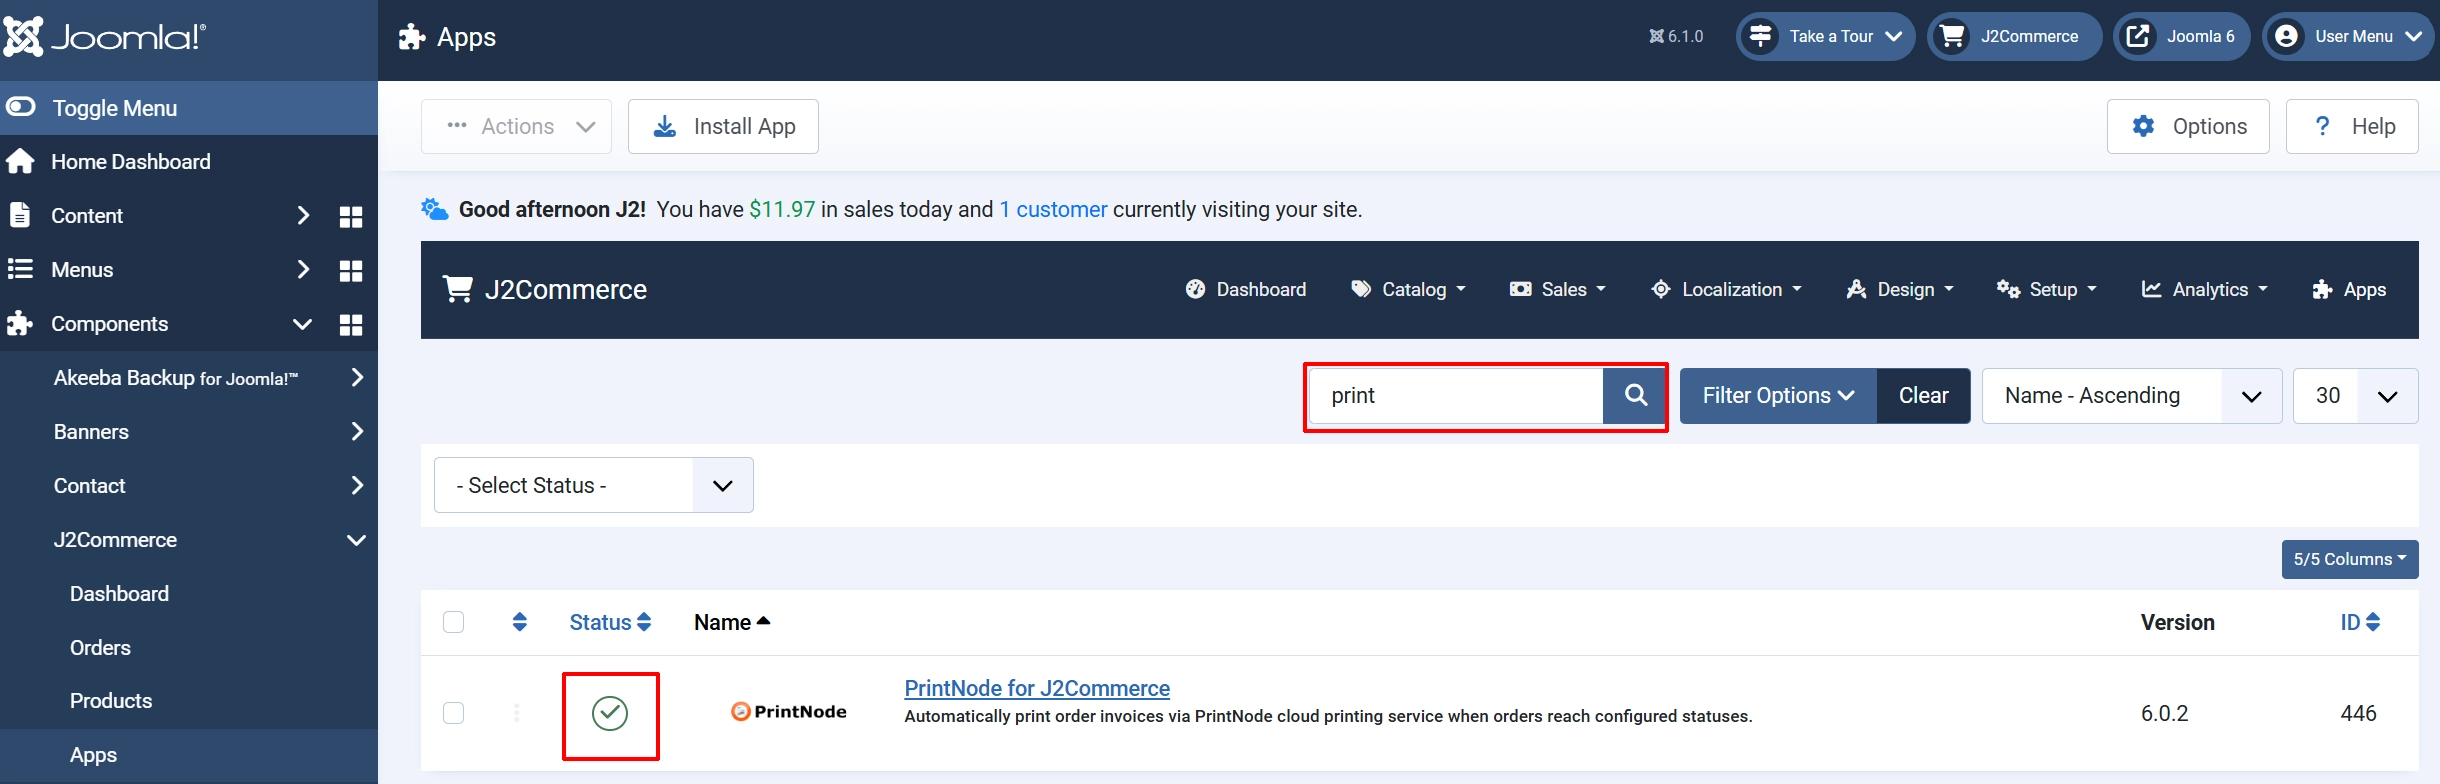
Option A: Go to the J2Commerce icon at the top right corner -> Apps
Option B: Go to Components on the left sidebar -> J2Commerce -> Apps

To help you narrow down the list, you can do a search for PrintNode, click the X, and it will turn into a green checkmark. It is now enabled and ready for setup.
Configure the App
Click on the Printnode title to open the app and start configuring it.
Click the Toggle Inline Help button at the top of any app to show a description below each field.

Enter the API Key and Test the Connection
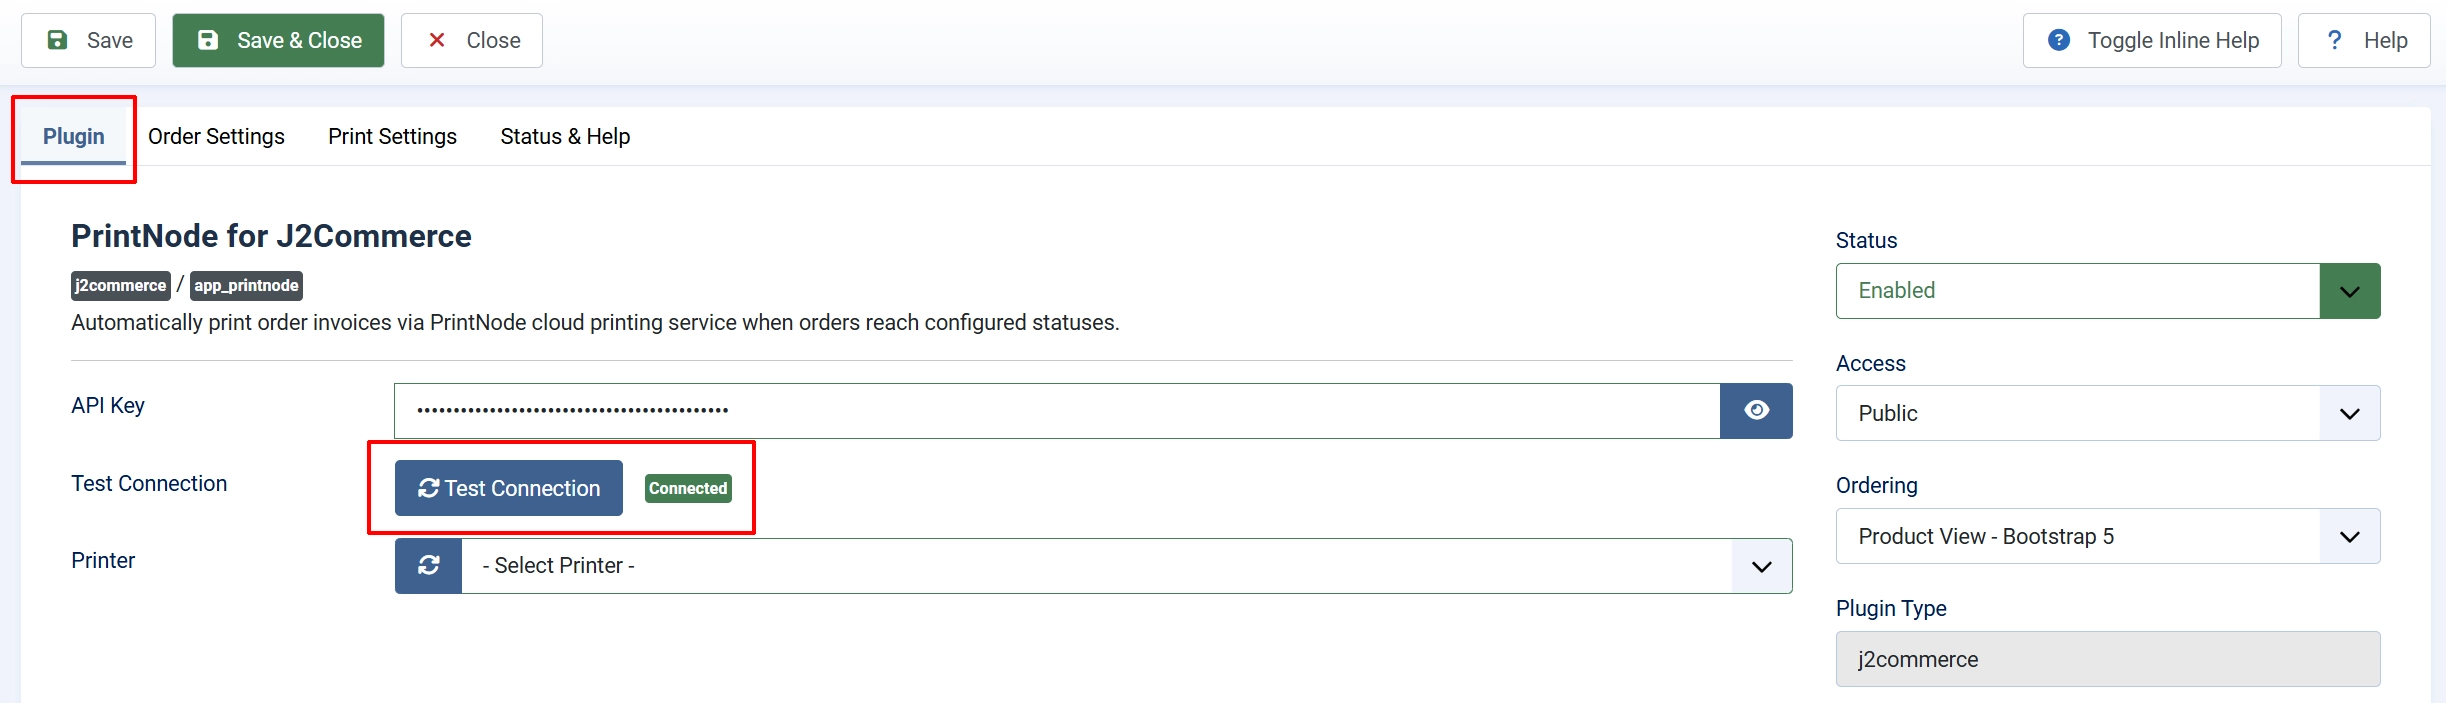
API Key: Your PrintNode API key. Keep this private. It's located on the PrinNode website
After saving, return to the plugin settings. The Test Connection button is now active — click it.
Test Connection: Button that verifies the API key is valid and returns the connected account email.
A result appears below the button. A successful connection shows the email address of your PrintNode account. If it shows "Connection error", double-check the key and verify your server has cURL enabled.
Printer: Dropdown of printers registered to your PrintNode account. Refresh to load the latest list.
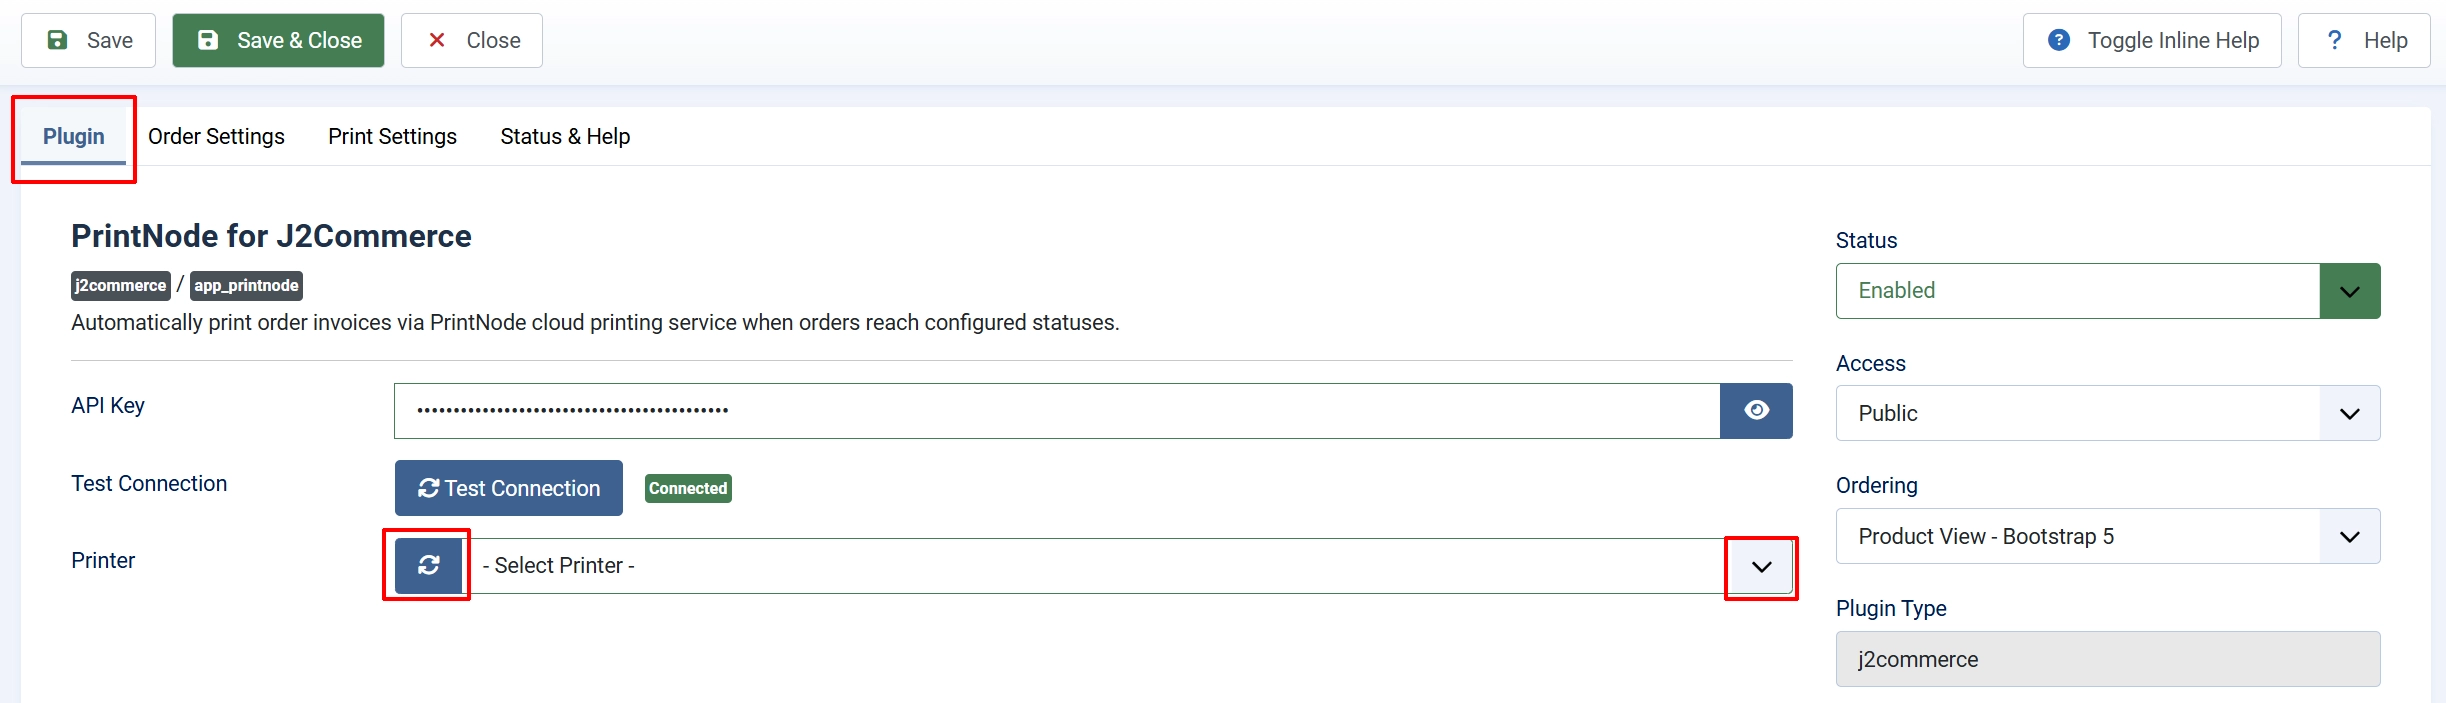
- Still on the Basic Settings tab, click the Refresh icon next to the Printer field.
- The dropdown populates with printers registered to your PrintNode account. Each printer shows its name and whether it is currently online or offline.
- Select the printer that should receive invoice print jobs.
- Click Save.
If no printers appear, see Troubleshooting. It's most likely that you haven't downloaded the printers from the PrintNode website.
Order Settings tab
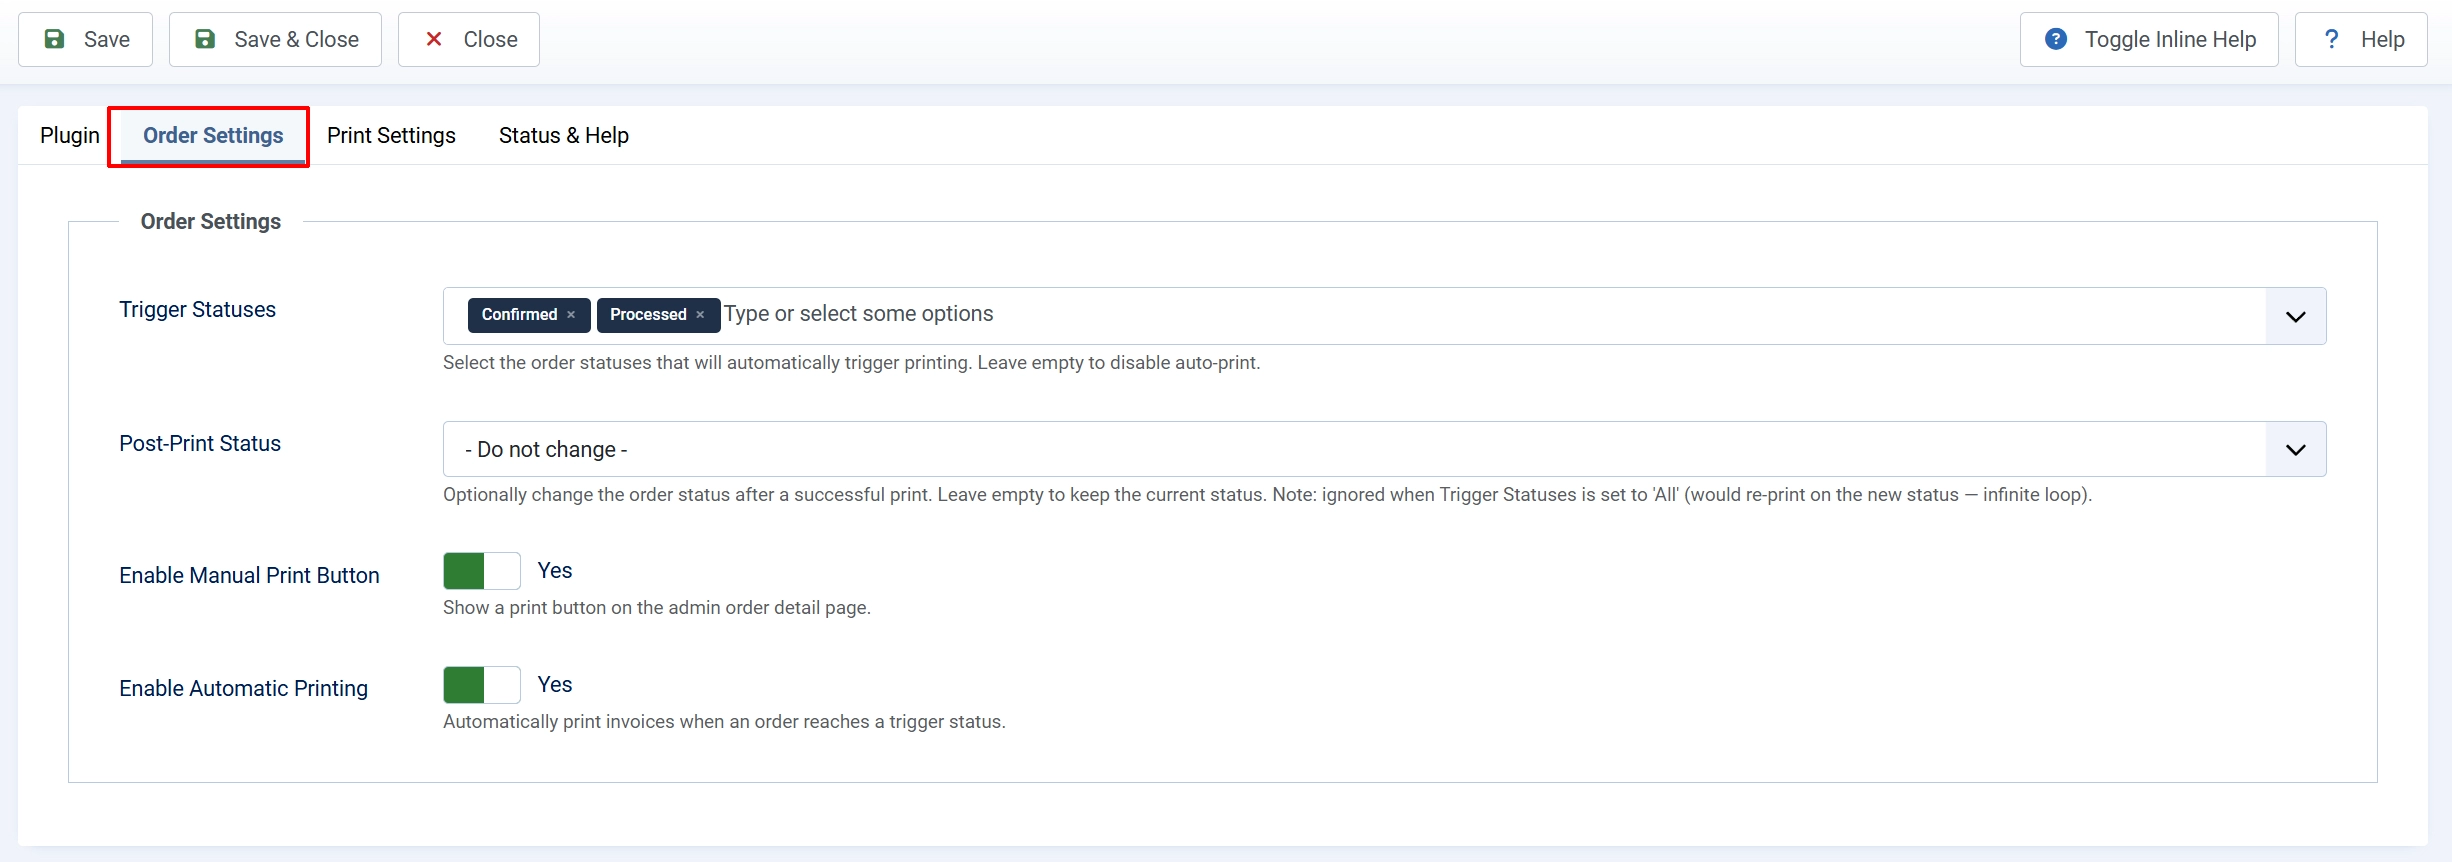
Trigger Statuses: In the Trigger Statuses field, select one or more order statuses that should automatically trigger printing. Hold Ctrl (or Cmd on Mac) to select multiple. Common choices are "Confirmed" or "Paid".
Post-Print Status (Optional): The Post-Print Status field lets you automatically move the order to a different status after a successful print — for example, moving it from "Confirmed" to "Ready to Ship" so your team knows the invoice has been printed.
Leave this field set to — Do not change — if you do not need automatic status transitions.
Important: The post-print status must not match any of your trigger statuses. If it did, every print would trigger another print, creating an infinite loop. The plugin detects this and skips the status change automatically, but it is better to configure the statuses correctly so the intended workflow runs as expected.
**Enable Manual Print Button:**Show the Print Invoice button on the admin order detail page.
Enable Automatic Printing: Leave Enable Automatic Printing set to Yes if you want printing to happen without any manual action.
Print Settings tab
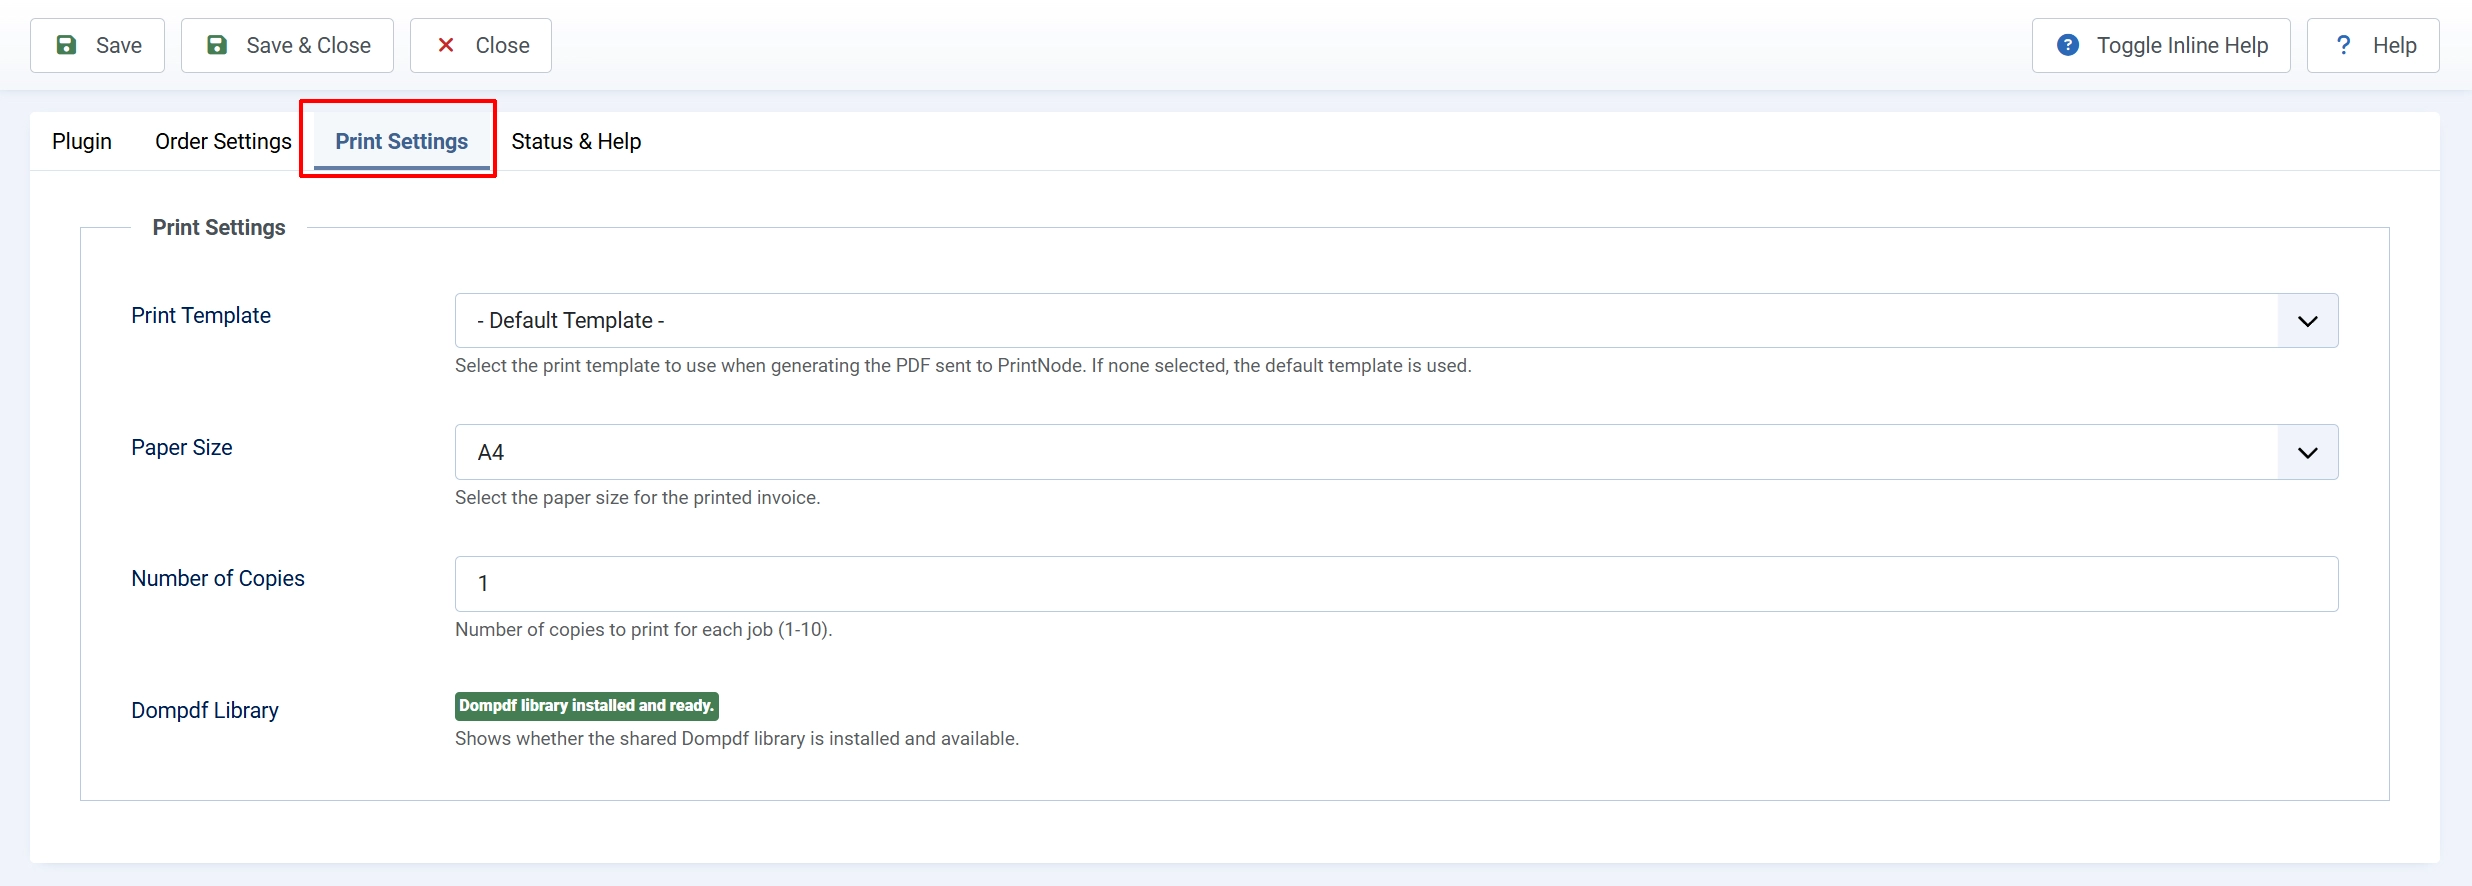
Invoice Template: Invoice template to use for the printed PDF. Leave empty for the default template. If you want to create a new Invoice template and need help, visit https://docs.j2commerce.com/v6/design/invoice-templates
Paper Size: Paper size for printed invoices. Options: A4, Letter, Legal, A5.
Number of Copies: How many copies to print per job (1–10).
Dompdf Library: Read-only status indicator showing whether the Dompdf library is installed. Check the Dompdf Library status indicator. It should show "Dompdf library installed and ready." If it shows a warning, install the Dompdf library before proceeding.
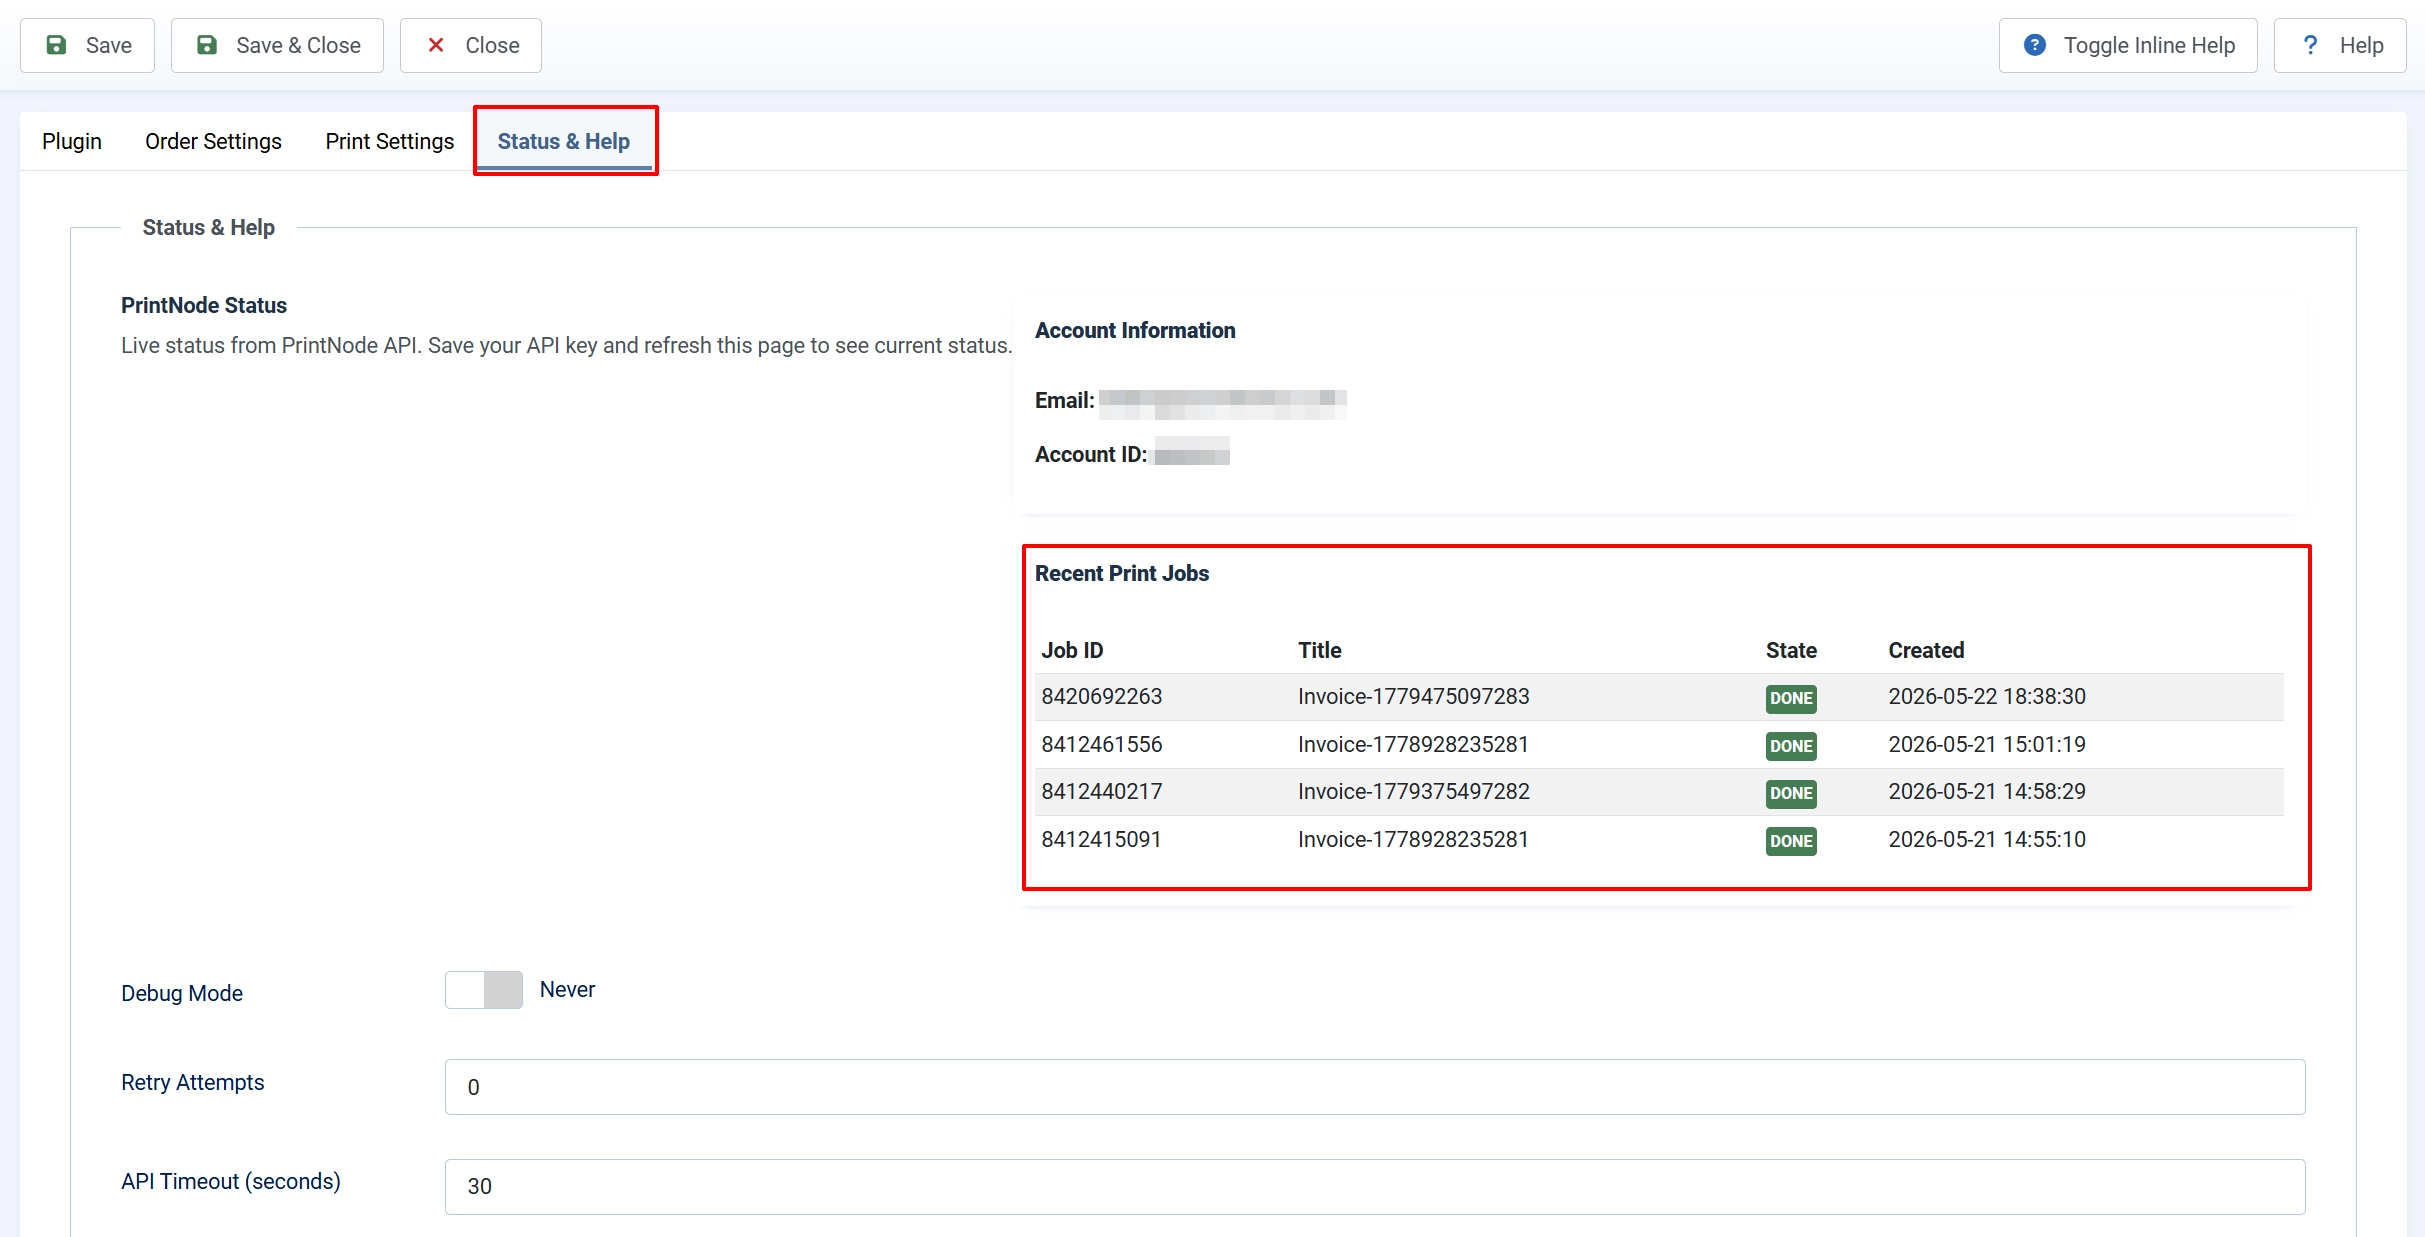
Status and Help Tab
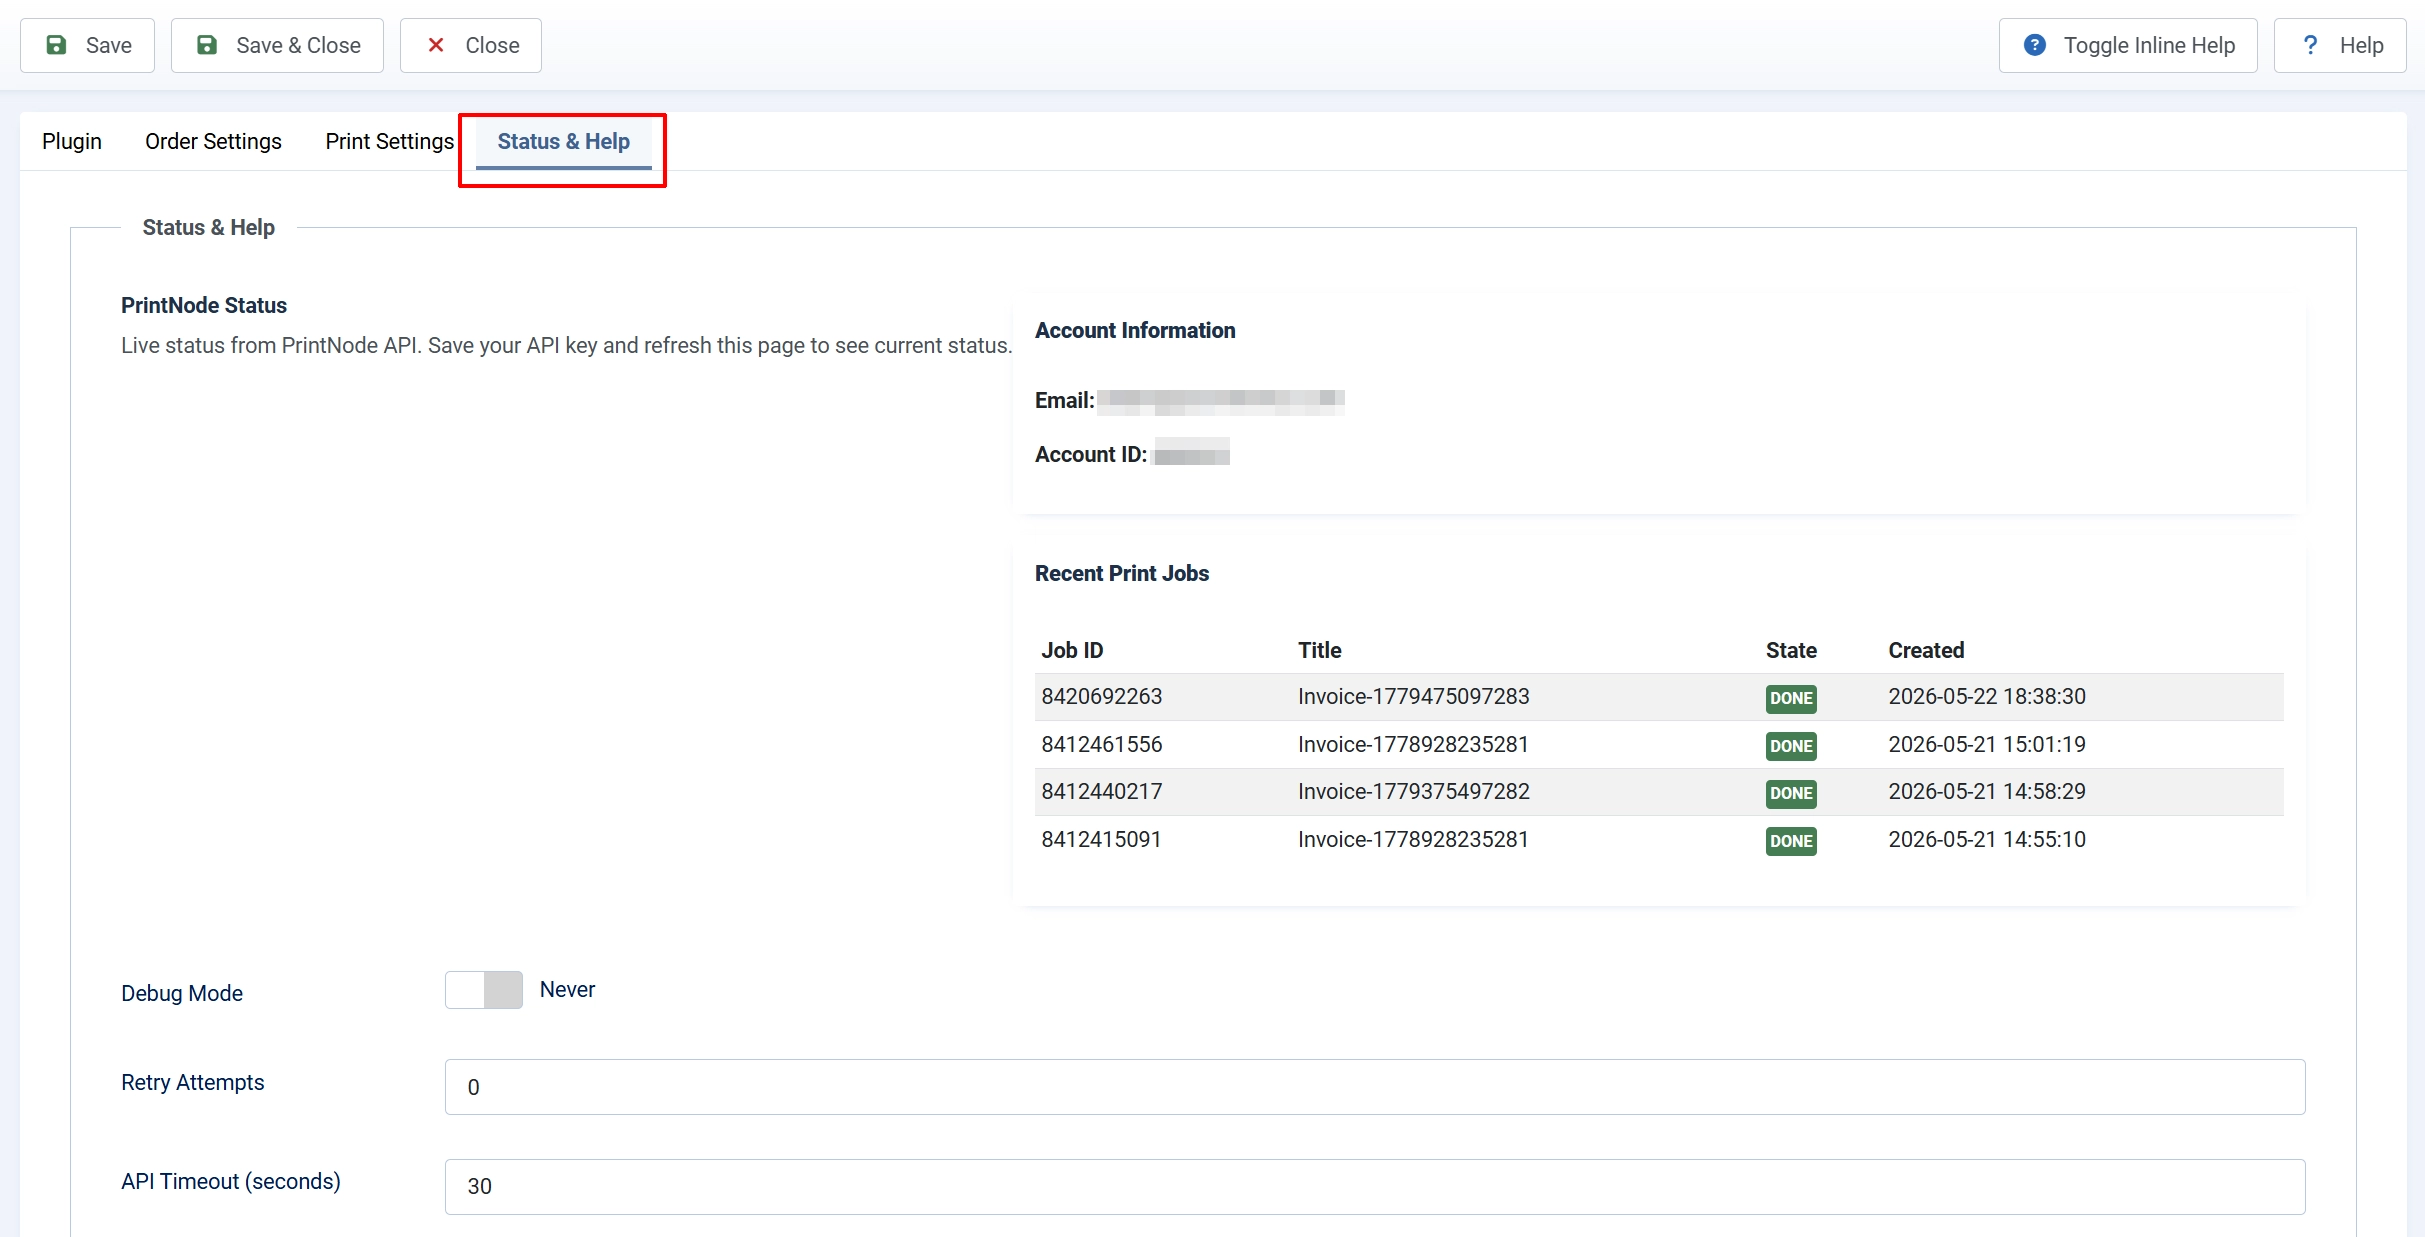
The Status and Help tab shows a live panel pulled from the PrintNode API. It displays:
- Your PrintNode account email and account ID
- The name, ID, and current state (online/offline) of the selected printer
- The state of the computer running the PrintNode client
- A table of recent print jobs with job ID, title, state, and creation time
Save your API key and refresh the page to see current data in this panel.
Debug Mode: Write detailed log entries to administrator/logs/app_printnode.php. Disable in production.
Retry Attempts: How many times to retry a failed print job (0–5). Retries use exponential backoff.
API Timeout (seconds): Timeout for PrintNode API requests (5–60 seconds).
How Automatic Printing Works
When an order status changes in J2Commerce, the plugin checks whether the new status matches any of your configured trigger statuses. If there is a match, the plugin:
- Generates an invoice PDF using the J2Commerce invoice system and the Dompdf library.
- Encodes the PDF and submits it to the PrintNode API via a secure HTTPS request.
- PrintNode queues the job and sends it to the PrintNode client running on your computer.
- The PrintNode client delivers the job to the physical printer.
- If a post-print status is configured, the order status is updated after the print job is submitted successfully.
A record of each print attempt — whether successful or failed — is added to the order history log so you have a complete audit trail.
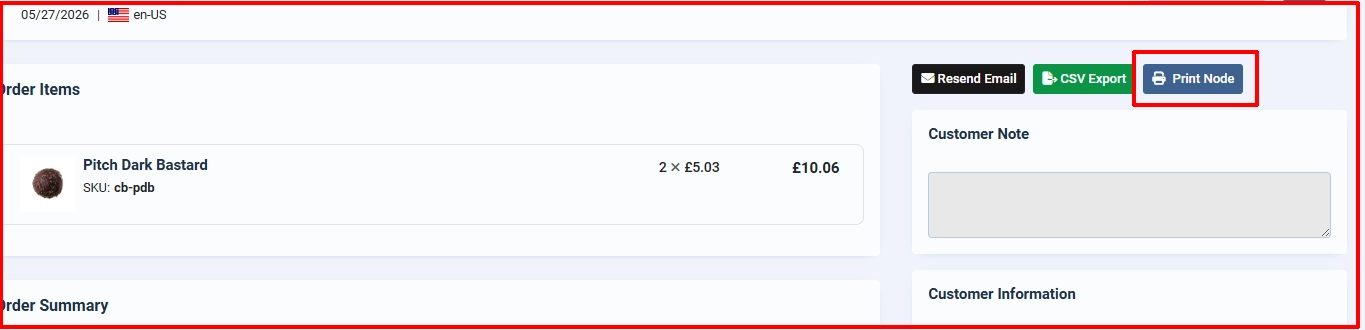
Manual Printing
If you want to print a single invoice on demand rather than waiting for a status change:
- In Joomla admin, go to J2Commerce -> Orders and open any order.
- At the top of the order detail page, a PrintNode button is displayed (only when Enable Manual Print Button is set to Yes in plugin settings).
- Click PrintNode.
- A confirmation prompt appears. Click OK to submit the print job.
- A status message confirms the job was submitted, including the PrintNode job ID.
The order history is updated with the username of the admin who requested the print.
Creating Invoice Templates
To create an invoice template, go to J2Commerce > Design > Invoice Template > New
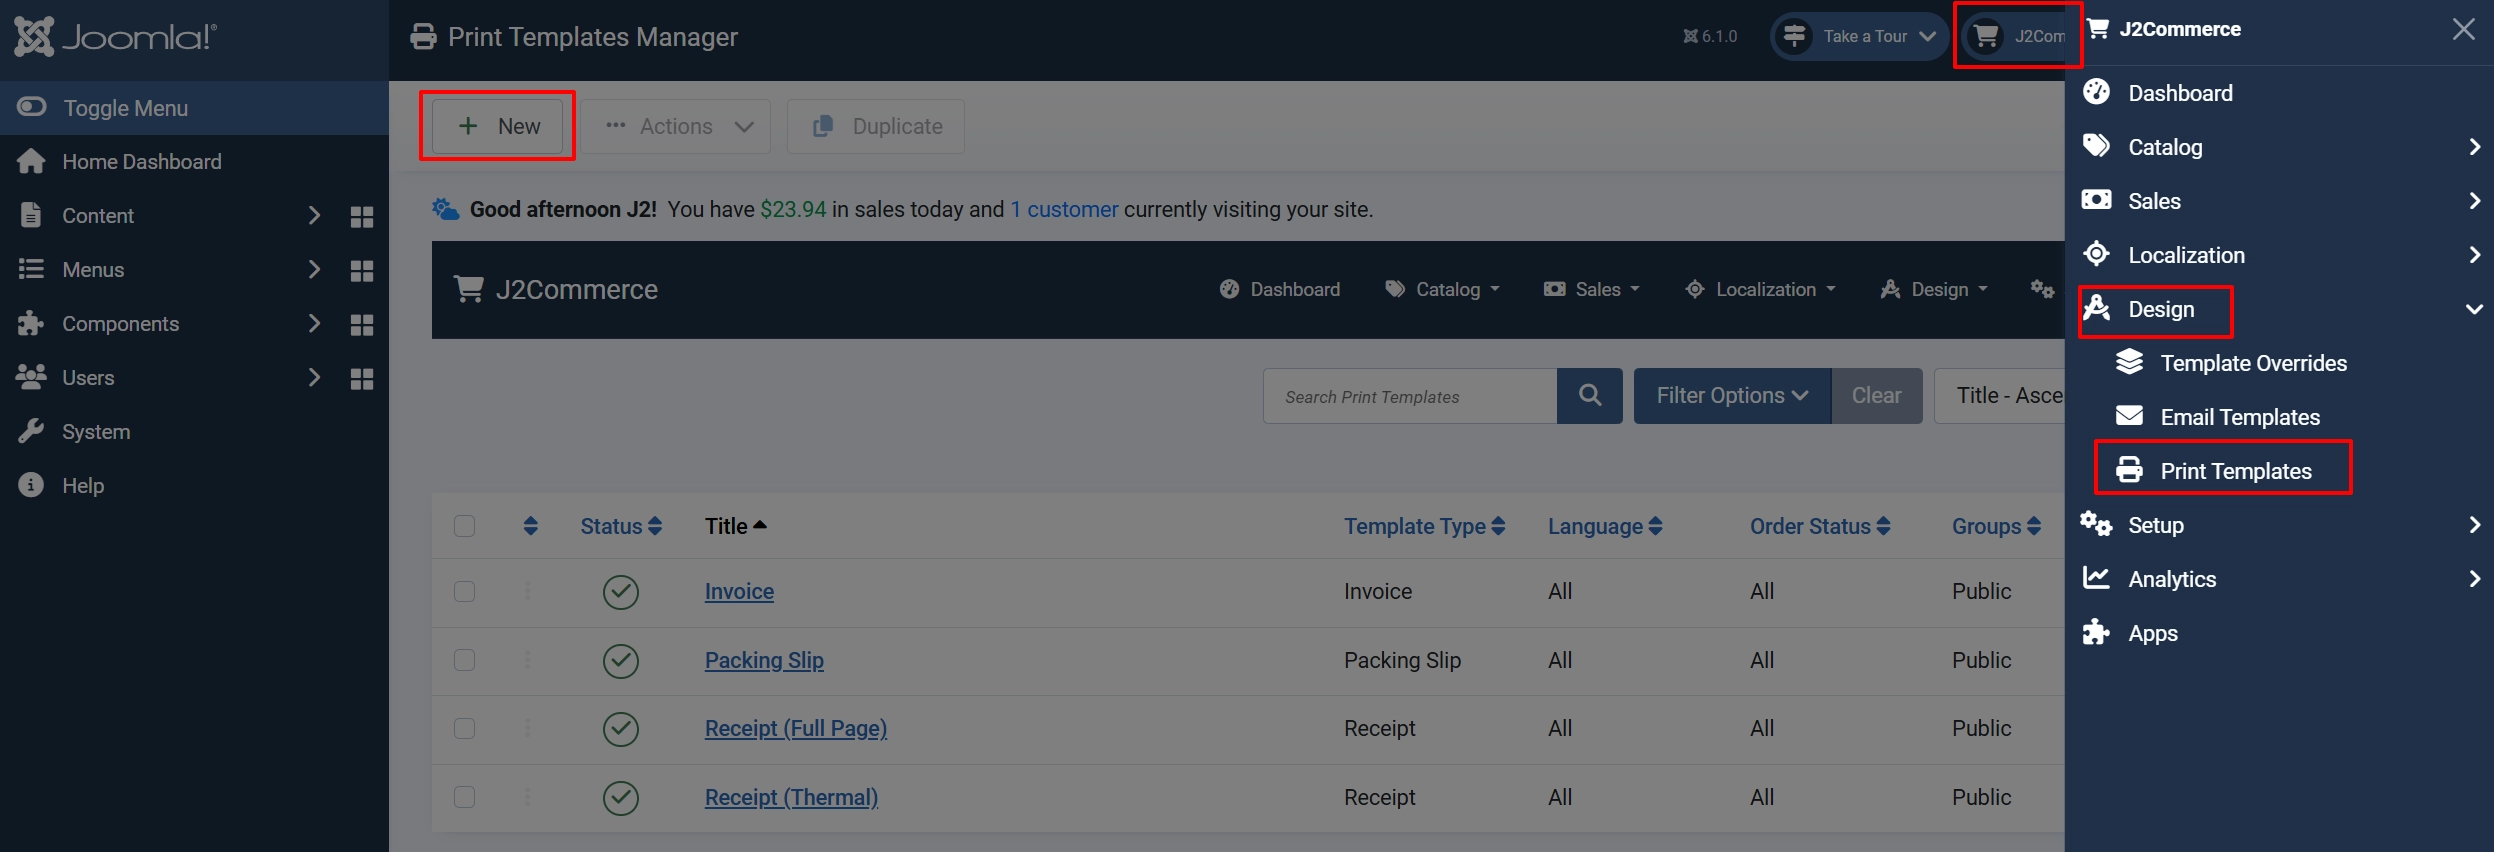
To learn more on how to set up an invoice template, visit the documentation below https://docs.j2commerce.com/v6/design/invoice-templates
Troubleshooting
"Connection error" when testing the API key
Cause: The API key is incorrect, or the server does not have the PHP cURL extension enabled.
Solution:
- Copy the API key directly from the PrintNode website — avoid extra spaces.
- Ask your hosting provider to confirm that the PHP
curlextension is enabled. - Re-save the plugin settings and test again.
No printers appear in the Printer dropdown
Cause: The PrintNode client is not running on the host computer, or the printer has not been added to your PrintNode account.
Solution:
- On the computer connected to your printer, open the PrintNode client application and confirm it shows a green "Connected" status.
- Log in to printnode.com and verify the printer appears under Printers.
- Return to the plugin settings and click the refresh icon next to the Printer field.
Print job submitted but nothing prints
Cause: The printer may be offline, or the PrintNode client may have lost its connection.
Solution:
- Open the Status and Help tab inside the plugin settings. Check the computer state — a "disconnected" warning means the PrintNode client is no longer connected to the cloud service.
- Restart the PrintNode client on the host computer.
- Verify the printer is powered on and shows as online in your PrintNode account.
"JINVALID_TOKEN" error on the Print Invoice button
Cause: The admin session token expired while the order page was open.
Solution: Refresh the page and click the Print Invoice button again.
"Dompdf library is NOT installed" warning in Invoice Settings
Cause: The shared Dompdf library required for PDF generation is not installed.
Solution: Download and install the Dompdf library plugin from the J2Commerce Extensions Store, then return to the Invoice Settings tab to confirm the status indicator changes to "installed and ready."
PDF generation fails silently / print job not submitted
Cause: The Joomla temporary directory used by Dompdf may not be writable.
Solution:
- Enable Debug Mode in the Advanced Settings tab and save.
- Attempt a print, then check
administrator/logs/app_printnode.phpfor error details. - Ensure the
tmp/directory at the root of your Joomla site is writable by the web server. - Disable Debug Mode after resolving the issue.
Orders print repeatedly / infinite loop
Cause: The Post-Print Status was set to a status that is also listed in Trigger Statuses.
Solution: The plugin detects this condition automatically and skips the post-print status change, so no infinite loop occurs. However, your intended workflow (order moving to "Ready to Ship" after printing) will not run until the configuration is corrected. Open the Order Settings tab, choose a Post-Print Status that is not in your Trigger Statuses list, and save.
What Changed from J2Store PrintNode
If you are upgrading from the J2Store version of this plugin, here is what is different in the J2Commerce 6 release:
- Native Joomla 6 architecture — no FOF 2 framework dependency
- Shared Dompdf library — the PDF library is now installed once site-wide instead of bundled inside this plugin
- J2Commerce invoice system — invoices are generated using the same invoice templates and layout system used for email invoices
- Infinite-loop guard — the plugin automatically skips the post-print status update when it detects that the new status would trigger another print
- Retry with exponential backoff — failed print jobs can now be retried automatically (0–5 attempts, configurable)
- API key masked in logs — the API key is never written in full to the debug log file, only the last four characters appear
- Vanilla JavaScript — the manual print button and admin UI use no jQuery