After-Sale Surveys
The After-Sale Surveys app lets you ask customers quick feedback questions right after they check out. Surveys appear on the order confirmation page, one question at a time, and you can control exactly who sees them using a built-in rules engine. A dedicated analytics dashboard shows response rates, completion rates, Net Promoter Score, and question-by-question results so you can see what customers are telling you without leaving the J2Commerce admin.
Requirements
- PHP 8.3.0 or later
- Joomla 6.x
- J2Commerce 6.x
Purchase and Download
The After-Sale Surveys app is a separate add-on available from the J2Commerce Extensions Store. It is not included with the core J2Commerce 6 component.
Step 1: Go to www.j2commerce.com -> Apps.
Step 2: Locate the After-Sale Surveys app, click View Details, then Add to Cart -> Checkout.
Step 3: After purchase, go to My Downloads under your profile menu and find the app. Click Available Versions -> View Files -> Download Now.
Install the App
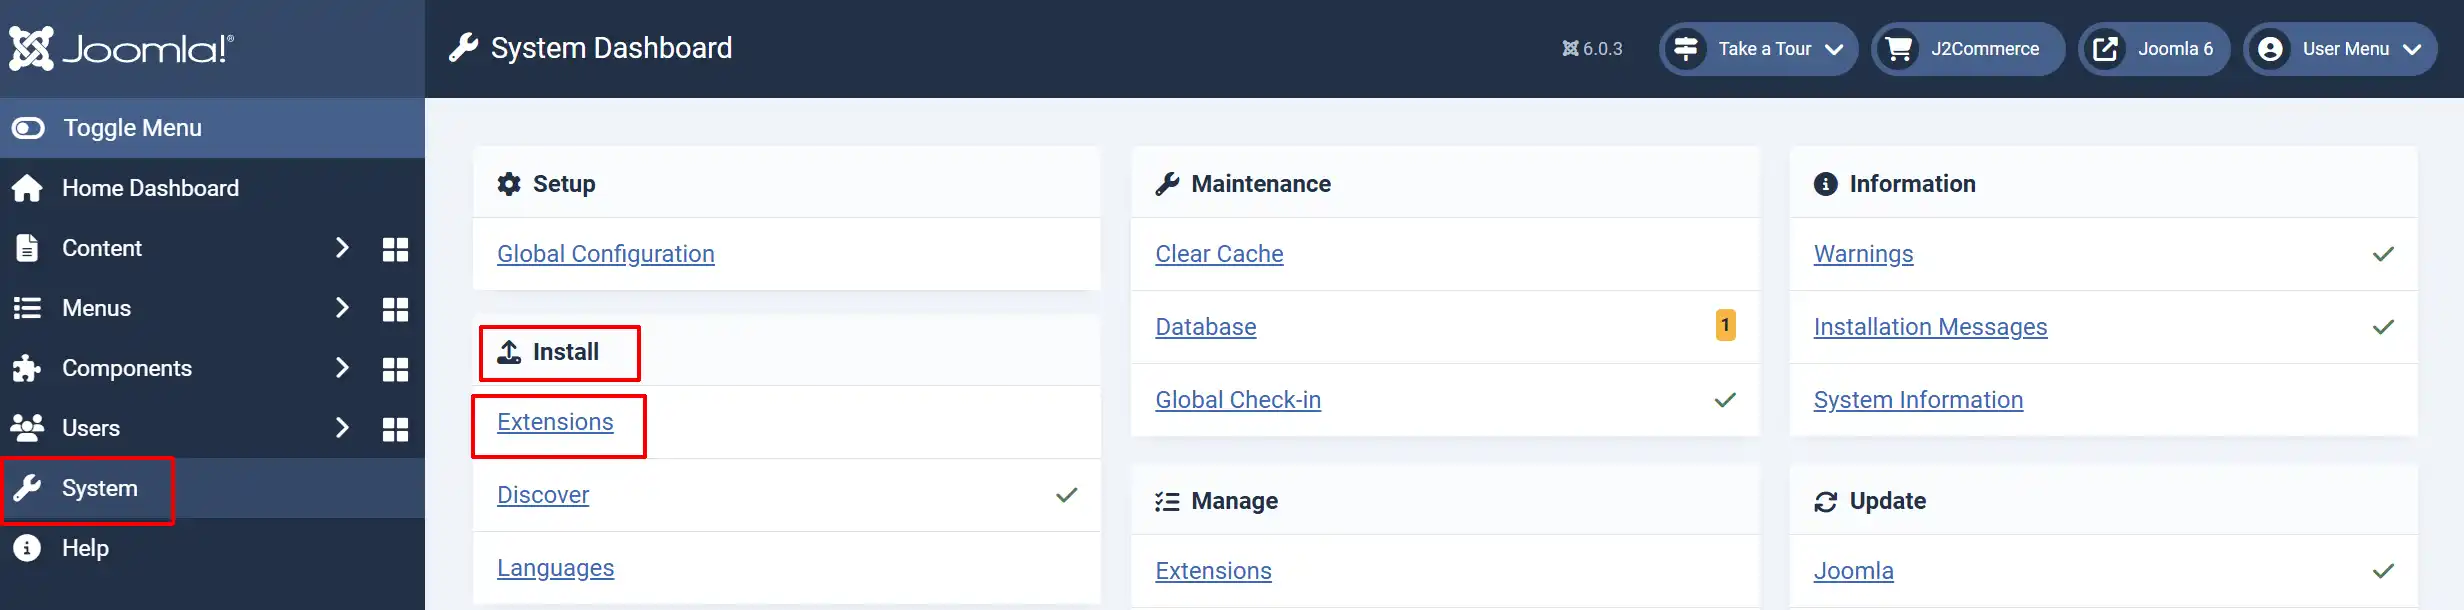
In the Joomla Administrator, go to System -> Install -> Extensions.
Upload the plugin app_aftersalesurveys.zip file or use the Install from URL option.
Enable the App
The plugin installs and enables itself automatically. No separate enable step is needed. However, it's important to know where to go to enable or disable it in the future.
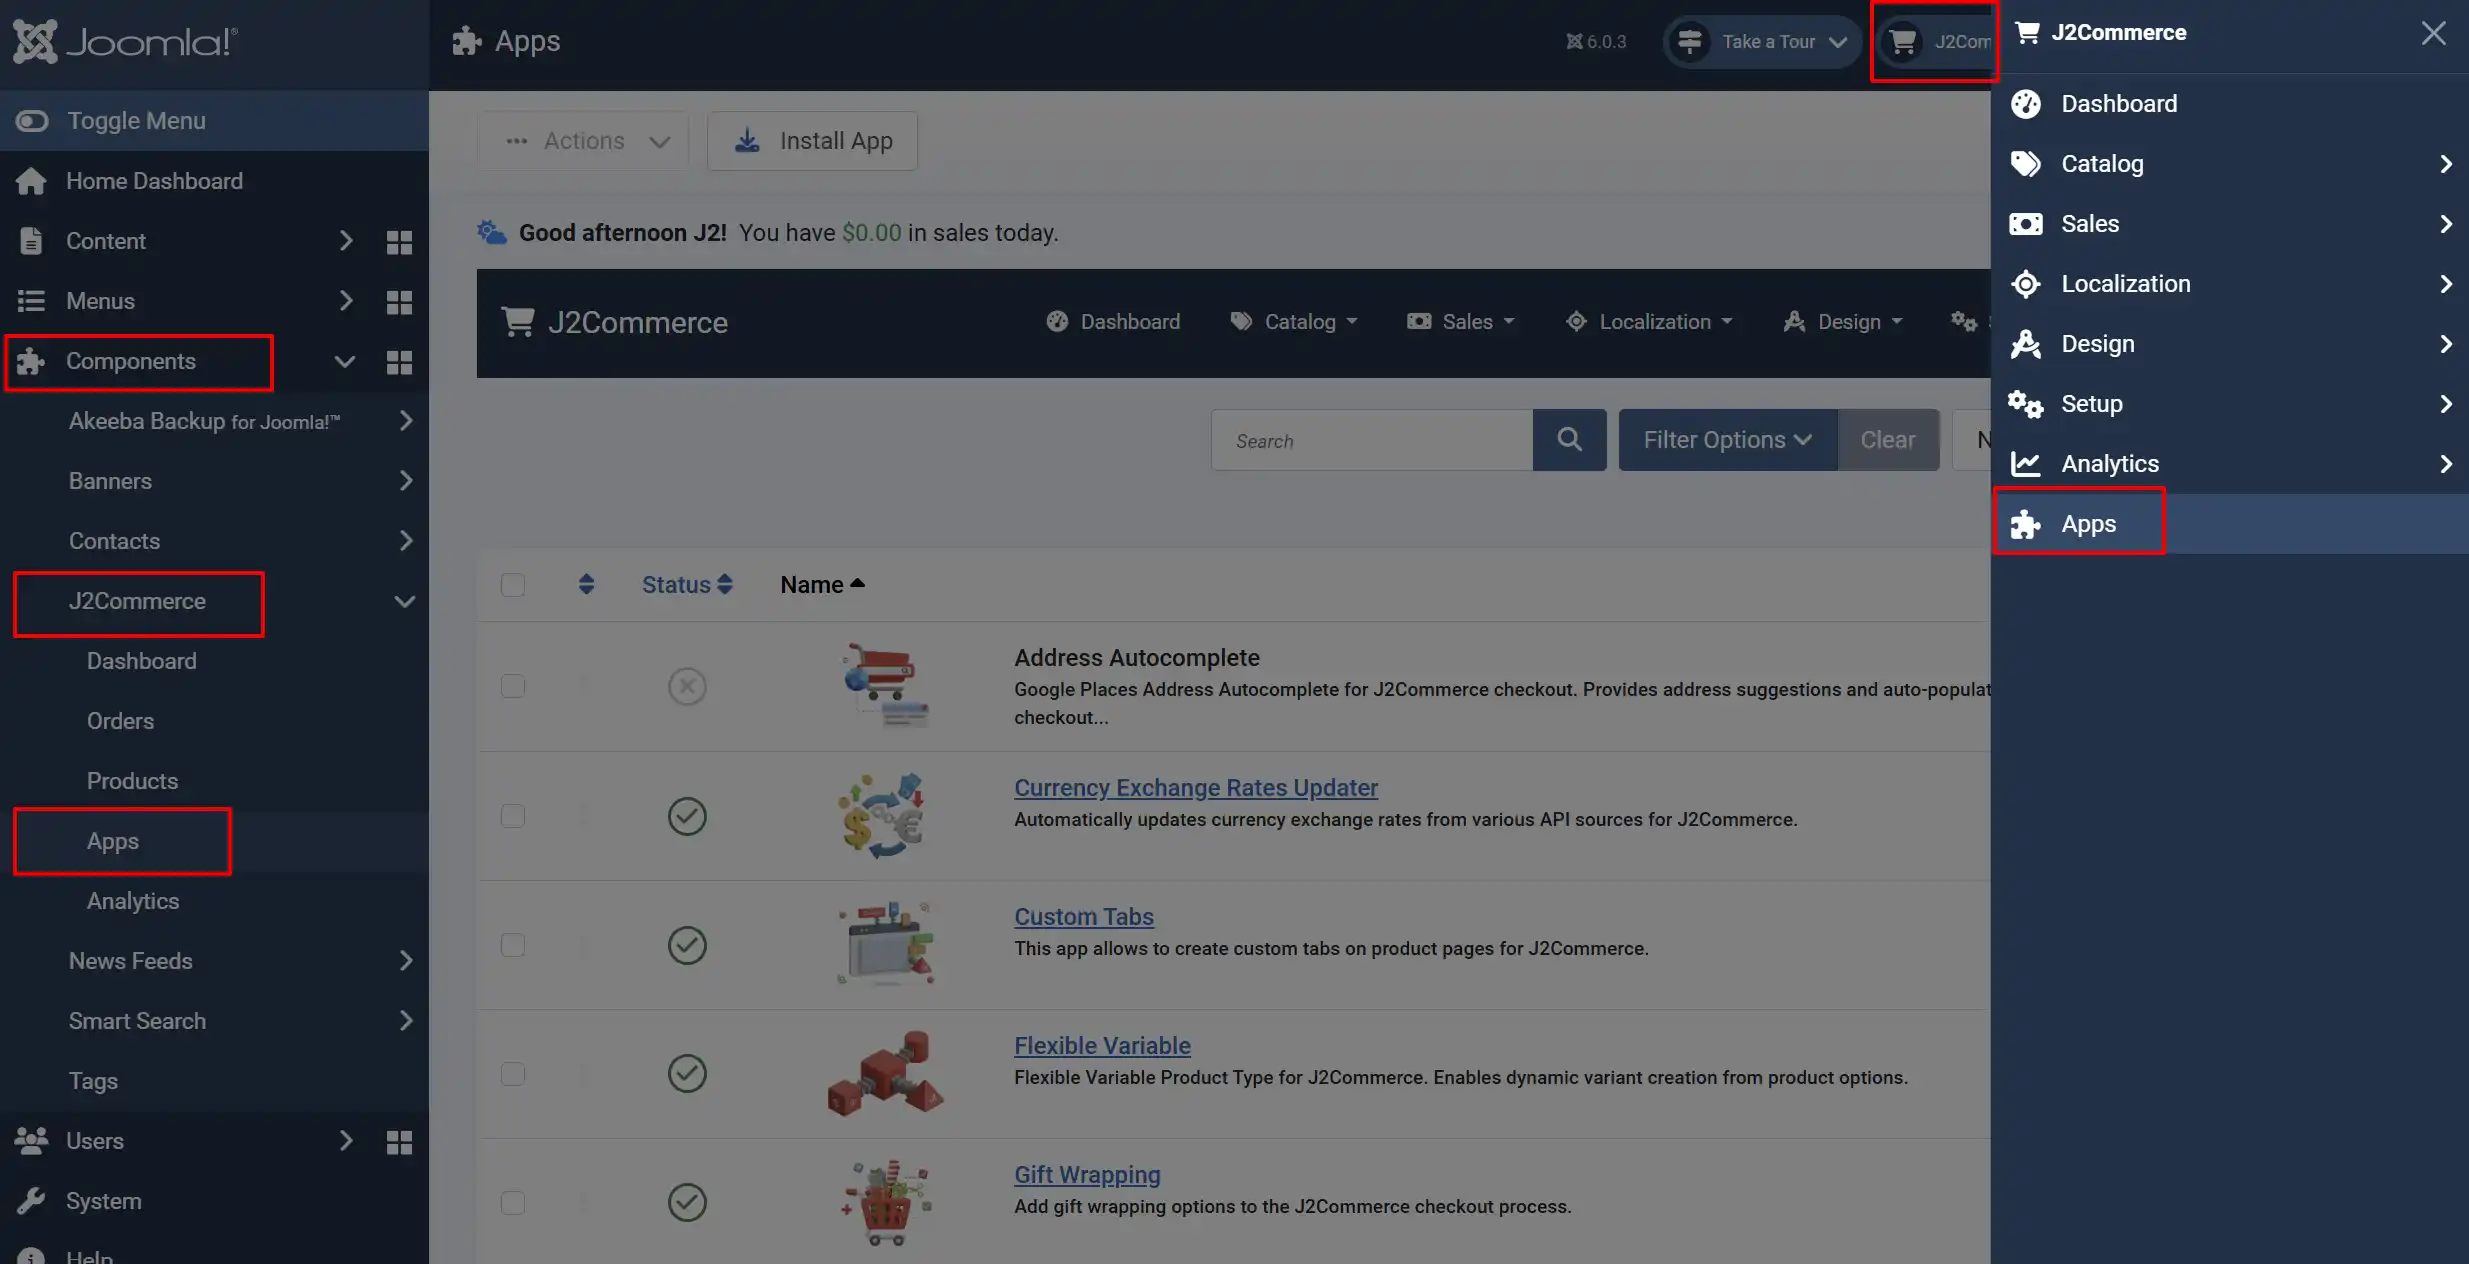
There are two ways to reach the Apps list.
Option A: Go to the J2Commerce icon at the top right corner -> Apps
Option B: Go to Components on the left sidebar -> J2Commerce -> Apps
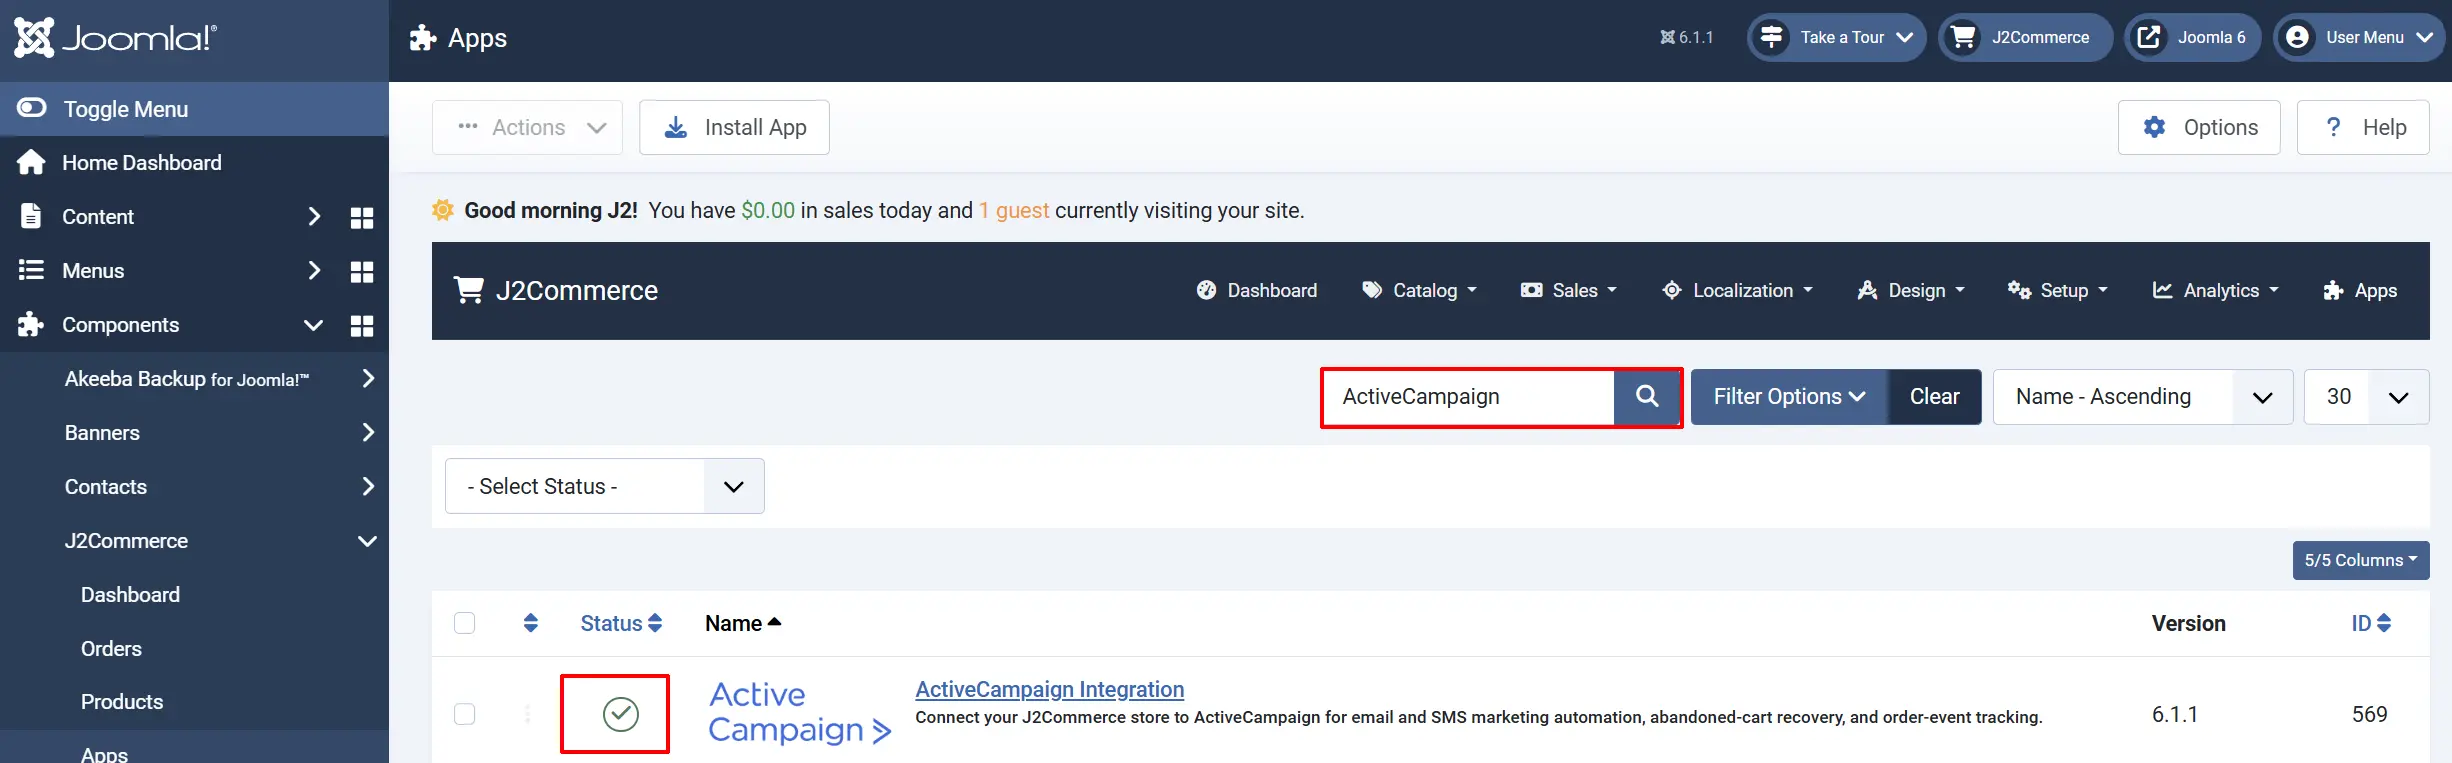
To help you narrow down the list, you can do a search for After-Sale Surveys, click the X, and it will turn into a green checkmark. It is now enabled and ready for setup.
Configure the App
Click the After-Sale Surveys title in the Apps list to open the plugin settings.
Click the Toggle Inline Help button in the toolbar and the app will show a description below each field as you configure it.
Basic Settings Tab
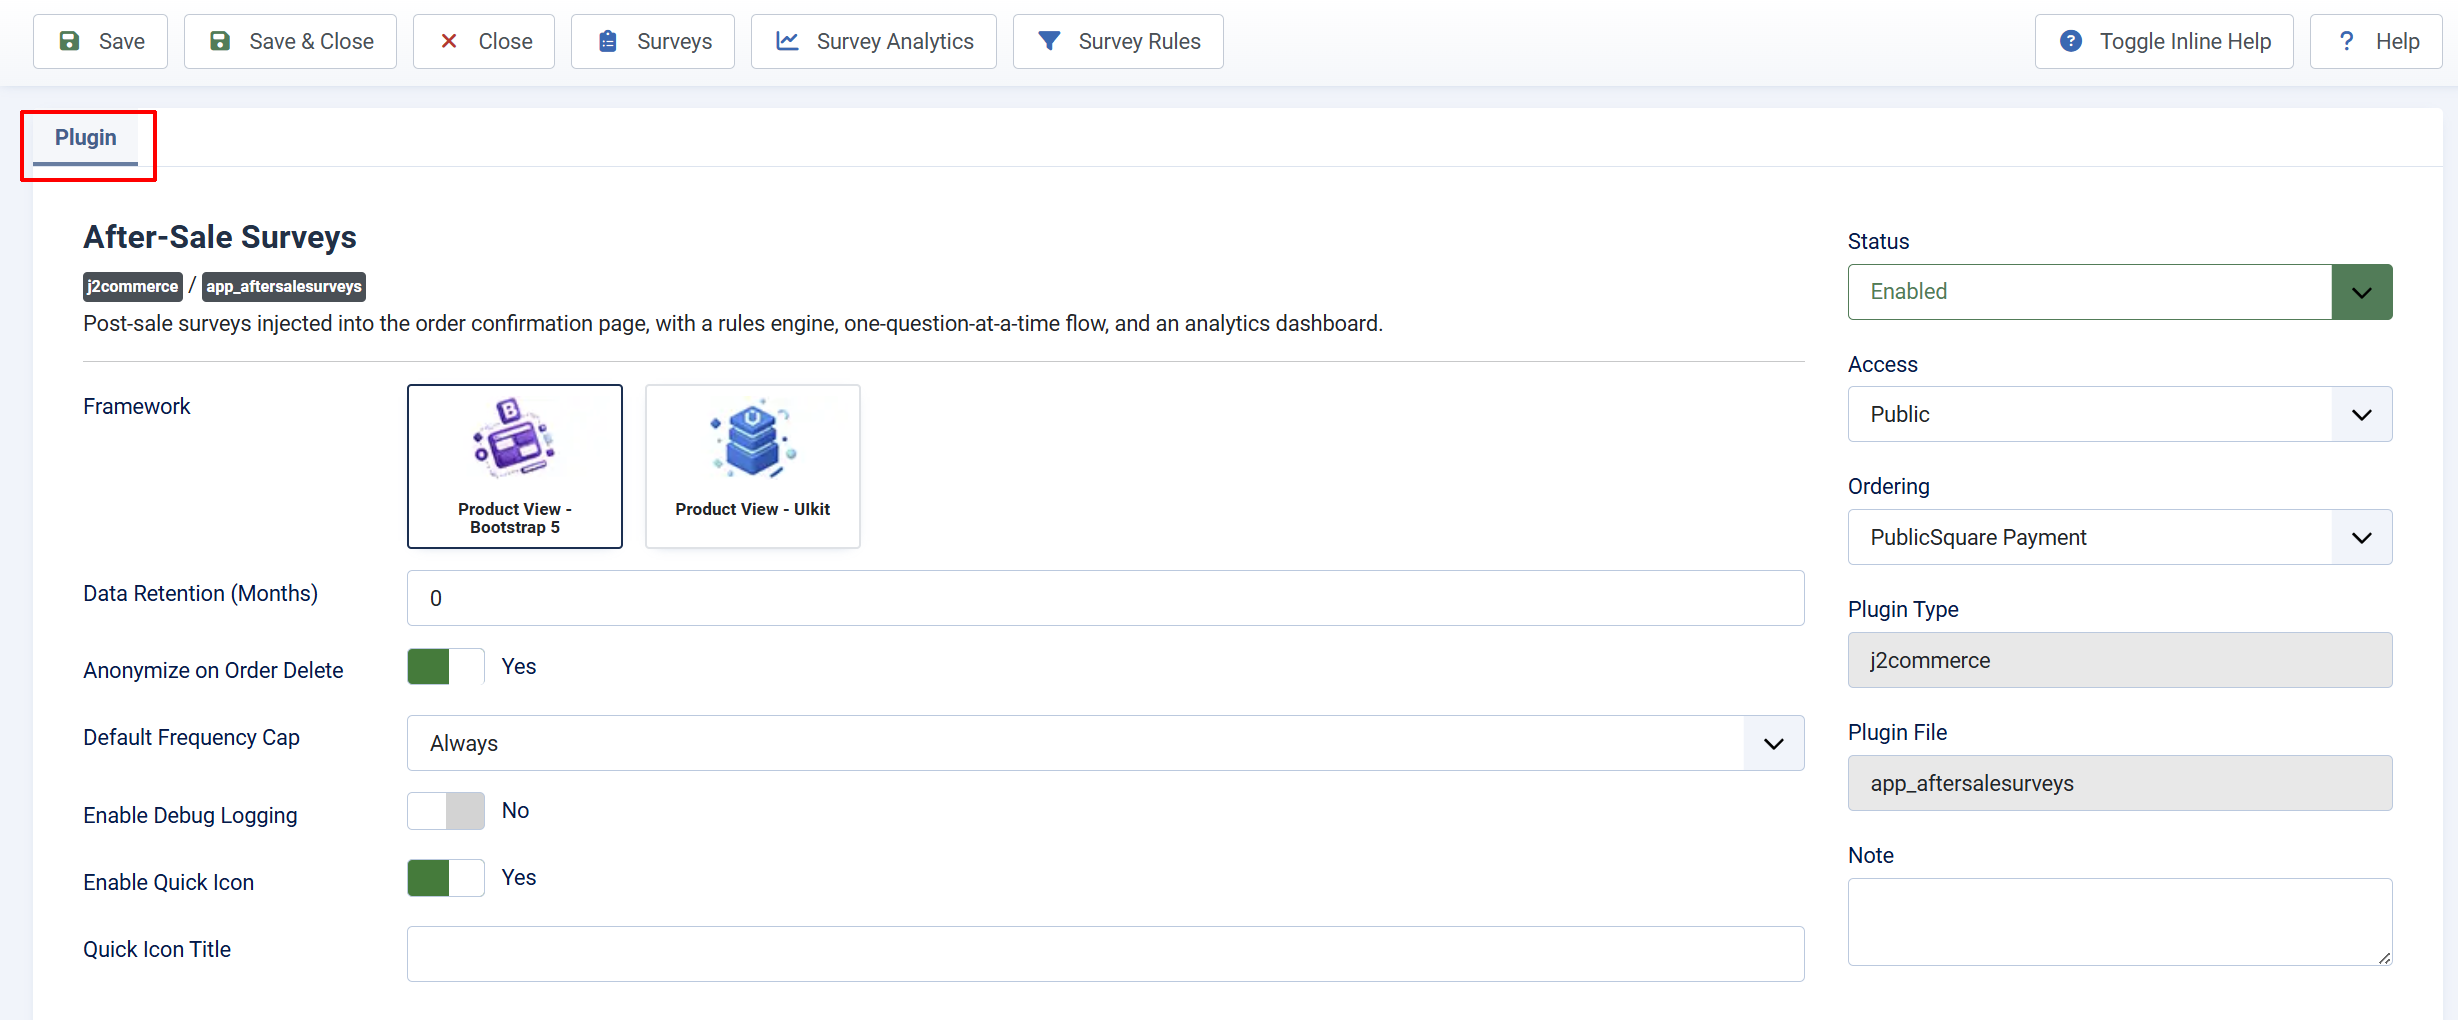
Framework: Which front-end styling framework renders the survey card: Bootstrap 5 (default) or UIkit 3. Match this to your site template.
Data Retention (Months): Automatically purge survey responses older than this many months. Set to 0 to keep responses forever.
Anonymize on Order Delete: When a store admin deletes an order, any survey response linked to it is automatically anonymized instead of left with orphaned personal data.
Default Frequency Cap: The frequency-capping mode pre-filled whenever you create a new survey (you can still change it per survey). Options: Always, Once Ever, Once Every N Days, First Order Only.
Enable Debug Logging: Logs rule evaluation and response lifecycle activity (IDs only, never personal data) to the J2Commerce log. Useful only while troubleshooting.
Enable Quick Icon: Shows a Surveys quick icon on the J2Commerce dashboard with a live count of completed survey responses.
Quick Icon Title: Custom label for the quick icon (only shown when Enable Quick Icon is Yes). Leave blank to use the default label, Surveys.
Open the Surveys Manager
After the app is enabled and configured, you manage surveys, questions, rules, and analytics from a dedicated Surveys screen. There are two ways to reach it.
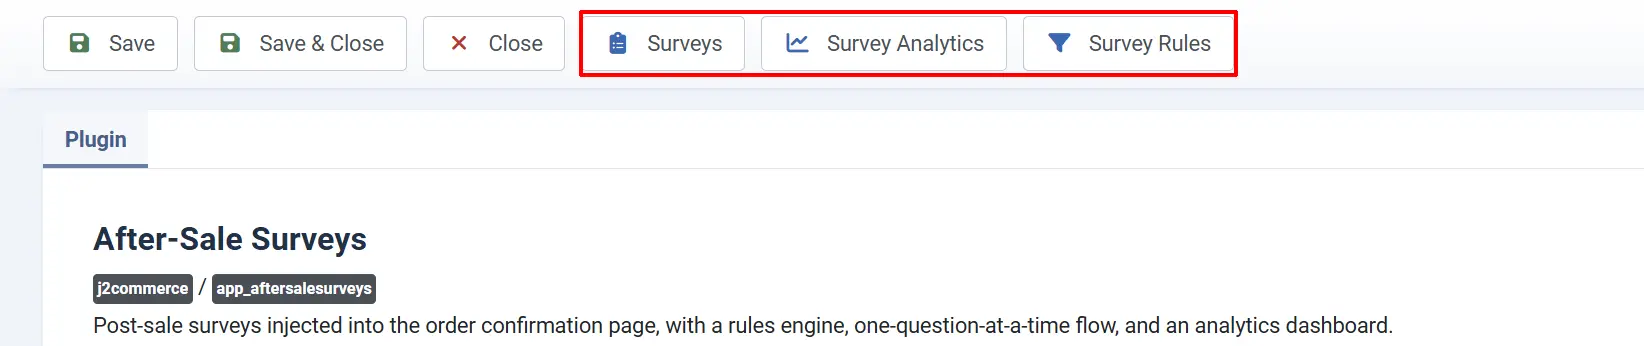
Option A: Go to System -> Manage -> Plugins, open After-Sale Surveys, and use the Surveys, Survey Analytics, and Survey Rules buttons that now appear in the toolbar.
Option B: From the J2Commerce Dashboard, look for a Surveys link under the Sales section, and a Survey Analytics link under the Analytics section.
Create a Survey

Click the Surveys button, then click New Survey in the toolbar.
Basic Settings tab
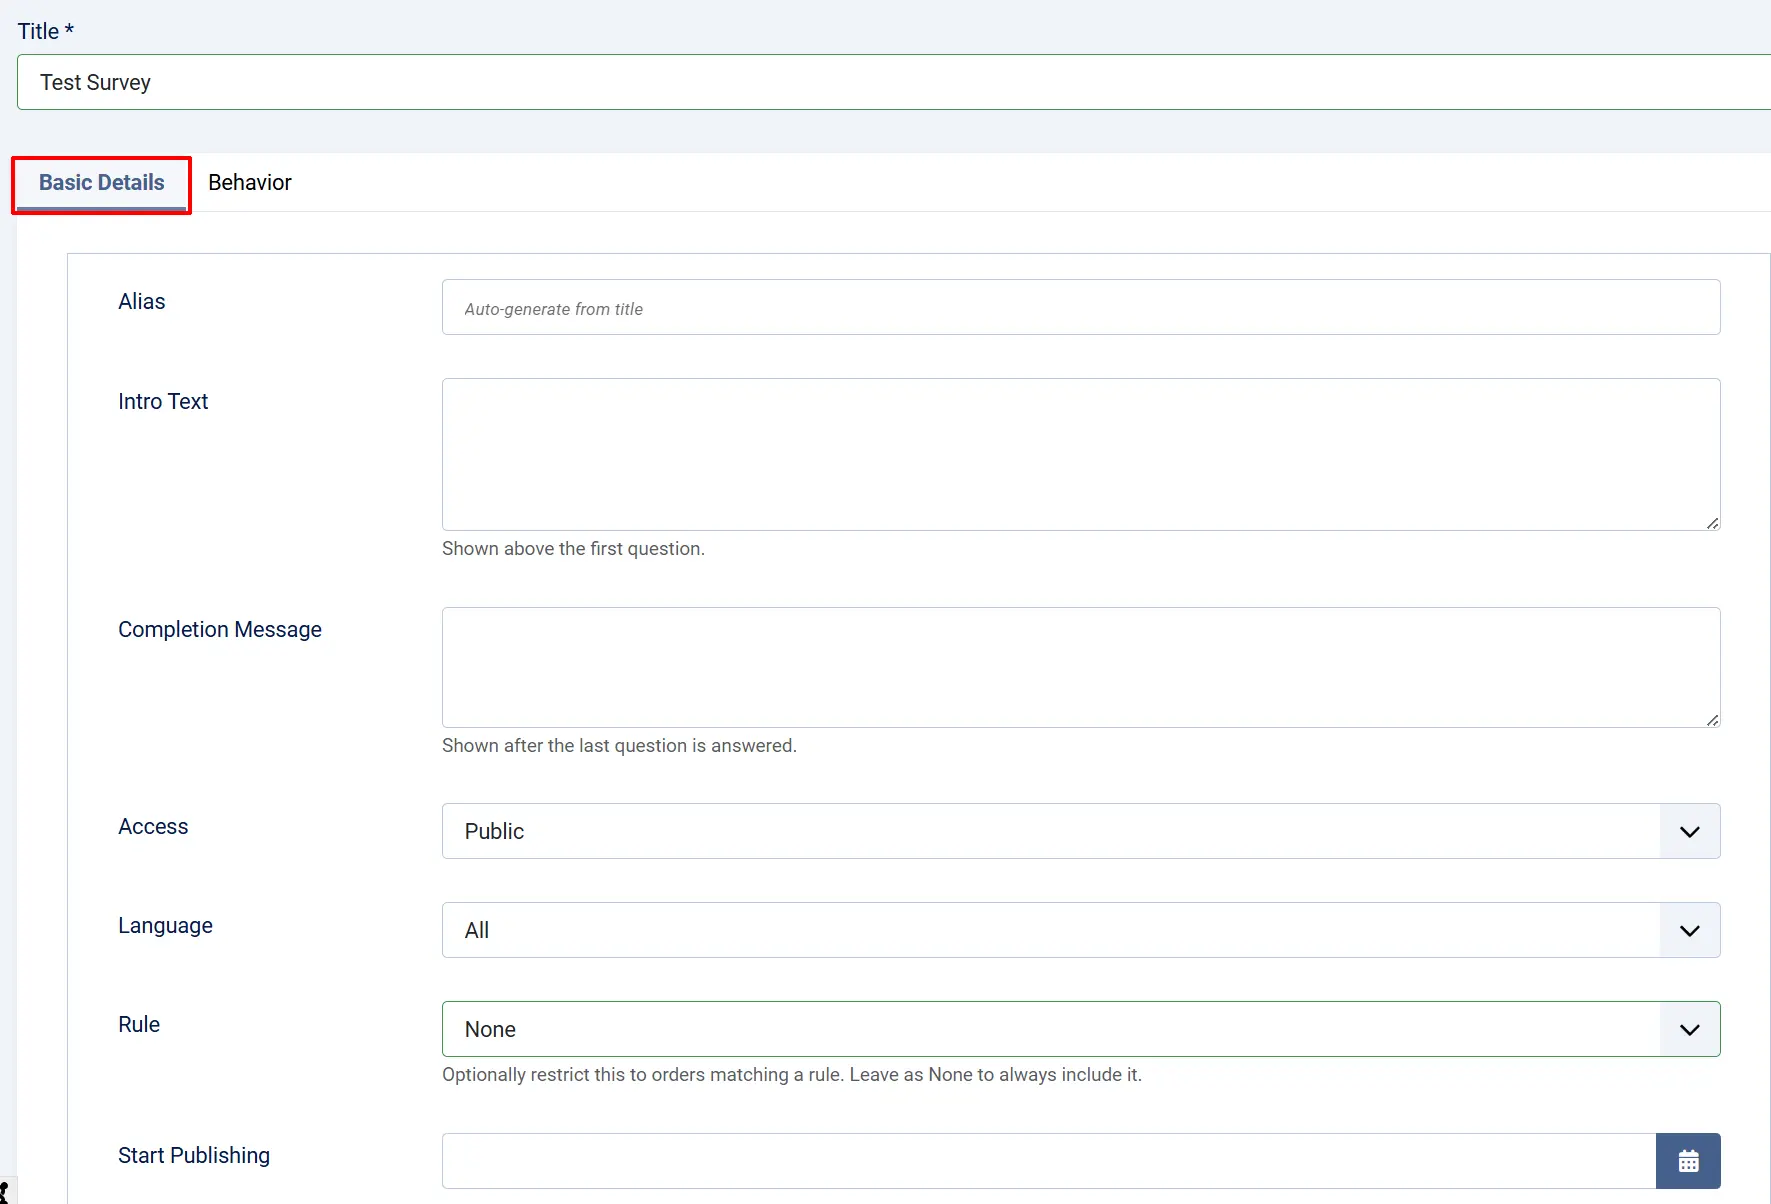
Title: The survey's internal name (required). Not shown to customers.
Alias: The SEF-friendly identifier. Leave blank to auto-generate from the title.
Intro Text: Shown above the first question on the survey card.
Completion Message: Shown once the customer answers (or skips) the last question.
Access Level: The Joomla access level a customer's account must meet to be shown this survey.
Language: Restrict the survey to a specific site language, or leave as All to show it regardless of language.
Rule: Optionally attach a rule so this survey only shows for orders that match it. Leave as None to always consider it (subject to frequency cap and sampling).
Start Publishing / Finish Publishing
Optional date range during which the survey is active.
Status: Enable or disable the survey.
Behavior tab
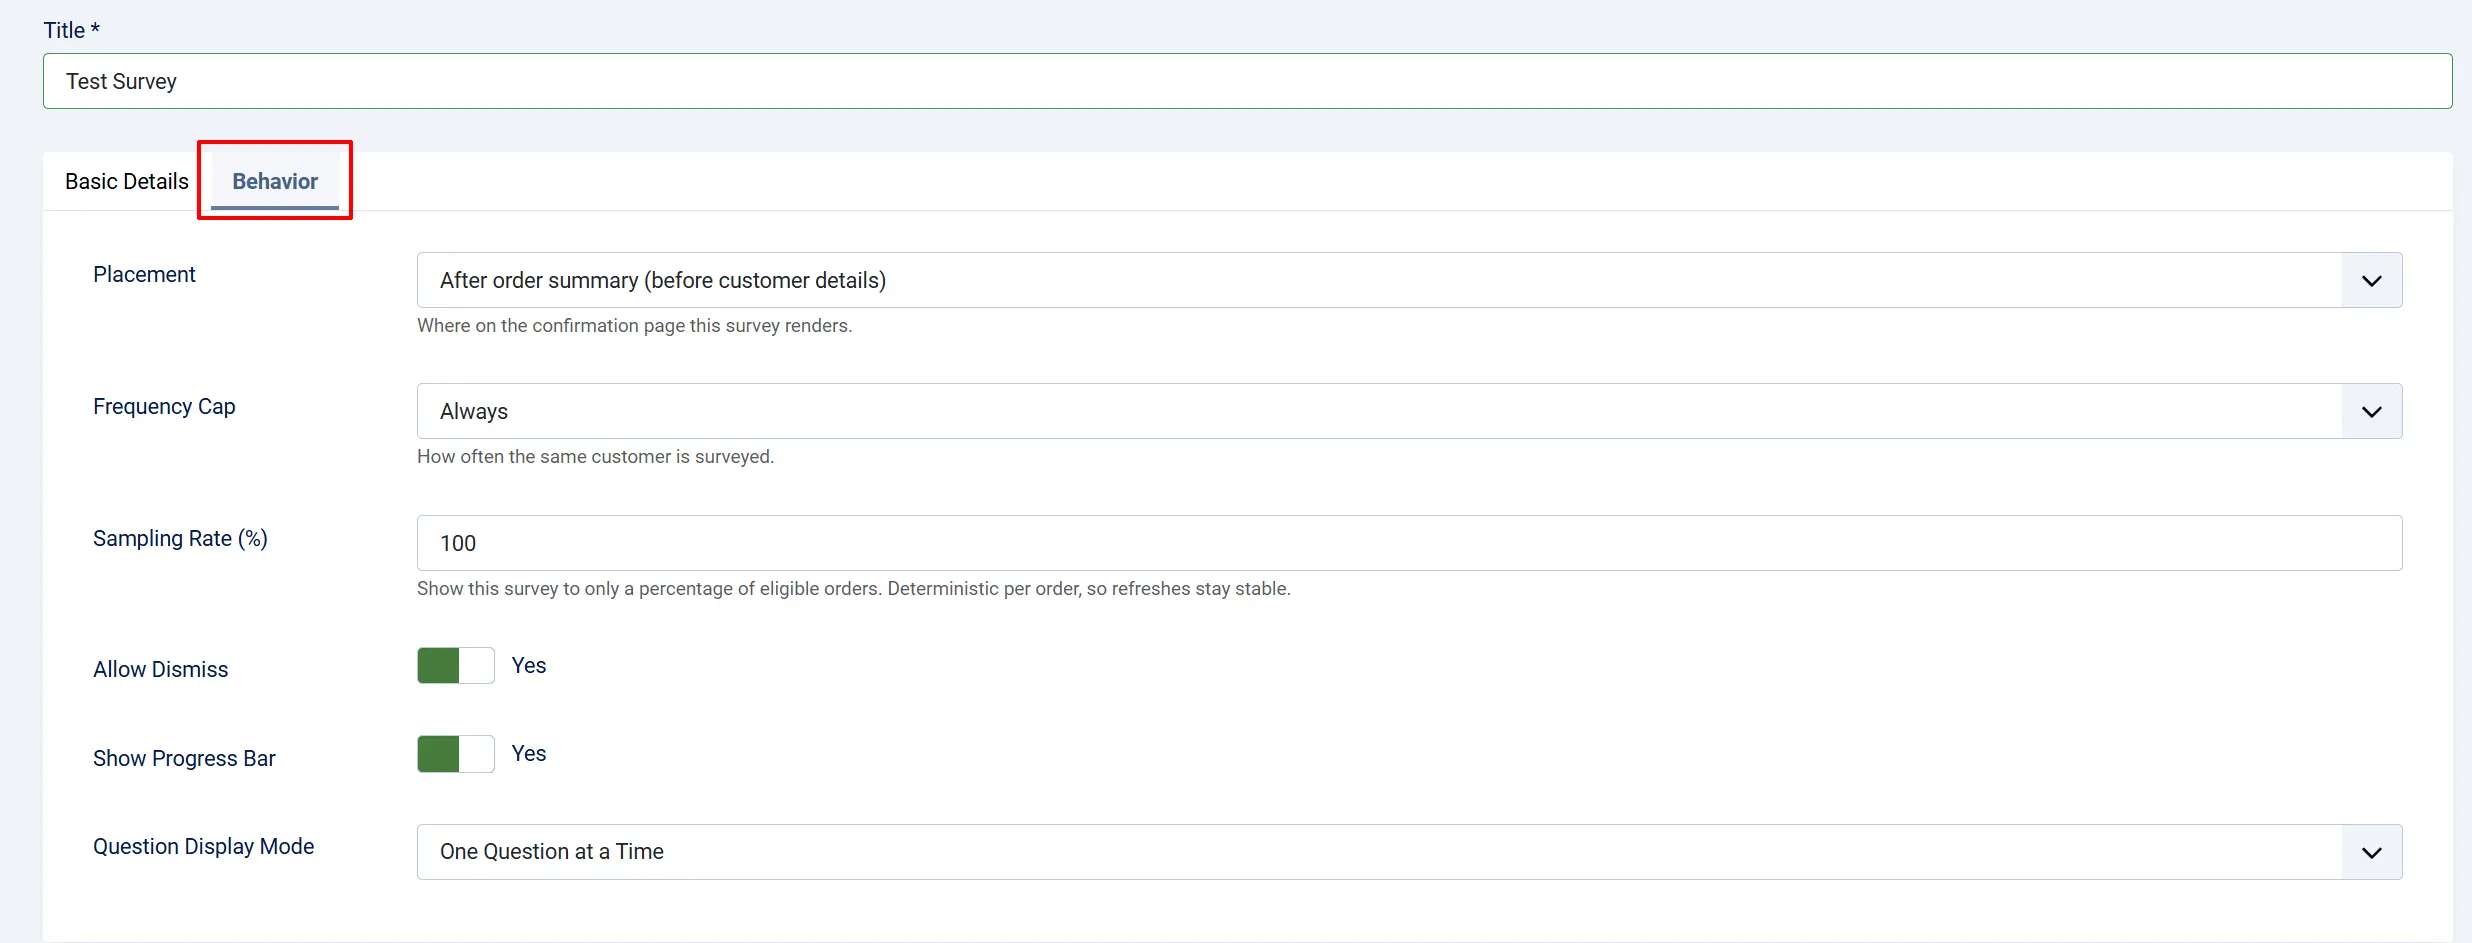
Placement: Where on the order confirmation page the survey card renders: Before order status, After order summary (before customer details), or Bottom of page.
Frequency Cap: How often the same customer is shown this survey: Always, Once Ever, Once Every N Days, or First Order Only.
Frequency (Days): Only shown when Frequency Cap is Once Every N Days. The number of days that must pass before the same customer is asked again.
Sampling Rate (%): Show this survey to only a percentage of eligible orders. The same order always gets the same in/out result, so refreshing the page never flips it.
Allow Dismiss: Whether the customer sees a No thanks link to close the survey without answering.
Show Progress Bar: Whether a progress bar appears above the questions.
Question Display Mode: How questions are presented. Currently only One Question at a Time is available.
Once a customer starts answering a survey, the exact set of questions they see is locked in for that response. Adding, removing, or changing questions afterward will not affect a survey that's already in progress or completed.
Build a Rule to Target Specific Orders

Rules let you show a survey (or a single question) only to orders that match conditions you define — for example, only orders over a certain amount, or only orders shipped to a specific country. A rule is a reusable, standalone record: create it once, then attach it to any number of surveys and questions using their Rule field.
- From the Surveys screen, click Survey Rules in the toolbar (or use the Survey Rules button from the plugin's toolbar).
- Click New Rule.
- Enter a Title so you can recognize the rule later.
- Choose whether the rule requires Match ALL conditions or Match ANY condition.
- Click Add Condition for each check you want to add, choosing a condition type and a value.
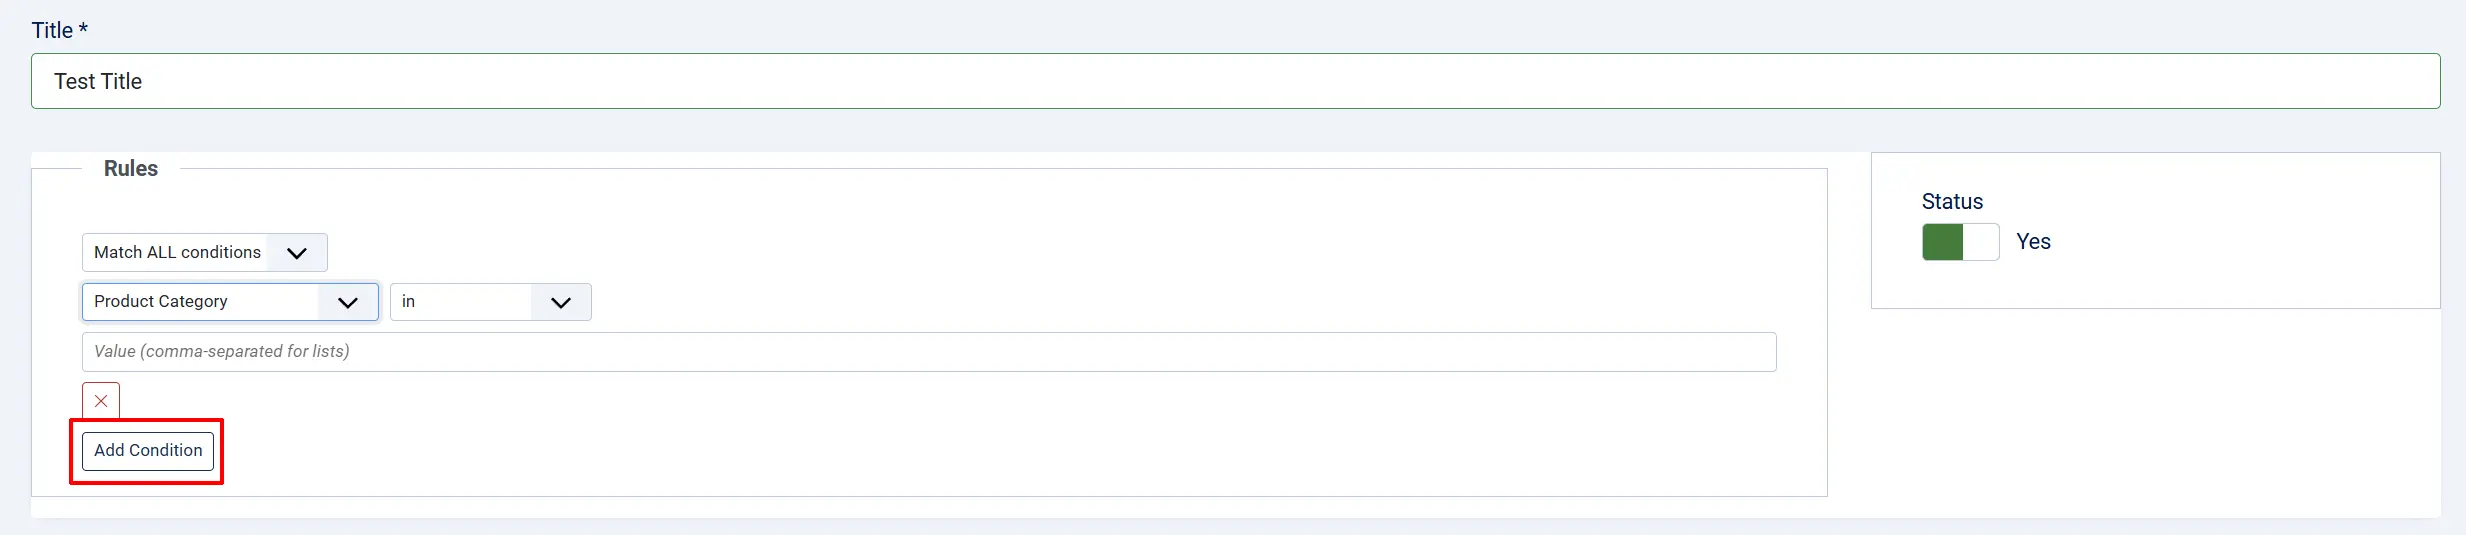
Available condition types:
| Condition Type | Matches On |
|---|---|
| Product | Specific products in the order |
| Product Category | Categories of the products purchased |
| Product Quantity | Total quantity of items in the order |
| Order Total | Order total or subtotal amount |
| Order Item Count | Number of distinct line items in the order |
| User Group | The customer's Joomla user group |
| Access Level | The customer's Joomla access level |
| Geozone | The billing or shipping geozone |
| Country | The billing or shipping country |
| Customer Type (New/Returning) | Whether this is the customer's first order |
| Coupon Used | Whether a discount code was applied, and which one |
| Payment Method | The payment method used on the order |
| Shipping Method | The shipping method used on the order |
| Language | The customer's site language |
The Rules list shows how many surveys and questions currently use each rule in its Used By column, so you can see the impact before editing or disabling a rule.
Add Questions to a Survey
- From the Surveys list, click Manage Questions under a survey's title (or click Manage Questions in the toolbar while editing an existing survey).
- Click New Question.
Question: The question text shown to the customer (required).
Help Text: Optional supporting text shown under the question.
Question Type: See the table below.
Scale Minimum / Scale Maximum: Only shown for Rating Scale questions. Defaults to 1–5.
Max Length: Only shown for Short Text and Long Text questions. Leave blank to use the built-in defaults (191 characters for Short Text, 2000 for Long Text).
Minimum Selections / Maximum Selections: Only shown for Multiple Choice questions. Leave at 0 for no limit.
Required: Whether the customer must answer (rather than click Skip) before continuing.
Rule: Optionally attach a rule so this individual question is only included for matching orders. Leave as None to always include it.
Status: Enable or disable the question.
Question types:
| Type | Customer Sees |
|---|---|
| Single Choice | One selectable option from a list you define |
| Multiple Choice | One or more selectable options from a list you define |
| Rating Scale | A numeric scale between your configured minimum and maximum |
| Net Promoter Score (0–10) | The standard 0–10 NPS scale |
| Yes / No | A simple boolean choice |
| Short Text | A single-line text box |
| Long Text | A multi-line text box |
- For Single Choice and Multiple Choice questions, use the Answer Options section to click Add Option and enter each selectable answer.
- Click Save & Close.
Questions are shown to the customer in the order they appear in the Questions list. Use the Change Status toolbar menu to publish, unpublish, or delete questions in bulk.
Reviewing Survey Analytics
Open the Survey Analytics dashboard to see how your surveys are performing.

Use the Survey and Date Range filters at the top to narrow the view. Date Range options include Today, Yesterday, Last 7 Days, Last 30 Days, This Month, Last Month, This Year, and a Custom Range.
| Metric | What It Shows |
|---|---|
| Eligible Impressions | How many order confirmation pages showed a survey card |
| Response Rate | Percentage of impressions where the customer started answering |
| Completion Rate | Percentage of started responses that were finished |
| NPS | Net Promoter Score, calculated from NPS-type question answers |
| Responses Over Time | A chart of impressions, started, and completed responses over the selected period |
| Drop-off Funnel | Where in the question sequence customers stop responding |
| Top Surveys by Views / Completions | Which surveys get the most impressions and finished responses |
| Top Questions | Which questions get the most answers versus skips |
Select a specific survey in the filter to also see a per-question results breakdown further down the page.
Reviewing Individual Responses
Open Responses (from the dashboard toolbar, or the Responses link) to browse individual customer responses.

Filter by Survey, Status (In Progress, Completed, Dismissed, Abandoned), a text Search, or a date range. Click any row to open its detail view, which lists the order, the customer (or Guest/Anonymized), the response status, and every question with its recorded answer.
Select one or more rows to Anonymize or delete them, or click Export CSV to download the currently filtered responses as a spreadsheet.
What Customers See
When a customer reaches the order confirmation page after checkout, the app checks whether an enabled survey is eligible for that order — matching the survey's Placement, Access Level, attached Rule (if any), Frequency Cap, and Sampling Rate. If so, a small card appears at the configured placement showing the survey's intro text and its first question.
- Customers answer one question at a time, with a Next button to continue.
- Optional questions show a Skip button; required questions do not.
- If Show Progress Bar is enabled, a progress bar tracks how far along they are.
- If Allow Dismiss is enabled, a No thanks link lets the customer close the survey at any point.
- After the last question, the survey's Completion Message is shown.
- If a customer's browser has JavaScript disabled, the survey card does not appear.
Both logged-in customers and guest checkout customers can complete surveys — guests are recognized by their order confirmation session, so the survey remains available if they revisit the confirmation page.
Tips
- Use Rules to keep surveys relevant. A rule limiting a survey to orders over a certain total, or to a specific product category, prevents customers from being asked questions that don't apply to their purchase.
- Reuse rules across surveys and questions. The same rule (for example, "First-time customers") can drive eligibility for a whole survey and also control which individual questions appear within it.
- Use Sampling Rate to reduce survey fatigue. On high-volume stores, showing a survey to only 20-30% of eligible orders still gives you a solid sample size without asking every customer every time.
- Pick a Frequency Cap that matches your goal. Use Once Ever for a one-time satisfaction check, or Once Every N Days for recurring feedback from repeat buyers without overdoing it.
- Remember that question sets are frozen per response. If you need every future customer to see a newly added question, existing in-progress responses will not pick it up — only new responses starting after the change will.
Troubleshooting
Survey Does Not Appear on the Order Confirmation Page
Cause: The survey (or the app itself) is disabled, the Placement doesn't match where you're looking, its attached Rule doesn't match the order, the customer already used up their Frequency Cap, the order fell outside the Sampling Rate, or the publishing dates exclude today.
Solution:
- Go to the Surveys screen and confirm the survey shows a green checkmark (enabled).
- Edit the survey and check the Placement field matches where you're expecting it on the confirmation page.
- If a Rule is attached, review its conditions against the specific order you're testing with.
- Check Frequency Cap — if it's not Always, the same test customer may already be excluded from seeing it again.
- If Sampling Rate is below 100%, some orders will never see the survey by design; this is expected behavior.
Customer Says the Survey "Is Not Currently Available"
Cause: The response for that order was already marked Completed or Dismissed, or the survey (or its rule) changed after the customer started.
Solution: Go to Responses, search for the order, and check its status. If it shows Completed or Dismissed, this is expected — a customer cannot restart a finished response for the same order.
A Question Is Missing From a Customer's Survey
Cause: The question is disabled, or it has a Rule attached that didn't match the order at the moment the customer started the survey.
Solution:
- Go to Manage Questions for the survey and confirm the question shows a green checkmark (enabled).
- If the question has a Rule, review its conditions against the order in question.
- Remember that the question set is frozen once a response starts — a question added after that point will not appear for that specific response.
Analytics Dashboard Shows No Data
Cause: No surveys have been shown yet in the selected date range, or the wrong Survey or Date Range filter is selected.
Solution:
- Widen the Date Range filter (for example, switch to This Year).
- Confirm Survey is set to All Surveys or the correct survey.
- Place a real test order and complete checkout to generate a fresh impression, then refresh the dashboard.