Data Validation
The Data Validation app lets you enforce custom rules on your checkout fields. You can require that customers enter a valid phone number, a correctly formatted email address, a postal code that matches their country, or that a confirmation field matches another field exactly. Rules can apply to any combination of checkout steps — Billing, Shipping, Payment, and Register.
This app works with J2Commerce's custom checkout fields. You must have at least one enabled custom field before you can configure any rules.
Requirements
- PHP 8.3.0 or higher
- Joomla! 6.x
- J2Commerce 6.x
- At least one enabled custom checkout field
Purchase and Download
The Data Validation app is a separate add-on available from the J2Commerce Extensions Store. It is not included with the core J2Commerce 6 component.
Step 1: Go to the J2Commerce website -> Apps.
Step 2: Locate the plg_j2commerce_app_validationrules.zip package -> click View Details -> Add to cart -> Checkout.
Step 3: Go to My Downloads under your profile menu at the top right corner and search for the app. Click Available Versions -> View Files -> Download.
Install the App
You can install this Data Validation App using the Joomla installer. The following steps help you with a successful installation.
In the Joomla admin, go to System -> Install -> Extensions
Upload the plg_j2commerce_app_validationrules.zip package file or use the Install from URL option.
 (1)-a6689f12b23b8e992f5c2a169737672f.webp)
Enable the App
Once you have installed the App, you will need to enable it. There are two ways you can access the extension.
Option A: Go to the J2Commerce icon at the top right corner -> Apps
Option B: Go to Components on the left sidebar -> J2Commerce -> Apps
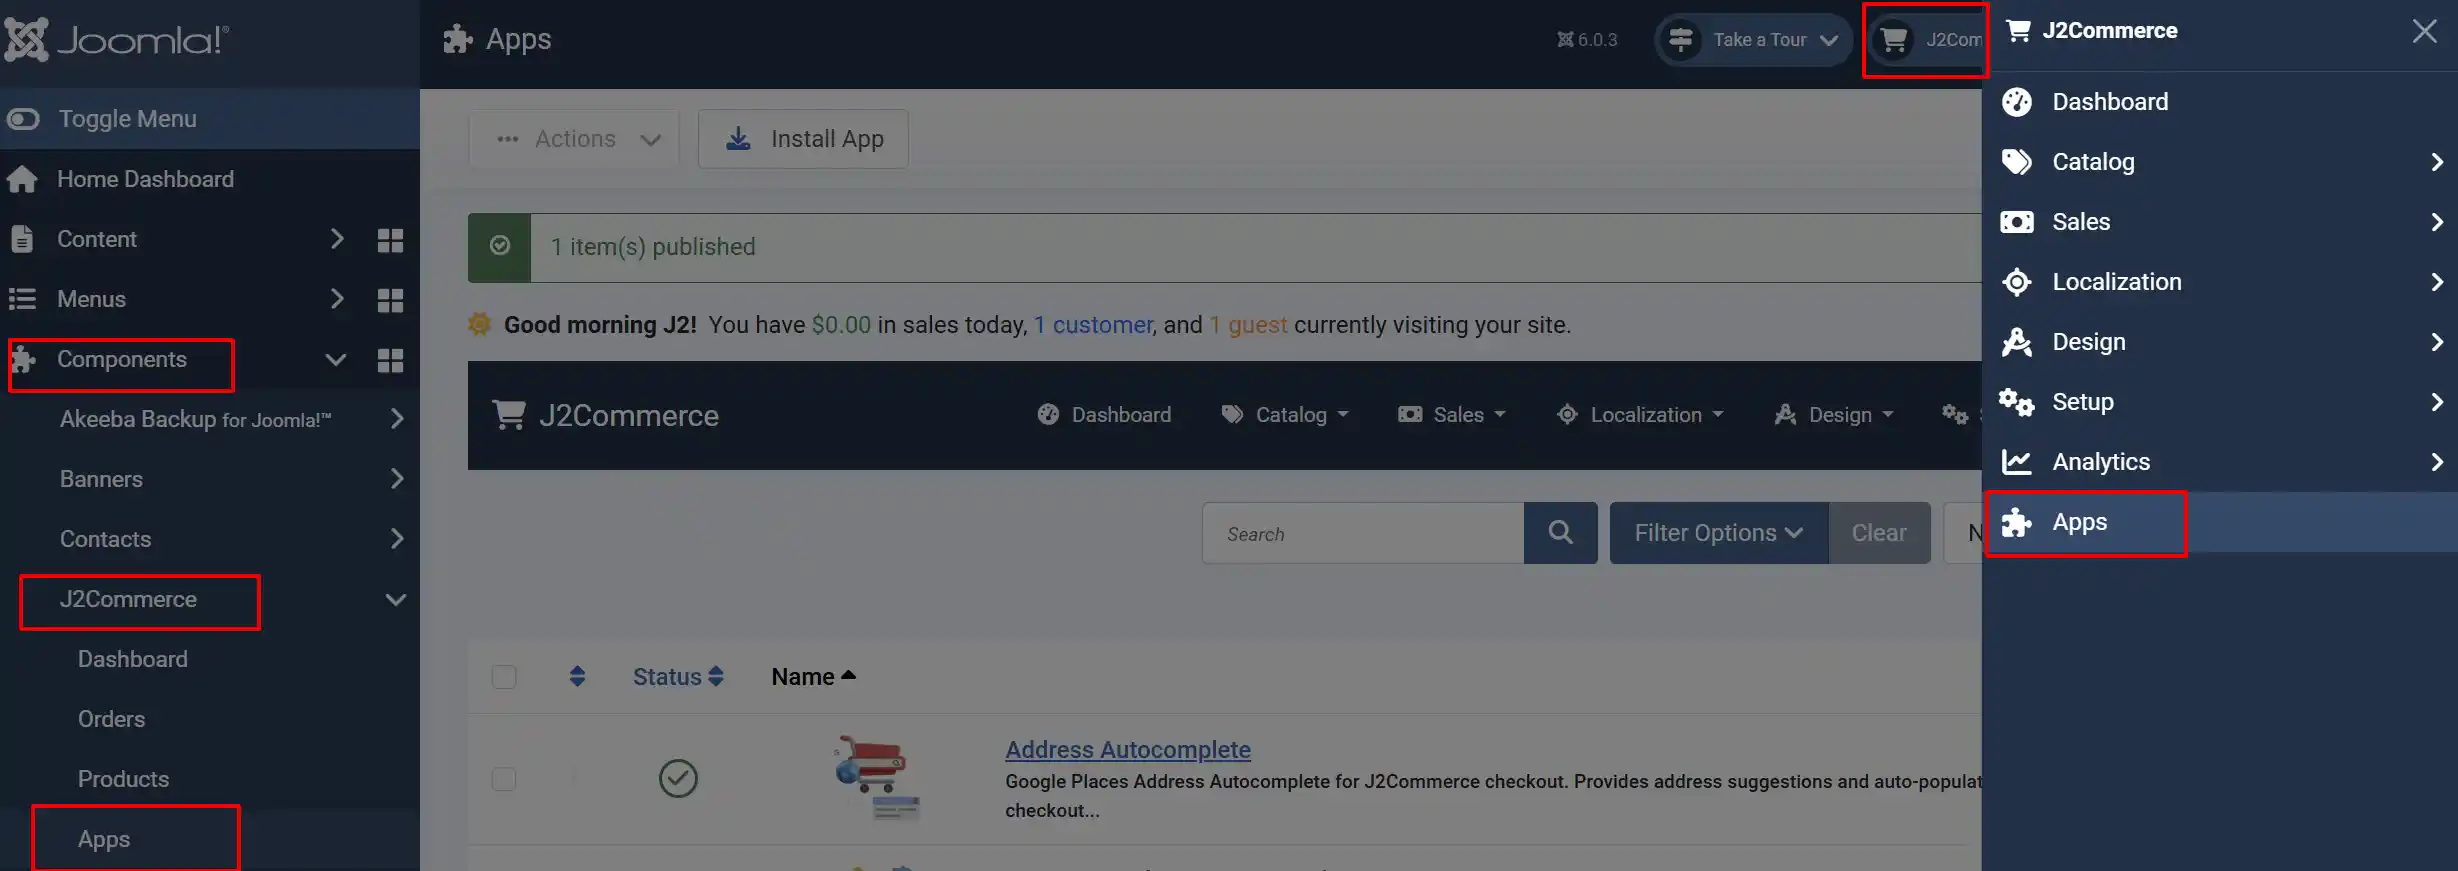
Look for Data Validation, click the X, and it will turn into a green checkmark. It is now enabled and ready for setup.
Configure the App
Click the Toggle Inline Help button in the toolbar and the app will show a description below each field as you configure it.
App Settings
- Go to J2Commerce -> Apps.
- Find Data Validation in the list and click its title to open the settings.
- Select the Rules tab.
Configure Validation Rules
The Rules tab shows a table with one row for each of your enabled custom checkout fields. Each row has three columns:
Custom Fields: Shows the field name and its internal key
Rules Apply For: Which checkout steps do these rules run on
Rules: The individual validation rules for this field
Step 1: Choose which checkout steps the rules apply to
In the Rules Apply For column, select one or more steps where you want the rules enforced:
- Billing — the billing address step
- Shipping — the shipping address step
- Payment — the payment step
- Register — the registration step during checkout
You must select at least one option before you can save rules for that field. If no step is selected, the rules are ignored even if they are configured.
Step 2: Add rules
In the Rules column for a field, click Add Rules. A new row appears with two dropdowns:
- Rule — select the type of validation
- Rule Value — provide any required value (for example, the maximum number of characters)
You can add multiple rules to a single field. Click Add Rules again to add another rule row.
Step 3: Save
Click the Apply button at the bottom of the form to save all rules. The rules are saved via AJAX — you do not need to leave or reload the page.
Available Rule Types
Match Field: Requires this field to equal another custom field (e.g., confirm email)
Max Length: Fails if the entered text exceeds the character limit
Min Length: Fails if the entered text is shorter than the minimum
Numeric: Field must contain only digits
Alphabet: Field must contain only letters (a–z, A–Z)
Alphanumeric: Field must contain only letters and digits
Phone: Field must match a phone number pattern (digits, spaces, +, (, ), -)
Email: Field must be a valid email address
Postal/Zip Code Validation: Validates the postal code against the format for the customer's selected country (85+ countries supported)
Match Table Field: Checks that the entered value exists in a column of a database table
Match Field
Use this rule when you want a customer to type a value twice — for example, an email address confirmation. Set the Rule Value to the other custom field that this field must match.
If the values do not match, the customer sees: "Field A does not match with Field B."
Match Table Field
This rule queries a database table and checks whether the entered value exists in the column you specify. After selecting the Match Table Field rule type, a Table dropdown appears. Select the table, and then select the Column from a second dropdown that loads automatically.
Use this rule carefully — it allows access to any database table visible to J2Commerce. Restrict it to tables with trusted, non-sensitive data.
Error Messages Shown to Customers
| Rule | Error message shown |
|---|---|
| Match Field | "[Field A] does not match with [Field B]" |
| Max Length | "Maximum allowed length is [N]" |
| Min Length | "Minimum length [N] required" |
| Numeric | "Field value must be numeric" |
| Alphabet | "Field value must be alphabet" |
| Alphanumeric | "Field value must be alphanumeric" |
| Phone | "Field value must be a valid phone number" |
| "Field value must be a valid email" | |
| Postal/Zip Code | "Invalid Postal/Zip Code Format" |
| Match Table Field | "Enter data not available" |
Advanced: Debug Mode
The plugin includes a Debug Mode option on the Advanced tab. When enabled, the plugin writes detailed log entries to the Joomla log directory.
Turn debug mode on only when you are troubleshooting. Disable it in production to avoid unnecessary disk usage.
Tips
- A custom field must be enabled in J2Commerce for it to appear in the Rules tab. If you do not see a field in the list, check that it is enabled under J2Commerce -> Custom Fields.
- The Postal/Zip Code rule reads the country the customer selected on the billing or shipping form. The validation pattern is chosen automatically based on the country.
- You can combine multiple rules on a single field — for example, both Min Length and Alphanumeric on a coupon code field.
- Rules only run on the checkout steps you select in Rules Apply For. A rule assigned only to Billing will not run on the Shipping step, even for the same field.
Troubleshooting
No fields appear in the Rules tab
Cause: No enabled custom checkout fields exist in your shop.
Solution: Go to J2Commerce -> Custom Fields and create or enable at least one field. Return to J2Commerce -> Apps -> Data Validation -> Rules tab and the fields will appear.
Rules are not running at checkout
Cause: No checkout step is selected in the Rules Apply For column for that field, or the field is not displayed on the step being validated.
Solution:
- Open the Data Validation plugin settings and go to the Rules tab.
- Check that at least one step (Billing, Shipping, Payment, or Register) is selected for the field.
- Confirm the custom field itself is configured to display on that step — check the field's display settings in J2Commerce -> Custom Fields.
- Click Apply to save.
Postal code validation always fails
Cause: The country selected by the customer does not match the postal code format, or the billing country field was not submitted with the form.
Solution: Verify that the billing country dropdown is included in your checkout form. The plugin reads the submitted country_id value to select the correct postal pattern. If the country is not submitted, postal validation is skipped.
Debug logs are not appearing
Cause: Debug mode may be disabled, or the Joomla log directory is not writable.
Solution:
- Open the plugin settings and go to the Advanced tab.
- Switch Debug Mode to Yes.
- Click Save.
- Complete a checkout to trigger the validation events.
- Check the Joomla log directory (configured under System -> Global Configuration -> Server -> Path to Log Folder).