
EDI Orders sends J2Commerce orders to your ERP or fulfillment partner as CSV files and brings data back in from CSV files. An export template builds a file whenever an order reaches a status you choose and can upload it to an FTP server. An import template maps the columns of a file to your store, so you can update order statuses, shipments, stock and prices, or load products, customers and past orders from another platform.
You can preview any import before it writes anything, and every run is recorded in an import log. Long imports pause and continue on their own, and a run that is cut off can be resumed from its log. EDI Orders is a separate add-on available from the J2Commerce Extensions Store and needs J2Commerce 6.6.4 or later.
Requirements
- J2Commerce 6.6.4 or later
- Joomla 6.0.0 or later
- The PHP FTP extension, only if you send exports to an FTP server or import from one
- A Joomla scheduled task and a cron job, only if imports or delayed exports run on a schedule
Purchase and Download
EDI Orders is a separate add-on available from the J2Commerce Extensions Store. It does not ship with the core J2Commerce 6 component.
- Buy EDI Orders in the J2Commerce Extensions Store.
- Open My Downloads in your profile menu and download the ZIP file.
Installation
Buy and download it from EDI Orders on the J2Commerce Extensions Store.
- In the Joomla Administrator, go to System -> Install -> Extensions.
- Upload the ZIP file.
- Go to J2Commerce -> Apps and check that EDI Orders shows a green checkmark. Click the status icon to enable it if it does not.
The app is listed as EDI Orders. It also adds an EDI Orders link to the J2Commerce menu, next to Orders, which opens the dashboard.
The Dashboard
Open J2Commerce -> EDI Orders to see the dashboard. It shows four totals for the period you pick: Import Runs, Rows Imported, Successful Exports and Failures. Charts and lists below them cover imports, exports and skip reasons.
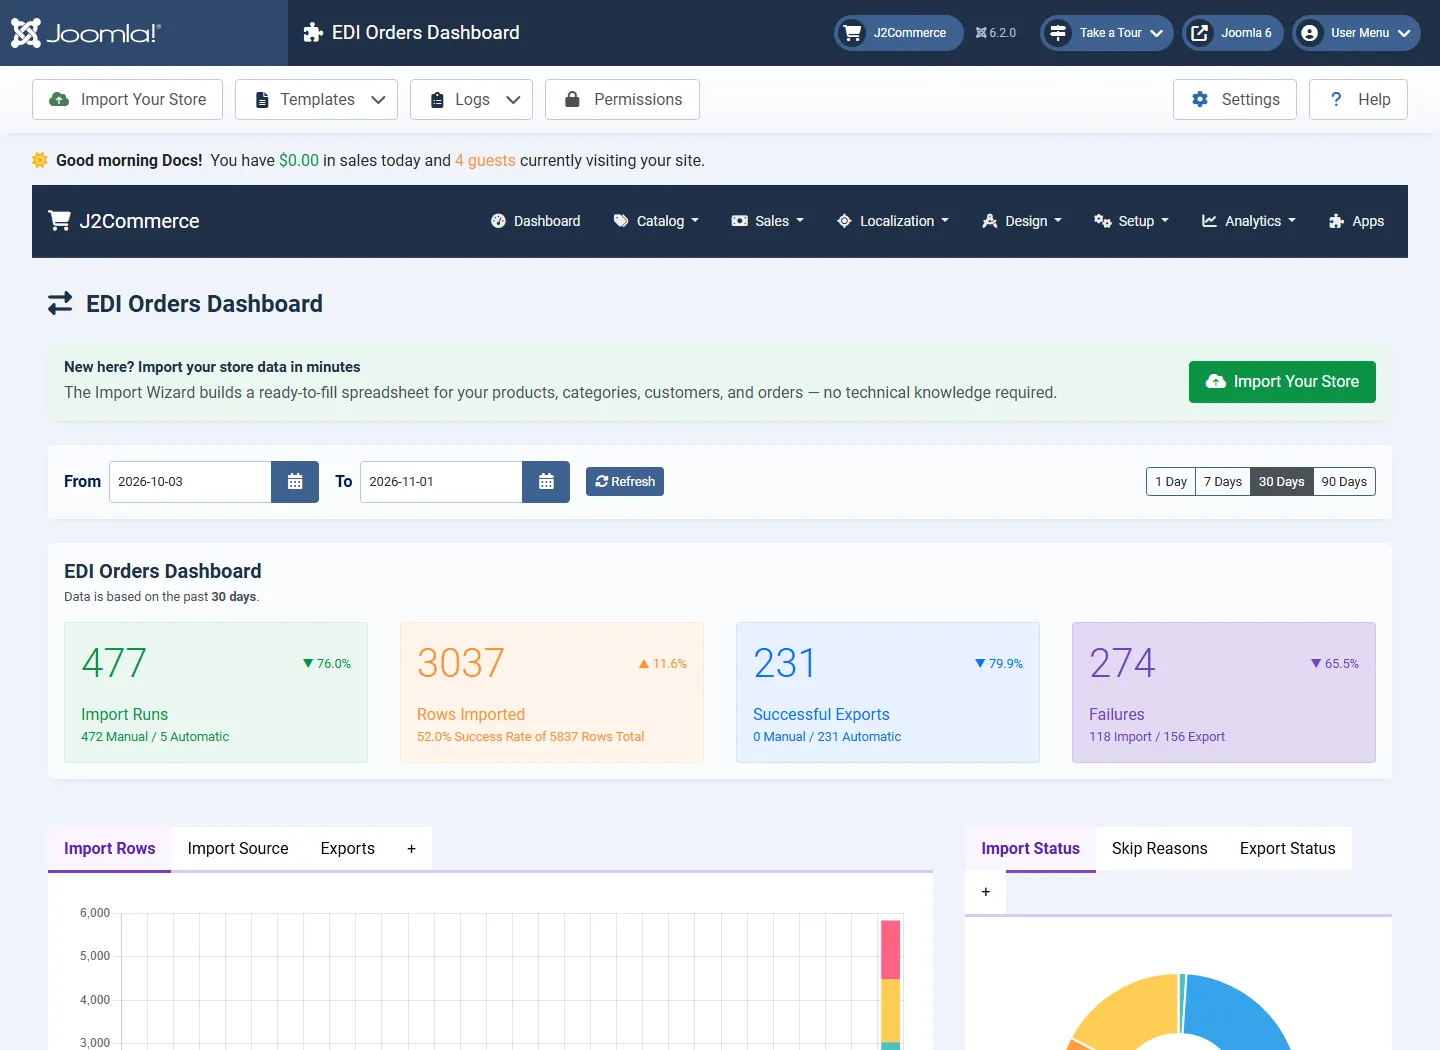
The toolbar holds the shortcuts you need:
- Import Your Store opens the Import Wizard.
- Templates opens Export Templates, Import Templates, the Import Wizard and, for users who may edit products, Unreferenced Images.
- Logs opens Import Logs.
- Settings opens the app settings.
- Permissions opens the permission matrix. It shows for Super Users and other users with the J2Commerce admin right.
App Settings
Click Settings on the dashboard toolbar. The Notifications tab controls store-wide alerts. Each import template also has its own notification settings.
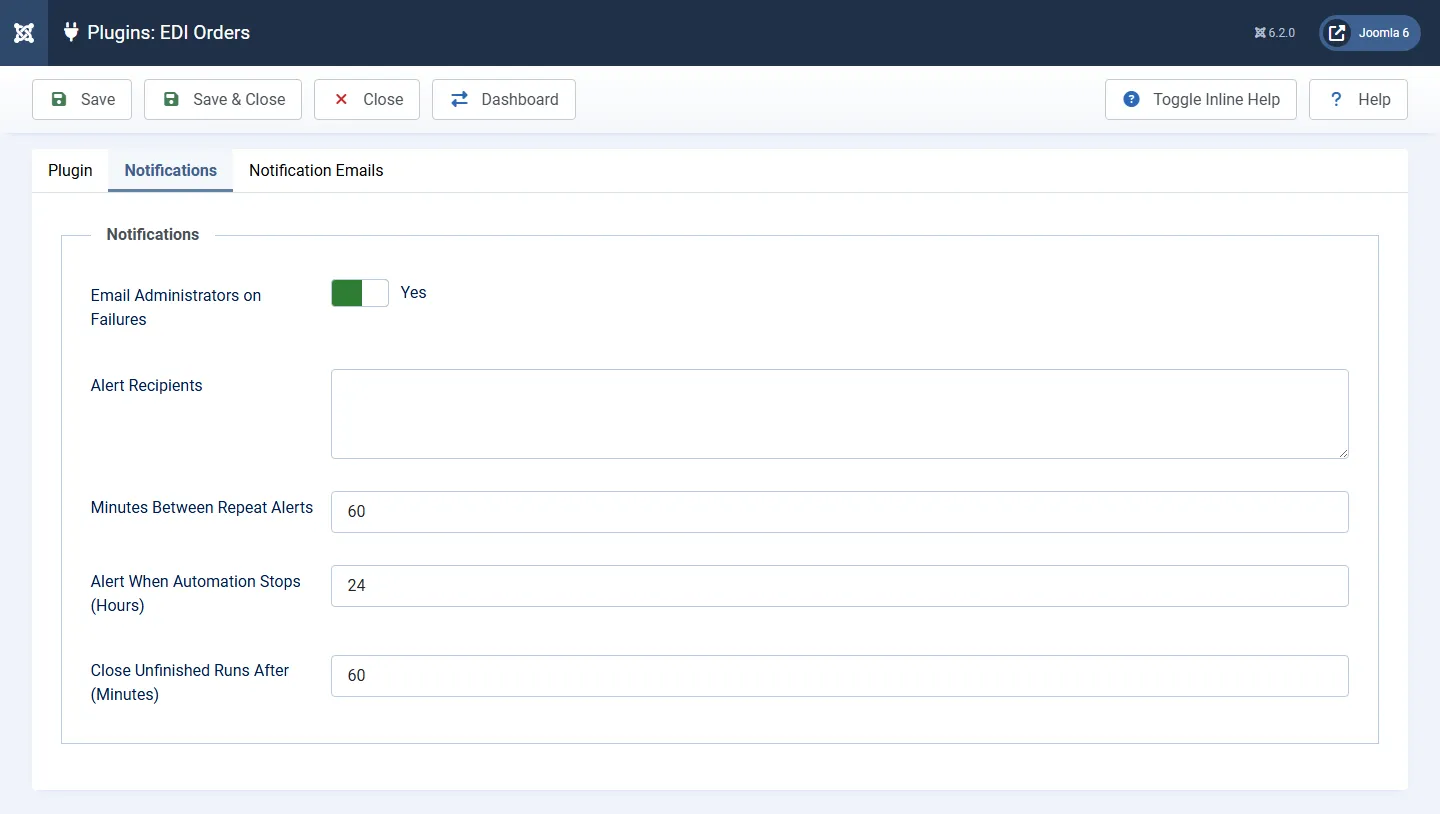
| Setting | What It Does | Default | Options |
|---|---|---|---|
| Email Administrators on Failures | Emails the recipients below when a scheduled import, a scheduled or queued export, or an export started by an order status change fails. It also emails when scheduled EDI work stops running. | Yes | Yes, No |
| Alert Recipients | One or more email addresses, separated by commas or new lines. Leave it empty to use the Administrator Email from the J2Commerce options. | Empty | Email addresses |
| Minutes Between Repeat Alerts | When a template keeps failing at the same step, sends at most one email in this many minutes. Failures in between are listed in the next email. Enter 0 to send an email for every failure. | 60 | 0 or higher |
| Alert When Automation Stops (Hours) | Sends one alert and shows a dashboard warning when the scheduled task has not run the EDI work for this many hours while scheduled imports or waiting exports exist. Set it higher than the longest interval of your EDI scheduled tasks. | 24 | 1 or higher |
| Close Unfinished Runs After (Minutes) | A scheduled import still marked Running after this many minutes is marked Failed and reported. Paused runs that wait to continue are not affected. | 60 | 5 or higher |
The Notification Emails tab has two buttons, Import for the Joomla Editor and Import for the Visual Editor. They create one email template for each import result (Failed, Partial and Complete) and for each automation alert (Export Failed, Automation Stopped and Running Again).
Warning
Importing the email templates again replaces the stored wording with the bundled wording. Any changes you made to those templates are lost.
Exporting Orders
An export template builds one CSV file for one order and can send it to an FTP server. Open Templates -> Export Templates on the dashboard to manage them.
How an Export Starts
An enabled template exports an order each time the order moves to the template's Export Trigger Status. This covers new orders, payment gateway updates and status changes made in the admin. A second trigger is the CSV Export button on the order screen, which runs one template for that order on demand.
After a successful export, the order history gets an [EDI] Exported line and the order moves to Status After Successful Export if you set one. A failed export adds an [EDI] FAILED line and emails the alert recipients.
The EDI Export History card on the order screen lists these lines. A manual export adds an [EDI] Re-exported line instead.
Note
With more than one enabled template, the CSV Export button becomes a drop-down list of templates. Manual exports need the J2Commerce right to export orders.
Export Template Settings
Open a template to edit it. One form holds the general, file, status trigger, FTP and logging settings.
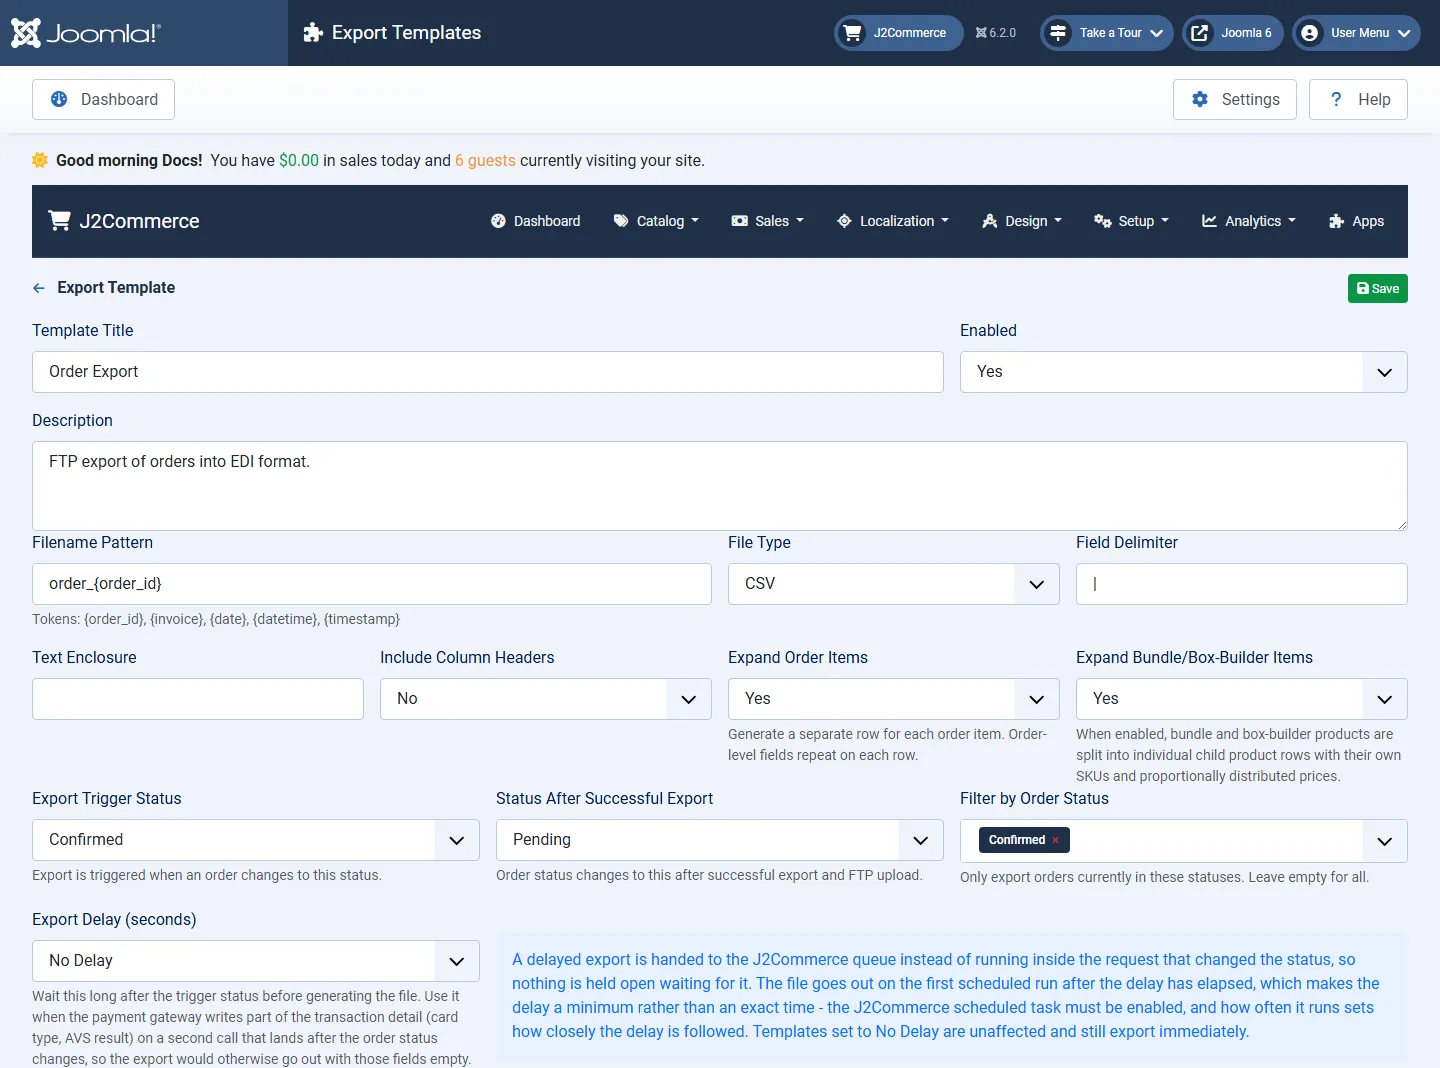
| Setting | What It Does | Default | Options |
|---|---|---|---|
| Template Title | The name of the template. It is required. | Empty | Text |
| Enabled | Only enabled templates export. | Yes | Yes, No |
| Description | A note for your team. | Empty | Text |
| Filename Pattern | The name of the file. Use the tokens {order_id}, {invoice}, {date}, {datetime} and {timestamp}. | order_{order_id} | Text with tokens |
| File Type | The format of the file. | CSV | CSV |
| Field Delimiter | The character between fields. Common values are a pipe, a comma or \t for a tab. Leave it empty for no delimiter. | Pipe (|) | Up to 5 characters |
| Text Enclosure | The character that wraps each value. Leave it empty for no enclosure. | Empty | Up to 5 characters |
| Include Column Headers | Adds a first line with the column names. | No | Yes, No |
| Expand Order Items | Writes one row for each order item. Order-level fields repeat on every row. | Yes | Yes, No |
| Expand Bundle/Box-Builder Items | Splits bundle and box-builder products into rows for their child products, with their own SKUs and prices shared out in proportion. | No | Yes, No |
| Export Trigger Status | The order status that starts an export. | None | Any order status |
| Status After Successful Export | The status the order moves to once the file is built and uploaded. | None | Any order status |
| Filter by Order Status | Exports only orders whose new status is in this list. Leave it empty for all. | Empty | Any order statuses |
| Export Delay (seconds) | Waits this long after the trigger status before building the file. Use it when your payment gateway writes card details in a second call after the status changes. | No Delay | No Delay, 5 Seconds, 30 Seconds, 5 Minutes (300 Seconds) |
| FTP Host, FTP Port, FTP Username, FTP Password | The server that receives the file. Leave FTP Host empty to skip the upload. | Port 21 | Text, number |
| Remote Path | The folder on the FTP server that receives the files. | / | Text |
| Passive Mode | Uses passive FTP. | Yes | Yes, No |
| Use SSL (FTPS) | Connects with FTPS. | No | Yes, No |
| Enable Logging | The dashboard counts templates with this on as With Logging Enabled. The export history lines on the order are written whether it is on or off. | Yes | Yes, No |
The Test FTP Connection button checks the host, port, login and remote path before you rely on them.
Info
A delayed export goes to the J2Commerce queue and is sent on the first scheduled run after the delay. The delay is a minimum, not an exact time, and the J2Commerce scheduled task must be enabled for it to work. Templates set to No Delay export at once.
Without an FTP host, the file stays in files/app_edi/exports on your server, a folder that web visitors cannot open. With an FTP host, the local copy is deleted after the upload. The scheduled task EDI: Clear Old Files removes generated files older than 30 days.
Export Template Fields
A template's fields are the columns of the file. Click a template's title in the Export Templates list to open its fields. There you can add or edit fields, and Sample Output previews the file for an order ID you type in.
| Setting | What It Does | Default | Options |
|---|---|---|---|
| Field Name | The name of the field. It is required. | Empty | Text |
| Column Header | The heading written when Include Column Headers is on. | Empty | Text |
| Source Type | Where the value comes from. | Order Field | Order Field, Custom SQL, PHP File, Static Value |
| Select Order Field | The order, billing address, shipping address or order item field to write. | None | Order, Billing Address, Shipping Address, Order Items |
| SQL Expression | An expression run for each order. It must reference an order or order-info column, and it can use :order_id and :j2commerce_order_id. | Empty | Text |
| PHP Transform File | A PHP file from the plugin's overrides folder that formats the value. | None | Files in overrides |
| Input Field | An order field whose value is passed to the PHP file as $fieldValue. | None | Order fields |
| Static Value | A fixed value written on every row. | Empty | Text |
| Increment Value | Writes this number multiplied by the row number, so 10 gives 10, 20, 30. | 0 | Number |
Warning
The Export Template button downloads a JSON file that contains the FTP host, user name and stored password. Keep it private, and do not email it or commit it to a repository.
Importing Data
An import template tells EDI Orders what a CSV file contains and where each column goes. You build one template for each kind of file, then run it by hand or on a schedule. Open Templates -> Import Templates on the dashboard to see them.
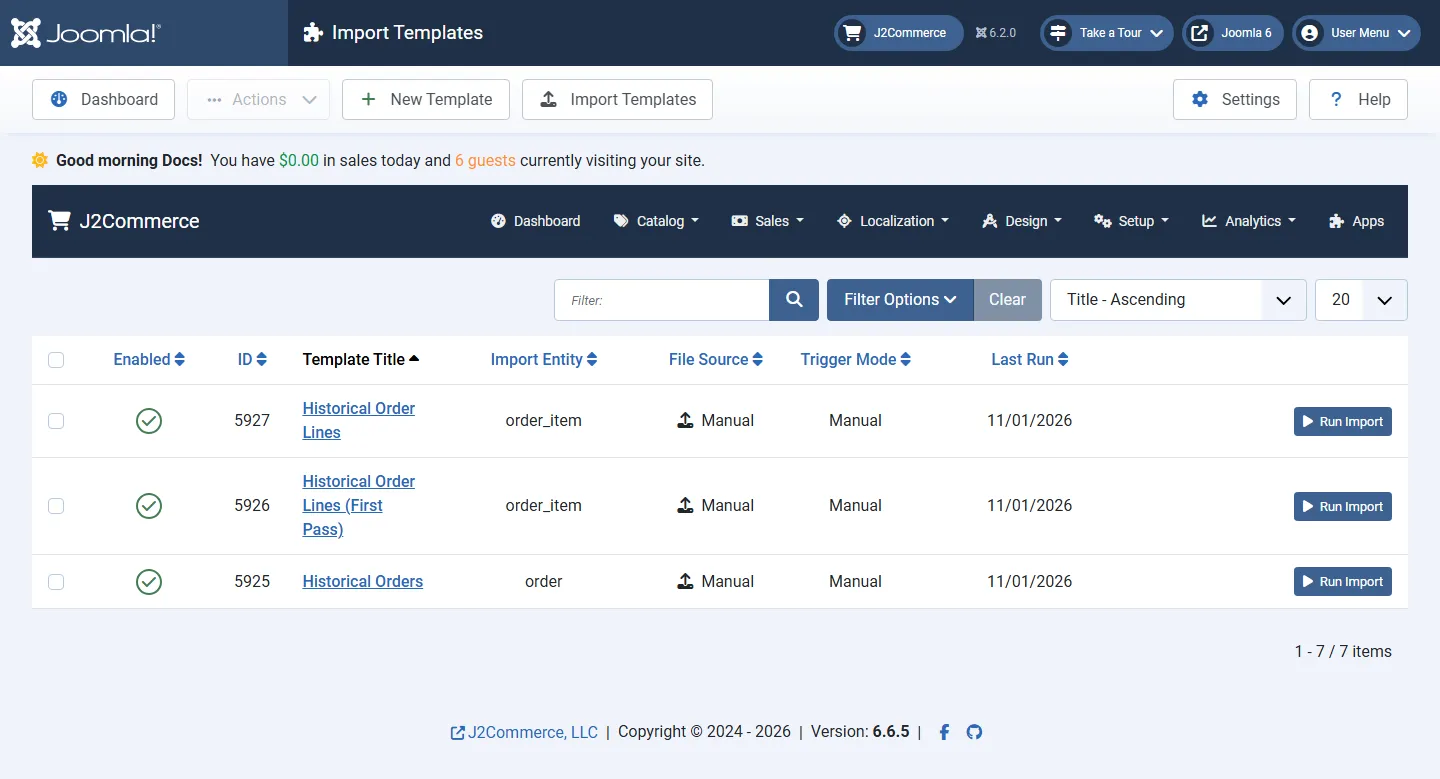
What You Can Import
The Import Entity setting picks the kind of record a template writes.
| Import Entity | What It Does |
|---|---|
| Order Status Update | Changes the status of existing orders, found by order ID. |
| Order Shipment | Writes tracking details to existing orders. Set Set Order Status After Shipment to also move the order to a new status. |
| Product Stock Level | Updates stock quantities. Update Stock Status also switches stock-managed variants between In Stock and Out of Stock. |
| Product Price | Updates product prices. |
| Category, Manufacturer | Creates or updates categories and manufacturers. |
| Customer, Customer Address | Creates customers and their billing or shipping addresses. |
| Product, Product Variant | Creates or updates products and variants. |
| Product Images | Sets the main image and the additional images of existing products. |
| Product Option, Product Option Value | Creates options and the option values of products. |
| Order (Historical) | Creates orders from another platform's export. |
| Order Item (Historical) | Adds line items to orders found by their source order number. Import the order first. |
| Order Transaction (Historical), Order Discount (Historical) | Adds payment and discount rows to imported orders. |
| Custom (Any Table/Column) | Writes to any J2Commerce table and column you map. |
The Import Wizard lists the entities your account may import. Order entities need the J2Commerce right to edit orders, and product entities need the right to edit products. Customer entities need the Joomla right to administer users, and Custom needs the J2Commerce administrator right.
The Import Wizard
Click Import Your Store on the dashboard to build a blank CSV with the exact column names your store expects. The wizard has three steps: Choose What to Import, Choose Fields and Options and Download. In the last step you pick the column separator, add an example row if you want one and download the file.
Tick Also create an import template from these choices to get a matching template at the same time. The wizard shows a recommended import order: categories and manufacturers first, then products, options, images, customers and orders, with status and shipment updates last.
Import Template Settings
Click New Import Template to create one. The editor has five tabs: General, Source & CSV, Column Mapping, Notifications and Import. Save with the toolbar buttons.
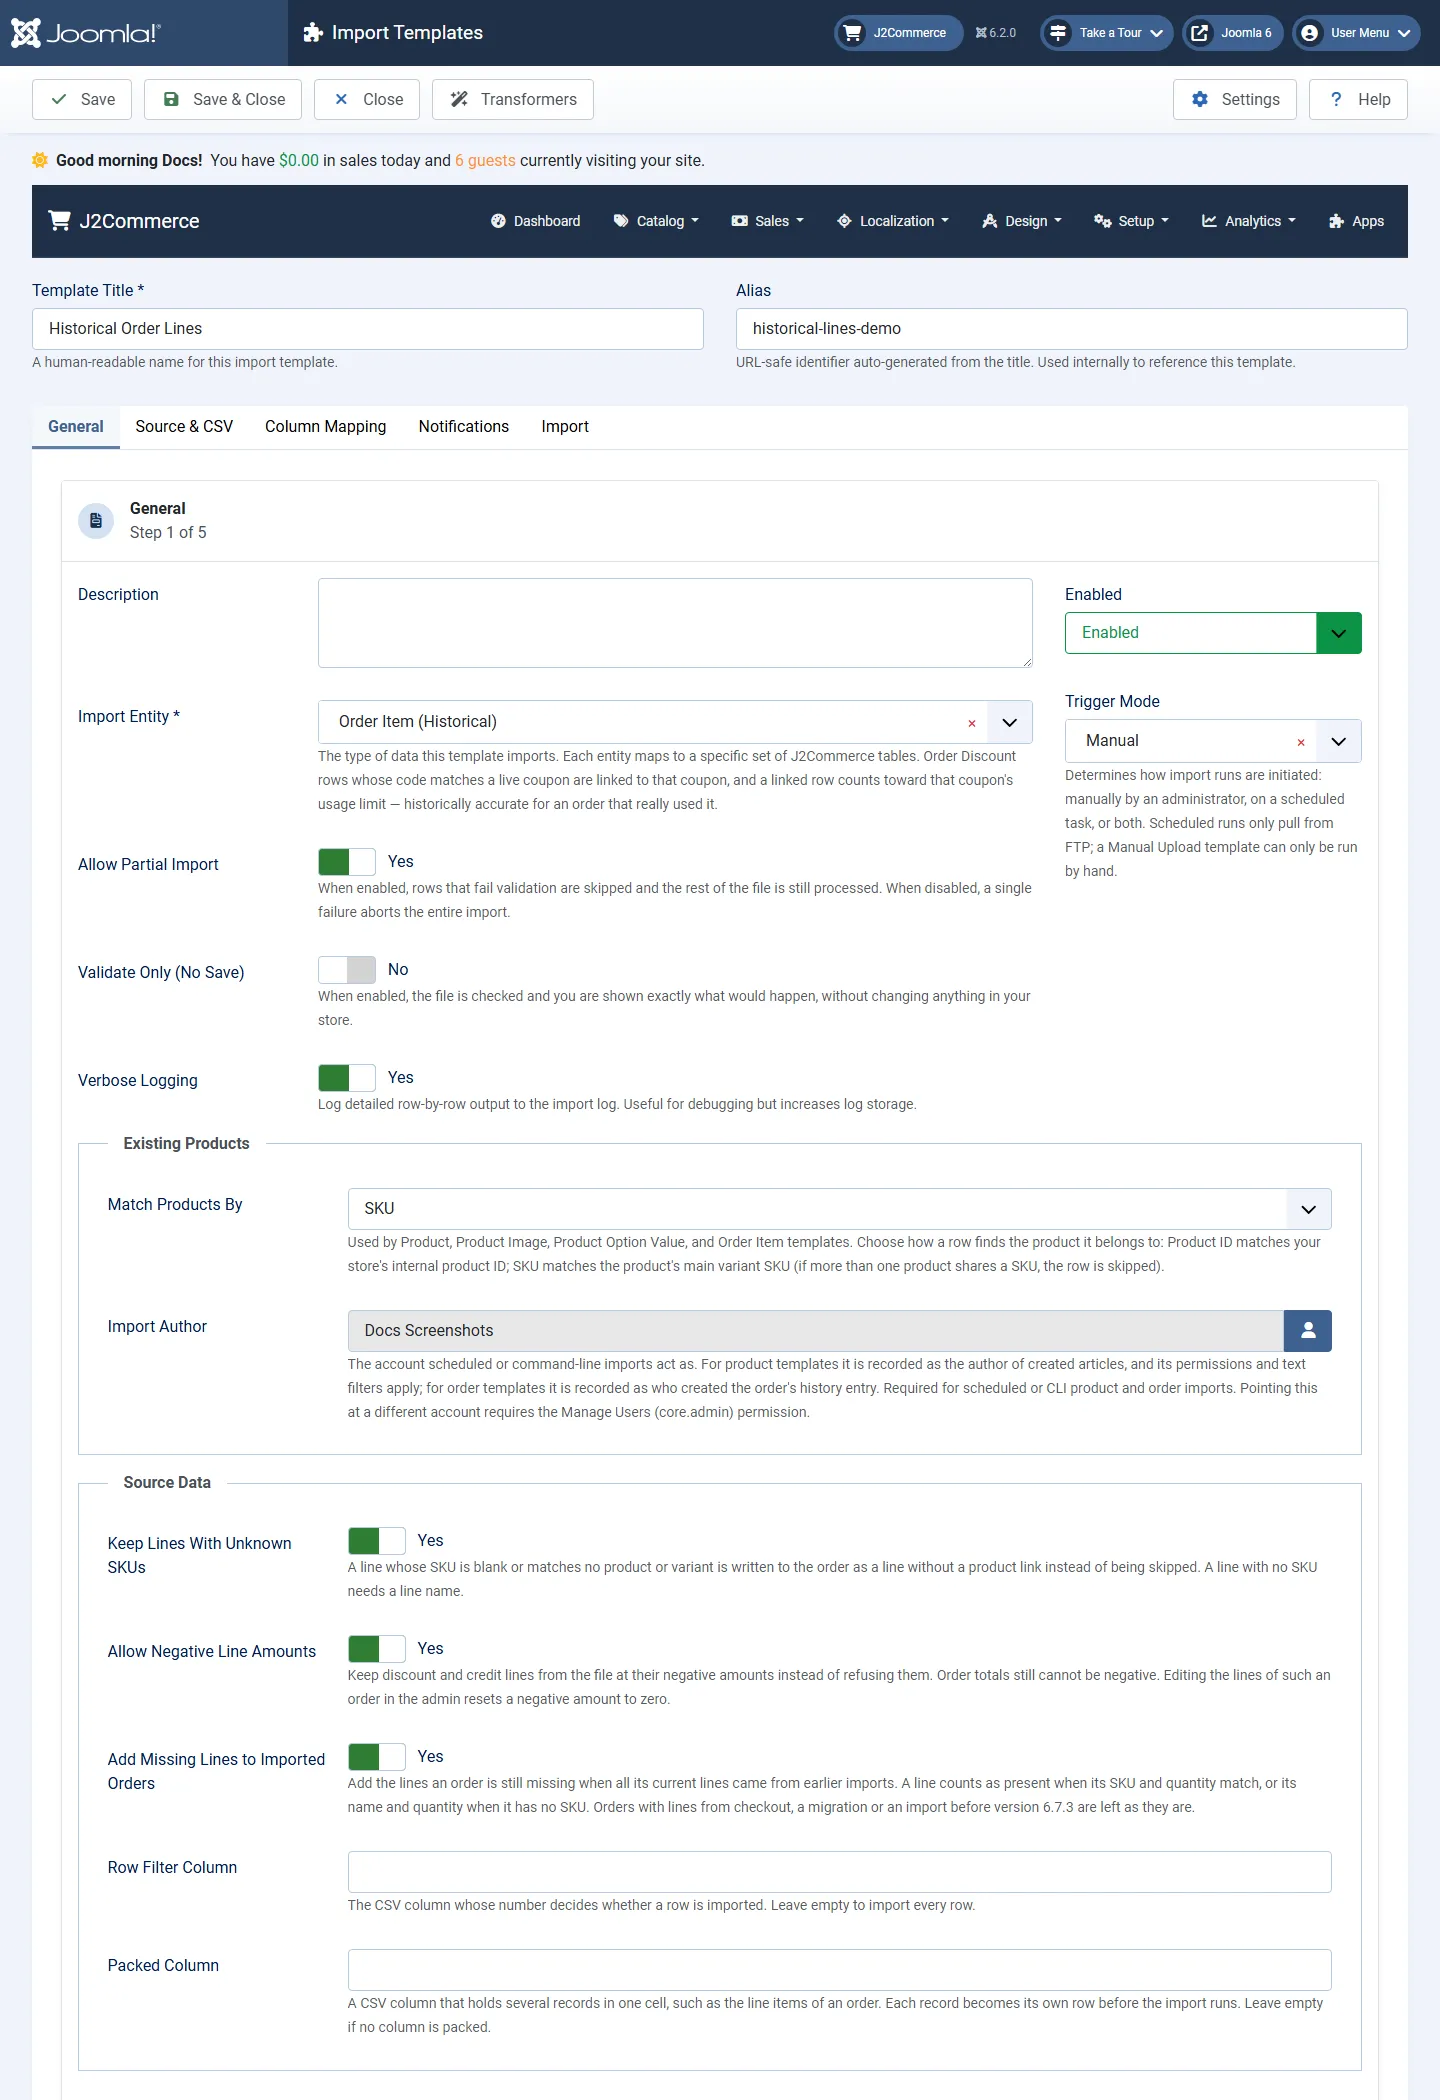
General Tab
| Setting | What It Does | Default | Options |
|---|---|---|---|
| Template Title, Alias | The name of the template. The alias is made from the title. | Empty | Text |
| Description | A note for your team. | Empty | Text |
| Import Entity | The kind of record the template writes. | Order Status Update | See What You Can Import |
| Allow Partial Import | On: a row that fails is skipped and the rest of the file is still imported. Off: the file is checked first, and one bad row stops it. | Yes | Yes, No |
| Validate Only (No Save) | Makes every run of this template a preview that changes nothing, including scheduled runs. | No | Yes, No |
| Verbose Logging | Keeps a log line for every row. Failed and skipped rows are always logged. | No | Yes, No |
| Enabled | Only enabled templates run on a schedule. | Yes | Yes, No |
| Trigger Mode | How runs start. Scheduled runs only collect files from FTP, so a Manual Upload template can only be run by hand. | Manual | Manual, Scheduled, Manual & Scheduled |
A few settings show only for the entity they belong to. Product entities show Match Products By (Product ID or SKU, default SKU), Overwrite Existing Product IDs and When a Product Already Exists. Customer templates show Password Mode, Require Password Reset and Customer User Group.
Source & CSV Tab
| Setting | What It Does | Default | Options |
|---|---|---|---|
| File Source | Where the file comes from. | Manual Upload | Manual Upload, FTP |
| File Pattern | Picks the files to collect from the FTP server, for example *.csv or orders_*.txt. | *.csv | Text |
| After Import | What happens to the source file after a successful import. | Delete File | Delete File, Keep File |
| Keep Processed Files (Days) | How long processed files are kept before they are deleted. Enter 0 to turn the cleanup off. | 30 | 0 to 365 |
| FTP Host, FTP Port, FTP Username, FTP Password, Remote Path | The FTP server details. They show when File Source is FTP. | Port 21, path / | Text, number |
| Passive Mode, Use SSL (FTPS) | FTP connection options. | Yes, Yes | Yes, No |
| Delimiter, Enclosure, Escape | The characters that separate and wrap values in the CSV file. | Comma, double quote, backslash | One character each |
| Encoding | The character encoding of the file, such as UTF-8, ISO-8859-1 or Windows-1252. | UTF-8 | Text |
| File Has Header Row | Skips the first row of the file as column names. | Yes | Yes, No |
Choose a sample CSV under Sample File (auto-detect headers) and click Detect Headers to fill the column mapping from the file's first row. The FTP section has a Test FTP Connection button.
Warning
The FTP password is stored in the database without encryption. Limit who can open the admin accordingly.
Column Mapping Tab
Each row of the mapping sends one CSV column to one place in your store. Click Add Field for a new row.
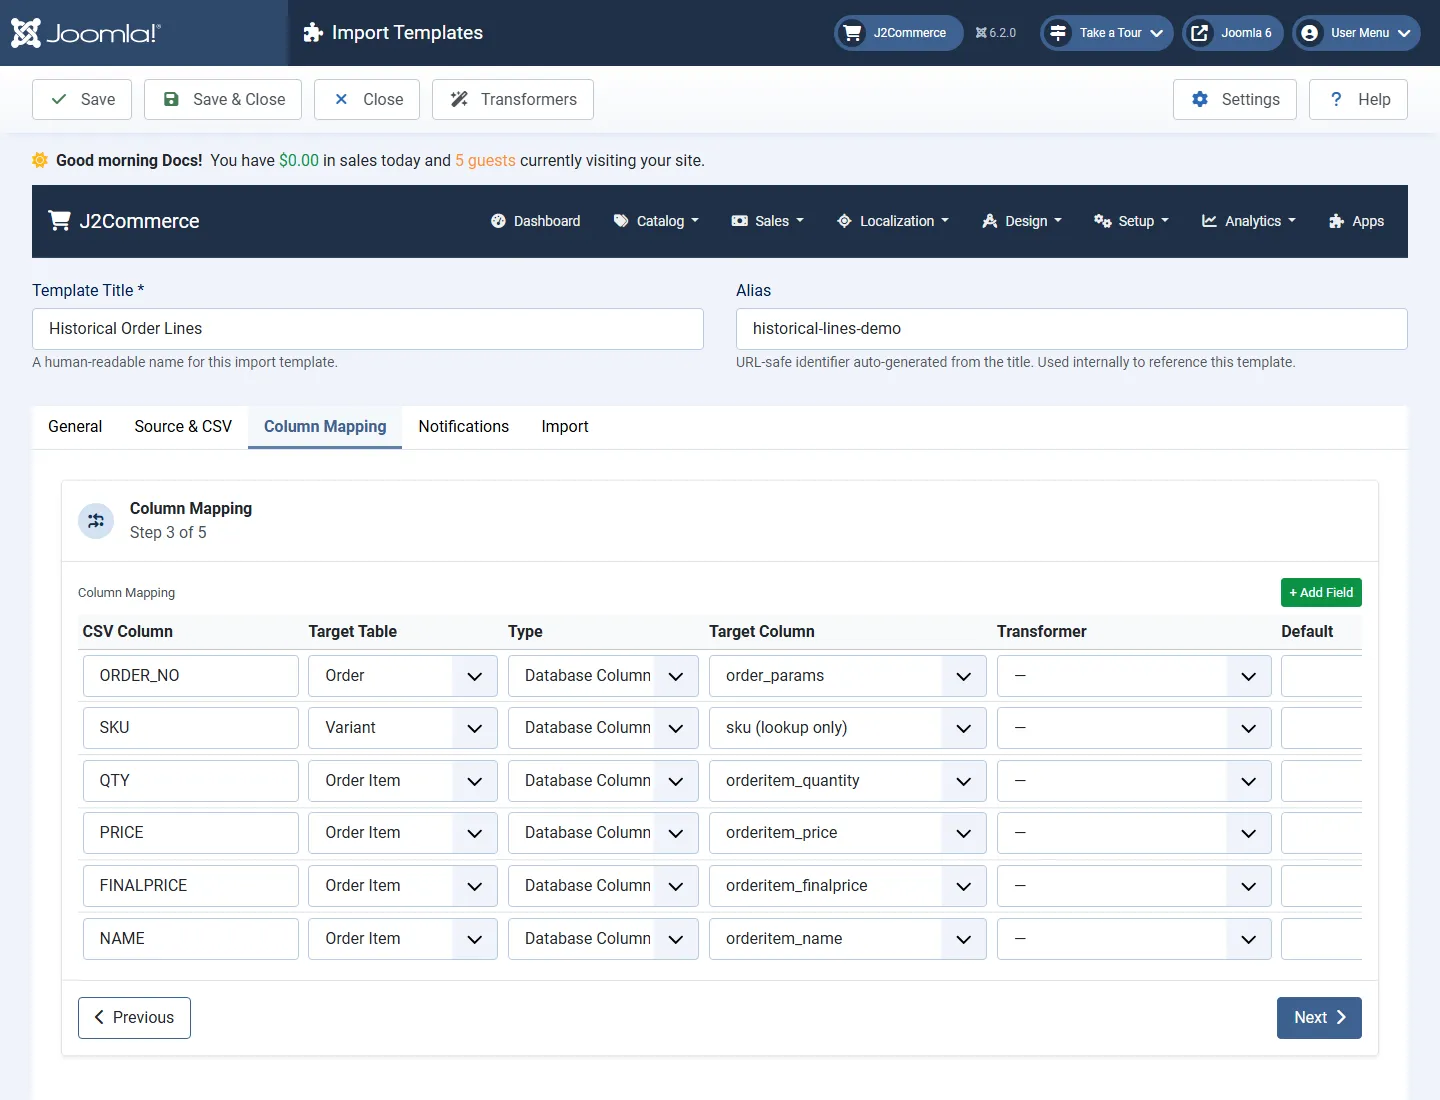
| Setting | What It Does | Default | Options |
|---|---|---|---|
| CSV Column | The column heading in the file. | Empty | Text |
| Target Table | The J2Commerce table the value goes to. | None | Tables that suit the entity |
| Type | How the value is made. A transformer you pick switches the type to PHP Transformer by itself. | Database Column | Database Column, PHP Transformer, Static Constant, Skip, Lookup Key |
| Target Column | The column in the target table. | None | Columns of the table |
| Transformer | A PHP file that converts the value before it is saved. | None | See Transformers |
| Default | Used when the cell is empty. | Empty | Text |
| Required | Fails the row when the value is still empty. | No | On, off |
| Lookup Key | Marks the column that identifies an existing record, such as the order ID or SKU. Every template needs at least one. | Off | On, off |
Info
Columns that J2Commerce protects, such as order dates and IDs, cannot be overwritten. Tick Lookup Key on a column like that to use it to find the record instead.
Transformers
A transformer converts a value before it is saved. Click Transformers in the import template toolbar to see the list and copy a file name. The files live in the plugin's import_overrides folder.
| Transformer | What It Does |
|---|---|
| Date (US) | Reads m/d/Y or m/d/Y H:i:s dates. |
| Date (EU) | Reads d/m/Y or d/m/Y H:i:s dates. |
| Date (ISO 8601) | Reads ISO 8601 and MySQL format dates. |
| Trim & Lowercase | Removes surrounding spaces and lowercases the value. |
| Phone Digits Only | Strips every character that is not a digit. |
| State to Two-Digit Code | Turns a US state name into its two-letter code. |
| Country to Two-Digit Code | Turns a country name or ISO-3 code into the ISO-2 code. |
| Lookup Status ID by Name | Turns an order status name into its ID. |
| Order Status ID | Turns a short code such as PROCESSING, SHIPPED or CANCELLED into the order status ID. |
| Lookup User ID by Email | Finds the Joomla user ID for a customer email. Returns 0 for a guest. |
| Lookup Variant ID by SKU | Finds the variant ID for a SKU. |
| Lookup Country ID by Name | Finds the country ID from a name, ISO-2 or ISO-3 code. |
| Lookup Zone ID by Name | Finds the zone ID from a state or province name or code. Map the country column first when a code is shared by more than one country. |
| Lookup Product Type by Value or Label | Matches a product type by its stored value or its label. A value that matches neither fails the row. |
| JSON Order Params | Wraps a non-empty value as JSON under the name Cancel Code. |
Four more files appear in the list without a description: concat_columns.php, lookup_status_id_by_map.php, lookup_country_id_optional.php and lookup_zone_id_optional.php.
concat_columns.phpjoins several columns into one value.lookup_status_id_by_map.phpmaps your supplier's status labels to local statuses.- The two optional lookups work like their plain versions but leave the value empty instead of failing the row.
The first two read a JSON recipe from the field's Static Value.
Order status columns must use one of the status transformers: lookup_status_id_by_name.php, lookup_status_id_by_map.php or order_status_id.php. Status IDs differ between stores, so a typed ID is not accepted.
Notifications Tab
| Setting | What It Does | Default | Options |
|---|---|---|---|
| Notify Customer on Status Change | Emails the customer when this import changes their order status. | No | Yes, No |
| Order History Comment Template | An optional comment added to the order history. Use the tokens {status} and {file}. | Empty | Text |
| Notification Emails | Emails a store administrator when a run of this template finishes with a result you choose. | Yes | Yes, No |
| Send an Email When the Result Is | The import results that send an email. | Failed, Partial | Failed, Partial, Complete |
| Failure Notification Recipient | The address that receives the emails. Leave it empty to use the store's default admin email. | Empty | Email address |
| Show failures on the dashboard tile | Counts this template's failed and partial imports in the failure count on the administrator dashboard. | Yes | Yes, No |
Source Data Options
These options help when you bring over the export of another platform. They sit under Source Data on the General tab.
The first four show only for the entity named in the table. The row filter and packed column settings show for every entity.
| Setting | What It Does | Default | Options |
|---|---|---|---|
| Add Missing Records Only | Customer and Customer Address templates only. Records that already exist are skipped and left untouched, and rows with nothing to create are skipped instead of failed. Use it to bring a later export of the same store up to date. | No | Yes, No |
| Keep Lines With Unknown SKUs | Order Item templates only. A line whose SKU is blank or matches no product or variant is written to the order as a line without a product link, instead of being skipped. A line with no SKU needs a line name. | No | Yes, No |
| Allow Negative Line Amounts | Order Item templates only. Keeps discount and credit lines at their negative amounts instead of refusing them. Order totals still cannot be negative. | No | Yes, No |
| Add Missing Lines to Imported Orders | Order Item templates only. Adds the lines an order is still missing when all its current lines came from earlier imports. A line counts as present when its SKU and quantity match, or its name and quantity when it has no SKU. | No | Yes, No |
| Row Filter Column | The CSV column whose number decides whether a row is imported. Leave it empty to import every row. | Empty | A column name |
| Import Rows Above | Shows when a Row Filter Column is set. Only rows whose filter column is greater than this number are imported. Other rows, and rows where the column is not a number, are skipped without a log line. | Empty | A number |
| Packed Column | A CSV column that holds several records in one cell, such as the line items of an order. Each record becomes its own row before the import runs. A row with an empty packed cell is dropped. | Empty | A column name |
| Packed Record Columns | Comma-separated names for the parts of each packed record, in order, for example LineSku,LineName,LineQty,LinePrice. Map these names like any other CSV column. | Empty | Text |
| Record Delimiter | The character between one packed record and the next. | Pipe | Pipe, Tilde, Semicolon, Comma |
| Part Delimiter | The character between the parts inside one packed record. | Tilde | Tilde, Pipe, Semicolon, Comma |
Note
Packed columns need File Has Header Row set to Yes. Rows skipped by the row filter count in the Skipped total of the run.
Add Missing Lines to Imported Orders works only on orders whose lines all came from imports made with version 6.7.3 or later. An order with lines from checkout, a platform migration or an older import is left as it is.
Running an Import
Run a preview first, then the live import. Both are on the Import tab of the template, and they take the same file.
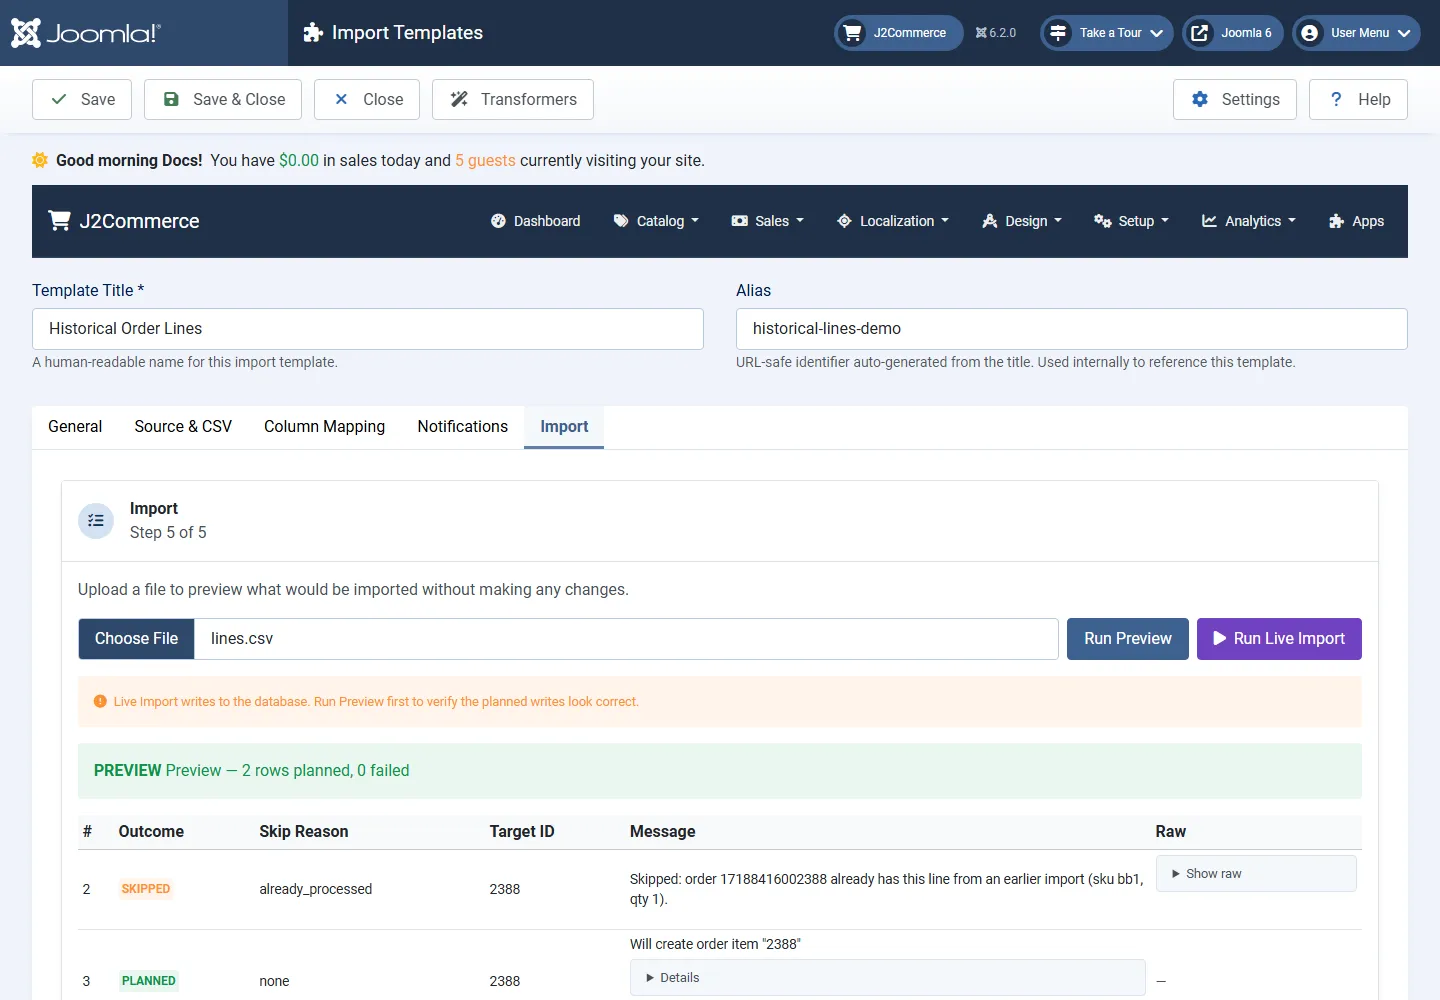
Preview and Live Import
- Open the template and go to the Import tab.
- For a Manual Upload template, choose the CSV file. For an FTP template, pick a file under File on the FTP server. Click Refresh file list if the file is missing.
- Click Run Preview. The table lists every row with its outcome, skip reason and message, and nothing in your store changes.
- Check the table, then click Run Live Import and confirm.
A preview is saved in the import log with a Preview label. A live import writes to your store and cannot be undone from this screen. The Run Import button on the Import Templates list starts a live import straight away, after you choose a file.
Allow Partial Import
With Allow Partial Import on, a bad row is skipped or failed and the other rows are still imported. With it off, every row is checked first. If any row fails the check, nothing is imported and the run is marked Failed.
Warning
Some problems only appear while a row is written. With Allow Partial Import off, the import stops at that row, the rows before it stay imported and the run is marked Partial.
Long Imports: Pause and Resume
A long import started in the admin pauses after about 20 seconds, sooner on servers with a short execution limit. The page continues it by itself and shows Import running: X of Y rows processed. You do not need to click anything.
If the connection drops or the browser closes, the import stays paused. Open Logs -> Import Logs, open the run and click Resume to continue from the next row.
Scheduled imports stop after Rows Per Scheduled Run rows and continue on the next run. The setting is in the template, defaults to 100 and accepts 1 to 1000.
Scheduled Imports
Set File Source to FTP and Trigger Mode to Scheduled or Manual & Scheduled. Then do the one-time setup.
- Go to System -> Manage -> Scheduled Tasks and click New.
- Pick the task type EDI: Run Imports. Add EDI: Send Exports for queued exports and EDI: Clear Old Files to tidy old files.
- Leave All Scheduled Import Templates on Yes for one task that covers every template. Choose No to pick templates by name and give each its own schedule.
- Set an interval, save and make sure the task is Enabled.
- Add a server cron job that triggers Joomla's scheduler. The template's General tab shows the exact line for your site and a How do I set this up? guide.
A file with the same contents is imported only once. A file that failed can be imported again after you fix the problem. With After Import set to Delete File, the file is deleted from the FTP server after a Complete, Partial or Skipped run.
Import Logs
Every run is recorded under Logs -> Import Logs. Filter the list by template, status, source and import type. Open a run with View to see its rows.
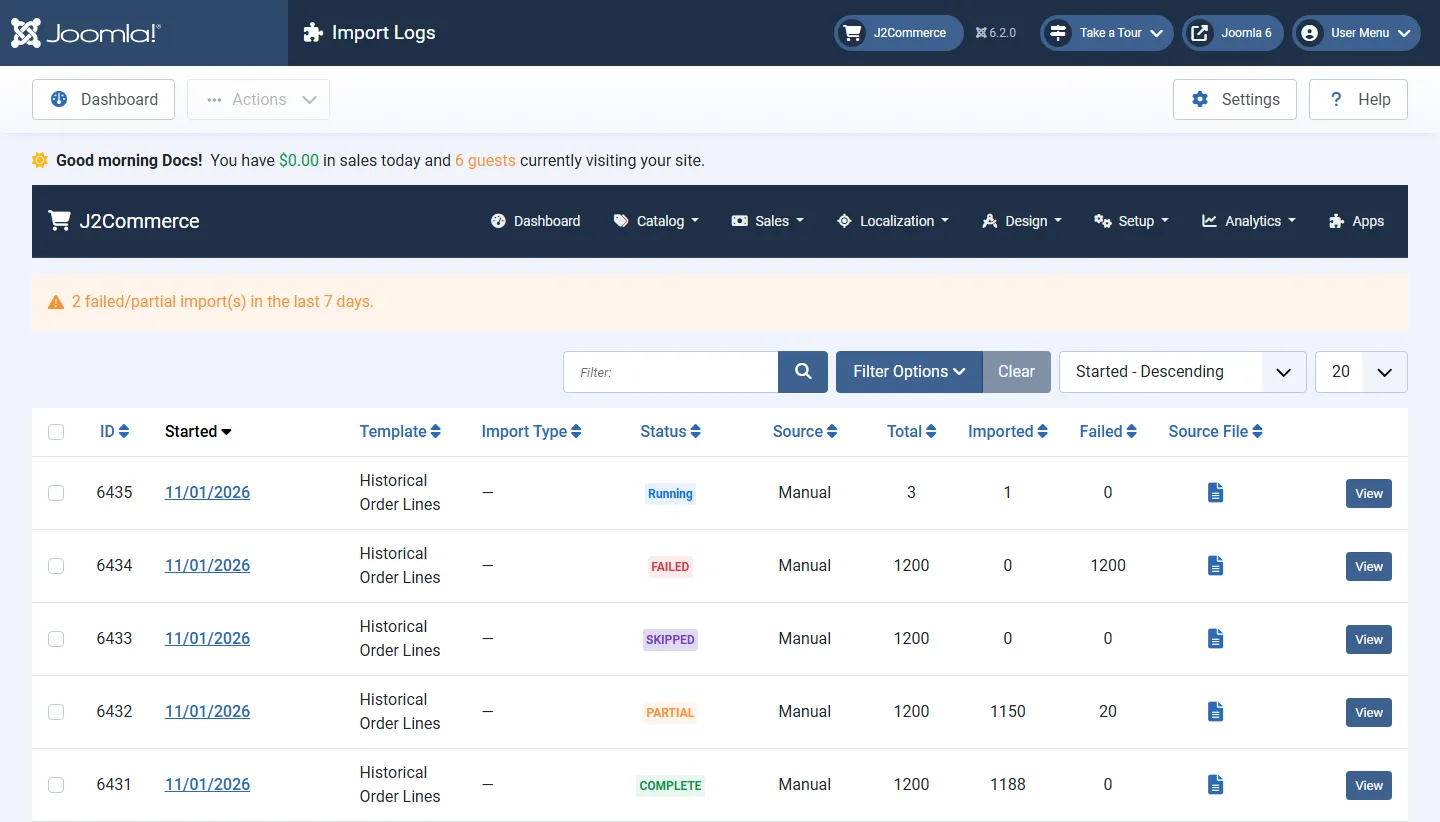
| Result | What It Means |
|---|---|
| Complete | No row failed. Rows that were skipped on purpose, such as records that already exist, do not change this. |
| Partial | Some rows failed and others were imported. |
| Skipped | Every row was skipped. Nothing was written and no row failed. |
| Failed | Nothing was imported. This includes a run that stopped on an unexpected error. |
| Running | The run is in progress, or it is paused and waiting to continue. A paused run can be resumed. |
A paused run, or a run that is still Running after the server's time limit, shows a Resume button on its log page. A preview shows as Preview or Preview Failed.
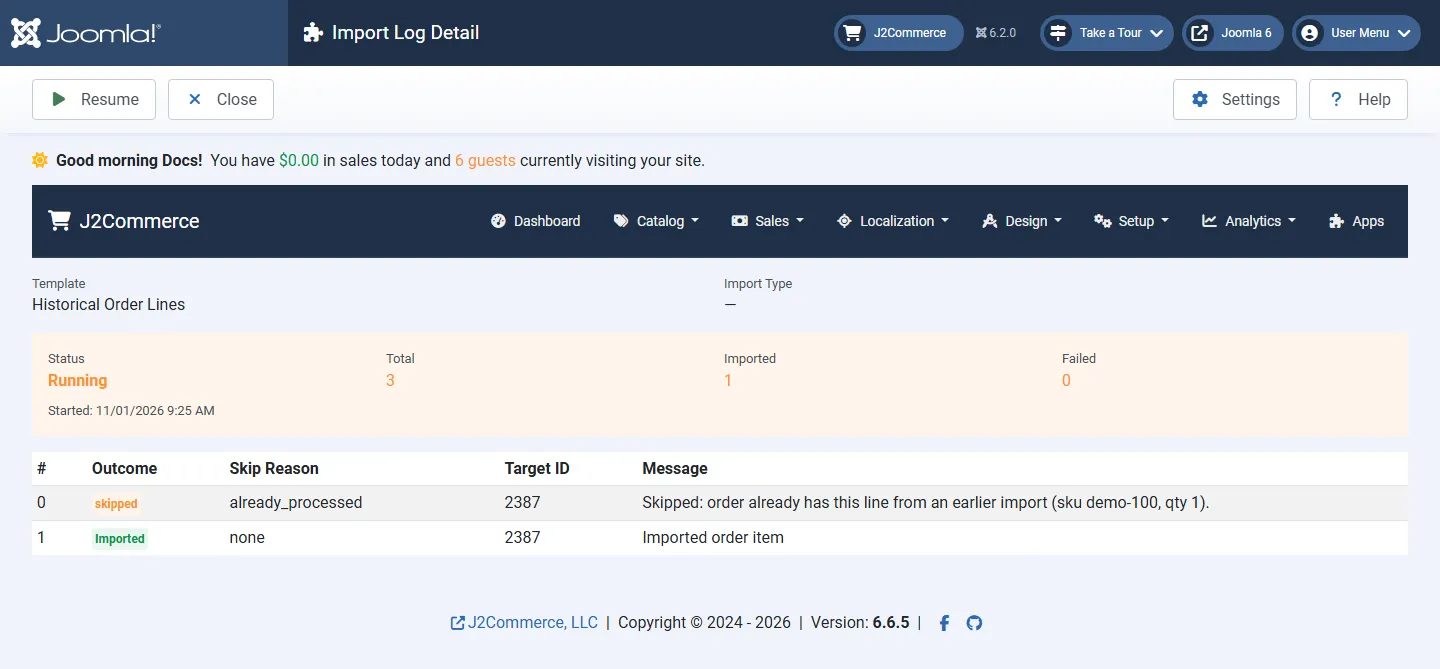
The row table lists the outcome of each row. Failed and skipped rows are always listed. Imported rows are listed only when Verbose Logging is on for the template.
| Skip Reason | What It Means |
|---|---|
no_match | No record matched the lookup key, or more than one did. |
already_processed | The record already exists and was left untouched. |
validation_failed | The row did not pass a check, such as a missing required value. |
parse_error | The row could not be read from the file. |
transformer_error | A transformer could not convert the value. |
protected_column | The mapping targets a column that import may not write. |
write_failed | The database refused the write. |
What Imported Data Does Not Do
- Imported orders never move stock. A later status change on the order, in the admin or by import, does not take stock or give it back.
- Imported orders send no email to the customer, and importing them triggers no order events.
- Imported customers get no account email.
- Orders are created once. An order that already exists is left as it is.
- Order Transaction and Order Discount rows are written only to imported orders. A row for an order placed at checkout is skipped.
- Order Item rows are added only to orders that have no lines yet. Orders with lines from checkout, a migration or an earlier import are skipped, unless Add Missing Lines to Imported Orders applies.
- An order with a negative line resets that amount to zero if its lines are edited in the admin.
Order Status Update and Order Shipment imports change orders that already exist. They email the customer only when Notify Customer on Status Change is on and the order changes status.
Permissions
Running imports needs the Perform EDI Imports action in addition to access to J2Commerce. Open Permissions on the dashboard toolbar to grant it. Until a group is granted the action, only Super Users can run imports.
Order entities also need the right to edit orders, product entities the right to edit products, and customer entities the Joomla right to administer users. Importing template files and archives needs the J2Commerce administrator right.
Troubleshooting
An Import Stopped Part Way
Cause: The connection dropped while the page was continuing a long import. The message reads The import stopped part way (import log N).
Solution: Open Logs -> Import Logs, open the run named in the message and click Resume.
A Scheduled Import Does Not Run
Cause: The scheduled task or the cron job is missing, or the template does not qualify.
Solution:
- Check that the template is Enabled, uses FTP as File Source, has an FTP host and has Trigger Mode set to Scheduled or Manual & Scheduled.
- Check that an enabled EDI: Run Imports task exists and that its Last Run time is recent.
- Check the cron job. The dashboard shows a warning and EDI Orders emails the alert recipients after the number of hours set in Alert When Automation Stops (Hours).
Every Row Is Skipped
Cause: The lookup key matches nothing, or the records already exist.
Solution: Open the log and read the Skip Reason and Message columns. Messages such as No local order found for source order number mean the parent records must be imported first, in the order the Import Wizard recommends.
Order Item Rows Are Skipped as Already Existing
Cause: The message reads order ... already existed with its line items before this run. The order has lines from checkout, a migration or an import made before version 6.7.3.
Solution: Those orders cannot take missing lines. Orders created by an import from version 6.7.3 on can, with Add Missing Lines to Imported Orders on.
Transaction or Discount Rows Are Skipped
Cause: The message reads Local order N was not imported. The order matched by source order number was placed through checkout.
Solution: Import the order first with an Order (Historical) template. Transaction and discount rows are never written to checkout orders.
A Negative Amount Is Refused
Cause: The message reads Negative value refused on and lists the columns.
Solution: Turn on Allow Negative Line Amounts in the Order Item template if the negative lines are discounts or credits.
Nothing Was Imported and Allow Partial Import Is Off
Cause: The summary reads rows failed the pre-import check. One failing row stops the whole file.
Solution: Fix the rows listed as Failed in the log, or turn Allow Partial Import on.
Protected Column Write Refused
Cause: A mapping row targets an ID or date column that import may not overwrite.
Solution: Tick Lookup Key on that row if the column identifies the record. Otherwise map the value to a different column.
The FTP Test Fails
Cause: The message names the step that failed: the PHP FTP extension, the connection, the secure handshake, the login or the remote path.
Solution: Fix the item the message names. For a handshake error, switch Use SSL (FTPS) off if the server does not support FTPS on that port. A blank password box keeps the saved password.
Uninstalling
Go to System -> Manage -> Extensions, search for EDI Orders and click Uninstall.
Important
Uninstalling deletes all export templates, import templates, field mappings and import logs. Download the templates you want to keep first. Orders, products and customers you imported stay in your store.
The folder files/app_edi on your server holds stored import files and generated exports. Delete it yourself if you no longer need those files.