ShipStation
The new J2Commerce integration with ShipStation helps you to integrate your J2Commerce site with one of the best shipping solutions, ShipStation. Now import your orders and manage shipping on the go with the help of this integration. With Shipstation, you need not worry about shipping your orders using different carriers, cause you can manage everything at a one-stop place using this integration.
ShipStation is a multi-channel, multi-carrier shipping solution that simplifies the shipping process for online merchants. ShipStation can be integrated seamlessly with any shipping carrier and channel, and your orders can be easily tracked and managed with just a few clicks, regardless of the location.
Now conduct your business with more fluidity and transparency with the easy interfacing of ShipStation.
NOTE: ShipStation will not send any Webhook notifications when you manually mark an order as Shipped in your ShipStation console. It is treated as externally fulfilled orders. Tracking numbers for those orders should be entered manually in your ShipStation and also in J2Commerce.
Requirements
- PHP 8.1.0 +
- Joomla! 4.x/ Joomla! 5.x +
- J2Commerce / J2Store 4.x +
Creating an account and generating API keys
Pre-requisites
A ShipStation account is required to use the integration. You could create one at www.shipstation.com
To get the API keys for the integration, it is necessary to create an account with ShipStation. The following are the steps to be done:
- Go to www.shipstation.com.
- Click on the Start your 30-day free trial button.
- A page appears asking you to create a new account. Furnish your details and click on the Let's go to shipping button.
- Before logging into your account, it is necessary to verify the email address by clicking on the link sent to your registered email address.
- Post verification, you can log in to the account by clicking on the login button in the top right corner and keying in the credentials.
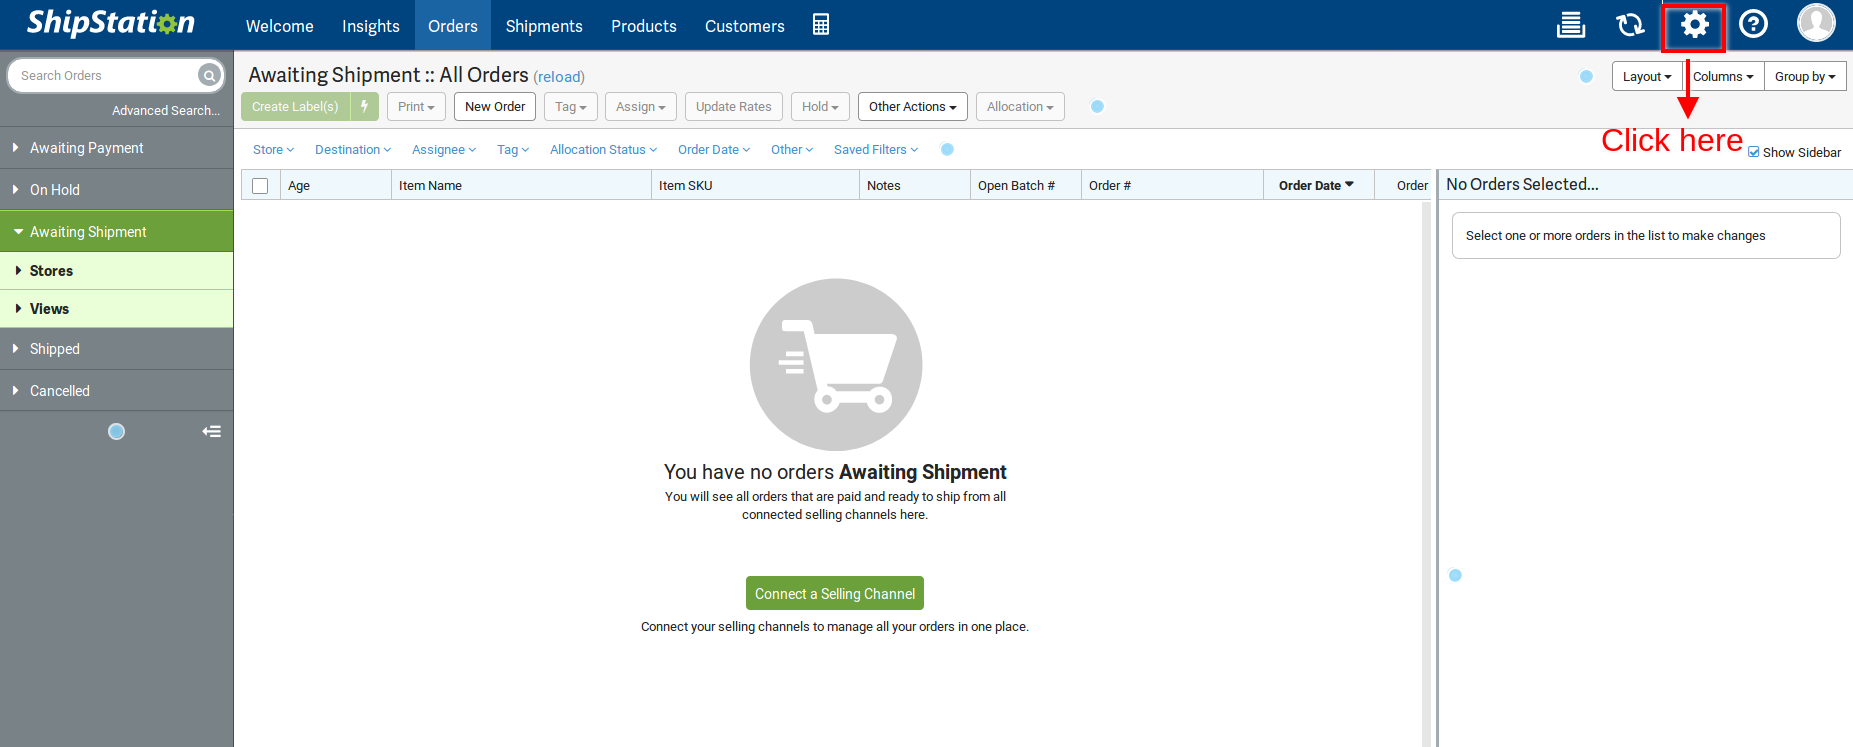
- Click on the settings icon in the right corner.
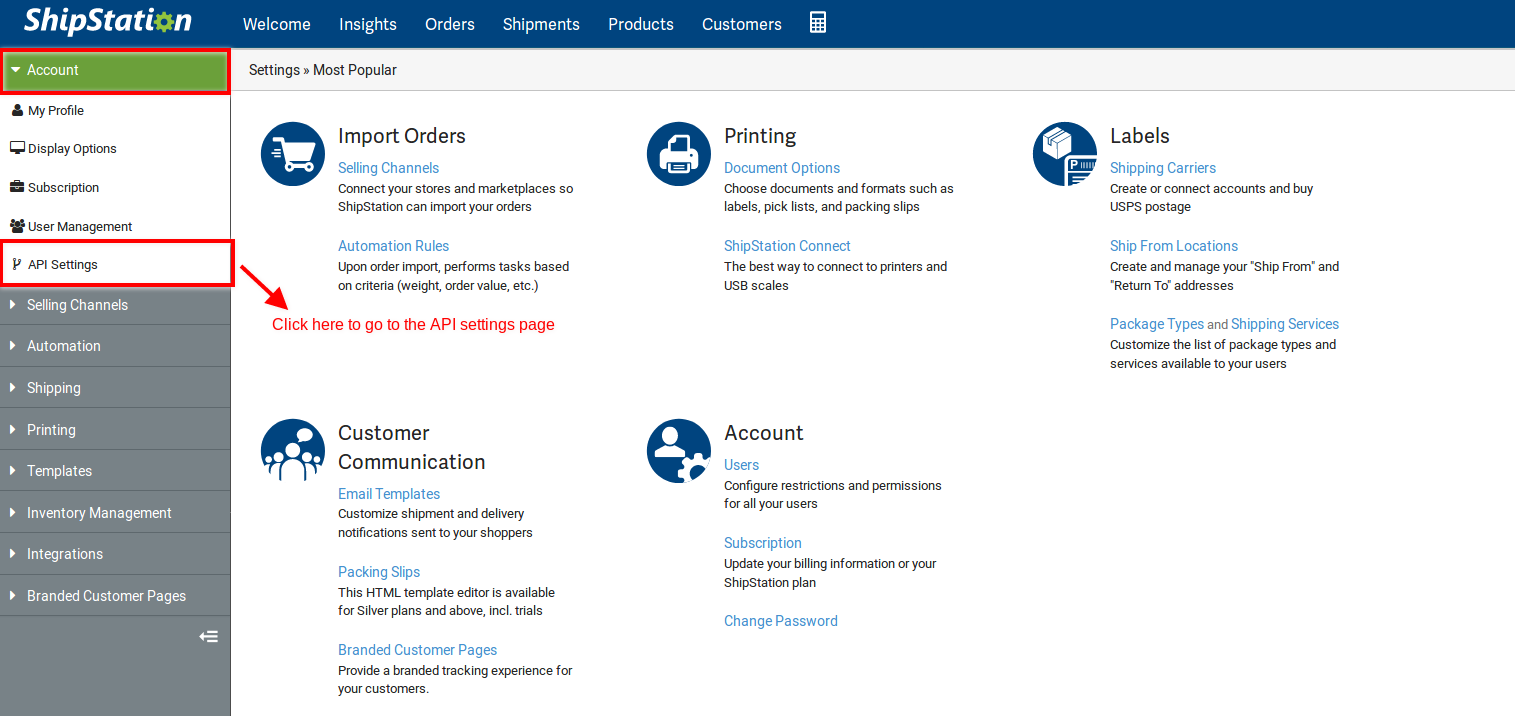
- There will be a lot of tabs displayed on the left side. Click on the Account tab.
- Clicking on the Account tab will open up the options from which the API settings option has to be chosen.
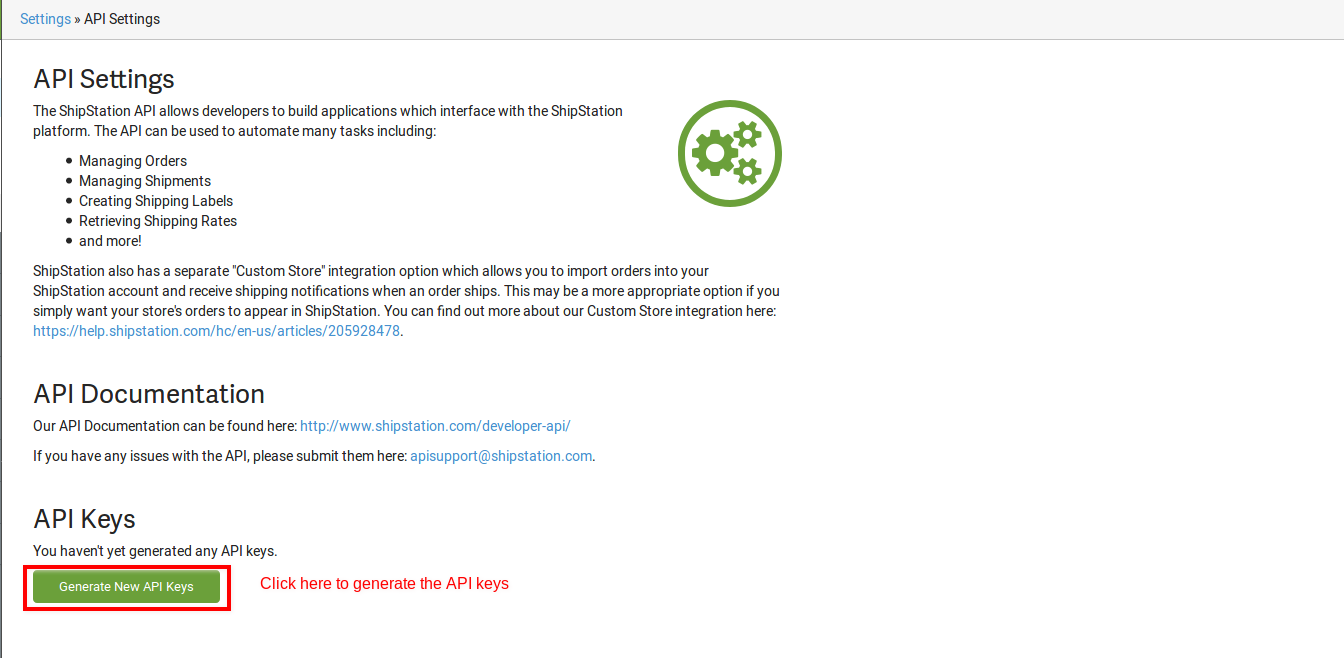
- Click on the Generate API keys button. API keys will be generated.
The screenshots below are for reference:
Creating an account with ShipStation

Generating API keys

Webhook URL
After entering the API keys in the app, the next step would be to set up the webhook URL in the ShipStation account.
This has to be done in order to receive notifications of the changes that occur in ShipStation. The notifications will come up in your J2Commerce site’s backend. So this is more of a synchronization.
Setting up webhook notifications
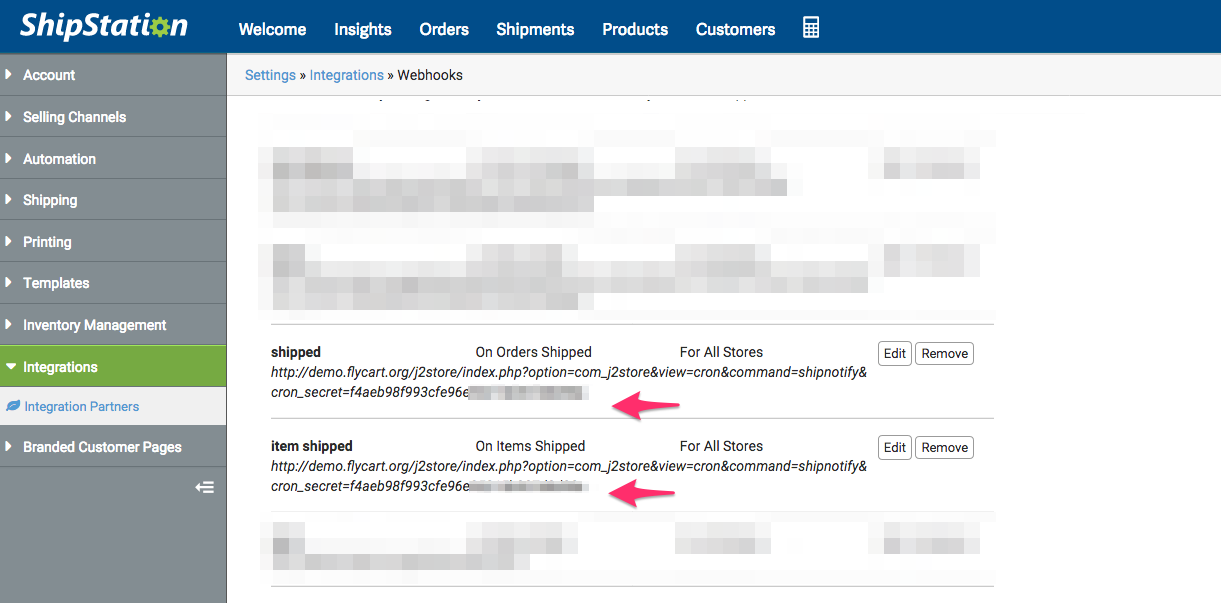
Webhook notifications can be set up by following the steps given below:
- The URL for the webhook can be fetched from the app’s settings once it's installed in the backend of your website.

- Now log in to your ShipStation account.
- Go to Settings > Integrations > Integration partner > Webhook.
- Specify the URL in the field Webhook URL and save.
App settings
Purchase the App
Step 1: Go to our J2Commerce website > Extensions > Apps
Step 2: Locate the ShipStation App > click View Details > Add to cart > Checkout.
Step 3: Go to your My Downloads under your profile button at the top right corner and search for the app. Click Available Versions > View Files > Download Now
Install the App
Go to System > Install > Extensions > Install the app
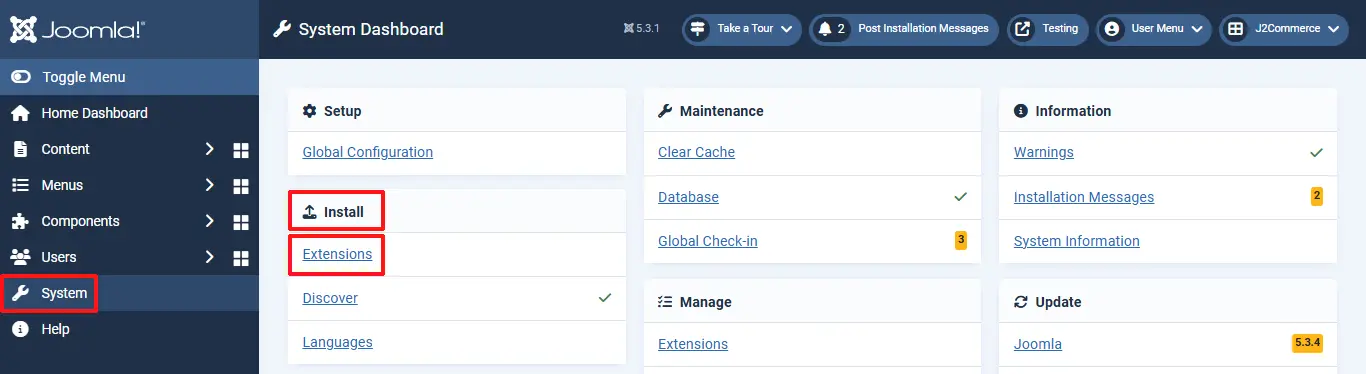
Enable the App
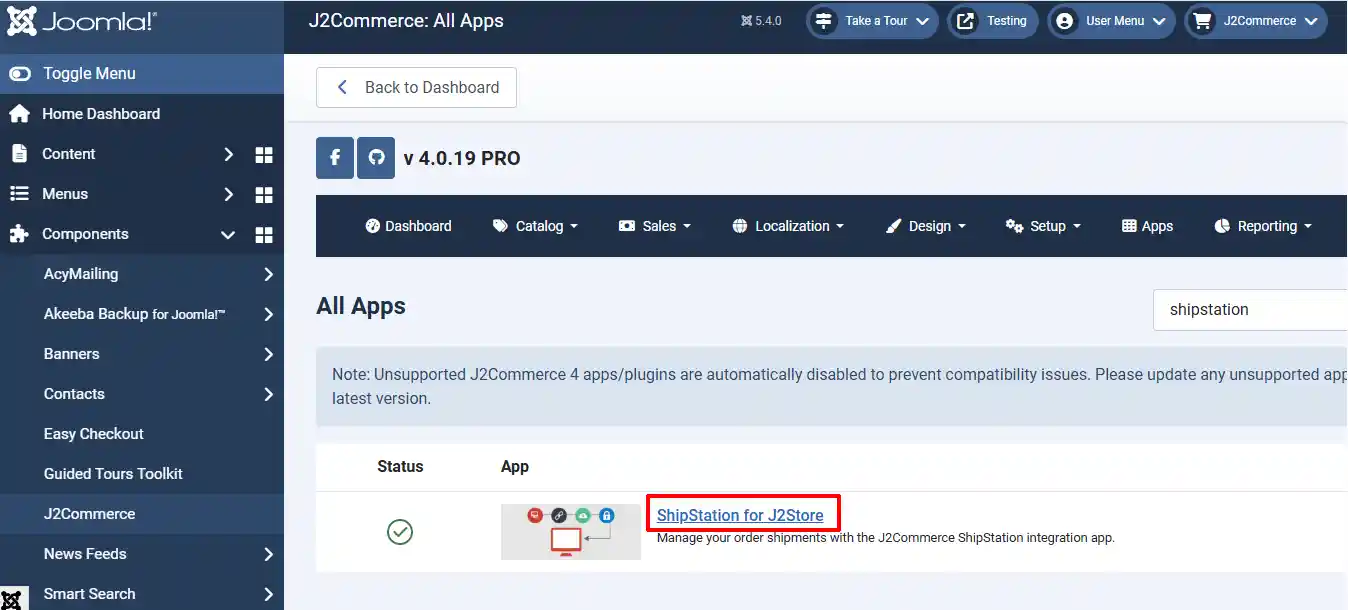
Go to J2Commerce > Apps > search for the ShipStation app
Click on the 'X' under Status to enable it.

Click on "Open App" or the Title to start setting up the app
Setting up the Parameters
There are multiple steps that need to be taken when setting up the parameters correctly, so we have broken them down into sections to make it easier to understand how to set up each section.
Setting up the Credentials
Enter your API Key and API Secret Key, which you should have already received from ShipStation. If not, follow the steps at the very beginning of this document.
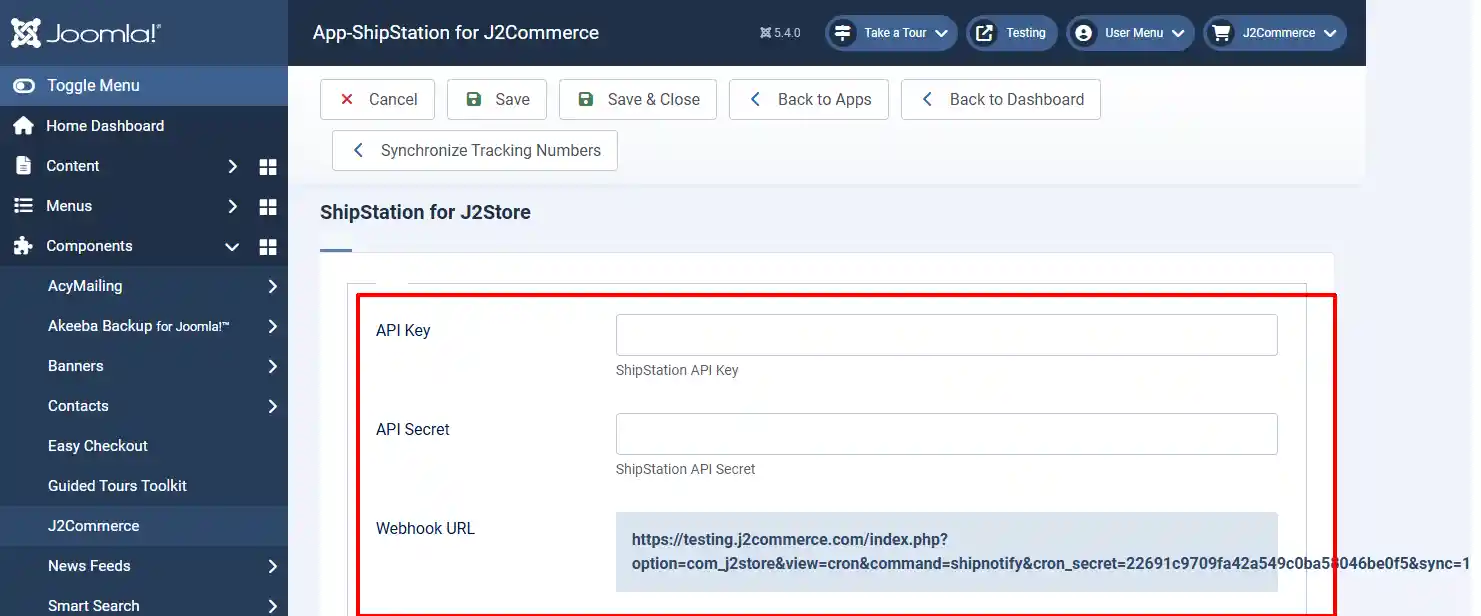
API key: The ShipStation API key has to be entered here. The procedure to generate the API keys has been mentioned at the top of this document.
API Secret: The ShipStation secret key has to be entered here. The procedure to generate the API keys has been mentioned at the top of this document.
Webhook URL: The webhook URL to be specified in the ShipStation account’s integrations part is provided here.
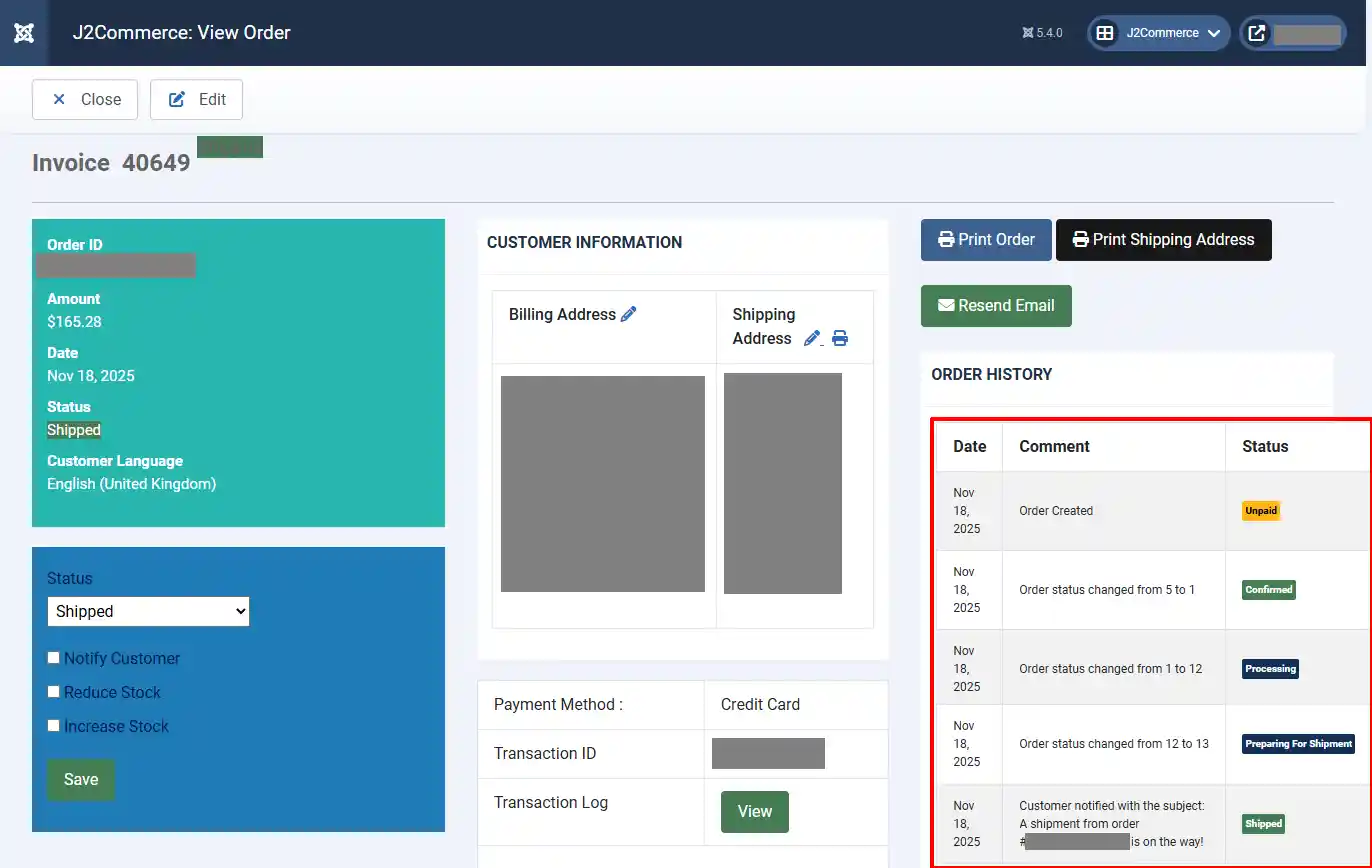
Setting up the Order Status
Think of the Order Statuses as an assembly line. When one step is completed, it triggers the next step in ShipStation to be activated, and so on. You can notify the customer when each step begins or is completed.
The Image below shows an example of the assembly line being created in ShipStation.
If you choose to use Confirmed as the new order status, then all orders will get pushed into ShipStation. If you are selling some items that do not need to be shipped - then you need to create a new order status (such as Processing), and then you will need to make sure any order confirmation emails that were triggered for the Confirmed order status are changed to the Processing order status (if that is the name of the New Order Status used)
Assign what each order status should read by following the steps below.
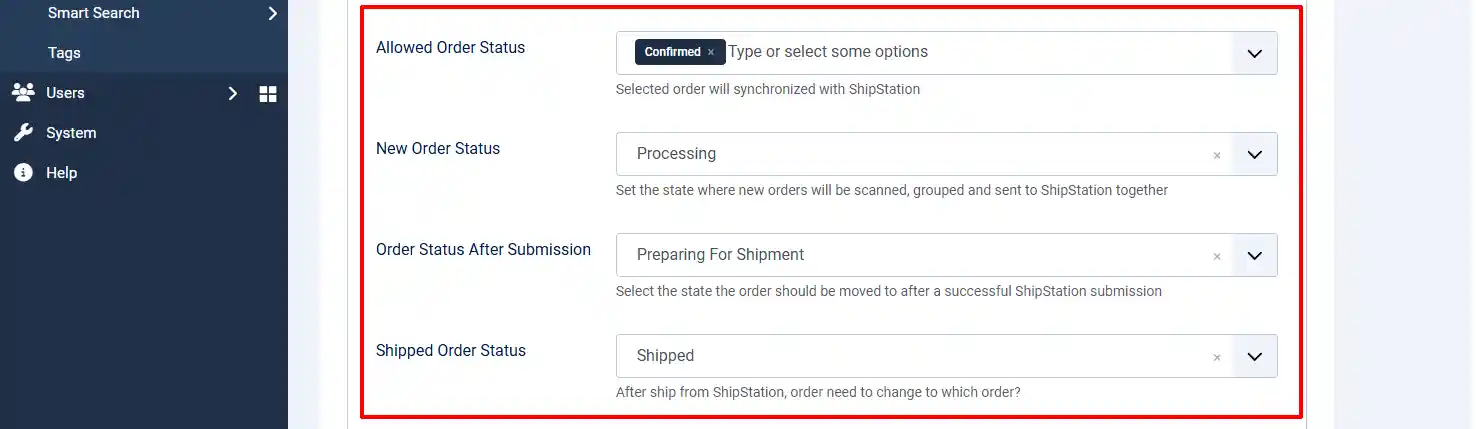
Allowed Order Status: Selected orders will synchronize with ShipStation. In this example, we have selected Confirmed. This means ShipStation will be activated with all orders that have been completed after their payment has been confirmed.
New Order Status: Set the state where new orders will be scanned, grouped and sent to Shipstation together. Most websites like having the first step say "Processing", but you can name it anything you wish that best supports your website.
Order Status After Submission: Select the State the order should be moved to after a successful ShipStation submission. Most websites like having the first step say "Preparing For Shipment", but you can name it anything you wish that best supports your website.
Shipped Order Status: This is the final step in the assembly line. After being shipped from ShipStation, the order needs to be changed to which order? Most websites like having the first step say "Preparing For Shipment", but you can name it anything you wish that best supports your website.
If the status you want doesn't show up in each drop-down down that means you haven't created it in the Order Status section of J2Commerce. Below will show you how to create a new order status.
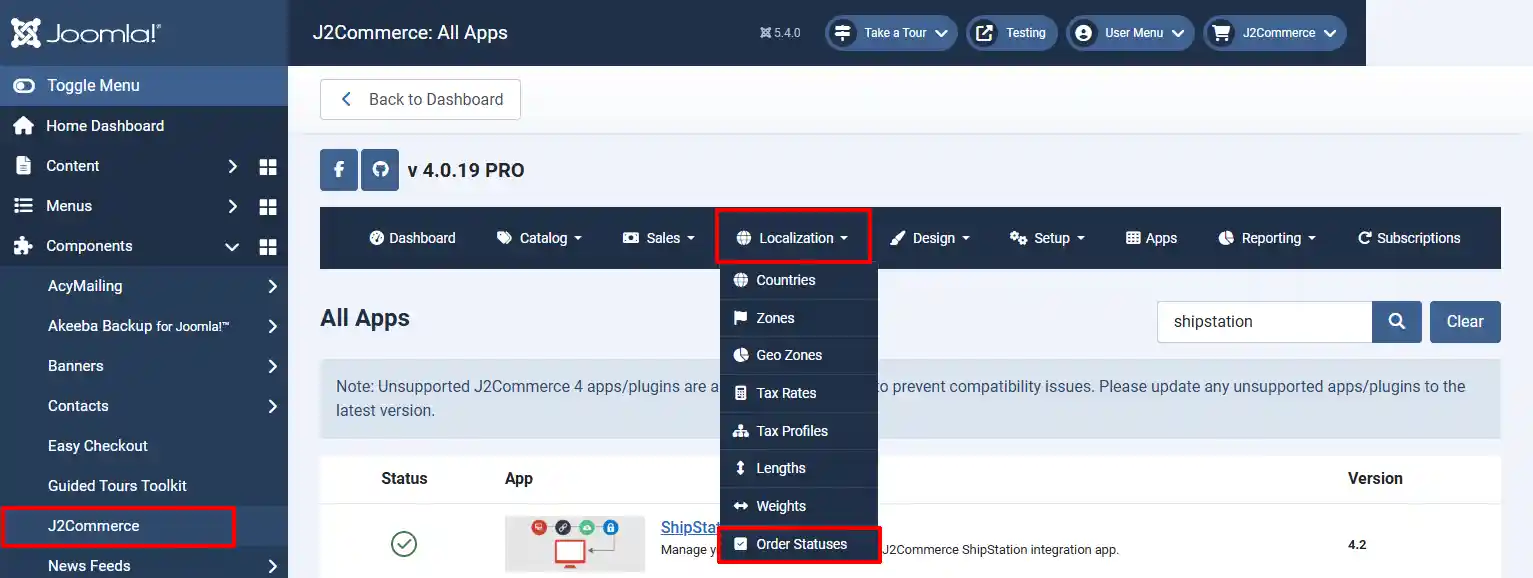
How to create a new Order Status
Go to J2Commerce > Localization > Order Statuses
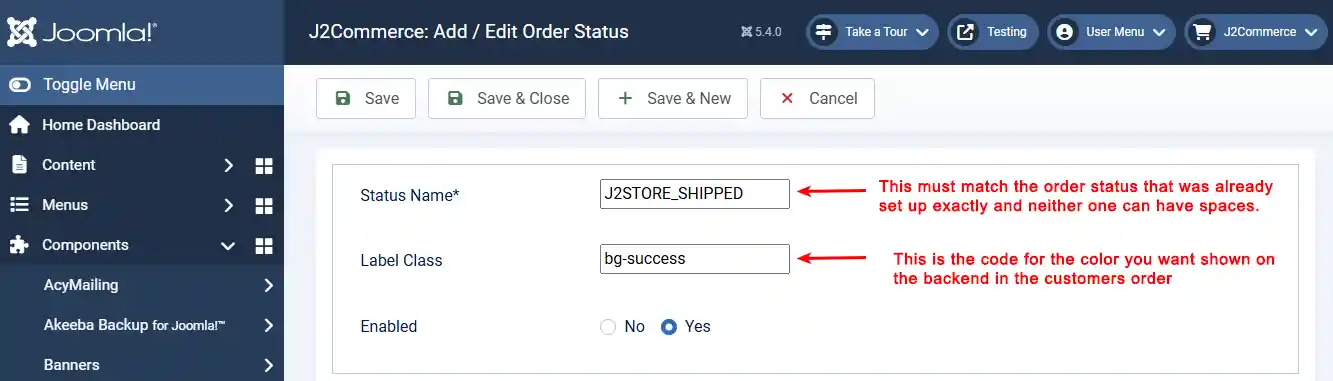
Note: The Status Name must have J2STORE_ at the beginning of the status and there cannot be any spaces in the name.
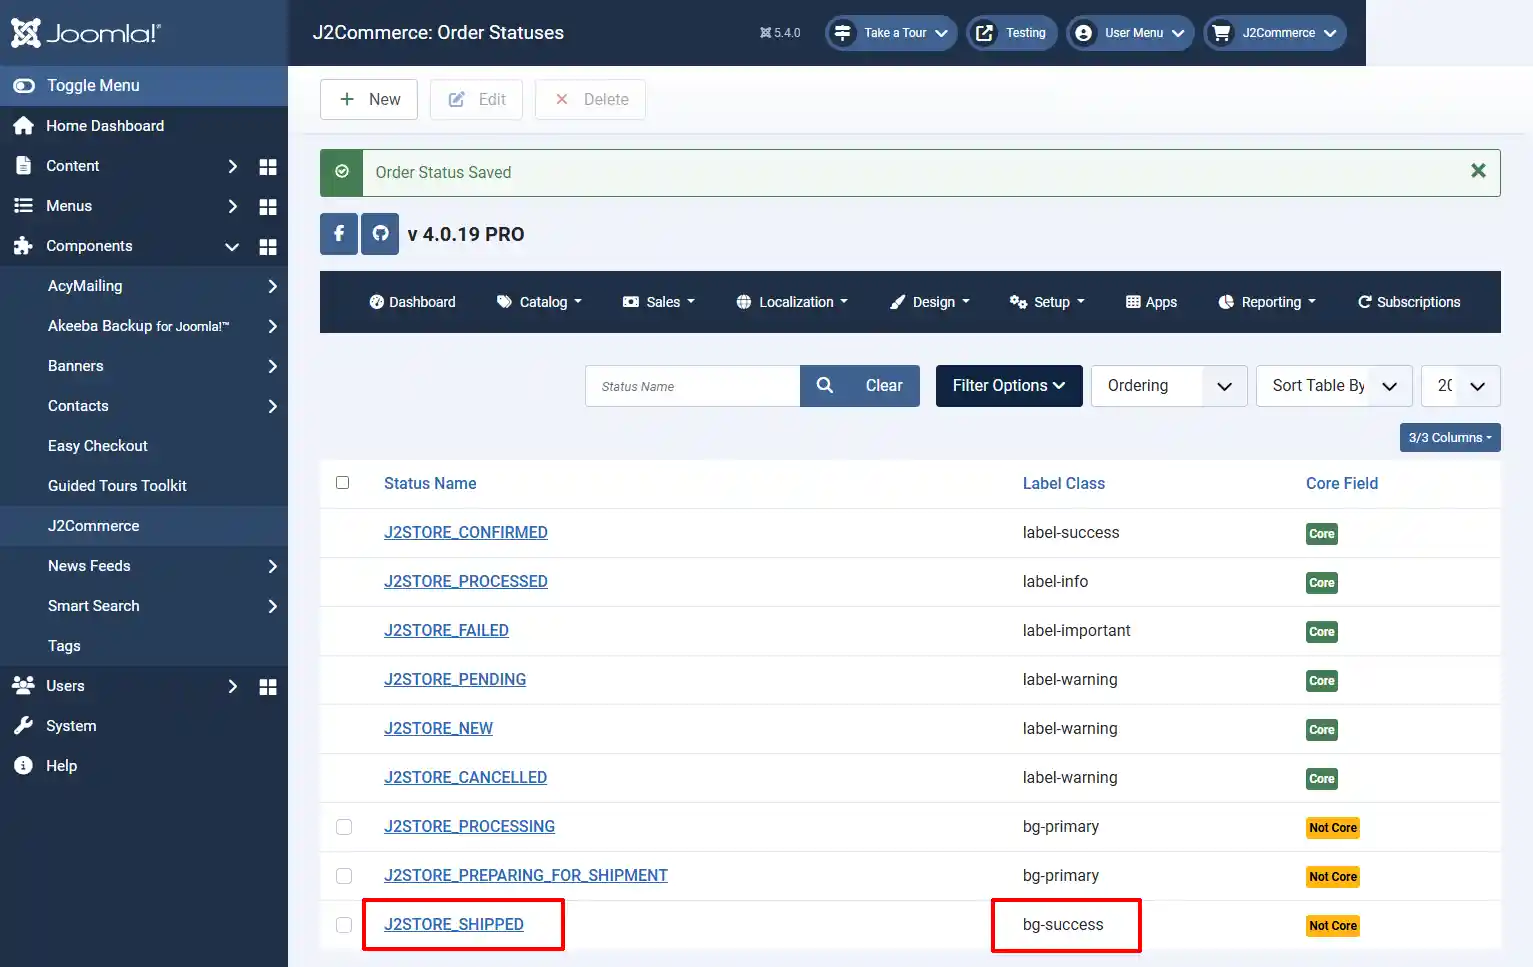
The Label Class is what determines the color of the order status, making it easy to see the process. See image below for an example.
Select New to create a new order status
As mentioned above
Status Name: This needs to start with J2Store_ and then the name you want shown up on the backend of the customer's order.
Label Class: This is used to set the .css class with the color of the label that is displayed in the backend of the order statuses.
Once you have created the Order Status, you need to set it up in the Language Override section so it can be translated to any language your website reads. ie, If you named it Shipped, then you need to do the language override so the word Shipped doesn't show up as English on a Dutch-speaking website. You want it to show up in Dutch instead of English.
How to create a new Language Overrides
Go to System > Manage > Language Overrides
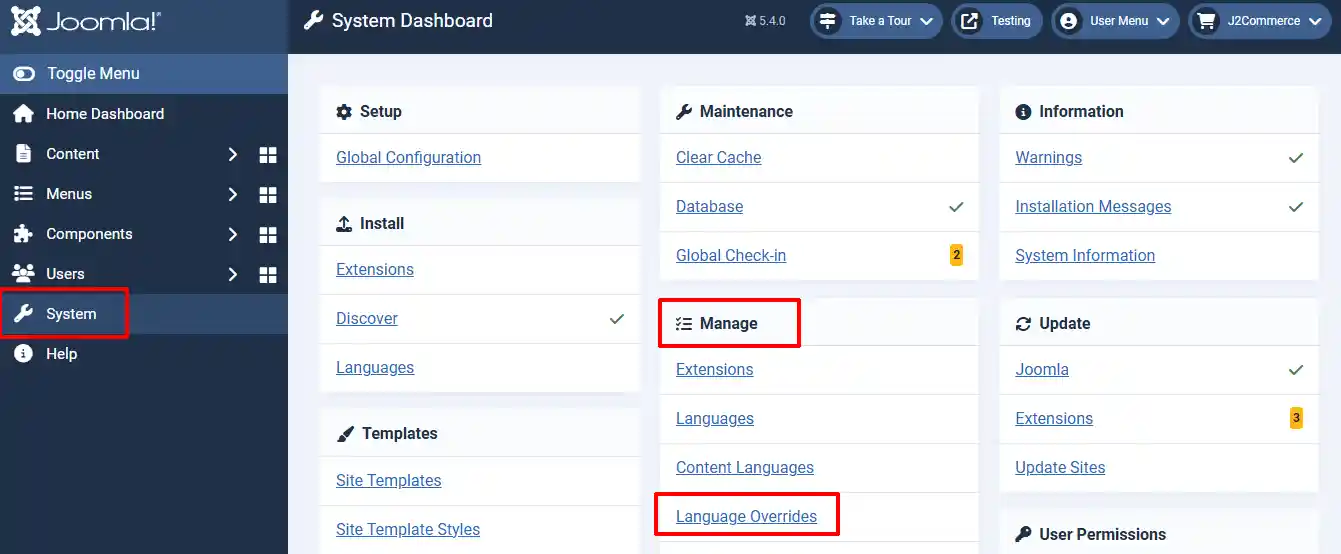
Choose English Administrator > New
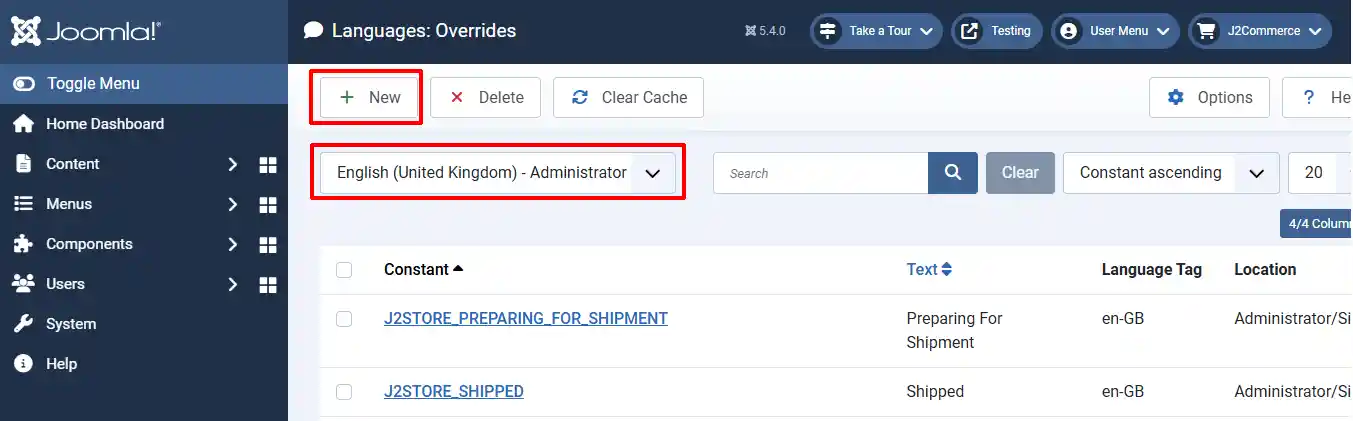
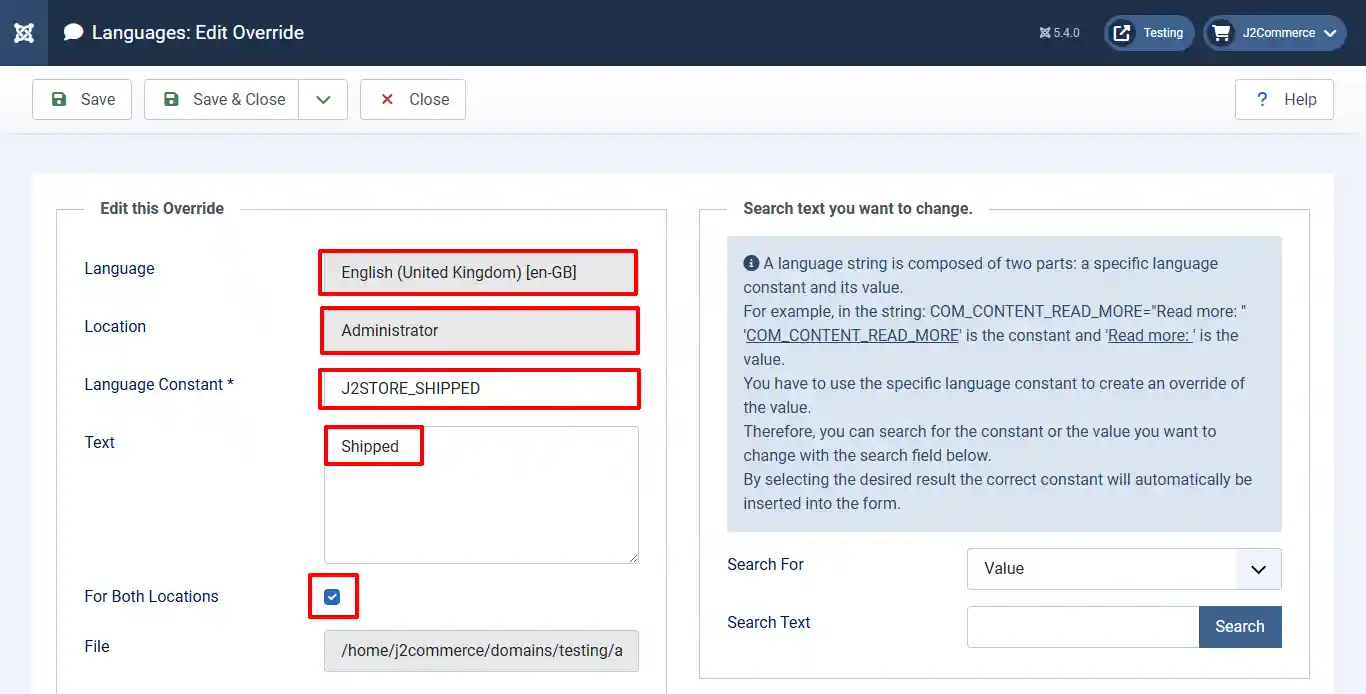
Language Constant: Copy and paste the exact name from the one you just created in Order Status. Remember it has the be the exact same name and no spaces in between the words, otherwise it will be broken
Text: This is how it will show up on the backend. You will want it to say Shipped instead of the language string of J2STORE_SHIPPED.
For Both Locations: Make sure you check this box so the update is shown on both the frontend (for the customer to see) and the backend (for the admin to see). Both the customer and Admin will see the word Shipped instead of the language string.
Setting up the Custom Fields
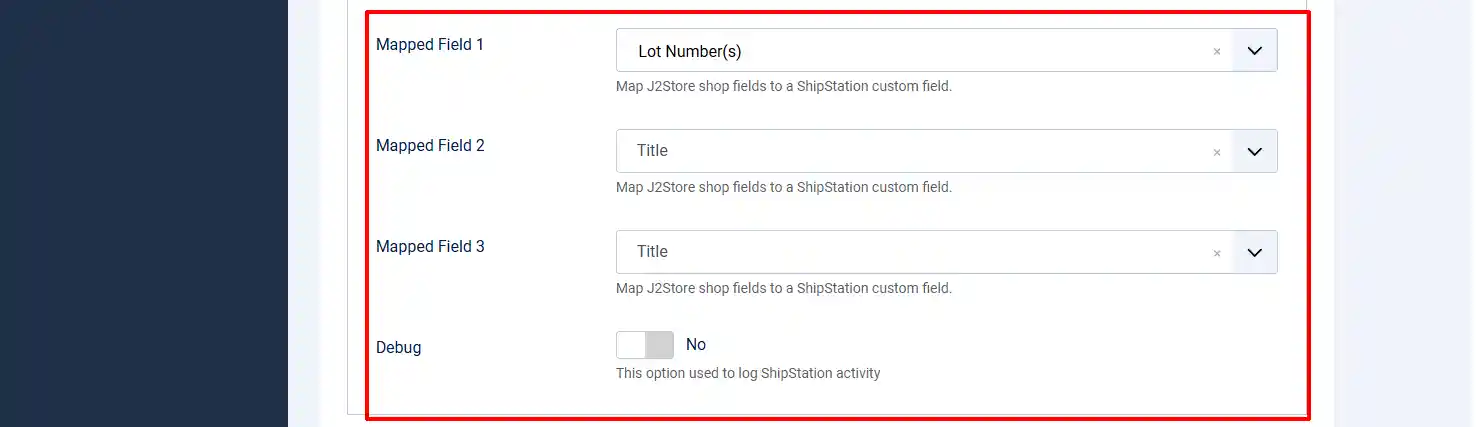
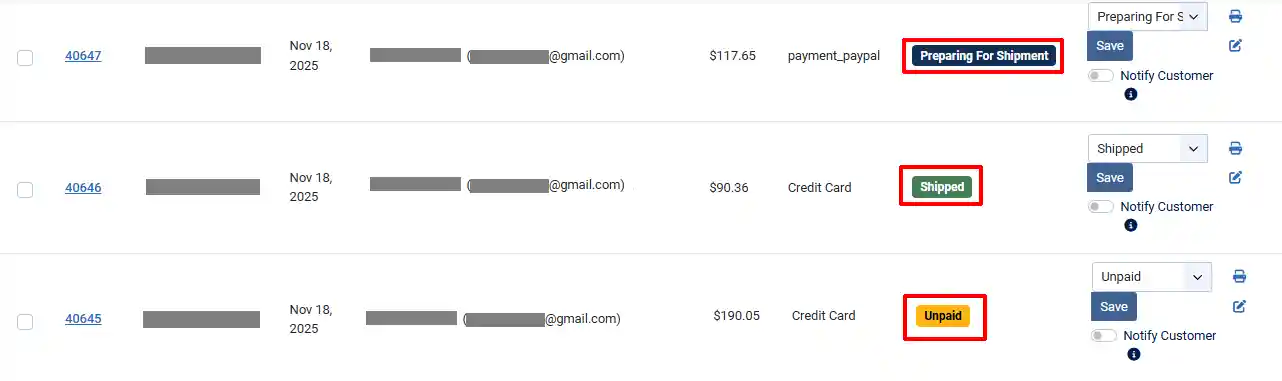
Step 3: The Mapped Fields are the same as Custom Fields. You need to set the Custom Fields up first in order for them to show up in the dropdown menus. The mapping/custom fields are to help organize orders.
Example: In the image above, the 1st field shows Lot Numbers(s) because the admin may want to be able to find all of the customers who were sent items with the same lot numbers in case of a recall on the product.
Debug: Debugging should never be left on live sites. It is only used when there is an issue and additional information is needed. The debug files are found in the/cache directory
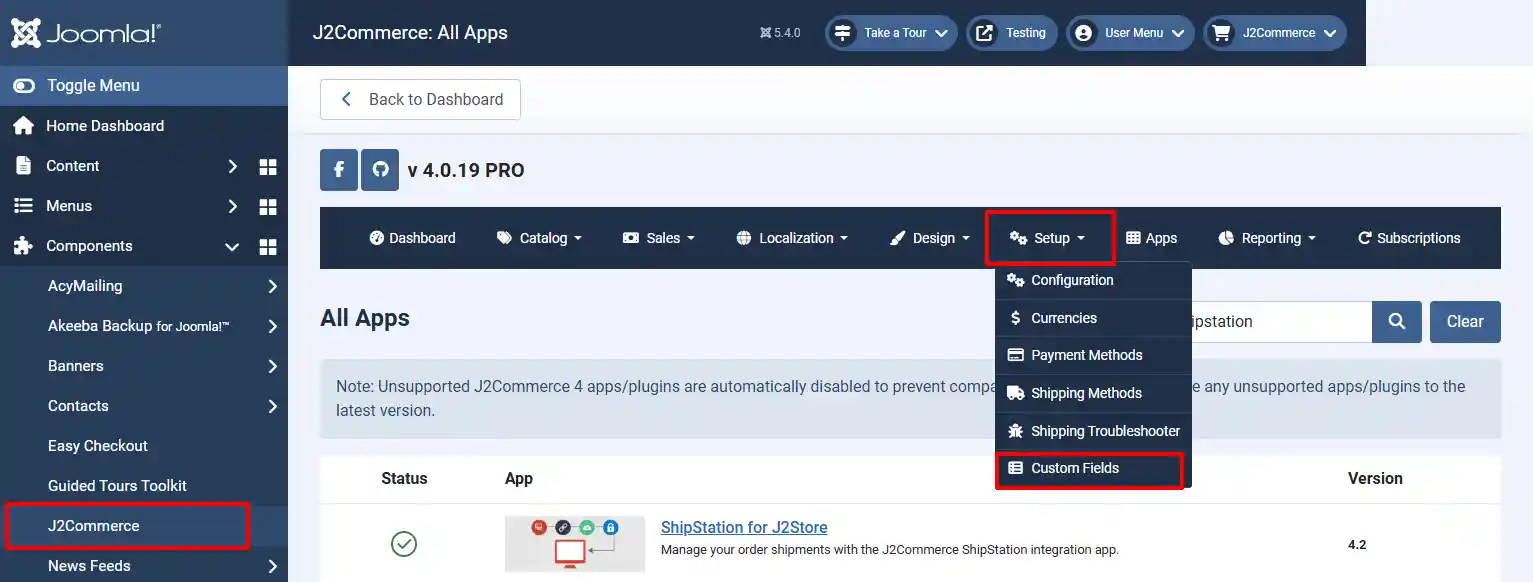
How to create a new Custom Field
Go to J2Commerce > Setup > Custom Fields > New
To add a custom field, we need to enter the following details. They are given below one by one: You can learn more about how to set up the Custom Fields here.
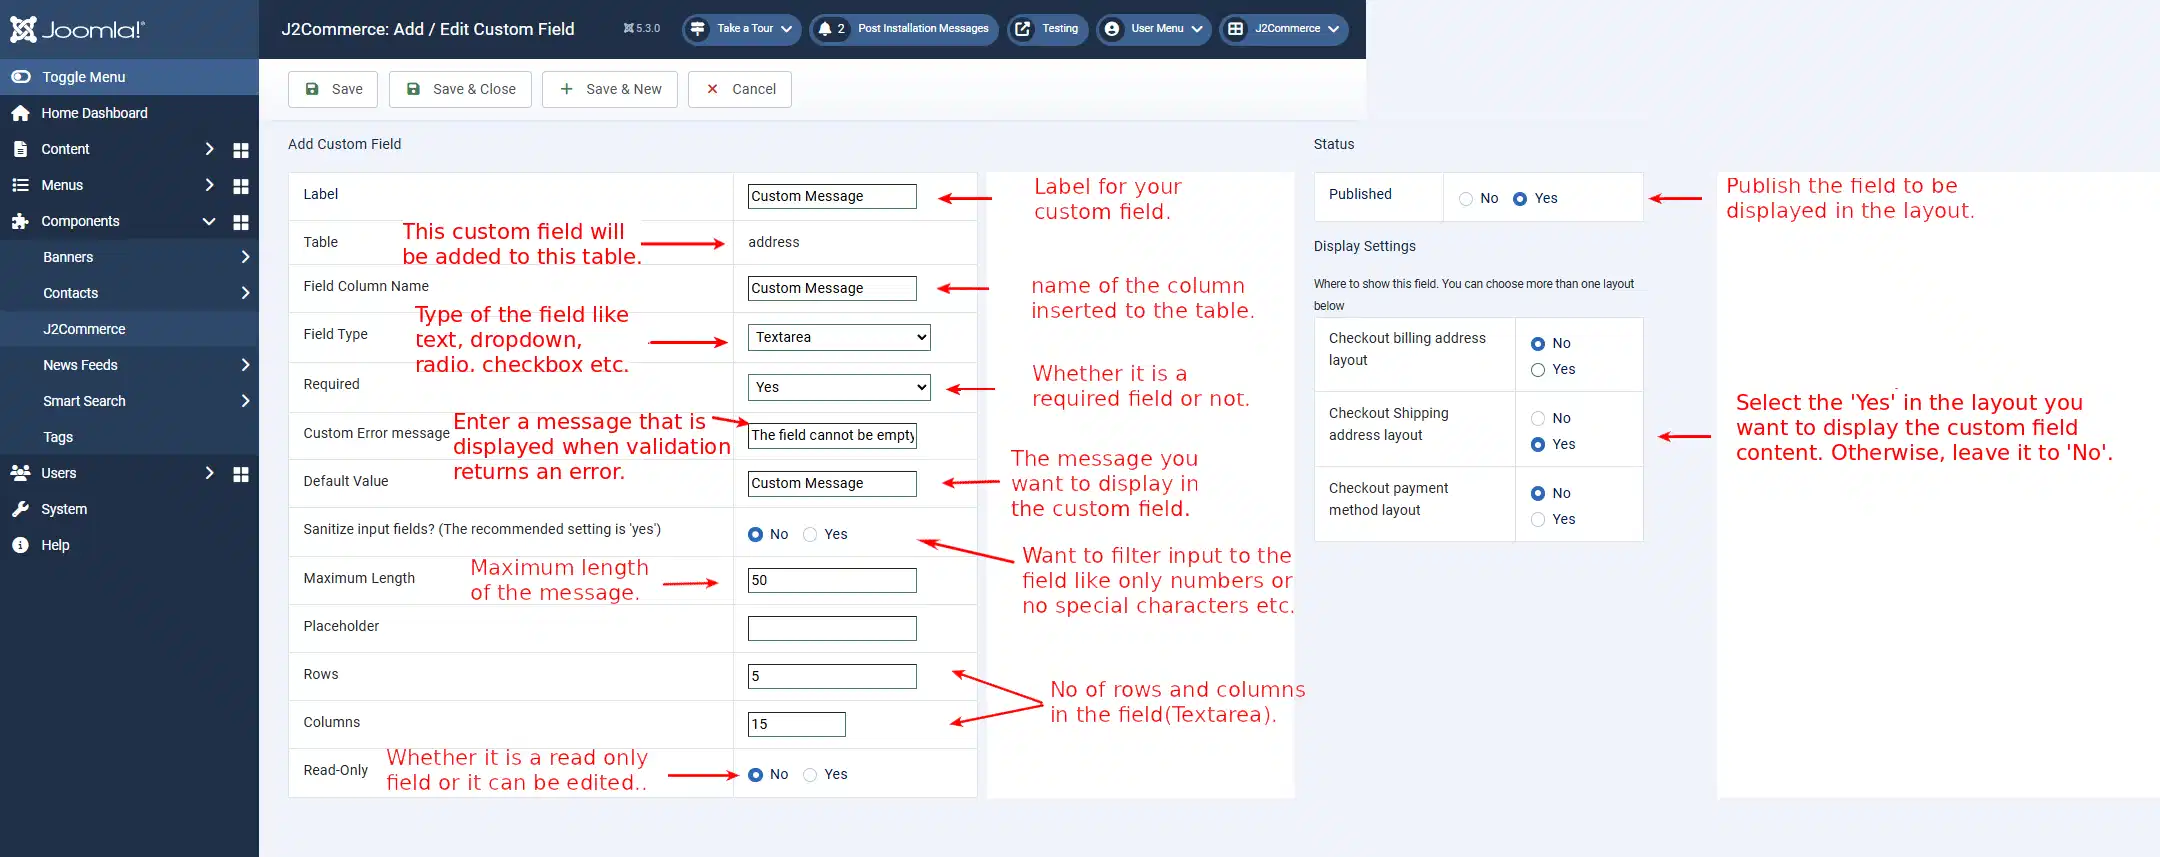
The Label: Name of the custom field that is displayed in the layout
Table: The table where the custom field is created - this is the default, and you can not change it
Field Column Name: name of the column that is created in the table
Field Type: This is the type of field you are about to create, and there are 12 types available to choose from
Text, Email, Text Area, wysiwyg editor (what you see is what you get), Radio, Checkbox, Single Dropdown, Zone/Country List, Date, Time, DateTime, and Custom Text
The remaining fields after the Field Type is selected will be different based on the Field Type, and the details have to be fed as required by the changed fields
Required: Whether the field is required or not - select Yes or No.
Custom Error Message: If it is a required field and left empty on data entry, this message will be displayed to alert the user
Default Value: What is given here will be the content displayed, if the user does not give any input to the field
Input Filtering: If you want to filter out the input to this field, you can select ‘YES’ and set the conditions
Maximum Length: The number of characters that are allowed to be entered in the field
Rows: No of rows that are allowed in the field
Columns: No of columns that are allowed in the field
Read-only: If it is set to ‘Yes’, it is only readable and the content cannot be changed
Status
Published: To display the field, it has to be published by setting this option to ‘Yes’.
Display Settings
You can choose the layouts to display the field. You can select all three layouts or any combination of layouts or only one layout. The layouts are:
-
Checkout Billing Address Layout
-
Checkout Shipping Address Layout
-
Checkout Payment Method Layout