Avalara AvaTax
Avalara AvaTax is a cloud-based tax calculation service that automatically determines the correct sales tax for your transactions based on:
• Ship-from location (your warehouse/store address)
• Ship-to location (your customer's address)
• Product type (different products may be taxed differently)
• Current tax laws (Avalara stays up-to-date with tax rate changes)
This extension connects your J2Commerce/J2Store shop to Avalara, so you don't have to manually configure tax rates for every state, county, and city.
Before You Begin
What you will need
-
An Avalara AvaTax Account - Sign up at [avalara.com](https://www.avalara.com)
-
Your Avalara credentials:
-
Account ID (also called Account Number)
-
License Key
-
Company Code
-
-
Your business's ship-from address (where the products ship from)
Getting Your Avalara Credentials
1. Log in to your Avalara Admin Console at [admin.avalara.com](https://admin.avalara.com)
2. Go to Settings > License and API Keys
3. Copy your Account ID and License Key
4. Note your Company Code (found under Settings > Company Setup)
Requirements <a href="#requirements" id="requirements" />
- PHP 8.1.0 +
- Joomla! 4.x/ Joomla! 5.x +
- J2Commerce / J2Store 4.x +
Purchase the App
Step 1: Go to our J2Commerce website > Extensions > Apps
Step 2: Locate the Avalara AvaTax App > click View Details > Add to cart > Checkout.
Step 3: Go to your My Downloads under your profile button at the top right corner and search for the app. Click Available Versions > View Files > Download Now
Install the App
Go to System > Install > Extensions > Install the app
-e0515ef561b368cb4d5a053cacb4c525.webp)
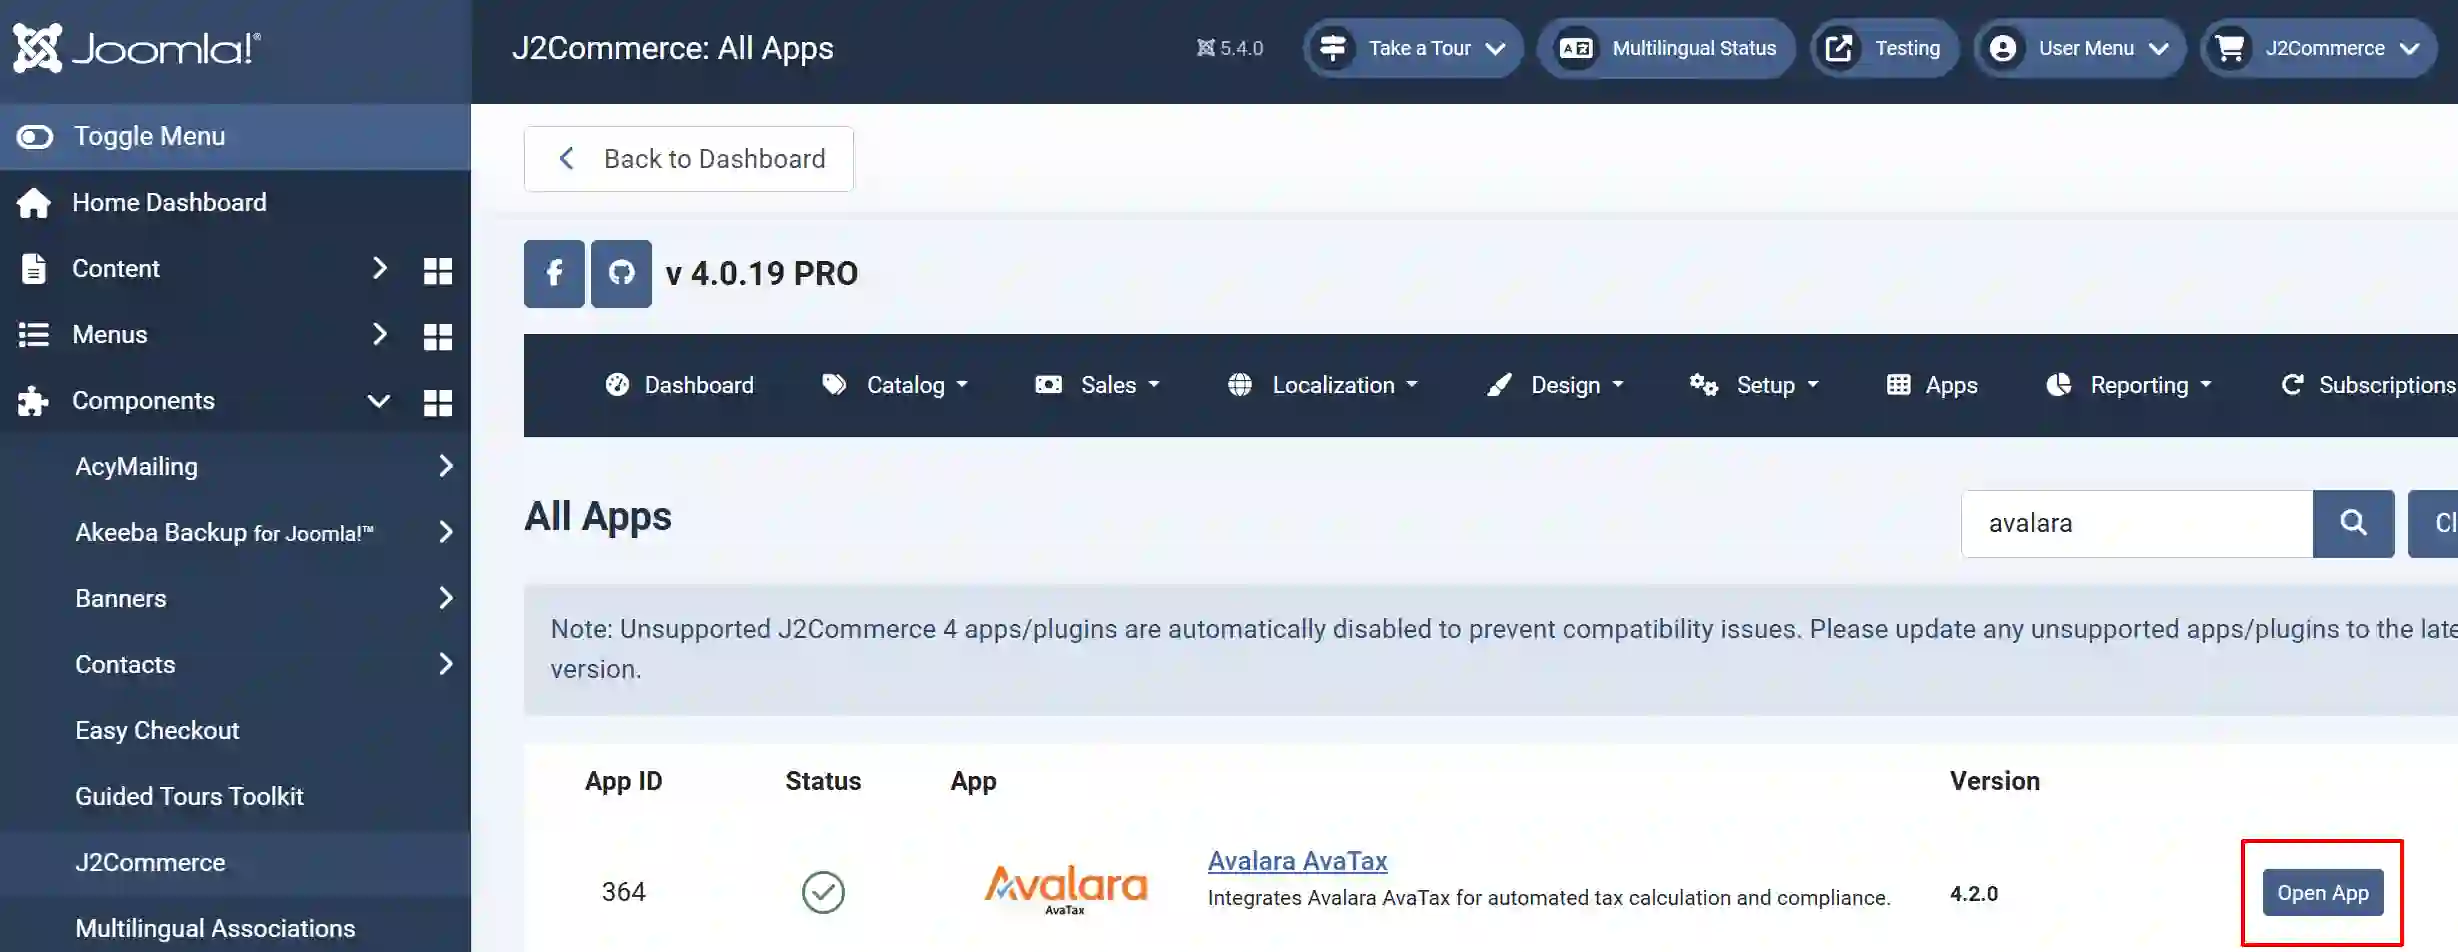
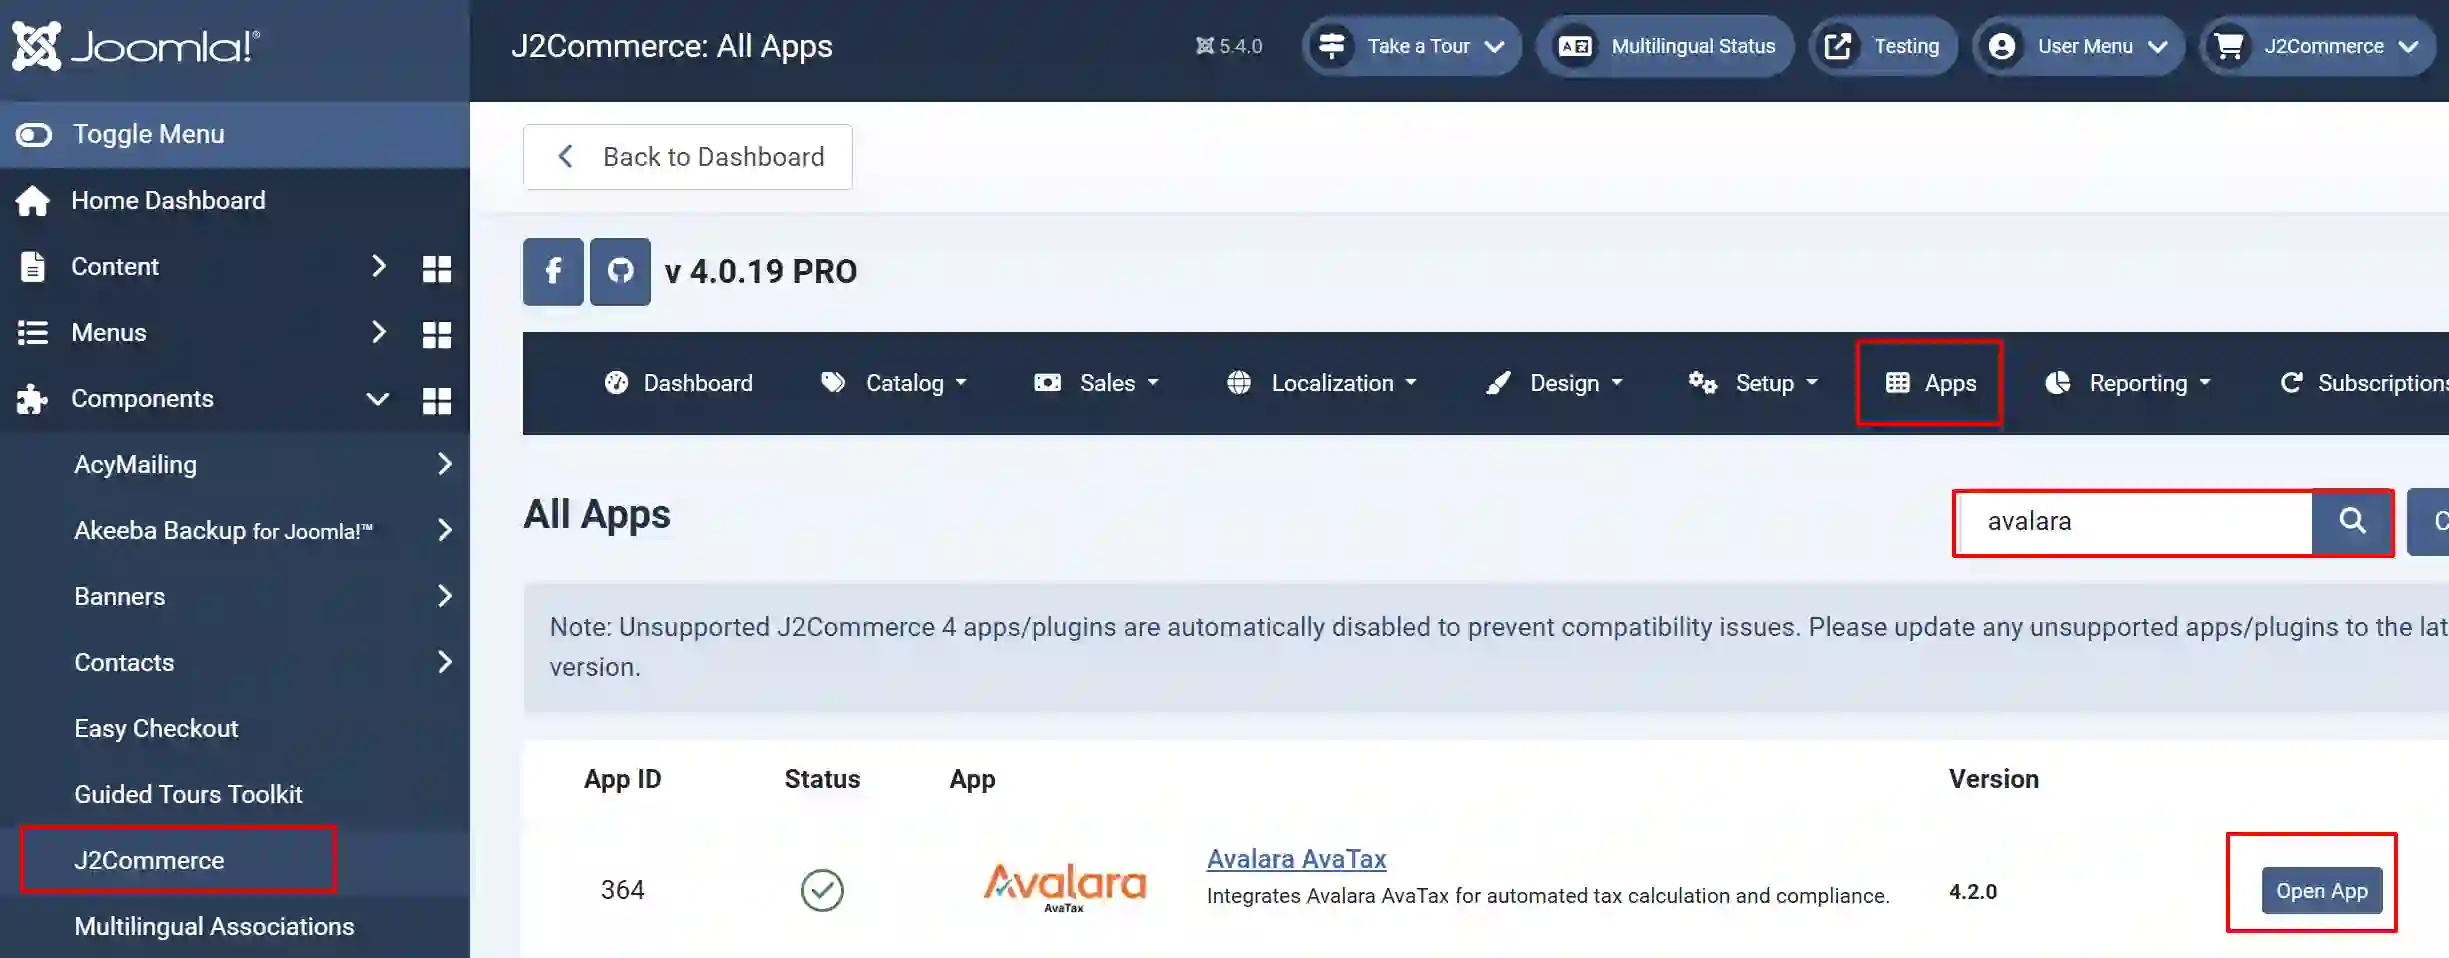
Enable the App
Go to J2Commerce > Apps > search for the Avalara AvaTax app
Click on the 'X' under Status to enable it.

Click on "Open App" or the Title to start setting up the app
Setting up the Parameters
Basic Settings tab
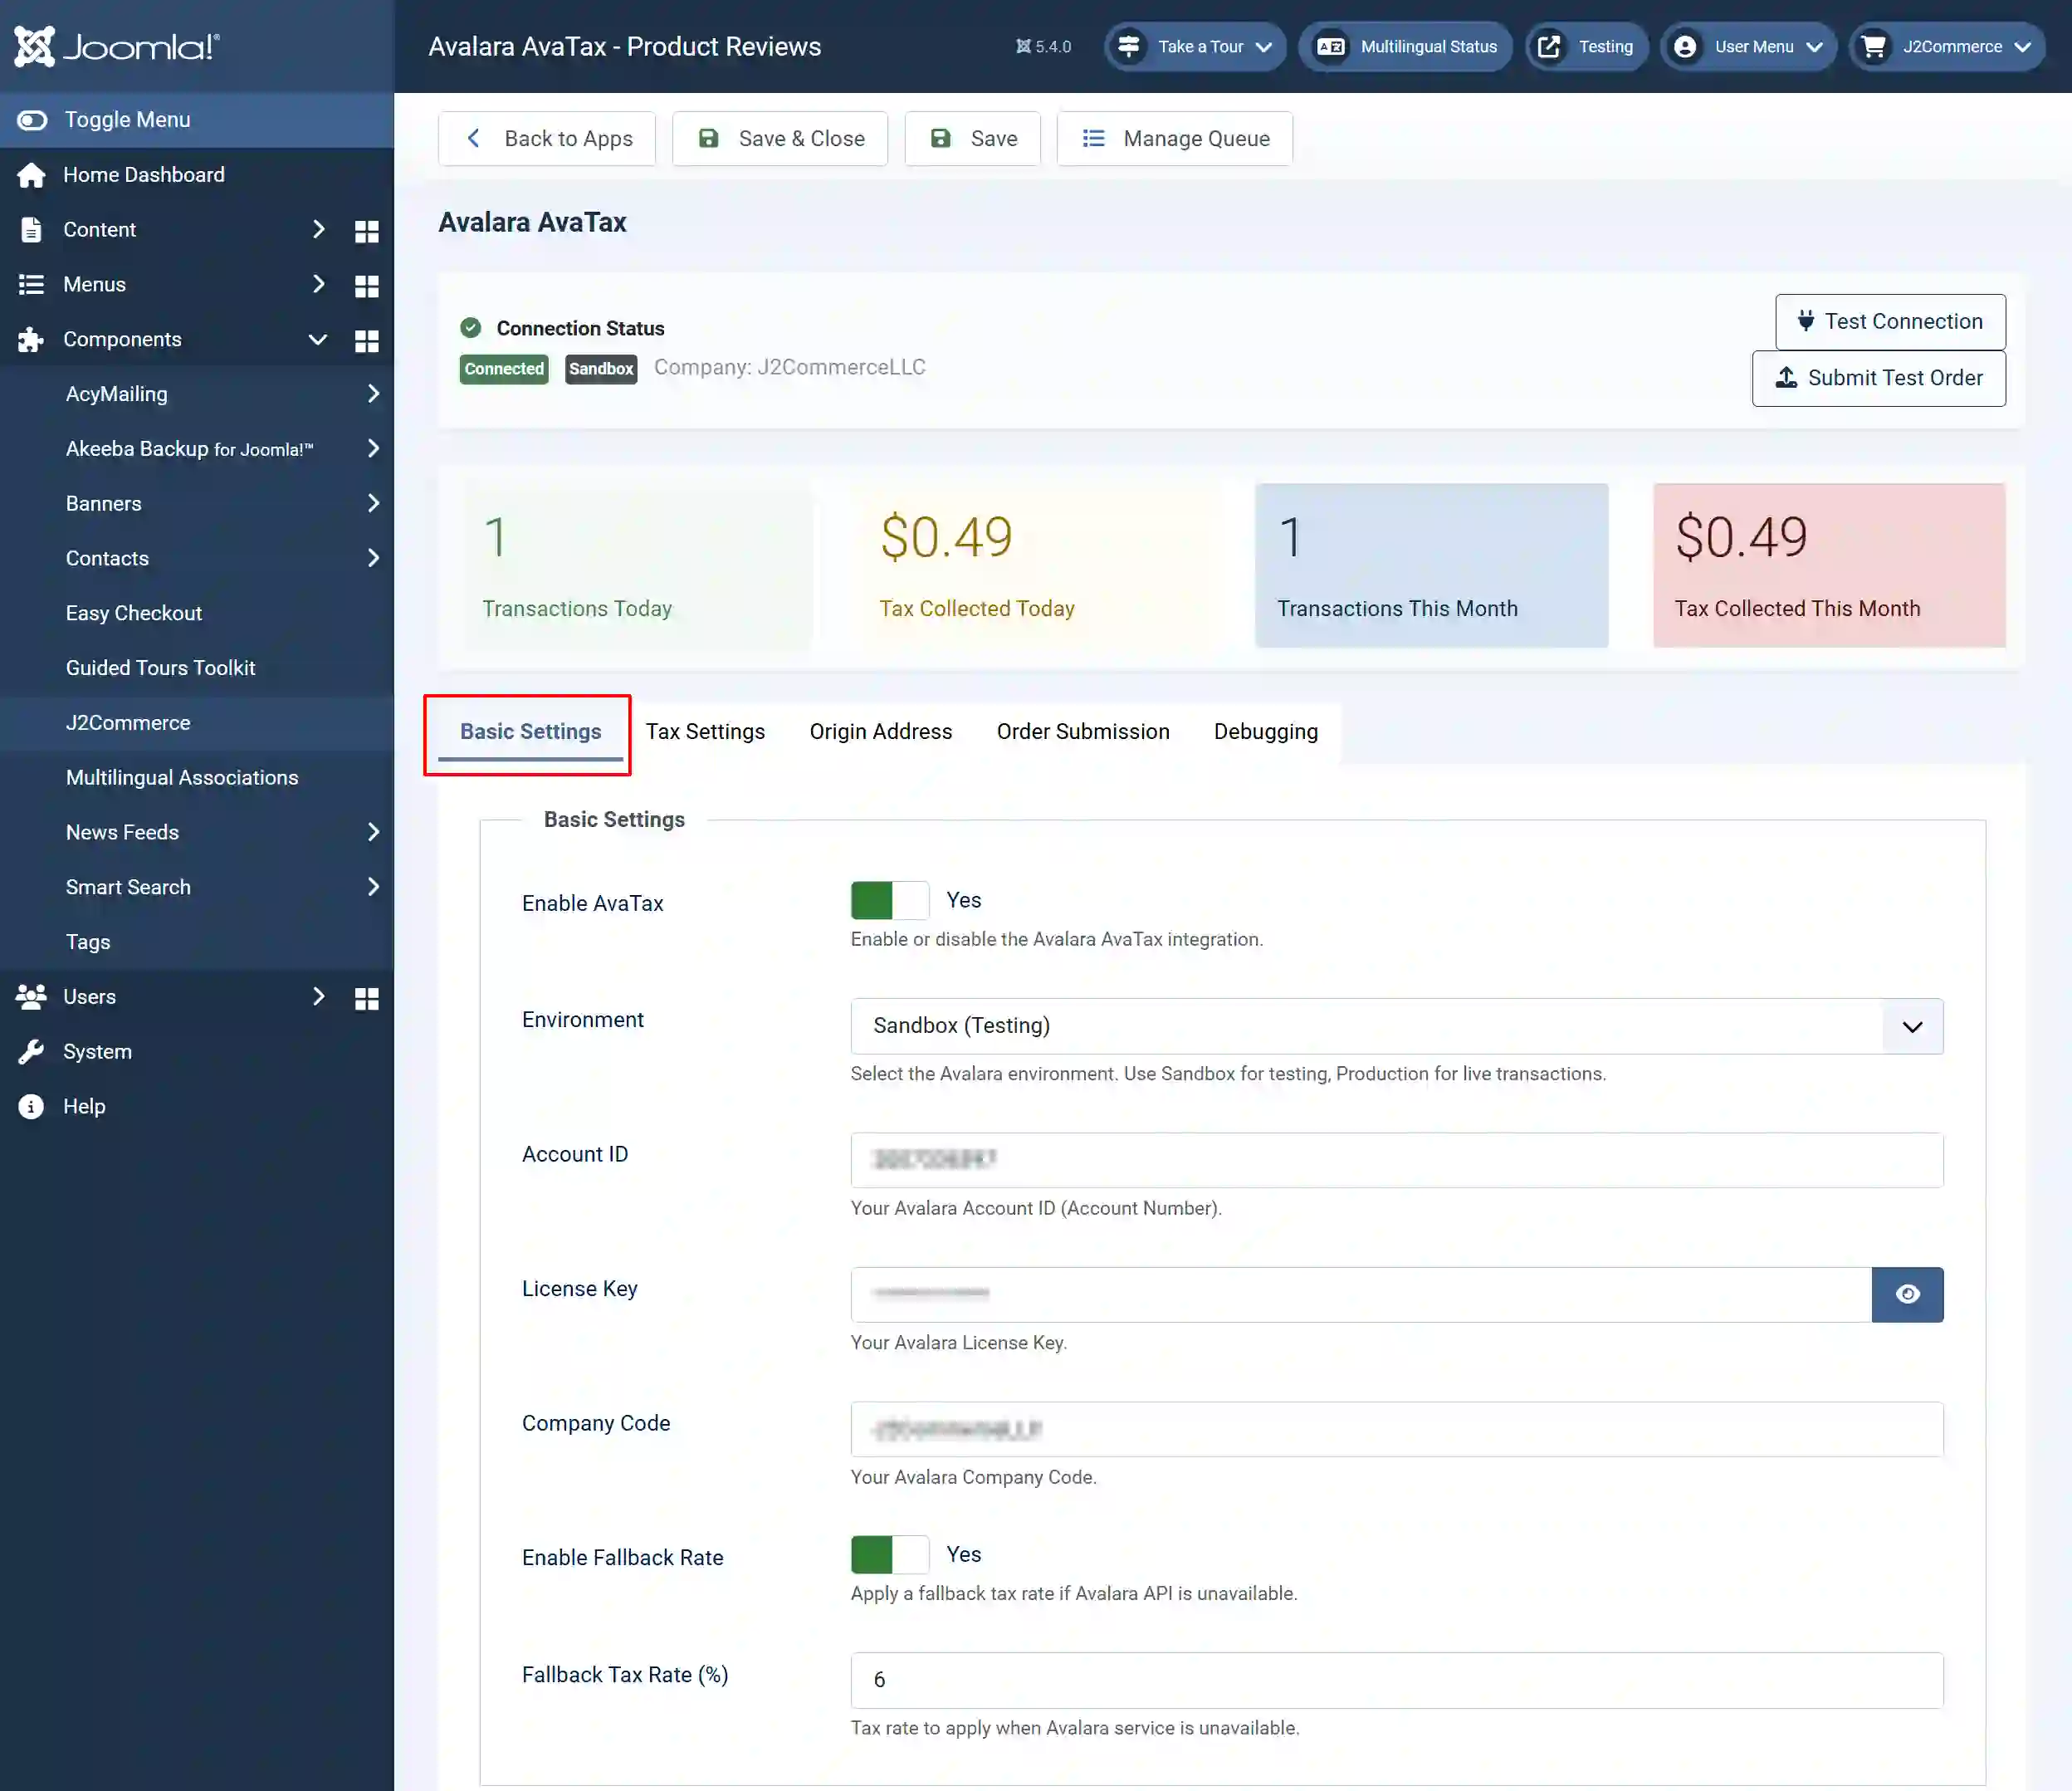
Enable AvaTax: Set this to yes to enable or disable the Avalara AvaTax integration
Environment: Select the Avalara environment. Use Sandbox for testing, Production for live transactions
Account ID: Your Avalara Account ID (Account Number)
License Key: Your Avalara License Key
Company Code: Your Avalara Company Code
Enable Fallback Rate: Set this to Yes to apply a fallback tax rate if the Avalara API is unavailable
Fallback Tax Rate (%): Tax rate to apply when the Avalara service is unavailable
Tax Settings tab
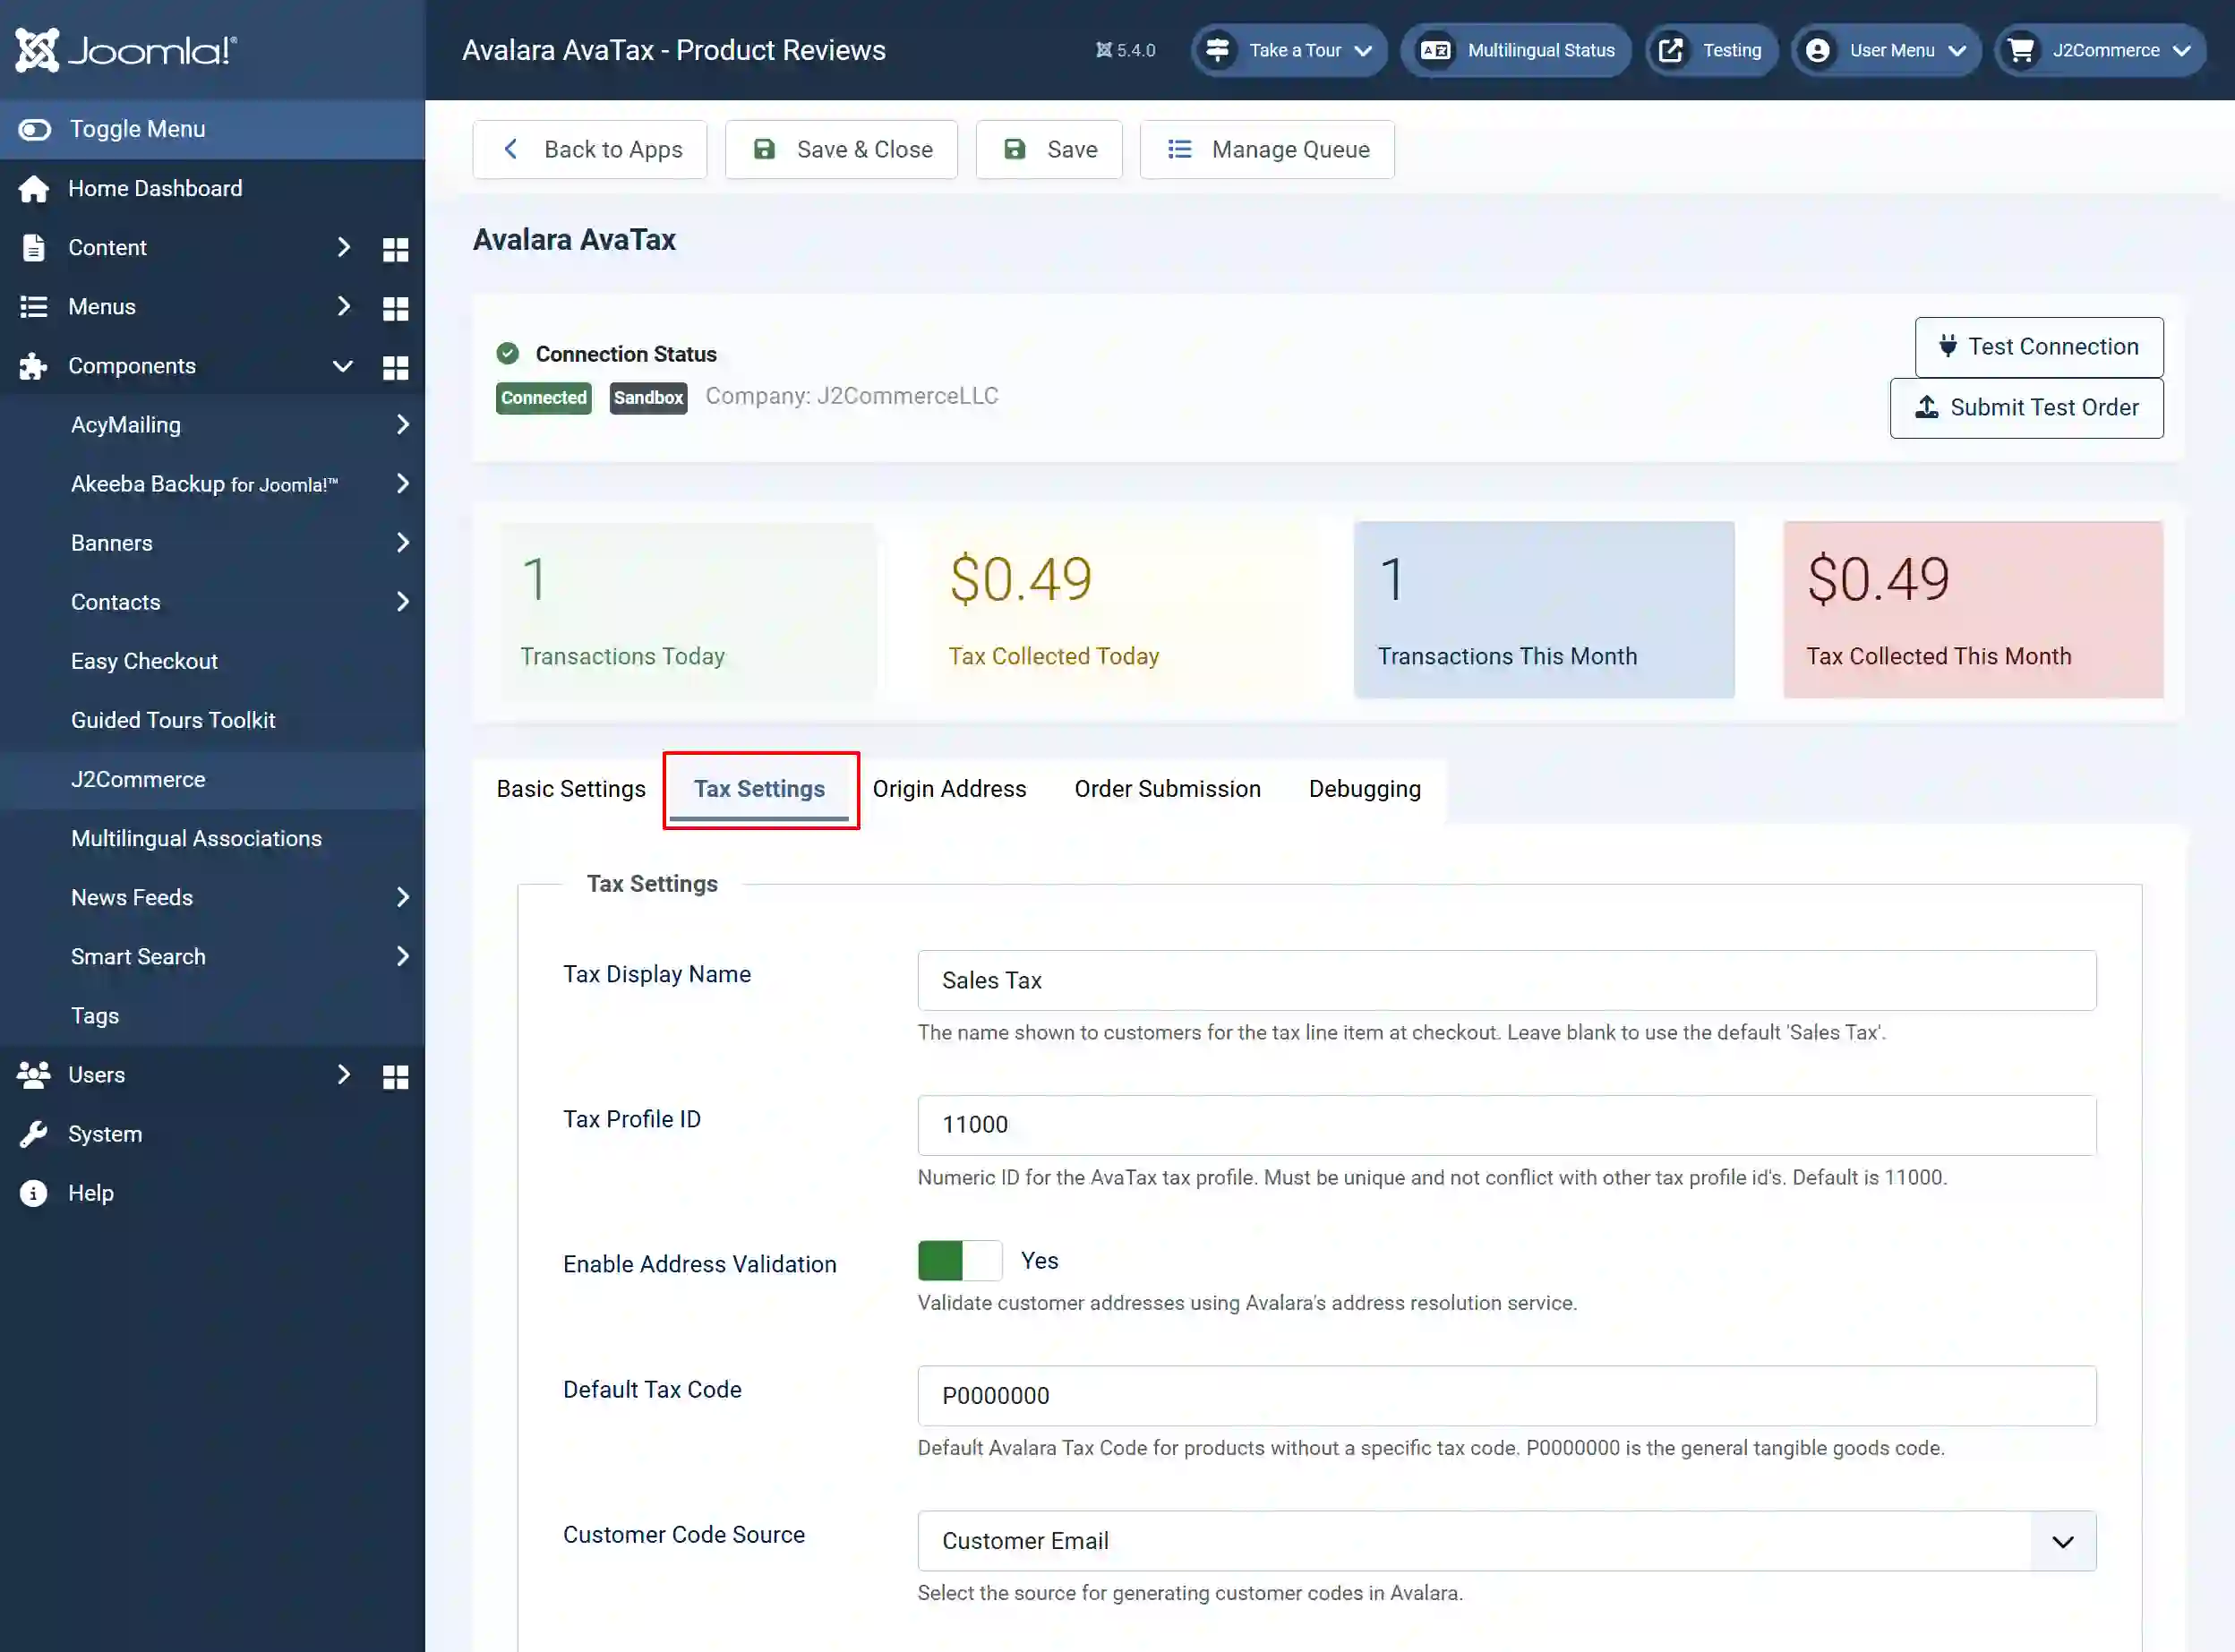
Tax Display Name: The name shown to customers for the tax line item at checkout. Leave blank to use the default 'Sales Tax.'
Tax Profile ID: Numeric ID for the AvaTax tax profile. Must be unique and not conflict with other tax profile id's. Default is 11000
Enable Address Validation: Set to Yes to validate customer addresses using Avalara's address resolution service
Default Tax Code: Default Avalara Tax Code for products without a specific tax code. P0000000 is the general tangible goods code
Customer Code Source: Select the source for generating customer codes in Avalara
-
Customer Email
-
User ID
-
Order ID
Origin Address tab
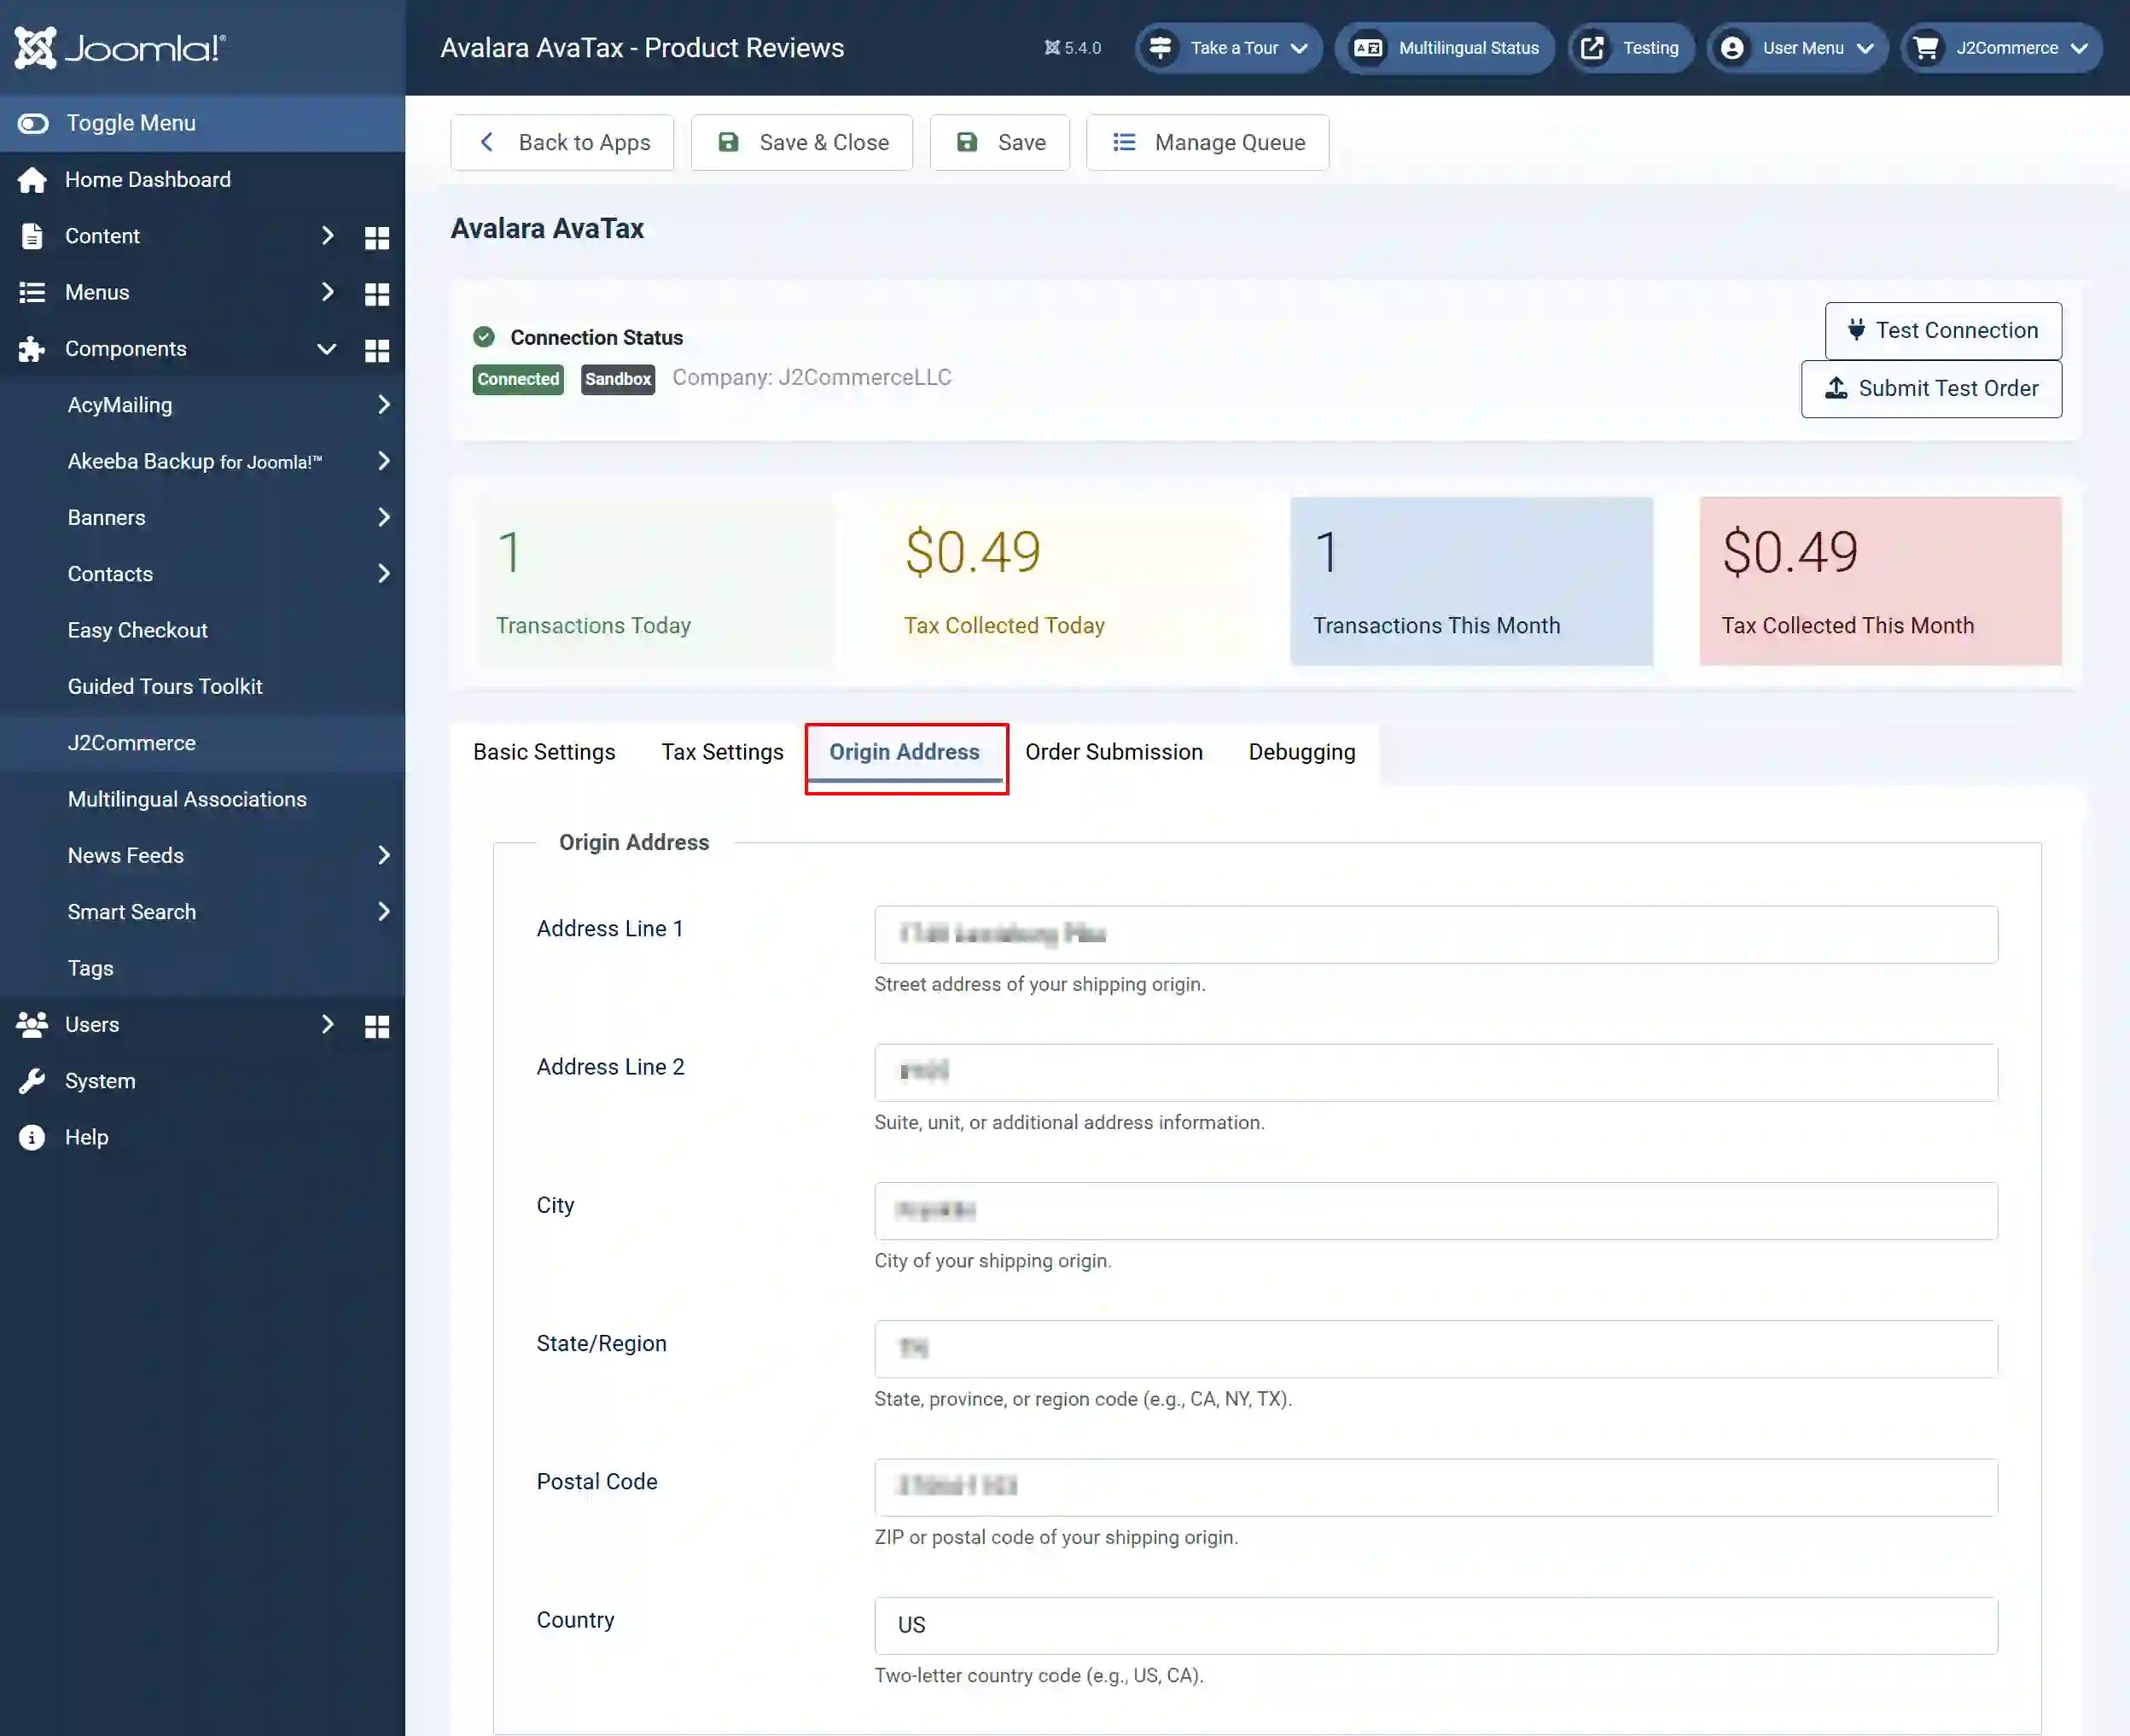
Address Line 1: Street address of your shipping origin
Address Line 2: Suite, unit, or additional address information
City: City of your shipping origin
State/Region: State, province, or region code (e.g., CA, NY, TX)
Postal Code: ZIP or postal code of your shipping origin
Country: Two-letter country code (e.g., US, CA)
Order Submission tab
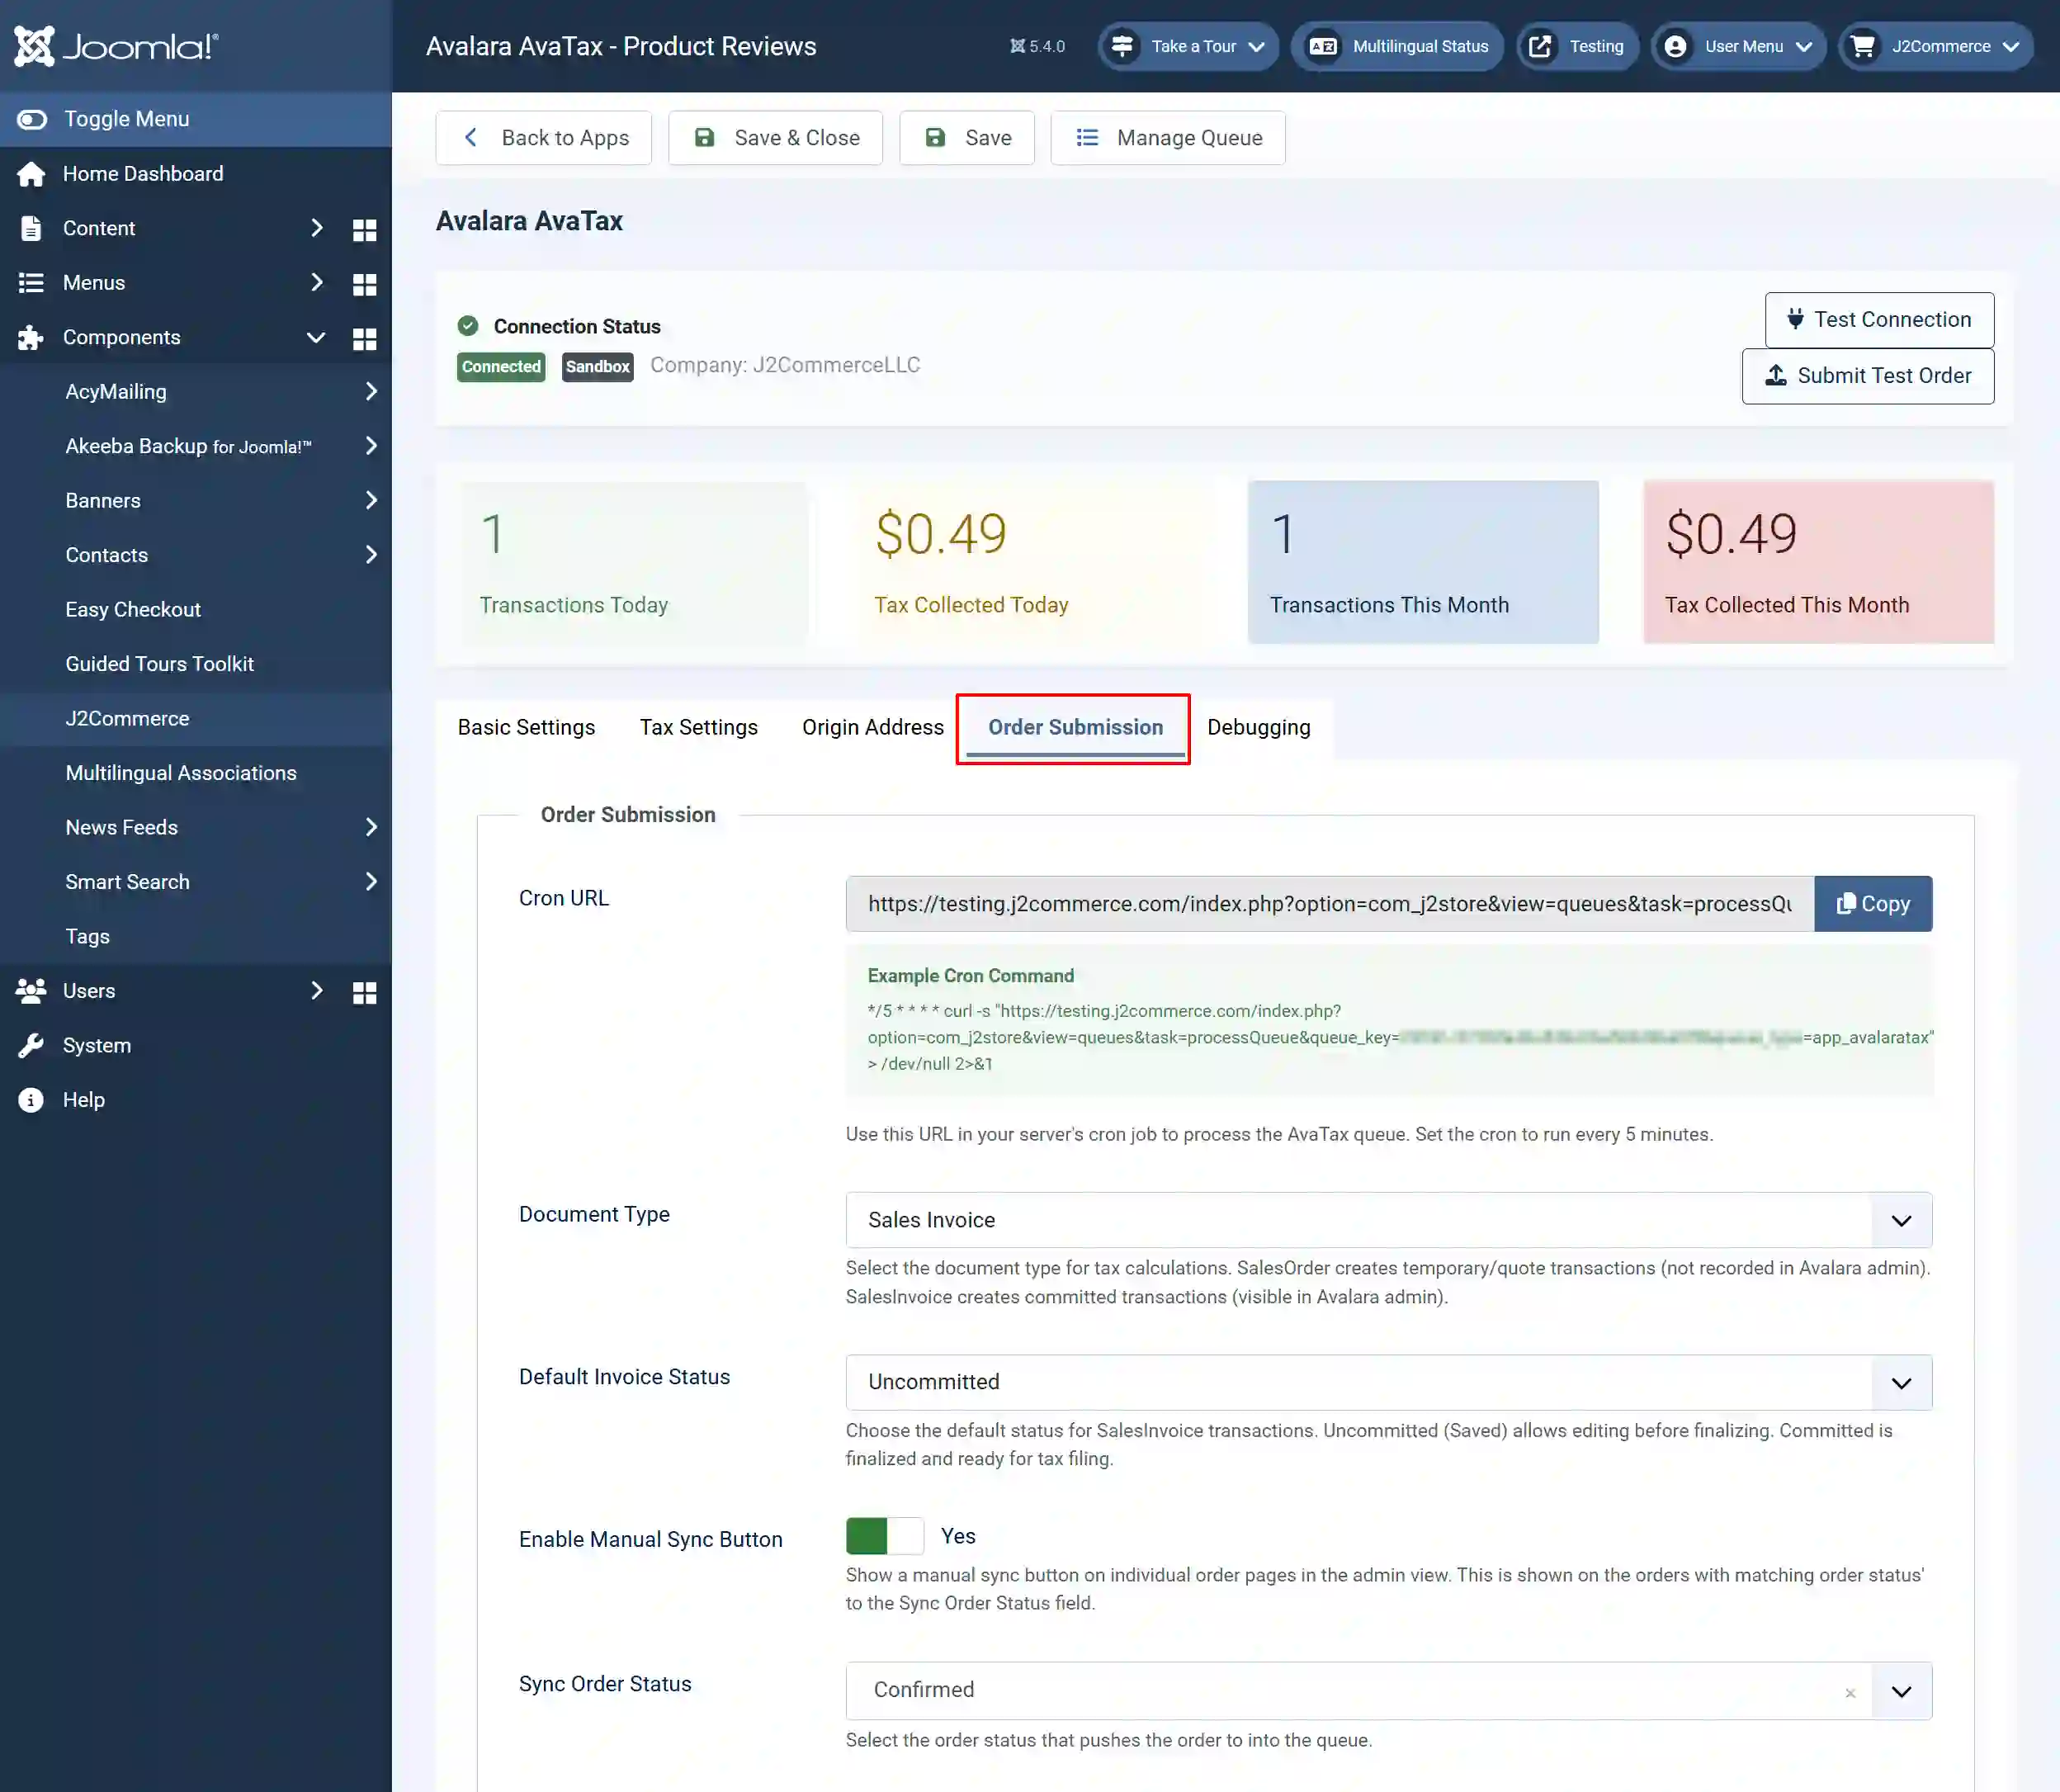
Cron URL: Use this URL in your server's cron job to process the AvaTax queue. Set the cron to run every 5 minutes
**How to set a cron job on your server
Visit the Cron Documentation to learn how to set up a cron job on your server.
Document Type: Select the document type for tax calculations. SalesOrder creates temporary/quote transactions (not recorded in Avalara admin). SalesInvoice creates committed transactions (visible in Avalara admin)
Default Invoice Status: Choose the default status for SalesInvoice transactions. Uncommitted (Saved) allows editing before finalizing. Committed is finalized and ready for tax filing
Enable Manual Sync Button: Set to Yes to show a manual sync button on individual order pages in the admin view. This is shown on the orders with a matching order status to the Sync Order Status field
Sync Order Status: Select the order status that pushes the order into the queue
Debugging tab
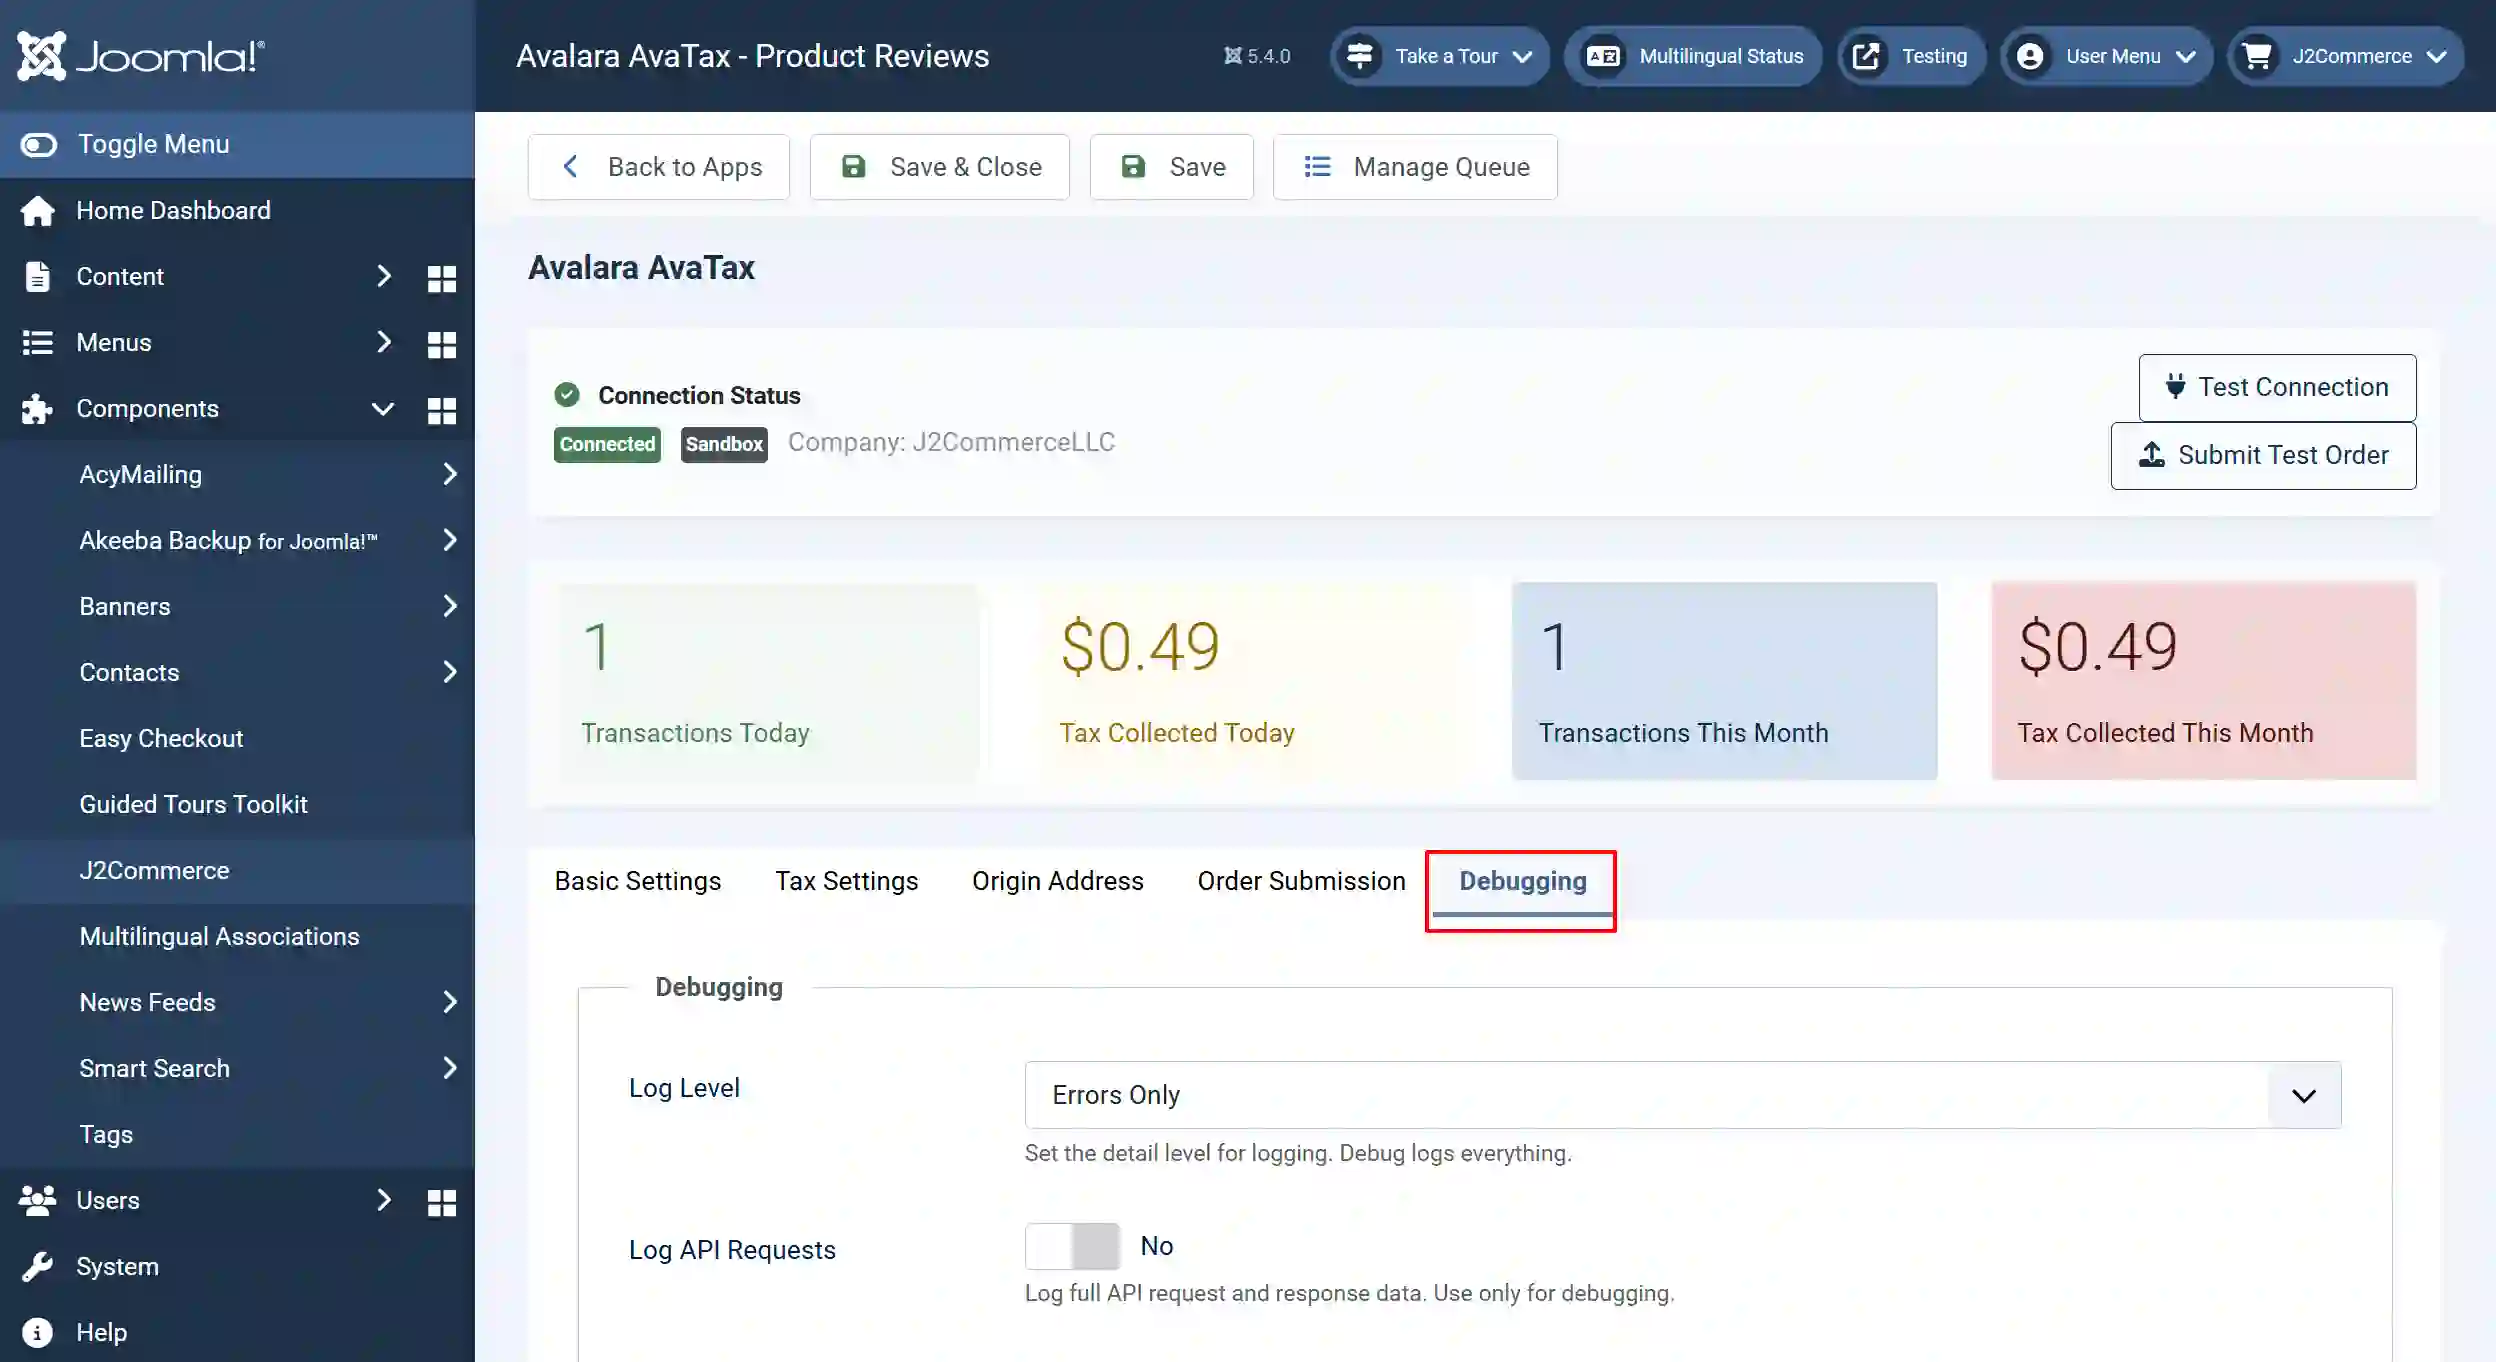
Log Level: Set the detail level for logging. Debug logs everything
Log API Requests: Log full API request and response data. Use only for debugging
Configuring Your Products
**For Avalara to calculate taxes on your products, each product must be assigned the Avalara Tax Profile.
For a Single Product
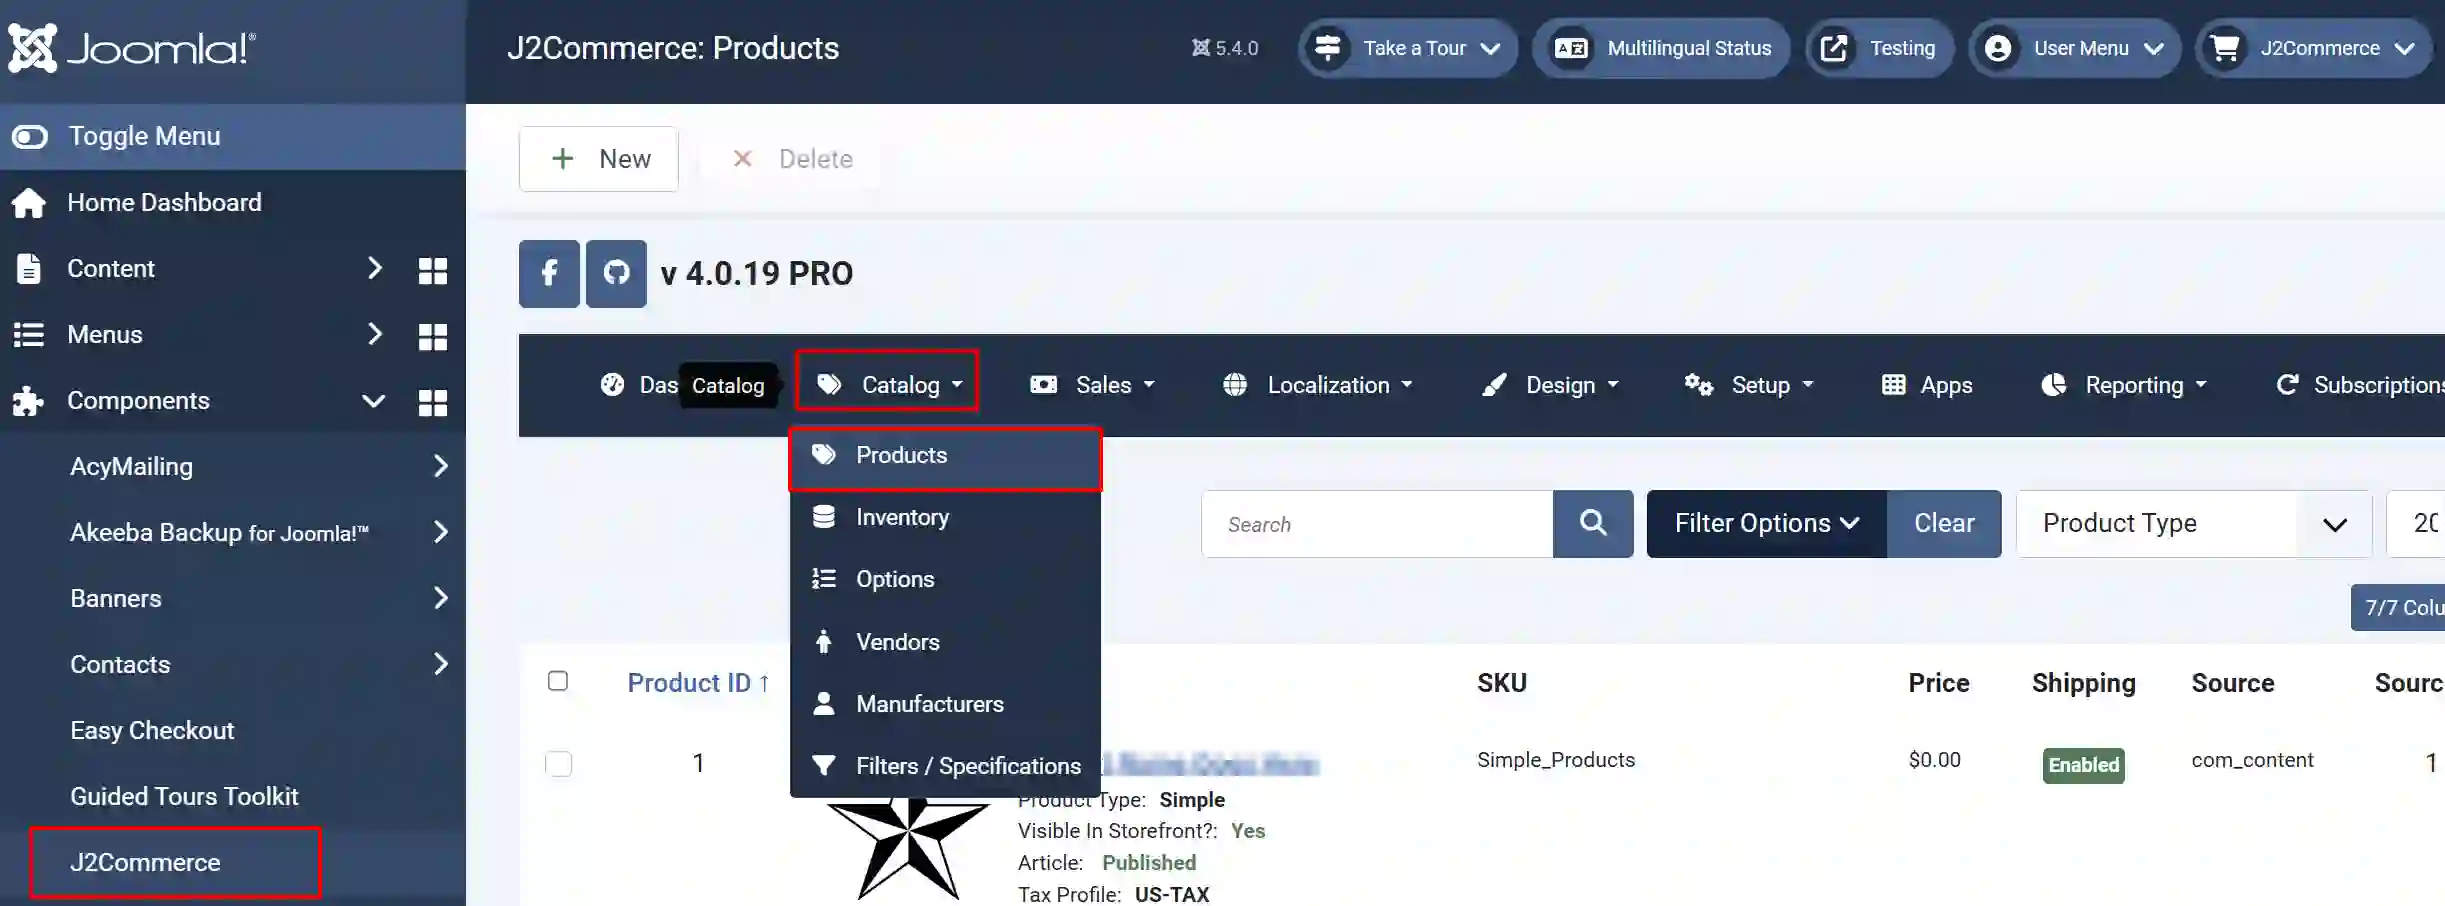
Go to J2Commerce > Catalog > Products
Search for the product
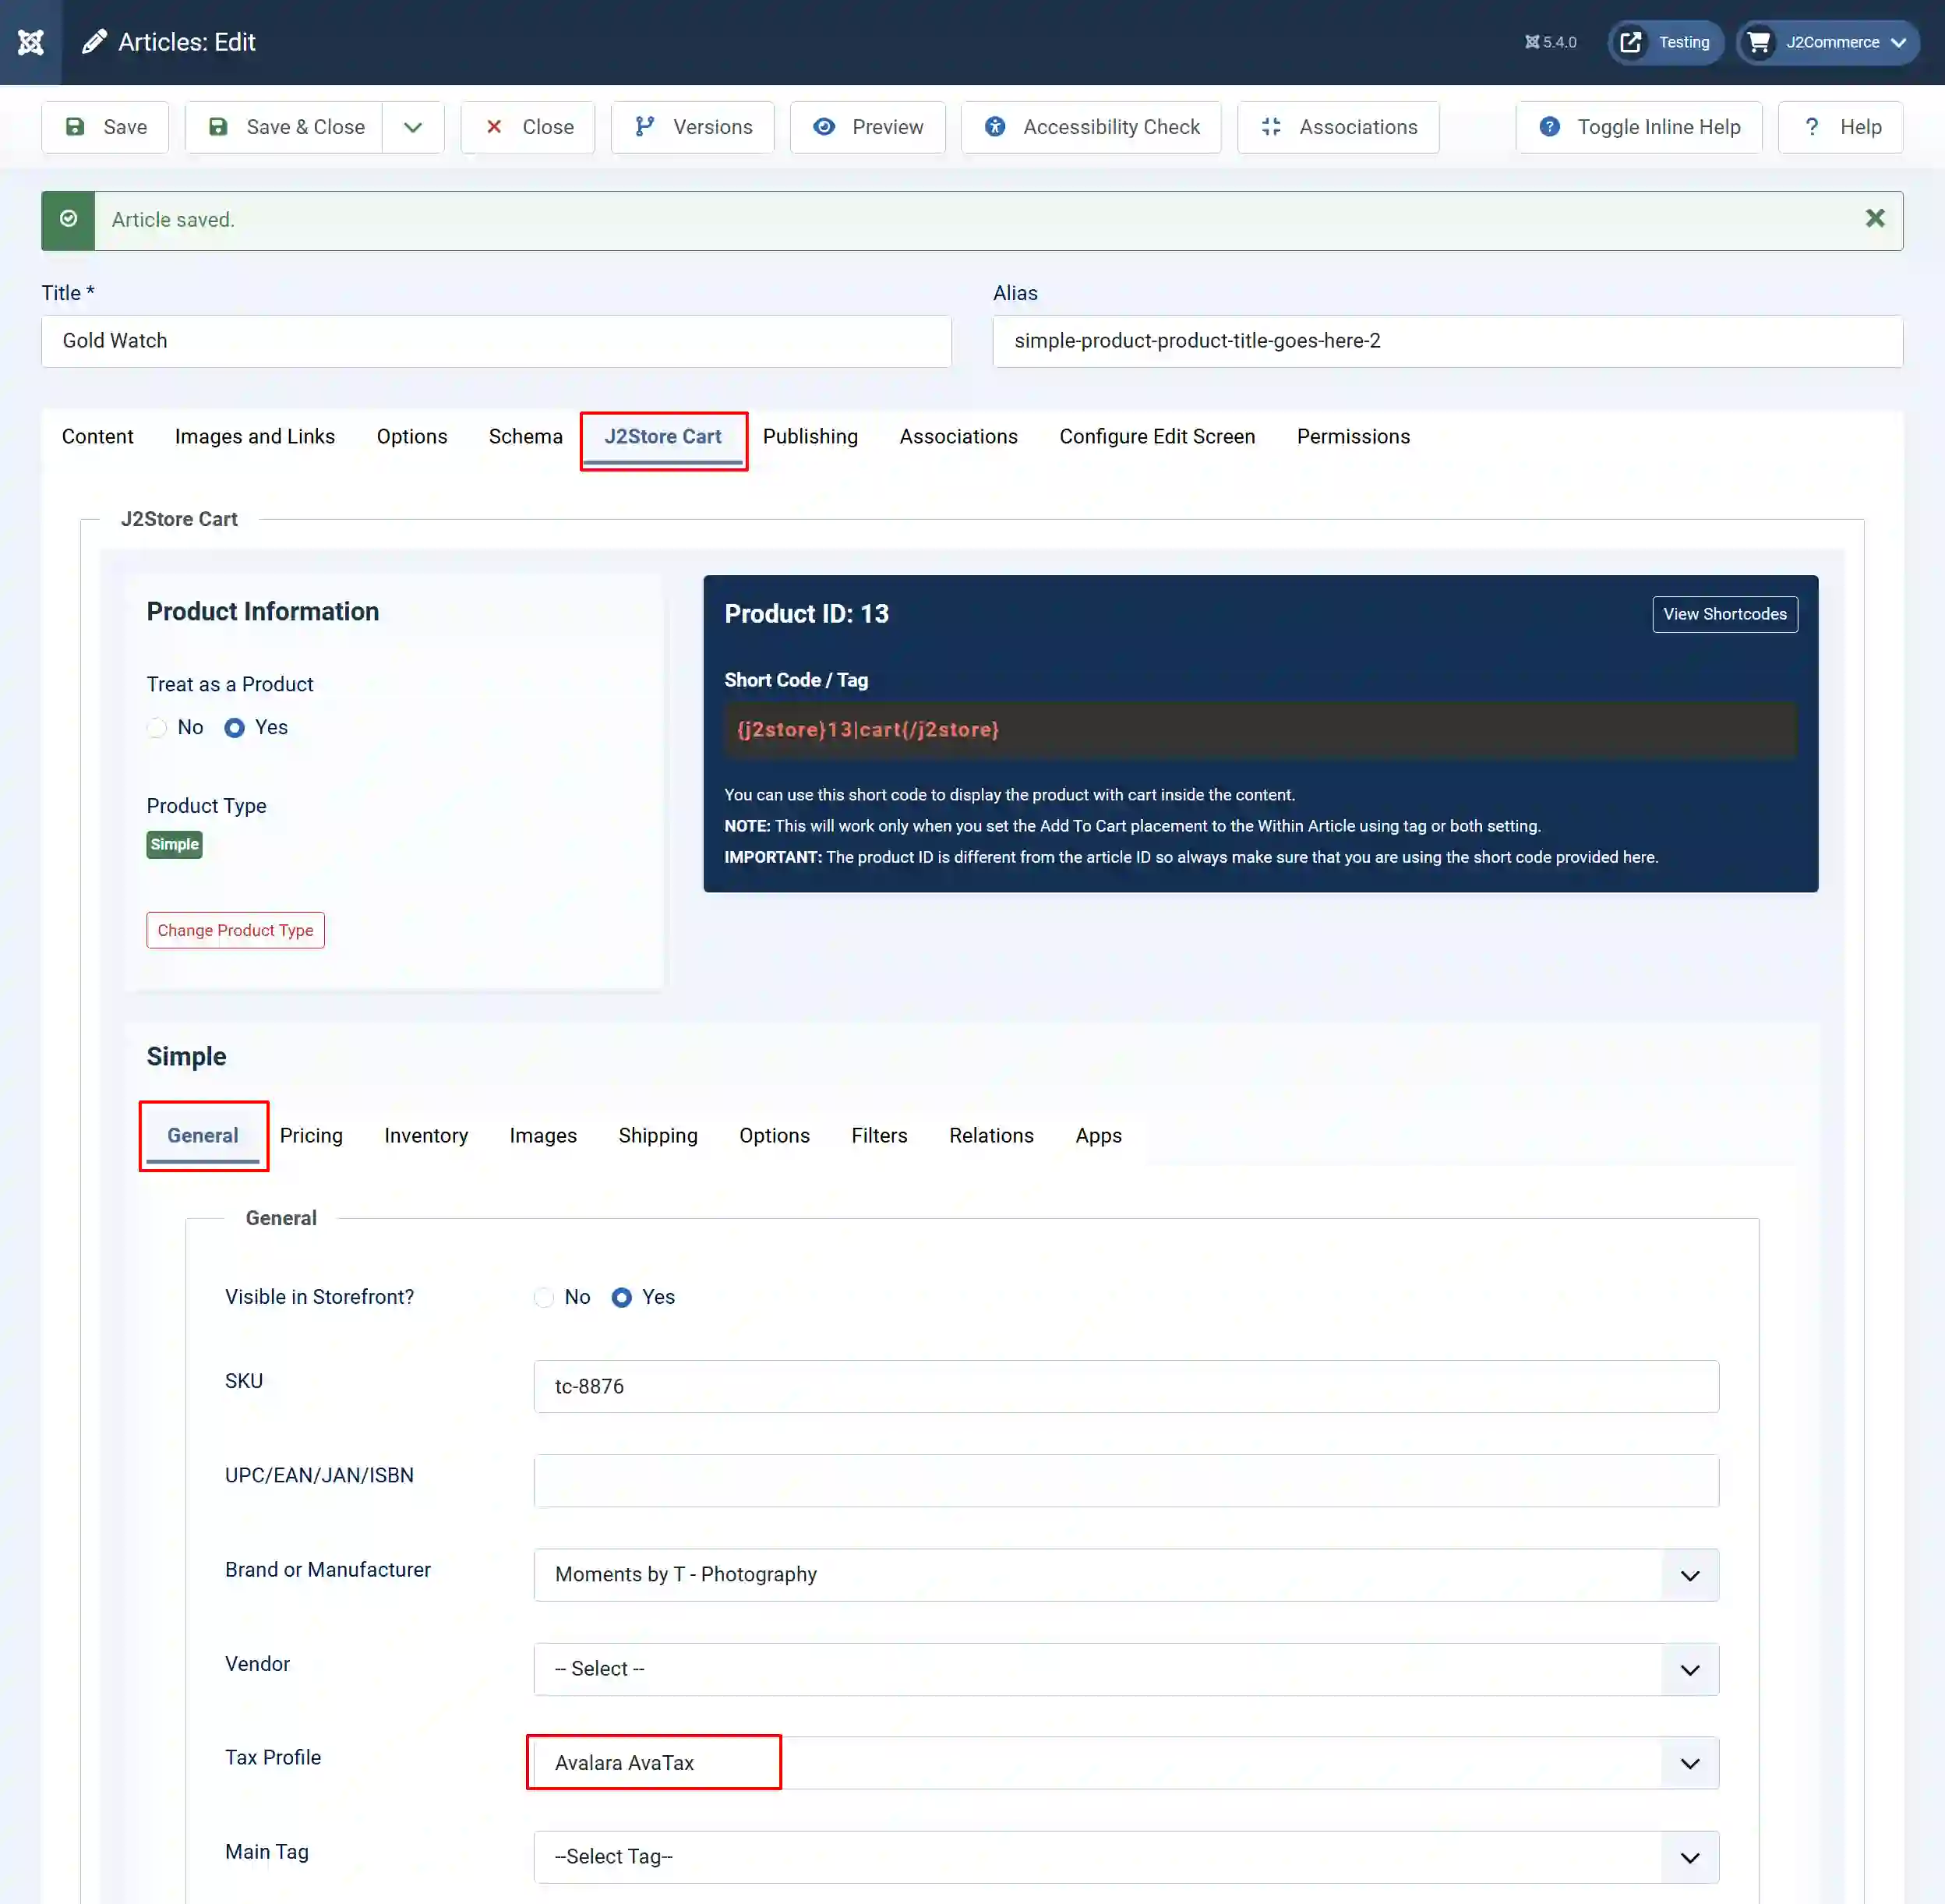
Scroll down to the General tab > Tax Profile dropdown
Select Avalara AvaTax (or the profile with ID 11000)
Save the product
Verify It's Working
-
Add a product (with an Avalara tax profile) to the cart
-
Proceed to checkout
-
Enter a shipping address
-
You should see the calculated tax amount on the final page

Setting Product Tax Codes
Different products may be taxed differently (e.g., clothing may be tax-exempt in some states). Avalara uses Tax Codes to identify product types.
What are Tax Codes?
Tax codes are alphanumeric identifiers that tell Avalara what type of product you're selling. Examples:
Tax Code | Description |
| P0000000 | General tangible personal property (default) |
| PC040100 | Clothing - General |
| PF050001 | Food for human consumption |
| D0000000 | Digital goods |
| SW054000 | Computer software |
You can search for tax codes at [taxcode.avatax.avalara.com](https://taxcode.avatax.avalara.com)
Assigning Tax Codes to Products
Go to J2Commerce > Catalog > Products
Search for the product and open it.
Go to J2Commerce (J2Store Cart) tab > App tab
Scroll down to find the Avalara Tax Code section
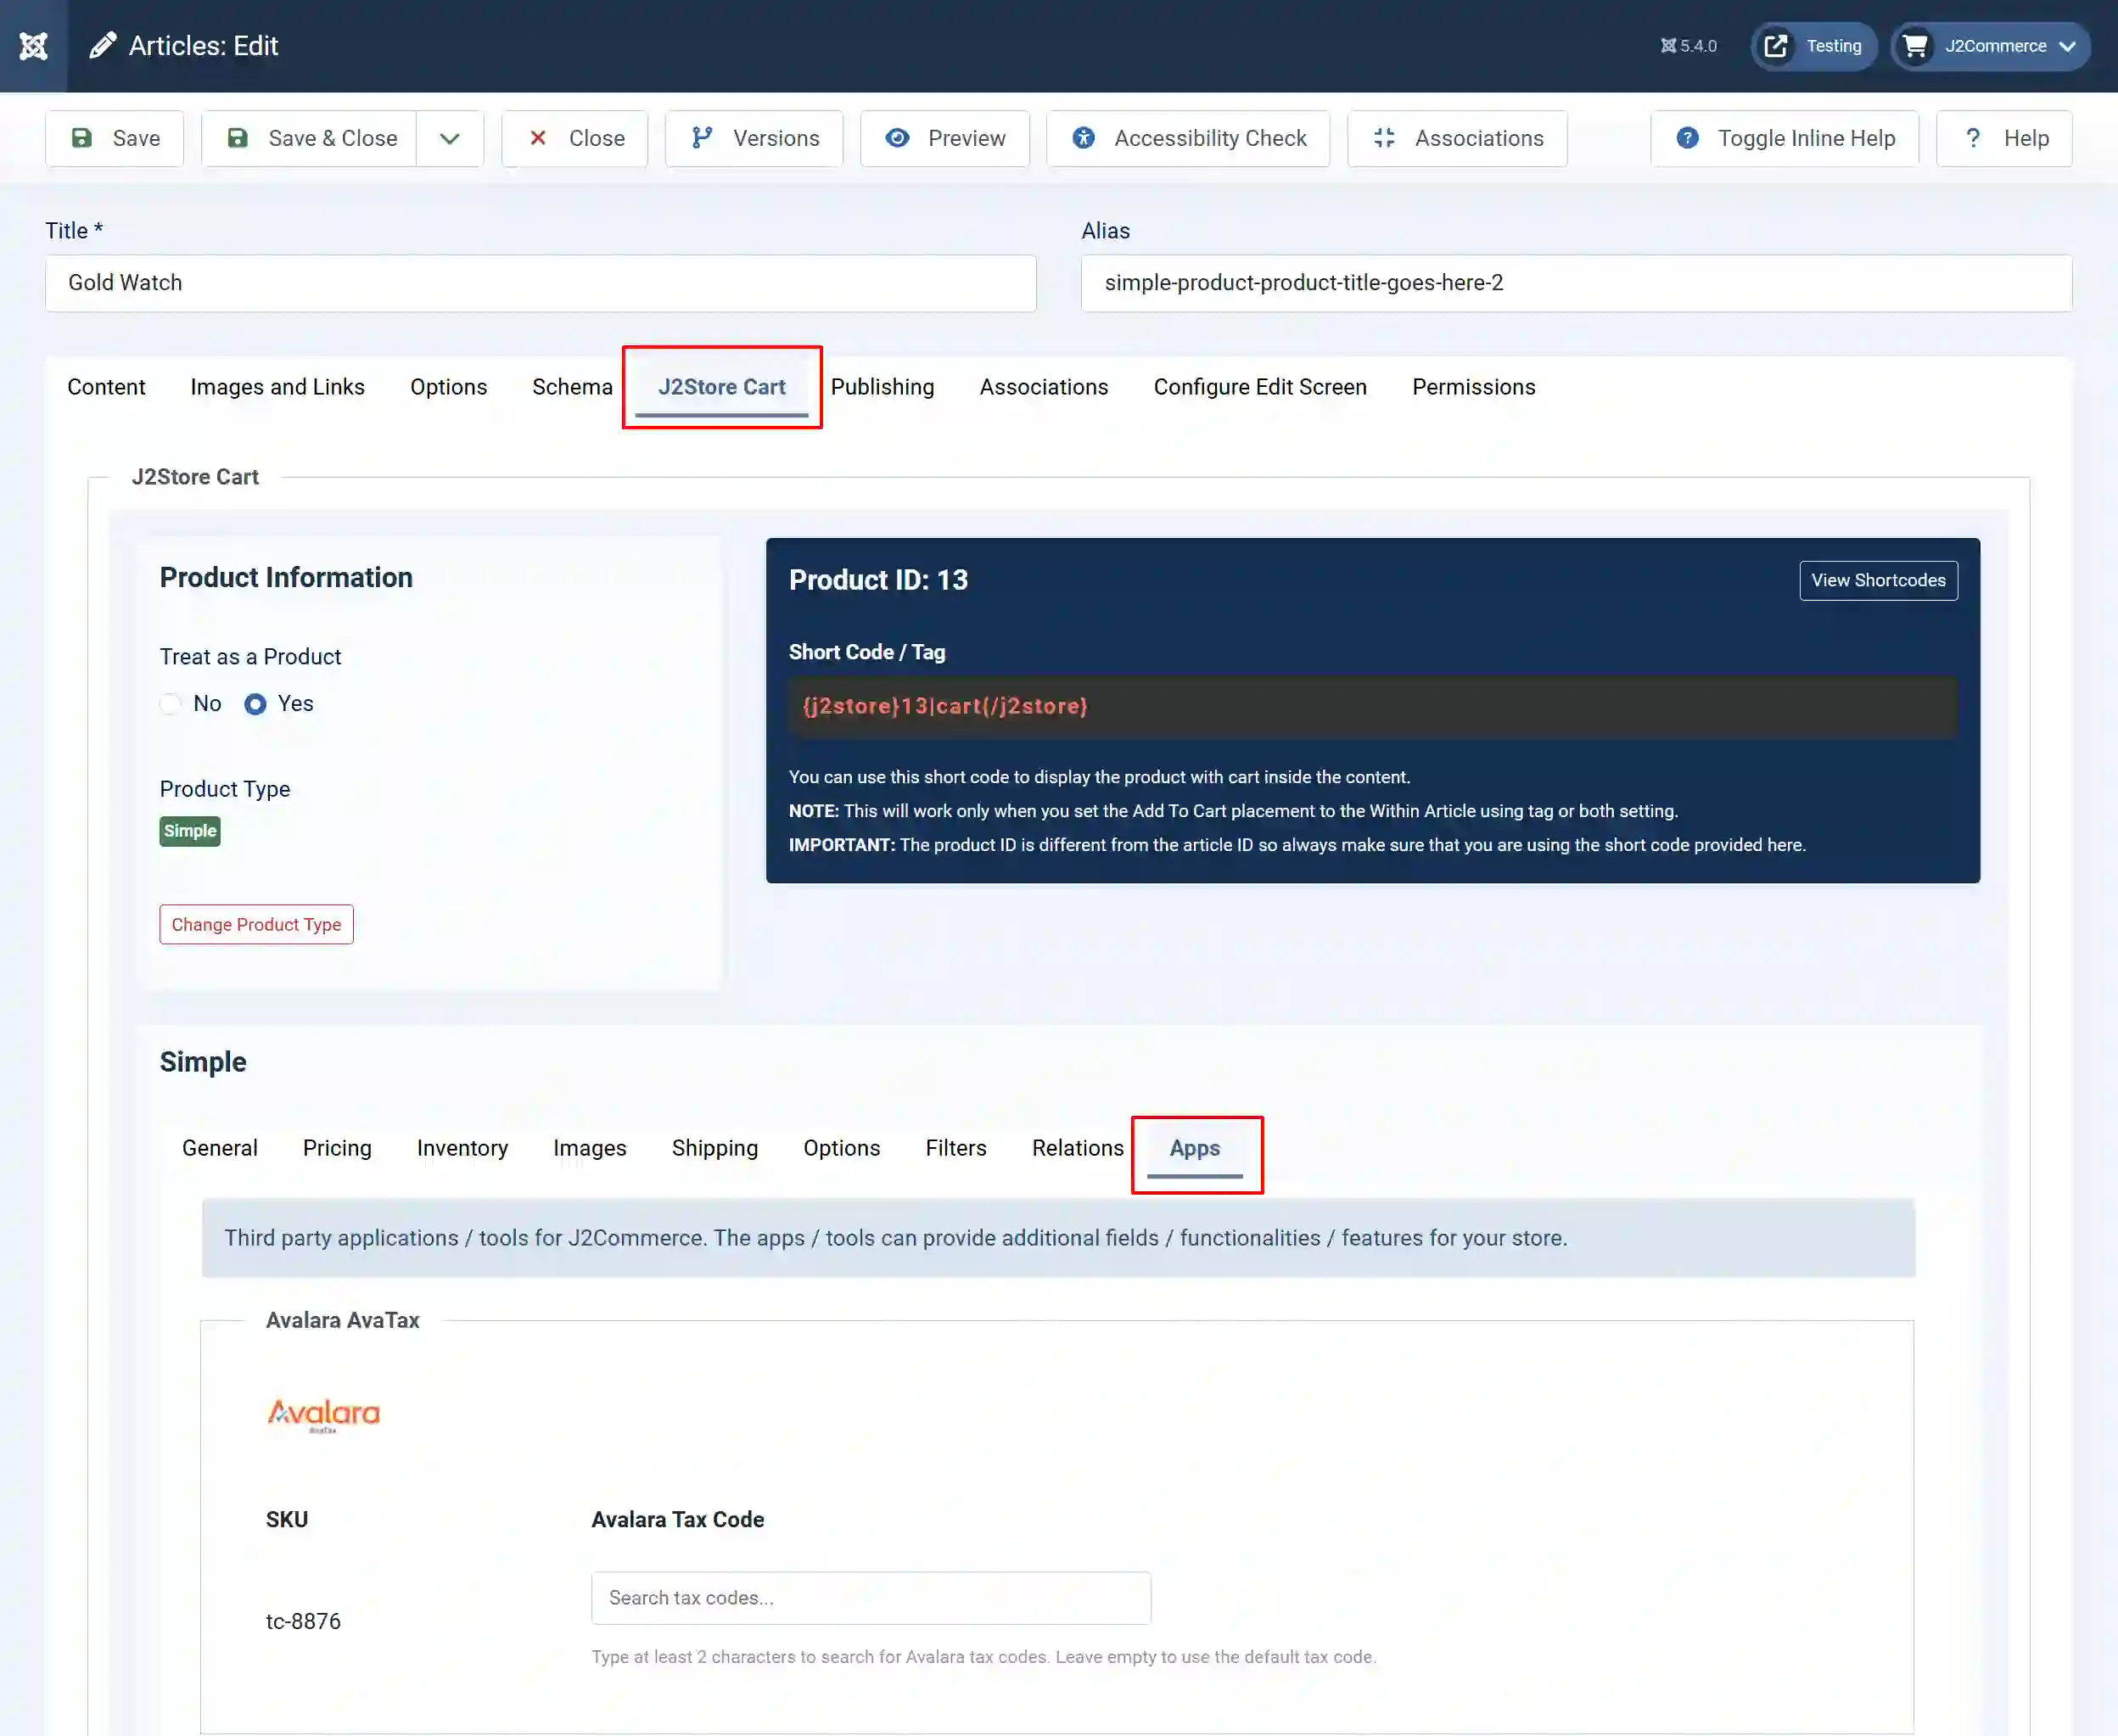
In the search box, type at least 2 characters (e.g., "cloth" or "food")
Select the appropriate tax code from the dropdown
Save the product

Note: For help understanding the tax codes and which choice you should make, contact Avalara Support: (https://support.avalara.com)
Tips for Tax Codes
• If you don't set a tax code, the Default Tax Code from settings is used (P0000000)
• You can set different tax codes for different product variants
• Search by code (e.g., "PC040") or description (e.g., "clothing")
Understanding Document Types
The Document Type setting controls how transactions are recorded in Avalara.
SalesOrder (Quote/Temporary)
• Used for estimates only
• NOT recorded in Avalara's admin console
• Good for: Testing, getting tax estimates
• Orders won't appear in your Avalara reports
SalesInvoice (Recorded)
• Creates permanent transaction records
• Appears in your Avalara admin console
• Good for: Production/live sales
• Required for tax filing and compliance
Invoice Status (Committed vs Uncommitted)
When using SalesInvoice, you can choose:
| Status | Description | When to Use |
| Uncommitted | Saved but editable | If you need to modify orders before finalizing |
| Committed | Finalized, ready for tax filing | When orders are final |
Recommendation: Start with "Uncommitted" so you can adjust orders if needed.
Queue Management
The queue system ensures orders are reliably sent to Avalara, even if there are temporary connection issues.
How It Works
-
When an order is placed and paid, it's added to the queue
-
A cron job processes the queue and sends orders to Avalara
-
Successfully processed orders are removed from the queue
-
Failed orders are retried automatically
Setting Up the Cron Job
-
In the Avalara AvaTax settings, find the Queue Settings section
-
Copy the Cron URL displayed
-
Set up a cron job on your server to call this URL every 5 minutes
Example cron command
*/5 * * * * curl -s "https://yoursite.com/index.php?option=com_j2store&view;=queues&task;=processQueue&queue;_key=YOUR_KEY&queue;_type=app_avalaratax" > /dev/null
How to set a cron job on your server
Visit the Cron Documentation to learn how to set up a cron job on your server.
Managing the Queue
Go to J2Commerce > Apps > Search for Avalara AvaTax
Open Avalara AvaTax
Click the Manage Queue button in the toolbar
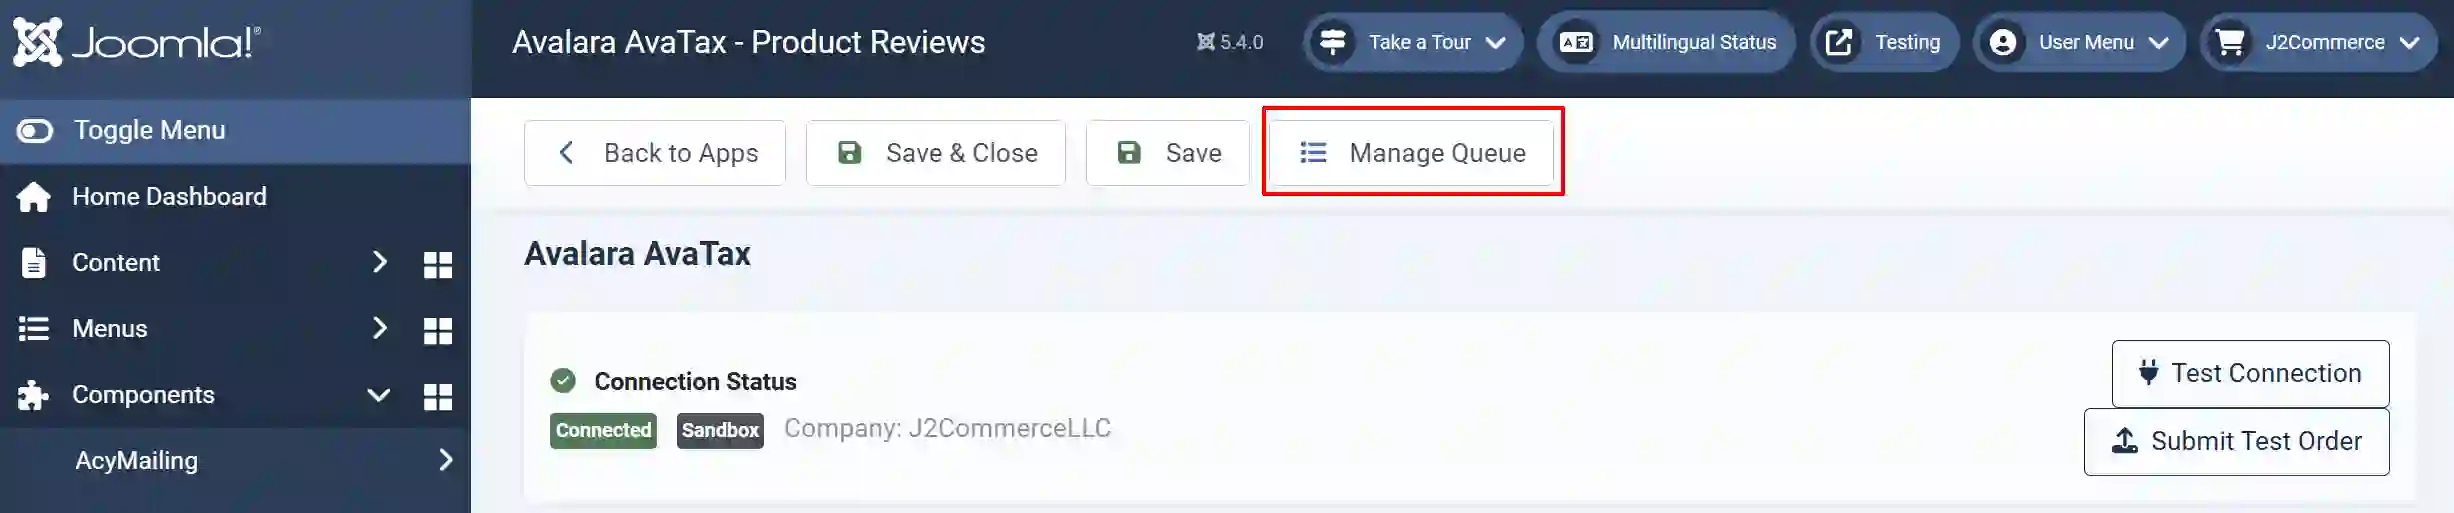
From here you can:
• View pending orders
• Retry failed orders
• Clear completed entries
• Delete stuck entries
Viewing Orders in Avalara
After orders are submitted to Avalara, you can view them in your Avalara Admin Console.
Finding Your Transactions
Step 1: Log in to [admin.avalara.com](https://admin.avalara.com)
Step 2: Go to Transactions
Search for transactions by
-
Document Code (e.g., "J2S-123" for order #123)
-
Date range
-
Customer code
Transaction Document Codes
Orders from J2Commerce/J2Store appear in Avalara with document codes in this format:
J2S-{order_id}
For example, order #456 would appear as J2S-456.
Troubleshooting
"Connection Failed" Error
Step 1: Verify your Account ID and License Key are correct
Step 2: Check that you're using the right Environment (Sandbox vs Production)
Step 3: Ensure your server can make outbound HTTPS connections
Tax Not Calculating
Step 1: Verify the product has the Avalara Tax Profile assigned
Step 2: Check that a shipping address with a postal code is entered
Step 3: Look at the logs: Avalara AvaTax Settings > View Logs
Orders Not Appearing in Avalara
Step 1: Check that Document Type is set to "SalesInvoice"
Step 2: Verify the queue is being processed (check cron job)
Step 2: Look for errors in the queue management screen
Wrong Tax Amount
Step 1: Verify your ship-from address is correct
Step 2: Check that the product has the correct tax code
Step 3: Verify the customer's shipping address is valid
Enabling Debug Logging
For troubleshooting, temporarily enable detailed logging:
Step 1: Open Avalara AvaTax settings
Step 2: Go to Logging Settings
Step 3: Set Log Level to "Debug (All)"
Step 4: Enable Log API Requests
Step 5: Reproduce the issue
Step 6: Check the logs for detailed information
Remember: Disable debug logging after troubleshooting to avoid large log files.
Getting Help
• Avalara Support: (https://support.avalara.com)
• Tax Code Search: (https://taxcode.avatax.avalara.com)
• Avalara Developer Docs: (https://developer.avalara.com)
• J2Store Support: (https://www.j2commerce.com/support)