---
title: "Wishlist Module"
description: "Display a wishlist item count with a heart icon and link anywhere on your site using the mod_j2commerce_wishlist module."
url: "https://docs.j2commerce.com/v6/apps-and-extensions/modules/mod_j2commerce_wishlist"
markdown_url: "https://docs.j2commerce.com/v6/apps-and-extensions/modules/mod_j2commerce_wishlist.md"
last_updated: "2026-10-31T23:39:50+00:00"
version: "J2Commerce 6"
breadcrumbs:
- title: "Home"
url: "https://docs.j2commerce.com/"
- title: "J2Commerce 6"
url: "https://docs.j2commerce.com/v6"
- title: "Apps and Extensions"
url: "https://docs.j2commerce.com/v6/apps-and-extensions"
- title: "Modules"
url: "https://docs.j2commerce.com/v6/apps-and-extensions/modules"
- title: "Wishlist Module"
url: "https://docs.j2commerce.com/v6/apps-and-extensions/modules/mod_j2commerce_wishlist"
---
# Wishlist Module
The **J2Commerce - Wishlist** module (`mod_j2commerce_wishlist`) displays a heart icon alongside the current shopper's wishlist item count and a link to the wishlist page. Place it in your navbar, header, or any module position to give shoppers one-click access to their saved products.
This module is a companion to the **app_wishlist** plugin. The plugin must be installed and enabled before this module will display a meaningful count.
## Prerequisites
- J2Commerce 6 is installed and active.
- The **app_wishlist** add-on plugin is installed and enabled. See the Wishlist app guide for setup instructions.
- At least one menu item is linked to the wishlist page (recommended for correct URL generation).
## Purchase and Download
The **Wishlist** Module is a premium add-on available from the J2Commerce extension directory.
**Step 1:** Go to our [**J2Commerce** website](https://www.j2commerce.com/extensions) **->** **Modules**
**Step 2:** Locate the **Wishlist** Module **->** click **View Details -> Add to cart -> Checkout**.
**Step 3:** Go to your **My Downloads** under your profile button at the top right corner and search for the app. Click **Available Versions -> View Files -> Download**
## Install the Module
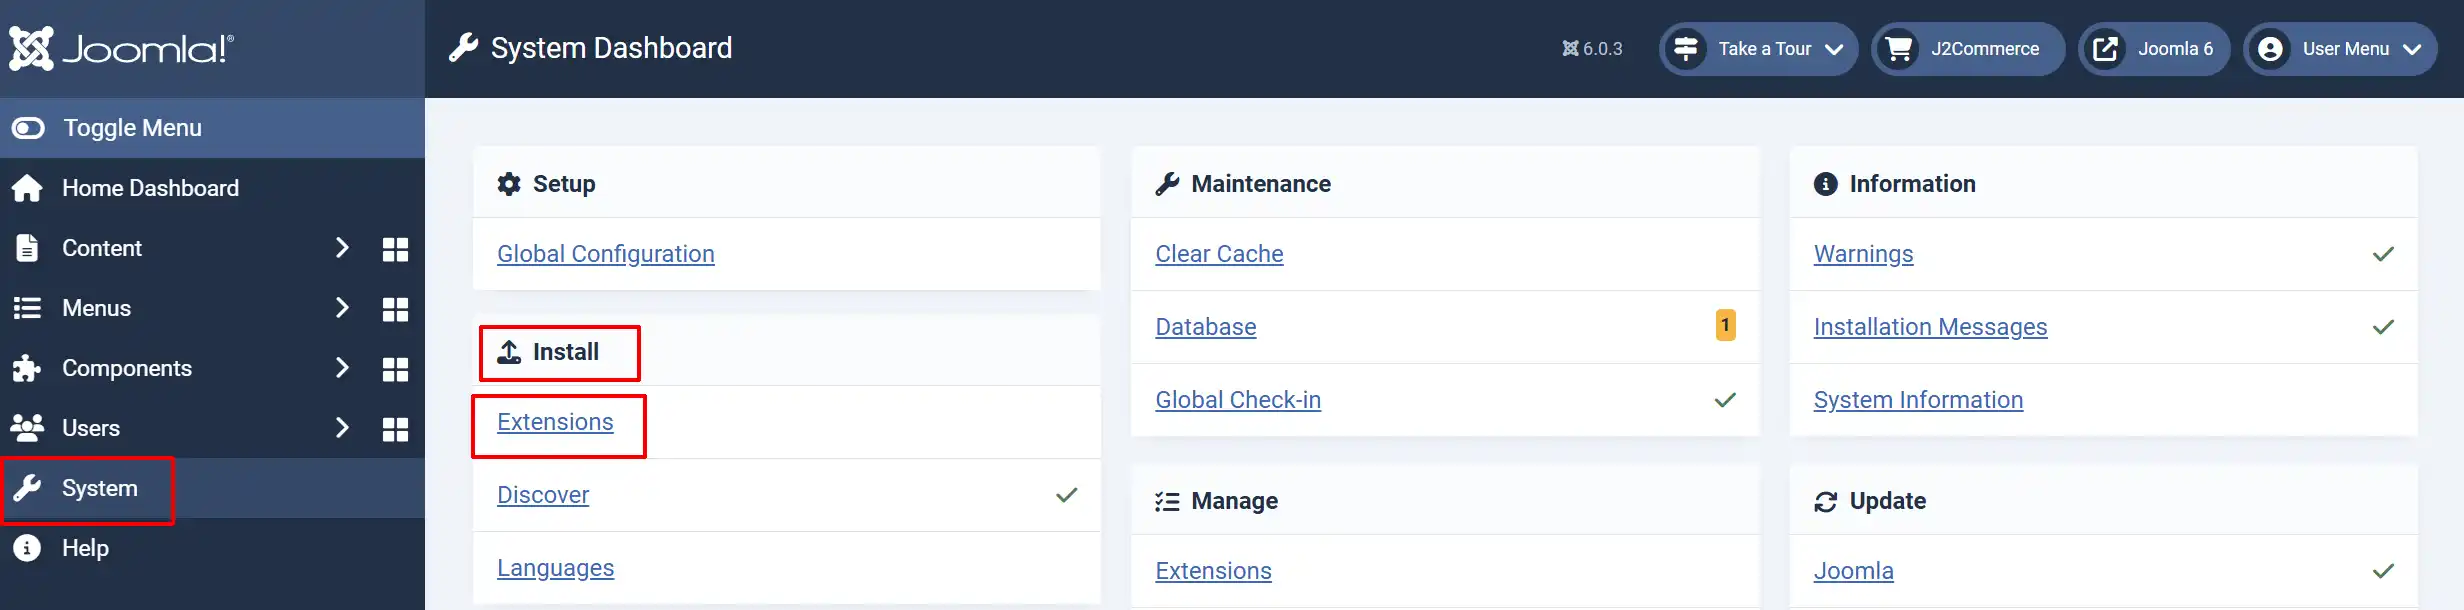
In the Joomla Administrator, go to **System** **->** **Install** **->** **Extensions**.
Upload the `mod_j2commerce_wishlist.zip` package ZIP file or use the Install from URL option.
## Enable the Module
Once you have installed the module, you will need to enable it. Go to the **Content** icon in the left sidebar **-> Site Modules**
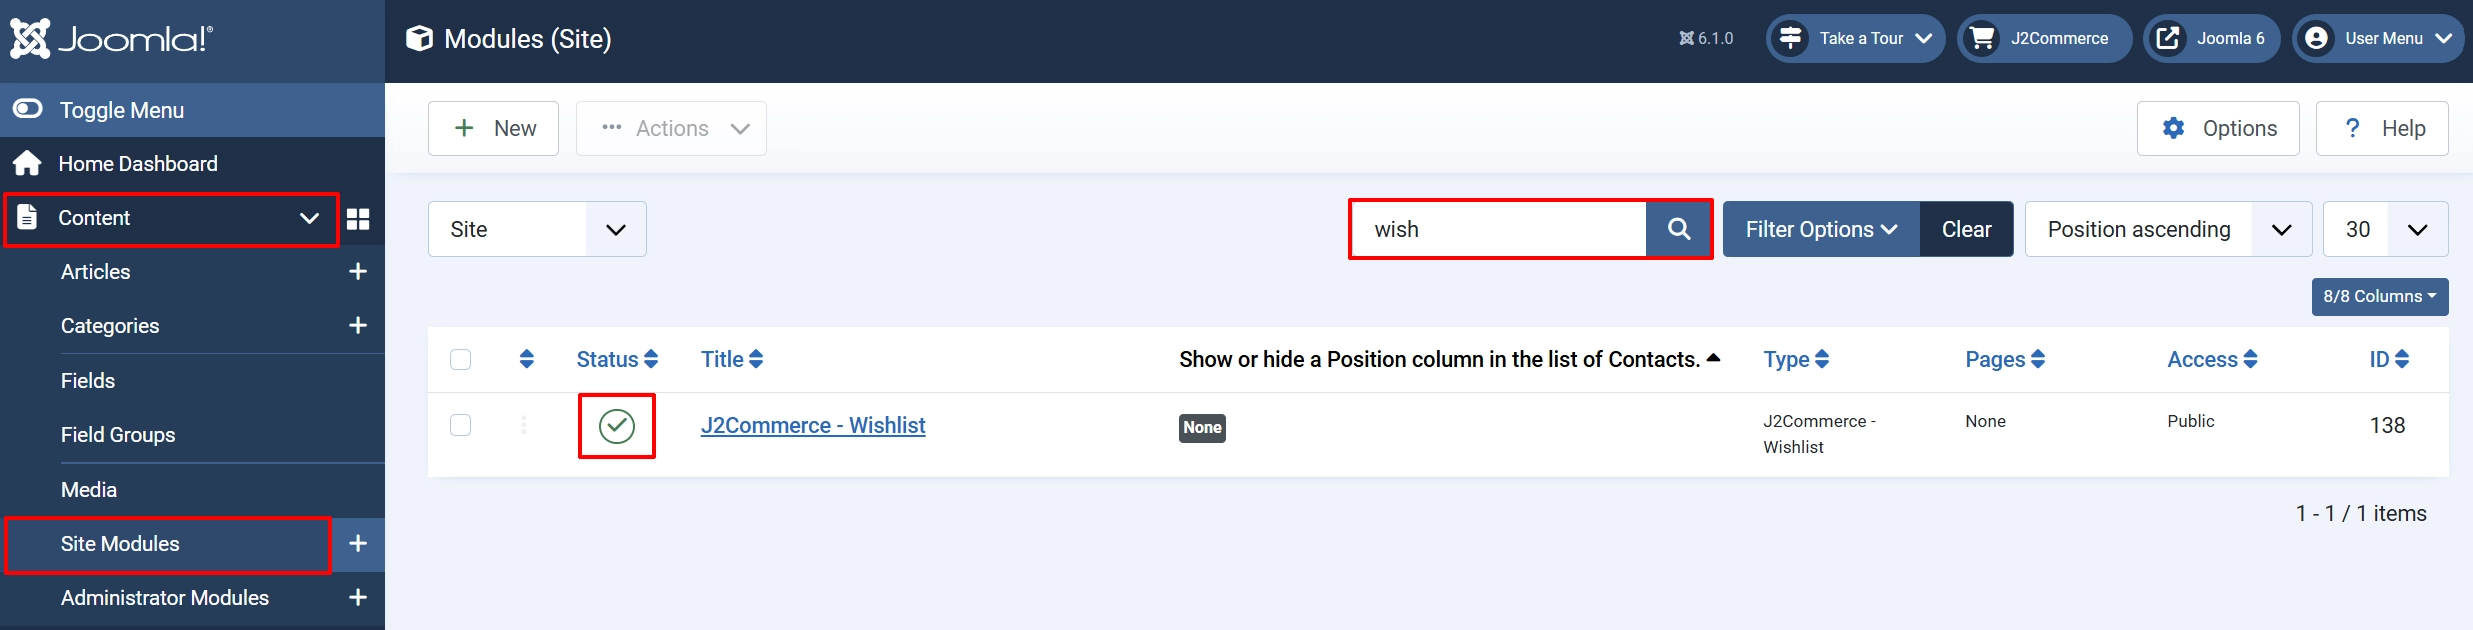
Search for **Wishlist**, click the **X,** and it will turn into a green checkmark. It is now enabled and ready for setup.
## Configure the Module
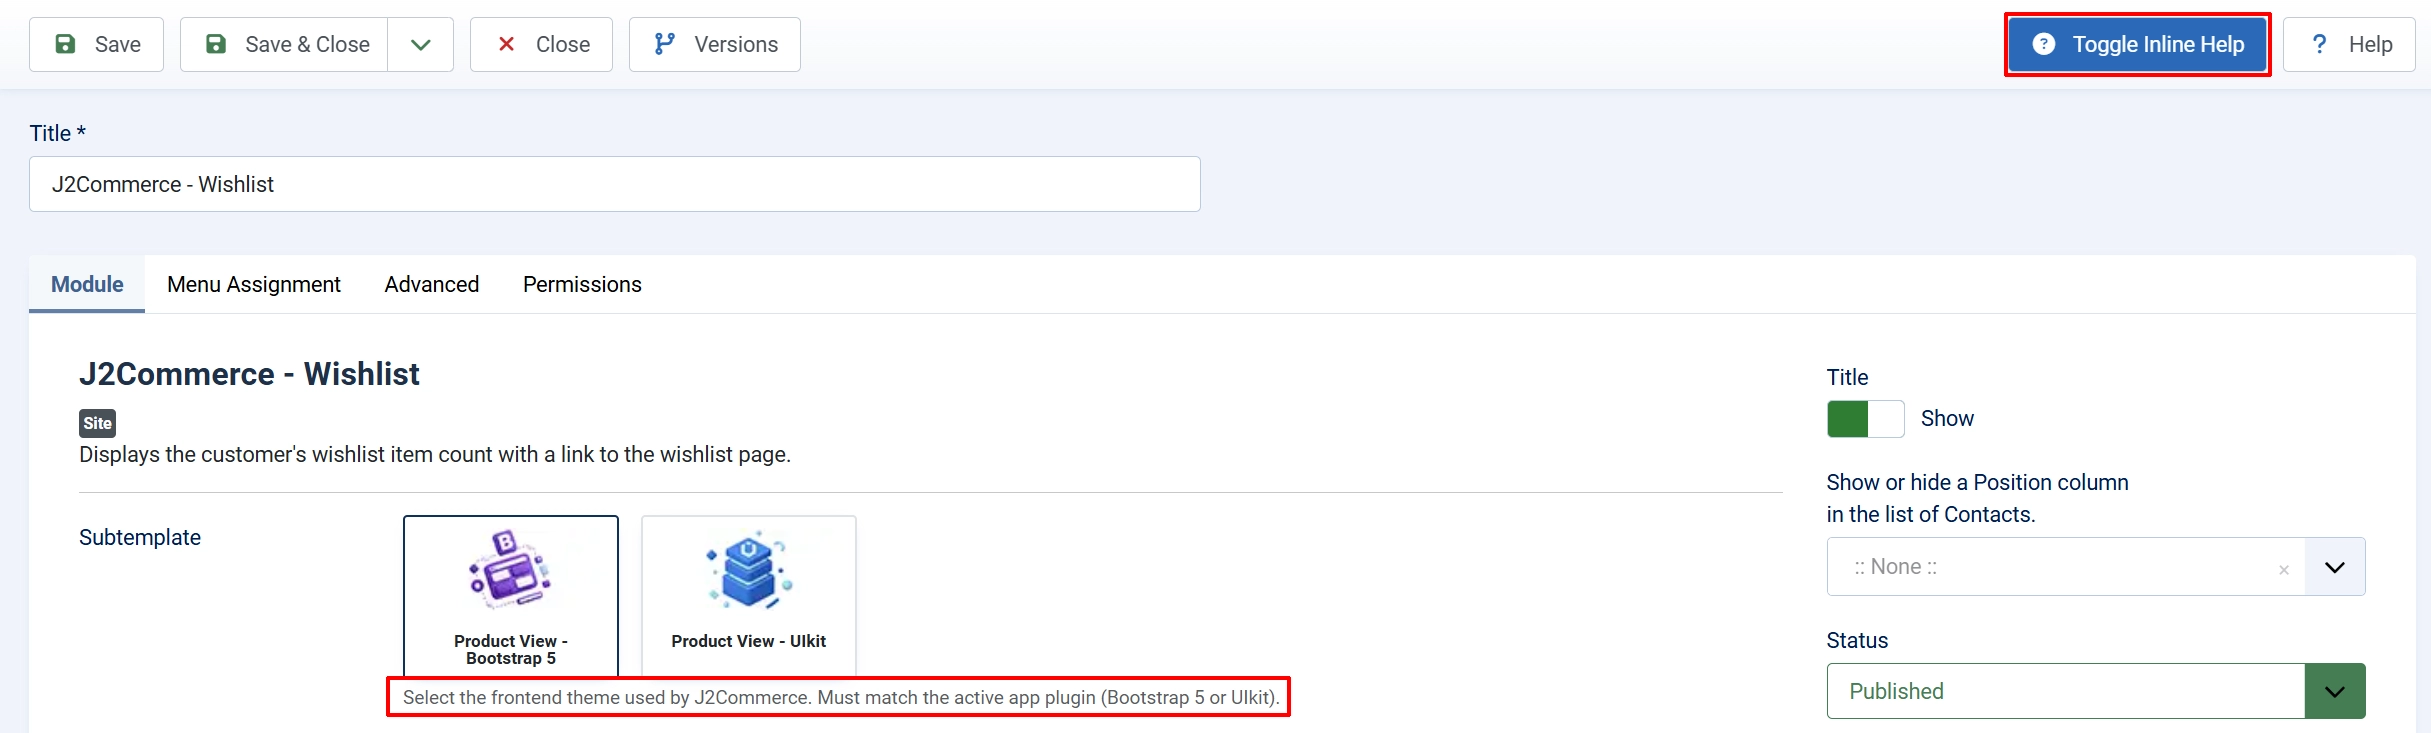
Once you click on the **Wishlist** Title next to the green checkmark, you are ready to start setting up the parameters.
> **Tip:** **Tip**: Click on the Toggle Inline Help button on any app/plugin you install and it will show a description below each section.
### Basic Settings tab
Assign the module to a **Position** (e.g., `menu`, `header`, or your template's top-right position).
Assign it to the pages where it should appear under the Wishlist **Menu Assignment** tab.
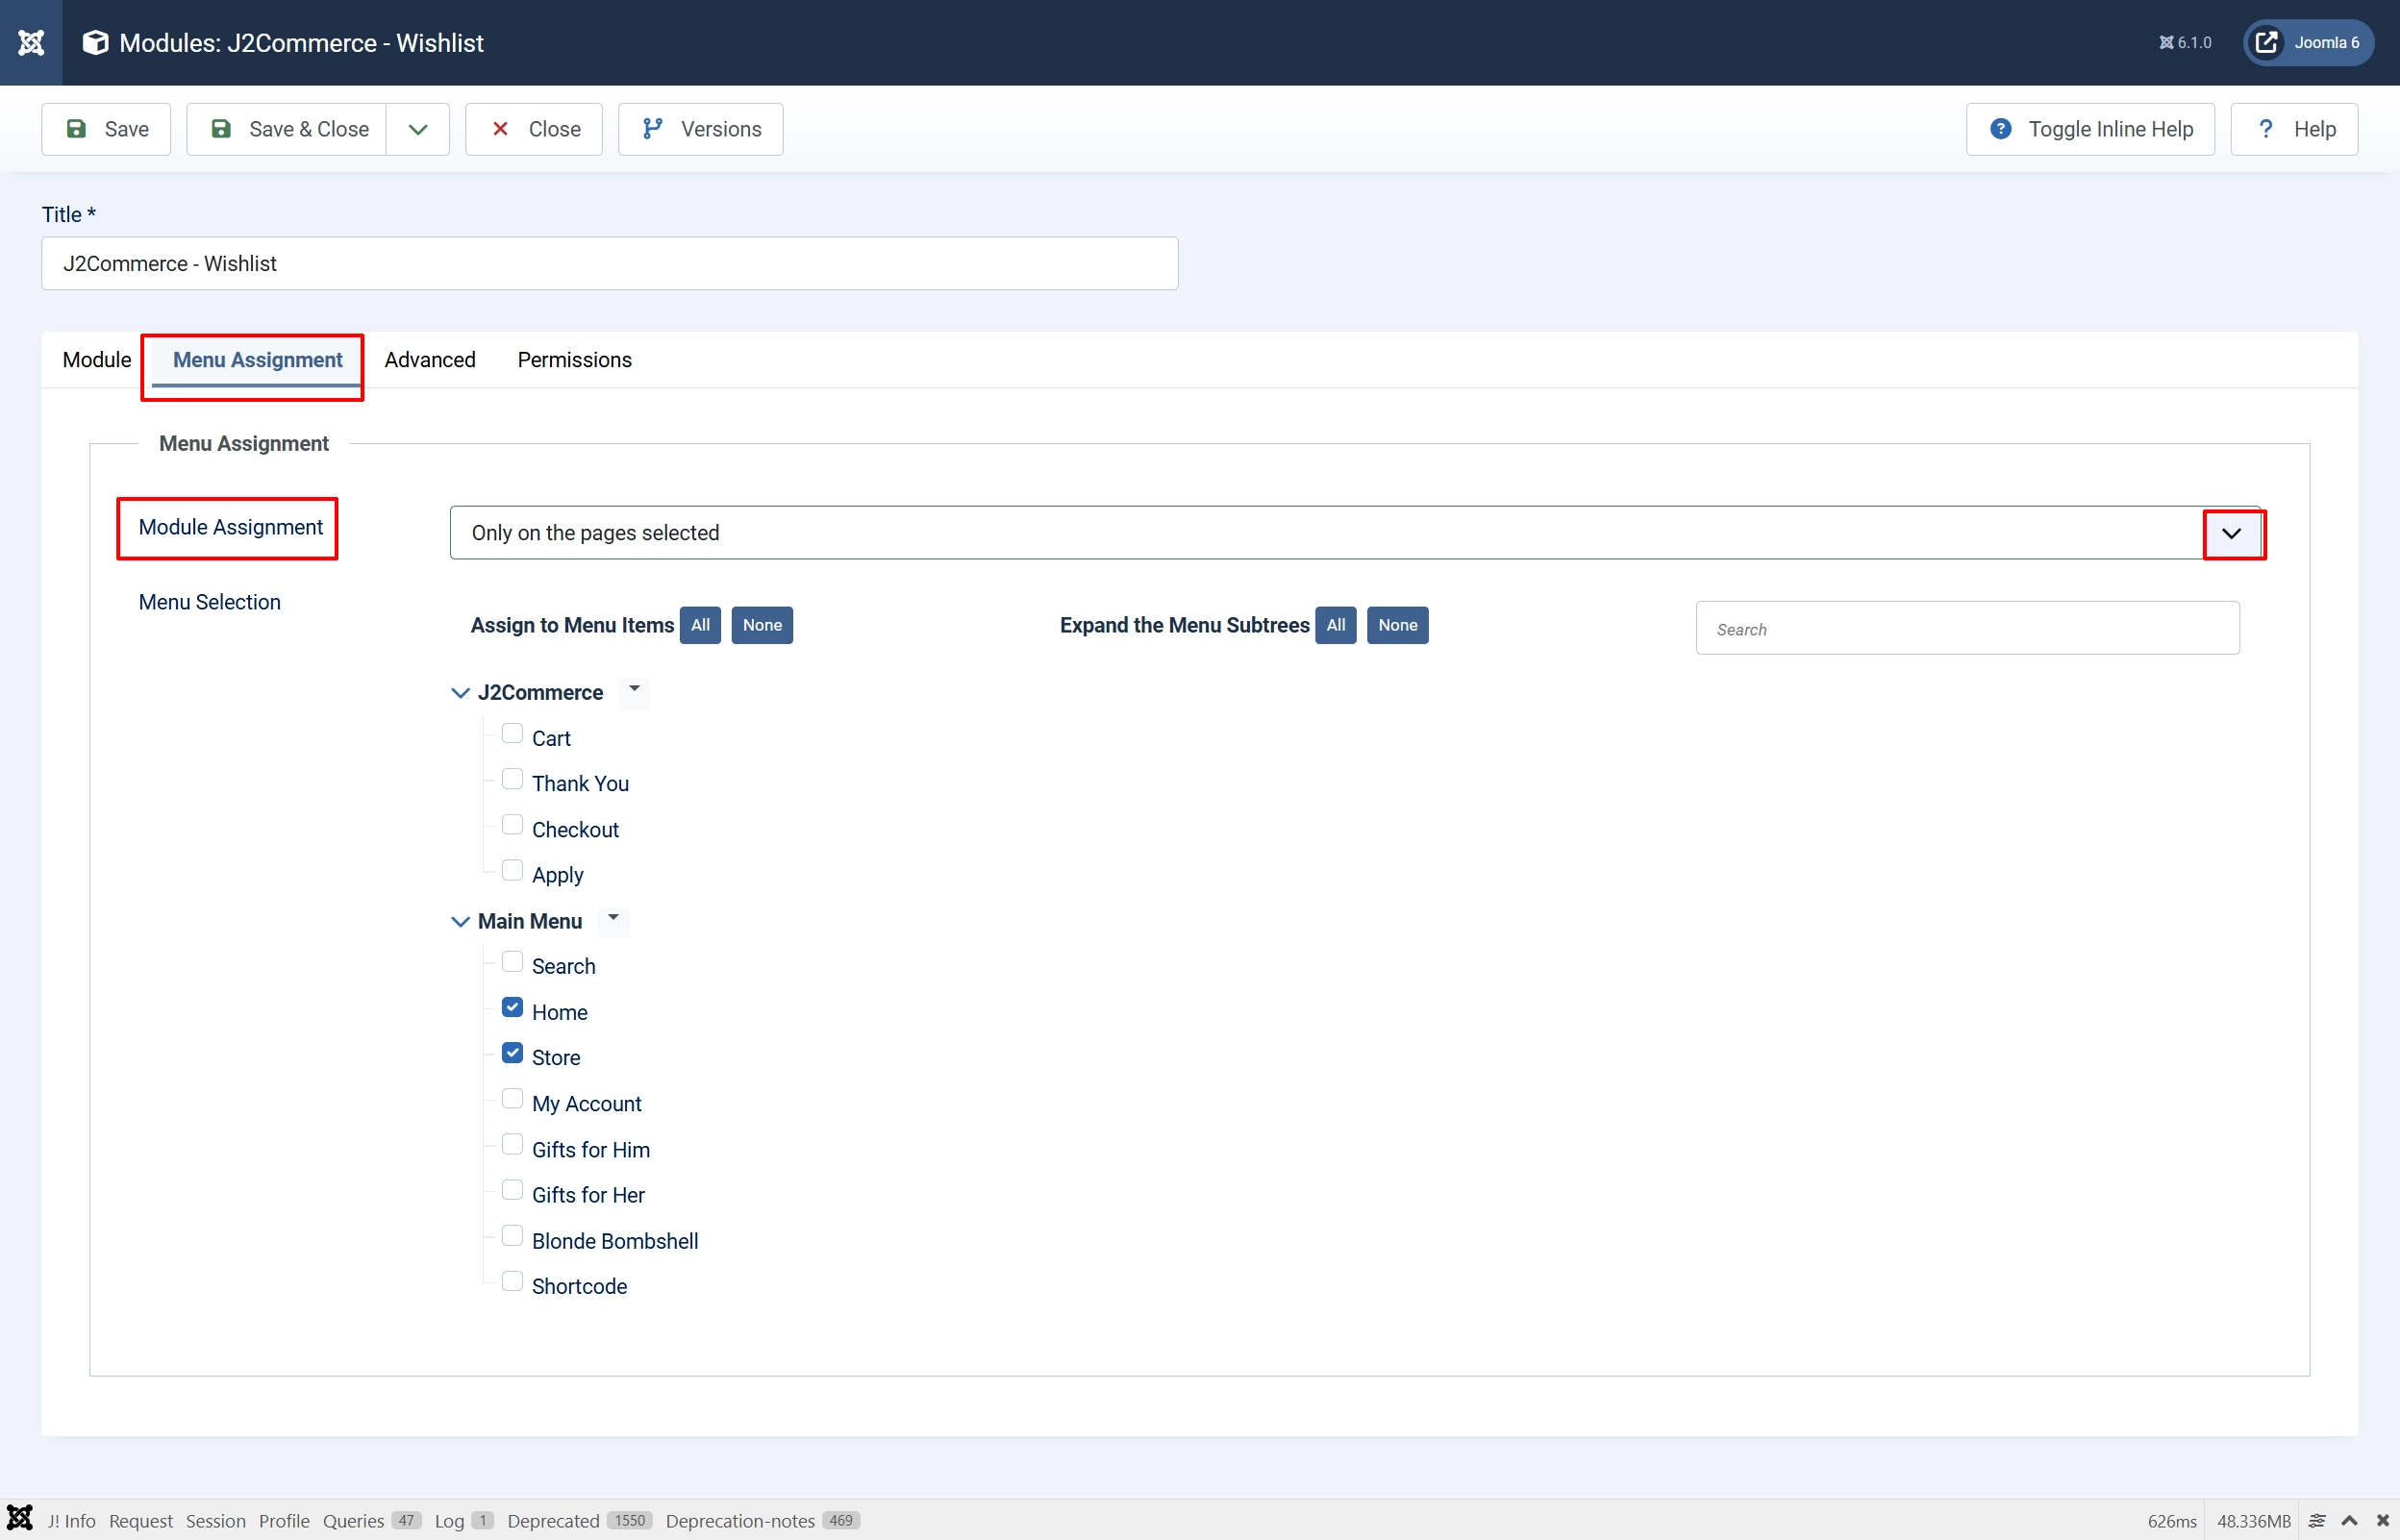
Click **Save & Close**.
## Configuration Options
All settings are on the **Module** tab when editing the module.
**Display type:** Show the wishlist link as a plain link or a Bootstrap 5 button.
- **Link** renders a plain `` tag that inherits your template's link styles. The badge count appears next to a heart icon, and a text label shows the item count or the word "Wishlist" when empty.
- **Button** renders an `` tag styled as a Bootstrap 5 `btn btn-outline-secondary`. Only the heart icon and badge count are shown — no text label — making it compact for tight spaces like navbars.
**Hide when empty:** When enabled, the entire module is hidden if the wishlist contains zero items.
**Wishlist menu item:** Manually select the menu item for the wishlist page. Leave empty to auto-detect.
When left empty, the module scans your site's menu for an item whose query matches `view=products&task=wishlist` and uses that item's ID to build a SEF URL. This is the same auto-detection logic used by the app_wishlist plugin itself.
If your site has multiple menu items pointing at the wishlist page, or if auto-detection is not working, use this field to pin the module to a specific menu item. Select the menu item from the dropdown.
## Placement Tips
- **Navbar / header** — Use the **Button** display type for a compact icon-plus-badge appearance that matches a cart icon.
- **Sidebar** — Use the **Link** display type with **Hide when empty** enabled so the sidebar doesn't show an empty entry.
- **After-add confirmation area** — Keep **Hide when empty** disabled so the module appears immediately after a shopper saves their first item.
## Live Count Refresh
The module automatically refreshes the displayed count without a page reload when the `j2commerce:wishlist:updated` custom DOM event fires. This event is dispatched by the app_wishlist plugin whenever a product is added to or removed from the wishlist.
No extra configuration is required — the JavaScript is output inline with the module and listens for the event on the document.
## Troubleshooting
### The module shows a count of zero even after adding items to the wishlist
**Cause:** The app_wishlist plugin is not installed or not enabled, so no items are being saved to the wishlist table.
**Solution:**
1. Go to **System** -> **Manage** -> **Extensions**.
2. Search for **app_wishlist**.
3. If it is not in the list, install it first.
4. If it is installed but disabled, click the checkbox and click **Enable**.
5. Reload the frontend and add a product to the wishlist.
### The wishlist link points to the wrong page or returns a 404
**Cause:** No menu item exists with the wishlist view assigned, or the wrong menu item was auto-detected.
**Solution:**
1. Create a menu item of type **J2Commerce** -> **Wishlist** if one does not exist.
2. Open the module settings in **Content** -> **Site Modules**.
3. Set the **Wishlist menu item** field to the correct menu item.
4. Save and reload the frontend.
### The count does not refresh after adding a product
**Cause:** The `j2commerce:wishlist:updated` event is not being dispatched by the theme or the app_wishlist plugin's JavaScript is not loaded.
**Solution:**
1. Check that the app_wishlist plugin is enabled and its JavaScript file loads on the product page (look for `wishlist.js` in the browser network panel).
2. If you have a custom template that suppresses JavaScript, ensure the `` includes deferred scripts.
3. If the event is dispatched under a different name in a customized build, update the listener in a template override of `tmpl/default.php`.